SubC Imaging AQUOREA Mk2 LED User manual

The Mk2 incorporates the latest generation of high power LEDs. It has built-in
power conditioning with temperature, signal and voltage protections. Integration is
simple as it is controlled via RS232/RS485, or operated automatically from a SubC
camera auxiliary bulkhead.
It has adjustable max power draw from 20-100 Watts that adjusts max lamp
brightness from 2400-12,500 lumens. Built-in charge control efficiency builds
reserve power to release a max strobe output of +25,000 lumens, even at 20 Watts
power draw.
The LED runs at low power in between strobes. After a pulse, it charges its internal
circuits. When running as a lamp, it can still pulse the LED at high current from its
internal charge bank.
Aquorea Mk2 LED: Hybrid Strobe and Video Lamp

Support Maintenance

Support Engineered in Canada
TW: ADR
PM: CC
+1 (709) 702-0395 [email protected] SubC Control Ltd
327 Memorial Drive
Clarenville, NL, Canada, A5A 1R8
www.subcimaging.com
Installing TeamViewer for remote support
1. Ensure the LAN functionality in TeamViewer is enabled (go to Extras > Options > General > Incoming LAN
connections). Using TeamViewer over LAN allows for much faster operation and better quality. SubC
recommends using a LAN connection whenever possible.
2. You can obtain TeamViewer 8 software from:
https://community.teamviewer.com/t5/Knowledge-Base/Download-TeamViewer-8-and-9/ta-p/78348
Install and open Teamviewer on your computer. You will see a window similar to the one below.
3. Make note of the Your ID and Password fields.
4. Contact SubC tech support and provide them with your codes; they now have remote access and can
help with any issues that may arise.
Installing AnyDesk for remote support
1. Download Anydesk from https://anydesk.com/. Once downloaded, open the
AnyDesk.exe file.
2. Once the program is running, you will see a window similar to the one to the right.
Make note of your address.
3. Click the settings button and choose the option to Set Password from the list.
4. A new window will appear, check the option “Enable unattended access”.
5. Type in a password twice and click the Apply button.
6. Contact SubC tech support and provide them with your address and password; they
now have remote access and can help with issues that may arise.

5
Please read this manual carefully before setting up and using your unit. The electronic version of this document is the controlled copy. Therefore,
all printed versions of this document are uncontrolled.
1. SubC equipment is designed to work at various depth ratings on unmanned vehicles. Designs are tested to their full pressure rating.
Production units are pressure-tested to a nominal rating to ensure no leaks. If using our equipment on vehicles containing people, you
do so at your own discretion as SubC does not certify equipment for direct human contact underwater. Manned submersibles require
equipment to have additional pressure-testing to ensure safety.
2. The equipment has been designed for subsea usage. Observe the operating temperature specifications before prolonged usage in air
(do not operate for >10 minutes in air). Run equipment in water.
3. The power supply is polarized. Ensure the correct polarity is used before plugging into the unit. There are many built-in protections on
the bulkhead pins, however, incorrect electrical connections may still damage the internal electronics. See your equipment datasheet
for correct wiring. Some equipment has a custom pinout selected at point of sale. Check your documentation before powering.
4. Water should not come in contact with the pins on the bulkheads. When not in use, use dummy plugs. If water touches the pins, use
contact cleaner and compressed air to remove the water.
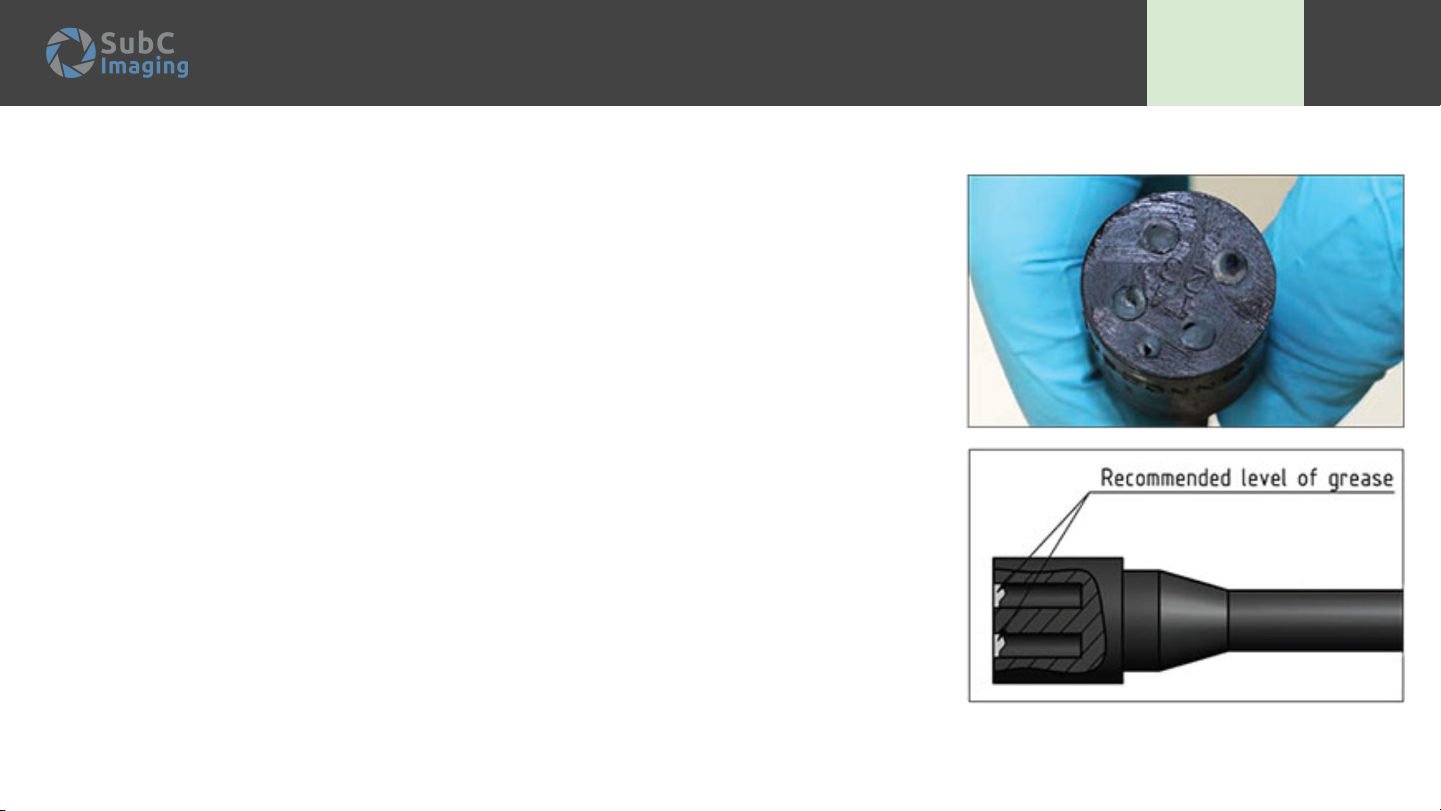
5. Before attaching the connector to the equipment, be certain that the pins are aligned, clean and lightly lubricated with appropriate
silicone o-ring grease (Molykote 44 Medium Lubricant or equivalent).
6. All fasteners on the equipment are metric. They should be hand tightened during regular maintenance.
7. When turning on and working with lasers, do not stare into the beam. Staring directly into the beam or
the reflected beam can cause permanent eye damage. Ensure you are always wearing the supplied
laser safety glasses.
8. Please refer to the regulations according to EN 60825-1 and BGV B2. For laser sources classified in
Laser Classes 3 and 4, please refer to the additional regulations according to EN 207/208 (Laser Safety).
*LED flashing may cause seizures in people who are susceptible
**The customer is responsible for ensuring that the device conforms to Laser Safety Standards. SubC recommends laser safety training.
Camera and Laser Precautions and Maintenance TW: ADR
Mech: BL
PM: CC
Updated:
2021-08-13

6
Best practices for assembling your system
Greasing the Connector/Dummy Plug (ABOVE WATER - DRY MATE ONLY)
A. Connectors must be greased with Molykote 44 Medium (or equivalent)
before every mating. Check the MSDS for your type of o-ring lubricant
before use.
B. A layer of grease corresponding to minimum 1/10 of socket depth should be
applied to the female connector
C. The inner edge of all sockets should be completely covered, and a thin
transparent layer of grease left visible on the face of the connector
D. After greasing, fully mate the male and female connector in order to secure
optimal distribution of grease on pins and in sockets
E. To confirm that grease has been sufficiently applied, de-mate and check for
grease on every male pin then re-mate the connector
O-Ring Lubricant TW: ADR
Mech: BL
PM: CC

7
Best practices for assembling your system
For the fundamentals of how to capture excellent underwater photos and detailed video, check out
our Underwater Photography Guide:
https://issuu.com/subcimaging/docs/subc_underwater_photography_guide?fr=sZmI1MTI1MjM2MzM
1. SubC products are designed to run in water. There is built-in thermal protection in our
equipment, however, we cannot guarantee performance in air.
2. The camera, LED, and laser should be attached to a solid mounting point with either stainless
steel hose clamps OR a machined clamp. In between the mount point and the equipment, use
some neoprene rubber, electrical tape, or similar insulation material to prevent corrosion from
dissimilar metal contact.
3. To limit particle backscatter, the LED should be positioned as far away from the camera as
possible in the system while also angling the light so that there is sufficient overlap. The Rayfin
camera field of view is 80 degrees diagonal and the LED’s beam angle is also matched at 80. So
the light should be slightly further from the scene than the camera, which is easily achievable. If it
isn’t set up properly, you may end up with dark corners in the images.
4. When connecting the cables to the equipment, use o-ring lubricant. See page about o-ring
lubricant.
System Hookup
80˚80˚
TW: ADR
Mech: BL
PM: CC

Software

Serial Setup
1. ComPort: Lists all the serial ports on your PC.
2. Connect: Connect to the selected com port. The
Aquorea is set default to RS232 and 9600 baud.
3. Disconnect: Disconnect from the selected com
port.
4. Refresh: Refresh the list of com ports.
Individual Control
1. Serial number: Enter the serial number of the light
(ex. 1111 or 2222)
2. Brightness: Either click on the + button or enter
the value of brightness (Note: for max battery time
use 50%)
3. Temperature: The temperature of the LED
Connect/Disconnect/Refresh button
Control Software - Setup and Control TW: ADR
Mech: BL
PM: CC
Updated:
2021-10-07

Changing Power Limit
1. Connect light to serial box following pinout:
○GND
○PWR
○Single signal
○RS232 tx
○RS232 rx
2. Plug in lamp, open software, and turn on serial box.
3. To view the current power settings: type the command
~Z?
The default is 60 watts.
4. To change the max power: type the command ~LPxx
with xx being the max power wattage you want to set
(ex. ~LP80)
Aux Port LED Power TW: ADR
Mech: BL
PM: CC
Updated:
2021-10-07

Specs Commands

Light Specs
Lamp Output: 2400 - 12000 lumens Strobe Output: +25,000 lumens
Beam Angle: 80 degrees (circular cone beam shape) Reaction speed: approx 200µ seconds
Color: 5000K
Electrical Specs
Efficiency: 145 lumen/watt @ 15℃ water Power: 18-32 Vdc / 20-100 watts
Protection: current, voltage, temperature Control: Serial RS232, 485 or PWM
Thermal Protection: Auto dim/shut off Min/Max Temperature: -10 to 20°C (in water)
Storage temperature: -20 to 55 °C
Mechanical Specs
Material: Grade 5 Titanium
Weight: 0.6kg(water), 1.1kg(air)
Depth Rating: 6000m
Subconn MCBH5M
1 GND
2 PWR
3 PWM strobe/lamp
4 RS232 Tx / RS485-
5 RS232 Rx / RS485+
Aquorea Mk2 LED Production: JMH
Mech: BL
PM: CC
Dimensions and Specs
Updated:
2017-12-13

Light Specs
Lamp Output: 2400 - 12000 lumens Strobe Output: +25,000 lumens
Beam Angle: 80 degrees (circular cone beam shape) Reaction speed: approx 200µ seconds
Color: 5000K
Electrical Specs
Efficiency: 145 lumen/watt @ 15℃ water Power: 18-32 Vdc / 20-100 watts
Protection: current, voltage, temperature Control: Serial RS232, 485 or PWM
Thermal Protection: Auto dim/shut off Min/Max Temperature: -10 to 20°C (in water)
Storage temperature: -20 to 55 °C
Mechanical Specs
Material: Grade 5 Titanium
Weight: 0.6kg(water), 1.1kg(air)
Depth Rating: 6000m
Subconn MCBH5M
1 GND
2 PWR
3 TTL
4 Step Dim
5 Strobe Enable
Aquorea Mk2 LED Production: JMH
Mech: BL
PM: CC
Updated:
2017-12-13
Dimensions and Specs

LEDs have a beam projection that favor the center of the beam. The stock beam angle in water of the Mk2 LED is 80 degrees. The typical
radiation pattern in water is shown below.
There is an available option for a diffusion lens to go over the LED. It slightly reduces the beam output but does make the beam more uniform.
Beam Angle and Intensity Production: JMH
Mech: BL
PM: CC
Updated:
2017-12-13

Deep-blue LED was mainly designed for underwater
bio-florescence and leak detection.
Organic light-emitting diodes (OLEDs) are required for
full-color displays and lighting applications. These help provide
a diverse and vibrant fluorescence experience.
Dominant Wavelength λd = 457 nm
http://www.nightsea.com/articles/blue-light-for-underwater-fluorescence/
Aquorea Deep-Blue Option Production: JMH
Mech: BL
PM: CC
Updated:
2017-12-13

Its main advantage lies in the fact that that most deep sea creatures are unable to see in the red spectrum, allowing researchers to
view biota in their natural environment without disturbing them.
Red LED was mainly designed for
marine research and as a reduced
luminous intensity output compared to
white light. However, output in lumens is
not the key factor in this application
since far-red falls at the edge of the
visible spectrum.
Luminous Flux ΦV typ 1400 to 1800
lumens
Dominant Wavelength λd = 734 nm
FWHM Δλ1/2 = 22 nm
Current Draw 4 A max at 24 V
Aquorea Far-Red Option Production: JMH
Mech: BL
PM: CC
Updated:
2017-12-13

For marine behavior surveys
SubC Imaging has created a system that incorporates a camera and
the Aquorea lighting to create a toolset that can view underwater life
without disturbing their natural patterns and behavior.
When the camera is used in conjunction with the Aquorea with Red
lighting it offers superior underwater low-light capability, undetectable
by marine life. The long wavelength red light is quickly absorbed and
extinguished by the uppermost layers of water. Because of this fact,
natural selection preferred sea creatures with more blue/green cones
instead of red.
Typical ocean creature eye spectral
response
Coloration of animals related to depth
See SubC LED page for
sample video.
This gives ROV
operators and Marine
Science another
capable tool for viewing
and working in the
harsh ocean
environments.
Aquorea Far-Red Option Production: JMH
Mech: BL
PM: CC
Updated:
2017-12-13

Serial settings
Baud Rate: 9600
Byte Size: 8
Parity: None
Stop Bits: 1
Flow Control: None
Serial communication
-function set driver rs232
-function set driver rs485
-function set driver baud:#
-product print status
-sensor alarm clear
-sensor alarm suppress
LED commands
~Lb###- Set the lamp current in
percent of power limit [0 - 100, or -1
to enable SS]
~LQ### - Set the strobe current in
percent of maximum output [0 -
100]
~LP###- Set the power supply
limit in Watts [20 - 120]
Addressing (multi-drop)
Commands can be sent to a particular
camera by appending “|” (pipe) and the
camera’s serial number (e.g.
~Aux0SetEnable|SUBC15000)
Product Commands
~Product Print Status - prints all
device
status strings
~Product Print State - prints device
state (On, Off, Hibernate, Busy)
~Product Reset EEPROM - reset
eeprom
of all settable bits
~Test Set Debug:[0-1]
~Product Set SN:##### - set the 5
digit serial number of the product (for
addressing)
Internal sensors
~Sensor Print Status - prints all sensors
~Sensor Print Temp - prints
temperature
~Sensor Print Humidity - prints humidity
~Sensor Print Runtime - prints runtime
of the system since manufacture
~Sensor Clear Alarm - clears alarm
messages
~Sensor Suppress Alarm - toggles the
constant output of alarm messages
~Sensor Set Timer Mode:#
0 - Silent updates
1 - Print constant updates
2 - Print updates on change [default]
~Sensor Set Timer:### - set the time in
seconds to check internal sensors
All commands start with a ‘~’ (tilde) character and end with a
‘\n’ (newline). Commands are not case-sensitive and the
order of command words does not matter.
Hardware Command List PM: CC Updated:
2017-12-13

When flash interval mode is enabled, the
Aquorea Mk2 will strobe autonomously at a
fixed frequency.
The strobe power, frequency and pulse width
are adjustable. Between strobes, the lamp can
be turned on or off.
If flash interval mode is started with the "~TF"
command, it will restart automatically after a
power cycle.
All of the power and timing settings are saved in
non-volatile memory.
*Note: power consumption may exceed the
defined limit in this mode.
~TF# Toggle or set and save
~TE# Toggle or set without saving
~Tb### Set lamp power as % of power limit (0-100)
~Tc### Set strobe power as % of maximum output (0-100)
~Tp##### Set strobe period in milliseconds (100-60000)
~Ts## Set strobe on-time in milliseconds (1-50)
Flash Interval Mode PM: CC Updated:
2017-12-13

Aquorea - Mk2 - depth - bh - beam - c - custom
depth meters sea water
bh bulkhead BH5M = Subconn MCBH5 male
BH5MRA = Subconn MCBH5 male right angle
[BH-5-M] = Seacon MC-BH-5 male
beam light dispersion beam angle 80° = Normal beam (Video applications)
clight wavelength (color) fRed = 734nm far-red
White = 5000K white
3400K = 3400K white
Other colors as chosen by customer
custom specific id for a custom build
Model Legend PM: CC Updated:
2017-12-13
Table of contents
Other SubC Imaging Lighting Equipment manuals
Popular Lighting Equipment manuals by other brands

ALS
ALS FLEXY2-600SW quick start guide

Larson Electronics
Larson Electronics LEDLB-12ET-IR-M instruction manual

LUMENWERX
LUMENWERX POP COLOR installation instructions

Haztec
Haztec 4-3056-ST Installation notes

Anolis
Anolis ArcPad 48 Integral user manual

Smart Electrician
Smart Electrician 3705414 User instruction manual

CYNTEC
CYNTEC VPN12AD02-FU Guide

Martin
Martin MAC Viper AirFX Safety and installation manual

TOBIAS GRAU
TOBIAS GRAU MY TABLE LT00-0 Assembly instructions

Clevertronics
Clevertronics LIFELIGHT-2PRO-SMS-600 Installation & maintenance instructions

Kendal Lighting
Kendal Lighting PF44-1LPE-CH instructions

Linmore LED
Linmore LED SL1 installation instructions