Summit SCR-1300 User manual

GLASS DOOR REFRIGERATOR
RÉFRIGÉRATEUR VITRÉ
Instruction Manual
Mode d’emploi
BEFORE USE, PLEASE READ AND FOLLOW ALL SAFETY RULES AND OPERATING INSTRUCTIONS.
AVANT D’UTILISER, VEUILLEZ LIRE ET SUIVRE TOUTES LES RÈGLES DE SÉCURITÉ
ET LES INSTRUCTIONS DE FONCTIONNEMENT.
Model/Modèle No.: SCR 1300
SCR 1150
COMMERCIAL

2
Appliance Safety
Important Safeguards
Location of Parts
Installation Instructions
Before Using Your Appliance
Installation of Your Appliance
Electrical Connection
Extension Cord
Reversing the Door Swing of Your Appliance
Adjustment of the Door
Operating Your Appliance
Control Panel
Troubleshooting
Care and Maintenance
Cleaning Your Refrigerator
Power Failure
Vacation Time
Moving Your Appliance
Energy Saving Tips
Limited Warranty
TABLE OF CONTENTS
3
3-5
6
7-10
7
7
8
8
9-10
10
11
11
12
12
12-13
13
13
13
13
14-15

3
APPLIANCE SAFETY
Your safety and the safety of others are very important.
We have provided many important safety messages in this manual and on your appliance.
Always read and obey all safety messages.
All safety messages will alert you about the potential hazard, tell you how to reduce the
chance of injury, and let you know what can happen if the instructions are not followed.
__________________________________________________________________________
●Plug into a grounded 3-prong outlet, do not remove grounding prong, do not use an adap-
ter, and do not use an extension cord.
●Replace all panels before operating.
●It is recommended that a separate circuit serving only your appliance be provided. Use
receptacles that cannot be turned off by a switch or pull chain.
This is the Safety Alert Symbol.The symbol alerts you to potential hazards that
can kill or injure you and others. All safety messages will follow the Safety
Alert Symbol and either the words ”DANGER” or ”WARNING”.
Danger means that failure to heed this safety state-
ment may result in severe personal injury or death.
Warning means that failure to heed this safety
statement may result in extensive product damage,
serious personal injury, or death.
IMPORTANT SAFEGUARDS
Before the appliance is used, it must be properly positioned and installed
as described in this manual, so read the manual carefully. To reduce the
risk of re, electrical shock or injury when using the appliance, follow basic
precautions, including the following:

4
● Never clean appliance parts with ammable uids. These fumes can create a re hazard
or explosion. And do not store or use gasoline or other ammable vapors and liquids in the
vicinity of this or any other appliance. The fumes can create a re hazard or explosion.
●Before proceeding with cleaning and maintenance operations, make sure the power line of
the unit is disconnected.
●Do not connect or disconnect the electric plug when your hands are wet.
●Unplug the appliance or disconnect power before cleaning or servicing. Failure to do so can
result in electrical shock or death.
● Do not attempt to repair or replace any part of your appliance unless it is specically re-
commended in this manual. All other servicing should be referred to a qualied technician.
FOLLOW WARNING CALLOUTS BELOW ONLY WHEN APPLICABLE TO YOUR MODEL
●Use two or more people to move and install appliance. Failure to do so can result in back or
other injury.
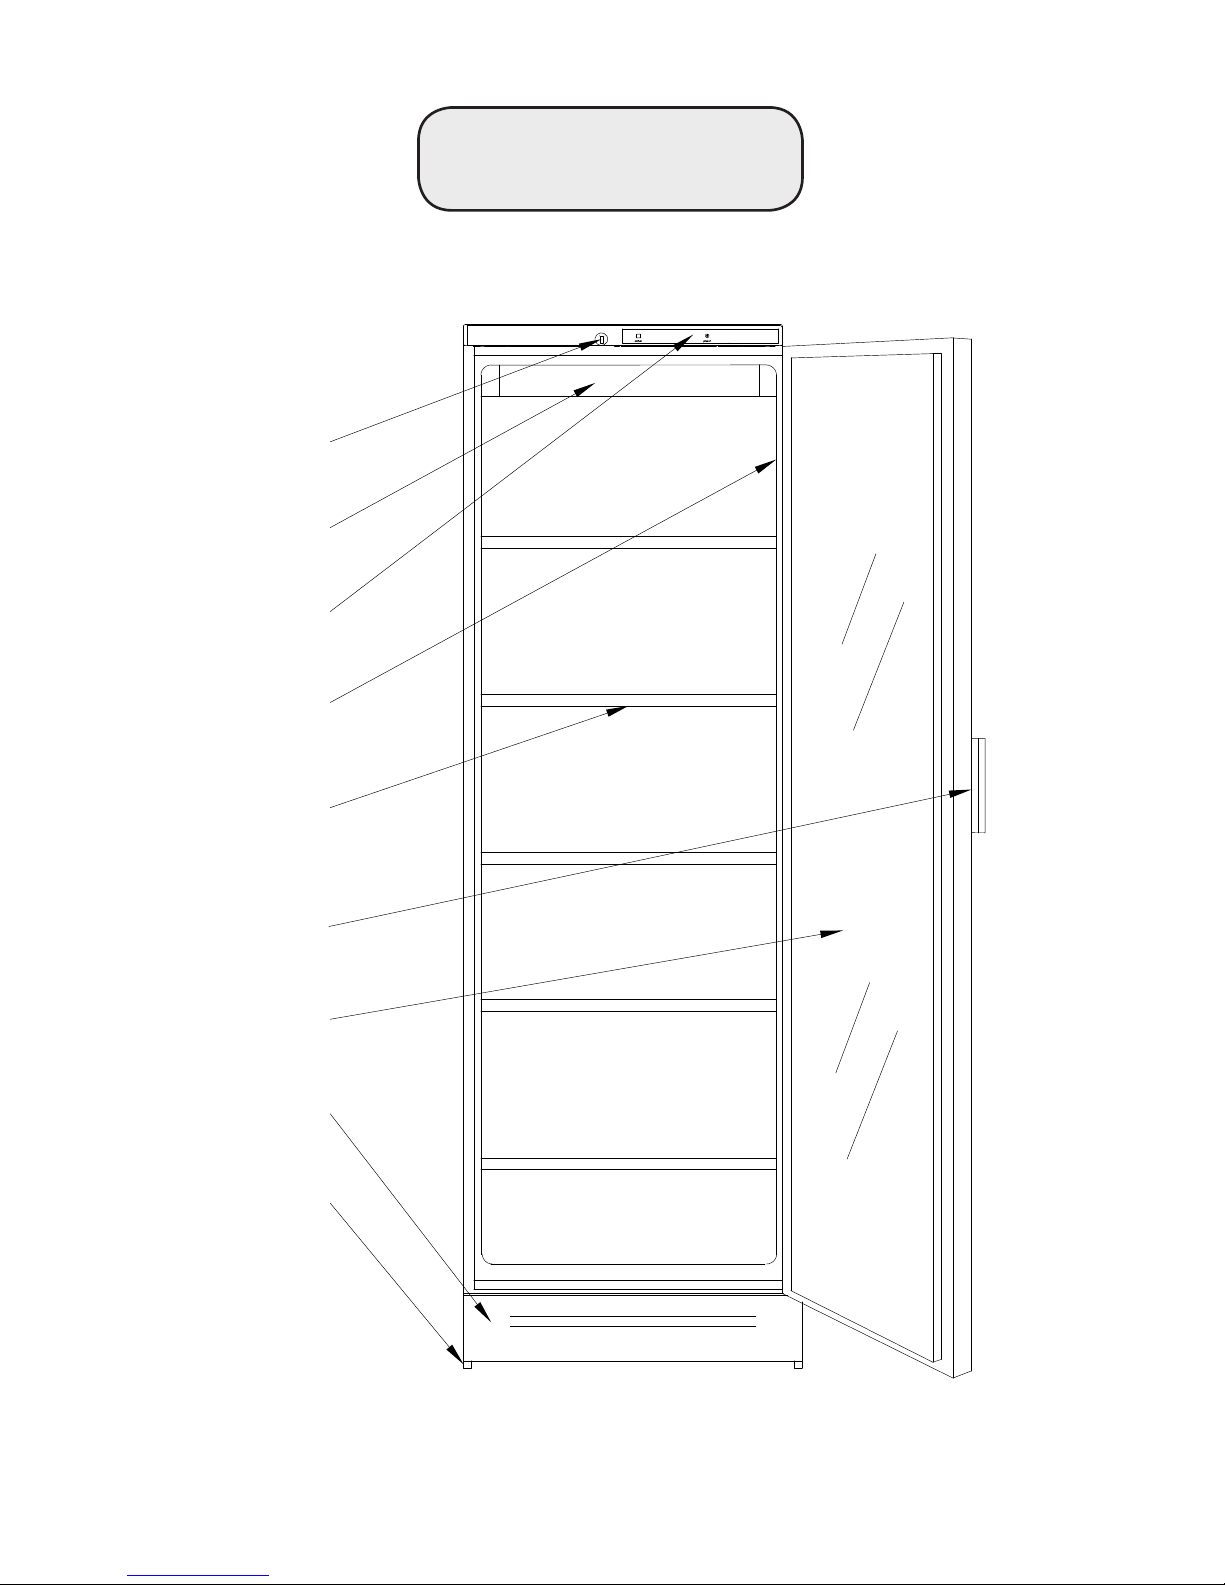
●To ensure proper ventilation for your appliance, the front of the unit must be completely
unobstructed. Choose a well-ventilated area with temperatures above 60°F (16°C) and
below 90°F (32°C). This unit must be installed in an area protected from the elements, such
as wind, rain, water spray or drips.
●The appliance should not be located next to ovens, grills or other sources of high heat.
●The appliance must be installed with all electrical, water and drain connections in accordan-
ce with state and local codes. A standard electrical supply (115 V AC only, 60 Hz), properly
grounded in accordance with the National Electrical Code and local codes and ordinances,
is required.
●Do not place chemical substances (solvents, reagents) in this refrigerator
●Do not kink or pinch the power supply cord of the appliance.
●The size of the fuse (or circuit breaker) should be 15 amperes.
●It is important that the appliance be leveled in order to work properly. You may need to
make several adjustments to level it.
● All installations must be in accordance with local plumbing code requirements.
●Make certain that the pipes are not pinched, kinked or damaged during installation.
●Check for leaks after connection.

5
●Never allow children to operate, play with or crawl inside the appliance.
●Do not use solvent-based cleaning agents or abrasives on the interior. These cleaners may
damage or discolor the interior.
●Use this appliance only for its intended purpose as described in this Instruction Manual.
● Keep ngers out of the “pinch point” areas. Clearances between the door and cabinet are
necessarily small. Be careful closing door when children are in the area.
Risk of child entrapment!
Child entrapment and suffocation are not problems of the past. Junked or abandoned applian-
ces are still dangerous, even if they will “just sit in the garage a few days”.
Before discarding your old refrigerator:
●Take off the doors
●Leave the shelves in place so that children may not easily climb inside.
- SAVE THESE INSTRUCTIONS -

6
LOCATION OF PARTS
Lock
Top lighting
Control panel
Rating plate
Shelf
Door handle
Glass door
Kick plate
Adjustable feet

7
INSTALLATION INSTRUCTIONS
BEFORE USING YOUR APPLIANCE
●Remove the exterior and interior packing.
●Before connecting the appliance to the power source, let it stand upright for approximately
2 hours. This will reduce the possibility of a malfunction in the cooling system from hand-
ling during transportation.
●Clean the interior surface with lukewarm water using a soft cloth.
INSTALLATION OF YOUR APPLIANCE
●Install the refrigerator in a dry place that is not exposed to direct sunlight or any other
source of heat.
●WARNING: Do not store or install the appliance outdoors.
●To allow for door opening, do not install the cabinet against a wall on its hinged side.
●If you want to set the appliance into an enclosure, consider these factors:
-There must be a space of at least 6” above the unit in order to allow the cooling
system to work satisfactorily;
- There must be at least 5/8” clearance between the enclosure wall and the door hinge
to allow for easy opening of the door;
- Allow at least 1” of clearance between the wall and the other side of the appliance.
-Take care that the air vent at the front of the unit is never covered or blocked in any
way.
● Place your refrigerator on a oor that is strong enough to support it when it is fully loaded.
To level the unit, adjust the front leveling legs. When it is moved from a hard oor to a
carpeted surface, allow time for settling into the softer surface, then re-level the unit if
necessary.
●Do not install in a location where the temperature will fall below 60°F (16°C).
● Plug the refrigerator into an exclusive, properly grounded wall outlet. Any questions
concerning power and/or grounding should be directed toward a certied electrician or an
authorized service center.

8
This appliance should be properly grounded for your safety. The power cord of this appliance
is equipped with a three-prong plug which mates with standard three-prong wall outlets to
minimize the possibility of electrical shock.
Do not under any circumstances cut or remove the third (ground) prong from the power cord
supplied. For personal safety, this appliance must be properly grounded.
This appliance requires a standard 115/120 Volt AC ~ 60Hz three-prong grounded electrical
outlet. Have the wall outlet and circuit checked by a qualied electrician to make sure the
outlet is properly grounded. When a standard 2-prong wall outlet is encountered, it is your
responsibility and obligation to have it replaced with a properly grounded 3-prong wall outlet.
To prevent accidental injury, the cord should be secured behind the appliance and not left
exposed or dangling.
The appliance should always be plugged into its own individual electrical outlet which has a
voltage rating that matches the rating label on the appliance. This provides the best perfor-
mance and also prevents overloading house wiring circuits that could cause a re hazard from
overheating. Never unplug the appliance by pulling on the power cord. Always grip the plug
rmly and pull straight out from the receptacle. Repair or replace immediately all power cords
that have become frayed or otherwise damaged. Do not use a cord that shows cracks or
abrasion damage along its length or at either end. When moving the appliance, be careful not
to damage the power cord.
EXTENSION CORD
Because of potential safety hazards under certain conditions, it is strongly recommended that
you do not use an extension cord with this appliance. However, if you must use an extension
cord it is absolutely necessary that it be a UL/CUL-Listed, 3-wire grounding type appliance
extension cord having a grounding type plug and outlet and that the electrical rating of the
cord be 115 volts and at least 10 amperes.
Improper use of the grounded plug can result in the risk of
electrical shock. If the power cord is damaged, have it replaced
by a qualied electrician or an authorized service center.
WARNING
ELECTRICAL CONNECTION

9
1. Remove the lock pin using a
at-headed screwdriver.
2. Remove the lock housing. 3. Loosen the top panel. Do not
remove the screws, just loosen
them.
4. Tilt the top panel forwards to
remove it (it is secured in tree
places)
5. Lay the appliance on its back
and remove the upper hinge,
using the hex key.
6. Pull the torsion spring out
of the door together with the
hinge.
7. Remove the bottom hinge
using the hex key.
8. Move the door handle to the
opposite side. 9. Move the hinge pin to the op-
posite side of the bottom hinge.
10. Ret the bottom hinge on
the opposite side.
11. Move the palstic door guard
to the opposite side.
12. Insert the hinge pin and
tosion spring into the the top of
the door on the opposite side.
REVERSING THE DOOR SWING OF YOUR APPLIANCE
This unit has the capability of the door opening from either the left or right side. The unit is
delivered to you with the door opening from the left side. Should you desire to reverse the
opening direction, please follow the following reversal instructions.

10
13. Fit the accompanying left-side
top hinge. Tighten the tosion spring
approx. 1/2 turn (anticlockwise on
left side, clockwise on rigth.)
14. Secure the top hinge in
position.
15. Raise the appliance into
uppight possion. Click the top
panel into place (it is secured in
three places.)
16. Retighten the top panel
screws using a screwdriver.
17. Ret the lock housing and
lock pin.
18. After reversing the door, it is important to check that the sealing gasket provides a tight
seal all the way round. If it does not, carefully heat the gasket evenly with a hair dryer. Then
ease the gasket outwards slightly so that it forms a tight seal against the cabinet. Be careful
not to heat the gasket so much that it melts!
ADJUSTMENT OF THE DOOR
(if necessary)

11
OPERATING YOUR APPLIANCE
It is recommended you install the appliance in a place where the ambient temperature is bet-
ween 72º and 78ºF (23º-26ºC). If the ambient temperature is above or below the recommen-
ded temperatures, the performance of the unit may be affected. For example, placing your
unit in extreme cold or hot conditions may cause interior temperatures to uctuate.
CONTROL PANEL
1. Lock (Not every model has a lock on top)
2. Green light indicating power on
3. Thermometer (Not every model has a
thermometer)
4. Thermostat button.
5. Door switch for internal fan
6. Light switch
Connect the appliance to a grounded electrical socket (120V AC, 60Hz). A green light (2) on
the control panel indicates that the appliance has been switched on.
The thermostat knob is adjustable from 0 (cold) to 7 (coldest). Find the position that gives you
the desired temperature. Start at position 4.
Button 1 on the control panel allows the door to be locked and unlocked.
Switch 6 turns the top lighting on and off.

12
TROUBLESHOOTING
Before calling a repairman, check that:
●The plug is properly connected into the wall socket.
●The fuse (or circuit breaker) is intact.
●The power has not been cut off.
●All controls are correctly set.
●Switch off the cabinet for 15 minutes (by setting the thermostat to 0). Switch it on
again and after 5 minutes, check whether frost has formed on the evaporator.
●Do not open the cabinet unnecessarily.
CARE AND MAINTENANCE
CLEANING YOUR REFRIGERATOR
●Turn off the power, unplug the appliance, and remove all items, including shelves.
●Wash the inside surfaces with a solution of warm water and baking soda (about 2 table-
spoons of baking soda to a quart of water).
●You may remove the top panel and wash it when cleaning inside the cabinet.
●Wash the shelves with a mild detergent solution.
●Wring excess water out of the sponge or cloth when cleaning the area where the controls
are located, or any electrical parts.
● Wash the outside cabinet with warm water and mild liquid detergent. Rinse well and wipe
dry with a clean soft cloth.
● The kick panel can be removed to facilitate vacuum cleaning the oor.
●Do not use steel wool or a steel brush on the stainless steel.
●To make the cooling system work at its best, it is necessary from time to time to clean the
wire condenser and the compressor at the back of the cabinet with a brush or vacuum
cleaner. Remember to clean the drain.

13
CAUTION:
Failure to unplug the appliance during cleaning could result in electrical shock or other perso-
nal injury.
POWER FAILURE
Most power failures are corrected within a few hours and should not affect the temperature of
your appliance if you minimize the number of times the door is opened. If the power is going
to be off for a longer period of time, you need to take the proper steps to protect the contents.
VACATION TIME
●Short vacations: Leave the appliance operating during vacations of less than three weeks.
●Long vacations: If the appliance will not be used for several months, remove all items and
turn off the appliance. Clean and dry the interior thoroughly. To prevent odor and mold
growth, leave the door open slightly, blocking it open if necessary.
MOVING YOUR APPLIANCE
1. Remove all items.
2. Securely tape down all loose items (shelves) inside your appliance.
3. Turn the adjustable legs up to the base to avoid damage.
4. Tape the door shut.
5. Be sure the appliance stays secure in the upright position during transportation.
Also, protect the outside of the appliance with a blanket or similar item.
ENERGY SAVING TIPS
●The appliance should be located in the coolest area of the room, away from heat-produ-
cing appliances and out of direct sunlight.
● Ensure that the unit is adequately ventilated. Never cover air vents.
●Do not keep the door open any longer than necessary.

14
LIMITED WARRANTY
ONE-YEAR LIMITED WARRANTY
Within the 48 contiguous United States, for one year from the date of purchase, when
this appliance is operated and maintained according to instructions attached to or fur-
nished with the product, warrantor will pay for factory-specied parts and repair labor to
correct defects in materials or workmanship. Service must be provided by a designated
service company. Outside the 48 states, all parts are warranted for one year from ma-
nufacturing defects. Plastic parts, shelves and cabinets are warranted to be manufac-
tured to commercially acceptable standards, and are not covered from damage during
handling or breakage.
5-YEAR COMPRESSOR WARRANTY
1. The compressor is covered for 5 years.
2. Replacement does not include labor.
ITEMS WARRANTOR WILL NOT PAY FOR:
1. Service calls to correct the installation of your appliance, to instruct you how to use
your appliance, to replace or repair fuses or to correct wiring or plumbing.
2. Service calls to repair or replace appliance light bulbs or broken shelves. Consu
mable parts (such as lters) are excluded from warranty coverage.
3. Damage resulting from accident, alteration, misuse, abuse, re, ood, acts of God,
improper installation, installation not in accordance with electrical or plumbing
codes, or use of products not approved by warrantor.
4. Replacement parts or repair labor costs for units operated outside the United
States.
5. Repairs to parts or systems resulting from unauthorized modications made to the
appliance.
6. Expenses for travel and transportation for product service in remote locations.
7. The removal and reinstallation of your appliance if it is installed in an inaccessible
location or is not installed in accordance with published installation instructions.
DISCLAIMER OF IMPLIED WARRANTIES; LIMITATION OF REMEDIES
CUSTOMER’S SOLE AND EXCLUSIVE REMEDY UNDER THIS LIMITED WAR-
RANTY SHALL BE PRODUCT REPAIR AS PROVIDED HEREIN. IMPLIED WAR-
RANTIES, INCLUDING WARRANTIES OF MERCHANTABILITY OR FITNESS FOR
A PARTICULAR PURPOSE, ARE LIMITED TO ONE YEAR. WARRANTOR SHALL
NOT BE LIABLE FOR INCIDENTAL OR CONSEQUENTIAL DAMAGES. SOME
STATES DO NOT ALLOW THE EXCLUSION OR LIMITATION OF INCIDENTAL OR
CONSEQUENTIAL DAMAGES, OR LIMITATIONS ON THE DURATION OF IMPLIED
WARRANTIES OF MERCHANTABILITY OR FITNESS, SO THESE EXCLUSIONS OR
LIMITATIONS MAY NOT APPLY TO YOU. THIS WARRANTY GIVES YOU SPECIFIC
LEGAL RIGHTS AND YOU MAY ALSO HAVE OTHER RIGHTS, WHICH VARY FROM
STATE TO STATE.

15
FELIX STORCH, INC.
770 Garrison Avenue
Bronx, NY 10474
Phone: (718) 893-3900
For parts and accessory ordering,
troubleshooting and helpful hints, visit:
www.summitappliance.com/support
For ordering parts and accessories, trouble-
shooting and helpful hints, visit:
:
www.summitappliance.com/support
FELIX STORCH, INC.
770 Garrison Avenue
Bronx, NY 10474
Phone: (718) 893-3900
Fax: (718) 842-3093
www.summitappliance.com
WARNING! This product may contain chemicals known to the state of California
to cause cancer or birth defects or other reproductive harm. For more informa-
tion, visit: www.summitappliance.com/prop65
Chemicals known by the manufacturer to be present in this product in concen-
trations higher than threshold limits: NONE.
Printed in Denmark

2
TABLE DES MATIÈRES
Sécurité de l’appareil
Mesures de sécurité importantes
Emplacement des pièces
Instructions d’installation
Avant d’utiliser votre appareil
Installation de votre appareil
Branchement électrique
Rallonge
Inversion de l’ouverture de la porte
Ajustement de la porte
Utilisation de votre appareil
Panneau de conguration
Dépannage
Entretien
Nettoyage de votre réfrigérateur
Panne de courant
Temps des vacances
Le transport de votre appareil
Conseils d’économie d’énergie
Garantie limitée
3
3-5
6
7-10
7
7
8
8
9-10
10
11
11
12
12
12-13
13
13
13
13
14-15

3
SÉCURITÉ DE L’APPAREIL
Votre sécurité et celle des autres est très importante.
Nous donnons de nombreux messages de sécurité importants dans ce manuel et sur votre
appareil.
Toujours lire et respecter toutes les consignes de sécurité.
w
Tous les messages de sécurité vous alertent au sujet du danger potentiel, vous expliquent
comment réduire le risque de blessures et vous laissent savoir ce qui peut arriver si les in-
structions ne sont pas suivies.
__________________________________________________________________________
●Branchez sur une prise à trois broches, ne retirez pas la broche de terre, ne pas utilisez un
adaptateur, et ne utilisez pas de rallonge.
●Remplacez tous les panneaux avant le fonctionnement.
● Il est recommandé qu’un circuit distinct soit utilisé pour alimenter votre appareil unique-
ment. Utilisez des récipients qui ne peuvent pas être désactivés par un interrupteur ou une
chaîne.
Nous avons fourni de nombreux messages de sécurité importants dans ce
manuel et sur votre appareil. Toujours lire et respecter les consignes de sécu-
rité.
DANGER signie que le non-respect de cet énoncé
de sécurité peut entraîner des blessures graves ou
la mort..
AVERTISSEMENT signie que le non-respect de cet
énoncé de sécurité peut entraîner des dommages im-
portants au produit, des blessures graves ou la mort.
MESURES DE SÉCURITÉ IMPORTANTES
Avant d’utiliser l’appareil, celui-ci doit être correctement positionné et in-
stallé, tel qu’indiqué dans ce manuel. Assurez-vous de le lire attentivement
an de réduire le risque de feu, de choc électrique ou de blessure lors de
l’utilisation de l’appareil. Suivez les mesures de précaution suivantes:
AVERTISSEMENT

4
● Ne nettoyez jamais les pièces de l’appareil avec des liquides inammables. Les émanati-
ons peuvent provoquer un feu ou une explosion. N’entreposez et n’utilisez pas d’essence
ou autres vapeurs et liquides inammables à proximité de cet appareil ou de tout autre. Les
vapeurs peuvent créer un risque d’incendie ou d’explosion.
● Avant de procéder à des opérations de nettoyage et d’entretien, assurez-vous que la ligne
d’alimentation de l’appareil est débranché.
● Ne brancher ou débrancher pas la prise électrique, lorsque vos mains sont mouillées.
●Débranchez l’appareil ou coupez le courant avant de le nettoyer ou de le réparer. Le non-
respect de ces recommandations peut entraîner un choc électrique ou la mort.
● Ne tentez pas de réparer ou de remplacer une partie quelconque de votre appareil à moins
qu’il ne soit spéciquement recommandé dans ce manuel. Toute autre réparation doit être
conée à un technicien qualié.
Suivez la légende AVERTISSEMENT ci-dessous que lorsque applicables à votre modèle.
● Il est recommandé qu’au moins deux de personnes ou plus déplacent et installent l’appa-
reil. Le non-respect de cette précaution peut entraîner des blessures au dos ou autres.
● Pour assurer une bonne ventilation de votre appareil, le devant de l’unité doit être com-
plètement dégagé. Choisissez un endroit bien aéré avec des températures supérieures
à 60°F (16°C) et inférieures à 90°F (32°C). Cet appareil doit être installé dans une zone
protégée contre le vent, la pluie, des gouttes d’eau ou des vapeurs.
● L’appareil ne doit pas être situé à proximité de fours, de grilles ou d’autres sources de
chaleur élevée.
● L’appareil doit être installé avec toutes les connexions électriques, d’eau et de canalisation
conformément aux codes nationaux et locaux. Une alimentation électrique standard (115 V
CA seulement, 60 Hz), conforme avec le National Electrical Code et les codes et ordonnan-
ces locaux, est nécessaire.
● Ne placez pas des substances chimiques (solvants, réactifs) dans le réfrigérateur
●Ne pliez et ne pincez pas le câble d’alimentation de l’appareil.
● La taille du fusible (ou disjoncteur) doit être de 15 ampères.
● Il est important que l’appareil soit mis à niveau an de fonctionner correctement. Plusieurs
ajustements seront peut-être nécessaires an d’y arriver.
● Toutes les installations doivent être conformes aux exigences du code de plomberie.
● Assurez-vous que les tuyaux ne soient pas pincés, noués ou endommagés lors de l’instal-
lation.
● Vériez s’il y a des fuites après la connexion.
●Ne laissez jamais des enfants utiliser, jouer ou ramper à l’intérieur de l’appareil.
AVERTISSEMENT

5
● Bien que l’unité a été testée à l’usine, pour des raisons d’entreposage à long terme, le
premier lot de glaçons doit être jeté.
●N’utilisez pas de produits nettoyants à base de solvants ou de produits abrasifs à l’intérieur
de l’appareil. Ces produits peuvent endommager ou décolorer l’intérieur.
● Utilisez cet appareil uniquement pour son usage prescrit, tel que décrit dans ce manuel.
●Gardez les doigts hors des zones de pincement. L’espace entre la porte et le placard est
restreint. Soyez vigilant lorsque vous fermez les portes en présence d’enfants.
Risque d’emprisonnement pour les enfants!
Des enfants pris au piège et suffoqués n’est pas un scénario du passé. Les appareils jetés ou
abandonnés sont encore dangereux, même s’ils sont ”simplement entreposés dans le garage
pendant quelques jours”.
Avant de jeter votre vieux réfrigérateur:
●Enlever les portes
● Laissez les étagères en place an que les enfants ne puissent pas y pénétrer facilement.
- CONSERVER CES INSTRUCTIONS -

6
EMPLACEMENT DES PIÈCES
Serrure
Éclairage supérieur
Panneau de conguration
Plaque signalétique
Étagère
Poignée de porte
Porte vitrée
Plaque de protection
Pieds ajustables
Other manuals for SCR-1300
1
This manual suits for next models
1
Table of contents
Languages:
Other Summit Refrigerator manuals

Summit
Summit SCR600 Series Guide

Summit
Summit MB12B User manual

Summit
Summit SPR623OS User manual

Summit
Summit FF41SSTB Guide

Summit
Summit ALRF49B User manual

Summit
Summit FFBF285SS User manual

Summit
Summit FF7LBIPUB Guide

Summit
Summit FFBF246SS User manual

Summit
Summit SP7D2 User manual

Summit
Summit ASDR1524 User manual

Summit
Summit FF19524 User manual

Summit
Summit SCUR 18 User manual

Summit
Summit FF29BL User manual

Summit
Summit FF7BSSTB Guide

Summit
Summit FF7LBISSTB Guide

Summit
Summit CP-35 User manual

Summit
Summit CP-35 User manual

Summit
Summit FF-874W User manual

Summit
Summit SP6DS User manual

Summit
Summit FFBF285SS User manual