Sun Telecom SUN-HMS200 User manual

All the trademarks mentioned in this manual are registered property of Sun Telecom.
The right to interpret this manual is reserved by Sun Telecom.
English
User’s Manual
SUN-HMS200/400
Fiber Microscope
Table: SUN-UM-TL-HMS001 Version: A/0

User Safety Warning
LASER
DO NOT use the fiber microscope to view active fiber signals under ANY circumstances.
Active fiber signals contain laser light, and direct eye contact with laser light should be
avoided. The failure to avoid direct eye contact with laser light can result in serious damage
to the eye. The Fiber Microscope may magnify the laser light in active fiber signals; direct
eye contact with magnified laser light should be avoided. Laser safety filters, as used on
the Fiber Microscope, are no substitute for practicing good laser safety. If you are
unfamiliar with laser safety practices, seek out professional training. There are many
capable trainers working in the fiber optic field who can help.
Figure 1
DANGER
LASER
GER

Content
1 Brief Introduction.......................................................................................1
2 Specification..............................................................................................1
3 Setup .........................................................................................................1
4 Operation...................................................................................................2
5 Changing the Lamp...................................................................................3
6 Maintenance..............................................................................................4
7 Changing the Magnification.......................................................................4

Fiber Optic Solutions Provider 1/4
www.suntelecom.cn • +86-21-60138638 • ics@suntelecom.cn
1 Brief Introduction
Sun Telecom SUN-HMS200/400 handheld fiber optic microscope utilizes a
white light LED for coaxial illumination. Light is introduced into the optical
path (axis) so that it comes out the tip of the objective lens and strikes the
ferrule perpendicular to the end face. This method of illumination produces a
high level of resolution, providing excellent detail of scratches and
contamination.
2 Specification
Parameters
Specifications
Models
SUN-HMS200
SUN-HMS400
Optical Magnification
200X
400X
Power Requirements
3 “AAA”alkaline batteries
Light Source
White LED, rated for 100,000 hours
Controls
Momentary on/off switch for light source and
fine-focus control wheel
Laser Safety Filter
Built-in IR filter
Adapter Interface
2.5mm universal male adaptor and 1.25mm
universal male adaptor included
Weight (kg)
0.6
Dimensions (mm)
225 X 60 X 35
3 Setup
The Fiber Microscope comes fully assembled and requires only a few steps
before it is ready to use.
1) Begin by removing the instrument from its case.
2) You'll need to insert 3 “AAA” batteries. Unscrew and remove the "Battery
Cap”. Insert the batteries with the "-" side up towards the Battery Plug;
"+" side down towards the Light Switch (see Figure 2). Replace the
Battery Cap and tighten.
3) If you have purchased the Fiber Microscope with a UniversalAdapter, it

Fiber Optic Solutions Provider 2/4
www.suntelecom.cn • +86-21-60138638 • ics@suntelecom.cn
should already be in place and your instrument is ready to use. If you
purchased an adapter separately, simply screw it into the threaded hole
at the opposite end from the light Switch. Your instrument is ready to
use.
4 Operation
In this manual, we will explain general use of the Fiber Microscope. However,
it is important to read the specific termination instructions published by the
manufacturer of the connector you are using. This will ensure proper
termination.Also be sure you have read the User Safety Warning and fully
understand that direct eye contact with laser light and magnified laser light
should be avoided.
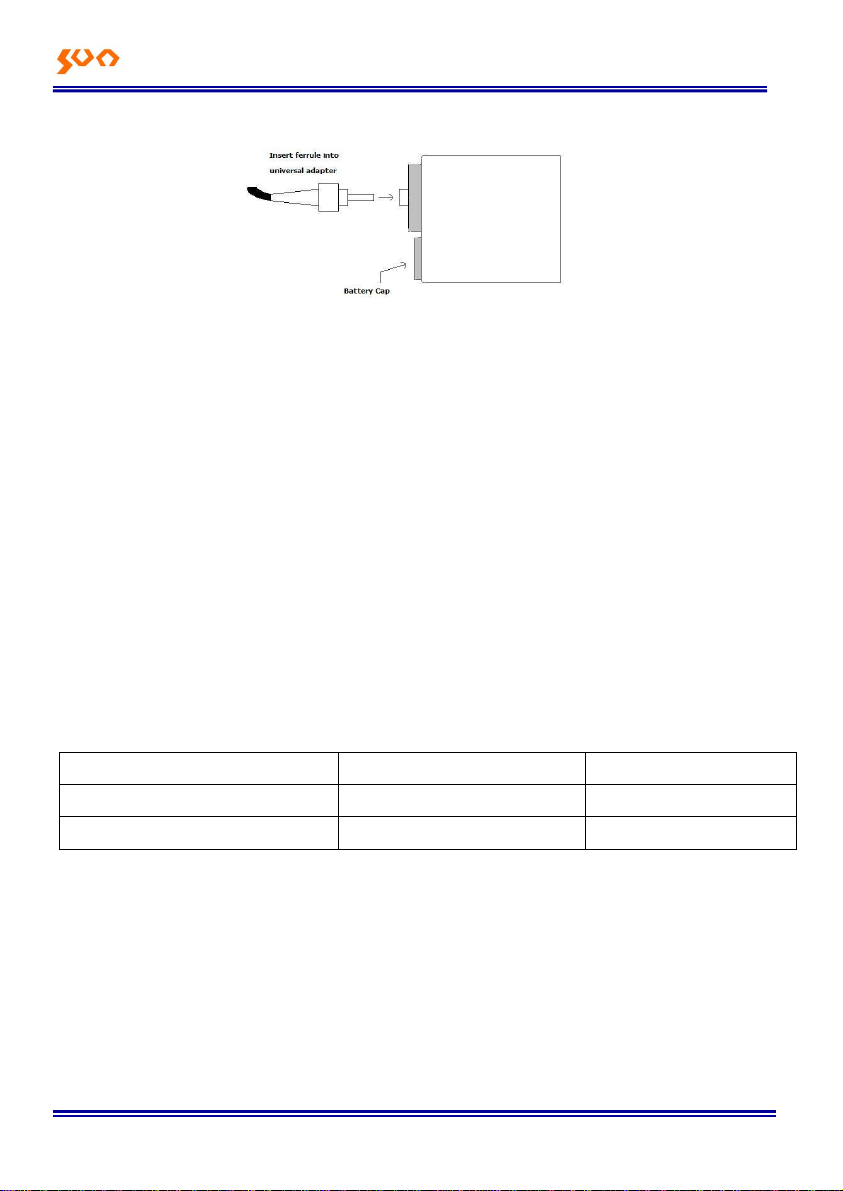
1) Begin by loading the polished connector into the adapter.
If you have purchased our Universal Adapter, simply slide the connector
ferrule (2.5mm) into the hole until you feel it hit a stop.
Note: It may require a little pressure to get it started as our Universal adapter is
equipped with a no-slip gripping mechanism; it is important to slide the connector
ferrule all the way to the end. This will minimize any refocusing that needs to be done
when changing from one connector to the next.
If you have purchased one of the dedicated adapters, insert the
connector just as you would into a patch bay or mated connector.
2) Now turn the light on. The light works by pressing and holding the light
Switch in. You can tell whether the light is on by checking the "Backlight
Window". If the light passes through this window, you are ready to work.
3) Once the connector is loaded and the light is on, hold the eyepiece up to
your eye and begin focusing. Unlike many instruments of this type, the
Fiber Microscope is always centered so there is no alignment to be
done.

Fiber Optic Solutions Provider 3/4
www.suntelecom.cn • +86-21-60138638 • ics@suntelecom.cn
4) Then grip the focusing adjustment (brass wheel with rubber grip) and
turn it to focus the image. Once you find the image, very little re-focusing
is necessary if the connector is properly loaded.
Notes for the first use: Please use the microscope to focus the image; it may take a
little longer to find the image.
5) Once you can visualize the connector ferrule, you can evaluate it for
polish quality, cleave quality, and cleanliness optionally, you can hold
the opposite end of a cable to the Backlight window to give further
contrast to the core. Check with the manufacturer of your connector for
further instructions.
5 Changing the Lamp
This microscope utilizes a white LED light source. The LED has a stated lamp
life of over 100,000 hours. Therefore, you should never have to change the
lamp. If you have problems with illumination, please call your sales person to
arrange for repair.
Figure 2

Fiber Optic Solutions Provider 4/4
www.suntelecom.cn • +86-21-60138638 • ics@suntelecom.cn
Figure 3
6 Maintenance
Keep this instrument dry and clean. it is built for durability and field use, but
careful operation will greatly extend life.
7 Changing the Magnification
If you wish to change the magnification or have damaged one of the optical
components, you will need to change either the eyepiece or the objective.
Only the eyepiece is easily serviced by the user. if you need to change the
objective, please contact your dealer for a service ReturnAuthorization.
Before you change the objective or eyepiece, determine which components
you need using the following table.
Magnification
Eyepiece
Objectives
200
20
10
400
20
20
This manual suits for next models
1
Table of contents
Popular Microscope manuals by other brands

Atmos
Atmos C 11 Assembly instructions

Ash
Ash INSPEX 3 Quick start user guide

Celestron
Celestron 44302-A instruction manual

Horiba Scientific
Horiba Scientific DeltaMyc J810018 Operation manual

Zeiss
Zeiss Axiovert 25 C operating manual

Bresser
Bresser University of Oxford 9203820 GYE 000 operating instructions