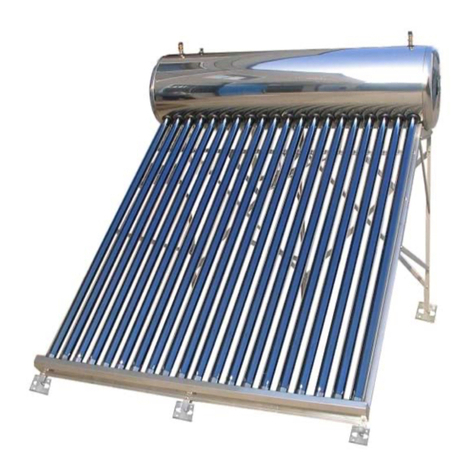
SUNFLOWER SFA-HJ Series User manual

Version 11.03
For our present, For their future.
Sub
j
ectto chan
g
e 2011 SUNFLOWER SOLAR

http://www.sunflower‐solar.com/
Version11.03
Subjectto change 2011 SUNFLOWER SOLAR
2
SFA-HJ series Installation Manual
Thermosyphon Tubular Solar Water Heater
Contents
1. SOLAR WATER HEATER SIZE AND WEIGHT................................................................................................................ 3
2. HOW TO TRANSPORT AND CARRY IT............................................................................................................................ 4
3. INSTALLATION ...................................................................................................................................................................... 4
3.1 INSTALLATION LOCATION CHOICE ................................................................................................................................... 4
3.2 UNPACK AND INSPECTION................................................................................................................................................ 5
3.3 FIX THE FRAMES AND TANK ............................................................................................................................................. 5
3.3.1 Steps of Assembly
..................................................................................................................................................... 5
3.3.2 Water Tank Assembly
.............................................................................................................................................. 7
3.4 ALL-GLASS VACUUM TUBE ASSEMBLY.............................................................................................................................. 8
3.5 FIX SOLAR WATER SUPPLIER (OPTIONAL ACCESSORY)................................................................................................ 10
3.5.1 The diagram of the connectors of water supplier
........................................................................................ 10
3.5.2 Water Supplier Assembly (optional accessory)
............................................................................................ 10
3.6 THE WATER INLET AND WATER OUTLET PIPE CHANNEL CONNECTION OF SOLAR WATER HEATER............................... 11
3.6.1 Piping diagram for system
................................................................................................................................... 11
3.6.2 Piping diagram for system with Water supplier (optional accessory)
................................................. 11
3.6.3 Piping diagram for system with Controller (optional accessory)
.......................................................... 12
3.7 TRIAL OPERATION AND TROUBLESHOOT METHODS....................................................................................................... 13
4. LIGHTNING PROTECTION................................................................................................................................................ 13
5. HOW TO CONNECT COUPLE OF COLLECTORS........................................................................................................... 13
6. DIMENSIONS OF PIPE CONNECTIONS........................................................................................................................ 14
7. PRECAUTIONS...................................................................................................................................................................... 14
8. MAX. WORKING PRESSURE ............................................................................................................................................ 14
9. INSTALLATION ANGLE...................................................................................................................................................... 14
10. WIND AND SNOW ACCUMULATION........................................................................................................................ 15
11. MAINTENANCE REQUIREMENTS .............................................................................................................................. 15
11.1 CLEANING ............................................................................................................................................................................ 15
11.2 LEAVES ................................................................................................................................................................................. 15
11.3 BROKEN TUBE...................................................................................................................................................................... 15

http://www.sunflower‐solar.com/
Version11.03
Subjectto change 2011 SUNFLOWER SOLAR
3
1. Solar water heater size and weight
Specification Size(mm)
Item No. Diameter
of water
tank
Qty. of
solar
tubes
Diameter
of solar
tube
Length
of solar
tube
Weight A B C D
SFA42154715-HJ Ø 420mm 15pcs Ø 47mm 1.5M 48KG 1170 1060 1307 1346
SFA42184715-HJ Ø 420mm 18pcs Ø 47mm 1.5M 54KG 1380 1270 1307 1346
SFA42204715-HJ Ø 420mm 20pcs Ø 47mm 1.5M 59KG 1520 1410 1307 1346
SFA42244715-HJ Ø 420mm 24pcs Ø 47mm 1.5M 71KG 1800 1690 1307 1346
SFA42304715-HJ Ø 420mm 30pcs Ø 47mm 1.5M 87KG 2220 2110 1307 1346
SFA47155818-HJ Ø 470mm 15pcs Ø 58mm 1.8M 63KG 1348 1228 1594 1655
SFA47185818-HJ Ø 470mm 18pcs Ø 58mm 1.8M 74KG 1591 1471 1594 1655
SFA47205818-HJ Ø 470mm 20pcs Ø 58mm 1.8M 84KG 1753 1633 1594 1655
SFA47245818-HJ Ø 470mm 24pcs Ø 58mm 1.8M 99KG 2077 1957 1594 1655
SFA47305818-HJ Ø 470mm 30pcs Ø 58mm 1.8M 118KG 2563 2443 1594 1655
Fig 1.1
Please read the whole manuals carefully
before assemble!

http://www.sunflower‐solar.com/
Version11.03
Subjectto change 2011 SUNFLOWER SOLAR
4
2. How to transport and carry it
Please carry the tank horizontally. It’s forbidden to carry it vertically.
Please carry the glass tubes carefully and horizontally. It’s forbidden to carry them vertically.
If you want to transport your solar water heaters a long distance, it’s better to put the tank on the bottom and make
sure it won’t move during transportation. To save space, you can put the tube carton on the tank carton, and do
your best to drive carefully, avoiding bumpy road.
3. Installation
Installation sequence:
3.1 Installation location choice
The choices of solar water heater installation location have several principles as follows:
a) Solar water heater needs to face the Sun, make sure without any shadow in front;
b) Try to use shortest pipe connection, try to reduce the turning, no dead angle;
c) The installation location needs to bear the gravity of solar water heater, stable placement;
d) Easy installation and maintenance.
1.Installationlocationchoice2.Checkallparts3.Framesassembly
4.Frameplacement5.Watertankassembly6.Vacuumtubeassembly
7.Watersupplierconnection
(optionalaccessory)
8.Pipechannelconnection9.Trialoperation
10.Qualified

http://www.sunflower‐solar.com/
Version11.03
Subjectto change 2011 SUNFLOWER SOLAR
5
3.2 Unpack and inspection
Total quantity
SFA42*4715-HJ SFA42*5818-HJ
No. Name
15 18 20 24 30 15 18 20 24 30
1 Water tank 1 1 1 1 1 1 1 1 1 1
2 Gantry 2 2 2 3 3 2 2 2 3 3
3 Decoration ring 15+1 18+1 20+1 24+1 30+1 15+1 18+1 20+1 24+1 30+1
4 Silicon ring +1 +1 +1 +1 +1 +1 +1 +1 +1 +1
5 Tube caps 15+1 18+1 20+1 24+1 30+1 15+1 18+1 20+1 24+1 30+1
6 Diagonal-leg 2 2 2 3 3 2 2 2 3 3
7 Stand bar 2 2 2 3 3 2 2 2 3 3
8 Tube holder 1 1 1 1 1 1 1 1 1 1
9 Long diagonal brace 2 2 2 3 3 2 2 2 3 3
10 Cross-bar 3 3 3 3 3 3 3 3 3 3
11 Front Cross brace 2 2 2 4 4 2 2 2 4 4
12 Back Cross brace 2 2 2 2 2 2 2 2 2 2
13 Screw 1 PKG 1 PKG 1 PKG 1 PKG 1 PKG 1 PKG 1 PKG 1 PKG 1 PKG 1 PKG
14 Vacuum Tube 15 18 20 24 30 15 18 20 24 30
Note: In above form, the number after “+” means the quantity of extra free compensation parts.
3.3 Fix the Frames and Tank
3.3.1 Steps of Assembly
Steps 1: Gantry Assembly.
Fig 3.1
Gantry
Stand bar

http://www.sunflower‐solar.com/
Version11.03
Subjectto change 2011 SUNFLOWER SOLAR
6
Steps 2: Diagonal-leg Assembly.
Diagonal-leg.
Fig 3.2
Steps 3: Long diagonal brace Assembly.
Long diagonal brace.
Fig 3.3

http://www.sunflower‐solar.com/
Version11.03
Subjectto change 2011 SUNFLOWER SOLAR
7
Steps 4: Assembly other short frame parts (3 Cross-bars and 6 Cross braces assembly), the finally installation
as follow:
Fig 3.4
3.3.2 Water Tank Assembly
Warning: Please confirm the connection of frames is tighten and the placement is
stable first and then assembly the water tank.
Please check the water cylinder and make sure there is nothing inside of it. If there is, please try to take it out.
Put the assembled frames on level ground, or install them in their final place of operation, e.g. on the ground or
on a roof (If on roof, aerial work, please pay attention to safety).Remove the nuts from the screws at the end
of water tank.
Then two workers hold onto the two ends of the tank, and put the tank onto the gantry carefully.
Please try to let the screws go through the long notch on the gantry. You may need to gently turn the cylinder
to achieve it.
Then screw the nuts back onto the screws of the tank so that the tank can be fixed on the frame.

http://www.sunflower‐solar.com/
Version11.03
Subjectto change 2011 SUNFLOWER SOLAR
8
Note: "Do not tighten the bolts completely. Just make them snug. You may need to turn the tank so that the
vacuum tubes line up with the bottom tube holders. Once the tubes are installed, then tighten the bolts
completely so the tank is firmly connected to the stand."
Fig 3.5
3.4 All-glass vacuum tube Assembly
1) Put the Decoration ring on the opening part of the SFVA .Daub some lubricant referred in the above item on the
opening part of the SFVA tube.
Fig 3.6
2) Insert SFVA into one of the water tank's holes for evacuated tubes.
Please make sure the opening part of the SFVA tube also insert into the Seal Silicon ring and it's easily to insert
if in the way of going round and slowly.

http://www.sunflower‐solar.com/
Version11.03
Subjectto change 2011 SUNFLOWER SOLAR
9
Fig 3.7
3) After you insert the opening part of the SFVA tube into the holes of the water tank, put the end of the tube into
the cupping of the frame and make sure the course is going slowly.
4)
Fig 3.8

http://www.sunflower‐solar.com/
Version11.03
Subjectto change 2011 SUNFLOWER SOLAR
10
3.5 Fix solar water supplier (optional accessory)
3.5.1 The diagram of the connectors of water supplier
.
Fig 3.9
3.5.2 Water Supplier Assembly (optional accessory)
The connector on the bottom of water supplier is connected to the right connector on the water tank of solar
water heater.
The air vent (the left connector) need to be connected with a long pipe, and the length of pipe must higher
than the top position of water supplier. The air vent needs to be open all the time.

http://www.sunflower‐solar.com/
Version11.03
Subjectto change 2011 SUNFLOWER SOLAR
11
Fig 3.10
3.6 The water inlet and water outlet pipe channel connection of solar water heater
3.6.1 Piping diagram for system
Fig 3.11
3.6.2 Piping diagram for system with Water supplier (optional accessory)

http://www.sunflower‐solar.com/
Version11.03
Subjectto change 2011 SUNFLOWER SOLAR
12
Fig 3.12
Warning: If you use electric heater, the person who install the electric heater must have electrician qualification.
And you need to use electricity leakage protection plug and should connect with ground wire.
3.6.3 Piping diagram for system with Controller (optional accessory)
Fig 3.13
Note: If you use solar controller, please read the assembly manual of solar controller before you install the solar
controller.
Warning:
1) When the sunlight is adequate during the installation, you could full fill the glass tube with water and then insert
into the water tank, try to avoid thermal shock, it may lead to the broken of vacuum tube.
2) The air vent on the top of water tank needs to keep open. If adopt water supplier, please connect a long pipe to
the air vent, and the height must higher than the top position of water supplier.
3) Please pay attention to the weight capacity of roof.
4) Aerial work, please pay attention to safety.

http://www.sunflower‐solar.com/
Version11.03
Subjectto change 2011 SUNFLOWER SOLAR
13
3.7 Trial operation and troubleshoot methods
3.7.1 Trial operation
First please confirm whether the vacuum tube is shined by sunlight without water inside, otherwise can’t feed
the cold water.
Suggestions: If the process has to be finished under sunshine, you can cover the inserted tubes by black cloth,
etc.
3.7.2 Troubleshoot methods
Open the cold water inlet, check the pipe channel and connection between vacuum tube and water tank, if find
any leakage, it should close the valve immediately, eliminate the leakage.
As for the leakage when insert the vacuum tube, there are normal four points as follow:
1) The broken of Silicon ring
2) There is adsorption bubble on the Silicon ring
3) Silicon ring is not connected with inner tank
4) Insert vacuum tubes without any lubricant
3.7.3 Check the air vent to make sure its fluency.
4. Lightning protection
The solar water heater should have lightning protection to avoid lightening damage. A lightning rod is necessary
which should be 1.5m higher and 3 m farther away from the solar water heater. For any problems that involve
plumbing or electrical connections the services of a qualified professional must be employed.
Warning: When in thunderstorm weather please don't use solar water heaters.
5. How to connect couple of collectors
We suggest you use the corrugated connection pipe to connect every two solar collectors, which is very convenient
and completely fit two solar collectors. Please see the following picture.

http://www.sunflower‐solar.com/
Version11.03
Subjectto change 2011 SUNFLOWER SOLAR
14
Fig 5.1
6. Dimensions of pipe connections
All size of the connectors on the solar water heaters are 1/2 inch.
7. Precautions
1) When installing your solar water heater in a cold climate where freezing is possible, please put an insulation
layer around the pipes which are outside the building. You may want to add additional protection in the
form of a thermostatically controlled heat tape.
2) If you use the optional electric immersion heater, the person who installs the electric heater must be a
qualified electrician. You need to use an electricity leakage protection plug and everything should be
grounded.
8. Max. working pressure
This type is non-pressurized type, but the solar water heater could bear the gravity of water inside.
9. Installation Angle
It is common for solar water heaters to be installed at an angle that is similar to the latitude of your location.
Installing it with a tilt angle (as measured from horizontal) less than 20° is not recommended as the heat pipes

http://www.sunflower‐solar.com/
Version11.03
Subjectto change 2011 SUNFLOWER SOLAR
15
perform best in the range of 20-70 degrees. While adhering to this guideline, an angle of your latitude +/-10° is
acceptable, and will not greatly reduce the solar heater output.
Angles out of this range can also be used, but a decrease of heat output will result. When the angle is lower than
the latitude, it will increase summer output, while a higher angle will enhance winter output.
10. Wind and snow accumulation
When installing the solar water heater, please consider the issue of wind resistance and the resultant stress on the
fixed points. The standard frame is designed to withstand wind speeds of up to 100km/h (62 mph) and 30cm (about
11.8 inches) of snow accumulation without damage. For areas with the possibility for high winds, additional
reinforcement of attachment points (e.g. into roof rafters, or ground anchors) may be required and can easily be
supplied by your local installers.
11. Maintenance Requirements
11.1 Cleaning
Regularly raining could keep the heat pipe vacuum tube clean, but if it is particularly dirty then it may need to be
cleaned with a soft cloth and warm, soapy water or other glass cleaning solutions. If the tubes are not easily and
safely accessible, a water spray from a garden hose may also be used.
11.2 Leaves
During autumn, leaves may accumulate between or under the tubes. Please remove these leaves regularly to
ensure optimal performance and to prevent any fire hazard. (The solar water heater will not cause the ignition of
flammable materials).
11.3 Broken Tube
When the vacuum tube is broken, please close the valve immediately, please open the valve after replace the
vacuum tube, in order to save the water consumption. When replace the vacuum tubes, please follow the
instructions in step 3.4.
This manual suits for next models
10
Table of contents
Other SUNFLOWER Water Heater manuals
Popular Water Heater manuals by other brands

AER
AER INNOVATION INN600 user manual

RED-RING
RED-RING PowerStar AE9.5 240V Handbook

German pool
German pool GPU Series manual

AquaMAX
AquaMAX AQM 32 Instructions for installation, use and maintenance

AquaMAX
AquaMAX CG20 Series Owner's guide and installation instructions

Eco-Smart
Eco-Smart ECO-6 installation instructions

TERMA
TERMA Aquabasic 30 instruction manual

Noritz
Noritz ecoTOUCH NRC111-DV-NG installation manual

Grundfos
Grundfos GT-CF Installation and operating instructions

Hatco
Hatco Imperial Series Installation and operating manual

American Water Heater
American Water Heater NRQSS00110 Specification sheet

A.O. Smith
A.O. Smith LTE 66D instruction manual