manuals.online logo
Brands
  1. Home
  2. •
  3. Brands
  4. •
  5. Sunnydaze
  6. •
  7. Outdoor Cart
  8. •
  9. Sunnydaze LW-DUC User manual

Sunnydaze LW-DUC User manual

Thank you for choosing Sunnydaze Decor. We stand behind our brand and the quality of the items we sell. Replacement parts or products will be sent at our discretion,
within the one-year warranty period. Proof of purchase, with the date of purchase as well as photos of the defective merchandise, must be provided. If you have any
questions, comments or concerns please feel free to contact us by phone at: 888-881-4668. You may also contact us by email: customerservice@serenityhealth.com,
or via our webpage at: www.serenityhealth.com/contact-us/
INSTRUCTIONS
1.) Remove parts from carton. Place carton on flat surface. Assemble cart while on the carton to
avoid scratching or damaging the parts.
2.) Tools Needed: Socket wrench, an adjustable crescent wrench.
Parts List
A. Bed (1)
B. Side Panels (2)
C. Front Panel (1)
D. Back Panel (1)
E. Rear Axle Support Assembly (2)
F. Hand Coupler (1)
G. Wheels (4)
H. Bottom Support (1)
I. Center Front Axel Brace (1)
J. Steering Connector (1)
K. Yoke (1)
L. Front Axle Brace (1)
M. Handle (1)
N. Rear Axle (1)
Hardware List
O. M8 x 60 Hex Bolt (1)
P. M8 x 20 Hex Bolts (1)
Q. M8 X 16 Hex Bolt (11)
R. Handle Pin (1)
S. M12 Nylon Nut (2)
T. M8 Nylon Nut (13)
U. Cotter Pin (4)
V. Fence Assembly Pins (4)
W. M16 Washers (2)
X. M12 Washer (2)
Y. M8 Washers (13)
3.) Turn (Part A) BED Upside down.
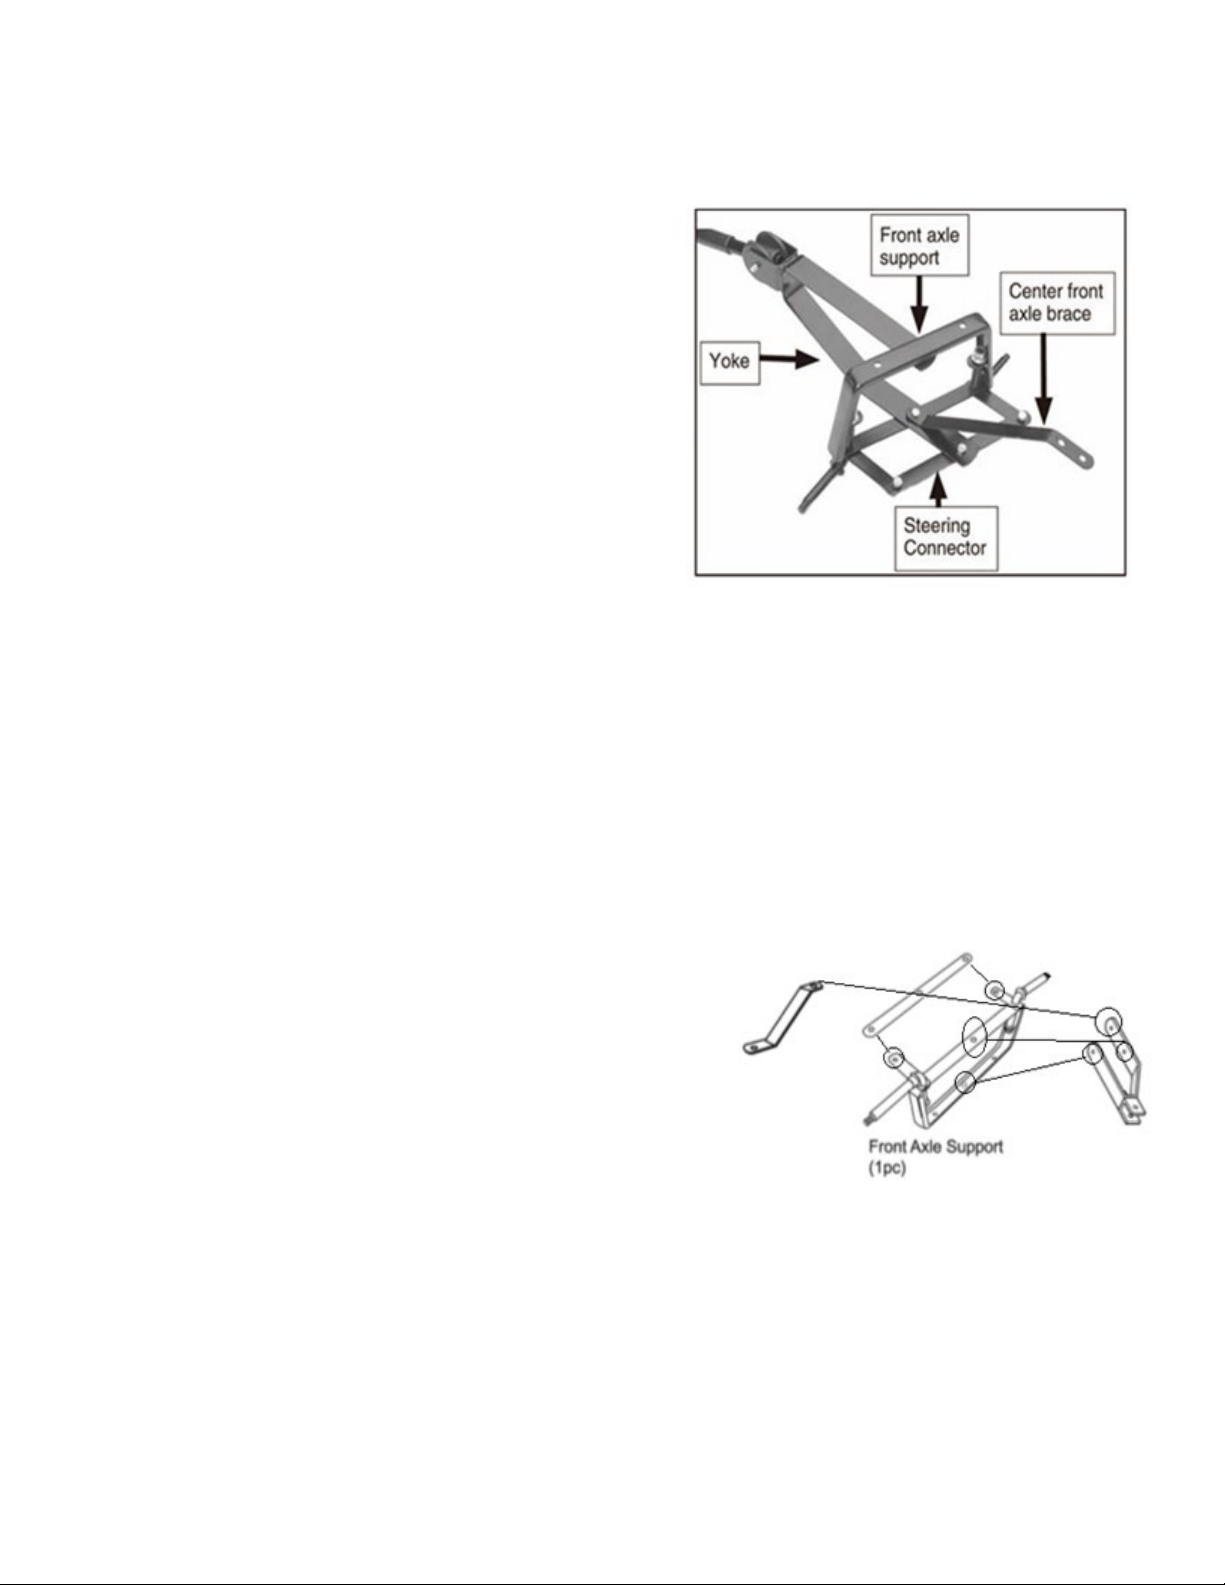
4.) Attach FRONT AXLE BRACE (PART L) to
BOTTOM SUPPORT (PART H) middle bar.
5.) Attach STEERING CONNECTOR (PART J) ends to
REAR AXLE SUPPORT (PART E) using M8X16 HEX
BOLT, M8 WASHER, and M8 NYLON NUT (PART Q, Y
and T)
6.) Attach STEERING CONNECTOR (PART J) two-
hole flat side to BOTTOM SUPPORT (PART H). Other
end will attach to middle of the FRONT AXLE BRACE
(PART L). (Do not secure yet)
7.) Attach YOKE (PART K) short side, to middle bolt of
FRONT AXLE BRACE (PART L) with COTTER PIN
(PART U). Place long side of YOKE (PART K) onto
FRONT AXLE BRACE and STEERING CONNECTOR
(PART J).
8.) Attach STEERING CONNECTOR (PART J) ends to
AXLE SUPPORT (PART E) using M8X16 HEX BOLT,
M8 WASHER, and M8 NYLON NUT (PART Q, Y and T)
9.) Attach STEERING CONNECTOR (PART J) two-
hole flat side to BOTTOM SUPPORT (PART H). Other
end will attach to middle of the FRONT AXLE BRACE
(PART L). (Do not secure yet)
10.) Attach YOKE (PART K) short side, to middle bolt
of FRONT AXLE BRACE (PART L) with COTTER PIN
(PART U). Place long side of YOKE (PART K) onto
FRONT AXLE BRACE and STEERING CONNECTOR
(PART J).
11.) Attach YOKE (PART K) short side, to middle bolt
of FRONT AXLE BRACE (PART L) with COTTER PIN
(PART U). Place long side of YOKE (PART K) onto
FRONT AXLE BRACE and STEERING CONNECTOR
(PART J).
12.) Place FRONT TIRES (PART G) onto FRONT
AXLE BRACE (PART L), secure with M12
WASHER (PART X) and M12 NYLON NUT (PART
13.) Place BACK TIRES (PART G) onto REAR
AXLE (PART N), secure with COTTER PIN (PART
U).
14.) Thread M8X60 HEX BOLTS (PART O)
between YOKE (PART K), HANDLE COUPLER
(PART F), and HANDLE (PART M) and secure with
M8 NYLON NUT (PART T).
15.) HANDLE GRIP (PART M) attaches to
HANDLE BAR (PART M) with HANDLE PIN (PART
R).
16.) Attach FRONT PANEL (PART C), BACK
PANEL (PART D) and SIDE PANELS (PART B)
with PINS (PART V).
IMPORTANT SAFETY INSTRUCTIONS
A. MAX LOAD: 600 lbs. NEVER OVERLOAD THIS CART
B. DO NOT Inflate tires more than 40 PSI
C. DO NOT Operate if any part is damaged or broken
D. Lower fence rails when loading large items onto cart.
E. Distribute load evenly in cart bed
F. DO NOT use on steep inclines where tipping may occur
G. DO NOT allow children to use this cart. IT IS NOT A TOY!
H. It is recommended that you DO NOT modify or use this cart for any application other than that for
which it was designed.
MAINTENANCE
A. When not in use, store the cart in a place which is dry and out of direct sunlight.
B. Periodically check tire pressure. Tire pressure should be between 36-40 PSI
C. Periodically check hardware.
D. Tighten any loose hardware.

Popular Outdoor Cart manuals by other brands

VITRA Caddy Instructions for use

VITRA

VITRA Caddy Instructions for use

Radio Flyer The Beast manual

Radio Flyer

Radio Flyer The Beast manual

Yukon 62587 Owner's manual & safety instructions

Yukon

Yukon 62587 Owner's manual & safety instructions

Westfalia 94 59 66 Original instructions

Westfalia

Westfalia 94 59 66 Original instructions

Ergotron YES36 user guide

Ergotron

Ergotron YES36 user guide

Westfalia 81 50 88 instruction manual

Westfalia

Westfalia 81 50 88 instruction manual

Trinity TSCPWH-1308 owner's manual

Trinity

Trinity TSCPWH-1308 owner's manual

Spectrum Industries eVolve 55480DW owner's manual

Spectrum Industries

Spectrum Industries eVolve 55480DW owner's manual

Link FC30 Assembly instructions and parts list

Link

Link FC30 Assembly instructions and parts list

LDI Spaces SAFCO 8968 Assembly instructions

LDI Spaces

LDI Spaces SAFCO 8968 Assembly instructions

Banner Stakes PLUS Line Assembly instructions

Banner Stakes

Banner Stakes PLUS Line Assembly instructions

Carlisle CC2243 Assembly instructions

Carlisle

Carlisle CC2243 Assembly instructions

SEVERIN SU 8125 Assembly instructions

SEVERIN

SEVERIN SU 8125 Assembly instructions

Agri-Fab 45-0350 owner's manual

Agri-Fab

Agri-Fab 45-0350 owner's manual

Copernicus BB007-6 Assembly guide

Copernicus

Copernicus BB007-6 Assembly guide

JohnDow Industries JDI-17PLP owner's manual

JohnDow Industries

JohnDow Industries JDI-17PLP owner's manual

Troy-Bilt TB-350S manual

Troy-Bilt

Troy-Bilt TB-350S manual

Hupfer Buffetcart Plus BC-40 operating instructions

Hupfer

Hupfer Buffetcart Plus BC-40 operating instructions

manuals.online logo
manuals.online logoBrands
  • About & Mission
  • Contact us
  • Privacy Policy
  • Terms and Conditions

Copyright 2025 Manuals.Online. All Rights Reserved.