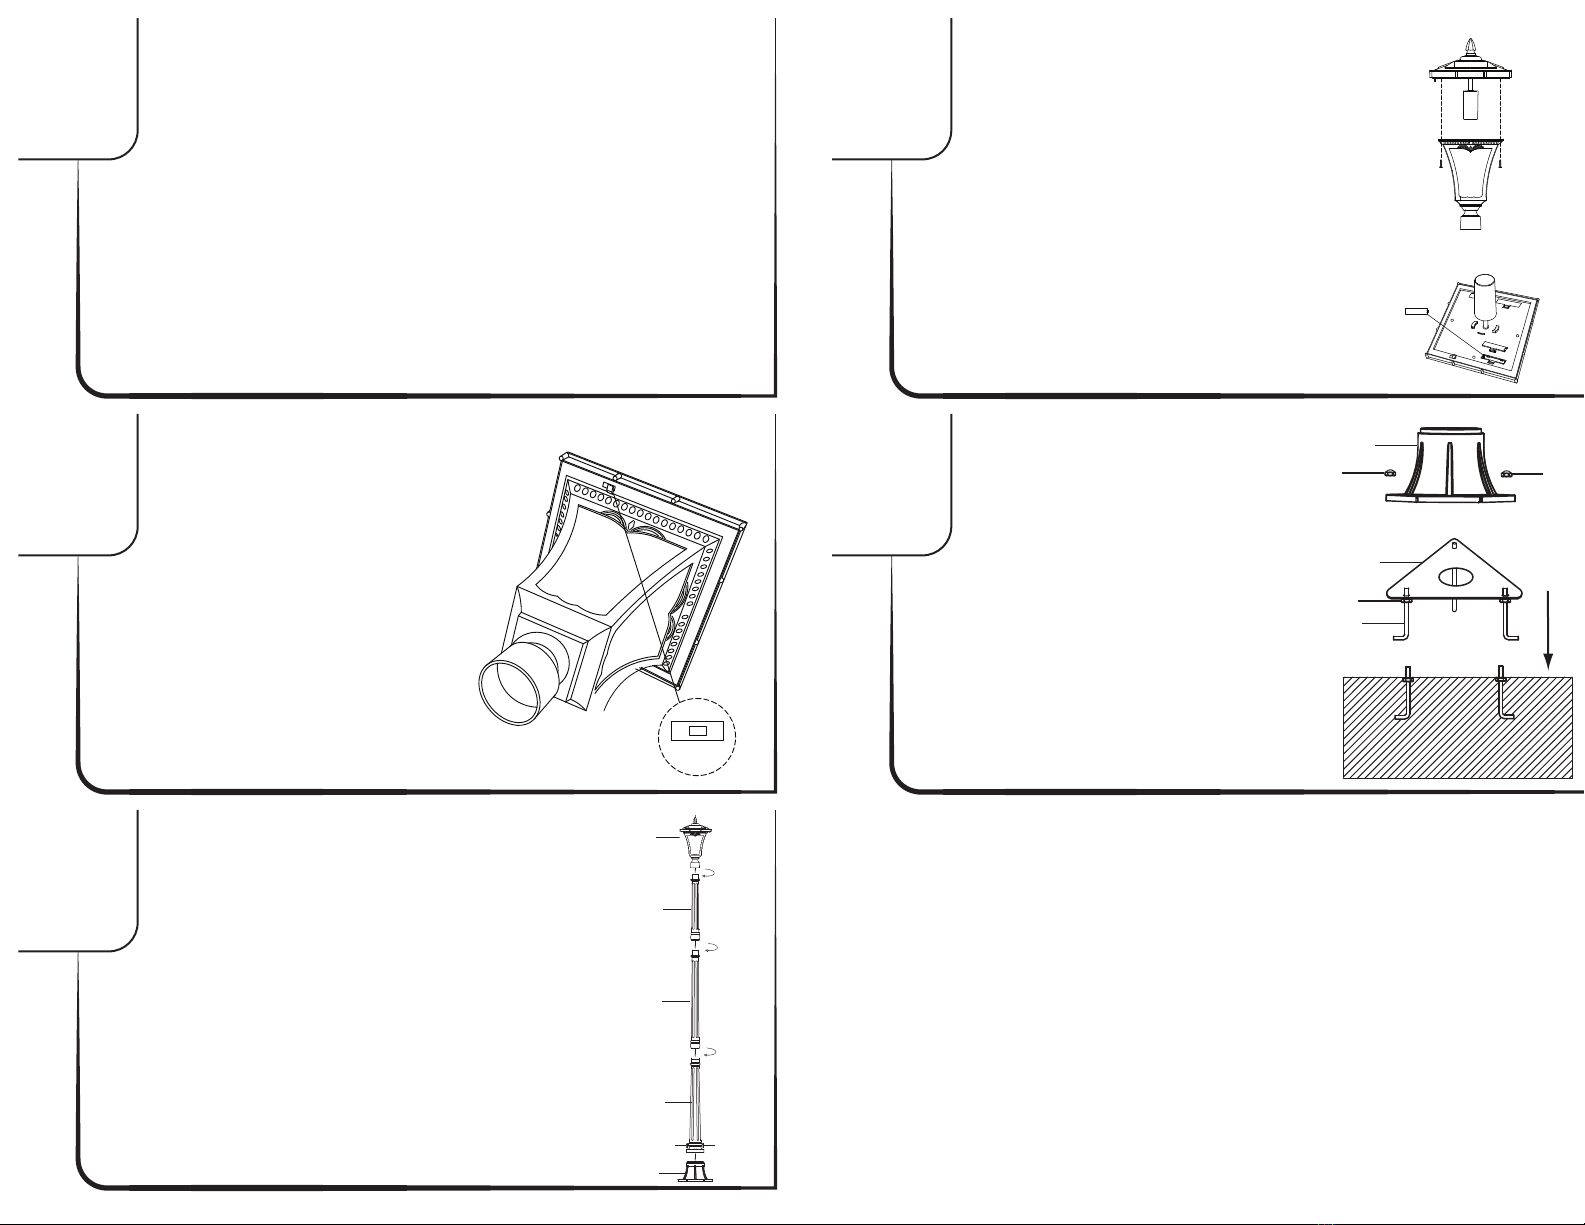
SUNRAY Vittoria 302074 User manual

Please do not return this product to the retailer.
If you are missing or have damaged parts please email
For Manuals, Replacement Parts or Customer Service visit:
www.ezreplacement.com
This product is intended for
This product can expose you to lead, a chemical known to the state of
California to cause cancer, birth defects and/or other reproductive harm.
For more information go to www.p65warnings.ca.gov/product
residential, non-commercial use.
Due to ongoing product development the actual product or products
may vary from the illustrations or photos shown within this manual.
J & J Global, LLC (Seller) warrants to the original Buyer only, that each product will be free from defects in material and
workmanship for a period of one (1) year from date of purchase. SELLER’S SOLE OBLIGATION AND BUYER’S EXCLUSIVE REMEDY
UNDER THIS LIMITED WARRANTY SHALL BE THE REPAIR OR REPLACEMENT OF PARTS, WITHOUT CHARGE, WHICH ARE
DEFECTIVE IN MATERIAL OR WORKMANSHIP. ANY PARTS AS DETERMINED BY THE SELLER WHICH HAVE BEEN MISUSED;
ABUSED OR DAMAGED EITHER DIRECTLY OR INDIRECTLY FROM REPAIRS OR ALTERATIONS ATTEMPTED BY UNAUTHORIZED
PERSON; IMPROPER MAINTENANCE, NEGLECT OR ACCIDENT ARE NOT COVERED BY THIS LIMITED WARRANTY. This
warranty does not apply to damage, heat-induced coloration changes, scratching or alteration due to normal use or
Additional Limitations
THIS LIMITED WARRANTY DOES NOT APPLY TO ACCESSORY OR CONSUMABLE ITEMS RELATED TO THIS PRODUCT. ALL
IMPLIED WARRANTIES SHALL BE LIMITED IN DURATION TO ONE (1) YEAR FROM DATE OF PURCHASE. IN NO EVENT SHALL
SELLER BE LIABLE FOR ANY INCIDENTAL OR CONSEQUENTIAL DAMAGES, INCLUDING BUT NOT LIMITED TO LIABILITY FOR
LOSS OF PROFITS, ARISING FROM THE SALE OR USE OF THIS PRODUCT.
If any provision of this Limited Warranty is for any reason held to be invalid or unenforceable, such provision shall not
affect any other provision herein, this Limited Warranty shall be construed as if such invalid and/or unenforceable
provision had never been contained herein.
This warranty gives you special legal rights, and you may also have other rights which vary from state to state.
This warranty contains the entire agreement between Seller and Buyer and supercedes any and all prior agreements,
arrangements, or understandings between the parties relating to product warranty.
Limited Warranty
weathering. To make a claim under this Limited Warranty, email [email protected] or visit www.ezreplace-
ment.com for warranty questions and claims.
MADE IN CHINA
©2020 J & J Global, LLC
Distributed By:
J & J Global, LLC
Irving, TX 75038

Vittoria Flickering Solar Lamp Post
Sku: 302074
Please keep this instruction manual for future reference
Read the instructions and precautions before use of this product
For warranty information, please refer to the back page of
this instruction manual.
Clean any dirt and debris from the solar panels, the panels cannont recharge if the
light is obstructed. Use a soft cloth to clean the panels. Do not use abrasives or
chemicals that might scrathc or damage the UV coating.
In a region where snow and ice are likely, and the light assembly is covered with
snow for an exteded period of time the batteries will requite recharge for at least 8
hours.
Recycling
Please dispose of batteries properly. Consult your local telephone listing for a
battery recycling ceneter in your area.
Care Instructions
Recycling
Ambient temperature
maximal 40oC (105oF)
Protect batteries
against heat and fire
risk of explosion
Do not dispose of
batteries in
household waste
Do not throw
batteries into water!

Package Contents
Hardware Contents
A B C D
E F
K L
G H I J
KL
Lantern Body Base Upper Post Middle Post
J-Bolts
Hex Nut Accorn Nut Lantern Screws
Base Screws Mounting Plate
Lower Post Lantern Top
x1 x1
x1 x1
x3
x2 x1
x3 x3 x2
x1 x1
F

1
2
3
4
5
Concrete
Pad
Level
G
H
B
L
II
Where To Place the Solar Light
Place the solar light in an area where it will
receive direct sunlight for at least 8 hours
per day. The number of hours the light is
illuminated is directly proportional to the number
of hours of sunlight it receives. If the light is
placed in a shaded area, it will not be able to fully
charge and its burn time will be limited. Do not
place the light near other outdoor lighting like
porch or streetlights. These may fool the sensor
and keep the light from coming on, or cause it to
turn off automatically.
Allow lantern to charge for at least 8 hours in full
sunlight with the ON/OFF switch in the OFF position.
Before assembling the lamp post make sure the switch
is set in the “OFF” position. The ON/OFF switch is located
on the lantern top. Once the batteries are fully
charged, set the ON/OFF switch to “W” for white light
or “A” for amber light. If the lantern doesn’t turn on
after initial charging, ensure batteies are making
contact with the terminals.
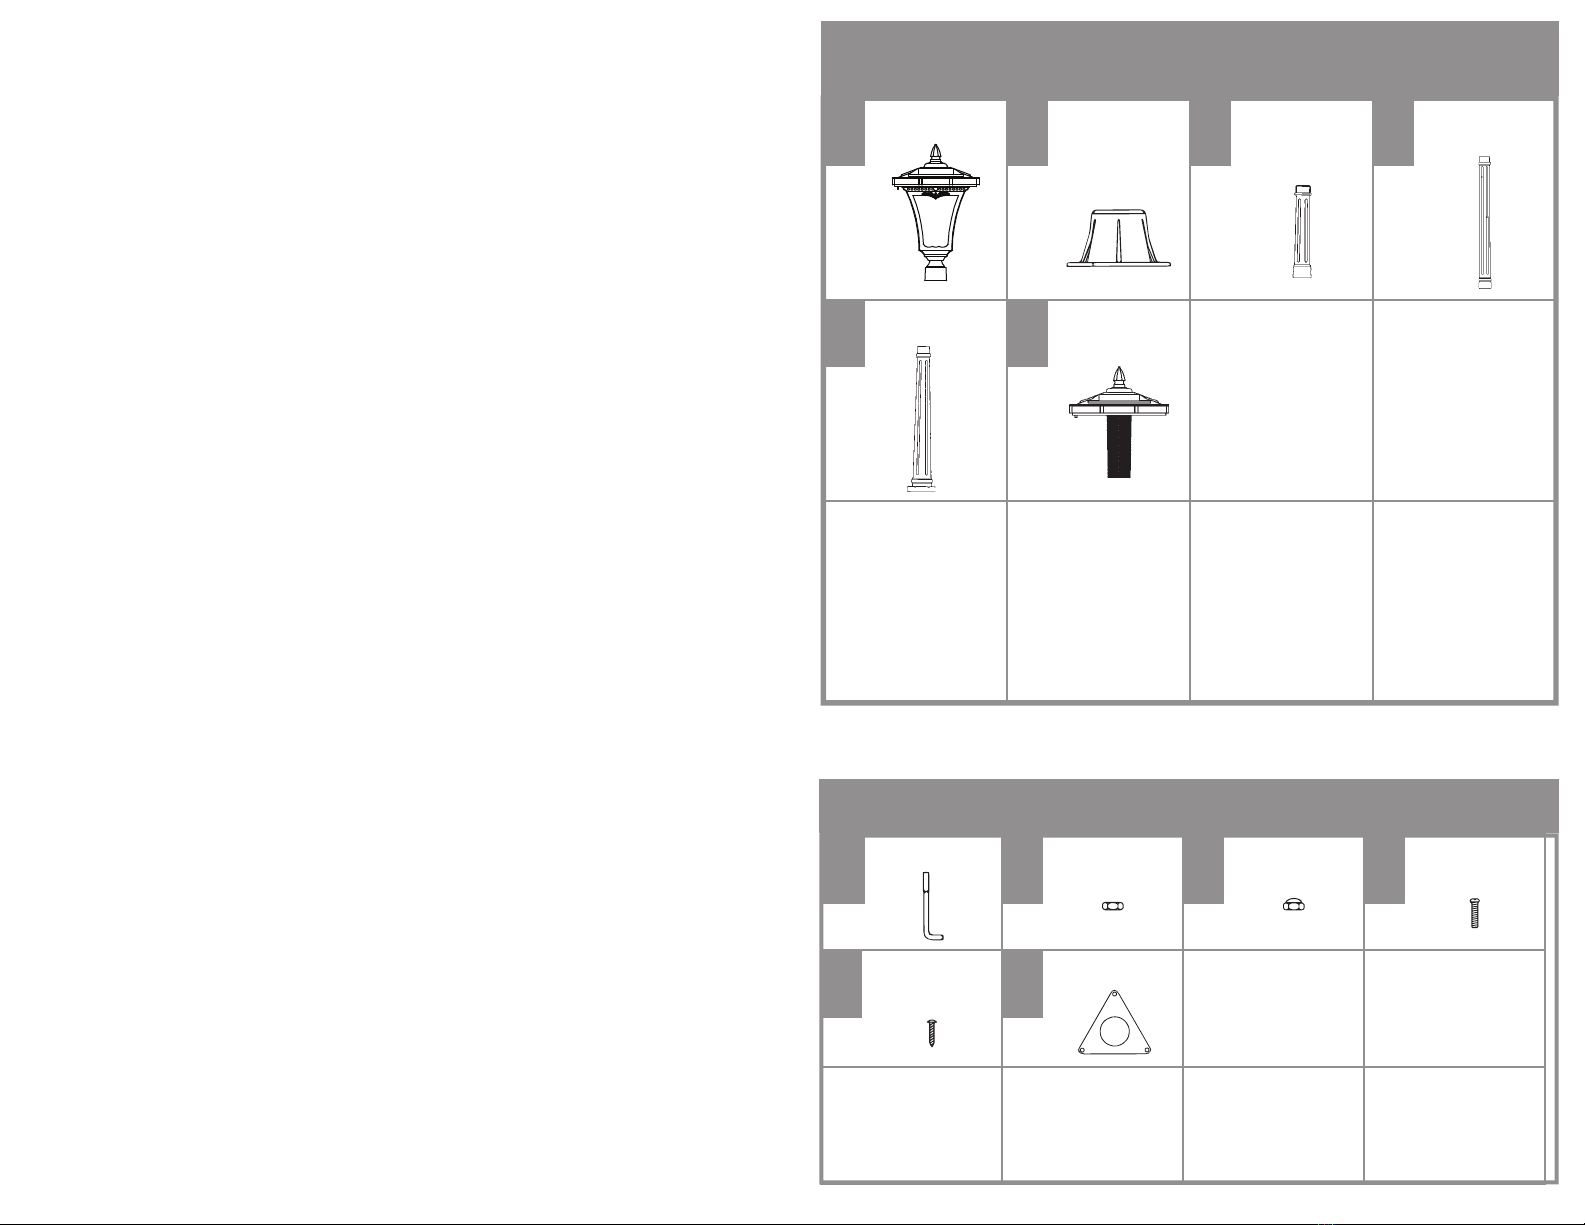
Attach lower lamp post (E) to lamp post base (B) using
screws (K) in 3 places.
Place middle post (D) on the lower post (E) and twist
clockwise to secure.
Place upper post (C) on the middle post (D) and twist
clockwise to secure.
Place the completed lantern assembly (A) onto the
upper lamp ost (C) and twist clock wise to secure.
Remove the screws from the top of the lantern housing
(A) as shown.
Carefully Lift the top of the housing (D), and open the
three battery compartments.
Remove old batteries, replace batteries with new ones
of same rating. Reference polarity direction inside
battery compartment.
Replace lantern top and secure with screws.
Thread hex nut (H) onto the j-bolt (G). Make sure the hex nut is
threaded down the j-bolt far enough for the top of the j-bolt to
fit through the mounting plate (L) and the lamp post base (E)
with enough threads to secure the base to the j-bolts with
acorn nuts (I). Repeaat steps for other j-bolts.
Using mounting plate (L) as a guide insert the j-bolts with hex
nuts into a wet concrete pad until the hex nuts are blow pad
level.
Place the mounting plate (L) onto j-bolts forming a mounting
bracket.
Align the lamp post base (B) holes with the j-bolts and secure
with the acorn nuts (I).
B
E
K K
D
C
A
ON OFF
A
F
J
Other SUNRAY Outdoor Light manuals
Popular Outdoor Light manuals by other brands

LIGMAN
LIGMAN LIGHTSOFT 3 installation manual

SLV Elektronik
SLV Elektronik QUADRASYL D instruction manual

V-TAC
V-TAC VT-730 installation instructions

HEPER
HEPER DOMINO AFX 2 Module Installation & maintenance instructions

Landscape Forms
Landscape Forms Motive installation guide

Quoizel
Quoizel WWD8408IB installation guide