Sunrise Medical DeVilbiss Pulmo-Aide 3655I Manual

DeVilbiss®Compressor/Nebulizer Instruction Guide
Pulmo-Aide®Models 5650C, 5650D, 5650H, 5650I, 5650K & 5650P
PulmoMate®Models 4650D, 4650I & 46502
Pulmo-Aide®Compact Models 3655D, 3655I, 3655K, 3655P & 3655T
CAUTION– Federal (U.S.A.) law restricts this device to sale by, or on the order of a physician.
Made in U.S.A. of U.S. and imported parts. Latex Free.
Models 4650D, 46502, 5650D, & 5650H UL Listed. Model 5650C CSA Listed.
Models 3655D & 3655T Entela Certified to UL1431, CAN/CSA C22.2 No. 601.1 and IEC60601-1.
DeVilbiss®Compresor/Nebulizador Guía de Instrucciones
Pulmo-Aide®Modelos 5650C, 5650D, 5650H, 5650I, 5650K y 5650P
PulmoMate®Modelos 4650D, 4650I y 46502
Pulmo-Aide®Compacto Modelos 3655D, 3655I, 3655K, 3655P y 3655T
PRECAUCION– La ley federal (EE.UU.) restringe la venta de este aparato para ser realizada por, o
bajo prescripción de, un médico.
Hecho en EE.UU. con partes de los EE.UU e importadas. No Contiene Látex.
Modelos 4650D, 46502, 5650D y 5650H Calificado U.L. Modelo 5650C Calificado CSA
Modelos 3655D y 3655T Certificación Entela para UL1431, CAN/CSA C22.2 Nº 601.1, e IEC 60601-1.
Guide d’Instructions du Compresseur/Nébuliseur
DeVilbiss®
Pulmo-Aide® Modèles
5650C, 5650D, 5650H, 5650I, 5650K et 5650P
PulmoMate® Modèles
4650D, 4650I et 46502
Pulmo-Aide® Compact Modèles
3655D, 3655I, 3655K, 3655P et 3655T
ATTENTION– La loi fédérale (États-Unis) limite la vente de ce dispositif par ou sur ordonnance
d’un médecin.
Fabriqué aux États-Unis avec des pièces américaines et importées. Garanti sans Latex.
Modèles 4650D, 46502, 5650D et 5650H Homologué U.L. Modèle 5650C Homologué CSA
Modèles 3655D et 3655T Homologation Entela aux normes UL1431, CAN/CSA C22.2 N° 601.1 et IEC 60601-1

Table of Contents
A-655
2
ENGLISH
IEC Symbols................................................................................... 3
Important Safeguards...................................................................... 3
Model 5650H & 4650D Grounding Instructions.................................... 4
Introduction .................................................................................. 5
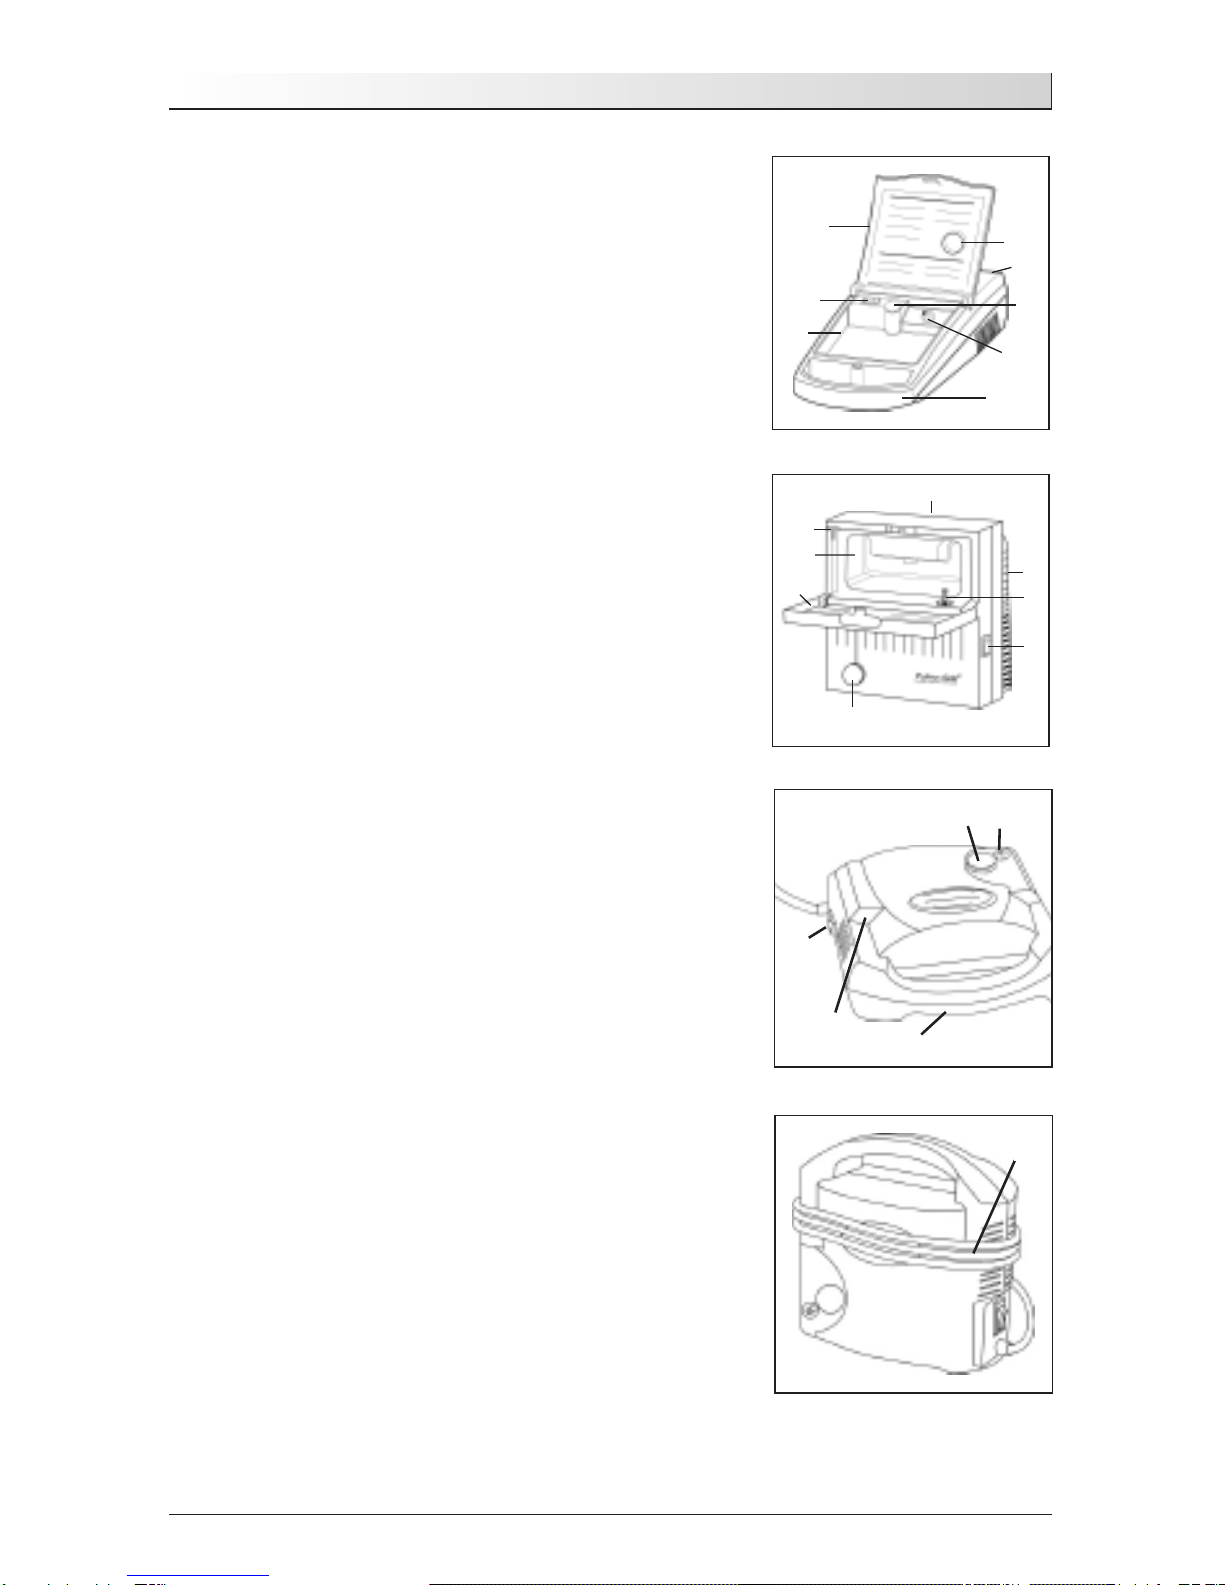
Important Parts of Your DeVilbiss 4650 or 5650 Compressor.................. 6
Important Parts of Your DeVilbiss 3655 Compressor ............................. 6
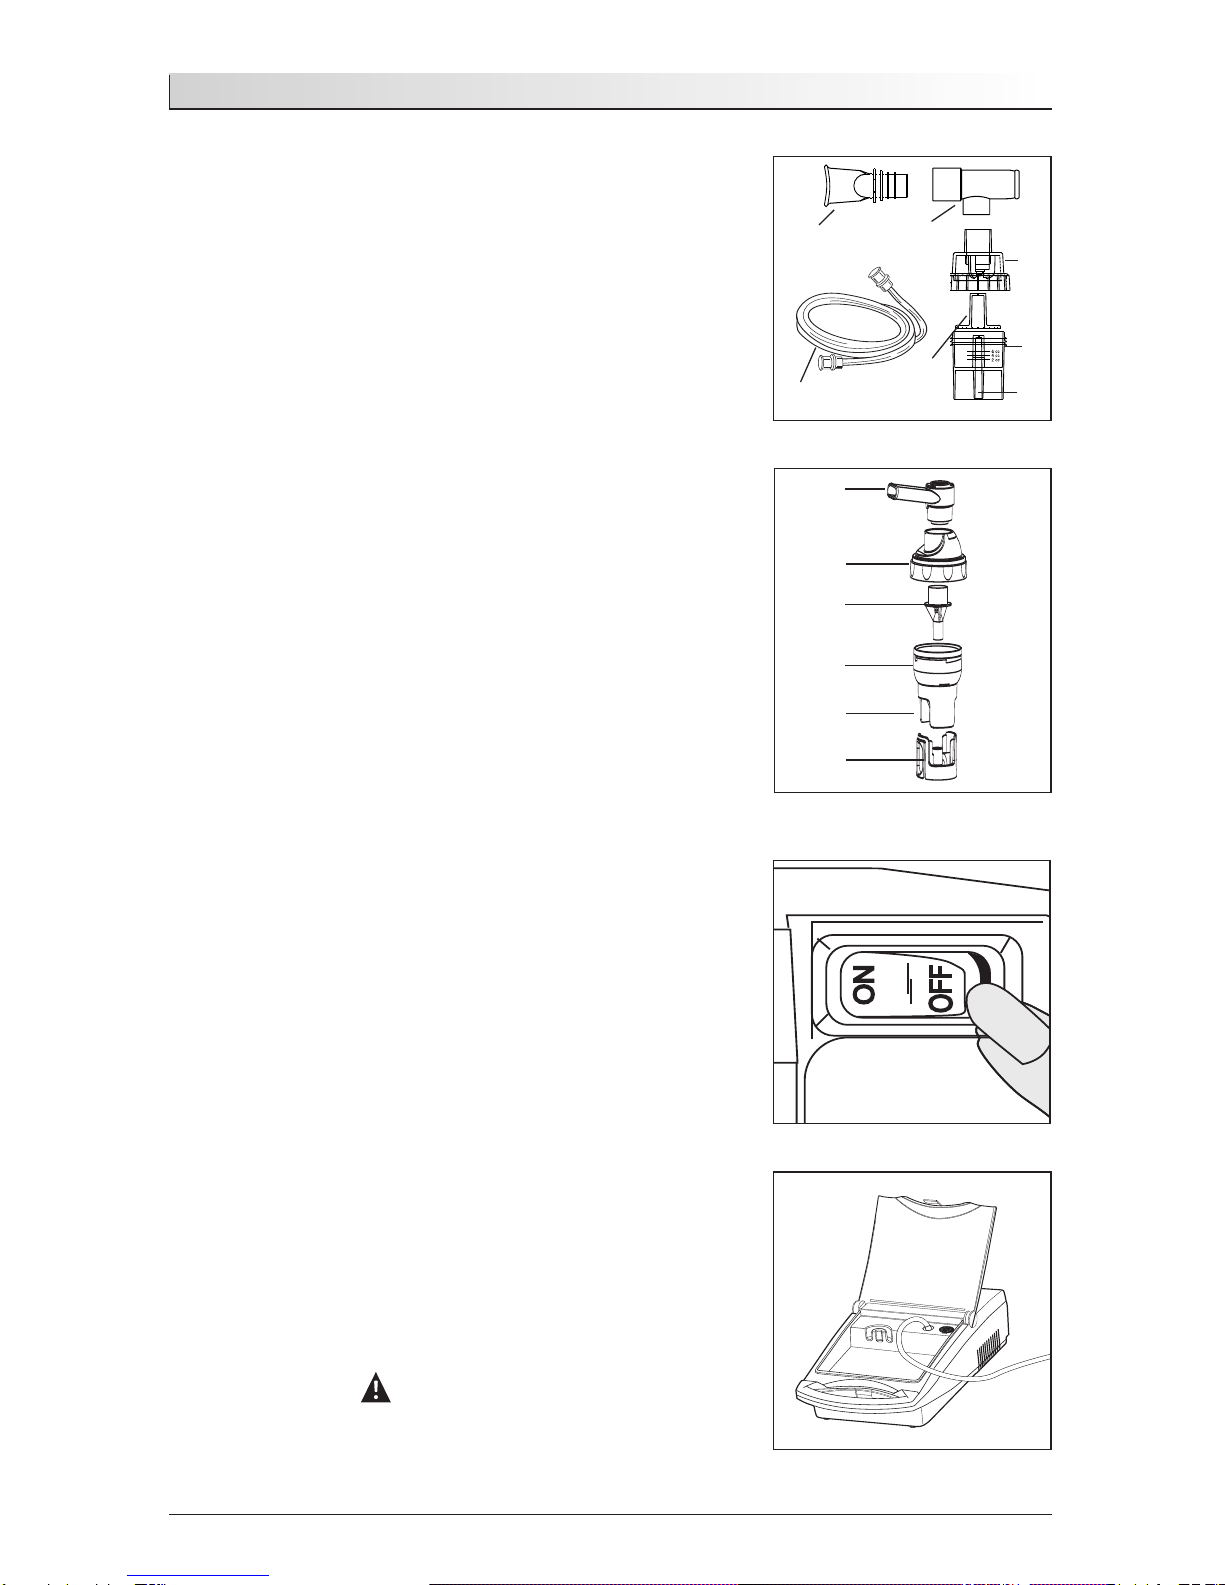
Important Parts of Your Disposable Nebulizer...................................... 7
Important Parts of Your Reusable Nebulizer ........................................ 7
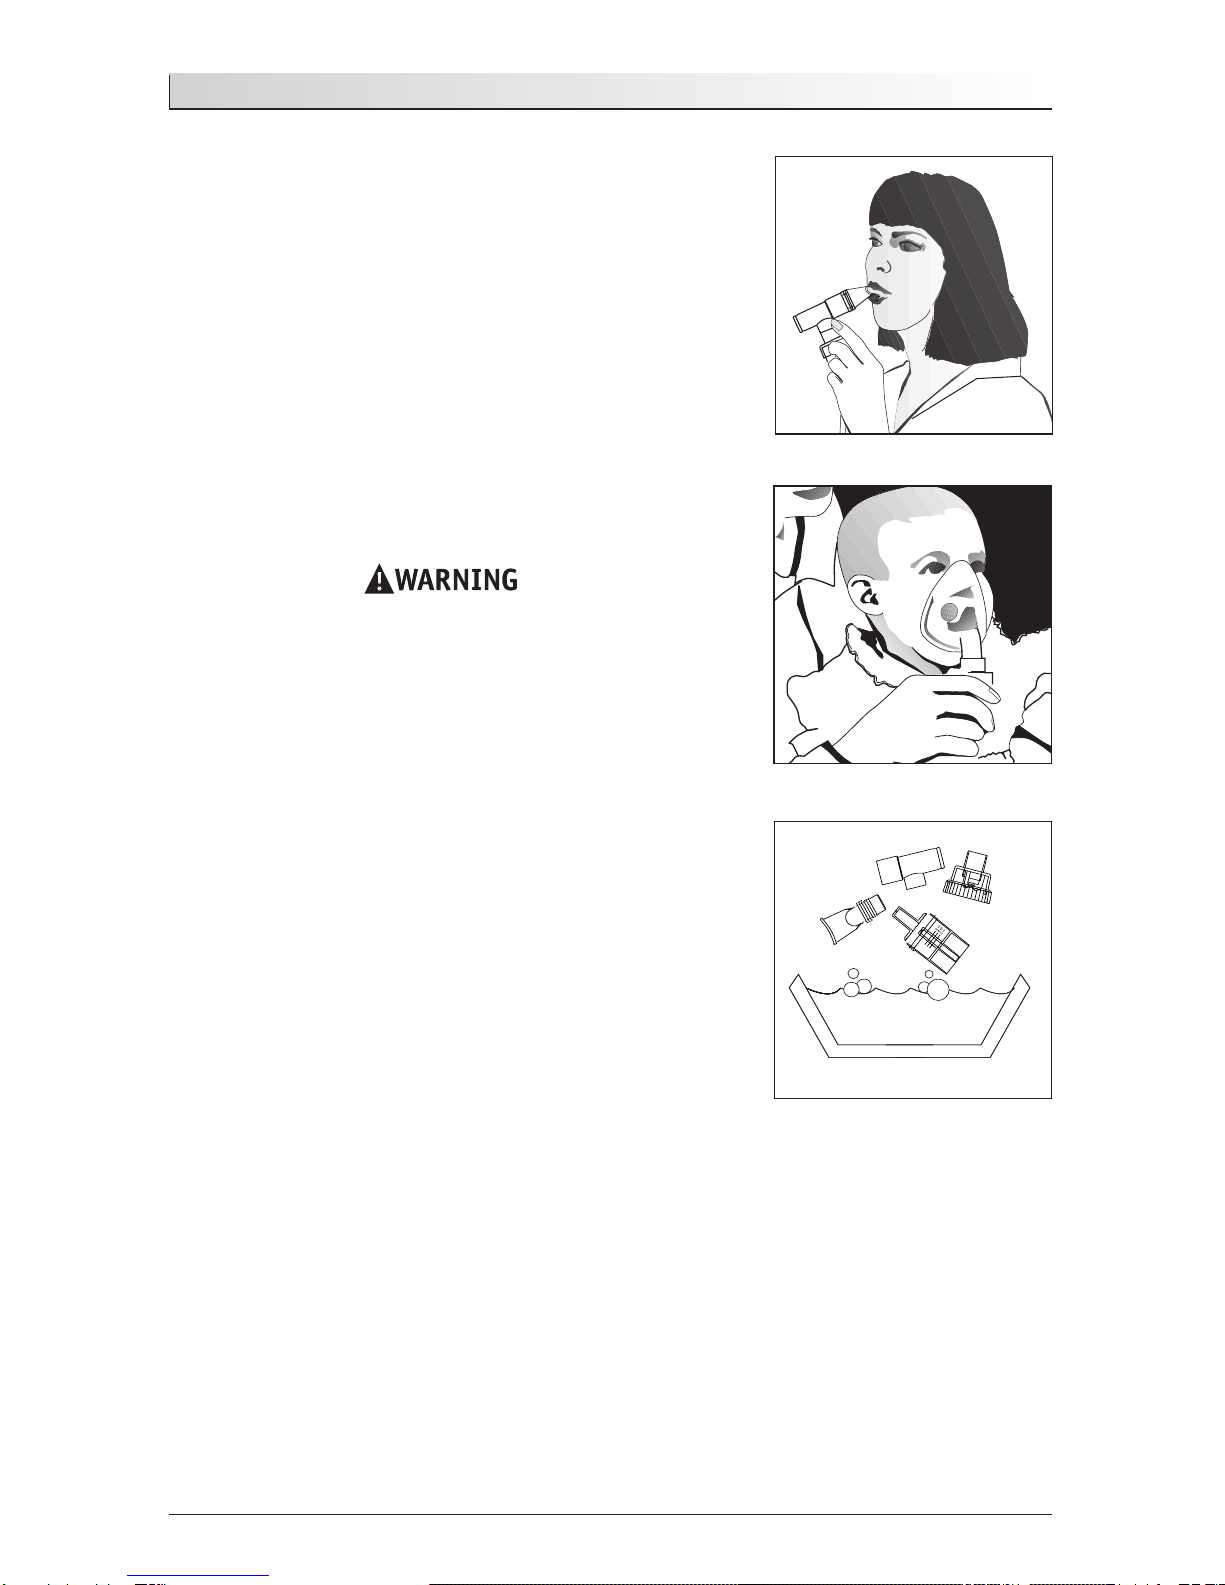
How to Operate Your Compressor....................................................... 7
Nebulizer Cleaning.......................................................................... 9
Compressor Cleaning ....................................................................... 10
Filter Change ................................................................................. 11
Maintenance .................................................................................. 11
Specifications ................................................................................ 12
Warranty........................................................................................ 13
ESPAÑOL
Simbolos IEC.................................................................................. 14
Precauciones Importantes ................................................................ 14
Instrucciones de Puesta a Tierra Para Los Modelos 5650H y 4650D......... 15
Introducción.................................................................................. 16
Partes Importantes de Su Compresor DeVilbiss Modelos 4650 o 5650...... 17
Partes Importantes de Su Compresor DeVilbiss Modelo 3655.................. 17
Partes Importantes de Su Nebulizador Desechable ............................... 18
Partes Importantes de Su Nebulizador Reutilizable............................... 18
Cómo Operar Su Compresor............................................................... 18
Limpieza del Nebulizador................................................................. 20
Limpieza del Compresor................................................................... 21
Cambio de Filtro............................................................................. 22
Mantenimiento............................................................................... 22
Especificaciones ............................................................................. 23
Garantía........................................................................................ 24
FRANÇAIS
Symboles CEI ................................................................................. 25
Mises en Garde Importantes............................................................. 25
Instructions de mise à la terre pour les modèles 5650H et 4650D.......... 26
Introduction .................................................................................. 27
Parties importantes de votre compresseur DeVilbiss modèles 4650/5650. 28
Parties importantes de votre compresseur DeVilbiss modèle 3655........... 28
Pièces importantes de votre nébuliseur jetable ................................... 29
Pièces importantes de votre nébuliseur réutilisable ............................. 29
Comment faire fonctionner le nébuliseur ............................................ 29
Nettoyage du nébuliseur.................................................................. 31
Nettoyage du compresseur ............................................................... 32
Changement du filtre....................................................................... 33
Entretien....................................................................................... 33
Spécifications ................................................................................ 34
Garantie........................................................................................ 35

IEC SYMBOLS
Attention, consult instruction
guide.
Alternating Current
Type BF Applied Part
Double Insulated
This device contains electrical
and/or electronic equipment
that must be recycled per EC
Directive 2002/96/EC - Waste
Electrical and Electronic
Equipment (WEEE)
IMPORTANT SAFEGUARDS
When using electrical products, especially when children are present, basic safety precau-
tions should always be followed. Read all instructions before using. Important information
is highlighted by these terms:
DANGER– Urgent safety information for hazards that will cause serious injury or death.
WARNING–Important safety information for hazards that might cause serious injury.
CAUTION– Information for preventing damage to the product.
NOTE– Information to which you should pay special attention.
READ ALL INSTRUCTIONS BEFORE USING.
DANGER
To reduce the risk of electrocution:
1. Always unplug this product immediately after using.
2. Do not use while bathing.
3. Do not place or store product where it can fall or be pulled into a tub or sink.
4. Do not place in or drop into water or other liquid.
5. Do not reach for a product that has fallen into water. Unplug immediately.
To reduce the risk of burns, electrocution, fire or injury to persons:
1. The product should never be left unattended when plugged in.
2. Close supervision is necessary when this product is used by, on, or near children or
invalids.
3. Use this product only for its intended use as described in this guide. Do not use
attachments not recommended by the manufacturer.
4. Never operate this product if:
a. It has a damaged power cord or plug.
b. It is not working properly.
c. It has been dropped or damaged.
d. It has been dropped into water.
Return the product to an authorized Sunrise service center for examination and repair.
5. Keep the power cord away from heated surfaces.
6. Never block the air openings of the product or place it on a soft surface, such as a
bed or couch, where the air openings may be blocked. Keep the air openings free of
lint, hair, and the like.
7. Never use while drowsy or asleep.
8. Never drop or insert any object into any opening or hose. A-655
Important Safeguards 3

Important Safeguards
A-655
4
9. Do not use outdoors. This product is for household use only.
10.Do not use in an oxygen enriched environment.
11.Connect this product (for grounded models) to a properly-grounded outlet only. See
Grounding Instructions.
12.Do not use this product with a DC to AC converter, or with any AC voltage and/or
frequency other than specified.
13.Do not operate unit in a backpack or carrying bag.
14.Care should be taken when this product is used in the vicinity of other electronic
equipment concerning the possible interference between them. They may need to be
moved apart.
NOTE– This unit employs a temperature and/or current limiting device that will shut off
the entire product should a malfunction occur or in the event of product misuse,
abuse, or abnormal operation. Contact your qualified Sunrise provider for a replace-
ment unit if necessary.
5650–The unit will restart when the motor cools to an acceptable level.
4650/3655–Contact your qualified Sunrise provider for a replacement.
This appliance has a polarized plug (one blade is wider than the other). As a safety fea-
ture, this plug will fit in a polarized outlet only one way. If the plug does not fit fully in
the outlet, reverse the plug. If it still does not fit, contact a qualified electrician. Do not
attempt to defeat this safety feature. If repair or replacement of the cord or plug is neces-
sary, contact your qualified Sunrise provider.
NOTE– The exterior surfaces of the unit and the air outlet connector may become slightly
warm to the touch during use. Warm air can also be felt exiting the vents on the
sides of the case of the unit. This is normal.
MODEL 5650H & 4650D GROUNDING INSTRUCTIONS
This product should be grounded. In the event of an electrical short circuit, grounding
reduces the risk of electric shock by providing an escape wire for the electric current. This
product is equipped with a cord having a grounding wire with a grounding plug. The plug
must be plugged into an outlet that is properly installed and grounded.
DANGER
Improper use of the grounding plug can result in the risk of electric shock.
If repair or replacement of the cord or plug is necessary, contact your qualified Sunrise
provider.
1. This unit is for use on a nominal 115V circuit and has a grounding plug. A temporary
adapter, which looks like the adapter illustrated in Figures B and C, may be used to
connect this plug to a 2-pole receptacle (as shown in Figure B) if a properly grounded
outlet is not available. The temporary adapter should be used only until a qualified
electrician can install a properly grounded outlet (Figure A). The grounding ear, lug,
or wire extending from the adapter must be connected to a permanent ground such as
a properly grounded outlet box cover. Whenever the adapter is used, it must be held
in place by the metal screw.

A-655
Important Safeguards / Introduction 5
2. If it is necessary to use an extension cord, use only a 3-wire extension cord that
has a three-blade grounding plug, and a 3-slot receptacle that will accept the plug
on the unit. If power cord is damaged do not use unit, and contact a qualified
Sunrise Medical provider.
SAVE THESE INSTRUCTIONS
INTRODUCTION
Your doctor has prescribed a liquid medication to treat your respiratory condition. To best
utilize this liquid medication, he has prescribed a DeVilbiss brand compressor/nebulizer.
Your DeVilbiss compressor/nebulizer works to convert the medication to a high-quality mist
of fine particles that penetrates deep into the lungs.
Be sure that you read and understand the information in this instruction guide. By follow-
ing these simple instructions and the advice of your physician, your compressor will
become an effective addition to your therapeutic routine.
Statement of Intended Use
The DeVilbiss compressor/nebulizer includes an AC powered air compressor that provides a
source of compressed air for home health care use. The compressor is used in conjunction
with a jet (pneumatic) nebulizer to convert certain inhalable drugs into an aerosol form for
inhalation by a patient. The device can be used with adult or pediatric patients.
NOTE– If using a nebulizer other than one distributed by Sunrise Medical, verify that the
pressure and/or flow characteristics of the nebulizer (while driven by the DeVilbiss
compressor) meet the nebulizer manufacturer’s recommendation.
Grounded Outlet Box
Grounded
Outlet
Grounding Pin
Adapter
Tab for
Grounding Screw
AC
B

Important Parts of Your Compressor
A-655
6
IMPORTANT PARTS OF YOUR DEVILBISS 4650
OR 5650 COMPRESSOR (Figures A & B)
1. Storage compartment
2. Storage compartment door with operating instructions
3. Power switch
4. Filter cap
5. Air-outlet connector
6. Carrying handle
7. Power cord storage
8. Nebulizer holder
NOTE– Models 4650D & 5650H are equipped with a three-
prong plug and must be grounded. All other models
are equipped with a two-prong plug.
IMPORTANT PARTS OF YOUR DEVILBISS 3655
COMPRESSOR (Figures C & D)
1. Power switch
2. Filter (non-washable)
3. Air-outlet connector
4. Carrying handle
5. Power cord storage recess
1
3
4
25
6
134
2
5
7
7
8
8
Figure A– 4650
Figure B– 5650
6 (on back)
Figure C– 3655
1
23
4
5
Figure D– 3655
5

A-655
Important Parts of Your Nebulizer 7
IMPORTANT PARTS OF YOUR DISPOSABLE NEBULIZER
1. Mouthpiece
2. T-piece
3. Cap
4. Medication Cup
5. Nebulizer Air-Inlet Connector
6. Baffle
7. Tubing
Nebulizer parts are not sold separately. Additional nebulizers
(part #4650D-621) are available through your Sunrise provider.
IMPORTANT PARTS OF YOUR REUSABLE NEBULIZER
1. Mouthpiece
2. Cap
3. Baffle
4. Medication Cup
5. Nebulizer Air-Inlet Connector
6. Interrupter Adapter (if applicable)
Nebulizer parts are not sold separately. Additional nebuliz-
ers (part #s 800D/800C/800G) are available through your
Sunrise provider.
HOW TO OPERATE YOUR COMPRESSOR
NOTE– Before initial operation, your nebulizer should be
cleaned following cleaning instructions, or as recom-
mended by your physician or Sunrise provider.
Models 4650 & 5650 (Steps 1-3 and Steps 4-12)
1. Place compressor on a level, sturdy surface so that
the controls can be easily reached when seated. Never
block the air openings of the product or place it on a
soft surface, such as a patient’s lap or a bed or couch
where the air openings may be blocked.
2. Open door to storage compartment.
3. Make sure the power switch is in the “Off” position
(Fig. 1). Unwrap power cord and plug power cord into
an appropriate wall outlet (refer to Specifications).
Plug models 5650H & 4650D into a grounded wall
outlet (refer to Grounding Instructions).
DANGER
DeVilbiss compressor/nebulizer must be operated on
the specified power source to avoid risk of electric
shock and damage to the compressor.
12
4
5
3
6
7
1
2
4
3
6
5
Reusable Nebulizer
Disposable Nebulizer
Figure 1
Figure 2

How to Operate Your Compressor
A-655
8
Models 3655 (Steps 1-3 and Steps 4-12)
1. Make sure the power switch is in the “Off” position
(Fig. 1) and unwrap power cord.
2. Place compressor so that the rubber feet are resting
on a level, sturdy surface (Fig. 3) and upon which
the controls can be easily reached when seated. Never
block the air openings of the product or place it on a
soft surface, such as a patient’s lap or a bed or couch
where the air openings may be blocked.
3. Plug power cord into an appropriate wall outlet.
DANGER
DeVilbiss compressor/nebulizer must be operated on
the specified power source to avoid risk of electric
shock and damage to the compressor.
All Models (Steps 4-12)
4. Wash hands.
5. Connect one end of the nebulizer tubing to the com-
pressor air-outlet connector (Fig. 2 or 3).
NOTE–During high-humidity weather conditions, condensation
(water build up) can occur in the nebulizer tubing.
6. Assemble clean nebulizer parts by placing baffle
down in medication cup. Add prescribed medication
into the medication cup (Fig. 4). Holding cup sta-
tionary, screw on nebulizer cap (Fig 5).
7. Assemble mouthpiece and t-piece (if applicable) and
insert into the top of the nebulizer cap. If using an
aerosol mask, insert the bottom part of the mask
directly into the top of the nebulizer cap.
8. Attach tubing to nebulizer air-inlet connector (Fig. 6).
9. Press the power switch “On” (Fig. 1) to start the
compressor.
10.Begin treatment by placing the mouthpiece between
teeth. With mouth closed, inhale deeply and slowly
through mouth as aerosol begins to flow, then
exhale slowly through the mouthpiece (Fig. 7). If
treatment needs to be interrupted, simply press
power switch “Off.”
NOTE–Your physician may recommend a specific breathing
pattern during treatment. If so, follow his/her
recommendations.
Figure 3
Figure 6
Figure 4
Figure 5

A-655
Cleaning 9
11.If an aerosol mask is used, place the mask over
mouth and nose (Fig. 8). As aerosol begins to flow,
inhale deeply and slowly through mouth, then
exhale slowly.
12.When treatment is complete, turn unit off by press-
ing the power switch to the “Off” position. Unplug
the unit from the wall power outlet.
NEBULIZER CLEANING
All parts of the nebulizer, except tubing, should be cleaned
according to the following instructions. Your physician
and/or Sunrise provider may specify a certain cleaning proce-
dure. If so, follow their recommendations.
To prevent possible risk of infection from contami-
nated medication, cleaning of the nebulizer is rec-
ommended after each aerosol treatment.
Disinfecting is recommended once a day.
Clean After Every Use:
1. With power switch in the “Off” position,
unplug power cord from wall outlet.
2. Disconnect tubing from the air-inlet connector and
set aside.
3. Disassemble mouthpiece or mask from cap. Open
nebulizer by turning cap counterclockwise and
removing baffle.
4. Wash all items, except tubing, in a hot water/dish-
washing detergent solution. Rinse under hot tap
water for 30 seconds to remove detergent residue.
Allow to air dry.
5. For reusable nebulizer only, clean daily in dishwash-
er using top shelf.
CAUTION– The DeVilbiss Reusable Nebulizer is dishwasher
safe, but do not place any DeVilbiss Disposable
Nebulizer parts in an automatic dishwasher;
doing so could cause damage.
Figure 7
Figure 8
Figure 9

Cleaning
A-655
10
Disinfect Daily:
1. Using a clean container or bowl, soak items in three parts hot water to one
part white vinegar for 30 minutes (Fig. 9) OR use a medical bacterial-germici-
dal disinfectant available through your provider. Be sure to follow manufactur-
er's instructions carefully.
2. With clean hands, remove items from disinfectant solution, rinse under hot tap
water, and air dry on a clean paper towel. Store in a zip-lock bag.
NOTE– Do not towel dry nebulizer parts; this could cause contamination.
To prevent possible risk of infection from contaminated cleaning solutions,
always prepare fresh solution for each cleaning cycle and discard solution
after each use.
3. Keep the outer surface of the tubing dust-free by wiping regularly. Nebulizer
tubing does not have to be washed because only filtered air passes through it.
NOTE– The DeVilbiss Disposable Nebulizer will last at least 15 days and possibly longer,
depending on usage. Proper cleaning will also help extend the life of the nebu-
lizer. Because it is disposable, we recommend that an extra nebulizer be kept on
hand at all times. Sunrise also manufactures the DeVilbiss Reusable Nebulizer
that is dishwasher safe and may be cleaned and reused for up to one year.
COMPRESSOR CLEANING
1. With power switch in the "Off" position, unplug power cord from wall outlet.
2. Wipe outside of the compressor cabinet with a clean damp cloth every few days
to keep dust-free. DANGER
Do not submerge in water; doing so will result in compressor damage.

A-655
Filter Change / Maintenance 11
FILTER CHANGE
Models 4650 & 5650
1. Filter should be changed every 6 months or sooner if filter turns completely
gray in color.
2. Remove filter cap by grasping it firmly and pulling out of the unit
(Figs. A or B).
3. Remove dirty filter with fingers and discard.
4. Replace with a new DeVilbiss filter (part #5650D-602). Additional filters should
be purchased from your Sunrise provider.
5. Push filter cap with new filter into position.
CAUTION– Do not reuse or wash filter or substitute any other material such as cotton
for a DeVilbiss air-inlet filter. It will result in compressor damage.
NOTE– An extra filter is packaged with the 4650 & 5650 series units.
Model 3655
1. Filter should be changed every 6 months or sooner if filter discolors.
2. Remove filter (Fig. C) by grasping it firmly and pulling out of the unit.
Discard old filter.
3. Replace with a new DeVilbiss filter (part #3655D-601). Additional filters should
be purchased from your Sunrise provider.
4. Push new filter into position.
CAUTION– Do not reuse or wash filter or substitute any other material such as cotton
for a DeVilbiss air-inlet filter. It will result in compressor damage.
MAINTENANCE
All maintenance must be performed by a qualified Sunrise provider or authorized ser-
vice center. DANGER
Electric shock hazard. Do not remove compressor cabinet. All disassembly and
maintenance must be done by a qualified Sunrise provider.

Specifications
A-655
12
SPECIFICATIONS
Size 3655 Series...................7.5" W x 4.0" H x 7.2" D (19.1 cm x 10.2 cm x 18.3 cm)
4650 Series ..............................7" W x 3.8" H x 13" D (18 cm x 10 cm x 33 cm)
5650 Series .......................10.1" W x 10.5" H x 6.5" D (26 cm x 27 cm x 17 cm)
Weight 3655 Series.....................................................................4.8 lbs. (2.18 kg)
4650 Series.....................................................................5.3 lbs. (2.40 kg)
5650 Series ......................................................................7.1 lbs. (3.2 kg)
Electrical
Requirements 3655D, 3655T, 4650D & 46502...........2.5 amps, 115 VAC (±10%) 60 Hz
3655I & 4650I.................................1.4 amps, 230 VAC (±10%) 50 Hz
3655K & 3655P................................1.4 amps, 230 VAC (±10%) 60 Hz
5650D, 5650H & 5650C ..................................1.3 amps, 115VAC 60Hz
5650I ..........................................................0.8 amps, 230VAC 50Hz
5650K & 5650P ........................................0.8 amps, 230VAC 50/60Hz
Sound Level 3655 Series ...........................................................................58 dBA
4650 Series............................................................................53 dBA
5650 Series............................................................................51 dBA
Power Consumption 3655D, 3655T, 4650D & 46502.....................140 watts maximum
3655I, 3655K, 3655P & 4650I .....................160 watts maximum
5650D, 5650H & 5650C ................................90 watts maximum
5650I, 5650K & 5650P ...............................100 watts maximum
Maximum Compressor Pressure 3655 & 4650 series.......35 psig or greater (241 kPa)*
5650 series..................30 psig or greater (206 kPa)*
Compressor Free Air Flow 3655 & 4650........................................8 lpm or greater*
5650...................................................9 lpm or greater*
Operating
Temperature Range all Models except 5650C................+40° to +104°F (+5 to +40°C)
5650C......................................+40° to +101°F (+5 to +38.5°C)
Operating Humidity all Models .......................................up to 95% non-condensing
Storage/Transport Temperature Range all Models......-40° to +158°F (-40° to +70°C)
Storage/Transport Humidity all Models............................up to 95% non-condensing
Supplied Nebulizer Capacity all models....................................................6 ml (cc)
Supplied Nebulizer Nebulization Rate all models.......................0.15 ml/min or greater*
Supplied Nebulizer MMAD all models.........................................5 microns or less**
*Conditions may vary based on altitude above sea level, barometric pressure, and temperature.
**Value determined with minimum flow rate through the nebulizer (20°C, sea level).
There are no hazardous materials used in the construction of this unit, therefore, there
are no known risks associated with disposal of the equipment.
This product (models 3655D & 3655T) complies with the following electromagnetic
compatibility standard: IEC 60601-1-2:2nd Edition
3655D & 3655T Equipment Classifications:
Protection against electric shock:................................................................Class II
Degree of protection against electric shock:.................................................Type BF
Equipment not suitable for use in the presence of flammable anaesthetic mixture with
air or with oxygen or nitrous oxide
Mode of operation:.................................................................Continuous operation

A-655
Warranty 13
FIVE-YEAR LIMITED WARRANTY ON COMPRESSOR PARTS
All DeVilbiss Compressor models are warranted to be free from defective workmanship and
material for a period of five years from the date of purchase. Any defective part(s) will be
repaired or replaced at Sunrise’s option if the unit has not been tampered with or used
improperly during that period. Make certain that any malfunction is not due to inadequate
cleaning or failure to follow the instructions. If repair is necessary, contact your authorized
Sunrise provider or Sunrise Service Department at 800-333-4000 (814-443-4881) (Canada
800-263-3390 or 905-660-2459) for instructions. NOTE— This warranty does not cover pro-
viding a loaner compressor, compensating for costs incurred in compressor rental while said
unit is under repair, or costs for labor incurred in repairing or replacing defective part(s).
THERE IS NO OTHER EXPRESS WARRANTY. IMPLIED WARRANTIES, INCLUDING THOSE OF MER-
CHANTABILITY AND FITNESS FOR A PARTICULAR PURPOSE, ARE LIMITED TO THE DURATION OF
THE EXPRESS LIMITED WARRANTY AND TO THE EXTENT PERMITTED BY LAW ANY AND ALL IMPLIED
WARRANTIES ARE EXCLUDED. THIS IS THE EXCLUSIVE REMEDY AND LIABILITY FOR CONSEQUEN-
TIAL AND INCIDENTAL DAMAGES UNDER ANY AND ALL WARRANTIES ARE EXCLUDED TO THE
EXTENT EXCLUSION IS PERMITTED BY LAW. SOME STATES DO NOT ALLOW LIMITATIONS ON HOW
LONG AN IMPLIED WARRANTY LASTS, OR THE LIMITATION OR EXCLUSION OF CONSEQUENTIAL OR
INCIDENTAL DAMAGES, SO THE ABOVE LIMITATION OR EXCLUSION MAY NOT APPLY TO YOU.
This warranty gives you specific legal rights, and you may also have other rights which vary
from state to state.
MANUFACTURER'S NOTE
Thank you for choosing a DeVilbiss compressor/nebulizer. We want you to be a satisfied
customer. If you have any questions or comments, please send them to our address on the
back of this manual.
FOR SERVICE CALL YOUR AUTHORIZED SUNRISE PROVIDER:
____________________________________________________
____________________________________________________
____________________________________________________
Phone ___________________________________________________
Purchase Date _____________________________________________
Serial # __________________________________________________

Precauciones Importantes
A-655
14
PRECAUCIONES IMPORTANTES
Cuando use productos eléctricos, especialmente cuando hay niños presentes, siempre deben
tomarse las precauciones básicas de seguridad. Lea todas las instrucciones antes de usar el
aparato. Se enfatiza la información importante por medio de estos términos:
PELIGRO– Información de seguridad urgente que involucra riesgos que puedan causar
lesiones serias o incluso la muerte.
ADVERTENCIA–Información de seguridad importante para riesgos que pudieran causar
lesiones serias.
PRECAUCION– Información para evitar daño al producto.
NOTA– Información a la que debe prestar atención especial.
LEA TODAS LAS INSTRUCCIONES ANTES DE USARLO.
PELIGRO
Para reducir el riesgo de electrocutación:
1. Siempre desconecte este producto inmediatamente después de usarlo.
2. No lo use cuando se bañe.
3. No coloque ni guarde el producto donde se pueda caer a la bañera o al lavabo.
4. No lo ponga ni lo deje caer en agua o en otro líquido.
5. No toque el producto que cayó en el agua. Desconéctelo inmediatamente.
ADVERTENCIA
Para reducir el riesgo de quemaduras, electrocutación, incendio, o lesiones a personas:
1. Nunca se debe dejar desatendido un producto cuando esté conectado.
2. Es necesario mantener una supervisión cercana cuando se use este producto con o
cerca de niños o inválidos.
3. Utilice este producto exclusivamente para lo que fue hecho, tal como se describe en
la guía. No use aditamentos que no recomiende el fabricante.
4. Nunca opere este producto si:
a) Tiene el cordón o el enchufe deteriorado.
b) No funciona apropiadamente.
c) Se ha caído o descompuesto.
d) Se ha caído en el agua.
Regrese el producto a un centro de servicio autorizado de Sunrise para ser examina-
do y reparado.
5. Mantenga el cordón lejos de superficies calientes.
6. Nunca bloquee las aberturas de aire del producto ni lo ponga en una superficie blan-
da, como una cama o sofá, donde se puedan bloquear las entradas de aire. Mantenga
las entradas de aire sin pelusa, pelo y otros objetos similares.
SIMBOLOS IEC
Atención, consulte la guía de
instrucciones
Corriente alterna
Parte aplicada Tipo BF
Doble aislamiento
Este aparato contiene equipo
eléctrico y/o electrónico que
debe ser reciclado de acuerdo
a la Norma EC 2002/96/EC –
Equipo Eléctrico y Electrónico
Residual (WEEE)

A-655
Precauciones Importantes 15
7. Nunca lo use cuando esté somnoliento o adormecido.
8. Nunca deje caer ni introduzca un objeto en ninguna abertura o manguera del producto.
9. No lo use en exteriores. Este producto es para usarse solamente en el hogar.
10.No lo use en un ambiente enriquecido de oxígeno.
11.Conecte este producto (para los modelos a tierra) a una toma de corriente puesta a
tierra apropiadamente. Vea las Instrucciones de Puesta a Tierra.
12.No utilice este producto con un transformador de CC a CA ni con un voltaje de CA y/
o frecuencia diferente de la que se especifica.
13.No utilice la unidad dentro de una mochila o una bolsa.
14.Hay que tener mucho cuidado al utilizar este producto cerca de otros equipos elec-
trónicos, ya que pueden producirse interferencias entre ellos. Es posible que sea
necesario separarlos.
NOTA– La unidad emplea un limitador térmico y/o de corriente que apagará la unidad en
caso de mal funcionamiento o en caso de mal uso, abuso o funcionamiento anormal
de la unidad. Póngase en contacto con el proveedor calificado de Sunrise para reem-
plazar la unidad si es necesario.
5650– La unidad se pondrá en funcionamiento nuevamente cuando el motor se
enfríe a un nivel aceptable.
4650/3655– Póngase en contacto con el proveedor calificado de Sunrise para reem-
plazar alguna pieza.
Este aparato lleva un enchufe polarizado (una clavija es más ancha que la otra). Como
medida de seguridad, este enchufe podrá entrar en un tomacorriente polarizado en una sola
posición. Si no logra introducir el enchufe completamente en el tomacorriente, déle la
vuelta. Si continúa sin entrar, póngase en contacto con un electricista cualificado. No
intente alterar esta medida de seguridad. Si es necesario reemplazar el cable o el enchufe,
póngase en contacto con su proveedor de Sunrise autorizado.
NOTA–Las superficies exteriores del equipo y el conector de salida pueden estar ligeramente
calientes al tacto durante el uso. También se puede sentir aire caliente saliendo de
los orificios de ventilación en los laterales de la caja de la unidad. Esto es normal.
INSTRUCCIONES DE PUESTA A TIERRA PARA LOS MODELOS 5650H Y 4650D
Este producto deberá estar a tierra. En caso de un cortocircuito eléctrico, la puesta a tierra
reduce el riesgo de choque eléctrico al proveer un alambre de escape para la corriente eléc-
trica. Este producto está equipado con un cordón eléctrico que tiene un alambre a tierra
con una clavija para puesta a tierra. La clavija deberá estar conectada a una toma de corri-
ente que esté instalada y puesta a tierra apropiadamente.
PELIGRO
El uso inapropiado del enchufe a tierra puede traer como resultado el riesgo de
choque eléctrico.
Si es necesaria la reparación o reemplazo del cordón eléctrico, haga contacto con su
proveedor calificado de Sunrise.
1. Esta unidad es para uso en un circuito nominal de 115V y tiene un enchufe a tierra.
Se puede utilizar un adaptador temporal, similar al que se muestra en las Figuras B y

Precauciones Importantes
A-655
16
C, para conectar este enchufe en un tomacorriente bipolar (como se muestra en la
Figura B) si no se encuentra disponible un tomacorriente puesto a tierra debida-
mente. El adaptador temporal debe usarse solamente hasta que un electricista califi-
cado pueda instalar un tomacorriente puesto a tierra debidamente (Figura A). El
saliente para toma de tierra, pestaña o cable que sobresale del adaptador debe estar
conectado a una toma de tierra permanente como la tapa de una caja de empalme
con toma de tierra adecuada. Cuando se use el adaprador debe mantenerse en su
lugar con un tornillo metálico.
2. Si es necesario utilizar una extensión, use solamente una extensión con tres conduc-
tores que tiene un enchufe a tierra de tres puntas y un tomacorriente de tres ranuras
en el que podrá enchufarse la unidad. Si el cable de energía se encuentra dañado no
use la unidad, póngase en contacto con el proveedor calificado de Sunrise.
GUARDE ESTAS INSTRUCCIONES
INTRODUCCIÓN
Su médico le ha prescrito un medicamento líquido para el tratamiento de su estado respirato-
rio. Para utilizar de la mejor manera el medicamento líquido, ha prescrito un compresor/ neb-
ulizador DeVilbiss. El compresor/nebulizador DeVilbiss funciona para convertir el medicamento
en una neblina de alta calidad de finas partículas que penetran dentro de los pulmones.
Asegúrese de leer y entender la información en esta guía de instrucciones. Al seguir estas
sencillas instrucciones y el consejo de su médico, su compresor se convertirá en un auxiliar
efectivo de su rutina terapéutica.
Enunciado de uso idóneo
El compresor/nebulizador DeVilbiss incluye un compresor de aire de CA que proporciona una
fuente de aire comprimido para el cuidado médico en el hogar. El compresor se usa, junto
con un nebulizador a chorro (neumático) en la conversión de ciertas medicinas respirables
en aerosoles para que sean inhaladas por el paciente. El dispositivo puede utilizarse con
pacientes adultos o pediátricos.
NOTA—Si utiliza un nebulizador que no haya sido distribuido por Sunrise Medical, verifique
que las características de presión y/ o flujo del nebulizador (mientras funcione con
el compresor DeVilbiss) se ajustan a las recomendaciones del fabricante del nebu-
lizador.
Receptáculo de la Toma Eléctrica Conectada a Tierra
Toma eléctrica
conectada a
tierra
Varilla a tierra
Adaptor
Aleta para el
tornillo a tierra
AC
B

A-655
Partes Importantes 17
PARTES IMPORTANTES DE SU COMPRESOR
DEVILBISS MODELOS 4650 O 5650
(Figuras A y B)
1. Compartimiento para guardar
2. Puerta del compartimiento para guardar con instruc-
ciones de operación
3. Interruptor de corriente
4. Tapa del filtro
5. Conector de salida de aire
6. Mango de transporte
7. Depósito para cordón eléctrico
8. Soporte del nebulizador
NOTA– Los modelos 4650D y 5650H están equipados con un
enchufe de tres clavijas y deben ser puestos a tierra.
Todos otros están equipados con un enchufe de dos
clavijas.
PARTES IMPORTANTES DE SU COMPRESOR
DEVILBISS MODELO 3655 (Figuras C y D)
1. Interruptor de corriente
2. Filtro (no lavable)
3. Conector de salida de aire
4. Mango de transporte
5. Rebaje para la recogida del cable de corriente
1
3
4
25
6
134
2
5
7
7
8
8
Figura A– 4650
Figura B– 5650
6
Figura C– 3655
1
23
4
5
Figura D– 3655
5

Partes Importantes
A-655
18
Figura 2
PARTES IMPORTANTES DE SU NEBULIZADOR
DESECHABLE
1. Pieza bucal
2. Pieza-T
3. Tapa
4. Copa del medicamento
5. Conector de entrada del aire
6. Deflector
7. Conducto
Las partes del nebulizador se venden por separado. Se cuen-
ta con nebulizadores adicionales (parte No. 4650D-621) que
puede conseguir a través de su distribuidor Sunrise.
PARTES IMPORTANTES DE SU NEBULIZADOR
REUTILIZABLE
1. Pieza bucal
2. Tapa
3. Deflector
4. Copa del Medicamento
5. Conector de entrada del aire
6. Adaptor de interruptor (en caso de usarlo)
Las partes del nebulizador se venden por separado. Se cuenta
con nebulizadores adicionales (parte no. 800D/800C/800G)
que puede conseguir a través de su distribuidor Sunrise.
CÓMO OPERAR SU COMPRESOR
NOTA– Antes de la operación inicial, se debe limpiar el nebu-
lizador siguiendo las instrucciones, o como lo
recomiende su médico o el distribuidor Sunrise.
Modelos 4650 y 5650 (Pasos 1-3 y pasos 4-12)
1. Coloque el compresor en una superficie nivelada,
sólida de tal forma que se puedan alcanzar los con-
troles con facilidad cuando esté sentado. Nunca blo-
quee las aberturas de aire del producto ni lo ponga
en una superficie blanda, como el regazo del
paciente una cama o sofá, donde se puedan bloquear
las entradas de aire.
2. Levante la puerta y muévala para abrir el compar-
timiento para guardar.
3. Asegúrese que el interruptor de corriente esté en la
posición de apagado (“Off”) (Fig. 1). Desenrolle el
cordón y conecte el cordón eléctrico en la toma eléc-
12
4
5
3
6
7
1
2
4
3
5
6
Nebulizador Reutilizable
Nebulizador Desechable
Figura 1

A-655
Cómo Operar su Compresor 19
trica de pared apropiada (vea las Especificaciones).
Enchufe los modelos 5650H y 4650D en un tomacorri-
ente puesto a tierra (vea las Instrucciones Para la
Puesta a Tierra al reverso).
PELIGRO
El compresor/nebulizador DeVilbiss debe operarse
en la fuente de poder específica para evitar una
descarga eléctrica y dañar el compresor.
Modelos 3655 (Pasos 1-3 y pasos 4-12)
1. Asegure que el interruptor de corriente se encuentra
en la posición "OFF" (Fig. 1) y desenrolle el cable de
corriente.
2. Coloque el compresor de tal manera que las patas de
goma reposen en una superficie plana y estable (Fig.
3) y en la que se pueda acceder fácilmente a los
controles cuando se esté sentado. Nunca bloquee las
aberturas de aire del producto ni lo ponga en una
superficie blanda, como el regazo del paciente una
cama o sofá, donde se puedan bloquear las entradas
de aire.
3. Enchufe el cable de corriente a un enchufe de pared.
PELIGRO
El compresor/nebulizador DeVilbiss debe operarse
en la fuente de poder específica para evitar una
descarga eléctrica y dañar el compresor.
Todos Modelos (Pasos 4-12)
4. Lávese las manos.
5. Conecte un extremo del conducto del nebulizador al
conector de salida del aire (Fig. 2 o 3).
NOTA–En condiciones climáticas muy húmedas, puede ocur-
rir condensación (acumulación de agua) en los tubos
del nebulizador.
6. Ensamble las partes limpias del nebulizador colocan-
do el deflector hacia abajo en la copa del medica-
mento. Ponga el medicamento prescrito en la copa
del medicamento (Fig. 4). Manteniendo la copa fija,
enrosque la tapa del nebulizador (Fig. 5).
7. Ensamble la pieza bucal y la pieza-T (en caso de usar-
lo) e inserte en la parte superior de la tapa del nebu-
lizador. Si se usa una mascarilla para aerosol, inserte
la parte inferior de la mascarilla directamente en la
parte superior de la tapa del nebulizador.
Figura 3
Figura 6
Figura 4
Figura 5

Limpieza
A-655
20
8. Fije el conducto del conector de la entrada de aire
del nebulizador (Fig. 6).
9. Oprima el interruptor de corriente en “On” (Fig. 1)
para encender el compresor.
10.Comience el tratamiento colocando la pieza bucal
entre los dientes. Con la boca cerrada, inhale pro-
funda y lentamente por la boca y el aerosol comen-
zará a fluir, luego exhale lentamente por la pieza
bucal (Fig. 7). Si es necesario interrumpir el
tratamiento, simplemente oprima el interruptor de
corriente en “Off.”
NOTA– Su médico podría recomendarle un patrón específico
de respiración durante el tratamiento. De ser así,
siga sus recomendaciones.
11. Si se usa una mascarilla de aerosol, coloque la mas-
carilla sobre boca y nariz (Fig. 8). Conforme el
aerosol comienza a fluir, inhale profunda y lentamente
por la boca, luego exhale lentamente.
12. Cuando haya terminado el tratamiento, apague la
unidad posicionando el interruptor de encendido en
“Off.” Desenchufe la unidad de la toma de corriente.
LIMPIEZA DEL NEBULIZADOR
Todas las partes del nebulizador, excepto el conducto,
deben limpiarse después de cada uso de acuerdo con las
instrucciones siguientes. Su médico y/o distribuidor Sunrise
puede especificar un cierto procedimiento de limpieza. De
ser así, siga sus recomendaciones.
ADVERTENCIA
Para evitar un posible riesgo de infección debido a
un medicamento contaminado, se recomienda
limpiar el nebulizador después de cada tratamiento
de aerosol se recomienda las desinfección una vez
al día.
1. Con el interruptor en la posición de apagado (“Off”),
desenchufe el cordón de corriente del tomacorriente
de pared.
2. Desconecte el conducto del conector de la entrada
de aire y póngalo aparte.
3. Desarme la pieza bucal o la mascarilla de la tapa.
Abra la nebulizador girando la tapa en el sentido con-
trario a las manecillas del reloj y retire el deflector.
Figura 7
Figura 8
Figura 9
This manual suits for next models
13
Table of contents
Languages:
Popular Air Compressor manuals by other brands

DOMUSA TEKNIK
DOMUSA TEKNIK BioClass iC 66 Installation and operating instructions

Ingersoll-Rand
Ingersoll-Rand SS358B owner's manual

Airpress
Airpress DC 24-225/15 Instruction manual for owner's use

Zipper Mowers
Zipper Mowers ZI-COM24E user manual

Sealey
Sealey AB900.V4 instructions

Senco
Senco PC1130 Parts reference guide

Jefferson Professional Tools & Equipment
Jefferson Professional Tools & Equipment JEFCIND050P-6.5 user manual

Meec tools
Meec tools 200070 operating instructions

Stanley
Stanley DN 200-10-5 Instruction manual for owner's use

Campbell Hausfeld
Campbell Hausfeld WL5000 Series operating instructions

Sealey
Sealey SAC55075B instructions

Makita
Makita MAC2000 manual