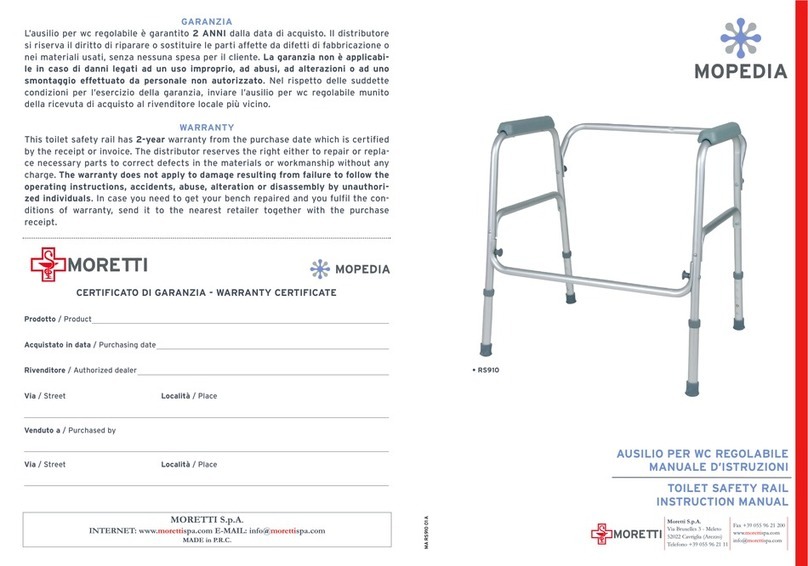
Sunrise Medical Guardian Tublift 040-0121AC Installation guide

Guardian®Tublift™
User Instructions & Warranty
Model 040-0121AC
21” Seat Height with Arm Mounted Control

Assembly Instructions
2
This manual contains important safety instructions. Please read it carefully before using
your GuardianTublift.
Assembly Instructions
Tools required: 1/2” open end wrench or small adjustable wrench
1. Unpack theTublift. You should have the following:
a.Seat assembly and control valve
b.Cylinder assembly
c. Base assembly
d.Plumbing connection
Figure 1
Seat
Assembly
Base Assembly Base Bushing
A Bolts
Cylinder
Tubing
Cy.linder
Assembly
DO NOT remove center bolt B Bolts
Cylinder
Tubing
Drain
Tubing
Supply
Hose
1.Place the base assembly on a table
or on the floor. Unwrap the
cylinder assembly and insert the
round aluminum post at the bottom
of the cylinder assembly into the
base bushing as shown in Figure 1.
2.Remove the four 5/16” x 1¼”
bolts and spacers (itemA and B in
Figure 1) from both sides of the
cylinder assembly and position the
seat assembly on the cylinder as
shown. Loosely install the top (A)
bolts with spacers between the seat
bracket and cylinder assembly.
3.Locate the drain tube. See Figure
2. It is the shorter tube coming
from the elbow on top of the
control valve. You will find a retainer
clip on this tube. Remove the clip.
With the seat assembly in position,
pass one of the bolts through the
small hole in the clip and loosely
install bolt in the lower position (B)
on the cylinder. Loosely install
remaining bolt. BEFORE tightening,
pass drain tube through the large
hole in the clip. Tighten all bolts
securely.
Pass the long 3/8” tube between the
seat and cylinder and fully insert
tubing through the nut and sleeve
and into the elbow at top of the
cylinder. Making sure it’s fully
inserted, tighten the nut. DO NOT
OVERTIGHTEN.
Figure 2

Installation 3
Plumbing Connections
NOTE: It is recommended to use a thread sealant orTeflon
tape on plumbing connections. Either of these can be
obtained at your local hardware store.
Your GuardianTublift comes complete with both
a shower connection and a spout connection. If
the bath has a shower, you MUST use a shower
connection (Figure 3). If there is no shower, use
the spout connection (Figure 4).
Connecting to the shower: Remove the
existing shower head (D) and install provided
connection (E) onto the shower pipe. Screw
the shower head back on to the end of the
connection. TheTublift supply hose will connect
to the side of the connection.
Connecting to the tub spout: Remove the
existing spout. Install the provided spout
connection. TheTublift supply hose will connect
to the nipple on the underside of the spout.
Tublift Installation
1. Lift the seat/cylinder assembly out of the base and set aside.
2. Place the base into the tub as far to the rear as possible (Figure 5). Wet the
suction cups.
3. Depress the suction cups,applying firm pressure to each one.
4. Mount the seat/cylinder assembly into the base bushing as shown in Figure 1.
5. Route the supply hose so that it will not interfere with the operation of theTublift,
and connect it to the plumbing connection.
WARNING!
Suctions Cups may not
adhere securely to tubs
with a textured bottom.
Use of an unstableTublift
can result in injury.
Tublift Operation
1. Turn on the water.
2. IfTublift is connected to the SPOUT: Pull up on the knob on top of the spout
and go to instruction 3.
IfTublift is connected to the SHOWER:
A. Make sure the diverter is turned toward the supply hose to theTublift.
B. Turn on the shower as you would before installation and go to instruction 3.
Figure 3
Figure 4
Figure 5
!
Nipple
Spout
Connection
E. Shower
Connection
Supply
Hose
Connection
D.Shower Head
TopView Base Installation inTub
Base
Bushing
Tublift Base
Drain

HeaderWarranty
Tublift Operation (continued)
3. Turn the valve on theTublift to the “UP” position and the seat will rise.(See notes
below).
4. Turn the control valve to the“DOWN” position and the seat will slowly descend.
You may control the rate of descent with small valve adjustments.(See notes below).
Please note forTublift Operation:
1. If you have installed a model with a hand-held shower you will note that it drips
when in the off position. This is a safety feature and requirement - not a defect.
(A.S.S.E.Standard #1014).
2. On models with optional hand-held shower (see separate instruction sheet),make
sure the hand-held shower is in the“OFF” position when raising or lowering the seat.
3. It is recommended to operate theTublift through a few up and down cycles to
“Bleed” any air from the cylinder.
4. Leave the valve in the“UP” position when moving on or off theTublift.
5. Keep control valve set at 90° when using hand-held shower with seat in up position.
WARNING! Do not exceed weight capacity of 200 lbs.
NOTE: This product contains natural rubber latex.
For better operation:
1. Leave theTublift control valve in the“UP” position when moving on or off the lift.
2. Lower theTublift and turn off the water when not in use.
3. Keep the area below theTublift clear of obstructions, including theTublift supply hose.
4. Do not use bath or other oils in the bath water. Oils will have an adverse affect on
the natural rubber suction cups.
4. In addition to rinsing theTublift after each bath, occasionally clean theTublift with a
regular household cleaning solution. DO NOT use petroleum base solvents.
5. DO NOT lubricate theTublift with petroleum products. Should lubrication ever be
necessary,use silicon based lubricants.
LimitedWarranty
Your Guardian brand product is warranted to be free of defects in materials and
workmanship for one year after purchase by the original consumer. This warranty does
not extend to non-durable components,such as rubber accessories and upholstery
materials,which are subject to normal wear and replacement.In the event of a defect
covered by this warranty,we will,at our option, repair or replace the product,provided
that you return it, postage prepaid. For warranty service please contact the retailer
where the product was purchased or Customer Service at 1-800-333-4000.
If you have a question about your Guardian product or this warranty, please call us toll-
free at 800-333-4000. This warranty gives specific legal rights,and you may have other
rights,which vary from state to state.
P/N 007-1000 Rev. E. 2.2002
!
4
Manufactured for:
Sunrise Medical Inc.
7477 E.Dry Creek Parkway
Longmont,CO 80503
1-800-333-4000
In Canada 1-800-263-3390
www.sunrisemedical.com
Made inTaiwan
Table of contents
Other Sunrise Medical Bathroom Aid manuals