sunsation SUN 3000 User manual

1
SERVICE
RETRACTABLE AWNING
SUN 3000 • 5000 • 8000
careguide

2
THANK YOU
FOR BUYING A SUNSATION AWNING
Congratulation on your purchase! Sunsation awnings
are known for their quality and reliability. Enjoy your
new Sunsation awning on your deck or patio and
experience an enhanced lifestyle for years to come.
In this Service Guide, you will find everything you
need to maintain and upkeep your awning. From
programming and troubleshooting your awning, to
care and cleaning instructions, use this guide to keep
your awning in pristine condition.
Our 5-year limited manufacturer’s warranty will
provide peace of mind in the event that you
experience any diculties with your new SunsationTM
awning. Please contact your awning installer for
customer support assistance.
We know your new awning will bring pleasure and
comfort in your life and we wish you many happy
times under its protection.

3
FABRICS
CARE & CLEANING
One of the best ways to keep Sunbrella® fabrics
looking good is to hose fabrics o every month with
clean water. This helps prevent dirt from becoming
deeply embedded in the fabric and eliminates the
need for more frequent vigorous cleaning. In most
environments, a thorough cleaning will be needed
every two to three years.
When it’s time for a thorough cleaning, Sunbrella
fabrics can be cleaned while still on an awning frame
or, size permitting, they can be removed to aid in the
cleaning of stubborn spills or for professional cleaning.
General or Light Cleaning
To clean Sunbrella while still on an awning frame:
• Brush o loose dirt.
• Hose down.
• Prepare a cleaning solution of water and mild
dishwashing soap.
• Use a soft bristle brush to clean.
• Allow cleaning solution to soak into the fabric.
• Rinse thoroughly until all soap residue
is removed.
• Air dry.
• May not require re-treatment depending on the
age of the fabric.
If stubborn stains persist, you can use a diluted
bleach/soap mixture or 303 Multi Surface Cleaner for
spot cleaning of mildew.
Heavy Cleaning for Stubborn Spills and Mildew
Sunbrella fabrics do not promote mildew growth,
however, mildew may grow on dirt and other foreign
substances that are not removed from the fabric. To
clean stubborn stains:
• Prepare a solution of 1 cup of bleach and 1/4 cup
mild soap per gallon of clean water.
• Allow mixture to soak into fabric for up to 15 min.
• Clean with soft bristle brush. (Note: This step
should be avoided when cleaning the coated side
(Back side) of Sunbrella Plus, Supreme, or Clarity.)
• Rinse thoroughly until all soap residue
is removed.
• Air dry.
• Repeat if necessary.
• Re-treatment of fabric for water and stain
resistance will be necessary after using
bleach solution.
Note: Use caution when cleaning the coated
(underside) of Sunbrella Plus, Supreme, or Clarity
with the recommended bleach solution. The coated
side of the fabric should only be sprayed with the
recommended bleach solution and rinsed thoroughly.
Retreating Sunbrella Fabrics
Sunbrella fabrics are engineered to provide long-term
performance. After repeated thorough cleanings or
years of use and exposure, you may choose to refresh
your fabrics with an appropriate retreating agent. We
recommend 303® Fabric Guard™ for the job.
Applying retreatment:
• Clean Sunbrella fabric, using one of the cleaning
methods outlined.
• Allow Sunbrella to completely air dry.
• Apply retreatment in a well-ventilated area
following instructions on the container.
Professional Awning Cleaners
For any issues that persist with your awning fabric,
contact your awning installer for more information
on professional awning cleaning services and re-
treatment services.

4
TROUBLESHOOTING &
PITCH CONTROL
Pitch Control & Level Awning
1. If your awning is motorized,
unplug the power cord
from the source.
5. Check the level on the front
of the awning to make sure
the awning is straight.
2. Make sure awning is
fully extended.
6. When finished, unhook the
crank. Plug in the motor.
Enjoy your awning!
3. Insert the hand crank into
the pitch control loop and
turn crank to adjust bar up
or down to desired height.
4. Repeat with all pitch
control loops until desired
height is reached.
Awning won’t extend.
Check that the awning fabric is straight on the track.
If it is misaligned, the fabric will jam and the awning
won’t open or close properly. Call your awning
installer for assistance.
Awning won’t retract.
If your awning is not closing properly, the arms may
be misaligned. You can try adjusting the pitch of
each arm until it is level. For instructions, see below.
For further assistance, contact your awning installer.
Motorized awning will not operate.
In the event of a power outage, or if the motor has
malfunctioned, the awning may not close with the
remote. In this case, you can close your awning
manually. Follow instructions on page below. Call
your awning installer to troubleshoot the motor.
The awning makes unusual noises
when opening or closing.
This can mean many things: the motor may be
malfunctioning, or the arms are not working
properly. Call you awning installer to diagnose and
help fix the problem. You may need a new motor, so
check with your awning installer if it is covered in the
5-year parts warranty.
Awning is not running on the track.
If the awning track is moving slowly, there may be
debris or contaminates clogging up the track. A
simple bit of WD-40 may help. Contact your awning
installer before attempting any adjustments yourself.
Awning fabric is sagging
Awning may be overextended and needs to be
retracted some in order to tighten the fabric.
Awning fabric is wrinkled
Leave the awning open in the sun for a while; this
should straighten smooth out the fabric.

5
LED
Lighting
Weather
Sensors
Switches &
Remote Control
SOMFY AWNING
UPGRADES
Somfy myLink
With Somfy myLink™, you are in control. Operate your
motorized awning from anywhere with one tap to extend and
retract your awning as needed. You can even automate your
awning on a schedule to eortlessly enjoy its many benefits.
Free iOS and Android app
Smart Control
The Somfy Smart
Home system lets you
easily control your
awning with voice
commands to Alexa or
Google Home.

6
PROGRAM YOUR
SOMFY MOTOR
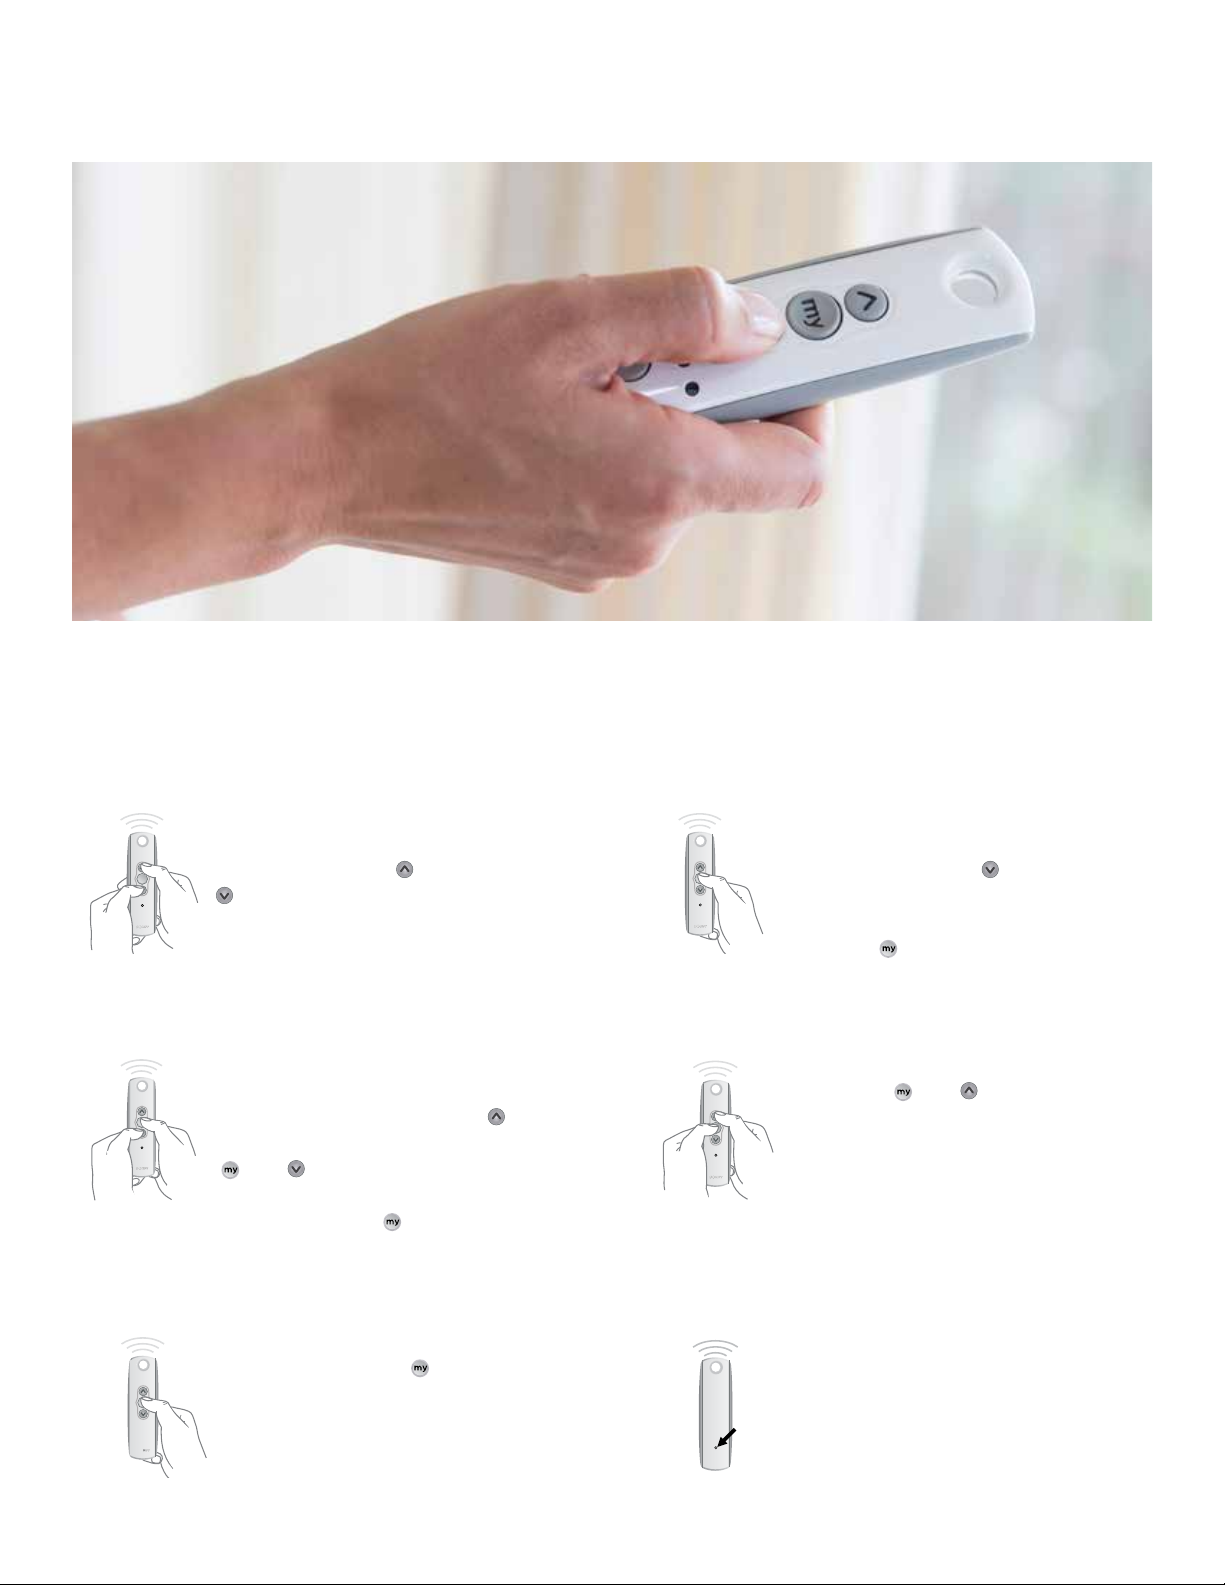
Set the awning limit remotely
Sunea RTS CMO motors can be set with the Telis remote control.
For videos and Troubleshooting, go to www.sunsationawning.com/support/
my
my
my my
STEP 6
Press and hold the Program
button on the back of the
transmitter until the motor
jogs. Double check limits as
a precaution.
STEP 1
Initiate programming by
pressing both the (Up) and
(Down) buttons at the same
time until the motor jogs.
STEP 5
Press and hold the button
until the motor jogs
op
my
STEP 2
Check the direction of operation.
Press and hold the button and
confirm it moves the motor out.
To change the direction press and
hold the (Stop) button until the
motor jogs.
my
my
STEP 3
Bring the motor to your desired
upper limit by pressing the
button. Press and hold both
the and buttons until
the motor begins to move
down, then release. Use the
button to stop it at the desired
lower limit
my
my
STEP 4
Press the button
until the motor begins
to move up. the motor will
stop at the original upper
point.
and
my
my
my
my
my
STEP 6
Press and hold the Program
button on the back of the
transmitter until the motor
jogs. Double check limits as
a precaution.
STEP 1
Initiate programming by
pressing both the (Up) and
(Down) buttons at the same
time until the motor jogs.
STEP 5
Press and hold the button
until the motor jogs
op
my
STEP 2
Check the direction of operation.
Press and hold the button and
confirm it moves the motor out.
To change the direction press and
hold the (Stop) button until the
motor jogs.
my
my
STEP 3
Bring the motor to your desired
upper limit by pressing the
button. Press and hold both
the and buttons until
the motor begins to move
down, then release. Use the
button to stop it at the desired
lower limit
my
my
STEP 4
Press the button
until the motor begins
to move up. the motor will
stop at the original upper
point.
and
my
my
my
my my
STEP 6
Press and hold the Program
button on the back of the
transmitter until the motor
jogs. Double check limits as
a precaution.
STEP 1
Initiate programming by
pressing both the (Up) and
(Down) buttons at the same
time until the motor jogs.
STEP 5
Press and hold the button
until the motor jogs
op
my
STEP 2
Check the direction of operation.
Press and hold the button and
confirm it moves the motor out.
To change the direction press and
hold the (Stop) button until the
motor jogs.
my
my
STEP 3
Bring the motor to your desired
upper limit by pressing the
button. Press and hold both
the and buttons until
the motor begins to move
down, then release. Use the
button to stop it at the desired
lower limit
my
my
STEP 4
Press the button
until the motor begins
to move up. the motor will
stop at the original upper
point.
and
my
my
my
my
my
STEP 6
Press and hold the Program
button on the back of the
transmitter until the motor
jogs. Double check limits as
a precaution.
STEP 1
Initiate programming by
pressing both the (Up) and
(Down) buttons at the same
time until the motor jogs.
STEP 5
Press and hold the button
until the motor jogs
op
my
STEP 2
Check the direction of operation.
Press and hold the button and
confirm it moves the motor out.
To change the direction press and
hold the (Stop) button until the
motor jogs.
my
my
STEP 3
Bring the motor to your desired
upper limit by pressing the
button. Press and hold both
the and buttons until
the motor begins to move
down, then release. Use the
button to stop it at the desired
lower limit
my
my
STEP 4
Press the button
until the motor begins
to move up. the motor will
stop at the original upper
point.
and
my
my
my
my my
STEP 6
Press and hold the Program
button on the back of the
transmitter until the motor
jogs. Double check limits as
a precaution.
STEP 1
Initiate programming by
pressing both the (Up) and
(Down) buttons at the same
time until the motor jogs.
STEP 5
Press and hold the button
until the motor jogs
op
my
STEP 2
Check the direction of operation.
Press and hold the button and
confirm it moves the motor out.
To change the direction press and
hold the (Stop) button until the
motor jogs.
my
my
STEP 3
Bring the motor to your desired
upper limit by pressing the
button. Press and hold both
the and buttons until
the motor begins to move
down, then release. Use the
button to stop it at the desired
lower limit
my
my
STEP 4
Press the button
until the motor begins
to move up. the motor will
stop at the original upper
point.
and
my
STEP 1
Initiate programming by
pressing both the (Up) and
(Down) buttons at the same
time until the motor jogs.
STEP 3
Bring the motor to your desired
upper limit by pressing the
button. Press and hold both the
and buttons until the motor
begins to move down, then
release. Use the button to stop
it at the desired lower limit
STEP 5
Press and hold the buttons
until the motor jogs
STEP 2
Check the direction of operation.
Press and hold the button and
confirm it moves the motor out.
To change the direction press and
hold the (Stop) button until the
motor jogs.
STEP 4
Press the and button until
the motor begins to move up.
the motor will stop at the original
upper point.
STEP 6
Press and hold the Program button
on the back of the transmitter until
the motor jogs. Double check limits
as a precaution.

7
1. To get started, download the free app from the
iTunes app store or Google Play. Plug the myLink
interface into a standard outlet. Be sure to place the
myLink near the motorized applications you plan to
control. The myLink will blink red.
2. Next, open the myLink app and press Start New
System. Follow the setup prompts. Confirm the
status LED is solid red indicating that the myLink is
in setup mode.
3. Go to network settings on your device and
connect to the myLink network. Return to the
myLink app and press the Search for myLink button.
For local time and sunset/sunrise myLink schedules,
you will need to allow the app to use your location.
4. Choose your network, enter the WiFi network
password, and press Next. The myLink will join
your network.
5. Confirm the LED status is solid green indicating
that the myLink is connected to the LAN.
6. Once it turns solid green, press Continue. Follow
the prompts to update the system if required. Now
simply name your myLink (for example Downstairs,
or Living Room, or Kitchen) and select your
preferred icon.
Your myLink is now setup and we can begin RTS
programming. You can add up to 16 channels to
your myLink.
1. Confirm that the RTS motorized products are fully
operational from at least one RTS control and that all
limits are set, including the “my” position if desired.
Now, identify the transmitter that currently controls
the motorized shades and confirm that it’s working
properly. (NOTE: the myLink cannot be used to set
limits or add and delete RTS transmitters.)
2. Select the channel or channels that operate
the product you wish to program. Press the
programming button on the back of the remote until
the shade moves up and down briefly.
3. Return to the app and press the Program button.
The shade will move up and down briefly again.
4. Now simply test the operation. The programming
is now complete for that channel. Press DONE to add
additional RTS channels. You can repeat the process
to create up to 16 channels.
That's it, you're myLink is ready to use! You can,
however, change your RTS programming at any
time! On the main menu, select Edit then select RTS
programming.
Somfy Mylink™ Setup & RTS Programming
Visit somfysystems.com for more information on how to program your awning.
SET UP YOUR
MYLINK™ APP

8
For more information, please contact
your authorized Sunsation™ dealer:
Your Company Name
Company Tagline
123 Main Street
Brooklyn, NY 11204
P. 718 123-4567
Sunsation™ awnings deliver Quality, Comfort, and Class.
Become a Sunsation™ owner today and see what all the hype is about.
sunsationawning.com
Other manuals for SUN 3000
1
This manual suits for next models
2
Table of contents
Other sunsation Accessories manuals