Sunwood MARINO User manual

Operation and installation manual
Guía del usuario e instalación
SUNWOOD MARINO PROPANE
ENGLISH & ESPAÑOL
HOW
TO
INSTALL
YOUR
HOT
BUDDY

2
0063CM3866
CERTIFIED BY KIWA
MANUFACTURER Sunwood® Dutch Design
Christiaan Huygensstraat 10
2665 KX Bleiswijk
The Netherlands
CONTACT DETAILS sales@sunwood.eu
+31 (0)10 521 1325
www.sunwood.eu
SUNWOOD MARINO
PRODUCT SPECIFICATIONS
Model
Version
PIN
Cat.
Type of gas
p, in mbar
Qn, in kW (Hs)
g/hr
KEEP THE INSTRUCTIONS
FOR FUTURE REFERENCE
GAS CONNECTION
This appliance requires an EN16436 certified flexible gas hose (from 40 to 50cm)
and an EN16129 certified pressure regulator (of 30/37mbar), which comply with the
regulations in force. Please consult your gas cylinder supplier for this.
WARNING: This appliance must be used, and the gas cylinder stored, in
accordance with the regulations in force.
Marino
Butane/Propane
0063CM3866
I3+
G30/G31
30/37
5,7
412/387

3
Installation instructions
Assembling the appliance
Allowed types of gas cylinders
Connecting the gas cylinder
Operation instructions
Operation with gas control valve
4
4
4
5
6
6
TABLE OF CONTENTS
1
1.1
1.2
1.3
2
2.1
WHAT'S IN THE BOX?
1x
1x
1x
2x
2x
4x
Marino frame, burner + gas control
valve
Marino top
Bag of lava rocks
Castor wheels (without brake)
Castor wheels (with brake)
Spring washers
EXPLANATION OF SYMBOLS
Turning on
Adjusting the flames
Turning off
Warranty
Maintenance
Warnings
6
6
6
8
9
12
2.2
2.3
2.4
3
4
5
4x
4x
4x
2x
1x
1x
1x
Nuts
Washers
Bolts
Screws
Adapter
Wrench
Allen key
WARNING: Chance of injury, damage, fire. Very important information.
TIP: Useful information.

4
1.2 ALLOWED TYPES OF GAS CYLINDERS
• Maximum allowed filling of the gas cylinder is 11kg.
• Maximum allowed width and height of the gas cylinder is 30cm x 58cm.
1. INSTALLATION INSTRUCTIONS
1. Attach the wheels. The correct assembly
order seen from below is: bolt - wheel -
Marino - washer - spring washer - nut. Use
the included wrench to tighten.
2. Spread the lava rocks evenly over the
burner's surface. Beware that no rock dust
gets into the burner.
3. Assemble the top of the Marino with the
supplied screws and a Philips Screwdriver
(not included).
1.1 ASSEMBLING THE APPLIANCE
1
2
3
3
2
1
1
2
3
WARNING: Use only the type of gas and type of gas cylinder specified in
this manual.
WARNING: Read the instructions before use.
WARNING: The minimum distance between the appliance and
combustible materials has to be 1,5 meters.
TIP: Always buy a sealed gas cylinder. Beware that the seal is not broken
with purchase, this ensures the gas cylinder has been checked and is safe.

5
1.3 CONNECTING THE GAS CYLINDER
This appliance requires an EN16436 certified flexible hose (from 40 to 50cm) and an
EN16129 certified pressure regulator (of 30/37mbar).
Consult the instructions of the pressure regulator to connect the gas cylinder.
THREADED CONNECTION 1/4" LH
OTHER CONNECTIONS:
Use the supplied adapter.
WARNING: Only change the gas cylinder in an amply ventilated area and
away from candles, cigarettes, and other ignition sources.
WARNING: Always check that the regulator seal (rubber O-ring) is cor-
rectly fitted and undamaged. If this is not the case it shall be exchanged
for a new regulator seal and the appliance shall not be used.
WARNING: Check the flexible hose at least once per month and each
time the gas cylinder is changed. If the hose shows signs of cracking,
splitting or other deterioration it shall be exchanged for a new hose of the
same length and of the equivalent quality.
WARNING: Do not connect the gas cylinder directly to the appliance
without regulator.

6
2. OPERATING INSTRUCTIONS
1. Push the control knob and turn counterclockwise to the ignition position. You will
hear a click, which is the spark to turn on the pilot burner.
2. Keep the control knob depressed for 10 seconds when the pilot light is on. Then let go
of the control knob and turn it counterclockwise fully.
3. In case the pilot light goes off: repeat step 1 and 2 until the pilot light stays on.
1. Set the desired flame height by turning the flame height knob.
2. Turn the knob clockwise for a lower position.
3. Turn the knob counterclockwise for a higher position.
2.2 TURNING ON
Operate the appliance with the gas control valve located behind the door.
2.3 ADJUSTING THE FLAMES
2.1 OPERATION WITH THE GAS CONTROL VALVE
Turn the control knob back to the same position as the image.
2.4 TURNING OFF
WARNING: Read the instructions before use.
WARNING: Check all gas connections on leakage before use. Use gas leak
detector spray on all gas fittings/connections. There is a leak if air bubbles
appear as result of the gas leak detector spray.
WARNING: In the event of gas leakage, the appliance shall not be used or
if alight, the gas supply shall be shut off and the appliance shall be investi-
gated and rectified before it is used again.
WARNING: In case of violent wind precautions must be taken against
tilting of the appliance.
WARNING: Close the gas cylinder or pressure regulator after use.

7
2.1 GAS CONTROL VALVE
2.2 TURNING ON
2.3 ADJUSTING THE
FLAMES
2.4 TURNING OFF

8
3. WARRANTY
The Sunwood Marino comes with a 1-year warranty from the date of purchase.
If there appears to be material or manufacturing errors, the defects resulting from
these errors shall be repaired or replaced by Sunwood. If a defect is not repaired
a fitting compensation can be offered by Sunwood. The decision to replace, repair
or otherwise provide compensation for a defect is taken at the sole discretion of
Sunwood.
All warranty claims are expressly subject to the condition that the maintenance
recommendations from Sunwood have been followed correctly and that the item is
used exclusively under normal conditions. In addition, the condition that the product
is solely used in the land of destination listed on the product sticker also applies.
Warranty claims for defects/damages arising from inappropriate use, incorrect or
injudicious use or from normal wear and tear are excluded from this coverage.
A warranty claim can only be made upon presentation of the original invoice, which
must therefore be stored carefully. Only the original buyer may submit a warranty
claim. The claim may only be submitted to the dealer from whom the product was
originally purchased.
A warranty claim must first be assessed by Sunwood. The warranty does not
automatically include reimbursement of the transport costs of defective products to
the Sunwood factory or to the concerned dealer. The same applies to return shipments
of replaced or repaired products. The repair itself is performed free-of-charge within
the warranty period.

9
4. MAINTENANCE
Good maintenance of the Marino will significantly benefit the quality and lifetime of
the product. For the most optimal protection we suggest using the weatherproof
protective cover (optional). It will keep the fire place nice and clean and ready to use.
Beware that the fire has cooled down entirely before placing the cover over the Marino.
If you do not use the Marino over a longer period of time, we suggest storing the fire
inside or in a weatherproof space.
Despite the high-quality finish and the use of high-quality materials, the climate
still affects the quality of the Marino. You can keep the Marino in top condition by
protecting it as much as possible against weathering (such as sunbeams).
Even though the fire has a UV-protection outer coating finish, this does not mean that
the fire is entirely UV-proof. In order to prevent discolouration we suggest placing the
Marino in an area free of direct sunlight (at least when it is not being used). This also
applies to prevent discolouration of the protective cover.
You can clean the Marino with a damp cloth and a normal cleaner. The use of abrasive
and aggressive cleaners must be avoided. Also avoid the use of microfibre cloths. These
deduce their cleaning capacity to the abrasive effect of the microfibres.
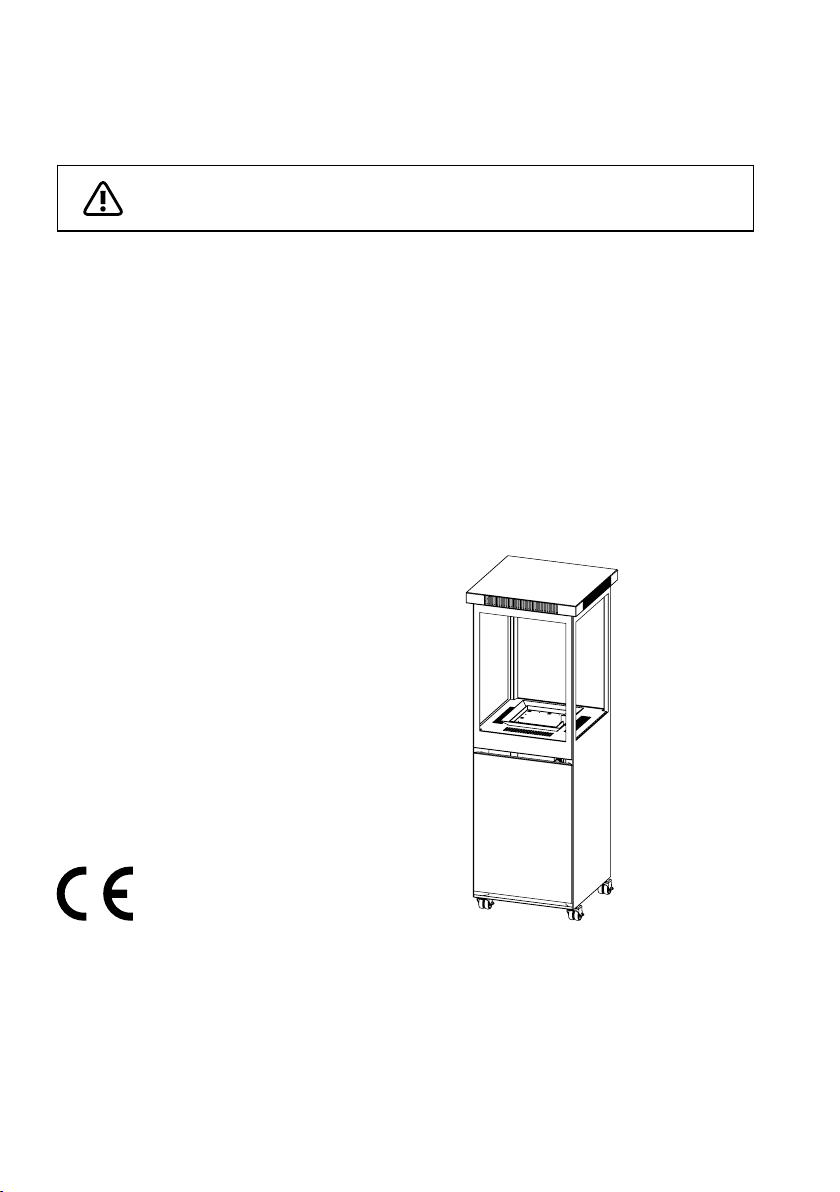
To clean the inside of the Marino you need to disassemble the roof first. Afterwards
you can lift the glass panes, which will provide you with all space needed to clean the
interior of the fireplace.
WARNING: The flexible gas hose and pressure regulator should be re-
placed every two years by an EN16436 certified flexible gas hose (from 40
to 50cm) and an EN16129 certified pressure regulator (of 30/37mbar).

10
This appliance and the gas cylinder should be installed by a technically competent
person, and in accordance with these instructions and the regulations in force.
The minimum distance between the appliance and combustible materials has to be
1,5 meters.
Never leave the fire unattended.
Do not move the appliance when in operation.
Keep the product OUT OF REACH FOR CHILDREN when in operation, and until it has
completely cooled down.
Shut off the valve at the gas cylinder or the regulator before moving the appliance.
Never try to repair or make modifications to this product yourself.
Never block the air to the burner and/or the injector.
Never block the air to the gas cylinder housing.
In case of violent wind precautions must be taken against tilting of the appliance.
The use of this appliance in enclosed areas is DANGEROUS and PROHIBITED.
Use outdoors or in well-ventilated areas. Well-ventilated areas must have a min-
imum of 25% of the surface area open. The surface area is the sum of the walls
surface. See image below.
5. WARNINGS
Read these instructions before using this appliance and keep
them for future reference.


12
0063CM3866
CERTIFIED BY KIWA
MANUFACTURER Sunwood® Dutch Design
Christiaan Huygensstraat 10
2665 KX Bleiswijk
The Netherlands
CONTACT DETAILS sales@sunwood.eu
+31 (0)10 521 1325
www.sunwood.eu
SUNWOOD MARINO
ESPECIFICACIONES
Model
Version
PIN
Cat.
Type of gas
p, in mbar
Qn, in kW (Hs)
g/hr
GUARDE LAS INSTRUCCIONES PARA
CONSULTARLAS EN EL FUTURO
CONEXIÓN DE GAS
Este aparato necesita una manguera de gas flexible con la certificación EN16436
(de entre 40 y 50 cm) y un regulador de presión con la certificación EN16129 (de 30
/37mbar) que cumpla con las normativas en vigor. Consulte con su proveedor de
cilindros de gas para ello.
ADVERTENCIA: Este aparato debe utilizarse y el cilindro de gas
guardarse conforme a las normativas en vigor.
Marino
Butane/Propane
0063CM3866
I3+
G30/G31
30/37
5,7
412/387

13
Guía de instalación
Montaje del aparato
Tipos de cilindros de gas
permitidos
Conexión del cilindro de gas
Manual de Instrucciones
Funcionamiento con la válvula de
control de gas
14
14
14
15
16
16
TABLA DE CONTENIDOS
1
1.1
1.2
1.3
2
2.1
¿QUÉ CONTIENE LA CAJA?
1x
1x
1x
2x
2x
4x
Un bastidor Marino, un quemador +
una válvula de control de gas
Cubierta Marino
Bolsa de rocas de lava
Ruedas Castor (sin freno)
Ruedas Castor (con freno)
Arandelas de resorte
EXPLICACIÓN DE LOS SÍMBOLOS
Incitación
Configuración de altura
de la llama
Apagado
Garantía
Instrucciones de
mantenimiento
Advertencias
16
16
16
18
19
20
2.2
2.3
2.4
3
4
5
4x
4x
4x
2x
1x
1x
1x
Tuercas
Arandelas
Pernos
Tornillos
Adaptador
Llave
Llave Allen
ADVERTENCIA: Posibilidad de lesiones, daños o incendio. Información
muy importante.
CONSEJO: Información útil.

14
1.2 TIPOS DE CILINDROS DE GAS PERMITIDOS
• El cilindro de gas se puede llenar como máximo con 11 kg.
• El ancho y la altura máximos permitidos del cilindro de gas son de 30 cm x 58 cm.
1. GUÍA DE INSTALACIÓN
1. Instale las ruedas si lo cree conveniente. El
orden correcto de instalación empezando
por abajo es: Tornillo – Rueda – Marino –
Anillos – Tuerca. Utilice la llave incluida
para apretar.
2. Distribuya las piedras suministradas de
manera uniforme sobre el quemador.
Asegúrese de que no hayan granos finos que
se puedan meter en el quemador.
3. Vuelva a colocar la parte superior de
la Marino con los tornillos. Utilice un
destornillador (no incluido).
1.1 MONTAJE DEL APARATO
1
2
3
3
2
1
1
2
3
ADVERTENCIA: Utilice solamente el tipo de gas y de cilindros de gas
especificado en este manual.
ADVERTENCIA: Lea las instrucciones antes de su uso.
ADVERTENCIA: La distancia entre materiales combustibles ligeros y la
chimenea debe ser al menos 1,5metros.
CONSEJO: Compre siempre un cilindro de gas sellado. Asegúrese de
que el sello no esté roto en el momento de la compra. De este modo, se
asegurará de que se ha comprobado el cilindro de gas y que es seguro.

15
1.3 CONEXIÓN DEL CILINDRO DE GAS
Este aparato necesita una manguera de gas flexible con la certificación EN16436 (de
entre 40 y 50 cm) y un regulador de presión con la certificación EN16129 (de 30/37mbar).
Consulte las instrucciones del regulador de presión para conectar el cilindro de gas.
CONEXIÓN ROSCADA 1/4" LH
OTRAS CONEXIONES:
Utilice el adaptador suministrado.
ADVERTENCIA: Para cambiar el cilindro de gas, hágalo únicamente en
una zona ampliamente ventilada y alejada de velas, cigarrillos y demás
fuentes de ignición.
ADVERTENCIA: Compruebe siempre que el sello del regulador (junta tó-
rica de goma) esté correctamente instalado y sin daños. En caso contrario,
se cambiará por un sello del regulador nuevo y el aparato no se utilizará.
ADVERTENCIA: Revise la manguera de gas una vez al mes y cada vez que
cambie de bombona de gas. Si la manguera de alguna señal de deteriora-
miento ha de sustituirse por una de la misma longitud y calidad.
ADVERTENCIA: No conecte el cilindro de gas directamente al aparato
sin el regulador.

16
2. MANUAL DE INSTRUCCIONES
1. Presione la perilla de control en y gira en sentido antihorario hasta la posición de en-
cendido. Tendrá que escuchar un "click" que es la inflamación de la chispa de la luz
piloto.
2. Si arde la llama piloto mantenga la perilla de control para otros 10 segundos. Después
suelte el botón.
3. Si la luz piloto sale repita los pasos 1 y 2 hasta que el piloto permanece encendida.
1. El alto del fuego se puede establecer a través del botón de altura de la llama en la
dirección correcta para activar.
2. Para una posición inferior, gire el botón hacia la derecha, hacia la derecha.
3. Gire la perilla en sentido antihorario para un estado superior, contra el reloj.
2.2 INCITACIÓN
Accione el aparato con la válvula de control de gas situada detrás de la puerta.
2.3 CONFIGURACIÓN DE ALTURA DE LA LLAMA
2.1 FUNCIONAMIENTO CON LA VÁLVULA DE CONTROL DE GAS
Apagar el fuego girando el mando de control para que vuelva a la posición como en la
imagen.
2.4 APAGADO
ADVERTENCIA: Compruebe que no haya fugas en todas las conexiones
de gas antes de iniciar el uso. Utilice el espray para la detección de fugas de
gas en todos los empalmes/conexiones de gas. Existirá una fuga si aparecen
burbujas de aire como resultado del espray de detección de fugas de gas.
ADVERTENCIA: En caso de que se produzca una fuga de gas, el aparato
no se utilizará o, si se incendia, se cortará el suministro de gas, se investi-
gará el aparato y se rectificará antes de volver a utilizarlo.
ADVERTENCIA: En caso de que haya fuertes vientos, será necesario
tomar precauciones para evitar vuelcos del aparato.
ADVERTENCIA: Lea las instrucciones antes de su uso.

17
2.1 FUNCIONAMIENTO CON LA
VÁLVULA DE CONTROL DE GAS
2.2 INCITACIÓN
2.3 CONFIGURACIÓN DE
ALTURA DE LA LLAMA
2.4 APAGADO
ADVERTENCIA: Cierre el cilindro de gas o el regulador de presión tras el
uso.

18
3. GARANTÍA
Las Sunwood Marino disponen de 1 año de garantía desde la fecha de facturación.
Si en el periodo de garantía hay un problema técnico con el producto debido a un fallo
material o un fallo de fabricación, será reparado o reemplazado por Sunwood. En el
caso de no poder repararse, se compensará de otra forma adecuada. Sunwood decide si
un fallo se arregla, se reemplaza o se compensa.
Para tener derecho a la garantía, tienen que haberse seguido todas las instrucciones de
este manual y haberse hecho un uso normal del producto. También se hace hincapié en
que la estufa tiene que haberse usado en el país correspondiente al idioma del manual
y el país correspondiente a la pegatina del producto.
La garantía no será ofrecida si el problema ha tenido lugar por causas ajenas a fallos de
fabricación o si se le ha dado un uso inapropiado al producto.
Para poder disponer de la garantía se necesita tener en todos los casos la factura
original del producto. Solo el comprador original puede tener el derecho a la garantía.
El derecho a la garantía siempre ha de ser evaluado por Sunwood primero. La garantía
no incluye siempre una compensación de los gastos de envío de productos defectuosos
o piezas hacia la fábrica de Sunwood o un punto de venta. Lo mismo ocurre en los
gastos de vuelta de los productos reemplazados o reparados. La reparación en sí es
totalmente gratuita dentro del plazo de la garantía.

19
4. INSTRUCCIONES DE
MANTENIMIENTO
El mantener correctamente la Marino ayuda a incrementar la calidad y alargar la vida
del producto.
Para obtener la protección máxima del producto recomendamos hacer uso de las
fundas resistentes al tiempo (compra por separado). De esta forma, la estufa siempre
estará limpia y preparada para su uso. Tenga en cuenta que la estufa debe de estar
totalmente apagada y fría antes de colocar la funda. Si tiene planeada no usar la estufa
durante un periodo más largo, recomendamos colocarla en algún sitio interior.
Aún contando con acabados de alta calidad y el uso de materiales premium, el clima
puede afectar a la calidad de la estufa. Es por esto que recomendamos protegerlo
cuanto más del sol. Aunque la estufa cuenta con una laca de pintura resistente a las
radiaciones UV, no significa que sea inmune. Para evitar un descoloramiento de la capa
de pintura, recomendamos que cuando no se use el producto, se coloque en un lugar
sin radiaciones del sol.
Para limpiar la Marino, ha de usar un trapo húmedo y un limpiador normal. Debe evitar
cualquier uso de productos de limpieza agresivos y abrasivos, incluidos los productos
con microfibras. Para limpiar el interior de la Marino lo primero que ha de hacer es
desmontar la tapa. Después podrá sacar los cristales elevándolos hacia arriba para
disponer de todo el espacio necesario para limpiar su interior.
ADVERTENCIA: La manguera de gas flexible y el regulador de presión
deben sustituirse cada dos años por una manguera de gas flexible con la
certificación EN16436 (de entre 40 y 50 cm) y un regulador de presión con
la certificación EN16129 (de 30/37mbar).

20
Este aparato y el cilindro de gas deben ser instalados por parte de una persona
con la formación técnica correspondiente y conforme a estas instrucciones y a las
normativas en vigor.
La distancia entre materiales combustibles ligeros y la chimenea debe ser al menos
1,5metros.
Nunca deje el fuego desatendido.
No mueva el aparato cuando esté en funcionamiento.
Mantenga el producto FUERA DEL ALCANCE DE NIÑOS cuando está en uso, y
hasta que este totalmente se enfría.
Apague la válvula en el cilindro de gas o el regulador antes de mover el aparato.
Nunca haga cambios o reparaciones al producto usted mismo.
Nunca obstruir la boquilla de dirección o grabadora de flujo de aire.
Nunca obstruir la dirección de flujo de aire la vivienda de la botella de gas.
En caso de que haya fuertes vientos, será necesario tomar precauciones para evitar
vuelcos del aparato.
El uso de este dispositivo en un espacio reducido es PELIGROSO y
PROHIBIDO! Este dispositivo está destinado a uso fuera o en un área bien
ventilada. Un espacio es considerado como tal sólo si un mínimo del 25% de la
superficie de la pared está abierto. Consulte a continuación de la imagen.
5. ADVERTENCIAS
Lea estas instrucciones antes de utilizar el aparato y guárdelas
para consultarlas en el futuro.
Other manuals for MARINO
5
This manual suits for next models
1
Table of contents
Languages:
Other Sunwood Patio Heater manuals