12 | 13
BROSE
36 V
DE
M99 PRO Scheinwerfer Installation am Brose Motor
1. E-Bike Akku herausnehmen.
2. Motorabdeckung abschrauben.
3. Universelles M99 PRO Anschlusskabel für
Antriebe durch den Rahmen führen.
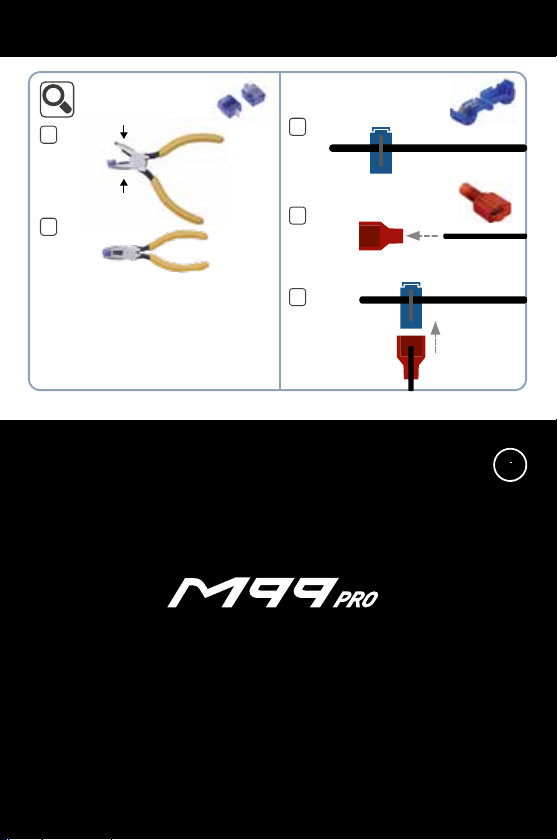
4. Brose Motorkabel ausstecken und bei Bedarf
abmanteln, um Platz für die Stromabzweigverbinder
zu schaffen (Abb.C1).
5. Litzen des universellen M99 PRO Anschlusskabels
mithilfe der beigefügten Stromabzweigverbinder an
das Brose Motorkabel koppeln (Abb. C2-C3).
6. Motorkabel wieder an den Motor anschließen, alle
Kabel ordentlich verlegen und Motorabdeckung
wieder verschließen.
EN
M99 PRO Front Light installation on Brose motor
1. Take out the battery of the E-Bike.
2. Remove the motor cover.
3. Pass the Universal M99 PRO connector cable through
the bike frame.
4. Unplug the Brose motor cable and strip the black
shrink tube off the cable, if needed, to get more space
to install the tap connectors (ill. C1).
5. Connect the wires of the Universal M99 PRO
connector cable with the included tap connectors
to the Brose motor cable (ill. C2-C3).
6. Reconnect motor cable, secure the cables and close
motor cover.
FR
Montage du phare M99 PRO au moteur Brose
1. Enlever la batterie du VAE.
2. Dévisser le capot moteur.
3. Passer le câble de raccordement M99 PRO universel
pour les moteurs en interne du cadre.
4. Débrancher le câble du moteur Brose et dénuder le
câble si nécessaire pour créer de la place pour les
connecteurs de prise (ill. C1).
5. Coupler les toronsdu câble M99 avec le câble du
moteur en utilisant les connecteurs de prise inclus
(ill. C2-C3).
6. Brancher le câble à nouveau au moteur, poser
tous les câbles et refermer le capot moteur.
NL
Installatie M99 PRO koplamp aan Brose-motor
1. Accu van de e-bike eruit halen.
2. Kap van de motor eraf schroeven.
3. Universele M99 PRO aansluitkabel voor
aandrijvingen door het frame trekken.
4. Brose-motorkabel eruit trekken en indien
nodig ontmantelen om plaats te maken voor
een aftakverbinder (afb. C1).
5. Draad van de universele M99 PRO aansluitkabel
koppelen aan de Brose-motorkabel met behulp van
de meegeleverde aftakverbinder (afb. C2-C3).
6. Motorkabel weer aan de motor aansluiten, alle
kabels correct verleggen en de kap van de motor
weer sluiten.
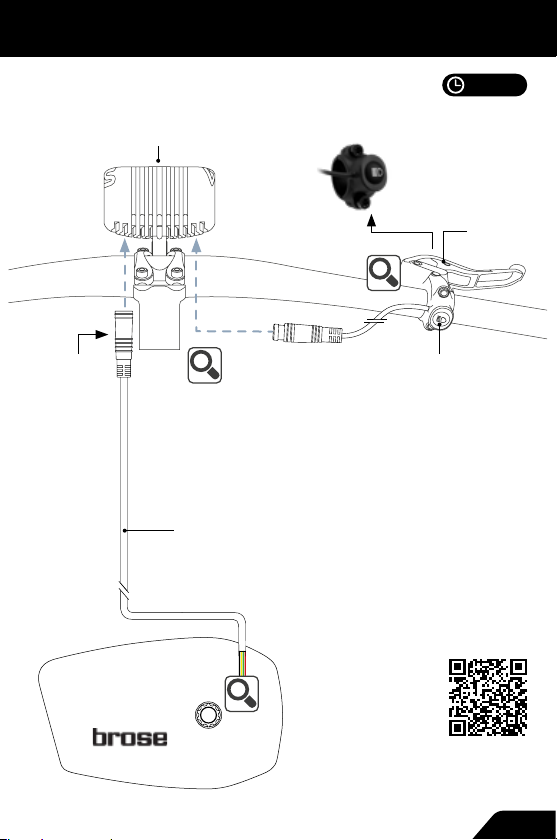
M99 PRO
INSTALLATION | INSTALLATION | INSTALLATION | INSTALLATIE
B
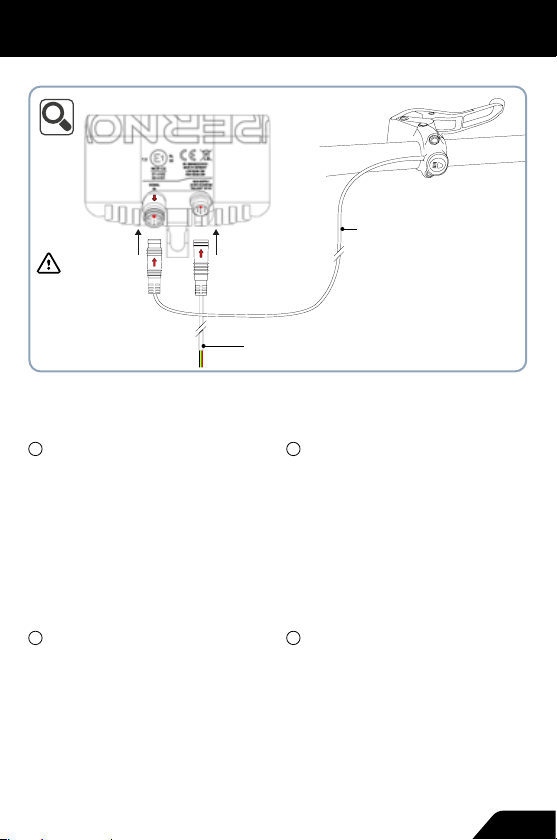
Installation Fernlichttaster | High beam switch installation
Installation de l’interrupteur du feu de route | Installatie schakelaar groot licht
Fernlichttasterkabel
High beam switch cable
Câble de l’interrupteur du feu de route
Kabel schakelaar groot licht
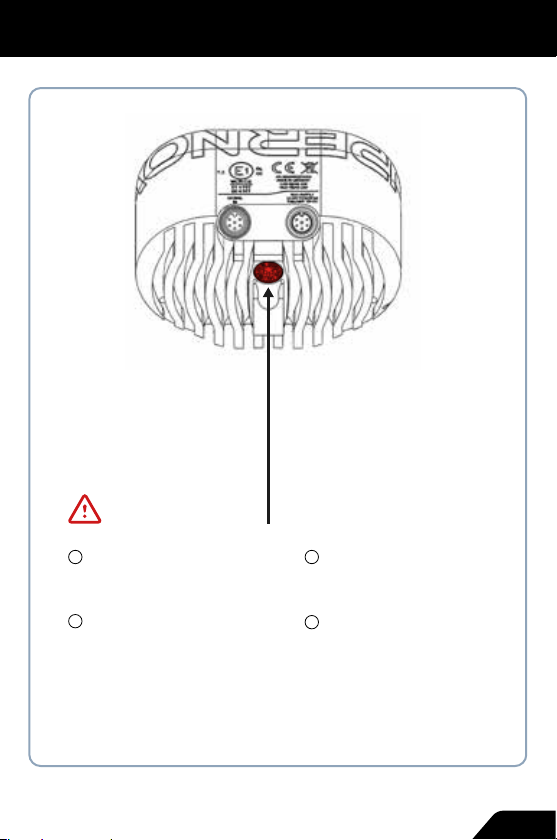
Bitte die Pfeile auf den
Steckern aufeinander
ausrichten. | Please align
the arrows on the connectors.
Veuillez aligner les flèches sur
les deux prises. | Plaats de
pijlen op de stekkers
naast elkaar.
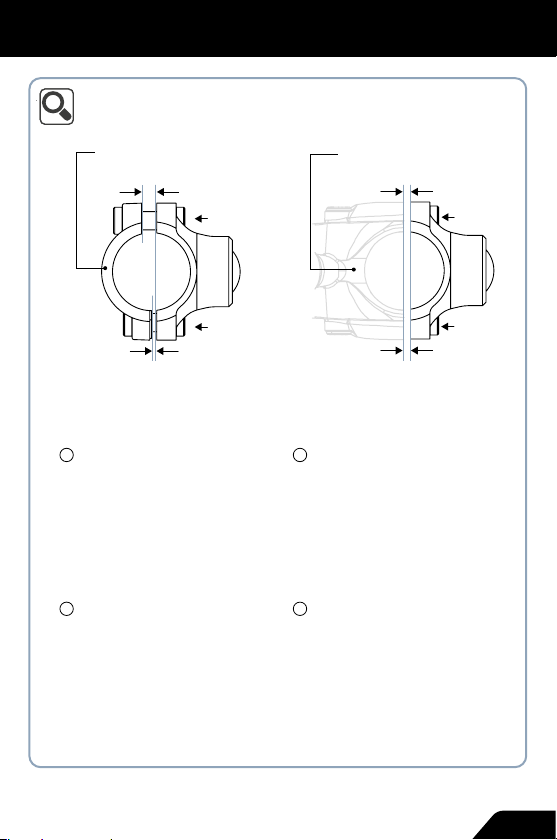
Unteransicht | Bottom view | Vue du bas | Onderaanzicht
Universelles M99 PRO Anschlusskabel für Antriebe
Universal M99 PRO connector cable for drives
Câble de raccordement M99 PRO universel pour moteurs
Universele M99 PRO aansluitkabel voor aandrijvingen