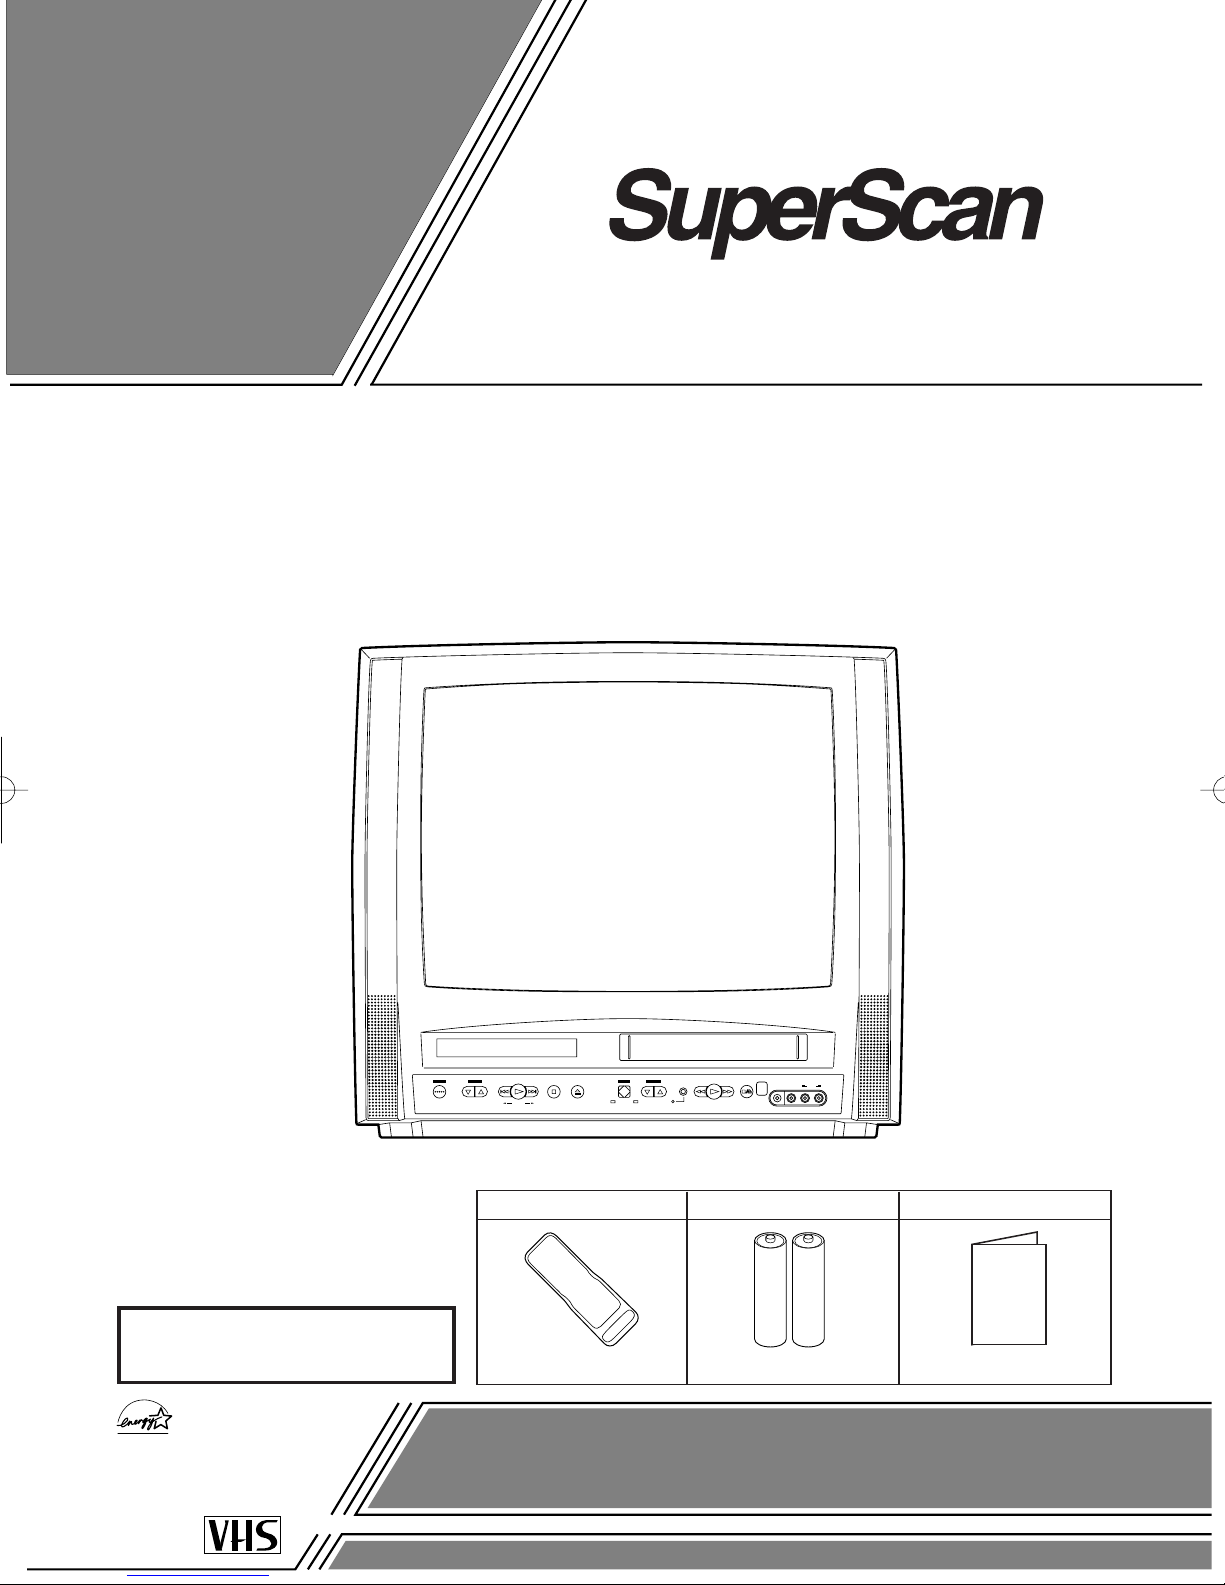
SUPERSCAN 19TVD3S User manual

COLOR TV/DVD/VCR TRIPLE COMBO
19TVD3S (19 inch)
OWNER’S
MANUAL
As an ENERGY STAR
Partner, our company has
determined that this product meets
the ENERGY STAR guidelines for
energy efficiency. ENERGY STAR is
a U.S. registered mark.
®
®
®
If you need additional assistance for set-up or operating after
reading owner’s manual, please call TOLL FREE : 1-800-968-3429.
Please read before using this equipment
SKIP STOP OPEN/CLOSE REC/OTR REW PLAY F.PWD
HEADPHONE
VIDEO AUDIO
STOP/EJECT
PLAY
VOLUMEVOLUME SELECTSELECT CHANNELCHANNELPOWERPOWER
SEARCH
SKIP
DVD TV/VCR
L R
INSTRUCCIONES
EN ESPAÑOL INCLUIDAS.
SUPPLIED ACCESSORIES
BatteriesRemote Control Unit
2 AA BatteriesNE209UD
Owner’s Manual
0EMN02333
Owner's Manual
TD860HL(P01-34).qx33 03.10.21 11:55 AM Page 1

1.Read instructions-All the safety and operating instructions
should be read before the appliance is operated.
2.Retain Instructions-The safety and operating instructions
should be retained for future reference.
3.Heed Warnings-All warnings on the appliance and in the
operating instructions should be adhered to.
4.Follow Instructions-All operating and use instructions
should be followed.
5.Cleaning-Unplug TV/DVD/VCR from the wall outlet before
cleaning. Do not use liquid cleaners or aerosol cleaners. Use
a damp cloth for cleaning.
EXCEPTION: Aproduct that is meant for uninterrupted
service and, that for some specific reason, such as the possi-
bility of the loss of an authorization code for a CATV con-
verter, is not intended to be unplugged by the user for clean-
ing or any other purpose, may exclude the reference to
unplugging the appliance in the cleaning description other-
wise required in item 5.
6.Attachments-Do not use attachments not recommended by
the TV/DVD/VCR manufacturer as they may cause hazards.
7.Water and Moisture-Do not use this TV/DVD/VCR near
water-for example, near a bath tub, wash bowl, kitchen sink,
or laundry tub, in a wet basement, or near a swimming pool,
and the like.
8.Accessories-Do not place this TV/DVD/VCR on an unstable
cart, stand, tripod, bracket, or table. The TV/DVD/VCR may
fall, causing serious injury to someone, and serious damage
to the appliance. Use only with a cart, stand, tripod, bracket,
or table recommended by the manufacturer, or sold with the
TV/DVD/VCR. Any mounting of
the appliance should follow the
manufacturer’s instructions and
should use a mounting accessory
recommended by the manufacturer.
An appliance and cart combination
should be moved with care.Quick
stops, excessive force, and uneven
surfaces may cause the appliance
and cart combination to overturn.
AMEUBLES- Cet appareil ne doit
être placé que sur un meuble (avec
ou sans roulettes) recommandé par
le fabricant. Si vous l’installez sur
un meuble à roulettes, déplacez les
deux ensembles avec précaution.
Un arrêt brusque, l’utilisation
d’une force excessive et des sur-
faces irrégulières risquent de désta-
biliser l’ensemble et de le renverser.
9. Ventilation-Slots and openings in the cabinet and the back
or bottom are provided for ventilation and to ensure reliable
operation of the TV/DVD/VCR and to protect it from over-
heating, and these openings must not be blocked or cov-
ered. The openings should never be blocked by placing the
TV/DVD/VCR on a bed, sofa, rug, or other similar surface.
This TV/DVD/VCR should never be placed near or over a
radiator or heat register. This TV/DVD/VCR should not be
placed in a built-in installation such as a bookcase or rack
unless proper ventilation is provided or the manufacturer’s
instructions have been adhered to.
10.Power Sources-This TV/DVD/VCR should be operated
only from the type of power source indicated on the mark-
ing label. If you are not sure of the type of power supply to
your home, consult your appliance dealer or local power
company. For TV/DVD/VCRs intended to operate from
battery power, or other sources, refer to the operating
instructions.
11.Grounding or Polarization-This TV/DVD/VCR is
equipped with a polarized alternating-current line plug(a
plug having one blade wider than the other). This plug will
fit into the power outlet only one way. This is a safety fea-
ture. If you are unable to insert the plug fully into the out-
let, try reversing the plug. If the plug should still fail to fit,
contact your electrician to replace your obsolete outlet. Do
not defeat the safety purpose of the polarized plug.
12.Power-Cord Protection-Power-supply cords should be
routed so that they are not likely to be walked on or
pinched by items placed upon or against them, paying par-
ticular attention to cords at plugs, convenience receptacles,
and the point where they exit from the appliance.
- 2 - EN
1B15
WARNING: TO REDUCE THE RISK OF FIRE OR ELECTRIC SHOCK, DO NOT EXPOSE THIS APPLIANCE
TO RAIN OR MOISTURE.
CAUTION: TO REDUCE THE RISK OF ELECTRIC
SHOCK, DO NOT REMOVE COVER (OR BACK).
NO USER SERVICEABLE PARTS INSIDE. REFER
SERVICING TO QUALIFIED SERVICE PERSON-
NEL.
CAUTION
RISK OF ELECTRIC SHOCK
DO NOT OPEN
THIS SYMBOL INDICATES THAT DAN-
GEROUS VOLTAGE CONSTITUTING A
RISK OF ELECTRIC SHOCK IS PRESENT
WITHIN THIS UNIT.
THIS SYMBOL INDICATES THAT THERE
ARE IMPORTANT OPERATING AND
MAINTENANCE INSTRUCTIONS IN THE
LITERATURE ACCOMPANYING THE
APPLIANCE.
The caution marking is located on the rear of the cabinet.
IMPORTANT SAFEGUARDS
PORTABLE CART WARNING
S3126A
SYMBOLE D'AVERTISSEMENT POUR
LES COMPOSANTES
APPAREIL ET MEUBLE A ROULETTES
S3126A
TD860HL(P01-34).qx33 03.10.21 11:55 AM Page 2

- 3 - EN
1B15
13.Outdoor Antenna grounding-If an outside antenna or
cable system is connected to the TV/DVD/VCR, be sure
the antenna or cable system is grounded so as to provide
some protection against voltage surges and built-up static
charges. Article 810 of the National Electrical Code,
ANSI/NFPA No. 70, provides information with respect to
proper grounding of the mast and supporting structure,
grounding of the lead-in wire to an antenna discharge unit,
size of grounding conductors, location of antenna-discharge
unit, connection to grounding electrodes, and requirements
for the grounding electrode. (Fig. A)
14.Lightning-For added protection for this TV/DVD/VCR
receiver during a lightning storm, or when it is left unat-
tended and unused for long periods of time, unplug it from
the wall outlet and disconnect the antenna or cable system.
This will prevent damage to the TV/DVD/VCR due to
lightning and power-line surges.
15.Power Lines-An outside antenna system should not be
located in the vicinity of overhead power lines or other
electric light or power circuits, or where it can fall into
such power lines or circuits. When installing an outside
antenna system, extreme care should be taken to keep from
touching such power lines or circuits as contact with them
might be fatal.
16.Overloading-Do not overload wall outlets and extension
cords as this can result in a risk of fire or electric shock.
17.Object and Liquid Entry-Never push objects of any kind
into this TV/DVD/VCR through openings as they may
touch dangerous voltage points or short out parts that could
result in a fire or electric shock. Never spill liquid of any
kind on the TV/DVD/VCR.
18.Servicing-Do not attempt to service this TV/DVD/VCR
yourself as opening or removing covers may expose you to
dangerous voltage or other hazards. Refer all servicing to
qualified service personnel.
19.Damage Requiring Service-Unplug this TV/DVD/VCR
from the wall outlet and refer servicing to qualified service
personnel under the following conditions:
a. When the power-supply cord or plug is damaged or frayed.
b. If liquid has been spilled, or objects have fallen into the
TV/DVD/VCR.
c. If the TV/DVD/VCR has been exposed to rain or water.
d. If the TV/DVD/VCR does not operate normally by follow-
ing the operating instructions. Adjust only those controls
that are covered by the operating instructions, as improper
adjustment of other controls may result in damage and will
often require extensive work by a qualified technician to
restore the TV/DVD/VCR to its normal operation.
e. If the TV/DVD/VCR has been dropped or damaged in any
way.
f. When the TV/DVD/VCR exhibits a distinct change in per-
formance-this indicates a need for service.
20.Replacement Parts-When replacement parts are required,
be sure the service technician has used replacement parts
specified by the manufacturer that have the same character-
istics as the original part. Unauthorized substitutions may
result in fire, electric shock, injury to persons or other haz-
ards.
21.Safety Check-Upon completion of any service or repairs to
this TV/DVD/VCR, ask the service technician to perform
routine safety checks to determine that the TV/DVD/VCR
is in proper operating condition.
22.Heat-This TV/DVD/VCR product should be situated away
from heat sources such as radiators, heat registers, stoves,
or other products (including amplifiers) that produce heat.
GROUND CLAMPS
NEC - NATIONAL ELECTRICAL CODE
EXAMPLE OF ANTENNA GROUNDING AS PER
NATIONAL ELECTRICAL CODE
S2898A
WIRE
DISCHARGE UNIT
(NEC SECTION 810-20)
GROUNDING CONDUCTORS
(NEC SECTION 810-21)
ELECTRODE SYSTEM
(NEC ART 250, PART H)
SERVICE
EQUIPMENT
CLAMP
ANTENNA
LEAD IN
ANTENNA
POWER SERVICE GROUNDING
GROUND
ELECTRIC
FIGURE A
CAUTION: TO PREVENT ELECTRIC SHOCK, MATCH WIDE BLADE OF PLUG TO WIDE SLOT, FULLY
INSERT.
ATTENTION: POUR ÉVITER LES CHOC ÉLECTRIQUES, INTRODUIRE LA LAME LA PLUS LARGE DE
LA FICHE DANS LA BORNE CORRESPONDANTE DE LA PRISE ET POUSSER JUSQU’AU FOND.
TD860HL(P01-34).qx33 03.10.21 11:55 AM Page 3

- 4 - EN
1B15
RADIO-TV INTERFERENCE
This equipment has been tested and found to com-
ply with the limits for a Class B digital device, pur-
suant to Part 15 of the FCC Rules. These limits are
designed to provide reasonable protection against
harmful interference in a residential installation.
This equipment generates, uses, and can radiate
radio frequency energy and, if not installed and
used in accordance with the instructions, may cause
harmful interference to radio communications.
However, there is no guarantee that interference
will not occur in a particular installation. If this
equipment does cause harmful interference to
radio or television reception, which can be deter-
mined by turning the equipment off and on, the
user is encouraged to try to correct the interfer-
ence by one or more of the following measures:
1) Reorient or relocate the receiving antenna.
2) Increase the separation between the equipment
and receiver.
3) Connect the equipment into an outlet on a cir-
cuit different from that to which the receiver is
connected.
4) Consult the dealer or an experienced radio/TV
technician for help.
FCC WARNING- This equipment may gener-
ate or use radio frequency energy. Changes or
modifications to this equipment may cause
harmful interference unless the modifications
are expressly approved in the instruction man-
ual. The user could lose the authority to oper-
ate this equipment if an unauthorized change
or modification is made.
IMPORTANT COPYRIGHT INFORMATION
Unauthorized copying, broadcasting, public perfor-
mance and lending of discs are prohibited.
This product incorporates copyright protection tech-
nology that is protected by method claims of certain
U.S. patents and other intellectual property rights
owned by Macrovision Corporation and other rights
owners. Use of this copyright protection technology
must be authorized by Macrovision Corporation,
and is intended for home and other limited viewing
uses only unless otherwise authorized by
Macrovision Corporation. Reverse engineering or
disassembly is prohibited.
LASER SAFETY
This unit employs a laser. Only a qualified service
person should remove the cover or attempt to ser-
vice this device, due to possible eye injury.
CAUTION: USE OF CONTROLS OR ADJUST-
MENTS OR PERFORMANCE OF PROCE-
DURES OTHER THAN THOSE SPECIFIED
HEREIN MAY RESULT IN HAZARDOUS
RADIATION EXPOSURE.
CAUTION: VISIBLE AND INVISIBLE LASER
RADIATION WHEN OPEN AND INTERLOCK
DEFEATED. DO NOT STARE INTO BEAM.
LOCATION: INSIDE, NEAR THE DECK
MECHANISM.
This Class B digital apparatus complies with
Canadian ICES-003.
Cet appareil numérique de la classe B est con-
forme à la norme NMB-003 du Canada.
CAUTION: TO PREVENT ELECTRIC SHOCK,
MATCH WIDE BLADE OF PLUG TO WIDE
SLOT, FULLY INSERT.
ATTENTION: POUR ÉVITER LES CHOC
ÉLECTRIQUES, INTRODUIRE LA LAME LA
PLUS LARGE DE LA FICHE DANS LA
BORNE CORRESPONDANTE DE LA PRISE
ET POUSSER JUSQU’AU FOND.
PRECAUTIONS
TD860HL(P01-34).qx33 03.10.21 11:55 AM Page 4

- 5 - EN
1C29
AVOID THE HAZARDS OF
ELECTRICAL SHOCK AND FIRE
LOCATION
For safe operation and satisfactory performance of
your TV/DVD/VCR, keep the following in mind
when selecting a place for its installation:
•Shield it from direct sunlight and keep it away from
sources of intense heat.
•Avoid dusty or humid places.
•Avoid places with insufficient ventilation for proper
heat dissipation. Do not block the ventilation holes at
the top and bottom of the unit. Do not place the unit
on a carpet because this will block the ventilation
holes.
•Install unit in a horizontal position.
•Avoid locations subject to strong vibration.
•Do not place the TV/DVD/VCR near strong magnetic
fields.
•Avoid moving TV/DVD/VCR to locations where
temperature differences are extreme.
•Do not handle the power cord with wet hands.
•Do not pull on the power cord when disconnecting
it from an AC wall outlet. Grasp it by the plug.
•If, by accident, water is spilled on your unit, unplug
the power cord immediately and take the unit to an
Authorized Service Center for servicing.
•Do not put your fingers or objects into the
TV/DVD/VCR disc loading tray.
•Do not place anything directly on top of the unit.
WARNING
Moisture condensation may occur inside the unit
when it is moved from a cold place to a warm place,
or after heating a cold room or under conditions of
high humidity. If a DVD is played in a TV/DVD/
VCR which has moisture, it may damage the DVD
and TV/DVD/VCR. Therefore when condensation
occurs inside the unit, turn the POWER on and allow
at least 2 hours for the unit to dry out.
The serial number of this product may be found on the back of the unit. No other TV/DVD/VCR has the same
serial number as yours. You should record the number and other vital information here and retain this book as
a permanent record of your purchase to aid identification in case of theft. Serial numbers are not kept on file.
Date of Purchase
Dealer Purchase from
Dealer Address
Dealer Phone No.
Model No.
Serial No.
ANOTE ABOUT RECYCLING
This product’s packaging materials are recyclable and can be reused. Please dispose of any materials in
accordance with your local recycling regulations.
Batteries should never be thrown away or incinerated but disposed of in accordance with your local regula-
tions concerning chemical wastes.
The following symbols below appear in some head-
ings and notes in this manual, with the following
meanings
: Description refers to TV/VCR operation (in the
TV/VCR mode).
: Description refers to playback of DVD video discs
(in the DVD mode).
: Description refers to playback of audio CDs
(in the DVD mode).
: Description refers to playback of MP3 discs
(in the DVD mode).
: Description refers to the items to be set by the
QUICK mode (in the DVD mode).
QUICK
MP3
CD
DVD-V
TV/VCR
SYMBOLS USED IN THIS MANUAL
TD860HL(P01-34).qx33 03.10.21 11:55 AM Page 5

- 6 - EN
1C29
TABLE OF CONTENTS
CIMPORTANT SAFEGUARDS . . .2, 3
CPRECAUTIONS . . . . . . . . . . . . . . . .4
LOCATION . . . . . . . . . . . . . . . . . . .5
AVOID THE HAZARDS OF
ELECTRICAL SHOCK AND FIRE .5
WARNING . . . . . . . . . . . . . . . . . . . .5
SYMBOLS USED IN THIS
MANUAL . . . . . . . . . . . . . . . . . . . . .5
CTABLE OF CONTENTS . . . . . . . . . .6
CFEATURES . . . . . . . . . . . . . . . . . .7, 8
COPERATING CONTROLS AND
FUNCTIONS . . . . . . . . . . . . . . . .9, 10
CPREPARATION FOR USE . . . . . . .11
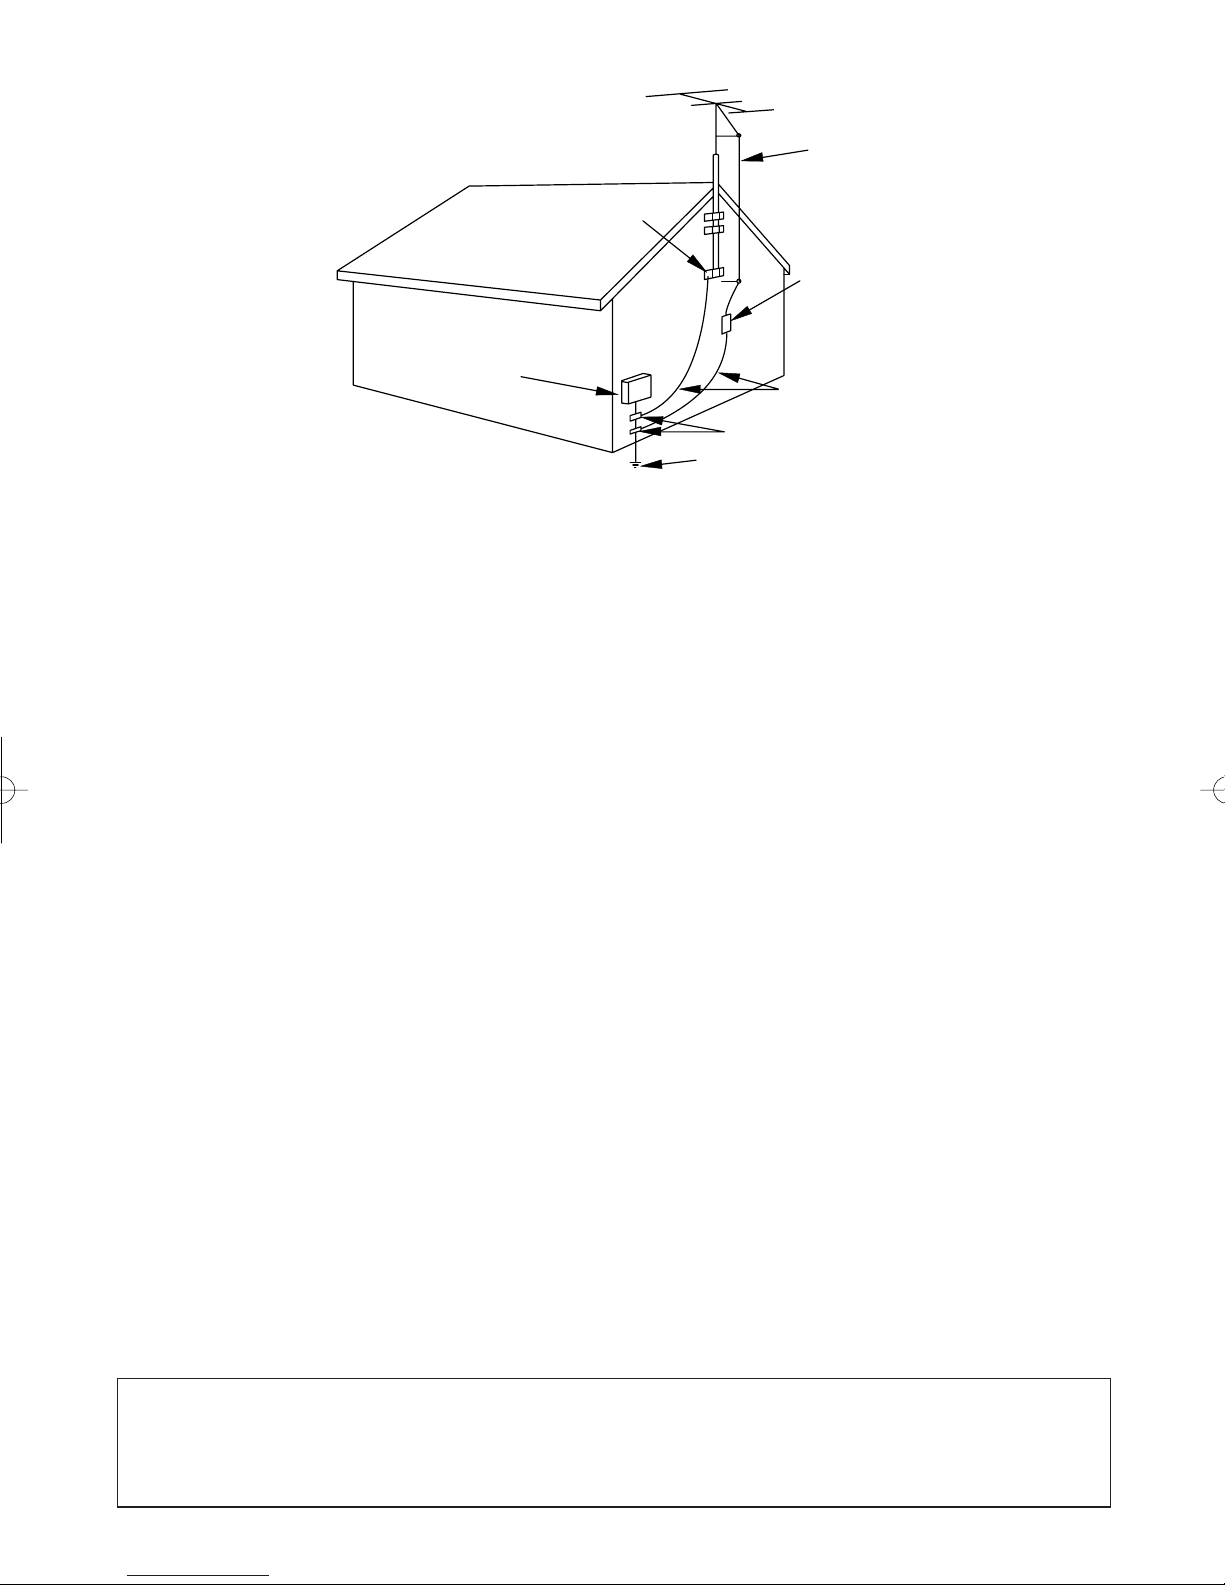
ANTENNA/CABLE
CONNECTION . . . . . . . . . . . . . . . .11
CONNECTING TO EXTERNAL
INPUT JACKS . . . . . . . . . . . . . . . .12
INSTALLING THE BATTERIES . .12
EXTERNAL INPUT MODE . . . . . .12
CONNECTING TO A STEREO
AMPLIFIER EQUIPPED WITH A
COAXIAL DIGITAL INPUT JACK
(DVD Sound only) . . . . . . . . . . . . .13
CONNECTING TO A DOLBY
DIGITAL RECEIVER
(DVD Sound only) . . . . . . . . . . . . .13
TV/VCR SECTION
CSET UP FOR USE . . . . . . . . . . . . .14
CHANNEL SET UP
FOR THE FIRST TIME . . . . . . . . .14
DELETING (OR ADDING)
CHANNEL . . . . . . . . . . . . . . . . . . .14
CHANNEL SET UP AGAIN . . . . . .15
SELECTING THE LANGUAGE . .15
DAYLIGHT-SAVING TIME . . . . . .15
CLOCK SET UP
(AUTO / MANUAL) . . . . . . . . .16, 17
CTV OPERATION . . . . . . . . . . . . . . .18
WATCHING A TV PROGRAM . . .18
DEGAUSSING . . . . . . . . . . . . . . . .18
PICTURE CONTROL . . . . . . . . . . .18
CLOSED CAPTION SYSTEM . . . .19
V-CHIP SET UP . . . . . . . . . . . .20, 21
CMTS(Multi-Channel Television
sound)SYSTEM . . . . . . . . . . . . . . . .22
CHECKING THE SELECTED
MTS MODE . . . . . . . . . . . . . . . . . .22
MTS RECORDING/MONITOR
MODE . . . . . . . . . . . . . . . . . . . . . .22
SELECTING THE MTS SYSTEM .23
CVIDEO CASSETTE . . . . . . . . . . . . .24
CPLAYBACK . . . . . . . . . . . . . . . . . . .25
NORMAL PLAYBACK . . . . . . . . .25
TRACKING ADJUSTMENT . . . . .25
SLOW MOTION . . . . . . . . . . . . . .25
PICTURE SEARCH . . . . . . . . . . . .25
STILL PICTURE . . . . . . . . . . . . . .25
VERTICAL HOLD CONTROL . . .25
CSPECIAL PLAYBACK . . . . . . . . . .26
RENTAL PLAYBACK . . . . . . . . . .26
AUTO REPEAT PLAYBACK . . . . .26
CSEARCH . . . . . . . . . . . . . . . . . . . . .27
ZERO RETURN . . . . . . . . . . . . . . .27
TIME SEARCH . . . . . . . . . . . . . . .27
INDEX SEARCH . . . . . . . . . . . . . .28
CSPECIAL FEATURES . . . . . . . . . .28
REAL TIME TAPE COUNTER . . .28
AUTO REWIND-EJECT . . . . . . . .28
CRECORDING . . . . . . . . . . . . . . . . .29
NORMAL RECORDING . . . . . . . .29
SKIPPING UNWANTED SCENES
DURING
RECORDING . . . . . . . . . . . . . . . . .29
OTR (One Touch Recording) . . . . . .30
COPYING A VIDEO CASSETTE
(Requires a VCR or camcorder) . . .30
CTIMER . . . . . . . . . . . . . . . . . . . . . .31
AUTOMATIC
TIMER RECORDING . . . . . . . . . .31
TIMER PROGRAM EXTENSION .32
HINTS FOR AUTOMATIC TIMER
RECORDING . . . . . . . . . . . . . . . . .33
AUTO RETURN . . . . . . . . . . . . . . .33
SLEEP TIMER . . . . . . . . . . . . . . . .33
CON SCREEN DISPLAY . . . . . . . . .34
CCABLE CHANNEL
DESIGNATIONS . . . . . . . . . . . . . .34
DVD SECTION
CABOUT THE DISCS . . . . . . . . . . . .35
PLAYABLE DISCS . . . . . . . . . . . .35
DISC TYPES . . . . . . . . . . . . . . . . .35
CPLAYING A DISC . . . . . . . . . . . . . .36
BASIC PLAYBACK . . . . . . . . . . . .36
GENERAL FEATURES . . . . . . . . .36
DISC MENU . . . . . . . . . . . . . . . . .36
TITLE MENU . . . . . . . . . . . . . . . . .36
RESUME . . . . . . . . . . . . . . . . . . . .37
PAUSE . . . . . . . . . . . . . . . . . . . . . .37
STEP BY STEP PLAYBACK . . . . .37
FAST FORWARD/REVERSE
SEARCH . . . . . . . . . . . . . . . . . . . .37
SLOW FORWARD / SLOW
REVERSE . . . . . . . . . . . . . . . . . . . .37
ZOOM . . . . . . . . . . . . . . . . . . . . . .37
CSEARCH FUNCTION . . . . . . . . . . .38
TRACK SEARCH . . . . . . . . . . . . .38
TITLE / CHAPTER SEARCH . . . .38
TIME SEARCH . . . . . . . . . . . . . . .38
MARKER SETUP SCREEN . . . . . .38
C
SPECIAL PLAYBACK FUNCTION . . .39
REPEAT . . . . . . . . . . . . . . . . . . . . .39
PROGRAM . . . . . . . . . . . . . . . . . . .39
RANDOM PLAYBACK . . . . . . . . .39
CPLAYING A MP3 DISC . . . . . . . . . .40
MP3 PLAYBACK . . . . . . . . . . . . . .40
TRACK SELECTION . . . . . . . . . . .40
PROGRAM . . . . . . . . . . . . . . . . . . .40
RANDOM PLAYBACK . . . . . . . . .40
CCHANGING THE SETTINGS . . . .41
SUBTITLE LANGUAGE . . . . . . . .41
AUDIO LANGUAGE . . . . . . . . . . .41
STEREO SOUND MODE . . . . . . . .41
CAMERA ANGLE . . . . . . . . . . . . .41
BLACK LEVEL SETTING . . . . . . .41
VIRTUAL SURROUND . . . . . . . . .41
C
THE ON-SCREEN INFORMATION . . .42
CCHANGING THE DVD SETUP
ITEMS . . . . . . . . . . . . . . . . . . . . . . .43
LANGUAGE SETTING . . . . . . . . .43
DISPLAY SETTING . . . . . . . . . . . .44
AUDIO SETTINGS . . . . . . . . . . . .44
PARENTAL CONTROL . . . . . . . . .45
CTROUBLESHOOTING GUIDE .46, 47, 48
CMAINTENANCE . . . . . . . . . . . . . . .49
DISC HANDLING . . . . . . . . . . . . .49
CSPECIFICATIONS . . . . . . . . . . . . .50
CWARRANTY . . . . . . . . . . .Back Cover
TD860HL(P01-34).qx33 03.10.21 11:55 AM Page 6

- 7 - EN
1C29
•
Hi-Fi system
–The Hi-Fi stereo recording system
offers you excellent sound quality with a dynamic
range of 80dB, frequency response from 20Hz to
20kHz, and 0.005% wow and flutter.
•
Rotary 4-head Record/Playback System–Four heads
ensure excellent picture quality and special effects playback.
•Index Search–
Fast-forwards to start of next recording.
•Slow Motion–View recorded program at slower
than normal speed.
•Infrared remote control
•Trilingual on screen tv/vcr setup display selec-
table in English or Spanish or French
•
Real time counter–This shows the elapsed recording
or playback time in hours, minutes, and seconds.
The
“–” indication will appear when the tape is rewound
further than the tape counter position “0:00:00”.
•181 channel capability PLL frequency synthesiz-
er tuner with direct station entry–(A converter
may be necessary to view scrambled cable chan-
nels.)
•Auto Clock Setting–Allows you to set the clock
function from a PBS broadcast station.
•Closed caption system–You may view specially
labeled (cc) TV programs, movies, news, prere-
corded tapes, etc. with either a dialogue caption or
text display added to the program.
•Auto power on and off system–Automatically
turns on the TV/DVD/VCR when you insert the
cassette, turns off after auto-rewind, and ejects
when the beginning of the tape is reached.
•Auto rewind when the end of a tape is
reached–This function is not active when using
timer recording.
•2 Step picture search operation–You can view a
video program at a high speed or super high speed
in either a forward or reverse direction in LP and
SLP mode. For SP mode only high speed.
•Three different playback tape speeds : SP/LP/SLP
•Two different recording tape speeds : SP/SLP
•Auto Head Cleaner–Automatically cleans video
heads as you insert or remove a cassette.
•Zero Return–The tape returns to counter of
0:00:00 by rewinding or fast forwarding.
•Still–“Freeze” the picture at any time, for close
viewing of a particular scene.
•Digital Auto Tracking (DTR)–Automatically
adjusts the tracking for each tape you play.
•Rental play mode–Improves playback picture
quality from worn tapes, such as rental tapes.
•Auto repeat–Allows you to repeat the playing of a
tape indefinitely without pressing the PLAY button.
•Time search–Let you set the TV/DVD/VCR to
advance the tape by entering the desired playback
time you want to skip.
•OTR (One Touch Recording)–Instant timed
recording from 30 to 480 minutes is possible at the
push of the REC/OTR button.
•1 Year, 8 events (including Daily and Weekly
Timer Recording)–The built-in timer allows you to
record up to 8 programs at different times on dif-
ferent channels up to 1 year in advance. The Daily
timer allows recordings to be made of daily broad-
casts, and the Weekly timer allows recording to be
made once a week up to the end of the tape.
•Auto return–After timer recording is finished, the
TV/DVD/VCR can return to the beginning of the
recording.
•Sleep timer–Allows you to have the
TV/DVD/VCR
automatically turn on or off at a desired time.
Timer Program Extension–Allow you to shift the
time schedule for automatic timer recording.
•V-CHIP–Enables parents to prevent their children
from watching inappropriate material on TV.
FEATURES
VCR Mode
ANOTE ABOUT RECYCLING
This product’s packaging materials are recyclable and can be reused. Please dispose of any materials in
accordance with your local recycling regulations.
Batteries should never be thrown away or incinerated but disposed of in accordance with your local regula-
tions concerning chemical wastes.
TD860HL(P01-34).qx33 03.10.21 11:55 AM Page 7

- 8 - EN
1C29
¡Dolby Digital sound
This player can output a Dolby Digital Signal via
the coaxial digital audio jack.
¡Still/fast/slow/step playback
Various playback modes are available including still
pictures, fast forward/reverse, slow motion and step
frames.
¡Random playback for audio CD and MP3
This player can shuffle the order of tracks to play
them in random order.
¡Program playback for audio CD and MP3
You can program the order of tracks to play them in
any desired order.
¡DVD menus in a desired language
You can display DVD menus in a desired language,
if available on a DVD.
¡Screen saver/Auto power-off functions
The screen saver program starts when there is no
input from the player for five minutes in the stop
mode. When the screen saver program is activated
for 15 minutes, the power automatically turns off.
¡Subtitles in a desired language
You can select a desired language for the display
subtitles, if that language is available on a disc.
¡Selecting a camera angle
You can select the desired camera angle, if a disc
contains sequences recorded from different angles.
¡Choices for audio language and sound mode
You can select the desired audio language and sound
mode, if different languages and modes are available
on a disc.
¡Parental lock
You can set the control level to limit playback of
discs which may not be suitable for children.
¡Automatic detection of discs
This player automatically detects if the loaded disc is
DVD, audio CD or MP3 on disc.
¡Playback MP3 disc
¡On-screen display
Information about the current operation can be dis-
played on a TV screen, allowing you to confirm the
currently active functions (such as program play-
back), on the TV screen using the remote control.
¡Search
Chapter search / Title search / Track search / Time
search
¡Repeat
Chapter / Title / Track / Group / All / A-B
¡Zoom
Magnified screen can be displayed.
¡Marker
Marker allows the user to return to a specific scene
on a disc.
¡Resume Play
User can resume playback from the part at which the
play was stopped.
¡Virtual Surround Sound
¡Bit rate indication
¡DRC (Dynamic range control)
You can limit the dynamic range of the audio.
NOTE:
•We do not recommend the use of universal remote controls. Not all of the functions may be controlled with
a universal remote control.
If you decide to use a universal remote control with this TV/VCR/DVD, please be aware that the code num-
ber given may not operate this TV/VCR/DVD. In this case, please call the manufacturer of the universal
remote control.
DVD Mode
TD860HL(P01-34).qx33 03.10.21 11:55 AM Page 8

- 9 - EN
1C29
OPERATING CONTROLS AND FUNCTIONS
5.STOP Button
Front panel
[P.36]
Press to stop the disc motion.
Remote Control
● DVD mode
[P.36]
Press to stop the disc motion.
● TV/VCR mode
[P.25]
Press to stop the tape motion.
6.OPEN/CLOSE Button
[DVD P.36]
Press to insert discs into or remove them from the
tray.
7.Disc loading tray
8.DVD Indicator
Lights on during DVD mode.
9.SELECT Button
Press to change to TV/VCR mode, Front A/V
input mode or DVD mode.
10.TV/VCR Indicator
Lights on during TV/VCR mode.
11. CHANNEL K/LButtons
Press to select memorized channel.
12. Recording Indicator
Flashes during recording. Lights up in the Stand-
by mode for Timer Recording.
13. REC/OTR (RECORD)Button
[TV/VCR P.29, 30]
Press for manual recording. Activates One Touch
Recording. (OTR is only during TV/VCR mode.)
14. REW Button (for TV/VCR)
[TV/VCR P.25]
Press to rewind the tape, or to view the picture
rapidly in reverse during playback mode. (Rewind
Search)
15. FWD Button (for TV/VCR)
[TV/VCR P.25]
Press to rapidly advance the tape, or to view the
picture rapidly in forward during playback mode.
(Forward Search)
16. STOP/EJECT Button
[TV/VCR P.27]
Press to stop the tape motion. Press in the Stop
mode to remove tape from the TV/VCR/DVD.
17. Remote control sensor window
- REMOTE CONTROL - [Fig. 2]
1.POWER Button
[TV/VCR P.14 / DVD P.36]
Press to turn the power on and off.
2.VOLUME X/ YButtons
Press to control the volume level for the DVD and TV.
3.SKIP Buttons (for DVD)
[P.37]
Press once to skip chapters or tracks to a desired
point.
Press and hold to change forward or reverse play-
back speed.
4.PLAY Button
[TV/VCR P.25 / DVD P.36]
Starts playback of the disc or tape contents.
- TV/DVD/VCR FRONT PANEL - [Fig.1]
SKIP STOP OPEN/CLOSE REC/OTR REW PLAY F.PWD
HEADPHONE
VIDEO AUDIO
STOP/EJECT
PLAY
VOLUME SELECT CHANNELPOWER
SEARCH
SKIP
DVD TV/VCR
L R
12 4 5 6 1071514983 3 411 12 13 2120191817
16
PAUSE
PLAY
STOP
ENTER
RECORD
DISC
MENU
RETURNTITLESETUP
A
-
B
REPEATSEARCH MODE
CLEAR
MODE ANGLESUBTITLEAUDIO
DISPLAY
SPEED C.RESET
POWER PICTURE SELECTSLEEP
CH.
VOL.
MUTEZOOM
123
456
789
0+10
+100
34
35
23
24
26
25
3 (DVD)
14 (TV/VCR)
13
27
28
30
31
33
32
29
4
36
37
38
41
3 (DVD)
15 (TV/VCR)
43
2
11
45
44
42
39
40
1
22
5(TV/VCR
/DVD/CD)
TD860HL(P01-34).qx33 03.10.21 11:55 AM Page 9

- 10 - EN
1C29
ANT.
COAXIAL
4746 48
18. HEADPHONE Jack
To connect headphone (not supplied) for personal
listening.
19. VIDEO input Jack
Connect to the video output jack of a video
camera, VCR, or video game system.
20. AUDIO L/R input Jacks
Connect to the audio output jacks of a video
camera, VCR, or video game system.
21. Cassette compartment
22. PICTURE Button
Press to adjust the picture.
23. Number Buttons
TV Mode:
[P.15]
Press two digits to directly access the desired
channel.
Remember to press a "0" before a single digit
channel.
+100 Button–
Press to select cable channels which are equal or
greater than number 100.
DVD Mode:
Press to enter the desired number.
+10 Button–
Press to enter the desired numbers which are
equal or greater than number 10.
24. PAUSE Button
[TV/VCR P.25 / DVD P.37]
Pauses the current disc or tape operation.
25. SPEED Button
[TV/VCR P.29]
Press to choose the desired recording speed:
SP/SLP.
26. C.RESET Button
[TV/VCR P.27]
Press to reset counter to 0:00:00.
Press to cancel a setting of timer program. (See
page 32.)
27. DISPLAY Button
TV/VCR Mode:
Display the counter or the current channel number
and current time on the TV screen.
DVD Mode:
[P.42]
Displays the current status on the TV screen for
checking purposes.
28. SETUP Button
[TV/VCR P.14-17] [DVD P.43-45]
Press to enter or exit the TV menu or DVD setup
mode.
29. TITLE Button
[DVD P.36]
Displays the title menu.
30. CLEAR Button
Resets a setting.
31. MODE Button
[DVD P.40]
Activates program playback or random playback mode.
32. SEARCH MODE Button
[DVD P.38]
Press to locate a desired point.
33. AUDIO Button
[DVD P.41]
Press to select a desired audio language or sound
mode.
34. SUBTITLE Button
[DVD P.41]
Press to select a desired subtitle language.
35. REPEAT Button
[DVD P.39]
Repeats playback of the current disc, title, chapter
or track.
36. ANGLE Button (DVD mode)
[DVD P.41]
Press to change the camera angle to see the
sequence being played back from a different angle.
37. A-B REPEAT Button
[DVD P.39]
Repeats playback of a selected section.
38. RETURN Button
Returns to the previous operation in the DVD
setup mode.
39. ENTER Button
Press to accept a setting.
40. Arrow Buttons
TV/VCR Mode:
Press to select a setting mode from the menu on
the TV screen.
Press to select or adjust from a particular menu.
DVD Mode:
Use when making settings while watching the
display on a TV screen.
41. DISC MENU Button
[DVD P.36]
Displays the menus in the DVD.
42. ZOOM Button
[DVD P.37]
Enlarges part of a DVD-reproduced image.
43. MUTE Button
Mutes the sound. Press it again to resume sound.
- TV/DVD/VCR REAR PANEL - [Fig.3]
TD860HL(P01-34).qx33 03.10.21 11:55 AM Page 10

- 11 - EN
1C29
CABLE WITH CONVERTER/
DESCRAMBLER BOX OR SATELLITE
BOX
If your cable service supplies you with a converter
box or if you use a satellite system, you can use the
basic connection shown in the illustration.
By using this connection you can also record scram-
bled channels. However, channel selection must be
made with the converter box or satellite box. This
means that channels cannot be changed using the
TV/DVD/VCR Remote Control. Unattended timer
recording is limited to one channel at a time.
PREPARATION FOR USE
CABLE WITHOUT CONVERTER/
DESCRAMBLER BOX
Use this connection if your cable system connects
directly to your TV/DVD/VCR without a converter
box.
By using this connection you can:
1) Use the TV/DVD/VCR remote to select channels.
2) Program one or more unscrambled channels for
Automatic Timer Recording.
NOTE: This TV/VCR/DVD will ONLYrecord and
view the same channel.
VHF/UHF SEPARATE ANTENNAS
In some areas it will be necessary to use an outdoor
antenna.
Antenna/Cable Connections
Continued on the Next Page.
ANT.
COAXIAL
ANT.
IN
OUT
or
VHF/UHF Antenna
(Not supplied)
VHF/UHF
Combiner
(Not supplied)
Flat twin-lead cable
UHF Antenna
(Not supplied)
VHF Antenna (Not supplied)
From Cable
System
75-ohm Coaxial
Cable (Not
supplied)
75-ohm
Coaxial
Cable
(Not sup-
plied)
Satellite Box or
Cable Box (Not supplied)
From Cable System or
Satellite Dish
44. SLEEP Button
[TV/VCR P.33]
Sets the Sleep Timer.
45. SELECT Button
Press to switch TV/VCR and DVD mode. You
can see the mode (TV/VCR or DVD) on the front
panel indicator.
46. ANT. in Jack
Connect to an antenna, cable system, or satellite
system.
47. Power cord
Connect to a standard AC outlet (120V/60Hz).
NOTE: Remove the power cord from the hook to
avoid breaking a wire before you connect
to a standard AC outlet.
48. COAXIAL digital audio out Jack
Connect to the digital input of an external Home
theater audio system (Not supplied)
[Fig. 4]
ANTENNA/CABLE CONNECTION
or
or
TD860HL(P01-34).qx33 03.10.21 11:55 AM Page 11

- 12 - EN
1C29
TO RECORD A SCRAMBLED/UNSCRAM-
BLED CHANNEL
1. Set the TV/DVD/VCR channel selector to the out-
put channel of the Cable Converter Box or Satellite
Box. (Ex. CH3)
2.Select the channel to record from your Cable
Converter Box or Satellite Box.
INSTALLING THE BATTERIES
1)Open the battery compartment cover by pressing
the cover on the remote unit in the direction of the
arrow.
2)Insert 2 “AA” penlight batteries into the battery
compartment in the direction indicated by the
polarity (+/-) markings.
3)Replace the cover.
EXTERNAL INPUT MODE
When using an external input signal (another VCR or
video camera), connect the player’s audio/video out-
put cables to the AUDIO L/R IN/
VIDEO IN jacks of your
TV/DVD/VCR. Then press the
CHANNEL button Kor Luntil
“AUX” appears on the screen.
AUX
Note to CATV system installer:
This reminder is provided to call the CATV sys-
tem installer’s attention to Article 820-40 of the
NEC that provides guidelines for proper ground-
ing and, in particular, specifies that the cable
ground shall be connected to the grounding sys-
tem of the building as close to the point of cable
entry as practical.
CONNECTING TO EXTERNAL
INPUT JACKS
When you watch a program recorded on an another
source (VCR or video camera), use the audio/video
input jacks on the front of the TV/DVD/VCR.
Connect the audio/video output jacks of another
source to the AUDIO L/R and VIDEO jacks of this
TV/DVD/VCR.
Then press the CHANNEL buttons K/Luntil "AUX"
appears on the screen.
NOTE:
•When you connect a monaural VCR (another
source) to this TV/DVD/VCR, connect the Audio
output jack of the monaural VCR (another source)
to the AUDIO L jack of this TV/DVD/VCR. The
audio will output in both L and R channel equally.
HEADPHONE
VIDEO AUDIOL R
[Another source]
To the audio
output jacks
Audio/Video
coaxial cable
(not supplied)
etc.
To the video
output jack
[Front of the
TV/DVD/VCR]
[Fig. 5]
TD860HL(P01-34).qx33 03.10.21 11:55 AM Page 12

- 13 - EN
1C29
CONNECTING TO A STEREO AMPLIFIER EQUIPPED WITH A
COAXIAL DIGITAL INPUT JACK (DVD Sound only)
Use an audio coaxial digital cable available at retail for the audio connections.
Connecting to an amplifier equipped with digital input jacks.
NOTES:
•The audio source on a disc in a 5.1 channel Dolby Digital surround format cannot be recorded as digital sound
by an MD or DAT deck.
•Be sure to turn off the power to all components in the system before connecting another component.
•Refer to the Owner's Manuals for the components to be connected to the TV/DVD/VCR.
•Set Dolby Digital to OFF for audio output in the setup mode. Playing a TV/DVD/VCR using incorrect set-
tings may generate noise distortion, and may also damage the speakers.
ANT.
COAXIAL
Amplifier equipped with
digital input jacks
To COAXIAL DIGITAL
AUDIO INPUT jack
To DIGITAL AUDIO OUT(PCM/BITSTREAM)
COAXIAL jack(only DVD AUDIO OUT)
[Fig. 6]
Front speaker
(left)
Center
speaker Front speaker
(right)
Surround
speaker
(left)
Surround
speaker
(right)
Subwoofer To DIGITAL AUDIO OUT(PCM/BITSTREAM)
COAXIAL jack
To COAXIAL DIGITAL
AUDIO INPUT jack
Dolby Digital
decoder
ANT.
COAXIAL
[Fig. 7]
CONNECTING TO A DOLBY DIGITAL RECEIVER (DVD Sound only)
If using this TV/DVD/VCR to play a DVD disc in a 5.1 channel Dolby Digital surround format, the
TV/DVD/VCR outputs a DOLBY DIGITAL Data stream from its COAXIAL digital audio out jack. By hook-
ing the player up to a Dolby Digital decoder, you can enjoy a more convincing, realistic ambience with power-
ful and high-quality surround sound as enjoyed in movie theaters.
Use audio coaxial digital cables available at retail for the audio connections.
NOTES:
•Be sure to turn off the power to all components in the system before connecting another component.
•Refer to the Owner's Manuals for the components to be connected to the TV/DVD/VCR.
•If connected to a Dolby Digital decoder, set DOLBY DIGITAL to ON for audio output in the setup mode.
(See page 44 to set DOLBY DIGITAL to ON.)
•Unless connected to a Dolby Digital decoder, set DOLBY DIGITAL to OFF for audio output in the setup
mode. Playing a TV/DVD/VCR using incorrect settings may generate noise distortion, and may also damage
the speakers.
Manufactured under license from Dolby Laboratories. “Dolby” and the double-D symbol are
trademarks of Dolby Laboratories.
TD860HL(P01-34).qx33 03.10.21 11:55 AM Page 13

- 14 - EN
1C29
SET UP FOR USE
You can program the tuner to scan all the channels you receive in your area.
NOTE: Channel memory programming is NOT needed when connected to a cable box or satellite box. Just
select the TV/DVD/VCR channel selector to the output channel of the cable box or satellite box (Ex CH3).
Then select the channel to be viewed on the Cable Box or Satellite Box.
CHANNEL SET UP FOR THE
FIRST TIME
1Plug in the TV/DVD/VCR power
cord
Plug the TV/DVD/VCR power cord
into a standard AC outlet.
NOTE:
•If some digits appear in the corner of
the screen, press the POWER button without
unplugging the power cord.
2Turn on the TV/DVD/VCR
Press the POWER button to turn on the TV/DVD/VCR.
3Select “ENGLISH” or “ESPAÑOL” or
“FRANÇAIS”
Select “ENGLISH” or
“ESPAÑOL”=Spanish or
“FRANÇAIS” =French using the
ENTER button. “[ ]” indicate the
selected language.
4Begin auto preset
Press the Arrow button Kor Lto
point to “AUTO PRESET”.
Then press the ENTER button.
The tuner scans and memorizes all
active channels in your area.
NOTES:
•The TV/DVD/VCR distinguishes between standard
TV channels and cable channels.
•If you want to play or record a video tape
BEFORE presetting the tuner, you must press the
SETUP button on the remote control. To preset the
tuner again, see “CHANNEL SET UP AGAIN” on
page 16.
•The TV/DVD/VCR may memorize TV channels as
CATV channels if reception conditions is poor. If
this happens, try AUTO MEMO action again when
reception conditions are better.
5After scanning
The tuner stops on the lowest memorized channel.
If you want to recall the selected channels, you can
select the desired channel directly with the remote con-
trol number buttons or the CHANNEL button Kor L.
TV/VCR
DELETING (OR ADDING)
CHANNEL
The channels you no longer receive or seldom watch
can be deleted from the memory. (Of course, you can
add the deleted channel into the memory again.)
1Select “CHANNEL SET UP”
Press the SETUP button on the
remote control.
Press the Arrow button Kor Lto
point to “CHANNEL SET UP”.
Then, press the ENTER button.
2Select “ADD/DELETE CH”
Press the Arrow button Kor Lto
point to “ADD/DELETE CH”.
Press the ENTER button.
3Enter the desired channel number
Press the Arrow button Kor Luntil
your desired channel number appears.
(You can also use the number buttons
or the CHANNEL buttons K/Lto
enter it) (Example: CH8)
4Delete (or add) it from (into) memory
Press the ENTER button. The channel number changes
to light red. The channel is deleted from memory.
•To delete another channel, repeat steps [3] and [4].
•If you press the ENTER button again, the channel
is memorized again.
•Press the RETURN button to return to TV/VCR
SETUP MENU.
5Exit the channel setup mode
Press the SETUP button on the remote control to
returns to TV mode.
NOTE: To confirm that channel(s) has been deleted
or added, press the CHANNEL button Kor L.
TV/VCR
Added channel: Light blue.
Deleted channel: Light red.
– SET UP –
BLANGUAGE
[ENGLISH] ESP FRA
AUTO PRESET
– SET UP –
LANGUAGE
[ENGLISH] ESP FRA
BAUTO PRESET
- TV/VCR SETUP -
TIMER PROGRAMMING
SETTING CLOCK
BCHANNEL SET UP
USER’S SET UP
V-CHIP SET UP
LANGUAGE [ENGLISH]
CAPTION [OFF]
ZERO RETURN
TIME SEARCH
INDEX SEARCH
– CHANNEL SET UP –
BADD / DELETE CH (TV)
AUTO PRESET
08
ADD / DELETE
TV/VCR SECTION
TD860HL(P01-34).qx33 03.10.21 11:55 AM Page 14

- 15 - EN
1C29
CHANNEL SET UP AGAIN
Make sure ...
•Press the POWER button to turn on the
TV/DVD/VCR.
1Select “CHANNEL SET UP”
Press the SETUP button on the
remote control.
Press the Arrow button Kor Lto
point to “CHANNEL SET UP”.
Then, press the ENTER button.
2Begin auto preset
Press the Arrow button Kor Lto
point to “AUTO PRESET”.
Then, press the ENTER button.
The tuner scans and memorizes all
the active channels in your area.
3After scanning
The tuner stops on the lowest memorized channel.
TV/VCR
SELECTING THE LANGUAGE
Make sure ...
•Press the POWER button to turn on the
TV/DVD/VCR.
NOTE: This function effects only the language on
the screen menu and not the audio source.
1Select “LANGUAGE”
Press the SETUP button on the
remote control.
Press the Arrow button Kor Lto
point to “LANGUAGE”.
2Select “ENGLISH” or “ESPAÑOL” or
“FRANÇAIS”
Select “ENGLISH” or “ESPAÑOL”= Spanish or
“FRANÇAIS”= French using the ENTER button.
3Exit the Language mode
Press the SETUP button on the remote control to
return to TV mode.
TV/VCR
NOTE: If Spanish or French is selected accidentally,
1)Press the SETUP button on the remote control.
2)Press the Arrow button Kor Lto point to “IDIOMA
[ESPAÑOL]” or “LANGAGE” [FRANÇAIS].
3)Press the ENTER button to select your desired lan-
guage.
4)Press the SETUP button to exit.
DAYLIGHT-SAVING TIME
Select this feature and the TV/DVD/VCR’s clock
automatically will advance one hour in April, then
reverse one hour in October.
When Daylight-Saving Time is ON, the clock will
change automatically as follows:
•First Sunday of April : At 2 AM the clock imme-
diately changes to 3 AM. Any timer programming
you have set to occur between 2 AM and 3 AM
will not record.
•Last Sunday of October : At 2 AM the clock
immediately changes to 1 AM.
Make sure ...
•Press the POWER button to turn on the
TV/DVD/VCR.
1Select “SETTING CLOCK”
Press the SETUP button on the
remote control.
Press the Arrow button Kor Lto
point to “SETTING CLOCK.”
Then, press the ENTER button.
2Set “D.S.T.” (Daylight-Saving
Time) to [ON]
Press the Arrow button Kor Lto
point to “D.S.T.”
Then, press the ENTER button until
[ON] appears.
3Exit the Daylight-Saving Time mode
Press the SETUP button on the remote control to
return to TV mode.
TO CANCEL THE DAYLIGHT-SAVING
TIME
Repeat steps [1] to [2], select [OFF] using the
ENTER button.
TV/VCR
- TV/VCR SETUP -
TIMER PROGRAMMING
SETTING CLOCK
BCHANNEL SET UP
USER’S SET UP
V-CHIP SET UP
LANGUAGE [ENGLISH]
CAPTION [OFF]
ZERO RETURN
TIME SEARCH
INDEX SEARCH
– CHANNEL SET UP –
ADD / DELETE CH (TV)
BAUTO PRESET
- TV/VCR SETUP -
TIMER PROGRAMMING
SETTING CLOCK
CHANNEL SET UP
USER’S SET UP
V-CHIP SET UP
BLANGUAGE [ENGLISH]
CAPTION [OFF]
ZERO RETURN
TIME SEARCH
INDEX SEARCH
- TV/VCR SETUP -
TIMER PROGRAMMING
BSETTING CLOCK
CHANNEL SET UP
USER’S SET UP
V-CHIP SET UP
LANGUAGE [ENGLISH]
CAPTION [OFF]
ZERO RETURN
TIME SEARCH
INDEX SEARCH
– SETTING CLOCK –
AUTO CLOCK [ON]
AUTO CLOCK CH SEARCH
AUTO CLOCK CH [02]
MANUAL CLOCK SET
BD.S.T. [ON]
TD860HL(P01-34).qx33 03.10.21 11:55 AM Page 15

- 16 - EN
1C29
CLOCK SET UP
(AUTO / MANUAL)
The TV/DVD/VCR clock must be set correctly before
VCR timer recording is possible. It is suggested that the
clock be set manually when first setting up the
TV/DVD/VCR. Then, setup auto clock correction which
will periodically correct the setting if necessary.
NOTE: If you cannot receive a station with time sig-
nals, auto clock setting cannot be performed. Use
manual setting only.
MANUAL CLOCK SETTING
Make sure ...
•TV/DVD/VCR power is turned on.
In the example below, the clock is to be set to:
DATE May 6th, 2003
SETTING TIME 5:40PM
TV/VCR
1Select “SETTING CLOCK”
Press the SETUP button on the
remote control.
Press the Arrow button Kor Lto
point to “SETTING CLOCK”.
Then, press the ENTER button.
2Select “MANUAL CLOCK
SET”
Press the Arrow button Kor Lto
point to “MANUAL CLOCK SET”.
Then, press the ENTER button.
3Select the month
Press the Arrow button Kor Luntil
your desired month appears.
(Example: May →05)
Then, press the Arrow button B.
4Select the day
Press the Arrow button Kor Luntil
your desired day appears.
(Example: 6th →06)
Then, press the Arrow button B.
5Select the year
Press the Arrow button Kor Luntil
your desired year appears.
(Example: 2003)
Then, press the Arrow button B.
6Select the hour
Press the Arrow button Kor Luntil
your desired hour appears.
(Example: 5, PM)
Then, press the Arrow button B.
7Select the minute
Press the Arrow button Kor Luntil
the desired minute appears.
(Example: 40)
8Start the clock
Press the SETUP button on the
remote control.
Although seconds are not displayed,
they begin counting from 00 when
you press the SETUP button on the
remote control. Use this feature to synchronize the
clock with the correct time.
NOTE:
When unplugging the AC cord or if there is a power
failure for more than 3 seconds, you may have to
reset the clock.
TO CHANGE CLOCK SETTING
If you want to change the clock,
1)Follow steps [1] and [2].
2)Select where you want to change using the Arrow
button Bor s.
3)Enter correct numbers using the Arrow button Kor
L.
4)Press the SETUP button on the remote control to
start the clock.
PLEASE NOTE:
If there is no local PBS station in your area or on
your cable system, select “AUTO CLOCK” and
press the ENTER button to turn [OFF] this function.
Then you can manually adjust the clock.
– SETTING CLOCK –
AUTO CLOCK [ON]
AUTO CLOCK CH SEARCH
AUTO CLOCK CH [02]
BMANUAL CLOCK SET
D.S.T. [OFF]
– MANUAL CLOCK SET –
MONTH DAY YEAR
0 5 / – – – – – – – – –
HOUR MINUTE
– – : – – – –
– MANUAL CLOCK SET –
MONTH DAY YEAR
0 5 / 0 6 – – – – – – –
HOUR MINUTE
– – : – – – –
– MANUAL CLOCK SET –
MONTH DAY YEAR
0 5 / 0 6 TUE 2 0 0 3
HOUR MINUTE
– – : – – – –
– MANUAL CLOCK SET –
MONTH DAY YEAR
0 5 / 0 6 TUE 2 0 0 3
HOUR MINUTE
0 5 : – – PM
– MANUAL CLOCK SET –
MONTH DAY YEAR
0 5 / 0 6 TUE 2 0 0 3
HOUR MINUTE
0 5 : 4 0 PM
5:40 PM
- TV/VCR SETUP -
TIMER PROGRAMMING
BSETTING CLOCK
CHANNEL SET UP
USER’S SET UP
V-CHIP SET UP
LANGUAGE [ENGLISH]
CAPTION [OFF]
ZERO RETURN
TIME SEARCH
INDEX SEARCH
TD860HL(P01-34).qx33 03.10.21 11:55 AM Page 16

- 17 - EN
1C29
AUTOMATIC CLOCK SETTING
Make sure ...
•The TV/DVD/VCR is turned on.
•Confirm the TV/DVD/VCR is receiving a RF
(Radio Frequency) signal from either an antenna or
cable system connection using the ANT IN jack on
the rear of the TV/DVD/VCR.
NOTE:
•If a cable converter box is being used, make sure it
is powered on.
•You must use the TV/DVD/VCR remote control to
perform the clock setting procedure.
1Select “SETTING CLOCK”
Press the SETUP button on the
remote control.
Press the Arrow button Kor Lto
select “SETTING CLOCK”.
Press the ENTER button to enter
“SETTING CLOCK” menu.
2Set “AUTO CLOCK” to [ON]
Press the ENTER button until
AUTO CLOCK [ON] appears.
3Begin “AUTO CLOCK CH SEARCH”
Press the Arrow button Lto select “AUTO CLOCK
CH SEARCH”.
Press the ENTER button.
•The TV/DVD/VCR is now
searching for the station which
contain the auto clock set signal.
The search for a signal may take
up to 20 seconds per channel.
•“_ _” appears at the lower left of
the screen when the search has
ended.
•Auto Clock station- write down
the number(s) that appear on the
screen. These are the auto clock
station(s) in your area. See item
4 below.
•If no number(s) appear on the TV screen, there are
no stations in your area which contain the Auto
Clock signal. Auto Clock Setting is not possible.
Please use Manual Clock Setting on page 16.
Press the SETUP button to exit the screen.
NOTE: During Auto Clock CH Search, the picture
may be distorted. This is normal.
4Enter the channel number that contains the
Automatic Clock Setting Signal
Press the SETUP button on the remote control.
Press the Arrow button Kor Lto
select “SETTING CLOCK”.
Press the ENTER button to enter
“SETTING CLOCK” menu.
Press the Arrow button Lto select
“AUTO CLOCK CH”.
Press the ENTER button, then
press the Arrow button Bor s
until you locate Auto Clock Set
station number. See item 3 above.
Press the SETUP button to exit the
screen.
5Turn off the TV/DVD/VCR
Once the TV/DVD/VCR is turned off , it will period-
ically check and set the correct date and time.
– SETTING CLOCK –
BAUTO CLOCK [ON]
AUTO CLOCK CH SEARCH
AUTO CLOCK CH [02]
MANUAL CLOCK SET
D.S.T. [OFF]
– SETTING CLOCK –
AUTO CLOCK [ON]
BAUTO CLOCK CH SEARCH
AUTO CLOCK CH [02]
MANUAL CLOCK SET
D.S.T. [OFF]
– AUTO CLOCK CH SEARCH –
08 10 13
_ _
– SETTING CLOCK –
AUTO CLOCK [ON]
AUTO CLOCK CH SEARCH
BAUTO CLOCK CH [ 45]
MANUAL CLOCK SET
D.S.T. [OFF]
- TV/VCR SETUP -
TIMER PROGRAMMING
BSETTING CLOCK
CHANNEL SET UP
USER’S SET UP
V-CHIP SET UP
LANGUAGE [ENGLISH]
CAPTION [OFF]
ZERO RETURN
TIME SEARCH
INDEX SEARCH
- TV/VCR SETUP -
TIMER PROGRAMMING
BSETTING CLOCK
CHANNEL SET UP
USER’S SET UP
V-CHIP SET UP
LANGUAGE [ENGLISH]
CAPTION [OFF]
ZERO RETURN
TIME SEARCH
INDEX SEARCH
TD860HL(P01-34).qx33 03.10.21 11:55 AM Page 17

- 18 - EN
1C29
TV OPERATION
DEGAUSSING
Magnetism from nearby appliances and speakers
might affect the color of the TV picture.
If this happens, move this TV/VCR/DVD away from
the appliance. If the color is still not correct, turn off
using the POWER button, unplug the power cord,
then plug it in again 30 minutes or so later.
TV/VCR
WATCHING A TV PROGRAM
1Turn on the TV/DVD/VCR
Press the POWER button to turn on the
TV/DVD/VCR.
2Select the channel number
Press the CHANNEL button Kor Lto select your
desired channel number or press the number on the
remote control.
Note for using the Number button on the remote
control:
¡When selecting cable channels which are higher
than 99, press +100 first, then, press the last two
digits. (Example: to select channel 125, first press
“+100” then press “2” and “5”).
¡You must precede single-digit channel numbers
with a zero (For example: 02, 03, 04 and so on).
Remember: If the TV/DVD/VCR is connected to a
cable box or satellite box, the TV/DVD/VCR must
be on CH3 or CH4, then the channel to be viewed
must be selected on the cable box or satellite box.
3Adjust sound
Press the VOLUME button XXor YY
to adjust the volume.
NOTES:
•If you press the CHANNEL button oor pin the
DVD mode, you can change the TV channels.
Even if you turn off the TV/DVD/VCR in the
DVD mode, when you turn it on again, it will go
into the TV/VCR mode.
TV/VCR
Arrow button sArrow button B
BRIGHT to decrease to increase
brightness brightness
CONTRAST to decrease to increase
contrast contrast
COLOR to pale to brilliant
TINT to purple to green
SHARPNESS to soft to clear
PICTURE CONTROL
The TV/DVD/VCR’s picture controls – BRIGHT,
CONTRAST, COLOR, TINT and SHARPNESS –
are preset to factory specifications. Although they are
usually the best, you may need to make some further
adjustments for a natural looking image.
NOTES:
•Procedures must be followed within 5 seconds or
the Picture Control mode will be cancelled.
•When setting the Picture Control, the Game mode
will be cancelled.
Make sure ...
•TV/DVD/VCR power must be turned on.
1Select “PICTURE CONTROL”
Press the PICTURE button on the remote control.
2Select item you want to adjust
Press the Arrow button Kor Luntil desired control
is displayed.
BRIGHT
CONTRAST
COLOR
TINT
SHARPNESS
3Adjust the picture control
Press the Arrow button Bor sto adjust to your
desired level.
TV/VCR
•If there is a power failure of any kind, the
TV/VCR/DVD will retain its memory for this fea-
ture.
VOLUME 20
C C C C C C C C C C C C
BRIGHT
– PPPPPPPPPPPPPPCCPPPPPPPPPPPPPP+
TD860HL(P01-34).qx33 03.10.21 11:55 AM Page 18

- 19 - EN
1C29
CLOSED CAPTION SYSTEM
You can view specially labeled (cc) TV programs,
movies, news, pre-recorded tapes with either a dia-
logue caption or text display.
CAPTION mode: By choosing the caption mode, you
can watch dramas, movies and news while captioning
the dialogues and the contents of news.
TEXT mode: By choosing the text mode, you can
watch half screen text information if you want.
1-2: You may get these captions or text information
by selecting either “1” or “2”. Caption “2” is used,
usually for a second language if available.
NOTE:
Not all programs are broadcast with closed captions.
Your television is designed to provide error free
closed captions from high quality antenna, cable and
VCR signals. Conversely, poor quality signals are
likely to result in caption errors or no captions at all.
Common signal conditions which may cause captions
errors are listed below:
•Automobile ignition noise
•Electric motor brush noise
•Weak snowy reception on TV screen
•Multiplex signal reception displaying picture
ghosts or airplane flutter.
•Playback of poorly recorded or worn VCR tapes.
NOTE:
If the TV/DVD/VCR displays a
black box on the TV screen, this
means that the TV/DVD/VCR is
set to the TEXT mode. To clear
screen, select [CAPTION1], [CAP-
TION2] or [OFF].
Make sure ...
•TV/DVD/VCR power must be turned on.
TV/VCR
1Select “CAPTION”
Press the SETUP button on the
remote control.
Press the Arrow button Kor Lto
point to “CAPTION”.
2Select your desired caption menu
Press the ENTER button until your
desired caption menu appears.
([CAPTION1], [CAPTION2],
[TEXT1] or [TEXT2])
3Exit the caption setting mode
Press the SETUP button on the remote control to
return to TV mode.
TO CANCEL THE CLOSED CAPTION
SYSTEM
Repeat steps [1] and [2], select [OFF] using the
ENTER button. Press the SETUP button on the
remote control to return to TV mode.
WHEN THE CLOSED CAPTION MODE
IS ON
The On-Screen Display will disappear after 5 sec-
onds.
•It will also disappear when the MUTE button is
pressed, and when the PAUSE button is pressed
while recording.
•If there is a power failure of any kind, the
TV/DVD/VCR will retain its memory for this fea-
ture.
- TV/VCR SETUP -
TIMER PROGRAMMING
SETTING CLOCK
CHANNEL SET UP
USER’S SET UP
V-CHIP SET UP
LANGUAGE [ENGLISH]
BCAPTION [OFF]
ZERO RETURN
TIME SEARCH
INDEX SEARCH
- TV/VCR SETUP -
TIMER PROGRAMMING
SETTING CLOCK
CHANNEL SET UP
USER’S SET UP
V-CHIP SET UP
LANGUAGE [ENGLISH]
BCAPTION [CAPTION1]
ZERO RETURN
TIME SEARCH
INDEX SEARCH
TD860HL(P01-34).qx33 03.10.21 11:55 AM Page 19

- 20 - EN
1C29
5Exit the V-Chip setting mode
Press the SETUP button on the remote control to
exit the screen.
V-CHIP SET UP
Make sure ...
•TV/DVD/VCR is turned on.
1Select “V-CHIP SET UP”
Press the SETUP button on the
remote control.
Press the Arrow button Kor Lto
select “V-CHIP SET UP”.
Then, press the ENTER button.
2Enter Access code
Use the number buttons on the remote
control to enter the access code.
•For the first time set-up or in the
event the TV/DVD/VCR has lost
power, enter the default code of the numbers:
0000.
3Select “TV RATING”
Press the Arrow button Kor Lto
select “TV RATING”.
Then, press the ENTER button.
4Blocking TV programs
Press the Arrow button Kor Lto
select “TV rating” that you wish to
block.
Press the ENTER button to turn it
[BLOCK].
•When you select the rating category and turn it
[BLOCK], the higher rating will turn [BLOCK]
automatically. Also, the lower rating will turn
[VIEW] automatically.
•When you turn “TV-Y” to [VIEW], then all ratings
will turn to [VIEW] automatically.
TV/VCR
ACCESS CODE
_ _ _ _
V-CHIP SET UP
- TV/VCR SETUP -
TIMER PROGRAMMING
SETTING CLOCK
CHANNEL SET UP
USER’S SET UP
BV-CHIP SET UP
LANGUAGE [ENGLISH]
CAPTION [OFF]
ZERO RETURN
TIME SEARCH
INDEX SEARCH
– V-CHIP SET UP –
BTV RATING
MPAA RATING
CHANGE CODE
BTV–Y [VIEW]
TV–Y7 ( ) [VIEW]
TV–G [VIEW]
TV–PG ( ) [VIEW]
TV–14 ( ) [VIEW]
TV–MA ( ) [VIEW]
Selection Rating Category Explanations
TV-Y Appropriate for all children
TV-Y7 Appropriate for children seven and older
TV-G General Audience
TV-PG Parental Guidance suggested.
TV-14 Unsuitable for children under 14
TV-MA Mature audience only
V-CHIP SET UP SUB RATINGS
When you select the ratings of TV-Y7,TV-PG,TV-14
or TV-MA you will have the option of selecting sub
rating categories.
1Select “V-CHIP SET UP”
Press the SETUP button on the
remote control.
Press the Arrow button Kor Lto
select “V-CHIP SET UP”. Then,
press the ENTER button.
2Enter Access code
Use the number buttons on the
remote control to enter the access
code. (Default code is 0000.)
3Select “TV RATING”
Press the Arrow button Kor Lto
select “TV RATING”.
Then, press the ENTER button.
4Selecting Sub-Ratings”
Press the Arrow button Lto select the sub-rating you
wish to block. Then, press the ENTER button twice.
•When you select [TV-Y7]:
Press the Arrow button Lor Kto
select “FV” (Fantasy Violence).
Then, press the ENTER button to
select [BLOCK] or [VIEW].
•When you select [TV-PG], [TV-
14] or [TV-MA]:
Press the Arrow button Lor Kto
select “D”(Suggestive Dialog),
“L”(Coarse Language),
“S”(Sexual Situation), or
“V”(Violence). Then, press the
ENTER button to select [BLOCK] or [VIEW].
Note: When you select [TV-MA], “D” does not
appear on the TV screen.
•The sub-ratings which set to
[BLOCK] appears next to the rat-
ing category in the TV rating
menu.
5Exit the V-Chip setting mode
Press the SETUP button on the remote control to
enter the setting and exit the screen.
– V-CHIP SET UP –
BTV RATING
MPAA RATING
CHANGE CODE
TV–Y7 [BLOCK]
BFV [BLOCK]
TV–PG [BLOCK]
BD[BLOCK]
L[BLOCK]
S[BLOCK]
V[BLOCK]
BTV–Y [VIEW]
TV–Y7 ( ) [VIEW]
TV–G [VIEW]
TV–PG (DLSV) [BLOCK]
TV–14 (DLSV) [BLOCK]
TV–MA ( LSV ) [BLOCK]
ACCESS CODE
_ _ _ _
- TV/VCR SETUP -
TIMER PROGRAMMING
SETTING CLOCK
CHANNEL SET UP
USER’S SET UP
BV-CHIP SET UP
LANGUAGE [ENGLISH]
CAPTION [OFF]
ZERO RETURN
TIME SEARCH
INDEX SEARCH
TD860HL(P01-34).qx33 03.10.21 11:55 AM Page 20
Table of contents
Other SUPERSCAN TV DVD Combo manuals