SWEEX LW313 User manual

ENglISH VErSIoN
2
LW313 Sweex Wireless 300N Adapter USB
Important!
• DonotexposetheSweexWireless300NAdapterUSBtoextremetemperatures.Donotplacethedeviceindirectsunlightorinthedirectvicinity
ofheatingelements.
• DonotusetheSweexWireless300NAdapterUSBinextremelymoistordustysurroundings.
• Protectthedeviceagainstpowerfulshocksandfalls–theymaydamagetheinternalelectronics.
• Neverattempttoopenthedeviceyourself,therearenoserviceablepartsinside.Openingthedevicewillcausethewarrantytolapse.
Package contents
In this package you will find:
• Wireless300NAdapterUSB
• CDwithdriver,softwareandthismanual
Ifyoufindthatanyofthepackagecontentsaremissing,pleasereturnthepackagetothesalespointwhereitwasbought.
Terminology list
This manual will contain a number of technical terms. It is important to know what they mean before you begin
installing and configuring the adapter.
• Adapter:ThisistheSweexWireless300NAdapterUSB,theproductyouhavejustbought.
• Wirelessnetwork:WirelessnetworksarebasedontheWi-Fistandard.TheadapterenablesyoutoconnecttoWi-Finetworksataspeedofupto
300Mbps,providedthatthenetworksupportsthisspeed(orhigher)
• (wireless)Adapter,modem,accesspoint:Thesearedevices(amongstothers)cantransmitawirelessnetworksignal.
• Wirelesssecurity:Wirelesssecurityisaformofprotectionforwirelessnetworksthatallowsonlyauthorizeddevicesaccesstothenetworkand
preventseavesdropping.Thereareseveraldifferentformsofwirelesssecurity,asisexplainedfurtheroninthismanual.
Installation Windows XP, Vista and 7
PlacetheSweexCDintheCDplayer,click“DriversandSoftware”andfollowtheinstructionsonscreen.

ENglISH VErSIoN
3
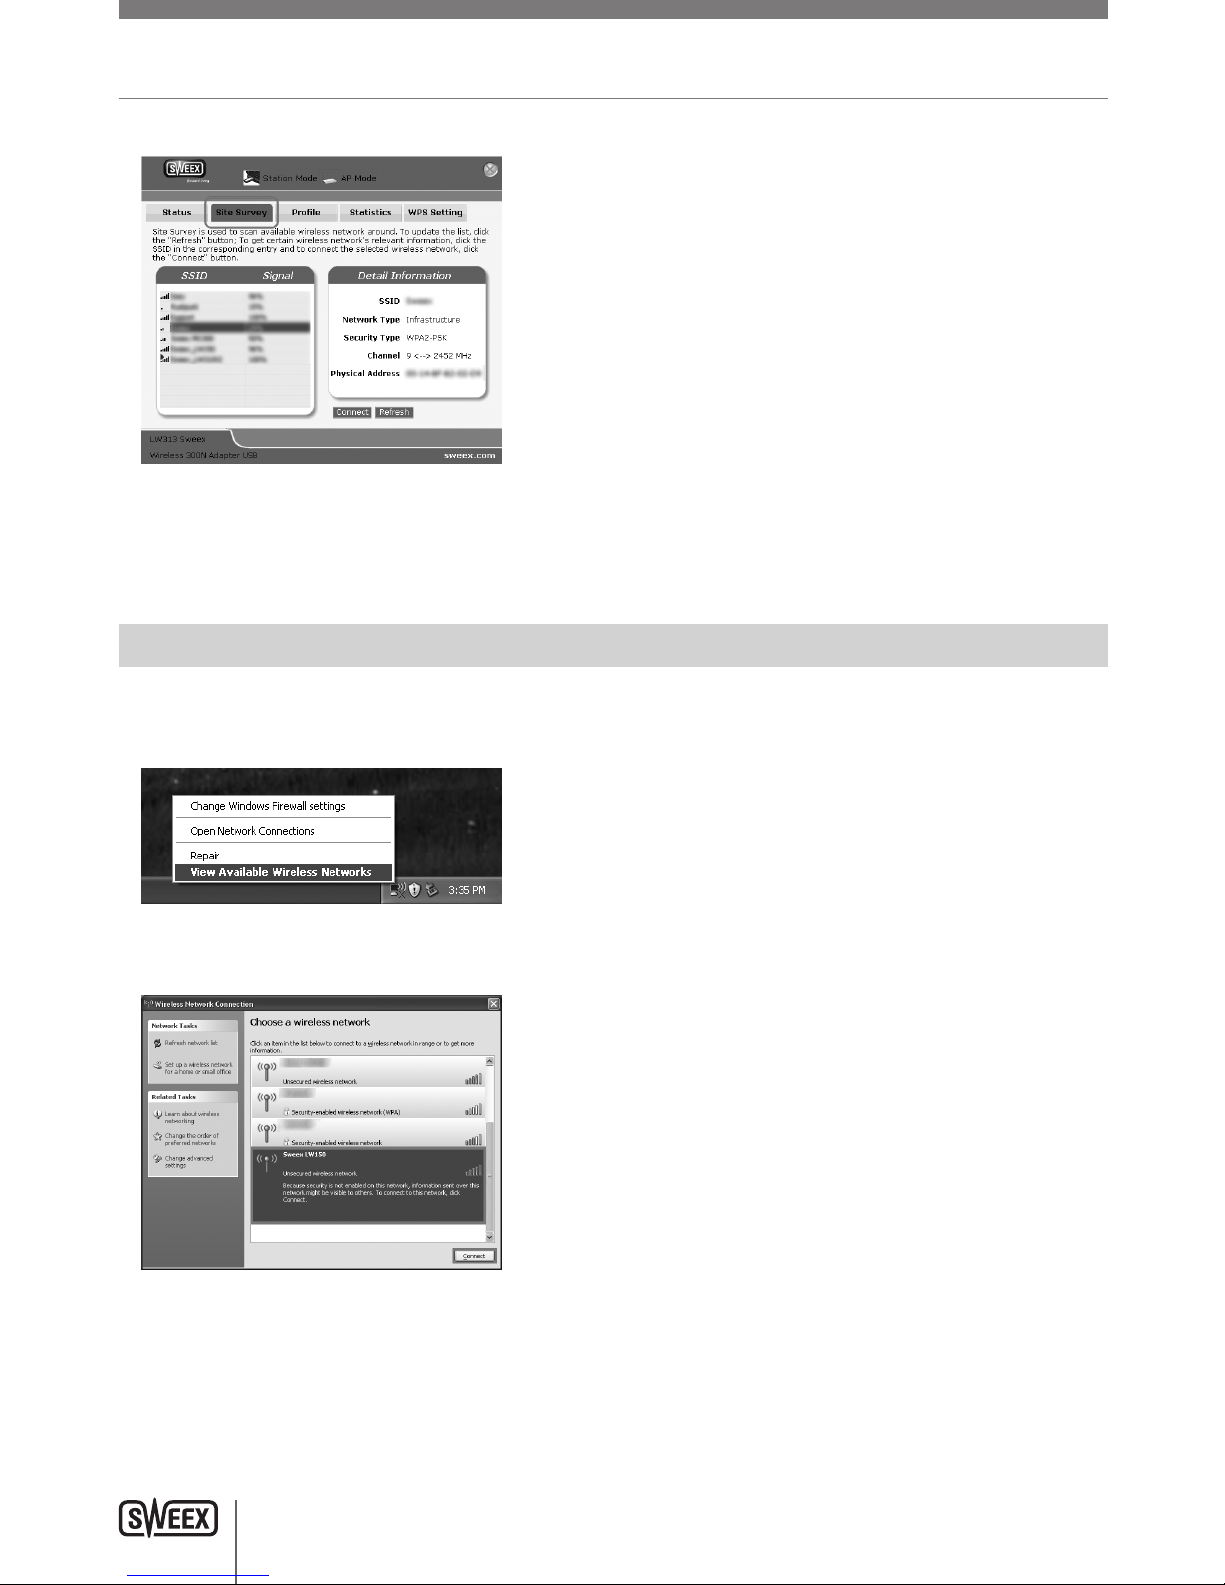
Setting up the wireless network
How does it work?
Tocreateawirelessnetworkyouneedawirelessadapter,wirelessmodemorWi-Fiaccesspoint.Thewirelessadapter,modemoraccesspoint
distributesthewirelessnetwork.Thenameofthisnetwork,alsocalledtheSSID,isdependantonyourwirelessadapter,modemoraccesspointand
isdifferentpertypeorbrand.Youcanoftenchangethename,soyou
caneasilyidentifyyourownwirelessnetwork.
Security
Awirelessnetworkiscomparablewithradiosignals.However,awirelessnetworkathomedoesnothavesuchalongrange.Therangeofahome
networkoftenhasarangeof20to30meters.Thismeansthatneighboursandpassers-bycanalsouseyournetwork.Thiswaytheycansurfon
yourinternetconnectionandpossiblyaccessyoursharedfolders
andfilesonyournetworkunpunished.Thatiswhyitisrecommendedtosecureyourwirelessnetwork.Thissecurityisconfiguredonthedevicethat
transmitsthenetwork.Inmostcasesthisisthewirelessadapter,modemoraccesspoint.
BymeansofaWEPorWPAsecuritycodeyoucansecureyournetwork.Thiscodeisalsocalledthenetworkkey.Enterthiscodeoneverycomputer
thatwantstoconnecttothesecurednetwork.Onlywiththiskeyyoucanbepartofthe
network.Ifyoudidnotenterthenetworkkeyyourselfintheadapterormodem,asktheinstaller,manufacturer,supplierorproviderforthiscode.
WPS (Wi-Fi Protected Setup)
Securingthewirelessnetworkintheadaptercanbedoneintwoways.Thetrustedmanualway(WEP,WPAandWPA2),whereyoudetermine
andenteryourownnetworkkey,orwiththeWPS(Wi-FiProtectedSetup)function,wherethemodem,adapteroraccesspointandthecomputer
“agree“onaWPA(2)networkkeyanduseitautomaticallywithonepushofabuttontosecurethenetwork.Thisfunctiononlyworkswitha
modem,adapteroraccesspointthatalsosupportsWPS.
Note:WindowsVistafromSP2onwardsandWindows7alreadysupportWPSout-of-the-box.WhenconnectingtoaWPSsecurednetwork,simply
followtheinstructionsonscreen.TheproceduredescribedbelowisforWindowsXPonly
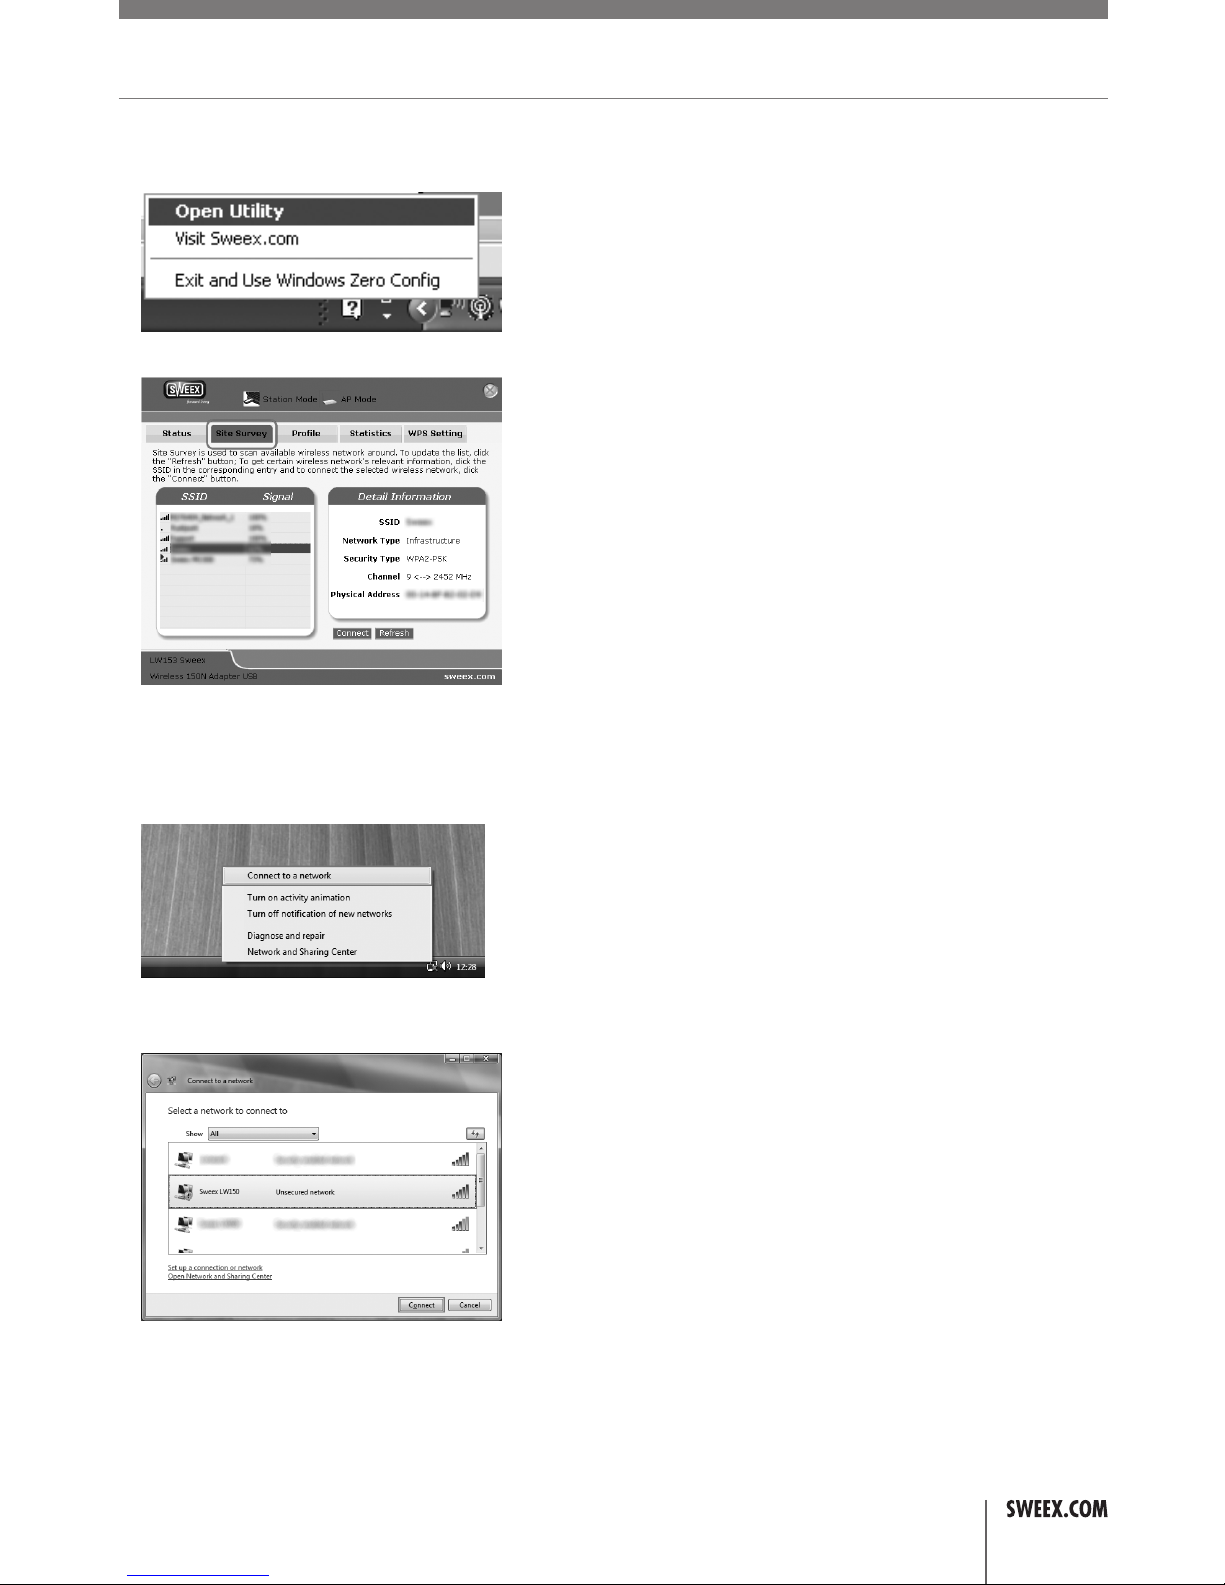
Connecting and securing with WPS
AfteractivatingtheWPSfunctionbepressingtheWPSbuttonontheadapterorviatheWPSconfiguration,youhavethecomputerscanforthe
automaticallygeneratednetworkkey,thenetworkissecuredautomatically.
• EnsureyouhavetheUtilityinstalledonyourcomputer.
• StarttheWPSfunctiononthemodem,adapteroraccesspoint.
• Right-clickthe“SweexWirelessUtility”iconandchoose“OpenUtility”.

ENglISH VErSIoN
4
TheSweexUtilitywillappear.Clickonthe“WPSSetting”tab,youshouldseethefollowingscreen:
ToconnecttoaWPSsecurednetwork,firstpresstheWPSbuttononyouradapter,thenclickthe“PBC”buttonintheSweexUtility.Theutilitywill
automaticallyfindyournetworkandestablishaWPSsecuredconnectiontoit.AfteraWPSconnectionhasbeensuccessfullyestablished,youwillsee
itinthe“WPSProfile”tableontheright.
Connecting to a wireless network
Windows XP
Right-clickonyourwirelessadapter’siconatthebottomrightofyourscreenandclick“ViewAvailableWirelessNetworks”:
Awindowtitled“Chooseawirelessnetwork”willappear.Inthiswindow,selectyournetwork,clickthe“Connect”buttonandfollowtheinstructions
onscreen:

ENglISH VErSIoN
5
Windows XP with Sweex Utility:
Right-clickonthe“SweexWirelessUtility”iconatthebottomrightofyourscreenandclick“OpenUtility”.
Clickonthe“SiteSurvey”tab,selectyournetwork,clickthe“Connect”buttonandfollowtheinstructionsonscreen:
Note:Incasethenetworkyou’reconnectingtoissecured,donotforgettoenterthesecuritykey!
Windows Vista:
RightclickontheNetwork&SharingCentericoninthebottomrightofyourscreen,andclick“Connecttoanetwork”:
Awindowtitled“Connecttoanetwork”willappear.Inthiswindow,selectyournetwork,clickthe“Connect”buttonandfollowtheinstructionson
screen:
Note:Ifyouseearedcrossnearthenetworkandthetext:“Thesettingssavedonthiscomputerforthenetworkdonotmatchtherequirementsof
thenetwork”,pleaserefertothetroubleshootingsectionofthismanual.

ENglISH VErSIoN
6
Windows 7:
Windows7willindicatewhenwirelessnetworksareavailable.Youcanrecognisethisbythefollowingiconinthebottom-rightofyourscreen:
Note:Ifyouseeasmallredcrossthroughtheicon,nonetworksareinrangeofyourcomputer.Pleaseconsultthetroubleshootingsectionofthis
manualifthisisthecase.
Clicktheiconandalistofwirelessnetworkswillappear,selectthe“SweexLW300”network,checkthe“ConnectAutomatically”checkbox,click
“Connect”andfollowtheinstructionson-screen:
Note:Ifyouseearedcrossnexttothenetworkandareunabletoconnect,pleaserefertothetroubleshootingsectionofthismanual.
Troubleshooting
Thischapterofthemanualwillexplainanumberofcommonissuesthatyoumayrunintoandpossiblesolutions.
• IcanconnecttoanetworkbutIcannotaccesstheinternetorothercomputersonthenetwork
• ThisissuemayarisefromincorrectIPsettingsonyourcomputer.Youcancheckandadjustyoursettingsasfollows:

ENglISH VErSIoN
7
Windows XP
1 Clickthestartbuttonatthebottomrightofyourscreenandclick“ControlPanel”
2 Inthecontrolpanel,click“NetworkandInternetConnectionsandopenthe“NetworkConnections”icon.IfyourcontrolpanelisinClassicView,
youmayopenthe“NetworkConnections”iconstraightaway.
3 RightclickthefirstconnectedLANorHigh-SpeedInternetConnection,inthisexamplethe“LocalAreaConnection”,andclick“Properties”from
thecontextmenu.Ifyouhavemultipleconnectedconnections,repeatsteps3to6foreachconnection.

ENglISH VErSIoN
8
4 Theconnection’spropertywindowappears.Inthiswindows,selectthe“InternetProtocol”fromthelistofitemsandclickthe“Properties”
Button:
5 TheInternetProtocol’spropertywindowappears.Inthiswindow,ensurethatbothsettingsaresetto“Obtainautomatically”:
6 Confirmthesettingsbyclicking“OK”.ThenetworksettingsforXParenowproperlyconfiguredforyouradapter.

ENglISH VErSIoN
9
Windows Vista
1 Clickthestartbuttonatthebottomrightofyourscreenandclick“ControlPanel”
2 IntheControlPanel,click“Viewnetworkstatusandtasks”.IfyourControlPanelisinclassicview,openthe“NetworkandSharingCenter”icon:
3 TheNetworkandSharingCenterwindowshouldnowopen.
IntheNetworkandSharingCenter,click“Managenetworkconnections”inthebarontheleftside:

ENglISH VErSIoN
10
4 RightclickthefirstconnectedLANorHigh-SpeedInternetConnection,inthisexamplethe“LocalAreaConnection”,andclick“Properties”from
thecontextmenu.Ifyouhavemultipleconnectedconnections,repeatsteps4to7foreachconnection:
5 Theconnection’spropertywindowappears.Inthiswindows,selectthe“InternetProtocolVersion4”fromthelistofitemsandclickthe
“Properties”Button:
6 TheInternetProtocolVersion4’spropertywindowappears.Inthiswindow,ensurethatbothsettingsaresetto“Obtainautomatically”:
7 Confirmthesettingsbyclicking“OK”.ThenetworksettingsforVistaarenowproperlyconfiguredforyouradapter.

ENglISH VErSIoN
11
Windows 7
1 Clickthestartbuttonatthebottomrightofyourscreenandclick“ControlPanel”
2 IntheControlPanel,click“Viewnetworkstatusandtasks”.IfyourControlPanelisiniconview,openthe“NetworkandSharingCenter”icon:
3 TheNetworkandSharingCenterwindowshouldnowopen.
IntheNetworkandSharingCenter,click“Changeadaptersettings”inthebarontheleftside:

ENglISH VErSIoN
12
4 Rightclickthefirstconnectedconnection,inthisexamplethe“LocalAreaConnection”,andclick“Properties”fromthecontextmenu.Ifyouhave
multipleconnectedconnections,repeatsteps4to7foreachconnection:
5 Theconnection’spropertywindowappears.Inthiswindows,selectthe“InternetProtocolVersion4”fromthelistofitemsandclickthe
“Properties”Button:
6 TheInternetProtocolVersion4’spropertywindowappears.Inthiswindow,ensurethatbothsettingsaresetto“Obtainautomatically”:
7 Confirmthesettingsbyclicking“OK”.ThenetworksettingsforWindows7arenowproperlyconfiguredforyouradapter.

ENglISH VErSIoN
13
• IappeartobeconnectedbutInternetExplorerstilldisplaysanerrormessage“InternetExplorercannotdisplaythe
webpage” or similar.
• Thisproblemmayarisefromincorrectproxyserversettings.Youcanadjustthesesettingsasfollows:
1 InInternetExplorer,clickthe“Tools”menuoriconandchose“InternetOptions”.
2 The“InternetOptions”windowwillnowopen.
3 Inthiswindow,clickthe“Connections”tabandinthistab,the“LANSettings”button.
4 The“LANSettings”windowwillnowopen.Ensurethatallcheckboxesareuncheckedandconfirmthesettingsbyclicking“OK”

ENglISH VErSIoN
14
• IhaveWindowsVistaandIgettheerrormessage“thesettingssavedonthiscomputerforthenetworkdonot
match the requirements of the network” when I try to connect. wirelessly.
• Thisproblemcanbesolvedasfollows:
1 IntheControlPanel,click“Viewnetworkstatusandtasks”.IfyourControlPanelisinclassicview,openthe“NetworkandSharing
Center”icon:
2 TheNetworkandSharingCenterwindowshouldnowopen.
IntheNetworkandSharingCenter,click“Managewirelessnetworks”inthebarontheleftside:
3 TheManageWirelessNetworkswindownowopens.Inthiswindow,selecttheconflictingnetworkandclick“Delete”.Afterthenetwork
hasbeendeleted,youcanclosethewindowandfollowthestepsdescribedinthe“Connectingtoawirelessnetwork”sectionofthe
manual.

ENglISH VErSIoN
15
• IhaveWindows7andIcannotconnecttomywirelessnetwork.Aredcrossisdisplayednexttothenetwork
• Thisproblemcanbesolvedasfollows:
1 ClicktheNetworkandSharingCentericoninthebottomrightofyourscreen:
2 Nextclick“OpenNetworkandSharingCenter”:
3 IntheNetworkandSharingCenter,click“Managewirelessnetworks”:
4 Thefollowingwindowwillappear,rightclickthenetworkthatwasindicatedwitharedcrossinstep2andclick“Removenetwork”:
5 Afterthenetworkhasbeenremoved,youcanclosethewindowandfollowthestepsdescribedinthe“Connectingtoawirelessnetwork”
sectionofthemanual.

ENglISH VErSIoN
16

ENglISH VErSIoN
17
Table of contents
Other SWEEX Adapter manuals

SWEEX
SWEEX BT211 User manual

SWEEX
SWEEX LC085 User manual

SWEEX
SWEEX LC086 User manual

SWEEX
SWEEX BT203V2 User manual

SWEEX
SWEEX PA311 User manual

SWEEX
SWEEX PA300 - QUICK_START_GUIDE User manual

SWEEX
SWEEX LC100040 User manual

SWEEX
SWEEX LW056V2 User manual

SWEEX
SWEEX LC086_PACK_W User manual

SWEEX
SWEEX LC100060 User manual
Popular Adapter manuals by other brands

Bauerfeind
Bauerfeind Uniprox VA1 instruction manual

Emos
Emos BASIC 1.0A manual

Dometic
Dometic COOLPOWER MPS50 Installation and operating manual

PowerBox Systems
PowerBox Systems BlueCom instruction manual

Magnadyne
Magnadyne WC-USB-B installation instructions

DURAVIT
DURAVIT Bluebox T537948 Mounting instructions