Swing Catalyst 3D MOTION PLATE Guide

START GUIDE
3D MOTION PLATE
swingcatalyst

Start Guide 3D Motion Plate 2017
2006-2017 © Initial Force AS
Swing Catalyst®
CONTENTS
3
Introduction..........................................................................................................4
Part 1: Studio installation
Flat and level oor..............................................................................................7
Feet on the oor.................................................................................................8
Connect the 3D Motion Plate.......................................................................9
Part 2: Install on computer
Installdrivers......................................................................................................10
Part 3: In software
Hardwaresettings............................................................................................12
Verify the data..................................................................................................14
Troubleshooting................................................................................................15
Checklist...............................................................................................................16
Support................................................................................................................17

54
INTRODUCTION
The patented Swing Catalyst 3D Motion Plate is a combination
of a sophisticated force plate and pressure plate technology.
Please refer to the 3D Motion Plate data guide for more detailed
information about the technology and the data measurements.
This guide will get you started with the installation of the 3D
Motion Plate.
For further assistance please visit:
www.swingcatalyst.com/help
- or contact us via:
suppor[email protected]
Pressure plate Force plate

76 Part 1 Studio installationPart 1 Studio installation
Place the 3D Motion Plate on a at and level oor to ensure
accurate data readings.
STUDIO INSTALLATION FLAT AND LEVEL FLOOR

98 Part 1 Studio installation
FEET ON THE FLOOR
Part 1 Studio installation
3
CONNECT THE 3D MOTION PLATE
Connect one of the provided USB cables to the side of the
pressure plate.
Connect the second USB cable underneath the force
plate.
Connect both cables to your PC. Please use the
provided extension cables if necessary.
1
2
1
2
All electronics connected to the 3D Motion Plate must have
ground. The power grid should have adequate grounding.
We recommend using surge protectors to prevent damage
to your electronics.
Important! To ensure accurate data readings the 3D Motion
Plate must be level and have all 4 feet in contact with the oor.
Make sure the plate is level before mounting the Balance Plate.
It’s important to account for the height of the Balance Plate when
adjusting the Force Plate to make the install ush with the turf.

1
2
3
1110 Part 2 Install on computerPart 2 Install on computer
INSTALL DRIVERS
Download the Swing Catalyst software. If you haven’t
received the download instructions via email already please
go to www.swingcatalyst.com/downloads
Install the Swing Catalyst software, and copy/paste your
license key when prompted. You should have received your
license key via email. If not, please contact
suppor[email protected]
Install both the drivers for the Balance Plate and the 3D
Motion Plate. First locate the Balance Plate drivers on your
hard drive and follow the install instructions. Balance Plate
Version 2 (64x32) drivers may also be downloaded from
www.swingcatalyst.com/drivers
4Balance Plate drivers on Windows 8:
Press the Windows button
Search for Balance Plate #2 Driver
For 64-bit Windows, run “Balance Plate #2 Driver (x64)”
For 32-bit Windows, run “Balance Plate #2 Driver (x86)”
Search
Everywhere
4
6
5
#2
#2
(x64)
(x86)
Balance Plate drivers on Windows 7:
Click on the Windows Start Menu -> Swing Catalyst ->
Drivers folder:
For 64-bit Windows, run “Balance Plate #2 Driver (x64)”
For 32-bit Windows, run “Balance Plate #2 Driver (x86)”
3D Motion Plate driver:
Download the 3D Motion Plate version 5 driver from
www.swingcatalyst.com/drivers
Run the “CDM v2.08.30 WHQL Certied.exe” le and follow
the instructions. The driver works on 32-bit and 64-bit for
both Windows 7 and 8.
5

1312 Part 3 In softwarePart 3 In software
HARDWARE SETTINGS
Start up the Swing Catalyst software.
Go to Settings in the Main Menu and select Hardware.
Select Motion Plate 6 - 98x50 cm, 2048 cells (2013) in
the dropdown menu and set the slider to ON.
1
2
2
3
3
4
4
5
5
6
Verify that the sensor plate is shown as connected.
Click the “Congure...” button to open the conguration
dialog and select the “Stance Sensor” tab.
Verify that your computer is connected to the internet, and
click “Download and install” to install the calibration le.
Please note that installation may take a few seconds.
When the installation is completed, click OK to close the
two dialogs.

1514 Part 3 In software Part 3 In software
VERIFY THE DATA
Now it is time to verify that you receive data from the 3D
Motion Plate.
Select Swing Analysis in the Main Menu, set up a new
golfer and click Start session. Select Capture in the Quick
Start menu and step on the 3D Motion Plate.
Important: You need to have a supported camera to be able
to go in capture mode. Read more about our supported
cameras on www.swingcatalyst.com/help
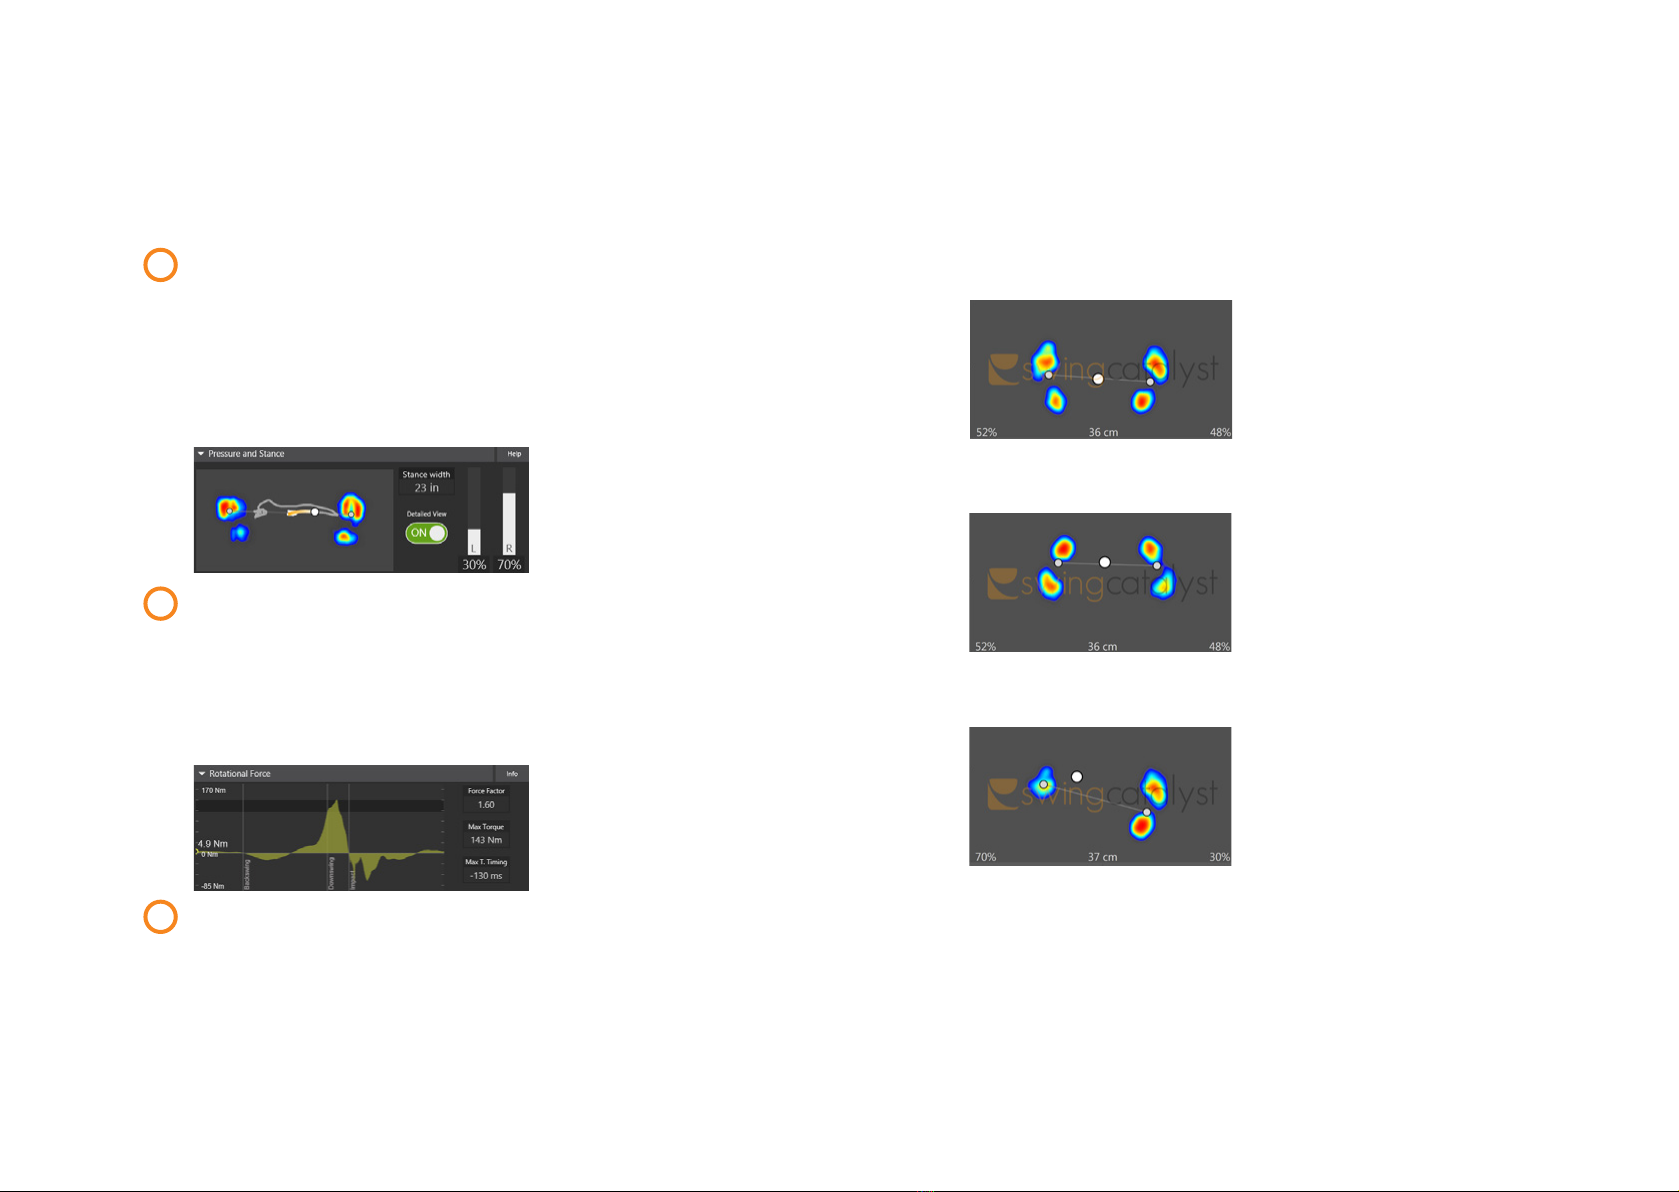
Make sure you see live pressure data in the Pressure and
Stance data box. In the data box you should see your toes
pointing upwards, while the white dot (CoP) should be
moving to the right when you are leaning towards the right
foot, and vice versa.
Click on the Manual Trigger while standing on the plate to
record a video. Open the recording and make sure you see
data in all 4 force data boxes::
• Rotational Force
• Vertical Force
• Horizontal Force (Toe/Heel)
• Horizontal Force (Right/Left)
1
2
3
TROUBLESHOOTING
Go to the Main Menu and select Hardware settings.
Click the “Congure...” button in the Sensor Plate section to open
the conguration dialog. Click the play icon and step on the plate.
Pressure upside down
If your toes are pointing
downwards, select “Rotate stance
data”. Ensure that the CoP is
moving in the correct direction
afterwards.
Correct
Your toes should now be pointing
upwards, while the white dot (CoP)
should be moving to the right
when you are leaning towards the
right foot, and vice versa.
Opposite CoP
If the CoP is moving to the left
when you are leaning towards
your right foot, select “Rotate
force data”.
The advanced options, mirror and ip, should only be used if the
rotate options doesn’t resolve the issue.

1716
Flat and level oor
All 4 feet in contact with the oor
Check electrical grounding
Connect both USB cabels to your PC
Install the drivers
Enable the 3D Motion Plate in the software
Verify the data
CHECKLIST
If you have any questions, please contact support:
suppor[email protected]
Information may also be found in our Help Center:
www.swingcatalyst.com/help
SUPPORT

Follow Swing Catalyst to
receive the latest updates:
swingcatalyst
Other manuals for 3D MOTION PLATE
1
Table of contents
Other Swing Catalyst Video Gaming Accessories manuals