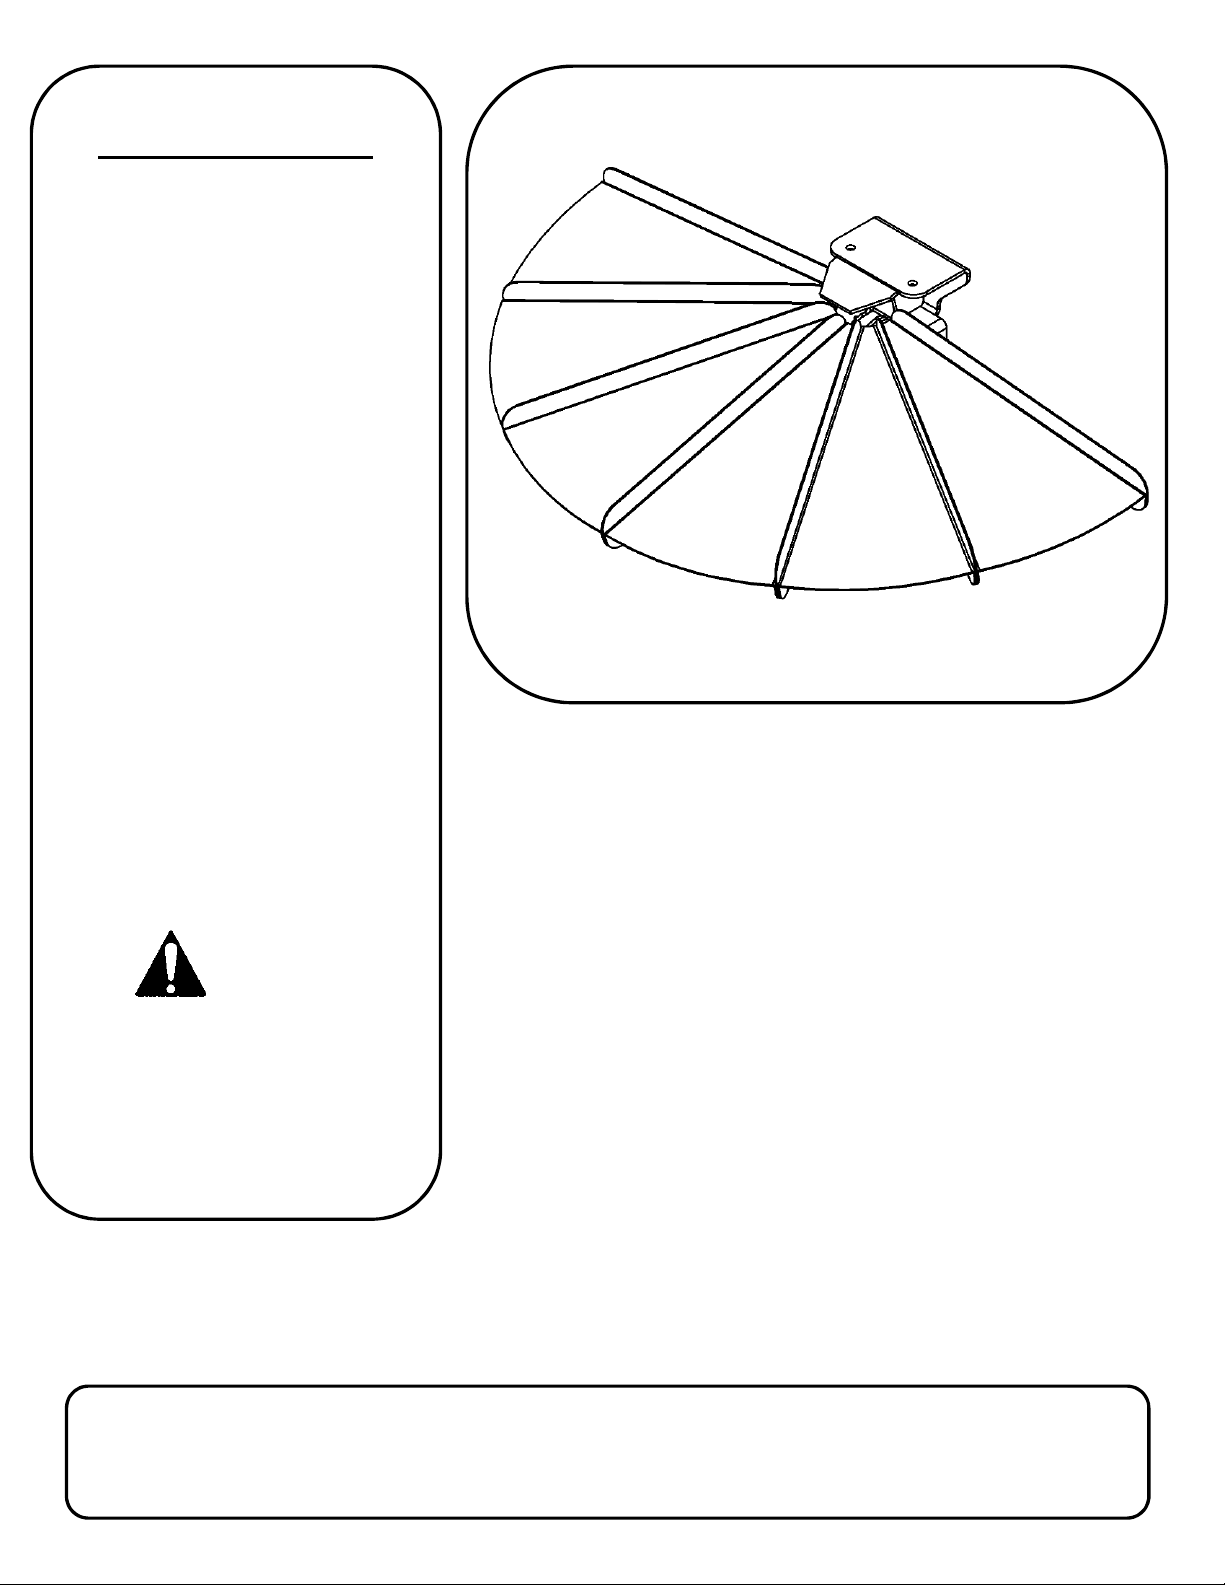
Swisher 22080 User manual

Feed Bin
Distributor
OWNER’S
MANUAL
SWISHER ACQUISITION INC.
602 CORPORATE DRIVE, WARRENSBURG, MISSOURI 64093
PHONE (660) 747-8 83 FAX (660) 747-8650
Assembly
Operation
Service and Adjustment
Repair Parts
www.swisherinc.com
MODEL NO.
STARTING SERIAL #:
L119-335001
22080
22094 REV 9-335
Read and follow all
Safety Precautions
and Instructions
before operating this
equipment.
IMPORTANT
Read and follow all
Safety Precautions
and Instructions
before operating this
equipment.
IMPORTANT
ade I The
USA
of US and Global Parts

2
•WARRANTY……………..…………………………………………..……………………….... 3
•SAFETY PRECAUTIONS…………………………………………..……………………….... 4
•SPECIFICATIONS …………………………………………………………………...……….. 4
•GENEAL OPERATIONS……….…………………..…………………......………..….……... 5
– INTENDED USE
– ATTACHING TRAIL CUTTER TO TOW VEHICLE
– TRANSPORTING
– GENERAL RECOMMENDATIONS
– EFORE EASH USE
•ASSEMBLY PARTS…………...…………………………….....……………….….………...... 6
•ASSEMBLY DIRECTIONS………………………………………………………...………... 7- 0
– CENTER RACKET ASSEM LY
– OUTER RACKET ASSEM LY
– MOUNTING RACKET TO FEED IN FRAME ASSEM LY
– FAN ASSEM LY TO MOUNTING RACKET
•TORQUE SPECIFICATIONS REFERENCE GUIDE….………….....………………..…....
•ORDERING INFORMATION………………………………………………………….…….. 2
TABLE OF CONTENTS

ҡ
The manufacturer’s warranty to the original consumer purchaser is: This product is free
from defects in materials and workmanship for one (1) year beginning from the date of
purchase by the original consumer purchaser. We will repair or replace, at our discretion,
parts found to be defective due to materials or workmanship. This warranty is subject to the
following limitations and exclusions:
) Commercial Use This product is not intended for commercial use and carries no commercial
warranty.
2) Limitation This warranty applies only to products, which have been properly
assembled, adjusted, and operated in accordance with the instructions
contained within this manual. This warranty does not apply to any product
of Swisher that has been subject to alteration, misuse, abuse, improper
assembly or installation, shipping damage, or to normal wear of the product.
3) Exclusions Excluded from this warranty are normal wear, normal adjustments, and
normal maintenance.
In the event you have a claim under this warranty, you must return the product to an authorized
service dealer. All transportation charges, damage, or loss incurred during transportation of parts
submitted for replacement or repair under this warranty shall be borne by the purchaser. Should you
have any questions concerning this warranty, please contact us toll-free at 1-800-222-8183. The
model number, serial number, date of purchase, and the name of the authorized Swisher dealer from
whom you purchased the unit will be needed before any warranty claim can be processed.
THIS WARRANTY DOES NOT APPLY TO ANY INCIDENTAL OR CONSEQUENTIAL
DAMAGES AND ANY IMPLIED WARRANTIES ARE LIMITED TO THE SAME TIME
PERIODS STATED HEREIN FOR ALL EXPRESSED WARRANTIES. Some states do not allow
the limitation of consequential damages or limitations on how long an implied warranty may last, so
the above limitations or exclusions may not apply to you. This warranty gives you specific legal
rights and you may have other rights, which vary from state-to-state. This is a limited warranty as
defined by the Magnuson-Moss Act of 1975.
3
LIMITED WARRANTY

簠ˡ
This Safety Alert Symbol indicates important messages in this
manual. When you see this symbol, carefully read the message that
follows and be alert to the possibility of personal injury.
Read this manual completely. Failure to observe the following safety instructions
could result in serious injury or death.
4
• Read the manual. Learn to operate this unit safely.
• Understand the speed, turning and stability of this unit.
• Allow only responsible adults who are familiar with these instructions to operate this
unit. Never allow children to operate this unit.
• Children are often attracted to the unit and activity.
Never assume that children will remain where you last saw them. Keep children
under the watchful care of another responsible adult.
•No riders!
•Always use caution when backing.
• Watch for traffic when operating near or crossing roadways.
• Never allow operation by untrained persons.
• Do not operate while under the influence of alcohol or drugs.
• Do not operate on slopes greater than 15 degrees.
SAFETY PRECAUTIONS
Thank you for choosing Swisher’s Feed in Distributor. efore
operating, please read, understand and follow all of the safety precautions
and other instructions explained in this manual.
Description
Overall Dimesions 21.5" L X 36" W X 8" H
Unit Weight 31 Lbs
Recommended Traveling Speed 5 mph Max
SPECIFICATIONS

ܐҦ
5
GENERAL OPERATIONS
CAUTION! Tragic accidents can occur if the operator is not alert to the presence of children.
Children are often attracted to the unit and activity. Never assume that children will remain where
you last saw them.
INTENDED USE
Your Feed in Distributor attaches underneath the Flow Gate of Feed in 21500 and distributes feed for
wildlife through a series of channels. This feed distribution will help reduce the chance of spreading
diseases such as Chronic Wasting Disease (CWD). It is not recommended to travel at speeds exceeding 5
MPH. Use for transporting feed to your livestock, seed to your farm implements or even as a drop feeder
for wildlife management.
ALTERNATIVE METHOD OF ATTACHING TO FEED BIN
• The Fan Assembly can be unpinned and reattached to the Mounting racket underneath the Feed
in and upside down. This will allow normal usage of the Feed in as if the Distributor weren’t
there (e.g. filling buckets with feed). See Figure 10.2
TRANSPORTING
• This unit should not be towed on any public roads without checking the existing federal, local and
state laws. Any licensing or modifications such as taillights, etc., need to comply with existing
federal, local or state vehicle requirements is the sole responsibility of the purchaser. Obey all
regulations when towing on public roads.
• If transporting this unit on a separate trailer, it is recommended to unpin the Fan Assembly from
the Mounting racket and store separately until ready to use.
GENERAL RECOMMENDATIONS
The warranty on this Feed in Distributor does not cover items that have been subjected to operator
abuse or negligence. To receive full value from the warranty, the operator must maintain the unit as
instructed in this manual. Some adjustments will need to be made periodically to maintain your unit
properly.
BEFORE EACH USE
• Check for loose fasteners and securely tighten if needed using the torque values found on page 11
of this manual.

ᥠҤ
6
Item # Description Part # Qty
1 Pin - Ben , Ø.500 X 4" Usable
22093
2
2 Nu - Serr Flange 5/16-18
NB170
2
3 Bol - Carriage 5/16-18 X 1
10197
2
4 Nu - Serr Flange 1/4-20
21485
14
5 Bol - Carriage 1/4-20 X 1/2
21474
14
6 Bracke - Fan Pla e, Righ
22088*
1
7 Weldmen - Moun ing Bracke
22083*
1
8 Bracke - Fan Pla e, Lef
22089*
1
9 Pla e - Fan
22092*
4
10 Divider - Fan
22091*
6
11 Divider - Fan, Cen er
22090*
1
12 Bracke - Fan Arm, Righ
22085*
1
13 Bracke - Fan Arm, Lef
22086*
1
ASSEMBLY PARTS
When ordering replacement parts
*USE PAINT CODE: TK= LACK
FIGURE 6.
Before assembling, make sure that all assembly parts are present.
ASSEMBLY PARTS

FIGURE 7.
CENTER BRACKET ASSEMBLY
1. Check that all parts are present before beginning
assembly. See Figure 7.1
2. In the orientation shown, loosely assemble Right Fan Plate
racket 6 , Center Fan Divider 11 and Left Fan Plate
racket 8 using two 1/4-20 X 1/2 Carriage olts 5 and
two 1/4-20 Serrated Flange Nuts 4 .
3. Using two 3/8-16 X 1 Carriage olts 3 and two 3/8-16
Serrated Flange nuts 2 , assemble Right Fan Arm racket
12 and Left Fan Arm racket 13 to the assembly created
in step 2. See Figure 7.2
4. Securely tighten all hardware using the torque values
found on page 11 of this manual.
Wrench/Socket
Qty. Size
(1) 9/16”
(1) 7/16”
Tools Required:
FIGURE 7.2
7
ASSEMBLY DIRECTIONS
Note: The Item Numbers
on this page refer to the
table on page 6

FIGURE 8.
8
ASSEMBLY DIRECTIONS
Wrench/Socket
Qty. Size
(1) 7/16”
Tools Required:OUTER BRACKET ASSEMBLY
1. Assemble Fan Divider 10 and Fan Plate 9 to the Center
racket Assembly created from the steps on page 7 using
two 1/4-20 X 1/2 Carriage olts 5 and two 1/4-20
Serrated Flange Nuts 4 . See Figure 8.1
2. Continue assembling Fan Divider 10 , Fan Plate 9 and
another Fan Divider 10 as shown in Figure 8.1 using four
1/4-20 X 1/2 Carriage olts 5 and four 1/4-20 Serrated
Flange Nuts 4 .
3. Repeat Steps 1 and 2 of the racket Assembly to
assemble the opposite side of the unit. See Figure 8.2
4. Securely tighten all hardware using the torque values
found on page 11 of this manual.
FIGURE 8.2
Note: The Item Numbers
on this page refer to the
table on page 6

FIGURE 9.
9
ASSEMBLY DIRECTIONS
MOUNTING BRACKET TO
FEED BIN FRAME ASSEMBLY
1. Remove the two 3/8-16 Serrated Flange Nuts found under
the Flow Gate of your Feed in and set aside.
See Figure 9.1.
2. Assemble Mounting racket Weldment 7 to the Feed
in Frame using the two 3/8-16 X 2 3/4 Carriage olts
already in place under the Flow Gate of the Feed in and
the two 3/8-16 Serrated Flange Nuts that were removed in
Step 1.
3. Securely tighten the two 3/8-16 Serrated Flange Nuts
using the torque values found on page 11 of this manual.
Wrench/Socket
Qty. Size
(1) 9/16”
Tools Required:
Note: The Item Numbers
on this page refer to the
table on page 6
FIGURE 9.2
FAN ASSEMBLY TO MOUNTING BRACKET
1. Using two Ø1/2 X 4” ent Pins 1 , connect the Fan
Assembly to the Mounting racket Weldment 7 and
secure with the two included Hairpins. See Figure 10.1
3/8-16 SERRATED
FLANGE NUT
Note: Some parts have
been hidden for clarity.

0
ASSEMBLY DIRECTIONS
Note: The Item Numbers
on this page refer to the
table on page 6
FIGURE 0.2
ALTERNATIVE METHOD OF
ATTACHING TO FEED BIN
1. The Fan Assembly can be unpinned and reattached to the
Mounting racket underneath the Feed in and upside
down. This will allow normal usage of the Feed in as if
the Distributor weren’t there (e.g. filling buckets with
feed). See Figure 10.2
FIGURE 0.
COMPLETED ASSEMBLY


WHEN ORDERING PARTS, PLEASE HAVE THE
FOLLOWING INFORMATION AVAILA LE:
* PRODUCT – FEED IN DISTRI UTOR
* SERIAL NUM ER - _______________
* MODEL NUM ER - _______________
* ENGINE MODEL NUM ER - _______________
TYPE - _______________
* PART NUM ER
* PART DESCRIPTION
TELEPHONE - 1-800-222-8183
FAX - 1-660-747-8650
SWISHER ACQUISITION INC.
1602 CORPORATE DRIVE
WARRENS URG, MO 64093
www.swisherinc.com
OWNER’S
MANUAL
www.swisherinc.com
CHANGING YOUR LANDSCAPE SINCE 945
IMPORTANT
Read and follow all
Safety Precautions
and Instructions
before operating this
equipment.
MODEL NO.
22080
Table of contents
Popular Industrial Equipment manuals by other brands

KiloVault
KiloVault HAB SCHNEIDER XW PRO UL9540 installation guide

Parker
Parker LX80L product manual

Siemens
Siemens 3SB24 04-0 operating instructions

SUHNER
SUHNER UPC 2-R operating instructions

ABB
ABB HT612769 Operation manual

Nibe
Nibe ClimateMaster Tranquility 22 Digital TZ... Installation, operation & maintenance instructions