Operating hints Agricultural Knapsack Sprayer Model 289350
Dear Customer:
You have purchased one of the best knapsack sprayers on the market today. The Safety Hints from the label
on your sprayer are repeated here for your protection. We urge you to read and observe them.
FOR YOUR SAFETY AND COMFORT:
Before using, filling or cleaning any sprayer, read all parts of the operating hints.
Make sure to set up the sprayer exactly as described in printed operating hints, on reminder tags and/or
stickers.
Wear protective clothing, respirator, gloves, eye protection, etc., whenever using, filling or leaning the
sprayer.
Periodically re-grease the lid gasket, lid vent and piston sleeve where applicable.
To ensure good performance keep lid vent free of obstruction. Keep connections well thightened.
Service and replace worn parts as required. Make sure the hose loops freely without kinking.
Read and follow all instructions of chemical suppliers.
Do not mix chemical formula inside the sprayer. Use separate container and fill the sprayer from there.
Else - as when applying liquid fertilizers- add these after the water.
Always sift formula through a strainer. If there is none under the lid, use a screened funnel.
Never fill the sprayer with hot liquids. Max. 30°C = 85°F.
This sprayer is made for agrichemicals in their recommended water or oil solutions. Do not use caustic,
corrosive or flammable solutions.
Before cleaning or servicing the sprayer allow all pressure to scape. Do not store or transport the sprayer
under pressure.
Unless spraying is to be resumed within hours, drain chemical formula (dispose of it in proper fashion) after
use and wash the sprayer -including hose, lance and shut-off valve- with plenty of fresh water.
Never store formula in a sprayer for more than a few hours.
Use the sprayer only for jobs for which it was designed. If in doubt, ask your dealer.
Do not leave any sprayer in reach of children or persons not qualified to use it in correct fashion.
When not in use -and especially for prolonged storage- keep your sprayer in a protected place away from
direct solar heat.
A S S E M B L Y
1. On opening the shipping box locate the following parts:
1 Pump handle
1 Pump lever
1 Spray lance
1 Tank lid (below the tank)
Inside the tank: 1 Strainer, 1 agitator, 1 cylinder holder nut, 1 cylinder, 1 pump holder nut, 1 bushing
guide, 1 felt ring, 1 pump tube with hose and shut-off valve, and a plastic bag with: 3 “C” lock pins, 1 cotter
pin, 3 small washers 1 big washer and 1 adjustable nozzle.
2. Take out the parts inside the tank; take the pump tube out carefully.
3. Lay down the sprayer over a table or a flat surface. Place the cylinder in the bottom opening of the tank
fix it firmly with the cylinder holder nut.
4. With the sprayer in vertical position, place the bushing guide and the pump holder nut with the felt ring on
the small tank opening. Grease the piston sleeve and the pumping tube and put it in the cylinder, guiding
carefully the piston sleeve to avoid damages. Tighten the pump holder nut.
5. Insert the pump lever in the pump tube placing a small washer on each side and fix it with an “C” lock pins.
6. Pass the pump handle through the holes on the base (the grip should be at the same side of the pump
lever). Fix the pump handle to the pump lever with a small washer and an “C” pin. On the other end of the
base fix the handle with a big washer and a cotter pin.
7. Attach the nozzle to the spray lance. Manually, tighten slightly.
8. Attach the spray lance to the shut-off valve and tighten it manually. Please check that the gasket is in
its place.
9. Attach the agitator to the pump tube.
O P E R A T I O N
(see section For Your Comfort and Safety)
Bear in mind that rubber parts on modern sprayer-e.g. piston sleeves, O´rings -resist virtually any
agrichemical. Yet improper use (formulas in greater-than-normal concentration, strong industrial solvents not
commonly known and/or used at the time of manufacture) may cause even the best materials to deform or
wear out prematurely. If this ever happens, call your supplier for support.
BN289350-1116E/EX Rev.03
Litho´d in México
Fax (474) 7420856
“ (474) 7424185
(474) 7412200
“ (474) 7412201
www.swissmex.com
Calle Swissmex No. 500
Col. Las Ceibas,
47440 Lagos de Moreno
Jalisco, México
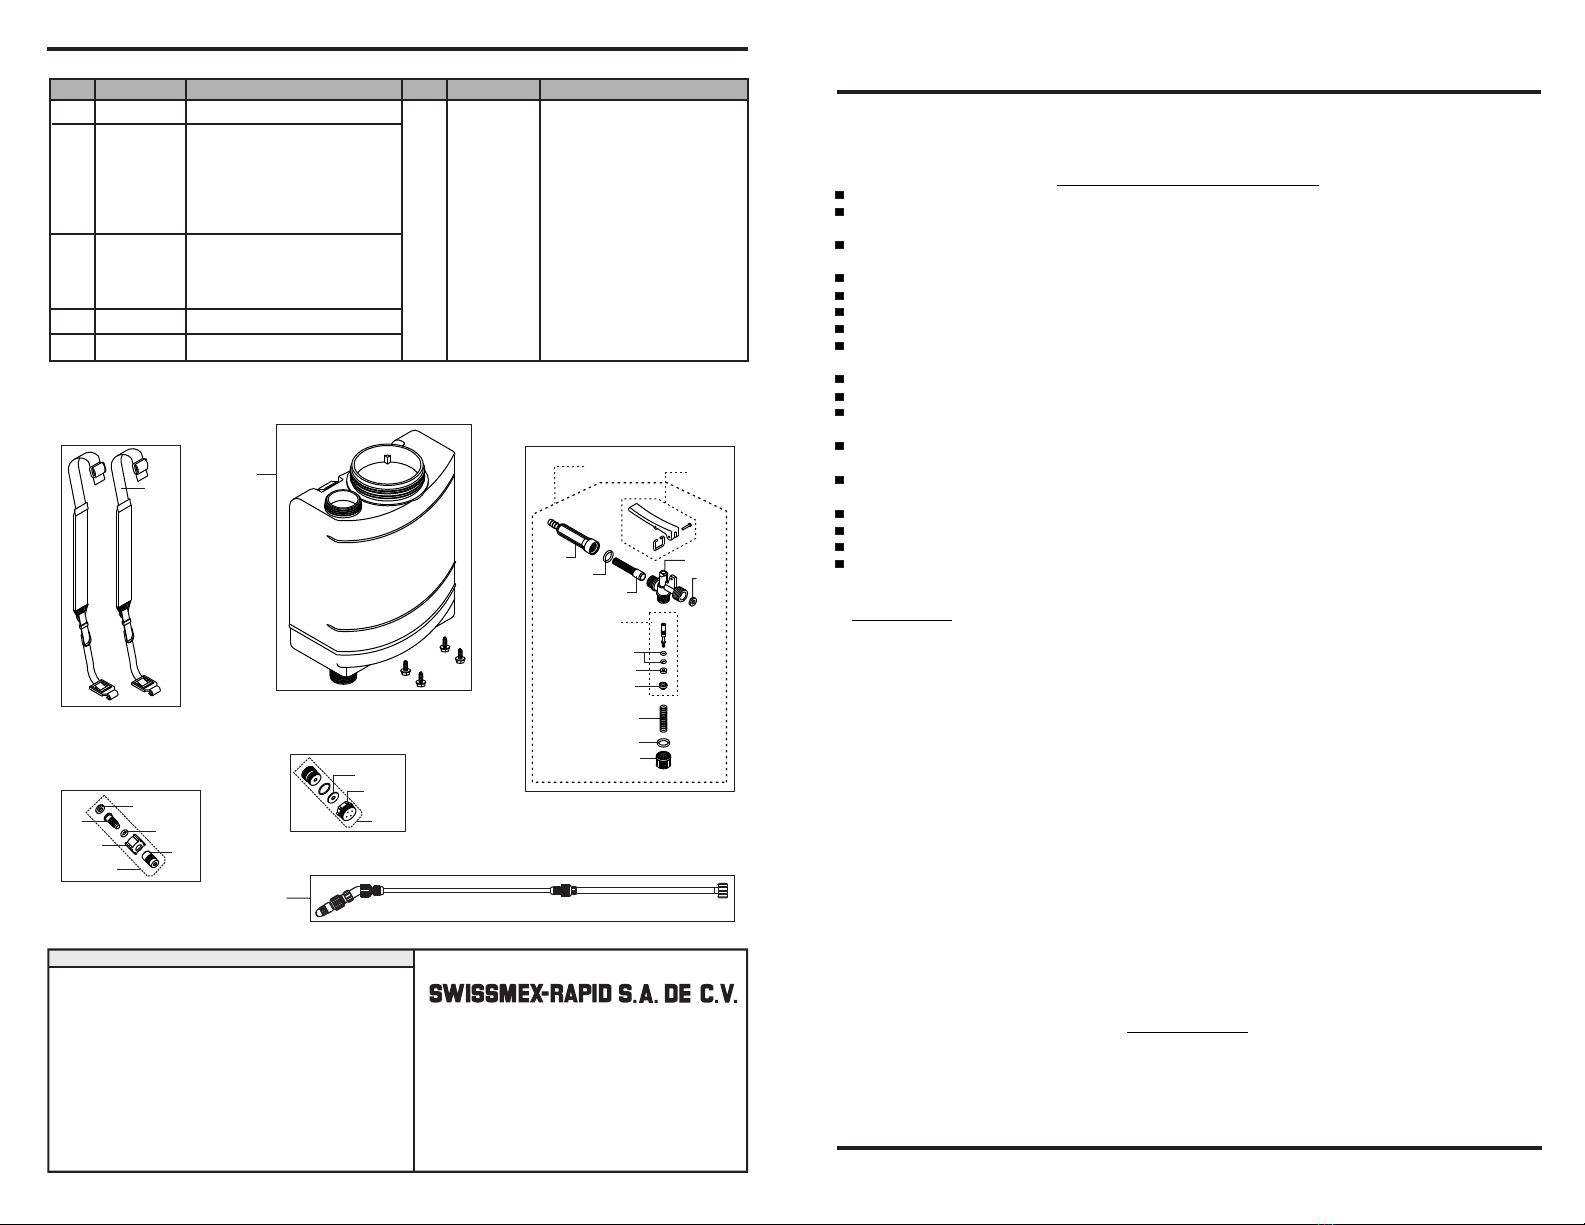
58G
PADDED CARRYING
STRAP
FACTORY-INSTALLED UPGRADE OPTIONS
56
56a
56b
56c
56d
56G
57a
57b
57G
E803-092
E803-114
E803-083
E803-090
E803-087
E803-092-C
E219-134
E219-133
E219-610-C
55G E219-236-C Telescopic spray lance
58G
59
E501-230-C
E289-105
Padded carrying strap ass´y
Blue tank
Nozzle body
Gasket - N
O´ring
Nozzle nut (2pcs)
Nozzle cap
Nozzle body ass´y
Hi-volume nozzle gasket
Hi-volume nozzle nut
Hi-volume nzzle 11/16” trhead
aluminum
60
60a
60b
60c
60d
60e
60f
60g
60h
60i
60G
60G1
60G2
E807-173
E807-075
E803-060
E807-074
E803-114
E803-068
E803-063
E803-065
E803-067
E803-164
E807-075-C
E803-072-C
E803-067-C
Valve body
Filter housing
O´ring
Filter insert
Gasket - N
O´ring - V (2pcs)
Pin gasket - N
Metal support
Plunger spring
Cap
Shut-off valve
ass´y
Valve lever ass´y
Plunger ass´y
Part Part
Code Code
Description Description
SPARE PARTS LIST
60G1
60
60d
60f
65a
60b
60b
60c
60e
60g
60h
60i
60G2
60G
SHUT-OFF VALVE
WITH BARB HOSE
HI-VOLUME
NOZZLE
57G
57a
57b
56a
56
56c 56d
56b
56G
ADJUSTABLE BRASS
NOZZLE
55G
TELESCOPIC SPRAY LANCE
Please note that marked "=" have standard
ORANGE color. Unless a parts order states
otherwise they will be supplied in this standard
color.
For practical time-saving accessories, special
nozzle tips etc. please refer to spec sheet
“OPTIONAL SWISSMEX-RAPID
ACCESSORIES”.
In the interest of continued technologic progress
specifications are subject to change without
notice.
NOTE:
59
BLUE TANK


