Swisson XRC-CT15b User manual

XRC-CT15b
External Trigger
Contacts for XRC-
150/200
User Manual

2
XRC-CT15b External Contacts Trigger for
XRC-150/200
User Manual
Issue 1 (2011-05-31)
Copyright © 2011 SWISSON AG
No part of this documentation may be reproduced
or transmitted in any form or by any means,
electronic or mechanical, including photocopying
and recording, without the prior written permission
of SWISSON AG.
The information in this documentation is supplied
without warranty of any kind, either directly or
indirectly, and is subject to change without prior
written notice. SWISSON its employees or
appointed representatives will not be held
responsible for any damages to software,
hardware, or data, arising as a direct or indirect
result of the product(s) mentioned herein.
Issued by
SWISSON AG
Fabrikstrasse 21
CH-3250 Lyss
Switzerland

3
Table of contents
Table of contents ............................................ 3
Overview......................................................... 4
General Description........................................ 5
Connecting the XRC-CT15b to the XRC-
150/200........................................................... 6
Connection .................................................. 6
Connecting Cable........................................ 7
Opening the XRC-CT15b ............................... 8
Connecting contacts to the XRC-CT15b ........ 9
Using internal Power ................................... 9
Using external Power .................................. 9
Configuration of the XRC-150 ...................... 10
Configuration of the XRC-200 ...................... 10
Technical Data.............................................. 12
Absolute Maximum ratings........................ 12
Operating Conditions ................................ 12
Safety notes.................................................. 14

4
Overview
1
2
3
4
1 Port Connector
The XRC-CT15b is connected with
the XRC-150/200 through this port.
2 Cable Glands
Glands for cables connected in the
XRC-CT15b
3 Lid
The lid of the XRC-CT15b can be
removed for connection of the
contacts
4 Lid Screw
This screw holds the lid on the XRC-
CT15b

5
General Description
The XRC-CT15b is an accessory for use with the
XRC-150/200. On this device up to 15 external
trigger contacts can be connected.
With these contacts the XRC-150/200 can be
controlled remotely:
Each button can be configured to start, stop or
pause, play back of a sequence on the XRC-
150/200.
Contacts 1 .. 15
XRC-CT15b
XRC-150

6
Connecting the XRC-CT15b to
the XRC-150/200
Connection
The XRC-CT15b can be easily connected to the
XRC-150/200 through running a cable from the
external port of the XRC-200 or from one of the two
external ports of the XRC-150 to the XRC-CT15b:
It doesn’t matter on which port (port #1 or #2) the
XRC-CT15b is connected to the XRC-150.

7
Connecting Cable
The connection of the XRC-CT15b to the XRC-
150/200 is done with a standard RJ45 8 pole
STRAIGHT network cable:
1
2
3
4
5
6
7
8
1
2
3
4
5
6
7
8
The speed of the data transmission between the
XRC-CT15b and the XRC-150/200 is 250 kBaud.
Therefore, the cable mustn’t be very high quality.

8
Opening the XRC-CT15b
To connect the XRC-CT15b with external trigger
contacts, the lid must first be removed. Simply
remove the lid screw:
Lid Screw
Slide out the lid of the XRC-CT15b:
Now you can see the connecting ports (1 – 15) for
the external trigger contacts and also two
connectors of the internal power (VCC and GND):

9
Connecting contacts to the
XRC-CT15b
Using internal Power
Using the internal power of the XRC-CT15b is a
very simple way to connect external trigger contacts
to the device.
Simply connect a switch, button, relay or another
contact with one connection to the internal supply
voltage (VCC) of the XRC-CT15b, and the other
connection to a dedicated input of the device:
Using external Power
When using external power, it’s necessary to
connect GND of the XRC-CT15b to the voltage
reference (ground) on the external device:
ATTENTION:
When using external power, you have to take
attention to the maximum ratings!!! (See chapter
Absolute Maximum ratings on page 12)
VCC
1
2
15
XRC-CT15b
Voltage of
external device
1
2
15
Reference (Ground
of external device
GND
XRC-CT15b
External Device

10
Configuration of the XRC-150
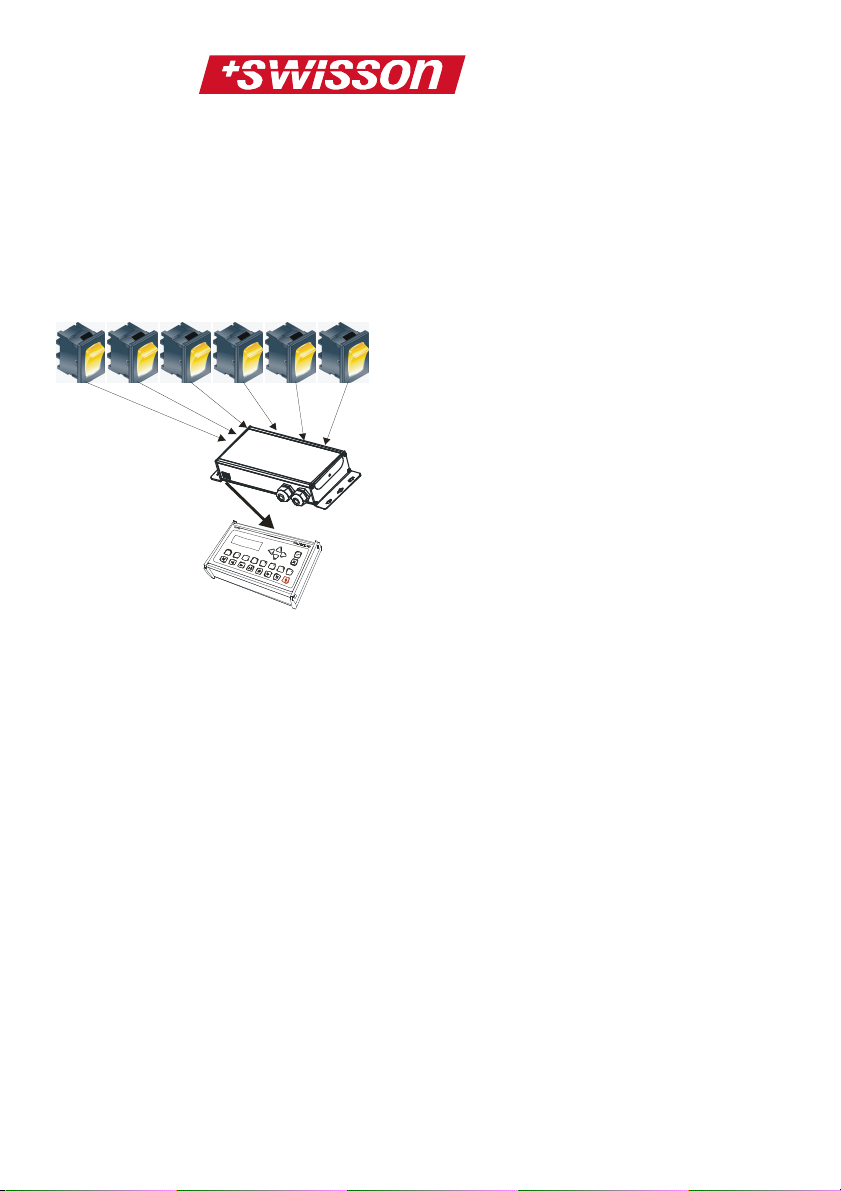
Every time a contact is activated, the XRC-CT15b
sends this information to the XRC-150.
Therefore it’s possible to configure each contact
activity on the XRC-150 to either start, stop or
pause, a sequence.
To configure the contacts, go to the menu point
EXTERNAL DEVICES in the XRC-150 main menu
and press the confirm/select button. Now scroll
to CONTACTS CONFIGURATION and press the
confirm/select button again. The following will
appear on the display of the XRC-150:
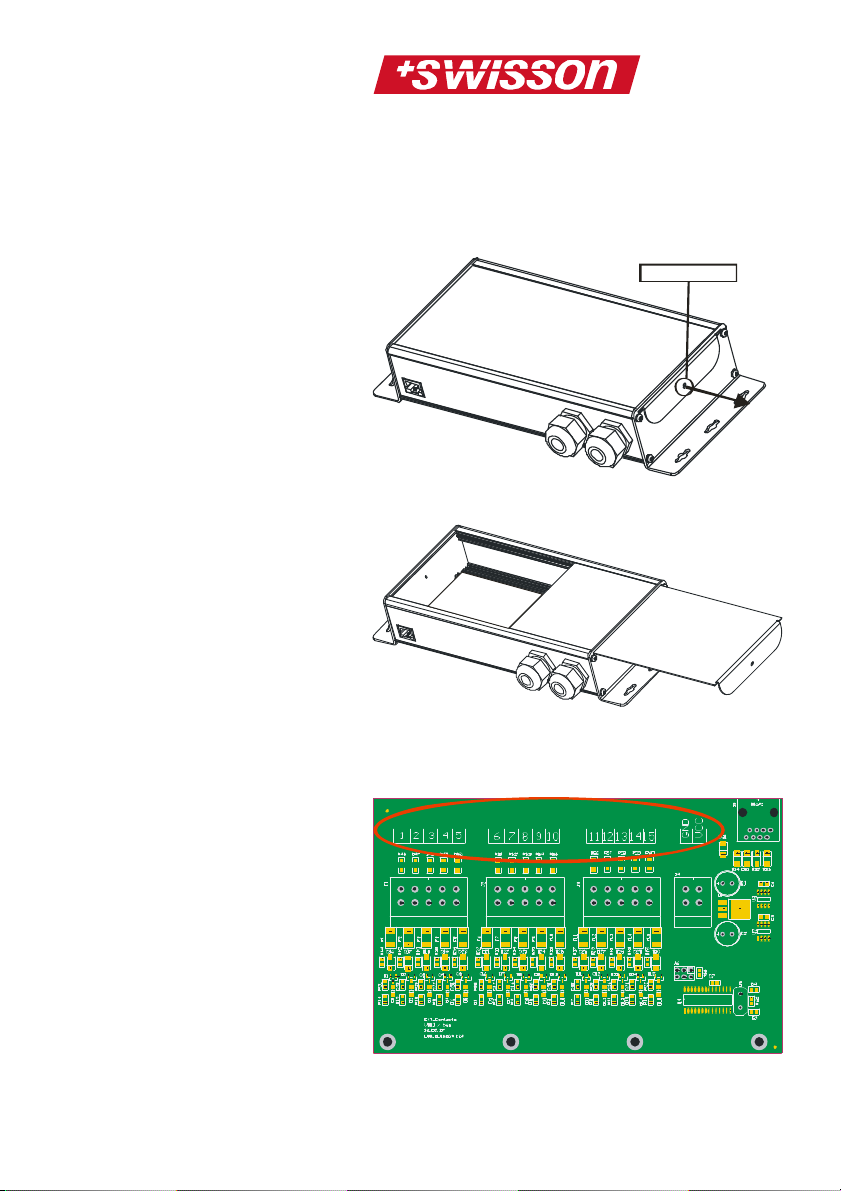
Now you need to choose the contact by activating
it. For example if you have connected a switch on
contact1, press this switch to configure contact1:
There are three different possible actions:
1. Play Sequence:
This will start playback of one of the 32
different sequences (the sequence can be
set)
2. Pause:
This will set the XRC-150 to pause or
release the XRC-150 from pause during
playback.
3. Stop:
This will stop the XRC-150 during play
back or recording.
Configuration of the XRC-200
In order to configure the XRC-200’s behavior upon
events triggered by an XRC-CT15b, open the XRC-
200’s menu and select ADVANCED, confirm by

11
pressing the OK button, then select
EXTRERNAL CONTACTS and press the OK
button. A table is displayed where each row
corresponds to one of the 15 External Contacts.
The leftmost column shows which contacts the row
configures. The arrow keys are used to navigate
within the table. When the OK key is pressed
while a cell in the second column is highlighted, a
menu will show up, where an action may be
selected. Available actions are NONE, PLAY
PLAYLIST, PLAY SEQUENCE, PAUSE and STOP.
When a cell in the rightmost column is highlighted,
pressing the OK key will display a list of
sequence numbers if the action of the row of the
highlighted cell is PLAY SEQUENCE. A list of
playlist numbers will be displayed if the action of the
row of the highlighted cell is PLAY PLAYLIST.
Please consult the XRC-200 manual to see how to
use the XRC-CT15b with XRC-200 playlists.

12
Technical Data
Absolute Maximum ratings
The maximum ratings of the XRC-CT15b mustn’t
be exceeded; otherwise the device will be
damaged.
Input voltage of
contacts (1 – 15)
when using external
power
17V
VCC current (if you
want to power
another device)
250mA
Operating Conditions
VCC 7V – 8V
Activation Voltage
when using external
power
If the voltage of a contact
exceeds 2.5V then it’s
activated. For another
activation, the voltage first
must fall below 2.0V
Switching
characteristic
As soon as a contact is
activated, the XRC-CT15b
will send a command to the
XRC-150/200. If the
contact stays activated,
nothing happens. To
initiate the command
again, the contact first has
to be deactivated.
Input Power No input power needed,
power comes over the
connecting cable from the
XRC-150/200
Software
Requirements
You must have software
version 1.10 or higher
installed on your XRC-
150/200 if you want to use
the XRC-CT15b external
triggers
Operating
temperature
0°C to 45°C
Dimensions / weight 267 mm/10.51in x

13
111mm/4.37in x
45mm/1.77in / 500g/1.10lbs

14
Safety notes
Consider the following notes absolutely when you
set up, connect and use the XRC-CT15b:
•Connect the cables only with the proper plugs
and sockets.
•Set the cables in an accident-proof fashion.
Connected cables mustn’t be stressed
mechanically too much.
•Keep the device away from sources of
electrical interference.
•This device is developed for only use together
with the XRC-150/200 Dynamic DMX Recorder
of SWISSON AG and no other devices.
•Clean the XRC-CT15b only with a soft, damp
cloth. Don’t use chemicals or other harsh
scrubbing agents.
•Protect the device against extreme dampness,
liquids, dust and dirt.
•Don’t use the device in places with excessive
direct sunlight or heat.
•Don’t use the device in highly combustible
areas.
Table of contents
Popular Lighting Equipment manuals by other brands

American DJ
American DJ Avenger ll User instructions

Meteor
Meteor VELA 4 installation guide

Larson Electronics
Larson Electronics EPL-HB-50LED-RT-JB2-6-EPP instruction manual

Pfannenberg
Pfannenberg PY L-S-TL quick guide

BARRON
BARRON EXITRONIX VLED-90L Series installation instructions

Ibiza
Ibiza MINI PARTY LIGHT SET instruction manual

Kino Flo
Kino Flo ParaZip 415 DMX Operation manual

Philips
Philips hue Gradient lightstrip user manual

Siteco
Siteco Connect 31 5LZ910W1 401 Series quick start guide

DeWalt
DeWalt DCL074 instructions

Kasco
Kasco RGB4C5 Operation & maintenance manual

Beamz professional
Beamz professional WH180RGB instruction manual