SCHOTT LLS 3 User manual

SCHOTT North America, Inc.
Part number: A20970
Serial number:
LLS 3
LED Light Source
User Manual
SCHOTT North America, Inc.
122 Charlton Street, Southbridge, MA 01550-1960
Phone: (508) 765-9744, Fax: (508) 765-1299
Email: machine.vision@us.schott.com
Website: www.schott-moritex.com

Table of Contents
1.0. SAFETY WARNING – ENGLISH 4
1.1. Safety Symbols – English 5
1.2. LED Safety Classification – English 5
1.3. Quick Start – English 5
2.0. SICHERHEITSHINWEISE - DEUTSCH 7
2.1. Sicherheitssymbole – Deutsch 8
2.2. Sicherheitseinstufung des Lasers – Deutsch 8
2.3. Schnellstart – Deutsch 8
3.0. AVERTISSEMENTS DE SECURITE – FRANÇAIS 10
3.1. Symboles de Sécurité – Français 11
3.2. Classification de la Sécurité du Laser– Français 11
3.3. Démarrage Rapide – Français 11
4.0. ADVERTENCIA DE SEGURIDAD – ESPAÑOL 13
4.1. Símbolos de Seguridad – Español 14
4.2. Clasificación de Seguridad del Láser – Español 14
4.3. Inicio Rápido – Español 14
5.0. 安全上の警告 – JAPANESE 16
5.1. 安全記号 – Japanese 17
5.2. レーザー安全性分級 – Japanese 17
5.3. クイックスタート – Japanese 17
6.0. GENERAL INSTRUCTIONS 19
6.1. Product Description 19
6.2. Installation Guidelines 20

User Manual - LLS 3
Page 3
6.3. Cleaning 21
6.4. LED Specifications 21
7.0. LLS 3 – LED LIGHT SOURCE OPERATION 22
7.1. General Operation 22
7.2. Front Panel Controls 22
8.0. USER CONTROL AND OPERATING MODES 23
8.1. User Control Modes 22
8.2. Operating Modes 22
9.0. REMOTE POLARITY SWITCH 25
10.0. RS-232 CONNECTION 26
11.0. ETHERNET CONNECTION 26
12.0. MULTI-PORT CONNECTION 26
13.0. REMOTE OPERATION: RS-232 29
14.0. REMOTE OPERATION: ETHERNET 36
15.0. POWER SUPPLIES 37
16.0. TROUBLESHOOTING 38
17.0. PRODUCT SPECIFICATIONS 39
18.0. DECLARATION OF CONFORMITY 40
19.0. REPLACEMENT PARTS LIST 41
20.0. SUPPORT, SERVICE, AND RMA POLICY 41
21.0. WARRANTY AND LIABILITIES 42

User Manual - LLS 3
Page 4
1.0. Safety Warning – English
1. Read, understand and follow all instructions in this manual.
2. Keep all safety and operating instructions for future reference.
3.
!
To ensure protection from electric shock, only power the LED Light
Source from an agency approved Class 2 DC power supply (double insulation)
such as the one included with the product.
4.
!
Never look directly at the LED output when on. LEDs feature a very high
luminance that can cause eye injury. Do not look at beam with optical
instruments. Use UV protective goggles when using a UV Light Source.
5.
!
Do not cover the front or the rear of the unit.
6. To ensure proper grounding, use the supplied ESD grounding connections.
7. Use only power cords with appropriate connectors for secure use.
8. Disconnect power cord when unit will be left unused for long periods of time.
9. Do not use this unit near any liquids or in an area with excessive moisture.
10. Do not place flammable materials on or near the unit.
11. Use only standard glass type cleaners. Do not use solvents or petroleum
distillates or any volatile or flammable liquids or foams.
12. Never spill liquid on the unit.
13. Unplug before servicing (servicing is for authorized personnel only).
14. Do not service the unit beyond that described in this manual. Return the light
source to an authorized service center. For a Return Material Authorization,
see Section 20.

User Manual - LLS 3
Page 5
1.1. Safety Symbols – English
The following Symbols are used in relation to the LED Light Source.
Symbol
Explanation
Unit ON/Standby
DC Power
DC Polarity
European Declaration of Conformity
Compliant with the Waste Electrical and
Electronics Equipment/Restriction of the Use
of Certain Hazardous Substances in Electrical
and Electronics Equipment (WEEE/RoHS)
recycling directives.
Optical Radiation Safety
1.2. LED Safety Classification – English
The LED Light Source is classified as a Type 1 LED Product. Do not stare into
the beam. LED output is out of the front nosepiece of the unit. Please follow all
safety and operational guidelines to ensure safe operation of the unit.
1.3. Quick Start – English
1.3.1. Input Voltage
The LLS 3 accepts input voltage up to 35 VDC. DC power for the LED Light
Source must be from an agency approved Class 2 DC power supply. A
suitable 24VDC power supply for 100 to 240 VAC and 50/60 Hz is provided
with the unit. Input voltage can be applied to either the circular DC connector
or the green terminal block (Multi-Port connector). It is advised that the
chassis ground terminal on the Multi-Port connector be attached to a suitable
earth ground.

User Manual - LLS 3
Page 6
1.3.2. Turning the Light Source “On”
1. Connect the cord from the power supply to the light source.
2. The LLS 3’s green status LED will illuminate for a few seconds while the
unit initializes. If the unit is in Standby Mode, then the LED will turn off.
3. Turn the intensity control knob all the way down (to prevent accidentally
shining the optical output onto others).
4. Press the On/Standby push button on the front of the unit.
5. Turn up the intensity control knob.
6. If the light engine does not light up, check the polarity switch setting.
7. To turn the LED Off, press the On/Standby push button on the front of
the unit.

User Manual - LLS 3
Page 7
2.0. Sicherheitshinweise - Deutsch
1. Bitte lesen Sie dieses Handbuch vollständig durch und befolgen Sie alle darin
enthaltenen Anweisungen.
2. Bewahren Sie alle Sicherheitshinweise und Betriebsanweisungen zum
späteren Gebrauch sorgfältig auf.
3.
!
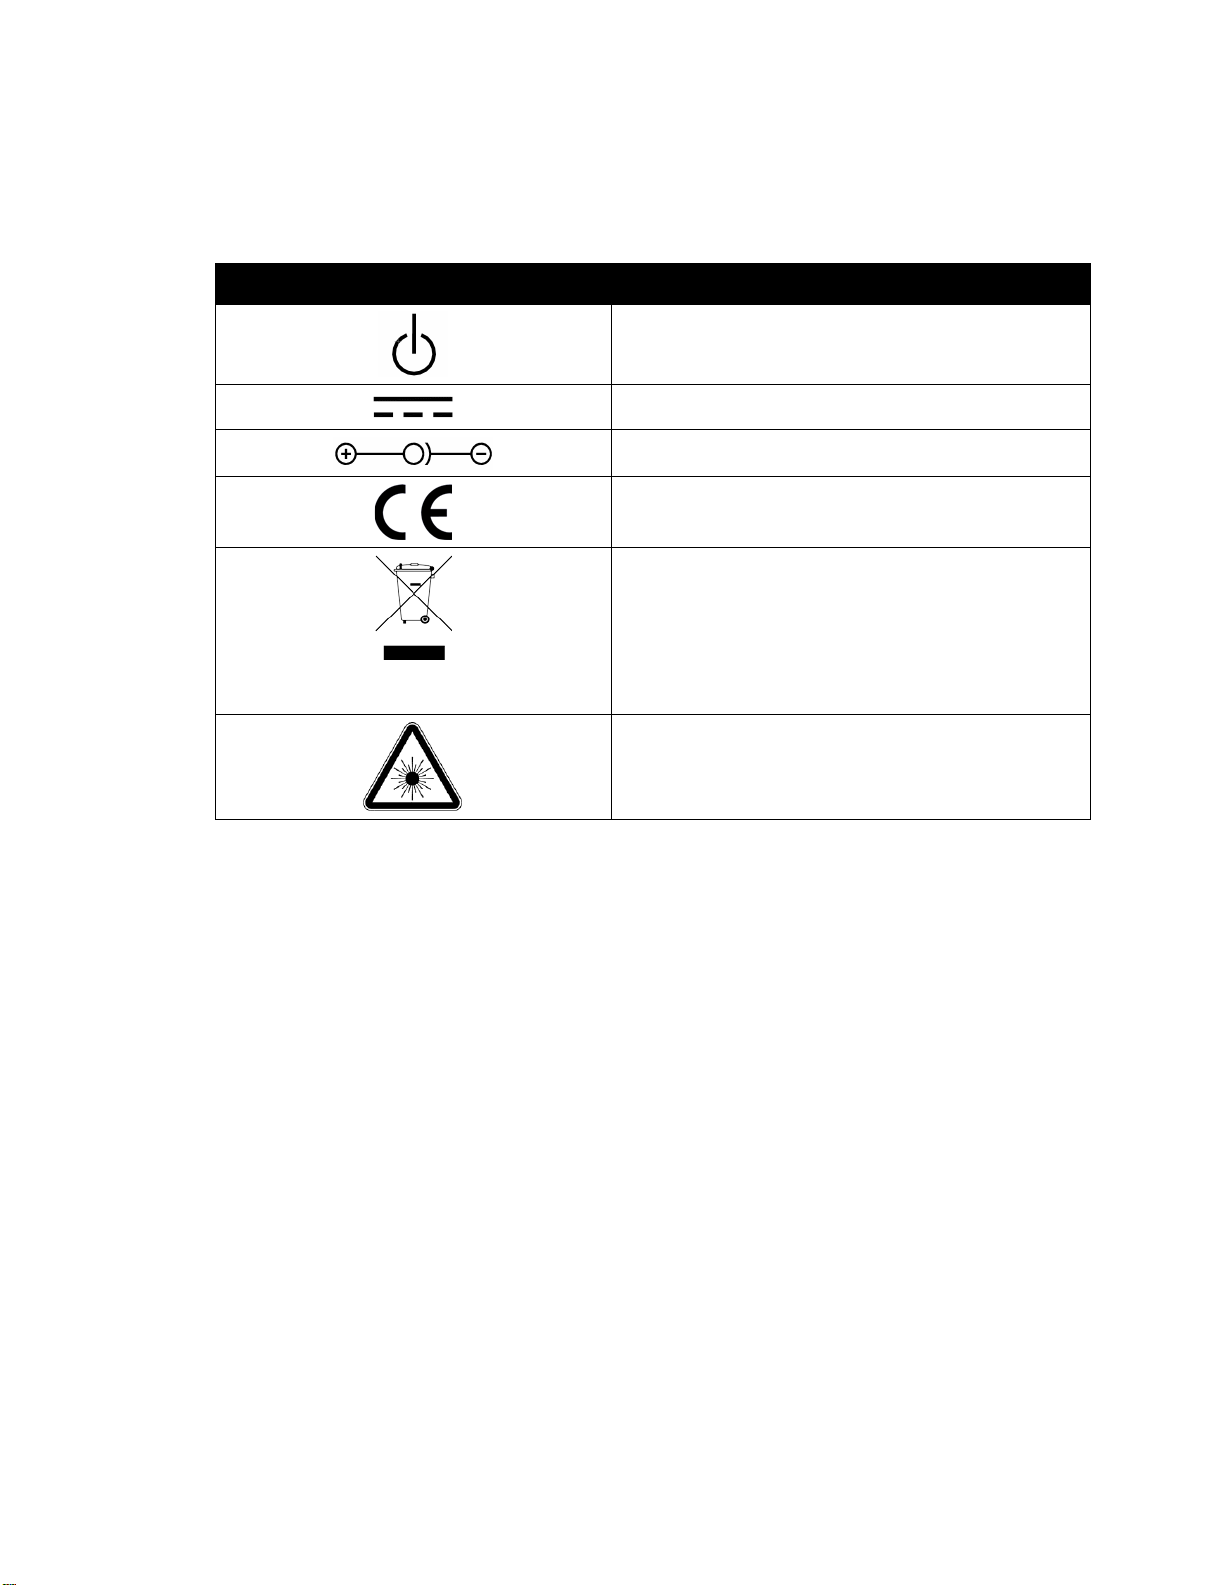
Zum Schutz vor Stromschlägen sollte die LED-Leuchte ausschließlich mit
einem behördlich zugelassenen Gleichstrom-Netzteil der Klasse 2 (doppelt
isoliert) betrieben werden. Das mitgelieferte Gerät entspricht der behördlichen
Anforderungen.
4.
!
Blicken Sie nie direkt in die eingeschaltete LED-Lichtquelle. LED-
Leuchten verfügen über einen sehr hohen Helligkeitsgrad und können zu
Augenverletzungen führen. Betrachten Sie den Lichtstrahl nicht mit optischen
Instrumenten. Verwenden Sie beim Einsatz von UV-Leuchten immer eine
Schutzbrille gegen die UV-Strahlung.
5.
!
Die Vorder- und Rückseite des Geräts bitte nicht abdecken.
6. Zur sicheren Erdung nur das mitgelieferte Erdungskabel zur elektrostatischen
Entladung verwenden.
7. Zum Zweck der Betriebssicherheit ausschließlich Anschlussleitungen mit den
passenden Steckvorrichtungen verwenden.
8. Wenn das Gerät über einen längeren Zeitraum nicht eingesetzt wird, bitte die
Stromversorgung unterbrechen.
9. Gerät nicht in der Nähe von Flüssigkeiten oder in übermäßig feuchten
Umgebungen einsetzen.
10. Lassen Das Gerät von entflammbaren Materialien entfernt halten.
11. Verwenden Sie bitte nur gewöhnliche Glasreiniger. Von der Verwendung von
Lösungsmitteln, Öldestillaten, flüchtigen oder leicht entzündlichen
Flüssigkeiten bzw. Schäumen ist abzusehen.
12. Vermeiden Sie das Verschütten von Flüssigkeiten auf dem Gerät.
13. Vor Wartungsarbeiten bitte den Stecker ziehen (Wartungsarbeiten dürfen nur
von entsprechend autorisiertem Personal vorgenommen werden).
14. Beschränken Sie Ihre Wartung des Geräts bitte auf das in diesem Handbuch
beschriebene Ausmaß. Geben Sie das Steuergerät an ein autorisiertes
Kundendienstcenter von SCHOTT zurück. In Abschnitt 20 finden Sie mehr
Informationen zur Rückgabegenehmigung für Materialien.

User Manual - LLS 3
Page 8
2.1. Sicherheitssymbole – Deutsch
Im Hinblick auf die LED-Lichtquelle werden die folgenden Sicherheitssymbole
verwendet:
Symbol
Erläuterung
Gerät einschalten/Standby
Gleichstrom
Gleichstrompolung
Europäisches Gütezeichen (CE-Kennzeichen)
Entsprechend der Richtlinien des
Europäischen Parlaments und des Rates zur
Beschränkung der Verwendung bestimmter
gefährlicher Stoffe in Elektro- und
Elektronikgeräten und über Elektro- und
Elektronik-Altgeräte (WEEE/RoHS).
Optischer Strahlungsschutz
2.2. Sicherheitseinstufung des Lasers – Deutsch
Die LED-Lichtquelle wird als Laserprodukt der Klasse 1 eingestuft. Nicht in den
Strahl blicken. Der Laserstrahl tritt am Objektiv an der Gerätvorderseite aus. Bitte
befolgen Sie zur Gewährleistung des sicheren Betriebs dieses Geräts alle
Sicherheits- und Betriebsanweisungen.
2.3. Schnellstart – Deutsch
2.3.1. Eingangsspannung
Die Laserlichtquelle kann mit einer Eingangsspannung von bis zu 35 Volt
Gleichstrom betrieben werden. Die Gleichstromversorgung der Laser-
Lichtquelle ist über ein behördlich zugelassenes Gleichstrom-Netzteil der
Klasse 2 vorzunehmen. SCHOTT bietet ein hierfür zugelassenes 24V-
Gleichstrom-Netzteil für 100 bis 240 V Wechselstrom und 50/60 Hz an. Die
Stromversorgung kann entweder über die runde Gleichstrombuchse oder die
grüne Klemmleiste (Multi-Port-Anschluss) erfolgen. SCHOTT empfiehlt den
Anschluss der Chassismasse-Klemme der Klemmleiste an eine geeignete
Erdung.

User Manual - LLS 3
Page 9
2.3.2. Einschalten des Steuergeräts
1. Schließen Sie die Lichtquelle an das Netzteil-Kabel an.
2. Die LLS 3 grüne Status-LED wird für ein paar Sekunden zu beleuchten,
während das Gerät initialisiert. Wenn sich das Gerät im Standby-Modus
wird die LED erlischt.
3. Drehen Sie den Intensitätsregler ganz herunter (zur Verhinderung des
versehentlichen Auftreffens des Laserstrahls auf eine Person).
4. Betätigen Sie den Einschalt-/Standby-Knopf an der Vorderseite des
Geräts.
5. Drehen Sie den Intensitätsregler wieder herauf.
6. Wenn der Leuchtkopf nicht aufleuchtet, Einstellung des Polaritätsschalters
überprüfen.
7. Zum Ausschalten der LED-Leuchte wieder den Einschalt-/Standby-Knopf
an der Gerätvorderseite betätigen.

User Manual - LLS 3
Page 10
3.0. Avertissements de sécurité – Français
1. Lisez, comprenez et suivez toutes les instructions dans ce manuel.
2. Gardez toutes les consignes de sécurité et opérationnelles pour référence
future.
3.
!
Afin de garantir la protection contre le choc électrique, alimenter la source
de la lumière du DEL uniquement avec un bloc d’alimentation CC de Classe 2
approuvé par une agence (double isolement) tel que celui inclus avec le produit.
4.
!
Ne jamais regarder directement la sortie du DEL lorsqu’elle est allumée.
Une des caractéristiques des DEL est une luminescence très forte qui peut
provoquer des blessures aux yeux. Ne pas regarder le faisceau avec des
instruments optiques. Utiliser des lunettes de protection contre les UV lors de
l’utilisation de la source de lumière UV.
5.
!
Ne pas couvrir l’avant ou l’arrière de l’unité.
6. Pour garantir une correcte mise à la terre, utiliser le conducteur de terre ESD
fourni.
7. Utiliser uniquement des cordons d’alimentation avec connecteurs appropriés
pour une utilisation en sécurité.
8. Déconnecter le cordon d’alimentation lors d’une inutilisation prolongée.
9. Ne pas utiliser cette unité à proximité de tout type de liquide ou dans une zone
trop humide.
10.Ne pas placer de matériaux inflammables sur ou à coté de l’unité.
11.Utiliser seulement des nettoyeurs pour type de verre standard. Ne pas utiliser
de solvants ou distillés de pétrole ou tout liquide ou mousse inflammable ou
volatile.
12.Ne jamais déverser du liquide sur l’unité.
13.Débrancher avant l’entretien (l’entretien est uniquement pour le personnel
autorisé).
14.Ne pas effecteur la maintenance de l’unité en dehors de ce qui est décrit dans
ce manuel. Ramener le contrôleur à un centre de service autorisé. Pour une
Autorisation de Retour Matériel, voir la Section 20.

User Manual - LLS 3
Page 11
3.1. Symboles de Sécurité – Français
Les Symboles sont utilisés en relation à la Source de Lumière DEL
Symbole
Explication
Unité ON/En attente
Courant en continu
Polarité CC
Déclaration Européenne de Conformité
Compatible avec les directives de recyclage
concernant l'équipement pour les déchets
électriques et électroniques/restriction à
l'utilisation de certaines substances
dangereuses dans l'équipement électrique et
électronique (WEEE/RoHS).
Sécurité Optique contre les Radiations
3.2. Classification de la Sécurité du Laser– Français
La source de lumière du DEL est classifiée comme Produit Laser de Classe 1.
Ne pas fixer le faisceau. La sortie laser est située au dehors de l’arcade frontale
de l’unité. Veuillez suivre toutes les instructions de sécurité et de fonctionnement
pour garantir un fonctionnement en sécurité de l’unité.
3.3. Démarrage rapide – Français
3.3.1. Voltage d’entrée
Le LLS 3 accepte un voltage d’entrée jusqu’à 35 VCC. L’alimentation CC
pour la Source de lumière du DEL doit arriver d’un bloc d’alimentation CC de
Classe 2 approuvé par une agence. SCHOTT offre un bloc d’alimentation
adapté de 24VCC pour un VCA de 100 à 240 et 50/60 Hz. Le voltage
d’entrée peut être appliqué soit au connecteur CC circulaire, soit au bloc
terminal vert (connecteur Multi-Porte). SCHOTT recommande de brancher le
terminal de terre du châssis sur le connecteur Multi-Porte à une mise à la
terre adaptée.

User Manual - LLS 3
Page 12
3.3.2. Allumer le Contrôleur
1. Connecter le cordon de l’alimentation à la source de lumière.
2. Le LLS 3 la LED verte s'allume pendant quelques secondes lorsque
l'appareil s'initialise. Si l'appareil est en mode veille, puis le voyant
s'éteint. 2.
3. Tourner le poignet de contrôle d’intensité complètement vers le bas (pour
prévenir l’illumination accidentelle de la sortie optique sur un tiers).
4. Appuyer sur le bouton On/Standby au front de l’unité.
5. Tourner vers le haut le poignet de contrôle d’intensité.
6. Si la tête de la lumière ne s’allume pas, vérifier le réglage de l’interrupteur
de polarité.
7. Pour éteindre le DEL, appuyer sur le bouton On/Standby au front de
l’unité.

User Manual - LLS 3
Page 13
4.0. Advertencia de seguridad – Español
1. Lea, comprenda y siga todas las instrucciones contenidas en este manual.
2. Guarde todas las instrucciones de seguridad y funcionamiento para su
referencia en el futuro.
3.
!
Para garantizar protección contra electrocución, alimente la Fuente
Luminosa LED exclusivamente con una fuente de alimentación de c.c. clase 2
homologada (doble aislamiento) como la que viene incluida con el producto.
4.
!
No mire directamente a la salida del LED cuando esté encendido. Los
LEDs se caracterizan por una luminancia muy alta que puede causar lesiones
oculares. No mire al haz con instrumentos ópticos. Utilice gafas protectoras UV
al utilizar la Fuente Luminosa UV.
5.
!
No cubra las partes frontal y trasera de la unidad.
6. Para garantizar que esté adecuadamente puesto a tierra, utilice el cable de
puesta a tierra ESD proporcionado.
7. Utilice exclusivamente cables de alimentación con los conectores adecuados
para un uso seguro.
8. Desenchufe el cable de alimentación cuando la unidad vaya a estar sin usar por
un tiempo prolongado.
9. No utilice esta unidad cerca de líquidos ni en un área con una humedad
excesiva.
10.No coloque materiales inflamables sobre la unidad ni cerca de ella.
11.Utilice exclusivamente limpiadores convencionales de cristal. No utilice
disolventes ni destilados del petróleo ni líquidos o espumas inflamables o
volátiles.
12.No derrame líquido sobre la unidad.
13.Desenchúfelo antes del mantenimiento (mantenimiento reservado
exclusivamente al personal autorizado).
14.No realice un mantenimiento de la unidad más allá de lo descrito en este
manual. Devuelva el controlador a un centro de servicio autorizado. Para una
Autorización de Material Retornable, véase la Sección 20.

User Manual - LLS 3
Page 14
4.1. Símbolos de seguridad – Español
Se utilizan los siguientes símbolos en relación con la Fuente Luminosa LED
Símbolo
Explicación
Unidad ENCENDIDA/en espera
Alimentación c.c.
Polaridad c.c.
Declaración Europea de Conformidad
Conforme a las directivas de reciclaje de
Equipos Eléctricos y Electrónicos Residuales
/Restricción del Uso de Determinadas
Sustancias Peligrosas en Equipos Eléctricos y
Electrónicos.
Seguridad de radiación óptica
4.2. Clasificación de Seguridad del Láser – Español
La Fuente Luminosa LED se clasifica como un producto láser de clase 1. No
mire al haz. La salida del láser se encuentra en el talón frontal de la unidad. Por
favor, siga todas las directivas de seguridad y funcionamiento para garantizar un
funcionamiento seguro de la unidad.
4.3. Inicio Rápido – Español
4.3.1. Tensión de Entrada
El LLS 3 acepta una tensión de entrada de hasta 35 Vcc. La alimentación
c.c. de la Fuente Luminosa LED debe provenir de una fuente de
alimentación c.c. de clase 2 homologada. Una fuente de alimentación de 24
Vcc adecuada para entre 100 y 240 Vca y 50/60 Hz se ofrece. La tensión de
entrada se puede aplicar tanto al conector c.c. circular como al bloque
terminal verde (conector multipuerto). Se aconseja unir el terminal de tierra
del chasis del conector multipuerto a una tierra adecuada.

User Manual - LLS 3
Page 15
4.3.2. “Encendiendo” el Controlador
1. Conecte el cable de la fuente de alimentación a la fuente luminosa.
2. El LLS 3 del LED de estado verde se ilumina durante unos segundos
mientras la unidad se inicializa. Si la unidad está en modo en espera, el
LED se apagará.
3. Baje del todo el selector de intensidad (para prevenir que se dirija
accidentalmente la salida óptica hacia una persona).
4. Pulse el botón de Encendido/En espera situado en la parte frontal de la
unidad.
5. Suba el selector de intensidad.
6. Si el cabezal luminoso no se enciende, compruebe la configuración del
conmutador de polaridad.
7. Para apagar el LED, pulse el botón de Encendido/En espera situado en
la parte frontal de la unidad.

User Manual - LLS 3
Page 16
5.0.
5.0. 安全上の警告 – Japanese
1. この手引書をよくお読みになり、記述された全ての指示に従ってください。
2. 今後参照するために、全ての安全及び取扱説明書を保管してください。
3.
!
感電の危険から身を守るために、本製品と共に納品されたものと同様の、行政機
関の認可した第 2級直流電力引き込み装置(2重絶縁)のみ LED 光源の電力供給に使
用して下さい。
4.
!
光源が発光しているときは、 LED 出力部に決して直接目を向けないでく
ださい。LED は特徴として、目の損傷を招きかねない非常に高い輝度を持って
います。光学器械を使って光線を凝視しないでください。紫外線光源を使うと
きは、紫外線保護眼鏡を使用してください。
5.
!
本装置の正面又は後部には何も被せないでください。
6. 適切なアースを確保するために、納品された ESD 接地ケーブルをご使用くださ
い。
7. 安全な使用のために、適正なコネクタの付いた電源コードのみをご使用くださ
い。
8. 装置を長時間使用しないときは、電源コードを抜いてください。
9. 本装置は、液体の近くあるいは湿度の高いエリアでは使用しないでください。
10.本装置の上及び近くには、可燃性物質を置かないでください。
11.一般的なガラス用クリーナーのみを使用してください。溶剤、石油留出物、あ
るいは揮発性又は可燃性の液体又は泡沫はいかなるものも使用しないでくださ
い。
12.本装置の上に液体をこぼさないでください。
13.整備・修理をする際には必ず電源コードを抜いてください(整備・修理は認可
された人員以外は行わないでください)。
14.本手引書に記述された範囲を超える整備・修理は行わないでください。制御器
は、認可された サービス・センターに戻してください。器具返還認証
(Return Material Authorization)については 第20 節をご覧ください。.

User Manual - LLS 3
Page 17
5.1. 安全記号 – Japanese
以下の記号が LED 光源に関して使用されています。
記号
説明
装置
ON/
待機
直流電力
直流極性
欧州適合宣言
電気装置及び電子工学装置の廃棄処分/電気
装置及び電子工学装置内への特定の有害物質
の使用制限 (WEEE/RoHS) のリサイクリング
指令に準拠
光学放射安全性
5.2. レーザー安全性分級 – Japanese
LED 光源は第 1級レーザー製品に分類されています。光線を凝視しないでくだ
さい。 レーザーは装置の正面先端部から出力されます。装置の安全な操作を確
保するために、 安全と運転に関する全ての指針に従ってください。
5.3. クイックスタート – Japanese
5.3.1. 入力電圧
LLS 3 は、最高 35 VDC までの入力電圧で使用出来ます。 LED 光源用の直
流電力は、 は100 から 240 VAC 及び 50/60Hz で使用可能な 24VDC のAC
アダプターを提供しています。入力電圧は 円形直流コネクタ又は緑色端子
ブロック (マルチポートコネクタ)のどちらにも通せます。. は、マルチポー
トコネクタ上のシャシー接地端子を適正なアースに取り付けることをお勧め
します。

User Manual - LLS 3
Page 18
5.3.2. 制御器を “On”に回す
1. LLS 3 に電源コードを接続する。
2. は、 LLS 3 の緑色のステータスは、ユニットの初期化を数秒間 LED が点
灯し ます。ユニットの場合、スタンバイモードにしてからは、 LED の電
源を切るということです。
3. 強度調節つまみを反時計回り一杯に回して MIN の設定にする (誤って人員
に光が照射するのを防ぐため)。
4. 装置正面の ON/OFF ボタンを押す。
5. 強度調節つまみを回して明るさを調整する。
6. LED が点灯しない場合は、極性スイッチの設定をチェックする。
7. LED を消すには、装置正面の ON/OFF ボタンを押す。

User Manual - LLS 3
Page 19
Technical References
6.0. General Instructions
6.1. Product Description
Congratulations on the purchase of the LLS 3 LED Light Source, the state of the art in
light output and control, utilizing a simplified user interface with versatile remote control
abilities. The LLS 3 is compatible with all standard COLDVision Series light guides.
Optimal performance is achieved when coupled with larger bundle diameters, 9-14mm.
The LLS 3 (A20970) was initially available in White with two different color temperature
options, Cool (6,000 K) and Warm (3,100 K). The flagship Cool White model boasts
light output equal to 150W DDL Halogen lamp levels. With the latest product updates, a
number of wavelengths including red, green, and blue are now available on the LLS 3
platform. Solutions with other wavelengths can be produced to match specific customer
application requirements, even in the non-visible UV and IR ranges.
The LLS 3 has several advanced features including:
•Various remote control abilities: Ethernet, RS-232, and analog 0-5V
•Triggered strobe up to 1 kHz
•Auto sensing inputs with front control lockout via Ethernet and RS-232
The Triggered Strobe Mode allows for overdriving the LED for a brief, controlled period.
The strobe intensity can be up to 200% of the Normal Mode intensity. Strobe on time
and delay time are adjustable via Ethernet and RS-232 commands. The strobe pulse
triggered polarity can be adjusted by the position of the polarity switch on the rear panel
of the unit.
Auto sensing inputs allows for the light source to automatically switch between the
various means of control (front panel intensity control knob, Ethernet, RS-232, and
remote analog 0-5V) without the need to specify the control mode in advance. The light
source senses which control interface is active and automatically uses that interface to
adjust the light intensity. In addition, the front control interface can be locked out via
Ethernet or RS-232 commands. The Ethernet and RS-232 interfaces also provide
continuous monitoring of LED temperature and light source status.
The LLS 3 is an intelligent light source that allows unparalleled flexibility. The LLS 3
can be configured to remember its operating state when power is removed and restores
the state when power is re-applied. This feature can be toggled on or off through
Ethernet and RS-232 commands. It is also possible to restore the light source to a pre-
determined state when a control system dictates, utilizing a single command.
The RS-232 and Ethernet demo program/software can be downloaded from the
website or obtained from sales/customer service. Please contact us for updates.
http://www.schott-moritex.com/us/english/syn/products/light_sources/index.html

User Manual - LLS 3
Page 20
6.2. Installation Guidelines
To insure proper operation of your LLS 3 – LED Light Source, the following
conditions must be met:
•For indoor use only, Installation Category, II; Pollution degree, 2
•Maximum Operating Altitude: 2000 Meters
•Minimum Clearances: Rear 3” (76 mm)
•Do not cover the rear air exhaust port or the front air intake port
•Avoid areas of excessive vibration
•Operate the light source only in an environment where people do not
require protective equipment
Top
Front
Right
Table of contents
Other SCHOTT Lighting Equipment manuals

SCHOTT
SCHOTT MC-LS Instruction manual

SCHOTT
SCHOTT KL 200 User manual

SCHOTT
SCHOTT VisiLEDs MC Series User manual

SCHOTT
SCHOTT EasyLED User manual

SCHOTT
SCHOTT MC-LS User manual

SCHOTT
SCHOTT KL 1500 compact User manual

SCHOTT
SCHOTT EasyLED Series User manual

SCHOTT
SCHOTT DCR III User manual

SCHOTT
SCHOTT KL 1500 LCD User manual

SCHOTT
SCHOTT KL 1600 LED User manual