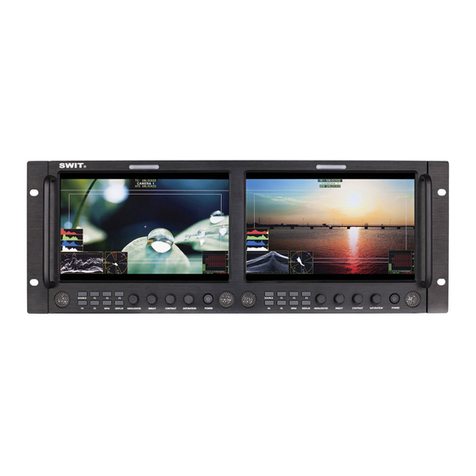
SWIT Electronics M-1092H User manual

Model: M-1092H
9” Rack Mount Broadcast 3GSDI LCD Mon tor
User Manual
Ver:V1.0.0V01
SWIT Electron cs Co., Ltd.
Please read th s User Manual
throughout before us ng.

Preface
1
.
All nternal technolog es of th s product are protected, nclud ng dev ce, software and trademark.
Reproduct on n whole or n part w thout wr tten perm ss on s proh b ted.
2
.
All brands and trademarks of SWIT Electron cs Co., Ltd. are protected and other relat ve trademarks
n th s user manual are the property of the r respect ve owners.
3
.
Due to constant effort of product development, SWIT reserves the r ght to make changes and
mprovements to the product descr bed n th s manual w thout pr or not ce.
4
.
The warranty per od of th s product s 2 years, and does not cover the follow ng:
(1) Phys cal damage to the surface of the products, nclud ng scratches, cracks or other damage to
the LCD screen or other externally exposed parts;
(2) The LCD dot defects are not over three;
(3) Any damage caused by us ng th rd-party power adaptors;
(4) Any damage or breakdown caused by use, ma ntenance or storage not accord ng to the user
manual.
(5) The product s d sassembled by anyone other than an author zed serv ce center.
(6) Any damage or breakdown not caused by the product des gn, workmansh p, or manufactur ng
qual ty, etc.
5
.
For any suggest ons and requ rements on th s product, please contact us through phone, fax, Ema l,
etc.

Maintenance
The Monitor
1. Please keep the s gnal term nals and the cool ng vent away from kn fe-edge, metal or l qu d n
order to avo d short-c rcu t and damage.
2. Please don't try to d sassemble any parts of the mon tor by yourself, wh ch would probably
damage the mon tor and do harm to human body, and t w ll cause the nval dat on of product
warranty.
3. Please don't touch the screen w th your f ngers, wh ch would probably deface the screen.
4. Please don't press the screen; the LCD s extremely exqu s te and fl msy.
The power
Please use the power adapter prov ded or recommended by the manufacturer n order to avo d
damage. For a th rd party power adapter, please make sure the voltage range, suppl ed power, and
polar ty of power lead are f t.
Please d sconnect the power cable under the follow ng s tuat ons:
1. If you do not operate th s mon tor for a per od of t me;
2. If the power cable or power adaptor s damaged;
3. If the mon tor hous ng s broken.
Working Environment
1. Please don't lay th s product on the unstable place.
2. Please don't lay th s product n hot, cold or wet locat on.
Cleaning
1. Please clean the screen w th dry and downy cloth or spec al LCD cleanser.
2. Please do not press hard when clean ng the screen.
3. Please do not use water or other chem cal cleanser to clean the screen. The chem cal may
damage the LCD.
4. For f rst t me use, please tear off the factory LCD f lm. To protect the LCD screen, please post the
LCD protect on f lm offered n the package.

1. Features
Full- D 9” LCD Panel
IPS LCD panel, 1920×1200 resolut on, H 170°/V 170° v ew ng angle, 800:1 contrast,
Multiple inputs
3G/HD/SD-SDI, HDMI and Compos te nput
Loop through outputs
3G/HD/SD-SDI, HDMI has loop through output
PIP Display
Under SDI/HDMI, sw tch on a sub-w ndow to PIP d splay another CVBS
Under CVBS, sw tch on a sub-w ndow to PIP d splay another SDI/HDMI
SDI audio de-embed
Under SDI and HDMI, t can d splay the de-embed SDI aud o and output v a 3.5mm headphone
socket or speaker
2-ch audio meter display
Under SDI and HDMI, t d splays channel1 and channel 2 embedded aud o meters w th mark. The
aud o meter s green, and w ll turn yellow when aud o exceeds -20dB, and turn red when exceeds
-9dB.
SDI Timecode
Under SDI nput, t can d splay the SMPTE t mecode, wh ch s used extens vely for
synchron zat on, and for logg ng and dent fy ng mater al n recorded med a.
Peaking focus assist (red/blue switch)
Under SDI and HDMI, t has Peak ng focus ass st funct on wh ch s to mark the sharpest edges of
the mage w th red or blue color, for users to check f the subjects are focused.
Zebra stripes
Under SDI and HDMI, t can d splay the Zebra Str pes wh ch are used to check f the mage s over
exposed or not by show ng black and wh te l nes on the mon tor. It s cons dered over exposed
when lum nance value exceeds 90%.
Freeze frame
To capture and d splay the on-play current frame.
Blue/Red/Green only
Under SDI and HDMI, t can be selected as the Blue/Red/Green Only Mode, only the
blue/red/green p xels are used to generate the mage, to ass st mage no se mon tor ng and
adjustment.
Safe Area Adjustable
You can select the scale of safe area frame from 80%, 85%, 88%, 90% ,93% and 95% n the menu
system.
Scale Marker
The mon tor has 16:9 nat ve LCD panel, and supports 4:3, 13:9, 14:9, 15:9, 1.85:1 and 2.35:1
scales marker for d fferent v deo produc ng.
UMD
Support TSL UMD protocol so that TALLY
、
UMD can be remotely controlled.
User definable function keys
There are 4 funct on keys on the mon tor front panel, wh ch perm t users to def ne shortcuts for the
var ous funct ons.
User definable GPI control
Offer DB9 nterface to def ne funct ons for users to remote operate the mon tor.
User editable video title
User can ed t a v deo t tle for the current camera, and the t tle w ll d splay on the top of screen.
2. Panel Instruction
Front view
⑴
Speaker: For SDI/HDMI embedded aud o and analog aud o mon tor ng. (W ll not work f earphone
s plugged n)
⑵
~
⑸
F1, F2, F3, F4 User def nable funct on keys
⑹
ENTER/VOL: Select and Apply
Under menu system, revolve “ENTER/VOL” to adjust sett ngs and press to apply;
Out of menu system, revolve “ENTER/VOL” to adjust volume, and press “ENTER/VOL” to mute.
BRIGHT
⑺
: Revolve “BRIGHT” to adjust br ghtness value from 0
~
100. Default: 50.
CONTRAST
⑻
: Revolve “CONTRAST” to adjust contrast value from 0
~
100. Default: 50.
SATURATION
⑼
: Revolve “SATURATION” to adjust saturat on value from 0
~
100. Default: 50.
POWER
⑽
: Power on/off
Connect w th power cable, press the “POWER” to sw tch on the mon tor. Press aga n to sw tch off.
D sconnect w th power cable or battery f the mon tor w ll not be used for a per od of t me.
SOURCE
⑾
: Press “SOURCE” to select SDI1
、
SDI2
、
HDMI
、
CVBS s gnal nput
⑿
ZOOM: Press “ZOOM” to sw tch on/off the zoom funct on.
⒀
DISPLAY: D splay current sett ngs
Press “D splay” to d splay or shut off relevant status nformat on
⒁
MENU: Press to enter Menu
⒂
TALLY: Red, Green and Yellow 3-color TALLY nd cator

Rear view
⑴
REMOTE: DB9 socket, external controll ng s gnal nput. (See deta ls n “4.REMOTE nterface
def n t on”)
⑵
SDI-OUT
:
SDI loop through output (BNC connector)
When SDI2 s d splayed, the SDI-LOOP outputs the SDI-IN2 s gnal, and when SDI-IN1 or other
nput sources are d splayed, the SDI-LOOP outputs the SDI-IN1 s gnal.
⑶
SDI-IN1: SDI nput (BNC connector)
⑷
HDMI-OUT: HDMI loop through output (HDMI
-A
connector)
⑸
PHONE: 3.5mm headphone socket, for SDI/HDMI embedded aud o and analog aud o mon tor ng.
⑹
AUDIO-IN: 3.5mm analog aud o nput
⑺
DC IN 11V-17V: Connect w th DC12V 4-p n XLR power adapter, support 6.5V-24V voltage nput (P n
1: Negat ve, P n 4: Pos t ve)
⑻
HDMI-IN: HDMI nput (HDMI
-A
connector)
⑼
SDI-IN2: SDI nput (BNC connector)
⑽
CVBS-IN: CVBS nput (BNC connector)
⑾
AC-DC 12V Power Adaptor
·Input formats
Input Supported formats
CVBS PAL ⁄ NTSC
HDMI
480 ⁄ 576 ⁄ 480p ⁄ 576p
1080
(
60 ⁄ 59.94 ⁄ 50
)
720p
(
60 ⁄ 59.94 ⁄ 50
)
1080p
(
60 ⁄ 59.94 ⁄ 50 ⁄ 30 ⁄ 29.97 ⁄ 25 ⁄ 24 ⁄ 23.98
)
SDI
SMPTE-425M 1080p
(
60 ⁄ 59.94 ⁄ 50
)
SMPTE-274M 1080
(
60 ⁄ 59.94 ⁄ 50
)
1080p
(
30 ⁄ 29.97 ⁄ 25 ⁄ 24 ⁄ 23.98
)
SMPTE-RP211 1080psf
(
30 ⁄ 29.97 ⁄25 ⁄ 24 ⁄23.98
)
SMPTE-296M 720p
(
60 ⁄ 59.94 ⁄ 50
)
SMPTE-125M 480
(
59.94
)
ITU-R BT.656 576
(
50
)

3. Menu Operation
⑴
Press “MENU” and t w ll d splay menu system
⑵
Revolve “ENTER” to select an tem. The selected tem w ll be h ghl ghted d splay.
⑶
Press “ENTER” to enter the selected tem.
⑷
Under menu system, press “MENU” to back to prev ous menu.
*The menu w ll automat cally save and qu t f t rema ns dle.
3.1 VIDEO submenu
The VIDEO submenu ncludes:
⑴
BRIG TNESS: 0-100 value adjustment
⑵
CONTRAST: 0-100 value adjustment
⑶
UE: 0-100 value adjustment
⑷
SATURATION: 0-100 value adjustment
⑸
S ARPNESS: 0-100 value adjustment
⑹
SD Aspect Ratio: Under SD-SDI nput, the aspect rad o can
be set to 4:3 or 16:9; under HD-SDI, t s not ava lable to adjust.
⑺
SCAN: “UNDERSCAN” / “OVERSCAN” / “Full Screen” /
“P xel-to-p xel” / ”SD 2X D splay” select on.
⑻
ZOOM: Turn on the zoom funct on to enlarge the v deo by
150% from the center n real t me.
3.2 Color Temp. submenu
The Color Temp. submenu ncludes:
⑴
Color Temp.: 5600K, 6500K, 9300K, USER1, USER2,
USER3
⑵
Red GAIN: 0
~
255 value adjustment
⑶
Green GAIN: 0
~
255 value adjustment
⑷
Blue GAIN: 0
~
255 value adjustment
⑸
Red Offset: 0
~
255 value adjustment
⑹
Green Offset: 0
~
255 value adjustment
⑺
Blue Offset: 0
~
255 value adjustment
* Remark: RGB GAIN and RGB Offset sett ngs are only ava lable
when “Color temp” s set as USER1/2/3
3.3 Marker submenu
The Marker submenu ncludes:
⑴
Marker Select: Select the scale marker from 4:3, 13:9, 14:9, 15:9, 1.85:1, 2.35:1 and 16:9
⑵
Safe Area: Select the safe area scale from 80%, 85%, 88%, 90%, 93% and 95%.
⑶
Center Marker: ON/OFF
Turn on/off the center cross marker on the central screen.
⑷
Marker Color: Select the color of markers from Wh te, Red,
Green, Blue, Black and Gray.
⑸
F t Marker: On/Off
When sw tched off, the s ze of the safe area s 80%~95% of
the actual screen d splay area; and when sw tched on, the
s ze of the safe area s 80%~95% of the ns de scale marker
area.

⑹
Marker Back: Normal, Sem transparent, Black
Normal: Normally d splay the outer area of scale marker
Half: half-tone d splay the outer area of scale marker
Black: Black d splay the outer area of scale marker
3.4 OSD submenu
The OSD submenu ncludes:
⑴
Menu Pos t on: Center, r ght top, r ght bottom, left top, left
bottom
⑵
Menu T meout: 0
~
60s
Set a t me ( n seconds) n wh ch the menu w ll automat cally
qu t f rema ns dle. Default: 30.
⑶
Language: Menu language select on, Engl sh and Ch nese
⑷
Source ID D splay: On/Off
⑸
Source ID Character: CAM 1
Revolve "ENTER" button to select the letters, and press
"ENTER" to nput. Max 10 letters are supported, the default s
CAM1. There are 76 letters ava lable, deta ls are as below:
A
~
Z
a
~
z
0
~
9
!
& ‘
(
)
* +
,
- . / : ?
⑹
Input nfo D splay: On/Off
On
:
turn on the OSD nfo d splay
Off
:
turn off the OSD nfo d splay
⑺
RS485 Addr 1
~
127 address select on
(8) UMD Pos t on: “Top” or “Bottom”
(9) Baudrate:”38400”, “19200”, “9600” and “115200”
(10) Par ty: “Odd”, “Even”, “None”
3.5 System submenu
The system submenu ncludes:
⑴
BackL ght: 0
~
100 value adjustment
⑵
~
F1
⑸
~
F4 Button: Def ne Funct on Key F1, F2, F3 and F4.
Funct on ncludes:
Input Source Scan: Reserved funct on, can not choose
⑹
Tally
⑺
-R Br ghtness: Low, Med um, H gh
Tally
⑻
-G Br ghtness: Low, Med um, H gh
Reset
⑼
: Yes/No
Select “YES” to recover all to factory sett ngs expect Language sett ng.
SD Aspect Rat o Zebra
Scan B/R/G Only
Zoom T me Code
Mono CVBS
Freeze Frame HDMI
Button Lock SDI1
PIP SDI2
Focus Ass st Source ID D splay
Aud o Bar Undef ned

3.6 GPI submenu
The “GPI” submenu ncludes:
⑴
GPI Control: on/off
On: User can control the mon tor through GPI control un t
Off: User cannot control the mon tor through GPI control
un t
⑵
Term nal1~5: Def ne each GPI term nal funct on; see deta ls
n “4.REMOTE nterface def n t on”
3.7 PIP submenu
The “PIP” submenu ncludes:
⑴
Sub W ndow S ze: Off, Large, Small
⑵
Sub W ndow Pos t on: R ght-Bottom, R ght-Top, Left-Bottom,
Center, Left-Top
⑶
Sub W ndow Source
When the nput s gnal s SDI1/SDI2/HDMI, the PIP w ndow
s gnal can only be CVBS;
When the nput s gnal s CVBS, the PIP w ndow s gnal can
be selected from SDI1/SDI2/HDMI.
4. REMOTE Interface Definition
The GPI nterface s the DB9 port, the DB9 term nals def n t on are as below:
User can def ne each GPI term nal funct on n the “menu”. It w ll be on when GPI term nal connected
to GND, and off when d sconnected.
Term nal 1
~
5: The funct ons can be set as below:
Undef ned Freeze Frame
Tally-R Button lock
Tally-G PIP
Tally-Y Focus ass st
SD Aspect Rat o Aud o bar
Scan Zebra
Zoom B/R/G Only
Mono T mecode
DB9 1 2 3 4 5 6 7 8 9
GPI GPI_1 GPI_2
GPI_3
GPI_4
GPI_5
VCC_OUT 485B(Rx-)
485A(Rx+)
GND

6. Specification
LCD Performance
S ze 9 nches
D splay area 192 mm×120 mm
Resolut on 1920×1200
Color Depth 8 b t
Aspect rat o 16:9⁄4:3
Br ghtness 450 cd⁄
㎡
Contrast 800:1
Input and Output
Input
BNC ×4 3G/HD/SD-SDI nput ×4
BNC ×2 CVBS nput ×2
HDMI ×2 HDMI nput ×2
3.5mm ×2 Analog aud o nput×2
Output
BNC ×2 3G/HD/SD-SDI loop through output×2
HDMI ×2 HDMI loop through output ×2
3.5mm ×2 SDI/HDMI/analog aud o output×2
Video Format
CVBS NTSC / PAL
HDMI
480 / 576 / 480p / 576p
1080 (60 / 59.94 / 50)
720p (60 / 59.94 / 50)
1080p (60 / 59.94 / 50 / 30 / 29.97 / 25 / 24 / 23.98)
SDI
SMPTE-425M 1080p (60 / 59.94 / 50)
SMPTE-274M 1080 (60 / 59.94 / 50)
1080p (30 / 29.97 / 25 / 24 / 23.98)
SMPTE-RP211 1080psf (30 / 29.97 / 25 / 24 / 23.98)
SMPTE-296M 720p (60 / 59.94 / 50)
SMPTE-125M 480 (59.94)
ITU-R BT.656 576 (50)
General
Input voltage DC: 6.5V
~
24V
Power consumpt on 36W
Work ng temperature 0
℃
~
+40
℃
Work ng hum d ty 10%
~
90%
Storage temperature
﹣
15
℃
~﹢
60
℃
Storage hum d ty 10%
~
90%
D mens ons 483*173*112mm
Net we ght (ma n body) 2.8kg

7. Packing List
1. Mon tor ×1
2. User Manual ×1
3. Warranty card ×1
4. LCD protect ve f lm ×2
5. Power adaptor +
Power cable
×1

Table of contents
Other SWIT Electronics Monitor manuals

SWIT Electronics
SWIT Electronics M-1093F User manual

SWIT Electronics
SWIT Electronics BM-U175HDR User manual

SWIT Electronics
SWIT Electronics BM-U243 User manual

SWIT Electronics
SWIT Electronics S-1243H User manual

SWIT Electronics
SWIT Electronics BM-U Series User manual

SWIT Electronics
SWIT Electronics FM-21HDR User manual

SWIT Electronics
SWIT Electronics S-1073F User manual

SWIT Electronics
SWIT Electronics S-1273F User manual

SWIT Electronics
SWIT Electronics FM-17 User manual

SWIT Electronics
SWIT Electronics FM-24DCI User manual