Syclone H10QBP User manual

HEPA Backpack Vacuum
Model H10QBP
Thank you for your recent purchase. You have bought a high quality, long-life com-
mercial vacuum cleaner. For your safety and continued satisfaction with this product,
please read this owner’s manual carefully before using. For your information, all parts
used in the manufacturing of this vacuum cleaner meet or exceed rigid quality con-
trol standards. We stand behind all our products and are available to assist you with
a knowledgeable and dedicated sta. If we can help you in any way, please call Cus-
tomer Service at 800-767-6933.
We also recommend that you visit our website aramsco.com for the fastest most e-
cient way to complete your product registration and see other Aramsco products and
accessories to meet your cleaning needs.
About the Machine
Inspection: Carefully unpack and inspect your new vacuum for shipping damage. Contents should be as shown.

Harness Assembly: Remove four (4) screws from vacuum housing inserts. Position harness
on vacuum housing. Align harness back plate with mounting holes to the vacuum body. Re-
insert four (4) screws through harness and tighten.
Adjusting Backpack Harness: Loosen waist and chest belt latches. Slide arms through shoulder straps. Adjust
shoulder straps to raise or lower backpack so that the weight is evenly distributed between the back and hips, and the
waist and chest belt latches comfortably. For signicantly shorter or taller operators, it may be necessary to adjust the
harness back-plate to nd a comfortable position. The back-plate can be re-positioned by removing and relocating the
four (4) screws to the vacuum housing.
To Operate:
(1) Pass the pigtail cord through the strap outside the left side of the waist belt. Pass your ex-
tension power cord (not provided with vacuum) through the plastic retaining clip hanging
from the harness. This will prevent the pigtail and extension power cord from separating
during operation.
(2) Place the pigtail switch box under the sewn strap and fasten the other strap
around the switch box.
(3) Fasten the waist belt and chest belt snugly and make sure the weight is resting
comfortably on your hips. Again, the back plate is adjustable up or down by re-
moving the four screws that attach to the vacuum’s body.
Thermal Protection: The motor in this vacuum is protected with a thermal cuto device. If an excessive high op-
erating temperature is detected, power to the motor will be cuto. Excessive operating temperature can be caused by a
blocked vacuum hose or clogged lters. If thermal cuto occurs, immediately turn o the vacuum and inspect for hose
blockage or full lter bag. Remove blockage and/or replace lter bag, then allow a few minutes for the vacuum to cool
down to reset thermal cuto device before turning vacuum on.
WARNING
• Unplugthevacuumwhenworkingonthemotororanyelectricalpart.
• Checktheconditionofallelectricalcordsbeforeeachuse.
• Donotlubricatethemotor;itisequippedwithsealedbearings.
• Thevacuumhasnouserserviceableparts.
• Donotvacuumwithafrayed,worn,ordamagedcord.
• Donotvacuumliquidsorexposethecanistervacuumtorainorwater.
• DonotvacuumhazardousortoxicmaterialswithoutHEPAinplace.
• Donotusetopickupammable.

Electrical Cord Care: Never stretch the cord tightly between the vacuum and the outlet. A cord that is stretched or
pulledwillnotfunctionproperlyandcreatesadanger.Aftervacuuming,unplugthecordandwindituploosely.Donot
wind the cord up by wrapping around your hand and elbow.
Proper Storage: When the vacuum is not in use, it should be stored in a dry place.
Filter Maintenance:
(1) Priortouse,checktheconditionofthedisposablepaperlterbag.Acloggedlterbagwillrestrictairow,reduc-
ing vacuum performance and increasing the likelihood of motor overheating. Note: To avoid tearing the dispos-
able paper lter bag, lift both the disposable paper lter bag and cloth bag at the same time. This is especially
necessary when the disposable paper lter bag is full.
(2) When necessary, hand or machine wash the cloth dust bag and let air-dry before replacing inside the vacuum.
DONOTputdustbaginsidemachinedryer.
(3) DonotattempttocleanHEPAlter.Ifthereisalackofairowafterreplacingthedisposablepaperlterbagand
clothdustbag,itwillbenecessarytoreplacetheHEPAlter.
(4) Rinse clean and air-dry the foam lter (below motor) when clogged. A damaged foam lter should be replaced
before operating the vacuum.
The vacuum cleaner is warranteed for 1 year from the date of purchase. Parts not covered under warranty are power
cords, lters, motor brushes and squeegee blades. The warranty covers only failure due to defective parts or workman-
ship and will be invalidated by improper application and abuse.
Undernocircumstancesshouldyoureturnafailedunittothefactory.Ifyouexperienceanyproblemswithyourvacuum
duringthewarrantyperiod,contacttheCustomerServiceDepartment.
Limited Warranty
PartNo. Description Qty.
122-3025-14 -1 Wand Aluminum 5’ 2-Piece Button-Lock 1
122-3030-14DustingBrushPlastic2”x1.5” 1
122-3060-14CreviceToolPlastic17”x1.5” 1
122-3070-14UpholsteryToolPlastic4”x1.5” 1
122-3044-14FloorToolMulti-SurfacePlastic14”x19/16” 1
122-3012-14HoseCrushproof6’x1.5”SwivelCus 1
Tool Kit

Ref. PartNo. Description Qty.
1 124-7332-14 Lid Plastic 1
2 124-3228-14 BagDisposableFilter 1
3 122-3230-14 Bag Cloth Filter 1
4 127-3321-14 HEPAFilter 1
5 124-7340-14 Valve Exhaust 1
6 124-7341-14 Cord Pigtail AC 1
7 124-7310-14 SwitchOn/O 1
8 124-7302-10 Motor 120V 1
9 124-7414-14 Gasket Motor Mount 1
10 124-7432-14 Clamp Steel Backpack 2
11 124-7416-14 HousingPlastic 1
12 Not Available Screw Steel 4
13 Not Available Washer 4
14 124-7343-14 Cover Exhaust 2
Revised 09/10/20
Ref. PartNo. Description Qty.
15 124-7344-14 HEPAFilterExhaust 2
16 124-7338-14 Fastener Assy Exhaust 2
17 124-7419-14 Plate Motor 1
18 Not Available Screw Steel 4
19 124-7425-14 GuardPlasticUpper 1
20 Not Available Screw Steel Self-Tapping 2
21 124-7339-14 Sealing Assy 1
22 124-3333-14 Harness 1
23 124-3334-14 Cord Extension 50’ 1
(Not included with original purchase)
Replacement Parts

Important Safety Instructions
When using an electrical vacuum, basic safety precautions should always be followed, including the following:
READ ALL INSTRUCTIONS BEFORE USING YOUR VACUUM CLEANER
WARNING: To reduce the risk of re, electrical shock, or injury:
1. Donotleaveappliancewhenpluggedin.Unplugfromoutletwhennotinuseandbeforeservicing.
2. Donotexposetorain.Storeindoors.
3. Donotallowtobeusedasatoy.Closeattentionisnecessarywhenusedbyornearchildren.
4. Useonlyasdescribedinthismanual.Useonlymanufacturer’srecommendedattachments.
5. Donotusewithdamagedcordorplug.Ifapplianceisnotworkingasitshould,hasbeendropped,damaged,leftoutdoors,or
dropped into water, contact Customer Service.
6. Donotpullorcarrybycord,useasahandle,closeadooroncord,orpullcordaroundsharpedgesorcorners.Donotrunappli-
ances over cord. Keep cord away from heated surfaces.
7. Donotunplugbypullingoncord.Tounplug,grasptheplug,notthecord.
8. Donothandleplugorappliancewithwethands.
9. Donotputanyobjectintoopenings.Donotusewithanyopeningblocked;keepfreeofdust,lint,hairandanythingthatmay
reduceairow.
10. Keep hair, loose clothing, ngers and all parts of the body away from openings and moving parts.
11. Donotpickupanythingthatisburningorsmoking,suchascigarettes,matches,orhotashes.
12. Donotusewithoutdustbagand/orltersinplace.
13. Turn o all controls before unplugging.
14. Useextracarewhencleaningonstairs.
15. Donotusetopickupammableorcombustibleliquidssuchasgasoline,oruseinareaswheretheymaybepresent.
16. This vacuum is for commercial use only.
17. Connect to a properly grounded outlet only. See grounding instructions.
SAVE THESE INSTRUCTIONS
GROUNDING INSTRUCTIONS - This appliance must be grounded. If it should malfunction or breakdown, grounding provides a
path of least resistance for electric current to reduce the risk of electric shock. This appliance is equipped with a cord having equip-
ment grounding conductor and grounding plug. The plug must be inserted into an appropriate outlet that is properly installed and
grounded in accordance with all local codes and ordinances.
WARNING: Improper connection of the equipment grounding conductor can result in a risk of electric shock. Check with a quali-
ed electrician or service person if you are in doubt as to weather the outlet is properly grounded.
Donotmodifytheplugprovidedwiththeappliance-ifitwillnotttheoutlet,haveaproperoutletinstalledbyaqualiedelectrician.
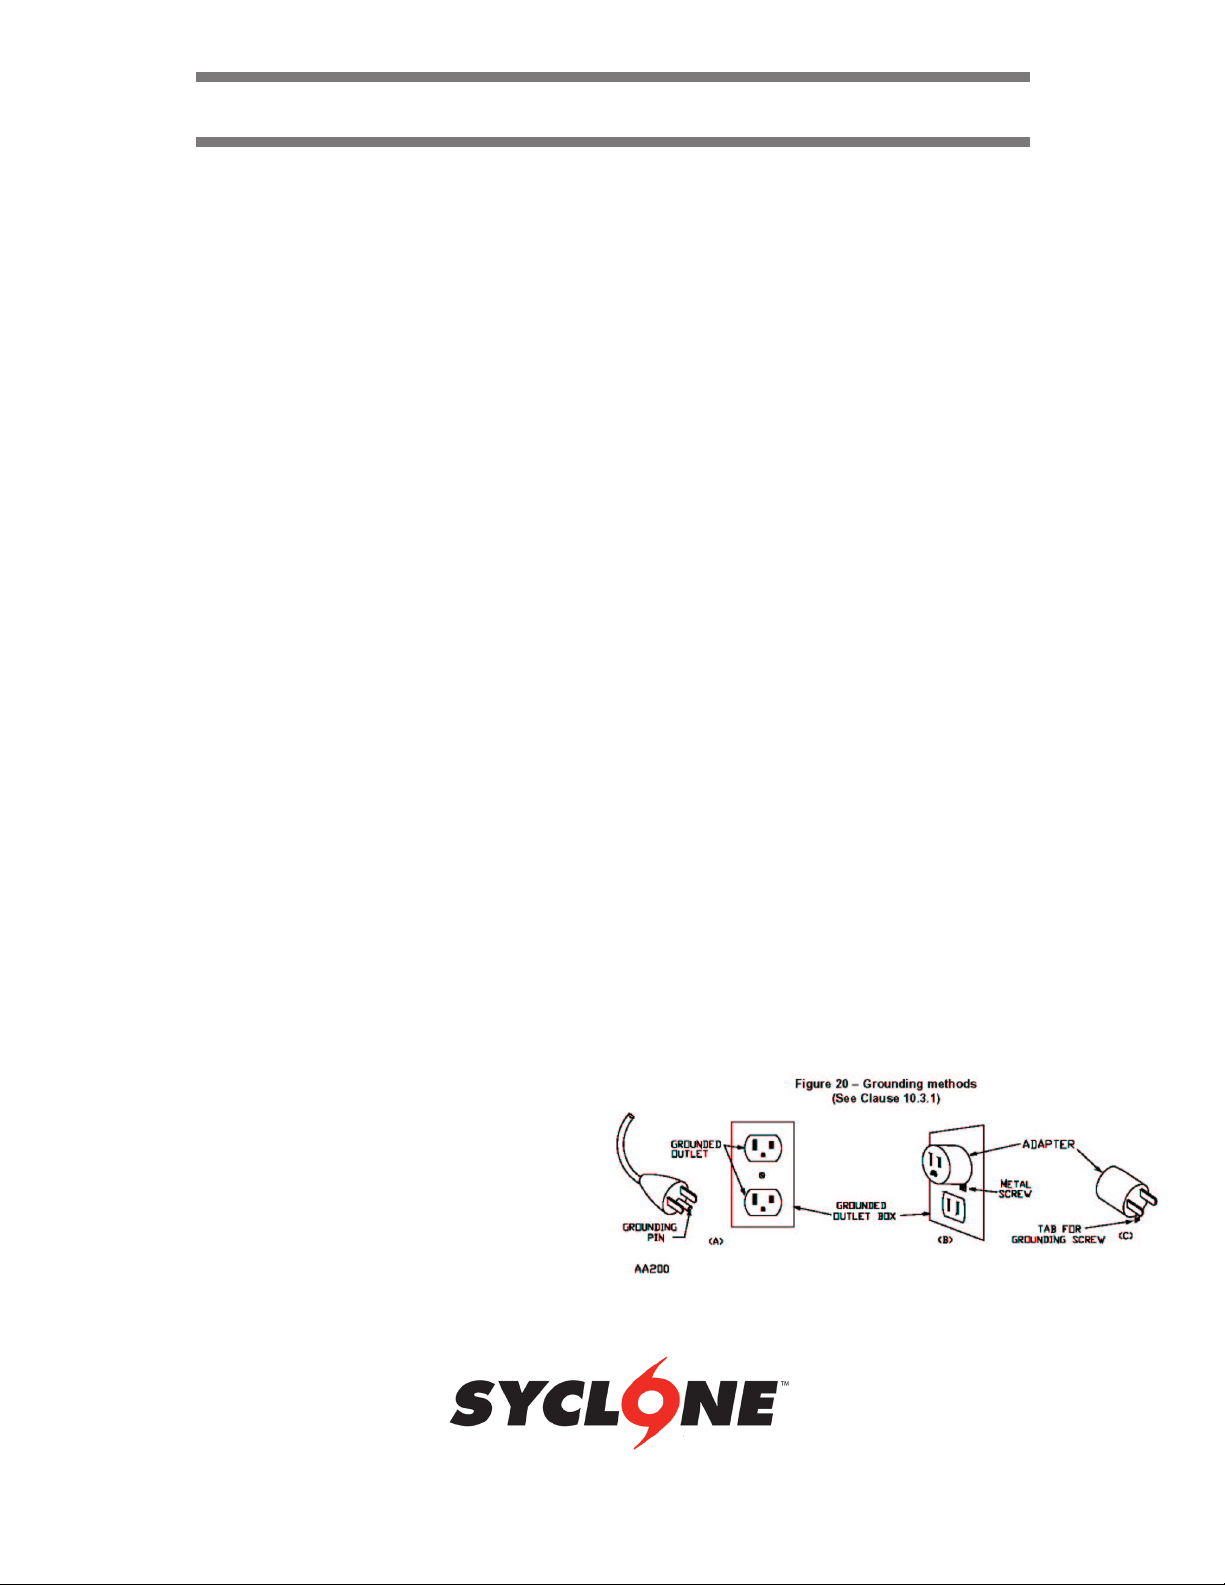
This appliance is for use on a nominal 120 - Volt circuit, and has a grounded plug that looks like the plug illustrated in sketch A be-
low. A temporary adapter that looks like the adapter illustrat-
ed in sketches B and C may be used to connect this plug to a
2-pole receptacle as shown in sketch B if a properly grounded
receptacle is not available. The temporary adapter should be
used only until a properly grounded outlet (sketch A) can be
installed by a qualied electrician. The green colored ear, lug,
or the like extending from the adapter must be connected to
a permanent ground such as a properly grounded outlet box
cover. Whenever the adapter is used, it must be held in place
by a metal screw.
NOTE:InCanada,theuseofatemporaryadapterisnotpermittedbytheCanadianElectricalCode.

IMPORTANTES CONSIGNES DE SECURITE
L’utilisation d’un appareil électrique demande certaines précautions:
LIRE TOUTES LES INSTRUCTIONS AVANT DE FAIRE FONCTIONNER CET APPAREIL
AVERTISSEMENT: Pour réduire les risques d’incendie, de choc életrique ou de blessure:
1. Nepaslaisserl’appareilsanssurveillancelorsqu’ilestbranché.Debrancherlorsquel’apparieln’estpasutiliséetavantl’entretien.
2. Ne brancher qu’à une prise de courant avec mise à la terre. Voir les instructions visant la miseà la terre.
3. Nepaspermettreauxenfantsdejoueravecl’appareil.Uneattentionparticuliéreestnécessairelorsquel’appareilestutilisépardes
enfantsnou à proximité de ces derniers.
4. N’utiliser que conformément à cette notice avec les accessoires recommandês par le fabricant.
5. Ne pas utiliser si le cordon ou la che est endommagé. Retourner l’appareil à un atelier de réparation s’il ne fonctionne pas bien, s’il est
tombé ou s’il a été endommagé, oublié á l’extérieur ou immergé.
6. Ne pas tirer soulever ou trainer l’appareil par le cordon. Ne pas utiliser le cordon comeune poignée, le coincer dans l’embrasure d’une
porte ou l’appuyer contre des arêtes vives ou des coins. Ne pas faire rouler l’appareil sur le cordon. Garder le cordon á l’écart des sur-
faces chaudes.
7. Ne pas débrancher en tirant sur le cordon. Tirer plutot che.
8. Ne pas toucher la che ou l’appareil lorsque vos mains sonthumides.
9. N’insérer aucun object dans les ouvertures. Ne pas utiliserl’appareil lorsqu’une ouverture est bloquée. S’assurer que de la poussiére,
de la peluche, des cheveux ou d’autres matiéres ne réduisent pas le débit d’air.
10. Maintenir les cheveux, les vétements amples, les doigts et toutes les parties du corps a l’écart des ouvertures et des piéces mobiles.
11. Ne pas aspirer de matiéres en combustion ou qui dégagent de la fumée, comme des cigartettes, des allumettes ou des cendres
chaudes.
12. Ne pas utiliser l’appareil si le sac á poussiére ou le ltre n’est pas en place.
13. Mettre toutes les commandes á la position ARRET avant de débrancher l’appareil.
14. Userdeprudencelorsdunettoyagedesescaliers.
15. Nepasaspirerdesliquidesinammablesoucombustibles,commedel’essence,etnepasfairefonctionnerdansdesendroitsoupeu-
vent se trouver de tels liquides.
16. Avertissement- Pour réduire les risques de choc électrique, ne pas exposer á la pluie et garder l’aspirateur á l’intérieur.
17. Appareils mis á la terre:“Ne brancher au’á une prise de courant avec mise á la terre. Vois less instructions visant la mise á la terre.
CONSERVER CES INSTRUCTIONS
INSTRUCTIONS VISANT LA MISE Á LA TERRE - Cet appareil doit étre mis à la terre. En cas de défaillance ou de panne éventuelles, la mise
à la terre fournit au courant un chemin de moindre résistance qui réduit le risque de choc électrique. Cet appareil est pourvu d’un
cordon muni d’un conducteur de terre et d’une che avec broche de terre. La che doit être branchée dans une prise appropriée cor-
rectment installée et mise à la terre conformement aux réglements et ordonnances municipaux.
AVERTISSEMENT: Unconducteurdeterremalraccordépeutentrainerunrisquedechocélectrique.Consulterunélectricienoun
technicien d’entretien qualié si vous n’êtes pas certain que la prise est correctement mise à la terre. Ne pas modier la che fournie avec
l’appareil - si elle ne peut être insérée dans la prise, faire installer
une prise adéquate par un électricien quali é.
Cet appareil est destiné à un circuit de 120 V et est muni d’une
che de mise à la terre semblable à celle illustrée par le croquis A
de la gure. Sassurer que l’appareil est branché à une prise de cou-
rant ayant la mê conguration que la che. Aucun adaptateur ne
devrait être utilisé avec cet appareil.
Las mise à la terre selon les croquis B et C n’est pas permise au
Canada.
www.aramsco.com
Table of contents
Other Syclone Vacuum Cleaner manuals