Syclone H4GVC-Plus User manual

Owner’s Manual
Model H4GVC-Plus HEPA Vacuum
Thank you choosing Syclone H4GVC-Plus HEPA Vacuum. This commercial
vacuum is well-constructed and should provide you with years of profes-
sional service if you take time to read this manual. It is important to learn the
steps for proper assembly, operation and maintenance. We suggest you keep
this manual on-hand in a secure place for future reference. We stand behind
this product and can help anytime with a knowledgeable customer service
sta. Please contact us anytime at (800) 767-6933.
SAVE THESE INSTRUCTIONS
GROUNDING INSTRUCTIONS - This appliance must be grounded. If it should malfunction or breakdown, grounding provides a
path of least resistance for electric current to reduce the risk of electric shock. This appliance is equipped with a cord having equip-
ment grounding conductor and grounding plug. The plug must be inserted into an appropriate outlet that is properly installed and
grounded in accordance with all local codes and ordinances.
WARNING: Improper connection of the equipment grounding conductor can result in a risk of electric shock. Check with a quali-
ed electrician or service person if you are in doubt as to weather the outlet is properly grounded.
Do not modify the plug provided with the appliance - if it will not t the outlet, have a proper outlet installed by a qualied electrician.
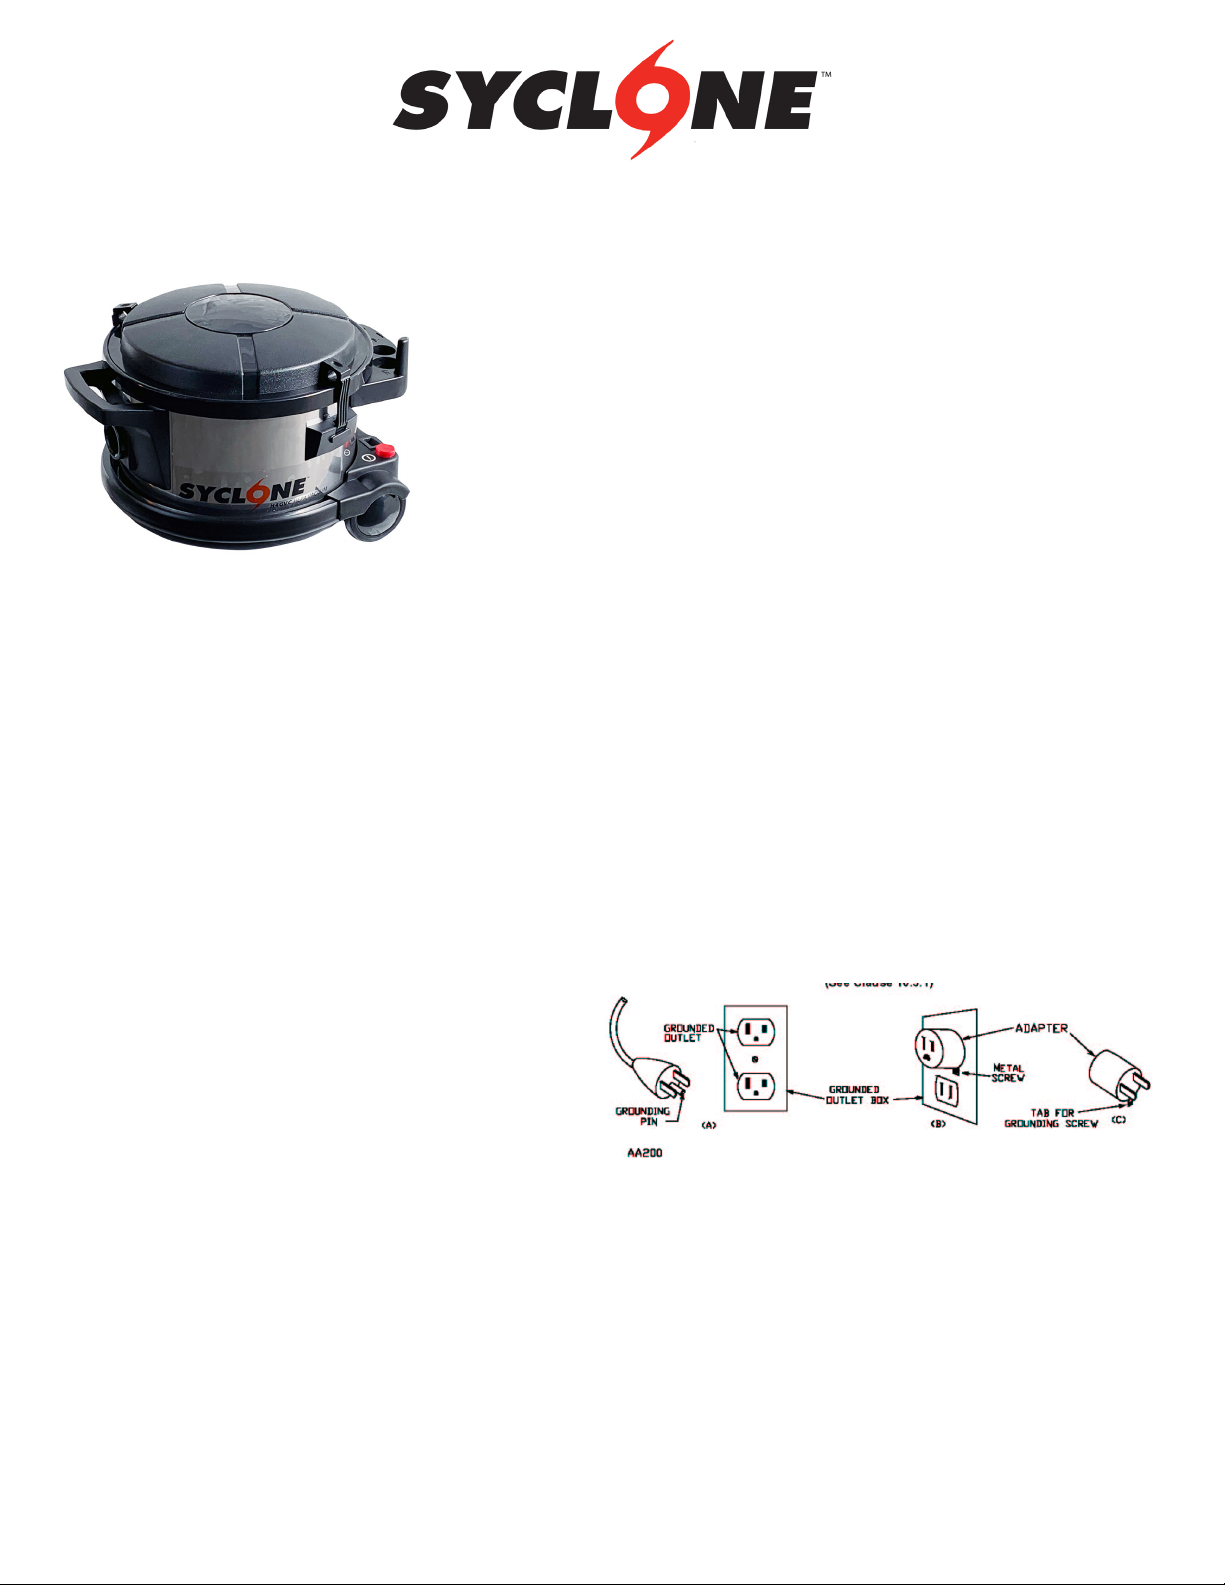
This appliance is for use on a nominal 120 - Volt circuit, and has a grounded plug that looks like the plug illustrated in sketch A be-
low. A temporary adapter that looks like the adapter illustrat-
ed in sketches B and C may be used to connect this plug to a
2-pole receptacle as shown in sketch B if a properly grounded
receptacle is not available. The temporary adapter should be
used only until a properly grounded outlet (sketch A) can be
installed by a qualied electrician. The green colored ear, lug,
or the like extending from the adapter must be connected to
a permanent ground such as a properly grounded outlet box
cover. Whenever the adapter is used, it must be held in place
by a metal screw.
NOTE: In Canada, the use of a temporary adapter is not permitted by the Canadian Electrical Code.

IMPORTANT:
This vacuum is equipped with a self-resetting thermo-protection switch to prevent
overheating of the vacuum’s components. If this switch activates and shuts down the
motor during vacuuming, it is necessary to wait 15-20 minutes for the motor to cool
and for the thermo-protection switch to reset itself. Normally, the thermo-protection
switch is activated when airow is severely restricted from a full disposable bag. To
avoid motor overheating, avoid excessive overlling of the disposable bag. We recom-
mend changing the disposable bag when it is ½ to ¾ full. Replacing disposable bags
often ensures greater airow and increased worker productivity. If the motor overheats after replacing the bag, check
for an obstruction in the vacuum hose or in the hose inlet.
WARNING:
Be certain the HEPA lter and disposable bag are installed correctly before using this vacuum. Failure to do so could
expose people in the work area to hazardous particles that could represent a serious health risk.
WARNING:
When using this vacuum to recover hazardous dust, do not attempt to open or dispose of its contents without personal
protection equipment (PPE). In addition, this procedure must be completed in a controlled & contained environment.
WARNING:
• Connecttoaproperlygroundedoutletonly.Seegroundinginstructionsonnextpage.
• Donotusevacuumtopick-upammableorcombustibleliquids.
• Donotvacuumliquidsorexposethevacuumtorainorwater.
• Checktheconditionofthepowercordbeforeeachuse.
• Whennotinuse,storethevacuuminadryspace.
• Unplugthevacuumwhenworkingonthemotororanyelectricalpart.
• Donotlubricatethemotor,itisequippedwithsealedbearings.
SAFETY PRECAUTIONS

Instructions for Use
Attaching Disposable Filter Bag:
1. Pull plastic clamps
upward and outward so
the plastic lid is loose
and can be removed.
2. Attach the opening on
the disposable lter bag
to the air inlet. Press the
collar and membrane
over the ridge located
on the air inlet.
3. Insert bag retainer clip
secure bag to air inlet.
4 Replace the plastic lid-
Take care to seat the lid
securely over the rim of
the canister and a prop-
er air-seal is achieved
between the HEPA and
the motor. Pull clamps
upward and inward to
lock-down plastic lid to
canister.
Attaching Hose & Wand:
Hose:
5. Push the hose cu
inside of the hose inlet.
6. Turn clockwise until
locked.
Note the grip handle is
equipped with an air-ow
bleed valve that allows you
to regulate airow and suc-
tion to prevent tools from
attaching itself to fabrics,
materials or surfaces.
Telescopic wand:
7. Slide catch downward
to extend length of
telescopic wand.
Extension wand:
8. Connect (slip-on) the
extension wand to the
telescopic wand for
high-reach cleaning.

www.aramsco.com
Crevice tool:
To clean tight and hard-to-
reach areas.
Upholstery tool:
To clean furniture and
other fabrics.
Combination Rug/Floor
Tool:
Cleans hard and soft oors.
Useyourfoottolowerthe
brush for hard oors, or
raise to activate beater bar
for carpets.
Round dust tool:
Usehorsehairbristlesto
hand clean hard and soft
surfaces.
HEPA FILTER SYSTEM
HEPA Filter: Your vacuum is equipped with an individually tested and certied HEPA lter that is 99.97% ecient
at .3 microns or larger. The HEPA lter is located inside the plastic lid.
To remove:
Grasp the plastic lid with
one hand and pull away
one of the tabs that secure
the HEPA lter. Repeat
with other tabs until HEPA
lter is loose and can be
removed from the lid.
To replace:
Slide HEPA lter ange un-
der one tab, then press the
HEPA lter rmly so it locks
inside the plastic lid.
Other Attachments:
Motor Inlet Filter:
This lter should be in-
spected and/or replaced
if clogged with dust and
debris.
Excessive dust on the mo-
tor inlet lter will indicate a
lack of an air seal between
the motor and HEPA lter.
Center Filter Seal Gasket:
This important gasket cre-
ates an air seal between
the vacuum motor and
HEPA lter. Due to the
strength of the air seal,
the act of removing the lid
may cause the center lter
seal gasket to move from
its original position. If this
occurs, inspect the gasket
carefully. Remove any
visible dust or debris, then
carefully seat it securely
back on the base of the
motor column.
Other Syclone Vacuum Cleaner manuals