Sylvox RT24R2GNDA User manual

USER’S MANUAL Note: The product and illustrations in this user's manual is only for explanation purposes and may vary depending on model.
S l ox
Model: RT24R2GNDA
S l ox
24inch RV TV

Recycling

The terms HDMI and HDMI High-Definition Multimedia Interface,
and the HDMI logo are trademarks or registered trademarks of
HDMI Licensing LLC in the Unites States and other countries.

Picture
Sound
Time
Setup
Lock
Channel
17-18
19
20
21
22-26
27
30-32
33
34
3
3
4
5
6
7
8
9
10
11
12
13
14
15
TV QUICK INSTALLATION GUIDE
16
FM 28-29

RT24R2GNDA
24"
32W
DC 12V 4A
1920 X 1080
7.1 lbs
x x inch 21.7 6.5 14.0
VESA100 x 100
S l ox
Base
Column bracket 6 Screws
One USB input
Product Dimensions
(Include base bracket)

VOL+
CH+
SOURCE
MENU
VOL-
CH-
S l ox
SPEAKER
REMOTE CONTROL SENSOR
POWER INDICATOR
Green: In power on mode.
Red: In standby mode.
Toggles between all the available input
sources
MENU
Press to see an on-screen menu of your
TV's features.
CH+/-
Press to change channels.
In the on-screen menu, use the CH +/-
buttons as up/down arrow buttons.
VOL+/-
Press to increase or decrease the volume.
In the on-screen menu, use the VOL +/-
buttons as left/right arrow buttons.
POWER /
Press POWER button to toggle between
normal and standby mode.
SOURCE
PLAY /
Play/stop DVD (in DVD mode).
EJECT /
Eject DVD.
9
10
Instruction:
1.Place the TV unit on a flat and clean table.
2.Fix stand by 3 pcs screws via screw hole B and A.
3.Fix stand by 3 pcs screws via screw hole D and C.
Screw Screw hole A
Screw hole B
Screw
Screw hole C
Screw hole D

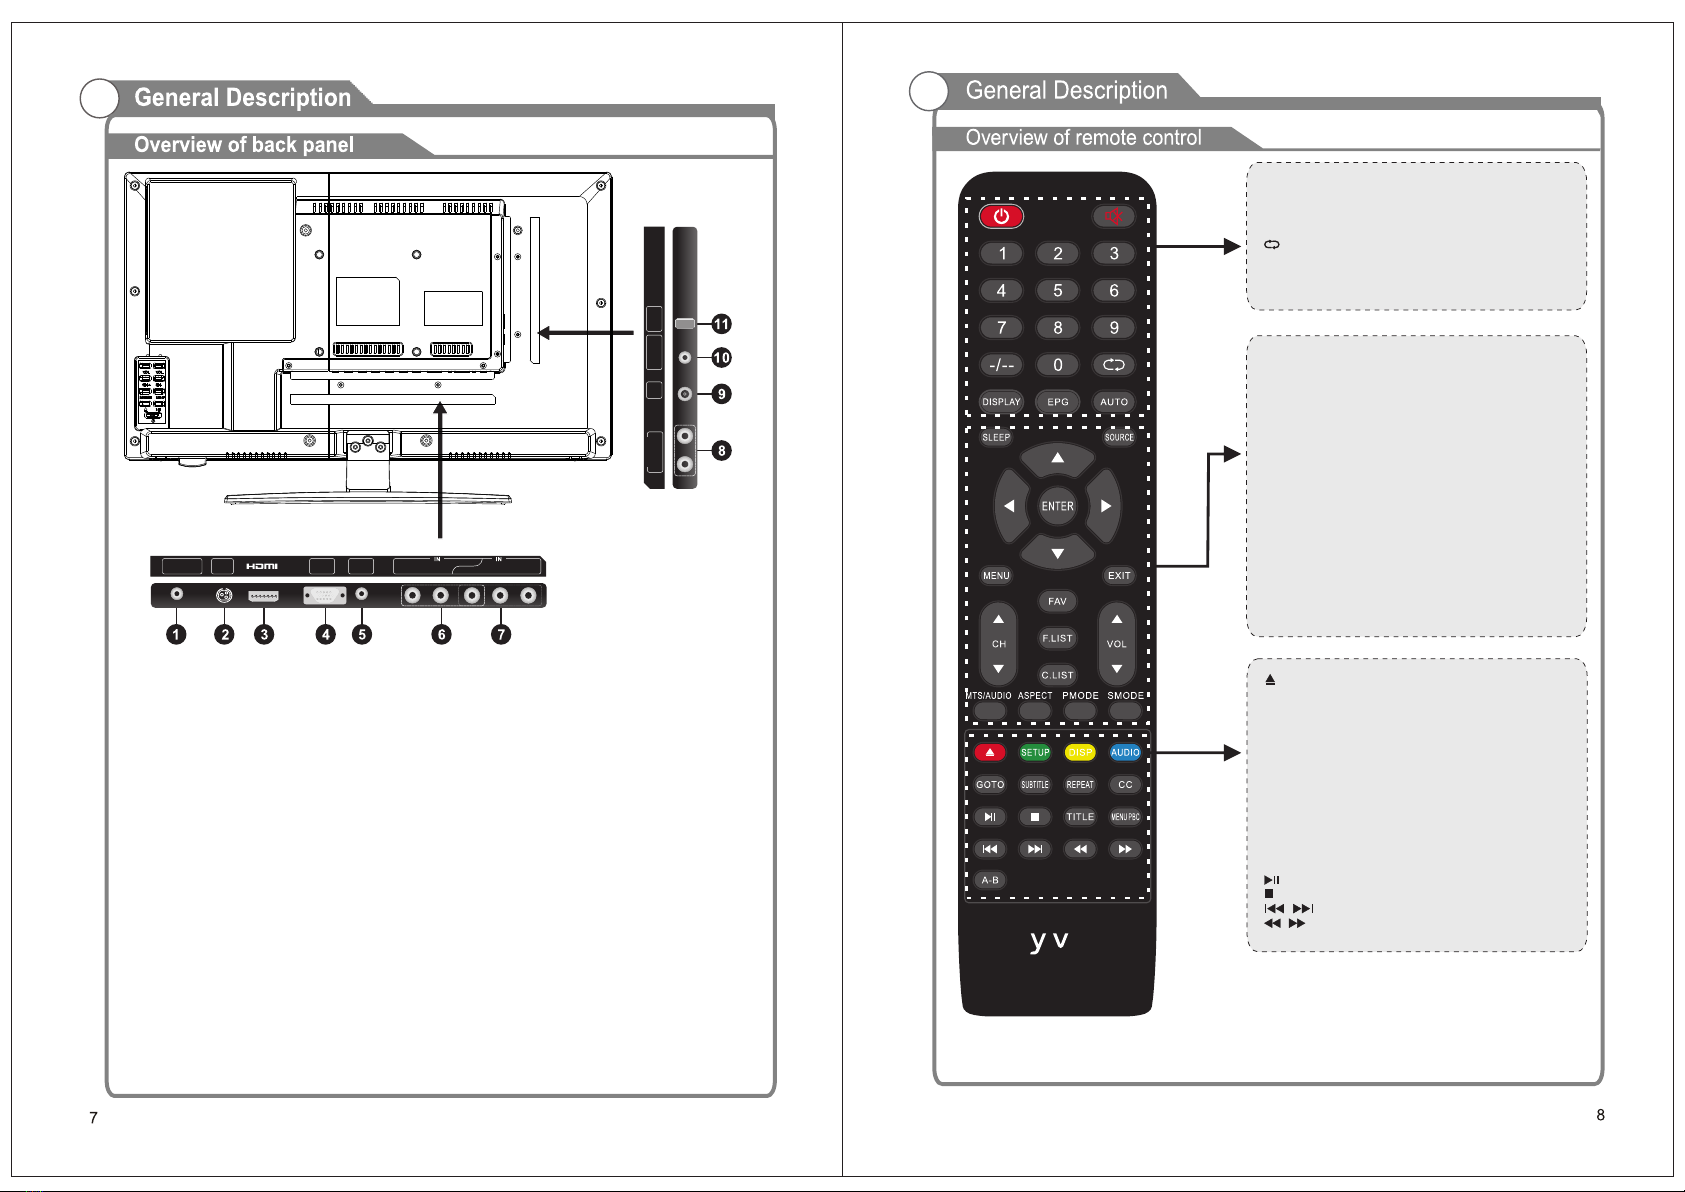
POWER: Power on/off button, press once to turn the TV
on and press again to turn the TV off.
MUTE: Press this button to mute or restore sound.
0-9: Select and switch to a channel using 0-9.
-/--: Switch the program digit.
:Switch back and front between the current and
previous channels.
DISPLAY: Display TV information.
EPG: Enter electronic program guide.
AUTO: Adjust the picture automatically in pc mode.
SLEEP: Set the sleep timer.
SOURCE: Press to change signal source.
ENTER: Enter the selected option or perform the selected
operation.
MENU: Press this button to enter the main menu.
EXIT: Exit the OSD (On-screen display).
FAV: Switch between custom set “Favorite List”
F.LIST: Press this key to display the Favorite List mode.
C.LIST: Press this key to display the channel list mode.
CH+/CH-: Change the channel.
VOL+/VOL-: Adjust the volume.
MTS/AUDIO: When stereo program is received, press this
key to switch sound system between mono and stereo.
When SAP program is received, press this button to
switch sound system between mono and SAP
When stereo and SAP program is received, press this key
to switch among mono, stereo and SAP.
Press this key to show the list of audio languages
available for the current channel in ATSC.
ASPECT: Press to adjust picture ratio.
PMODE: Select picture mode.
SMODE: Select sound mode.
: Open/close in DVD mode.
SETUP: DVD system setup.
DISP: Press to display the programs’ information.
AUDIO:Press to change the language of the audio in DVD
mode.
GOTO: Press this button to go to desired position The
player provides 3 search mode.
SUBTITLE: Press to select the subtitle language.
REPEAT: Press to change the playing mode.
CC: Press this key to select the CC, ON or Off mode and CC
on Mute.
TITLE: Press this button can return to the title of the disc.
MENU PBC: Press this button can return to the menu of the
disc, then play the disc from the first track.
: Play / Pause.
: Stop playing.
: Play previous / next media file.
:Play fast backward / forward.
A-B: Repeat play the segment between A and B.
S l ox
DC IN
EARPHO NE
OUT VGA
IN
PC
AUDIO
IN LRVIDEO
YPb Pr
COAXIA L
OUT
R
L
AUDIO O UT
RF USB
7. YPbPr
Connecting for the Y/Pb/Pr Input in
Component mode.
8. L/R AUDIO output
Audio outputs for external devices.
9. RF
Connect to an antenna or cable
NTSC & ATSC.
10.COAXIAL
Connect to a Digital Audio devices.
11.USB Service port.
1. EARPHONE
Connect a set of phone for private
listening.
2. POWER(DC 10.5-28V) input
3. HDMI
Connect a device with a HDMI input.
VGA/PC IN4.
Connect to your PC.
5. PC AUDIO
Audio input for external devices.
COMPOSITE VIDEO6.
Video input for external devices, such
as a camcorder or VCR.

S l ox
VIDEO
COAXIAL
OUT
R
L
AUD IO OUT
RF USB
DC IN
EARPHONE
OUT VGA
IN
PC
AUDIO
IN LRVIDEO
YPb Pr

VIDEO
VIDEO
1.Connect COAXIAL Cable between the COAXIAL jacks on the TV and the Digital
Audio amplifier.
Input jacks on the Digital Audio System. When a Digital Audio System is connected
to the COAXIAL terminal: Decrease the gain (volume) of the TV, and adjust the
volume level using the Digital Audio system's volume control.
COAXIAL
OUT
R
L
AUD IO OUT
RF USB
VIDEO
VIDEO
DC IN
EARPHONE
OUT VGA
IN
PC
AUDIO
IN LRVIDEO
YPb Pr
VIDEO
COAXIAL
OUT
R
L
AUD IO OUT
RF USB
DC IN
EARPHONE
OUT VGA
IN
PC
AUDIO
IN LRVIDEO
YPb Pr

VIDEO
VIDEO
VIDEO
COAXIAL
OUT
R
L
AUD IO OUT
RF USB
DC IN
EARPHONE
OUT VGA
IN
PC
AUDIO
IN LRVIDEO
YPb Pr
VIDEO
COAXIAL
OUT
R
L
AUD IO OUT
RF USB
DC IN
EARPHONE
OUT VGA
IN
PC
AUDIO
IN LRVIDEO
YPb Pr

TV QUICK INSTALLATION GUIDE
1.Connect an Antenna or Cable to your TV set
2.Connect the power cord and turn TV on.
3. Go to initial Setup.
Menu Language
to choose your menu language, press
the left/right arrows until the language
you need appears.
Air/Cable
Choose: Air or Cable
Press Up/Down button to choose,
then highlight Auto Scan and press
Enter to search all available channels.
Cable System
This option is adjustable when Cable is
selected in previous menu.
Variable range:AUTO/STD/IRC/HRC
Default:AUTO
Auto Scan
Please wait for the automatic channel
search to finish. This may take a few
minutes.
PLEASE TAKE THE TIME TO READ THE ENTIRE INSTRUCTION MANUAL INCLUDED
WITH YOUR TV FOR FURTHER OPERATING INFORMATION.
PLEASE KEEP THE ORIGINAL BOX FOR RETURNING YOUR UNIT IF SERVICE IS
REQUIRED.
If using the TV for the first time, the initial setup menu will display.
Turning the TV On and Off
Basic Operation
2. Press
button on the LED TV.
3. Normal picture will be displayed on the screen after 6 seconds. If no signal input,
4. If temporary POWER off is required, press
button on the LED TV.
5. If you want to completely switch off the power for this unit, unplug the power cord plug
for this unit.
6. After switching off the unit, you should turn on the TV again at least 5 seconds later.
Status indication lamp
Green: In power on mode.
Red: In standby mode.
Auto power off
If there is no signal input in any Mode, the TV will automatically accesses the standby
state in about 15 minutes.
Memory before turning TV off
The settings of picture and the preset channels will be memorized at turning off the unit.
When being started up again, the unit will work according to the mode set before being
turned off.
1. How to turn the TV on or off
1. After attaching cable to either an antenna or a cable service, insert the power cord plug
into a polarized AC outlet.
"No Signal" will be displayed on the screen.

Picture
Function introduction
Item Variablerange Default Explanation
Picture Mode Standard / Dy namic
/Soft/ User Standard
Contrast 0----100 50
You will need to watch the picture
when you adjust it,so,we close the
mainmenu,pop up Contrast small
menu
Bright 0----100 50 Same to Contrast
Color 0----100 50 This item is unavailable under VGA
channel and DVI signal
Tint -50-----50 0
Only adjustable under NT SC signal,
unadjustable under other
signals.Recover to 0 under non
NTSC
signal.
Sharpness 0----100 50 This Item is unavailable under
VG A
channel and DVI signal
Color Temp. Normal /Warm/Cool Normal
Blue Screen On/Off Off
After opening this option if there is
no signal input, the screen turns blue.
Adjust the OSD Screen
Press SOURCE button to display the input
source list.
Press ▼/▲button to select the input source
you want to watch.
Press ENTER button to enter the input source.
Picture

Time
Item Variablerange Default Explanation
SleepTimer
Off/5Min/10Min/15Min/30Min
/45M in/60Min/90Min/120Min
/180Min/240Min
Off
Time Zone Pacific /Alas ka/Hawaii
/Eastern/Cent ral/Mountain
Pacific
Daylight
Saving
Time
Off/On Off Only adjustable
under DTV
channel.
Function introduction
Time Format
Auto Clock Off/On Off
12-hour
12-hour/24-hour
Sound
Function introduction
Item Variable range Default Explanation
Sound Mode Standard / Music
/ Movie / User Standard
Bass 0---100 50
Treble 0---100 50
Balance 0---100 50
Surround Off / On Off
AutoVolume On / Off On
SPDIFRAW/ P C M RAW
Only available under DTV channel and
HDMI channel, it is grey under other
channels
Press left or right or enter key on the
remote ,will enter the TTS subpage item
settings.The meaning of the text read
aloud, after opening can adjust the
intensity and speed of sound
Accessibility Voice Guide/
Video Description

Lock
Note:
Input the correct password with four number(from 0-9), then you can enter next level
menu. If the password is wrong, then there will be prompting information in the middle
of the menu
Setup
Function introduction
Item Variable range Defaul Explanation
Menu Language English / French
/Spanish English
Now thereare only three kinds of
language for OSD,if clients need
more,we can add
Transparency Off/On Off
Zoom Mode
Non VGAchannel :
Wide/Zoom/Cinema
/Normal
VGAchannel:
Wide/Nornal
Wide
Only can be adjusted when
there is signal
Noise Reduction Off/Weak/Middle/Strong Middle
advanced
It always stands for the preliminary
menu include further sub page menu
You can enter C C D submenu
Source Label
It always stands for the preliminary
menu include further sub page menu
Closed Caption
Off/On On
Off/On OnDLC Dynamic contrast adjustment.
Setup Wizard
Press left or right will enter
install setup menu.
Restore Default
Press left or right button then will
enter restore page.
User can select YES to default
value for allthe set up value.
or select NO to does not restore.

OSD Menu Operations
23 24
Lock
TV
Input defined by the user's television viewing menu.
MPA A
User can setting the child-level to watch TV Program.
Canada English
User can setting the child-level to watch TV Program by Canada English
Character.
Canada French
User can setting the child-level to watch TV Program by Canada French
Character.
OSD Menu Operations
Lock
Function introduction
Item Variable range Defaul Explanation
Password to access
user-defined menus.
Off / On
Child lock main switch, if it is
off, US and Canada will be gray.
Off
US V-chip set.
Canadian V-chip set.
Only when the DTV code RRT
traffic detected by the system,
then you can enter the
sub-menu, or it will be gray.
Restore to the default
v-chip settings.
Set Password
System Lock
US
Canada
RRT Setting
Clear Lock
Set password
User can modify the system password after press enter button, user can input 4
digital number in the line blank.
Confirm password
After modify the password, user must reconfirm the new password by it to make
sure the password can work.

OSD Menu Operations
25 26
Lock
Note:
1、Use direction keys to move the object, press OK or Enter keys to lock or unlock.
When lock it, it shows black screen and MUTE, pop out prompting menu for you to
input password.
2、Only input correct password in prompt dialog box can you watch the program
normally, but if you change the channel or close it and then return to this channel,
you still need to input the password again.
Lock/ RRT Setting / Humor Level
Function explanation:
User can modify all of the RRT settings values by the item.
Lock/ RRT Setting / Intelligence Level
Function explanation:
User can restore the default settings values for the RRT settings values by the item.
Channel
OSD Menu Operations
Lock
Note:
Before the reset, it should alert the user and then confirm again.

27 28
Channel
Function introduction
Item Variable range Defaul Explanation
Air/Cable
Auto Scan
Favorite
Show/Hide
Channel No.
Channel
Label
DT V Signal
Air/Cable Cable
Among all the
channels searched
Cable System
User can select the standard mode for the wire search channel.
Start to Scan
Press right or enter button will Enter sub menu of searching.
OSD Menu Operations FM Menu Operations
Adjust the FM Screen
FM
Remarks: TV cable must be plugged into the tv tuner jack before FM
scanning&listening.
TV cable is used as an antenna when FM is selected.
Note: Press SOURCE button to set the input source to FM,
Press and hold CH+ button to turn on or off the backlight,
Press and hold menu button to Auto scan,
Press and hold CH- button to exit Auto scan,
Press CH+/- button to select channel.

30
Press VOL+ button to Frequency, then press vol+ again to select Frequency value ,
press VOL +/- to fine-tune , press CH+ button to manual scan, Press and hold CH- to
exit Frequency selection.
Press CH- button to Name ,press V+ button to select Name value, press CH+/- to
change the name, Press and hold CH- to exit Name.
FM Menu Operations
Adjust the FM Screen
29
DVD
HOME
Press the “HOME” button menu, through the up and down direction keys can be select,
Press the left or right button to select the DVD, and press the Enter button to enter.
Press the DVD SETUP button to enter.
TV SYSTEM
Set the options are: NTSC/PAL/AUTO.
VIDEO
Video Options.
TV TYPE
Set the screen ratio options are: PS(4:3 Pan Scan), Normal/PS(4:3 Letter Box),
and Wide (16:9)the default settings is wide.
PASSWORD
Enter “0000” to enter.
RATING
Level Disc Options.
RESUME
Restore to factory settings.
DEFAULT
This option will return the DVD
to it’s factory default settings.

31 32
DVD
OSD LANGUAGE
Set the OSD Language options.
AUDIO LANG
DVD language selection options.
SUBTITLE LANG
This player can display DVD subtitle languages if supported by the DVD disc.
when playing DVD’s you can hide the subtitle or choose any of them as the current
subtitle language.
MENU LANG
Set the MENU Language options.
AUDIO OUT
Press the "ENTER" Key enter, through the up and down direction keys can be select.
KEY
Press the "ENTER" Key enter, through the up and down direction keys can be select.
DVD
BRIGHTNESS
DVD Brightness options.
CONTRAST
DVD Contrast options.
HUE
DVD Hue options.
SATURATION
DVD Saturation options.
SHARPNESS
DVD Sharpness options.
DOWNMIX
DVD Downmix options.
OP MODE
DVD Op mode options.
DYNAMIC RANGE
DVD Dynamic Range options.
DUAL MONO
DVD Dual Mono options.

33 34
Warranty
Thank you for purchasing this Sylvox product. We are glad to offer 12 months free warranty for you.
If you have any questions, please contact us via our after-sales email or website for assistance.
After-sales email: service@sylvoxtv.com
Website: www.sylvoxtv.com
Table of contents
Other Sylvox TV manuals