Sylvox BT24A1KGGB User manual

USER’S MANUAL
Bathroom TV
Note: The product and illustrations in this user's manual is only for explanation purposes and may vary depending on model.
S l ox
Note: Reserved installation hole (detailed on page 6)
MUT E
POW ER SO URC E CH- CH+ VOL - VOL +

General Information
USER'S MANUAL
English
MANUAL DE USUARIO
MANUEL DE L'UTILISATEUR
Français
Español
English
To avoid damaging the television set please observe the following safety instructions
during setup and use.
Before cleaning, disconnect the television set. Use only a soft
damp cloth or a special cleaning product for flat-screens.
Cleaning the television set
LED Display Too much pressure on the screen can damage the television set.
Heat/damp/humidity The television set should not be exposed to high temperatures
(radiators, open fire).
The television set should not be used in areas with high humidity.
If moved from a cool area to one with a higher temperature, the
television set should be left for at least an hour before plugging
it in. A rapid change of temperature can lead to the formation of
condensation in the television set itself. This can lead to damage
if the television set is in use.
Condensation
To prevent overheating of the television set the ventilation slots at
the rear should always be clear.
Air Circulation
It is important to ensure that no small objects or liquids enter the
television set. They can cause damage or even fire.
Small Objects
Take care to avoid crushing fingers or other objects when turning
the television set in any direction.
Use the television set only with the voltage indicated in the
specifications.
Ensure that there is easy access to the plug and that the television
set can always be disconnected from the electricity supply.
Do not disconnect the television set by pulling the power cable.
Always take hold of the plug. The power cable must not be kinked
or placed over sharp edges.
Crushing
Electric Supply
When moving the television set, hold only the casing.
Repairs and servicing must be undertaken only by authorised and
trained personnel.
Moving the Television Set
Repairs/Accessories
In accordance with the Batteries Regulation, batteries are to be
disposed of only in containers provided for this purpose.
In extreme weather (storms, lightning) and long inactivity periods (going on holiday)
disconnect the TV set from the mains. The mains plug is used to disconnect TV set from the
mains and therefore it must remain readily operable. If the TV set is not disconnected
electrically from the mains, the device will still draw power for all situations even if the TV is in
standby mode or switched off.

IMPORTANT - Please read these instructions fully before installing oroperating
WARNING: Never let people (including children) with reduced physical, sensory or
mental capabilities or lack of experience and / or knowledge use electrical devices
unsupervised.
For ventilation purposes, leave at least 5cm of free space around the TV.
The ventilation should not be impeded by covering or blocking the ventilation openings
with items, such as newspapers, table-cloths, curtains, etc.
The power cord plug should be easily accessible. Do not place the TV, furniture, etc. on
the power cord. A damaged power cord/plug can cause fire or give you an electric shock.
Handle the power cord by the plug, do not unplug the TV by pulling the power cord. Never
touch the power cord/plug with wet hands as this could cause a short circuit or electric
shock. Never make a knot in the power cord or tie it with other cords. When damaged it
must be replaced, this should only be done by qualified personnel.
Do not expose the TV to dripping or splashing of liquids and do not place objects filled
with
liquids, such as vases, cups, etc. on or over the TV (e.g., on shelves above the unit).
Do not do not place open flames such as lit candles on the top of or near the TV.
Do not place any heat sources such as electric heaters, radiators, etc. near the TV set.
Do not place the TV on the floor and inclined surfaces.
To avoid danger of suffocation, keep plastic bags out of the reach of the babies, children
and domestic animals.
Do not dispose of the batteries in fire or with hazardous or flammable materials.
Warning: Batteries must not be exposed to excessive heat such as sunshine, fire or the like.
If you think batteries might have been swallowed or placed inside any part of the body,
seek immediate medical attention.
WALL MOUNTING WARNINGS
Read the instructions before mounting your TV.
Do not install the TV on an inclined.
Use the specified wall mounting screws and other accessories.
Tighten the wall mounting screws firmly to prevent the TV from fall.
Do not over-tighten the screws.
A television set may fall, causing serious personal injury or death. Many injuries, particularly
to children, can be avoided by taking simple precautions such, Educating children about the
dangers of climbing on furniture to reach the television set or its controls.
Accessories
Please make sure the following items are included with your TV.
If any items are missing, Please contact us.
English
English
Warranty Card
User’s manual
Adapter
Remote Control
Wall bracket
Batteries (AAA x 2)
Television
Fixed fittings
Screwdriver
Remote control base
MUTE
POWER SOURCE CH- CH+ VOL- VOL+

Content Specification
Note:
Design and specification modification maybe made at any time without prior notice,
all data and dimensions are approximations.
BT24A1KGGB
24"
30W
DC 12V 4A
1920 X 1080
23.50 x 6.00 x inch 1 1.65
Product Dimensions
(Include base bracket)
2 x 5W
English
English
BT32A1KGGB
32"
58W
DC 12V 6A
31.04 x 9.90 x inch 1 2.00
1
INSTALLATION
OVERVIEW
REMOTE-CONTROL UNIT
GENERAL DESCRIPTION
5-9
2-3
11
SPECIFICATION 1
10
SUPPORTINGSIGNALS 4
12-27
TROUBLESHOOTING 29-31
TV OPERATION
WARRANTY POLICY 32-33
28
READ BEFORE USING APPS
16
16
21
18
23
18
22
24
24-26
27
19-20
HOME SCREEN
INPUT SOURCE
DASHBOARD
CHANNELS & INPUTS
DISPLAY & SOUND
NETWORK & INTERNET
ACCOUNTS & SIGN-IN
PRIVACY
APPS
SYSTEM
REMOTES & ACCESSORIES

Overview
Overview
English
English
MUT E
POW ER SO URC E CH- CH+ VOL - VOL +
POWER INDICATOR
Red: In standby mode.
REMOTE CONTROL SENSOR
POWER: Press this button to turn the TV on or off.
SOURCE: Press to open the input source list.
MUTE: Press this button to cut off the sound of the TV set temporarily, press again to resume.
CH-/+: Press to change channels.
In the on-screen menu, use the CH +/- buttons as up/down arrow buttons.
VOL-/+: Press to increase or decrease the volume.
In the on-screen menu, use the VOL +/- buttons as left/right arrow buttons.
Back of TV
DC 12V
L/R OUT
HDMIUSB RJ45 OPTICALRF
1. RF
Connected to external antenna to receive the ATV/DTV program in ATV/DTV mode.
2. USB
USB input.
3. RJ45
Ethernet connection.
4. OPTICAL OUT
Digital audio output.
5. HDMI
Connecting for HDMI signal.
6. L/R OUT
Connect to the audio output jacks on your amplifier/home theater.
7. DC 12V
DC input.
23

English
English
Installation
Precautions during installation
Please install the TV host after the unit bus is installed. However, if the wall is difficult
to process after installation, please process it before installation.
Please confirm the installation position of the TV main body, so as not to interfere with
the wiring or faucet of the remote controller for hot water supply.
If there are ribs on the back of the wall, please avoid the ribs and adjust the position of
the mounting holes.
When using the mounting bracket, please be careful not to be injured by the end face.
Matters needing attention when unpacking
The mounting bracket leaves the factory in the state of being mounted on the TV main body.
When disassembling, please lift the bottom side, and then pull out the upper claw.
Supporting Signals
PRESET MODE (HDMI)
1
2
3
4
5
6
7
Resolution
640x480
720x480
720x576p
800x600
1280x720p
1920x1080i
1920x1080p
V.Freq.(Hz)
59.94
59.94
50
60
60
60
60
H.Freq.(KHz)
31.469
31.469
31.25
37.9
45
33.75
67.5
45

English
English
Installing support
Make a bottom hole at the place where the screw is driven.
Please use screws or fixers in the installation of metal parts according to the material,
thickness and state of the installed bathroom wall.
Punch holes in the marked positions in step 1.
When using the attached screws, please make a pre-drilled hole based on φ Φ3.0mm.
Make a bottom hole at the place where the screw is driven.
Drive the current threaded sleeve into the hole and fix it with the screw mounting bracket.
Please be careful not to
let the screws damage
the pipes in the wall.
Mark the positions of wiring holes and screw holes.
1. Place the installation fittings in the predetermined installation position of the bathroom wall.
※. Please pay attention to the size difference between the mounting bracket and the TV
main body.
The main body of the TV set is better than the mounting accessories,40mm on the left
and right.
※. Please make sure that the wall at the scheduled installation location is flat.
2. Draw a reticle on the bathroom wall according to the lines engraved on the mounting bracket.
3. Mark the mounting hole position 7 of the mounting bracket.
When sticking to the mounting bracket, please pay attention to whether it
is horizontal.
Draw a crosshair according to the reference line.
Mark the position
of the mounting
screw hole.
Mark the position
of the mounting
screw hole.
Drill wiring holes in the bathroom wall
With the intersection point of the reticle drawn on the bathroom wall in step1 as the center,
punch Φ30 mm〜Φ60 mm.
Wiring hole Φ30〜60mm
67

English
English
Temporarily set the TV main body
Perform initial setting and action confirmation.
Install the TV main body on the installation fitting.
1. Align the slot of the TV main body with two claws on the upper part of the mounting
bracket for installation.
※ Please hang the main
body on the upper jaw,
and then aim at the lower
part.
2. Fix the lower part of the mounting
bracket at 2 places with screws.
Cable jumper
Lead out the cable from the wiring hole.
The cable is led out from the wiring hole for about 200~300mm.
※ Do not pull the cable hard. Otherwise, it will lead to disconnection.
Cable jumper
Connect with the cable on the back of the
TV host.
After connection, please be sure to wrap
self-fluxing tape around each connector
and take waterproof measures.
※ Do not re-plug the cable when the
power box is electrified.
Otherwise, it will lead to failure.
After connection, use self-fluxing
adhesive tape to make waterproof
measures.
Please put the TV in a stable place
where there is no danger of falling.
In addition, please be careful not to
damage the surface of the picture.
8 9

English
English
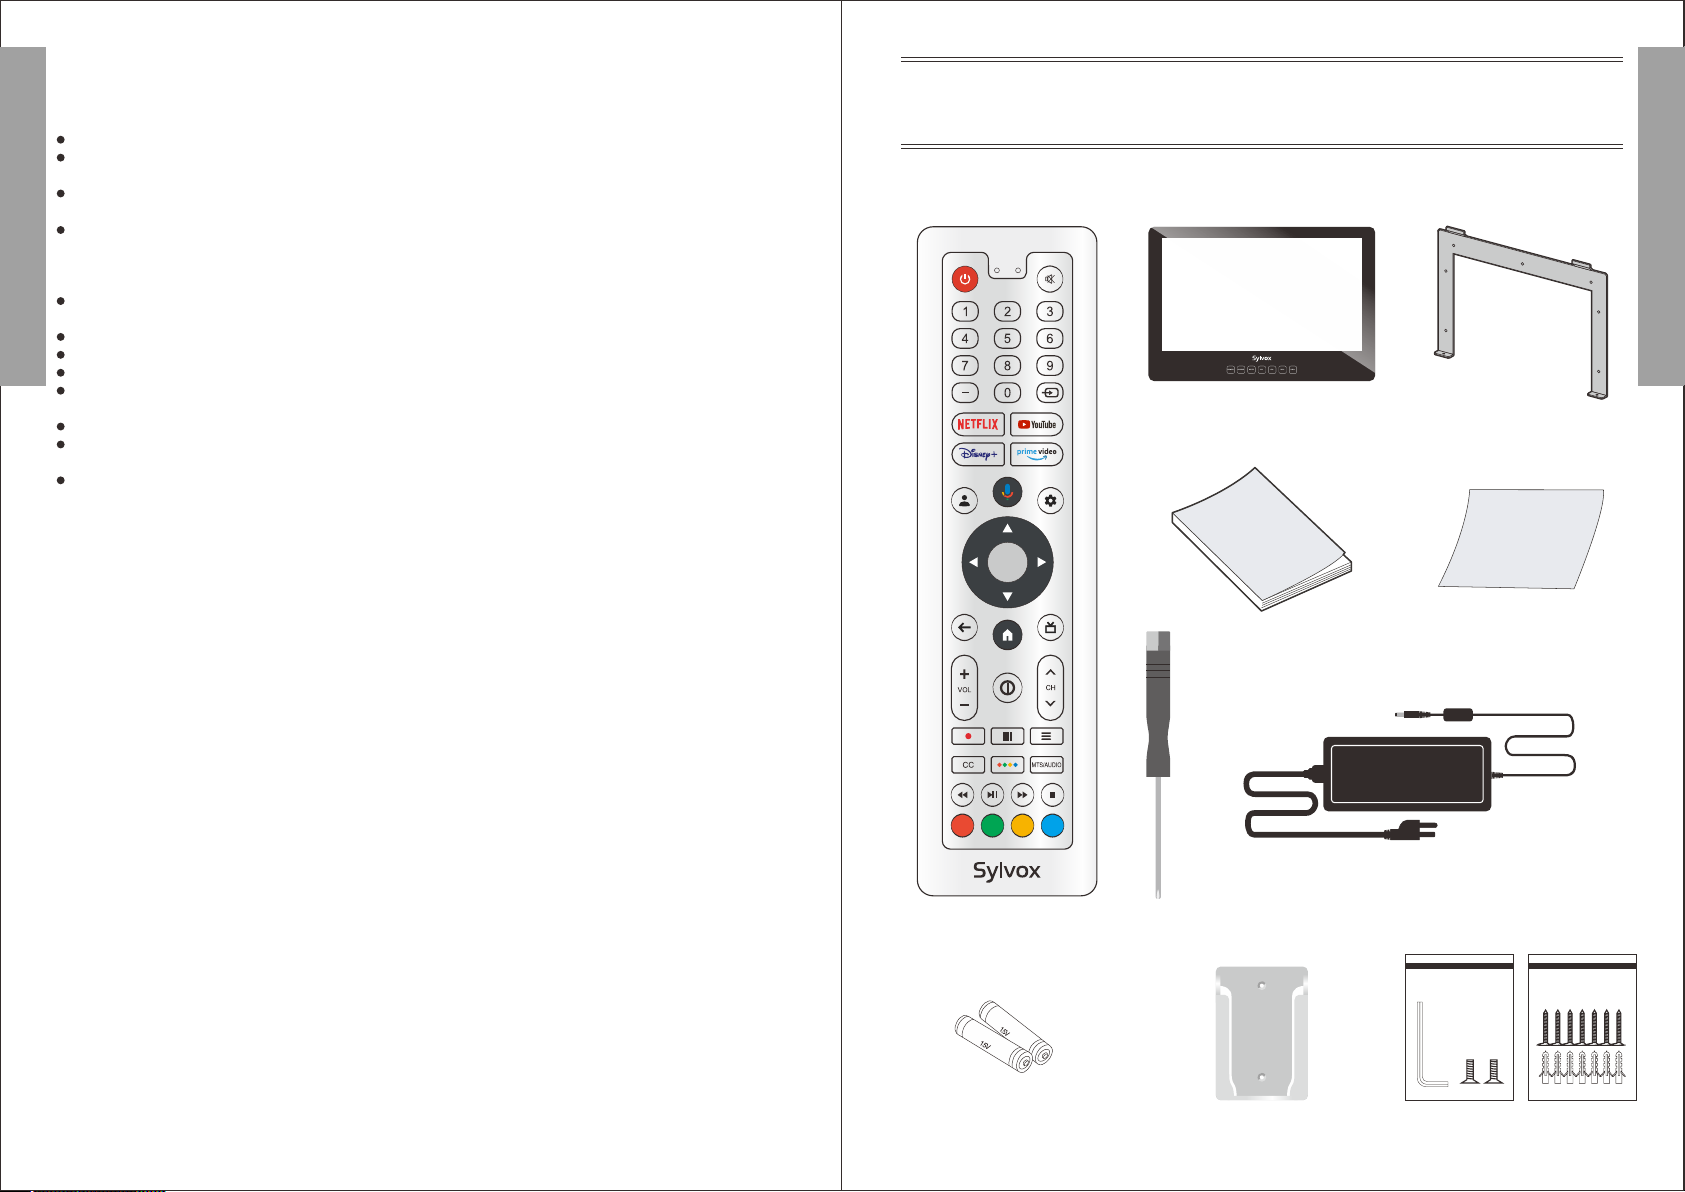
1. POWER: Turn the TV on and off.
2. MUTE: Press this button to cut off the sound of the TV
set temporarily, press again to resume.
3. Digital Buttons(0-9, -): Directly select channel with
digital buttons.
4. INPUT: Press to open the input source list.
5. NETFLIX: If network connects, press this key to view
NETFLIX directly.
6. YouTube: If network connects, press this key to view
YouTube.
7. Disney+: If network connects, press this key to view
Disney+.
8. Prime Video: If network connects, press this key to
view Prime Video.
9. Profile: Switch profile.
10. Google Assistant: Open Google Assistant.
11. Settings: Access the settings (direct or through the
dashboard in GTV)from any place in the system.
12. Arrow buttons ▲▼◀▶: Use to select on-screen menu
items and change menu values.
13. OK: Confirms selection.
14. BACK: Return to the previous menu.
15. Guide: Open Live TV EPG.
16. HOME: Display the HOME page.
17. VOL+/- : Press these buttons to adjust the volume.
18. CH : Press these buttons to change channel ∧/∨
upward or downward.
19. INFO: Press to display the channel information.
20. : In DTV mode, press ● button to record the TV
program.
21. APPS: Press to display the app list.
22. LIST: Press to display the channel list.
23. CC: Display CC function menu in TV/AV mode.
24. Button: Press to open virtual keyboard in DTV source.
25. MTS/AUDIO: In USB mode, press this button to
switch audio track when movie is playing. In TV mode,
press this button to switch MTS or Audio Language.
26. DIGITAL MEDIA PLAYER CONTROL BUTTON:
Include backward, forward, play/pause, stop in USB mode.
27. COLOR BUTTONS: It's used in the APPS.
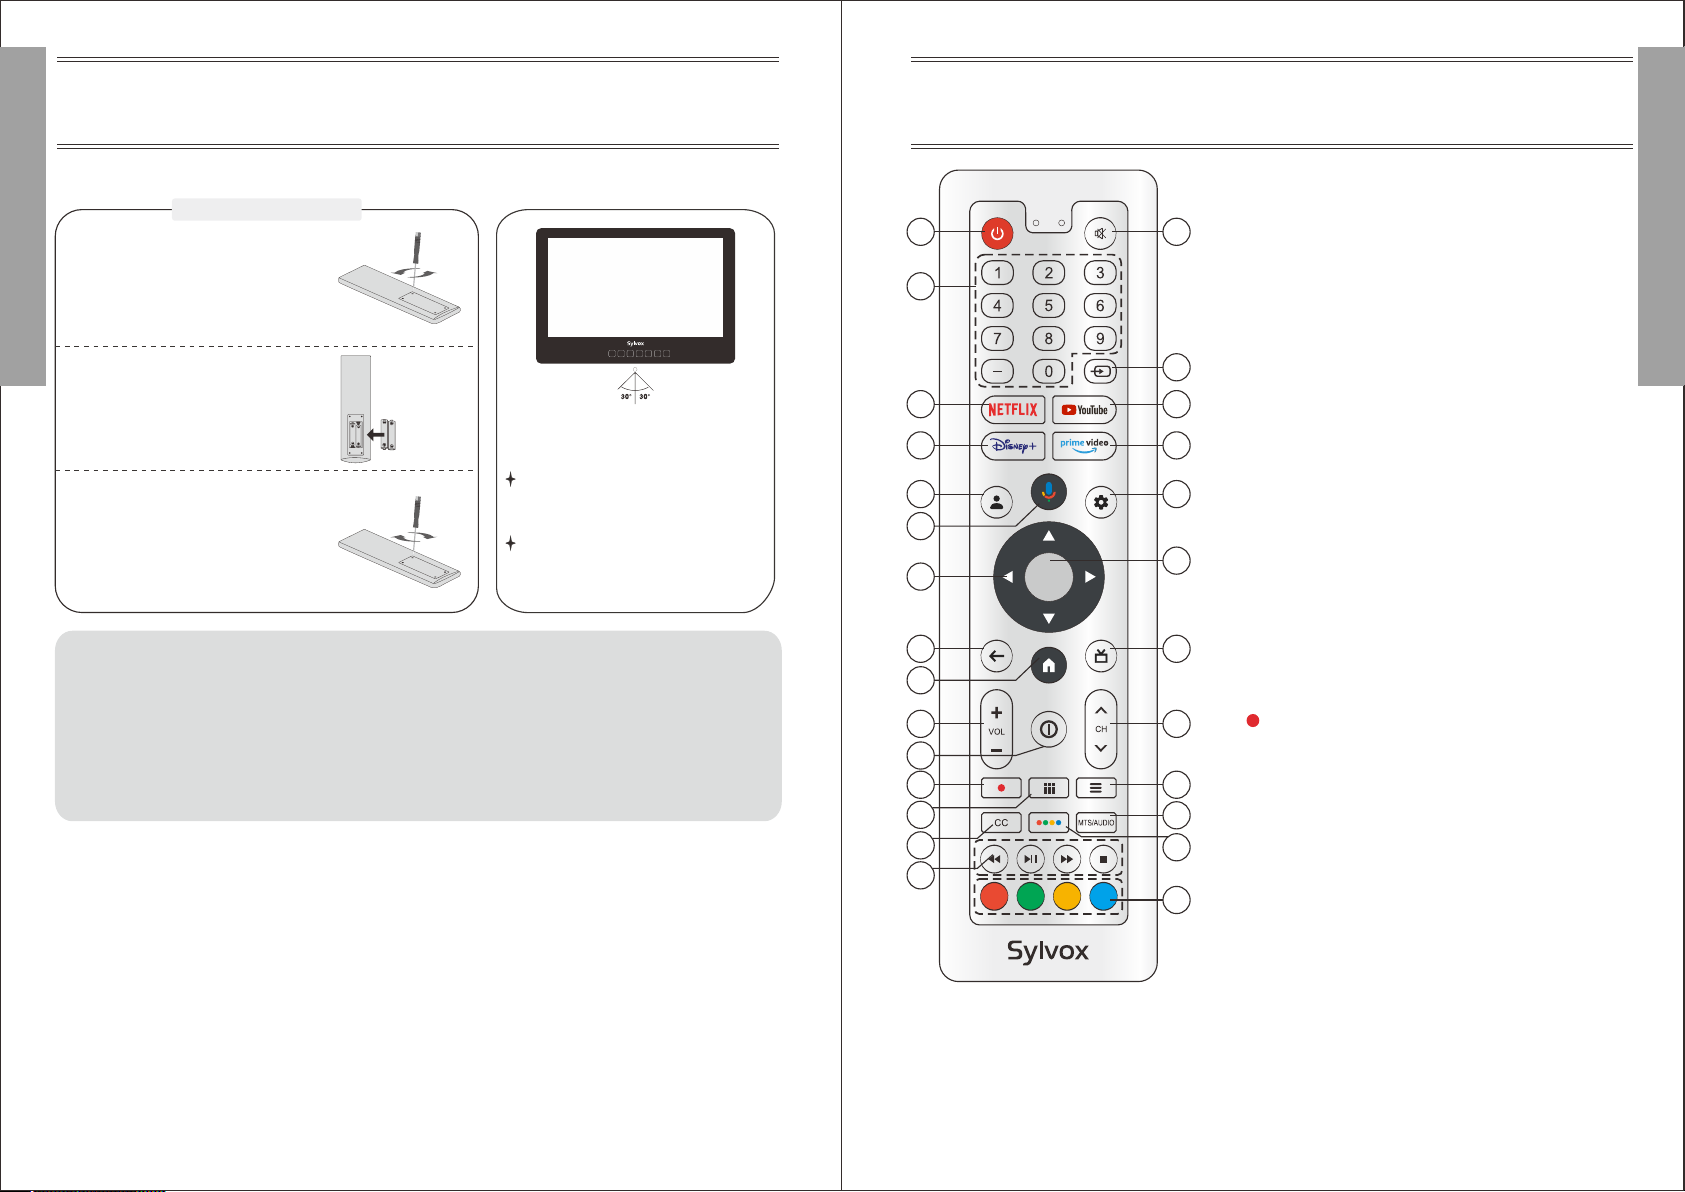
Remote-Control unit
General Description
Point the remote towards the remote
control sensor of the wireless TV and
use it within 7 meters.
Put the used batteries into the recyc-
ling bin since it can negatively affect
the environment.
Note:
1) Batteries should last approximately one year under normal use (actual use will vary).
2) If the TV will remain inactive for an extended period of time, remove the batteries from the remote
control to avoid possible damage due to leakage.
3) Do not mix old and new batteries or different types of batteries.
4) Do not throw batteries into fire or water.
5) The batteries (battery pack or batteries installed) should not be exposed to excessive heat such
as sunshine, fire or the like.
Remove the battery cover and insert the provided batteries. Then replace the battery cover.
MUTE
POWER SOURCE CH- CH+ VOL- VOL+
1 2
3
4
5
7
6
8
9
10
11
13
12
14 15
16
17 18
19
20 22
21 25
23 24
26
27
Installing Batteries
1
2
3
Use the accessory screwdriver
to remove the four screws of
the battery cover of the remote
controller and open the
battery cover.
Insert two 1.5V AAA size
batteries in correct polarity.
Don´t mix old or used
batteries with new ones. 2 x size
AAA 1.5V
Lock the four screws on the
battery box cover of the remote
controller with a screwdriver.
Please keep the screwdriver.
10 11

English
English
TV Operation
1. Please connect the TV to the power supply, and the indicator light will be red after power-on.
Press the (power) button on the remote control or TV to turn on the TV.
2. You need to pair the remote control with the TV first. After the code is successful, you can
use the Operate the Bluetooth remote control of the TV.
3.Press ▲/▼ to select the system language and press OK to confirm the language.
4. Press ▲/▼ to set up Google TV which need to sign in google account for Google service,
or basic TV which not need to sign in google account.
5. Scan setup code to download Google home app on your phone to set up or press ▲/▼ to set
up on TV.
6. Press ▲/▼ to select the wifi to connect, press OK and enter the password to confirm the
connection is successful.
7. By accepting the Google Terms of Service to improve the product experience, select "Accept"
to accept this condition.
12 13

English
English
8. Set your location.
9. Set your Time Zone.
10. Set your Daylight Saving.
11. Set the Tuner mode, You can also choose to skip first.
12. Please double check your Settings, After confirming OK, you can use it.
※The content displayed in the image depends on your region.
14 15

English
English
HOME SCREEN
After completing the wizard Settings, you can watch TV and go to the home screen.
1. Open Google Assistant or start a text search.
2. Among the applications installed on the TV, the icons for the favourite applications are shown inside
here. (Favourite applications can be added/ deleted/changed its order by users.)
2
1
Inputs: Icon to select an input source.
Settings: Various settings can be configured here. For details on the settings, see the next explanation.
INPUT SOURCE
In the HOME interface, press ▲/▼/◄/► to select the "Inputs" icon, press OK to open the input source
list, then press up to highlight an input and press OK to switch.
Under live TV, press the SOURCE button to display the list of input sources. You can select the desired
source.
NAVIGATING THE ON-SCREEN MENU
1. In the HOME interface, press the ► key to select the icon of the circular settings menu, press OK to
confirm.
2. Press ▲/▼ button to select what you want set.
3. Press OK to enter setting.
16 17

English
English
Dashboard
The Google TV dashboard provides a single location for users to access, settings,
notifications, picture settings and more. To open the panel, please press DASHBOARD on
your remote from the Google TV home screen.
1. Press to display the Home menu.
2. From the Google TV home screen, please press to display the DASHBOARD.
3. Use▲▼◀▶to select the desired menu and an item, then press OK.
Channels & Inputs
To set Channels and Inputs
Add channels
To add for the first time or additional channels, please follow the steps below:
1 Go to Settings > Channels & Inputs > Channels
2 Select your signal type
3 Select Channel Scan to start channel installation.
Inputs
Consumer Electronic Control (CEC) - This allows you to operate the linked functions between
our brand devices with CEC feature and this unit. We do not guarantee 100% interoperability
with other brands of CEC compliant devices.
Display & Sound
To set Picture and Sound
Picture
Picture Mode
Standard: For normal TV viewing.
Movie: Deep picture settings for a cinematic experience.
ECO: Eco TV settings for low power consumption.
Vivid: Enhanced picture contrast and sharpness for viewing in a well-lit room.
Sports: Brilliant picture settings for high action.
Game: Optimized for PCs and game consoles.
Screen Brightness
Adjusts the LED brightness to affect the overall brilliant color.
Advanced Settings
For more detailed picture settings, go to Advanced Settings, where you find settings for Color
Temperature, Noise Reduction And Picture Reset etc.
18 19

English
English
Sound
Sound Mode
The following sound settings can be configured. Depending on the format of the broadcasting,
some sound settings are not available.
Standard: For normal TV viewing.
Movie: Powerful sound settings for a cinematic experience.
Music: Optimized for music playback.
News: Set the anchor's voice at a comfortable volume.
Personal: The customized settings you preferred.
Audio output
Output Device: TV Speaker/SPDIF/Optical/HDMI-ARC
Digital Output: Auto/Bypass/PCM/ Dolby Digital Plus/ Dolby Digital
Digital Output Delay
The on-screen picture and the sound from an amplifier via the digital audio (SPDIF) output
jack are synchronized by delaying .the output from the connection.
The higher values will increase the digital audio (SPDIF) output delay.
Network & Internet
Setup network connection settings in order to use apps or network upgrade functions. To set
Network & Internet.
Wi-Fi setting
1. Confirm that Wi-Fi is turned on and you’re connected to the correct network.
2. If not, locate the network you’d like to connect to and select it to connect. Enter the
password if required.
3. Open one of your apps.
4. Play your video, music, or game again.
Note(s)
If you still have issues, turn the Wi-Fi option off and on again.
Use your Mobile/Tablet hotspot
Automatically adjusts video quality to use less mobile data.
● Data Saver reduces your data usage on mobile connections, increasing watch time by up to 3x.
● Data usage and alerts help you monitor your data usage while watching TV.
Scanning always available
Let Google’s location service and other apps scan for networks, even when Wi-Fi is off.
Ethernet
Proxy settings: Set Proxy manually.
IP settings: Configure the IP setting for your network connection.
20 21

English
English
Accounts & sign-in
You can manage to add or remove your Google account and kids profile account.
Google Account
Google TV profiles let everyone in your home enjoy their own personalized space with their
Google Account. With a personalized profile, you'll get TV show and movie recommendations
just for you, easy access to your personal watchlist and help from your Google Assistant.
Add Google account
You can add more than one account on your Google TV so you can sign in to services with
multiple accounts. Your media and activity sync across devices that your Google Account is
signed in to.
Add a Kid
Set up a kids profile on Google TV to choose which apps your kids can use, and to set up
bedtime reminders and screen time limits.
* Kids profiles may not be available in some regions or on some devices.
Privacy
This section is privacy settings of your TV, Google account and applications.
Location
● Google may collect location data periodically and use this data in an anonymous way to
improve location accuracy and location-based services.
Usage & diagnostics
● Automatically send diagnostic information to Google, like crash reports and usage data
from your device, apps, and Chromecast built-in. you can adjust these permissions at any
time from device settings. Learn more at g.co/tv/diagnostics.
Ads
● Manage your afs settings, such as resetting your advertising ID.
Google Assistant
You can ask questions and complete tasks on your Google TV with Google Assistant. Google
Assistant comes installed on your Google TV device. You can turn it on when you first set up
your device, or you can turn it on later.
Payment & Purchases
● Manage your account and purchases through the Play Store app on your mobile device, or
by following these links in a Web browser:
● Payment methods g.co/ManageWallet
● Order history g.co/Play/Order
● Subscriptions g.co/Play/Subscriptions
Security & Restrictions
● Your device and personal data are more vulnerable to attack by apps from unknown
sources. You agree that you are solely responsible for any damage to your device or loss of
data that may result from using these apps.
22 23

English
English
Apps
This section is apps settings, such as checking details and permissions.
System
Accessibility
You can use a screen reader, closed captions, Switch Access, and more to make your Google
TV device more accessible.
1. Press a (HOME) and use ▲▼◀▶ to select Settings then press OK.
2. Use ▲▼to select System, then press OK.
3. Use ▲▼to select Accessibility, then press OK.
4. Adjust the following items.
Turn on closed captions
Your caption preferences might not apply to certain apps.
1. From the Google TV home screen, in the top right, go to the user profile icon and select
Settings.
2. Select System > Accessibility.
3. Select Captions.
4. Turn on Display to show captions. Then choose your options.
You can choose the size, font, color, background and other characteristics of the caption text.
Turn on high contrast text
1. From the Google TV home screen, in the top right, go to the user profile icon and select
Settings.
2. Select System > Accessibility.
3. Turn on High contrast text (Experimental).
Text to speech
Text to speech output settings.
To set On/Off of this function, select and set TalkBack.
Use accessibility shortcuts
Accessibility shortcuts are a quick way to turn on accessibility features. To use accessibility
shortcuts, you first need to turn them on.
To turn on accessibility shortcuts:
1. From the Google TV home screen, in the top right, go to the user profile icon and select
Settings.
2. Select System > Accessibility.
3. Select Accessibility shortcut > Enable accessibility shortcut.
4. By default, the shortcut turns on TalkBack. To change what's included in the shortcut,
choose Shortcut service.
5. Choose an option and select OK.
To use the shortcut: On your remote, press and hold the back arrow and down buttons at
the same time for 3 seconds.
TalkBack
TalkBack is the Google screen reader included on Android devices. TalkBack gives you spoken
feedback so that you can use your device without looking at the screen.
Change screen reader settings
1. From the Google TV home screen, scroll up to the top navigation bar.
2. Select Profile Settings > Dashboard > Settings.
3. Select System > Accessibility.
4. Under “Services,” select TalkBack > Configuration.
5. Change settings for speech volume, verbosity (such as keyboard echo and usage hints),
and spoken passwords.
Note(s)
To find more options and settings for TalkBack, such as speech rate and intonation, in the
Accessibility menu, select Text to speech.
Use a screen reader
1. From the Google TV home screen, scroll up to the top navigation bar.
2. Select Profile Settings > Dashboard > Settings.
3. Select System > Accessibility.
4. Under “Services,” select TalkBack > Enable > OK.
Turn on Switch Access
1. From the Google TV home screen, in the top right, go to the user profile icon and select
Settings.
2. Select System > Accessibility.
3. Under “Services,” select Switch Access > Enable > OK.
About
You can check system update and TV registration information.
24 25

English
English
Reset
This will restore your device to default settings and erase all data, accounts, files, and
downloaded apps.
Date & Time
Automatic date & time
Use network-provided time or off
If it is set to off, please manually set the date and time.
Set time zone
Select your time zone
Use 24-hour format
Set the time to display in a 12 or 24-hour format
Language
You can set the language for the on-screen display.
1. Use ▲▼to select Language, then press OK.
2. Use ▲▼ to select English (Canada), English (United States), Español or Français then
press OK.
Keyboard
Perform the keyboard setting.
Storage
Internal shared storage
Removeable storage
Ambient mode (Digital Photo Frame)
Google TV lets you set your TV to scroll through Google Photos
when you're not watching anything.
Power & Energy
Power on behavior
Select the screen to start when powering on the TV.
Cast
Cast to Google TV
You can cast content from phones, tablets, or laptops to your
Google TV.
Restart
It just makes the TV turn off and again on. Your all settings will be kept. If you want to delete all
settings of the TV, please do factory reset. Settings > System > About > Reset > Factory reset
* This will restore your device to default settings and erase all data, accounts, files, and
downloaded apps.
Remotes & Accessories
You can connect several Bluetooth devices, like headphones or game controllers, to your
Google TV. You can only connect one audio device at a time.
Pair a Bluetooth device
1. From the Google TV home screen, in the top right, go to the profile picture or initial and
select Settings > Remote &Accessories > Pair accessory
2. Make sure your device is in pairing mode or is visible to other devices.
3. Identify the device you want to pair from the list and select it.
4. On the Bluetooth pairing request screen, select Pair.
Note(s)
Accessories that have been paired with your device appear in the Remote& Accessories
section of Settings. You can also rename or forget devices.
Reconnect a paired device
1. From the Google TV home screen, in the top right, go to the profile icon and select Settings
> Remote & Accessories
2. Under “ACCESSORIES” choose your device.
3. Select Connect.
Fix problems with connecting
Bluetooth devices
If your Bluetooth device won't connect, it could be an issue with the Bluetooth device or your
TV.
Troubleshoot connection issues
1. Turn off your Bluetooth device and then turn it back on. After your device is reset, try to pair
it again.
2. If you have multiple devices paired with your TV, disconnect the ones you're not using.
3. Unplug your TV for 10 seconds and then plug it back in. When your TV is on, try to pair it
again.
4. Check if your Bluetooth device connects to other devices, such as a phone or tablet.
A. If your device connects to other devices:Reset your Google TV device to factory settings.
B. If your device doesn't connect to other devices:Check that your Bluetooth device has up-
to-date software or get help from the device's manufacturer.
26 27

English
English
Troubleshooting
If you have any problem, check the couter measures for each symptom listed below. The following
symptoms may have been, caused by inaporopriate adjustment rather than actual malfunction of the
unit. If the trouble pens sts, contact the Customer Care Centre, see back page for contact details.
No power
No picture
Good picture but no
sound
Good sound but abnormal
color or no picture
No response to remote control
Colored dots may be present
on the screen
Picture is breaking up
Please check the power cord plugged in and that the power outlet
works.
Unplug the power cord and plug it in after 60 seconds and restart
the TV.
Please check antenna connection.
Station may be experiencing problems, please tune to another
station.
Please adjust the settings of contrast and brightness.
Please increase the volume.
Please check TV is under mute mode, press MUTE button on the
remote control.
Please check sound settings.
If external devices are being used, check their volumes are not set
too low or turned off.
If using AVI or Component inputs, please make sure cables are
connected properly and not loose.
If using DVI to HDMI cable, a separate audio cable is required.
Make sure a headphone jack >s not connected.
Please check antenna connection and antenna condition. If using
Component input, please check Component connections, incorrect
or loose connections may cause colour problems or cause the
screen to be blank.
Batteries of remote control may have exhausted, if necessary,
please change the batteries.
Clean the remote control lens. The distance between
LED TV and remote control should be within 8m, within
recommended operating angle and path is free of obstructions.
Although the LED screen is made with high-preci sion technology
and 99.99% or mere of the pixels are effective, black dots may
appear or bright points of light (red. blue, or green) may appear
constantly on the LED screen. This is a structural property of the
LED screen and not a malfunction.
Keep the TV away from noisy electrical sources such as cars, hair
dryers, welders, and all optional equioment.
Electrical atmospheric interference such as local or distant ightning
storms may cause picture to break up.
When installing optional equipment, leave some space between
the optional equipment and the TV.
Check the antenna and connection.
Keep the antenna away from any power or inpuVoutput cables.
Symptoms Possible solutions
Due to the product characteristics featured on the Apps store, as well as limitations in available
content, certain featured applications, and services may not be available on all devices or in all
territories. Some Apps featured may also require additional peripheral device or membership fees.
Services and content availability are subject to change without prior notice.
Manufacture takes no legal responsibility whatsoever for any interruption of App services caused by
the service provider for any reason.
An unstable Internet connection may cause delays or interruptions. In addition, applications may
terminate automatically depending on the network environment.
Applications services and updates may become unavailable.
Application content is subject to change by the services provider without prior notice.
Specific services may differ with the version of the application installed on the TV.
An application's functionally may change in future version of the application.
Depending on the third party service provider/s policies, certain applications may not support
multitasking.
The response to remote commands and the resulting on screen display may be delayed while a
webpage is loading.
The copy and paste operations are not supported.
The web browsing speed will differs with the network environment.
Depending on the types of video/audio codecs supported, it might not be possible to play certain
video and audio files while playing content.
Apps store have certain limitation, it consist many inbuilt apps for various needs of user but user
doesn't have facility to add other apps from any other media.
Read Before Using Apps
(*Terms & Conditions Apply)
28 29

FCC Warning
This device complies with part 15 of the FCC rules. Operation is subject to the following two
conditions: (1) this device may not cause harmful interference, and (2) this device must
accept any interference received, including interference that may cause undesired
operation.
Changes or modifications not expressly approved by the party responsible for compliance
could void the user's authority to operate the equipment.
NOTE: This equipment has been tested and found to comply with the limits for a Class B
digital device, pursuant to part 15 of the FCC Rules. These limits are designed to provide
reasonable protection against harmful interference in a residential installation. This
equipment generates uses and can radiate radio frequency energy and, if not installed and
used in accordance with the instructions, may cause harmful interference to radio
communications. However, there is no guarantee that interference will not occur in a
particular installation. If this equipment does cause harmful interference to radio or television
reception, which can be determined by turning the equipment off and on, the user is
encouraged to try to correct the interference by one or more of the following measures:
Reorient or relocate the receiving antenna.
Increase the separation between the equipment and receiver.
Connect the equipment into an outlet on a circuit different from that to which the
receiver is connected.
Consult the dealer or an experienced radio/TV technician for help.
Radiation Exposure Statement
This equipment complies with FCC radiation exposure limits set forth for an uncontrolled
environment. This equipment should be installed and operated with minimum distance 20cm
between the radiator and your body.
English
English
USB not playing
Noise from speaker
TV turns off automatically
Symptoms Possible solutions
Check your area is covered by Digital Video Broadcasts.
Try re-tuning or manually tuning missing channels.
Check that you are using the correct antenna type.
Check if the channel has been blocked in the main menu
settings.
Please check connecting USB cable and power supply is
connected.
Hard drive has not been formatted. Please make sure USB disk is
compatible and the multimedia data formats are supported. Only
support FAT32 format for the USB disk.
Compression of video contents may cause distortion especially on
fast moving pictures such as sports and action movies.
Check cable connections, make sure a video cable is not
connected
to an audio input.
Low signal level may cause sound distortion.
Check if the Off Timer is set to On in the Setup menu.
Sleep Timer may have been enabled.
If there is no signal for about 10 minutes from an input, the TV will
turn off.
Check if the On Timer is set to On in the Setup menu.
Black bars on each side will be shown on HD channels when
displaying SD (4:3) contents.
Black bars on Top & Bottom will be shown on movies that have
aspect ratios different from your TV.
Adjust picture size option on your external device or TV to full
screen.
After Auto Tuning only
some channels are
available
Channel cannot be
selected
Picture is distorted,
macroblock, small block,
dots, pixelization, etc
Picture is not shown in
full screen
TV turns on
automatically
Never place a television set in an unstable location. A television set may fall, causing serious
personal injury or death. Many injuries, particularly to children, can be avoided by taking simple
precautions such as:
- Using cabinets or stands recommended by the manufacturer of the television set.
- Only using furniture that can safety support the television set.
- Ensuring the television set is not overhanging the edge of the supporting furniture.
- Not placing the television set on tall furniture (for example, cupboards or bookcases) without
anchoring both the furniture and the television set to a suitable support.
- Not placing the television set on cloth or other materials that may be located between the television
set and supporting furniture.
- Educating children about the dangers of climbing on furniture to reach the television set or its
controls
If your existing television set is being retained and relocated, the same considerations as above
should be applied.
The plug or appliance coupler is used as the disconnect device, the disconnect device shall remain
readily operable.
WARNING
30 31

*
(a)
(b)
(c)
(d)
(e)
(f)
(g)
(h)
(i)
(j)
Warranty Period:
Sylvox repairs the TV free of charge under the condition of the normal use of the instruction
manual within 12 months.
Sylvox warrants that this product conforms to the manufacturer's specifications and will be
free of defects in material and workmanship should any defect occur.
Sylvox will correct the defect subject to the following conditions:
Any defects caused or repairs required as a result of the abusive operation, negligence,
accident, shipment damages, improper delivery and installation, application, and use for
which this product was not intended as set forth in the user’s manual or other applicable
Product documentation.
Any defects caused or repairs required as a result of any product that has been tampered
with, modified, adjusted, or repaired by any person other than Sylvox, a Sylvox authorized
service provider or a Sylvox authorized service center or dealer.
Any replacement of accessories, glassware, consumable or peripheral items required through
normal use of the Product, including but not limited to, earphones, remote controls, batteries,
etc.
Any cosmetic damage to the Product surface or exterior, including but not limited to that which
has been defaced or caused through normal wear and tear, improper shipping and handling,
or the use of chemical cleaning agents.
Any defects caused or repairs required as a result of damage caused by any external or
environmental conditions, including but not limited to, the use of incorrect voltage,
fluctuations or surges in transmission line/power line voltage, liquid spillage, or acts of nature
or God.
Warranty claims for Products returned with the altered, illegible, or missing model, factory
serial number, and UL markings.
Any Products used for rental, business, or commercial purposes.
Any installation, consumer instruction, delivery, setup, adjustment, and/or programming
charges.
A Product that is not installed following installation instructions is included with the Product.
Any signal reception problems (including antenna-related problems), images “burnt” into the
screen, signal noise or echo, interference or other signal transmission or delivery problems,
availability of third-party provided services or content (including, without limitation, image,
audio or video content).
No other entity other than Sylvox is authorized to extend, enlarge or transfer this warranty on
behalf of Sylvox.
The express warranties in this limited warranty are, in lieu of and, except to the extent
prohibited by applicable law, Sylvox disclaims all other warranties and conditions, express or
implied, whether arising by law, statute, by course of dealing, or usage of trade, including,
without limitation, implied warranties or conditions of all claims, whether based in contract,
negligence, strict liability or otherwise. Some states do not allow the exclusion or limitation of
incidental or consequential damages, so the above limitation or exclusion may not apply to
you.
For any questions, feel free to contact us via service@sylvoxtv.com at any time!
*
*
English
English
(1)
1.
2.
3.
4.
5.
6.
7.
8.
(2)
(3)
(4)
(a)
(b)
(c)
(d)
(e)
( f )
Warranty Policy
When returning an item, please note the following:
Only items purchased directly from www.sylvoxtv.com and authorized resellers can be
returned, such as Amazon, Walmart, Newegg, Wayfair, Aliexpress, etc.
We will not accept any return requests for products purchased from unauthorized third-party
suppliers.
Customer must contact the original vendor with your order ID or purchase proof and the detail
of the product issue at service@sylvoxtv.com to request a return/refund/repair/replace before
returning products. Sylvox will provide you with the shipping label in the mail.
Sylvox are responsible for all return shipping costs for quality problem.
If there is no reason to return the product after installation and use, Sylvox shall have the right
to charge restocking fees of 20% of the product value. (Only accept applications for no reason
return within 7 days after arrival, and freight costs are the responsibility of the customer)
Ensure that the item(s) you are returning is repackaged in the original condition with all the
documentation and accessories that came with it.
If the returned product is not in original packaging: artificial damage causes to affect the
second sale, such as its appearance being damaged, the lack of accessories, etc., we will
deduct the corresponding expenses according to the situation.
We will handle your request once getting your returning item.
How to return a product for a refund? (30 days money-back guarantee)
To return an item to Sylvox, Please contact the Sylvox team at service@sylvoxtv.com to
submit an after-sales application, we will provide you with the shipping label in the mail.
Please include your original order number or order proof in the email and ensure that the item
is returned within 30 days. No refunds will be issued until the item is received in its original
packaging (with its documentation and accessories).
Refunds
Once we receive and verify the condition of your product, a refund is initiated. The way your
refund is processed depends on your original payment method.
For credit or debit cards, refunds will be back to the card-issuing bank within 7-10 business
days of receipt of the returned item. Please contact the card-issuing bank with questions
about when the credit will be posted to your account.
What does the warranty not cover?
The wrong way of use and improper repair by the user caused the failure or damage.
Failure or damage caused by transportation, moving, and falling after purchase.
Other unavoidable external factors cause failure and damage.
Improper use of the equipment caused by water or other solution of damage.
Failure caused by a lightning strike or other electric system reasons
Damage caused by using power supply other than specified voltage.
Warranty
Thank you for purchasing this Sylvox product. We are glad to offer 12 months free warranty for you.
If you have any questions, please contact us via our after-sales email or website for assistance.
Customer Service Support:
Pre-sale:support@sylvoxtv.com
After-sale:service@sylvoxtv.com
Marketing:marketing@sylvoxtv.com
Website: www.sylvoxtv.com
Service Hotline: +1(833)379-5869 (Monday-Friday,9:00AM-5:00PM EST)
32 33
This manual suits for next models
1
Table of contents
Languages:
Other Sylvox TV manuals