Symmons Evolution EVOFR200KIT User manual

Evolution
Symmons Industries, Inc. ■31 Brooks Drive ■Braintree, MA 02184 ■Phone: (800) 796-6667 ■ Fax: (800) 961-9621
Copyright © 2022 Symmons Industries, Inc. ■symmons.com ■gethelp@symmons.com ■ZV-3701 REV 0 ■ 121322
EVOFR200KIT, EVOFR300KIT, EVOFR500KIT,
EVOFR800KIT
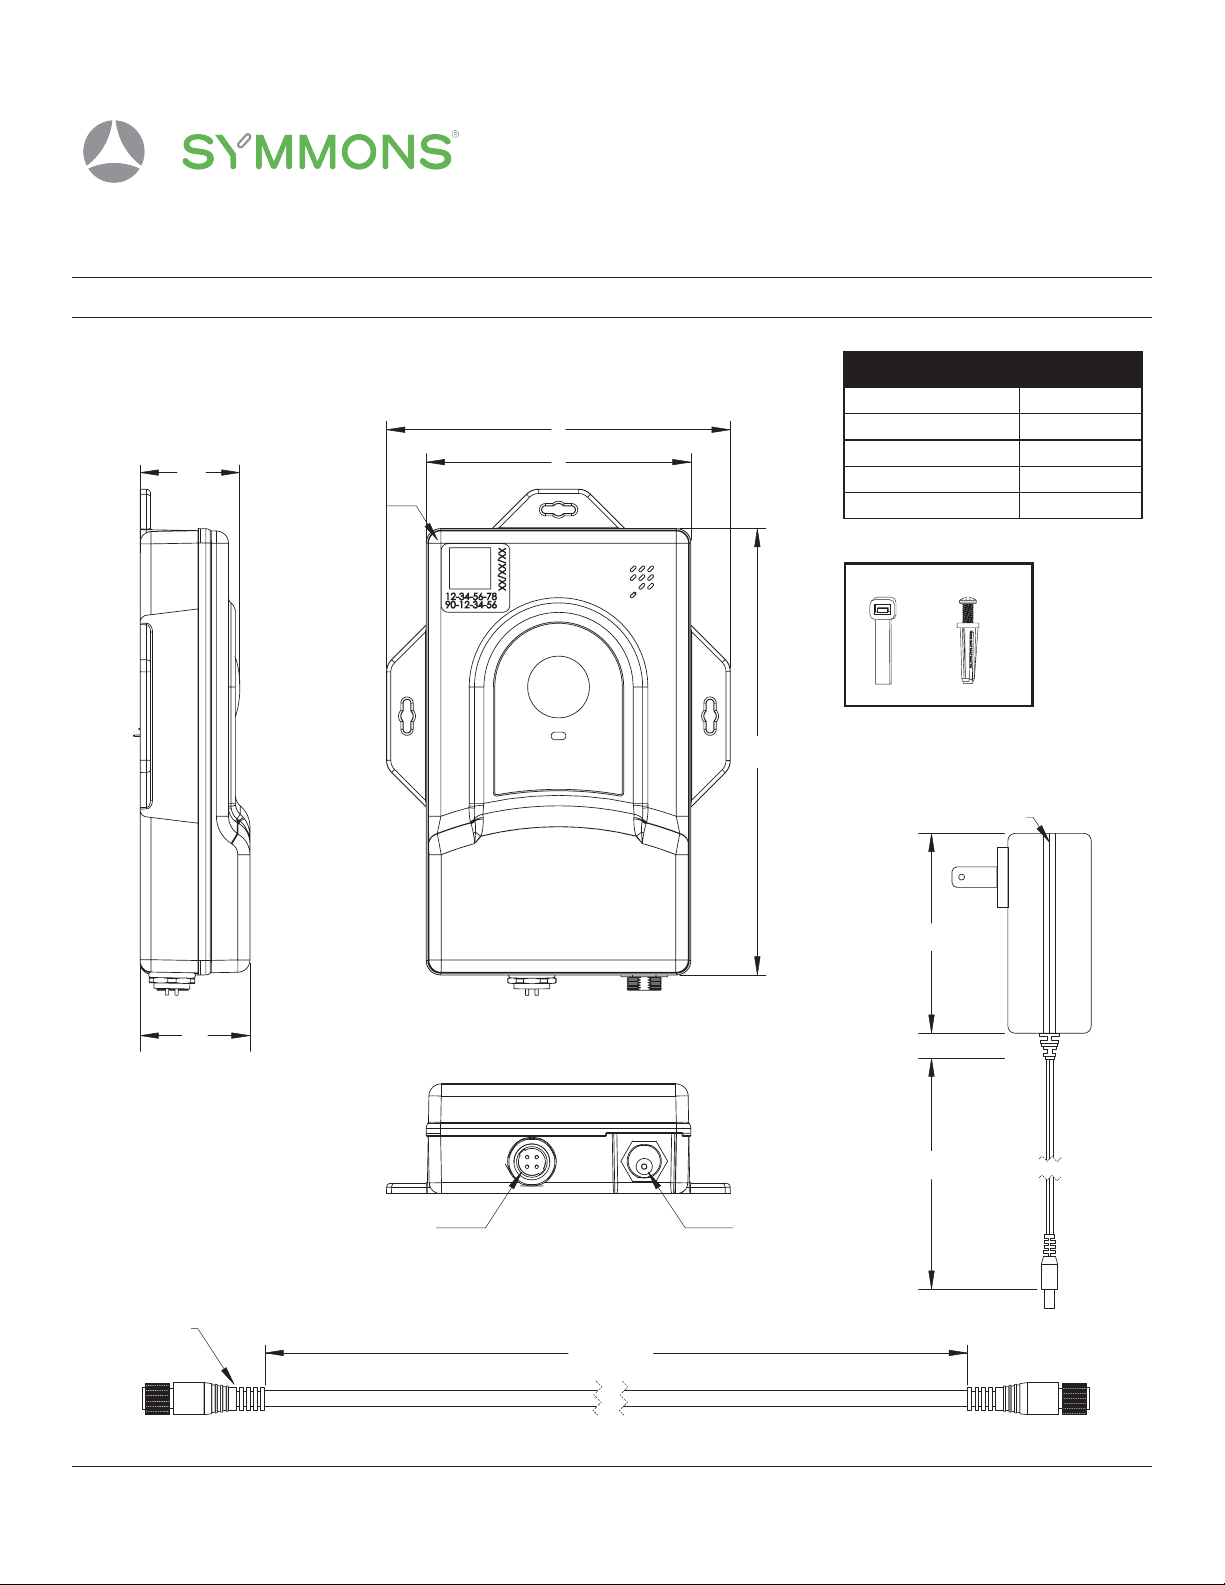
Evolution Flow Sensor Module, Clamp-on Meter
Installation Guide
Model Numbers Feature Highlights
☐EVOFR200KIT FLOW SENSOR, Clamp-on Meter,
1-1/2 to 2"
☐EVOFR300KIT FLOW SENSOR, Clamp-on Meter,
2-1/2 to 3"
☐EVOFR500KIT FLOW SENSOR, Clamp-on Meter,
4" to 5"
☐EVOFR800KIT FLOW SENSOR, Clamp-on Meter,
6" to 8"
• Flow Sensor Meter
• 24V DC Power Supply 60"
• 30 Foot M12 Cable
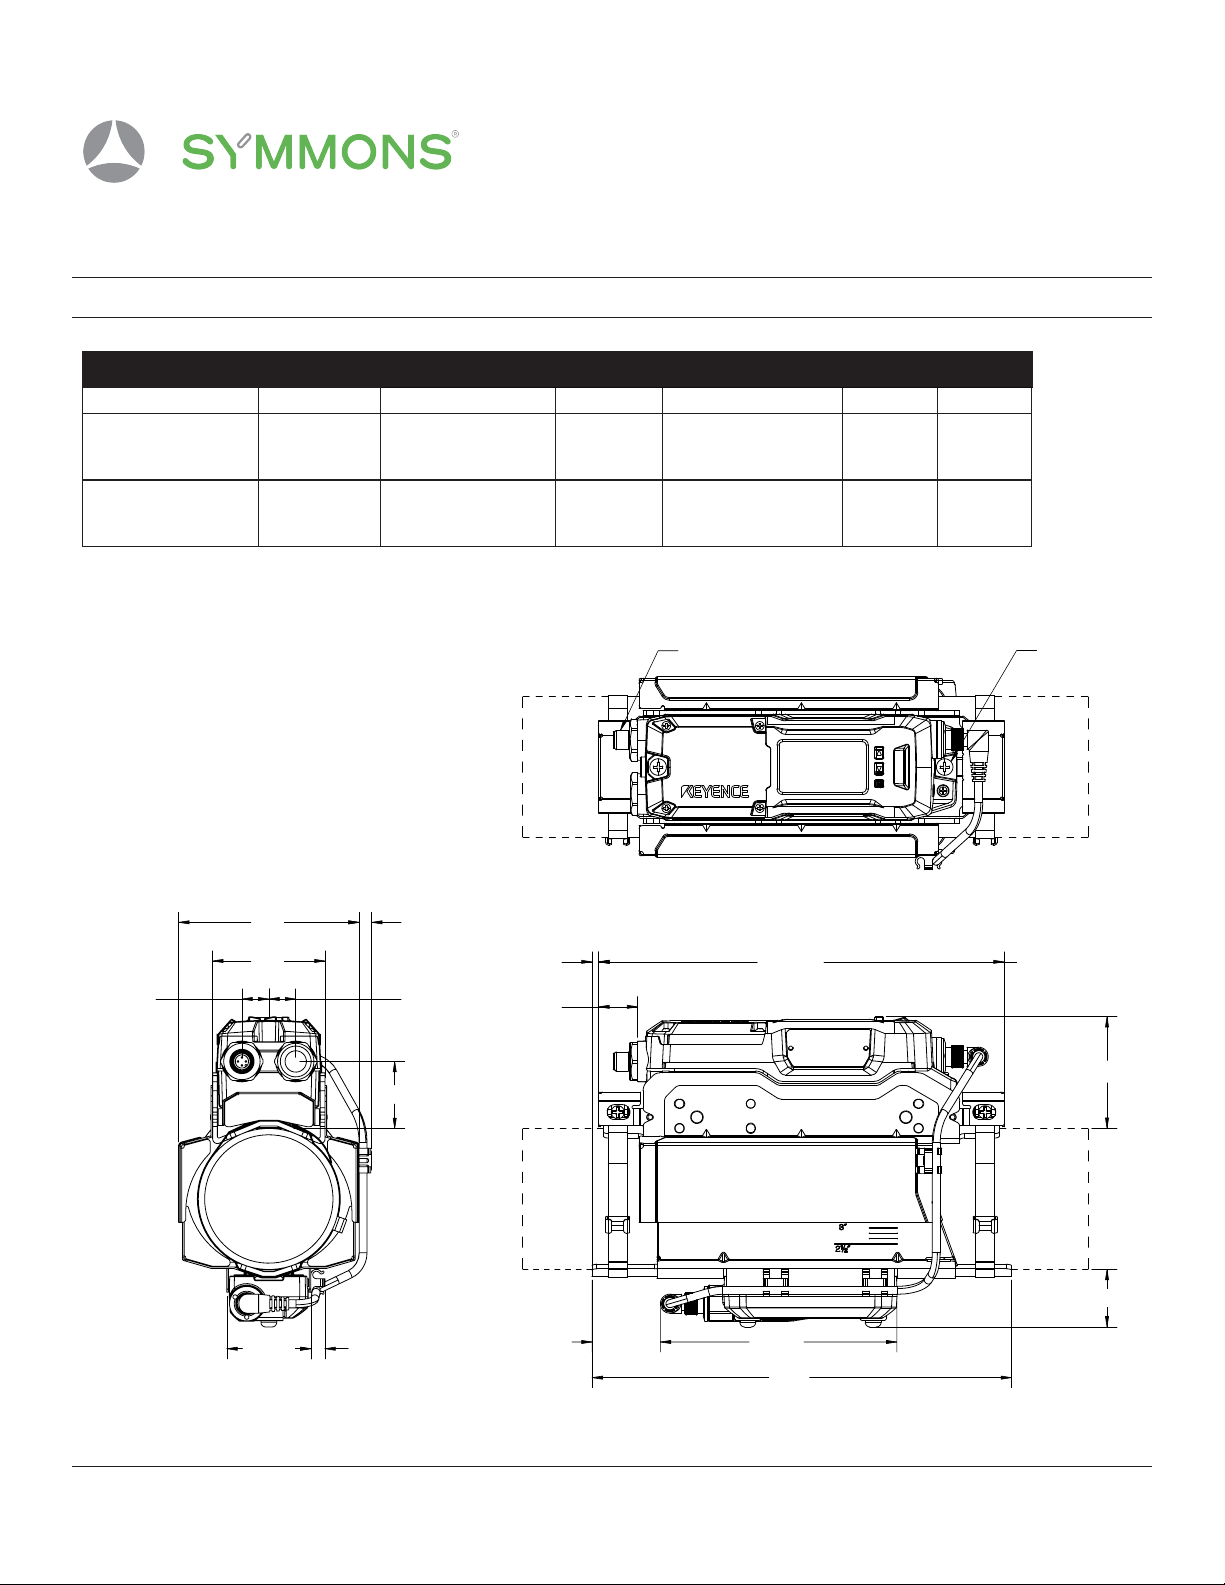
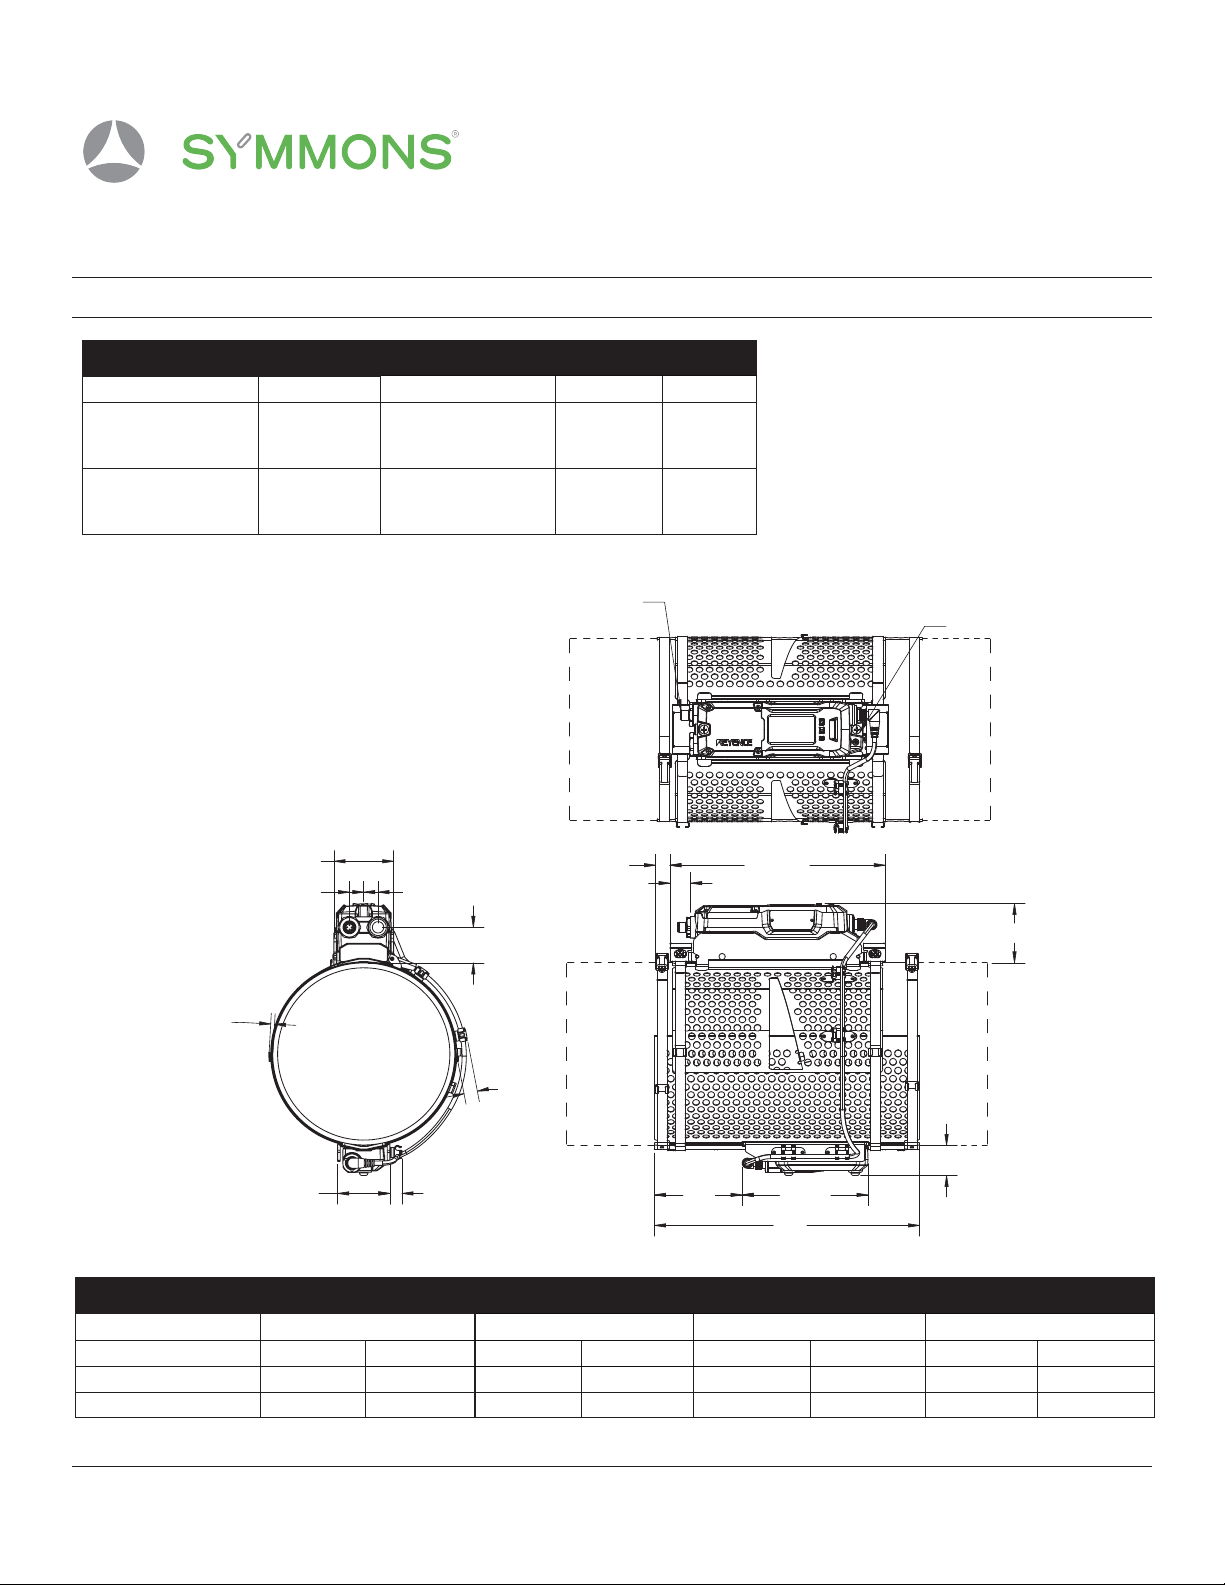
• Clamp-On Meter - Pipe Sizes ranging from 1-1/2" to
8" - Please see "Supported Pipe Diameter" Chart on
dimension page for appropriate sizing.
Location:
Compliance
Limited Lifetime - to the original end
purchaser in consumer/residential
installations.
10 Years - for commercial/industrial
installations. Refer to
www.symmons.com/warranty for
complete warranty information.
Warranty
Symmons Evolution EVOFR200KIT, EVOFR300KIT, EVOFR500KIT, EVOFR800KIT Includes flow sensor module, 24 V
DC power supply, 30 foot M12 cable, and clamp-on meter (pipe sizes ranging from 1-1/2” to 8”). 10 Year Commercial
Warranty. FCC rules compliant.
Architectural/ Engineering Specification
Repair Parts
☐EVOAPWR24 Replacement Power Supply
24VDC
• IC: 24889-WW08189
• FCC ID: 2ASQP-WW08189
This device complies with part 15 of the FCC Rules.

Evolution
Symmons Industries, Inc. ■31 Brooks Drive ■Braintree, MA 02184 ■Phone: (800) 796-6667 ■ Fax: (800) 961-9621
Copyright © 2022 Symmons Industries, Inc. ■symmons.com ■gethelp@symmons.com ■ZV-3701 REV 0 ■ 121322
EVOFR200KIT, EVOFR300KIT, EVOFR500KIT,
EVOFR800KIT
Dimensions - Flow Sensor (Included in Kit)
A
C
D
E
PCBA Plug
30 Feet
M12
Power Jack
B
1-11/16”
60”
Power Supply
24C DC
Evolution Sensor
Module
Measurement
A1-7/16"
B1-5/8"
C5"
D3-7/8"
E6-1/2"
X 4
X 12
Mounting Hardware

Evolution
Symmons Industries, Inc. ■31 Brooks Drive ■Braintree, MA 02184 ■Phone: (800) 796-6667 ■ Fax: (800) 961-9621
Copyright © 2022 Symmons Industries, Inc. ■symmons.com ■gethelp@symmons.com ■ZV-3701 REV 0 ■ 121322
EVOFR200KIT, EVOFR300KIT, EVOFR500KIT,
EVOFR800KIT
M6 x 2
M12 Connector
11/16"
11/16"
1-11/16"
3/8”
2-1/16”
1”
A C
D
E
F
B
10- 1/16"
1-7/16”
2-3/4”
Clamp on Meter Dimensions (mm)
Model A B C D E F
EVOFR200KIT 76mm 71mm 0mm -7.9 to -1.1
1-1/2" (40A): -2.6
2" (50A): -6.7 (4.4) 247mm
EVOFR300KIT 114mm 73mm 7.9mm -1.6 to 14.1
2-1/2" (65A): 9.3
3" (80A): 4.3 (43.2) 265mm
* The Correct Orientation is one in which the upper bracket is to the right of the lower bracket
Dimensions - EVOFR200KIT & EVOFR300KIT Clamp On Meter (Included in Kit)

Evolution
Symmons Industries, Inc. ■31 Brooks Drive ■Braintree, MA 02184 ■Phone: (800) 796-6667 ■ Fax: (800) 961-9621
Copyright © 2022 Symmons Industries, Inc. ■symmons.com ■gethelp@symmons.com ■ZV-3701 REV 0 ■ 121322
EVOFR200KIT, EVOFR300KIT, EVOFR500KIT,
EVOFR800KIT
Dimensions - EVOFR500KIT & EVOFR800KIT Clamp On Meter (Included in Kit)
2- 13/16"
11/16" 11/16"
1- 11/16"
5/8”
3/16"
A
B
D
C
9/16"
1- 3/8"
2- 3/4"
10- 1/16"
1”
5-7/8”
M6 X4
M12 Connector
Clamp on Meter Dimensions (mm)
Model A B C D
EVOFR500KIT 57mm 14.1 to 34.6
4" (100A): 29
5" (125A): 19 76.9mm 306mm
EVOFR800KIT 62mm 17.1 to 42.9
6" (150A): 37.6
8" (200A): 18.5 56mm 315mm
Supported Pipe Diameter
Model EVOFR200KIT EVOFR300KIT EVOFR500KIT EVOFR800KIT
Outer Diameter (mm) Ø44 to Ø55 Ø55 to Ø64 Ø64 to Ø83 Ø83 to Ø100 Ø100 to Ø127 Ø127 to Ø152 Ø152 to Ø191 Ø191 to Ø220
NPS (Nominal Pipe Size) 1-1/2" 2" 2-1/2" 3" 4" 5" 6" 8"
DN (Diameter Nominal) 40 A 50 A 65 A 80 A 100 A 125 A 150 A 200 A
* The Correct Orientation is one in which the upper bracket is to the right of the lower bracket

Evolution
Symmons Industries, Inc. ■31 Brooks Drive ■Braintree, MA 02184 ■Phone: (800) 796-6667 ■ Fax: (800) 961-9621
Copyright © 2022 Symmons Industries, Inc. ■symmons.com ■gethelp@symmons.com ■ZV-3701 REV 0 ■ 121322
EVOFR200KIT, EVOFR300KIT, EVOFR500KIT,
EVOFR800KIT
Installation Training Checklist
Setup Custom on Evolution App
Install Gateway
Install Temperature Sensor
Install Pipe Clamp-On Flow Sensor
Configure System
1. Open the Box and Find a location to plug in the Gateway
2. Unpack, assemble, and plug Gateway to 120VAC Supply
3. Creates and Configure Customer Property
4. Creates Customer account and send Email Invitation
5. Customer Logs into water.symmons.com
6. Download the Evolution App for iOS or Android and Sign-In
7. Scan Gateway QR Code and Complete App Steps
8. Plug a Temperature Probe into a Sensor Module and Turn ON
9. Install Temperature Sensor
10. Scan Temperature Sensor Module and Complete App Steps
11. Plug Clamp-on Keyence Sensor Probe into Sensor Module and plug power supply
into a 120VAC outlet
12. Install Clamp-on Flow Sensor onto pipe
13. Scan Sensor Module and Complete App Steps
14. Setup Other Users
15. Configure Alerts
16. Set Meeting for System follow-up (1-2 weeks from Training)

Evolution
Symmons Industries, Inc. ■31 Brooks Drive ■Braintree, MA 02184 ■Phone: (800) 796-6667 ■ Fax: (800) 961-9621
Copyright © 2022 Symmons Industries, Inc. ■symmons.com ■gethelp@symmons.com ■ZV-3701 REV 0 ■ 121322
EVOFR200KIT, EVOFR300KIT, EVOFR500KIT,
EVOFR800KIT
A. Locate Gateway, Power
Adapter, (1x) Thin Antenna,
(2x) Wide Antennas
B. Connect Antennas and Pow-
er Adapter to the back of
the Gateway
Install Gateway
1. Location
1. Connect Gateway Hardware
Mechanical Room Admin. Oce Front Desk
Find a central location for the Gateway. Location should be a secure area not enclosed
in metal. Recommended locations include:
Note: After plugging the Gateway power adapter into an outlet, it could take a few minutes to boot up.

Evolution
Symmons Industries, Inc. ■31 Brooks Drive ■Braintree, MA 02184 ■Phone: (800) 796-6667 ■ Fax: (800) 961-9621
Copyright © 2022 Symmons Industries, Inc. ■symmons.com ■gethelp@symmons.com ■ZV-3701 REV 0 ■ 121322
EVOFR200KIT, EVOFR300KIT, EVOFR500KIT,
EVOFR800KIT
Customer App Setup
1. Create and Configure Customer Property
2. Create Customer account & send Email Invitation
3. Customer Logs into water.symmons.com
4. Download the Evolution App for iOS or Android and Sign-In
5. Scan Gateway QR Code and Complete In-app Steps
Scan the Provided QR Code with your
Smartphone or camera to download the
evolution App.

Evolution
Symmons Industries, Inc. ■31 Brooks Drive ■Braintree, MA 02184 ■Phone: (800) 796-6667 ■ Fax: (800) 961-9621
Copyright © 2022 Symmons Industries, Inc. ■symmons.com ■gethelp@symmons.com ■ZV-3701 REV 0 ■ 121322
EVOFR200KIT, EVOFR300KIT, EVOFR500KIT,
EVOFR800KIT
Installation - Pipe Clamp-On Flow Sensor
1. Setup Custom on Evolution App
2. Find the best location to mount.
Tools Required
•Philips-head screwdriver
•The pipe measuring kit include in welcome pack
•Measuring tape to check mounting clearances
A. Determine which sensor for your pipe size,
A. The sensor connects to the module box with either a 10-foot or 30-foot
cable and the module box has a 4-foot power cable that must be plugged
into an electrical outlet.
B. Select a section of a straight pipe that is clean with no insulation, rust, or
seams. If there is insulation on the pipe, cut away a space slightly larger
then the sensor.
C. Look for a pipe that is horizontal or is vertical with an upward flow
D. There are two dierent types of brackets. FD-Q for smaller pipes and FD-R
for larger pipes.
Supported Pipe Diameter
Model EVOFR200KIT EVOFR300KIT EVOFR500KIT EVOFR800KIT
Outer Diameter (mm) Ø44 to Ø55 Ø55 to Ø64 Ø64 to Ø83 Ø83 to Ø100 Ø100 to Ø127 Ø127 to Ø152 Ø152 to Ø191 Ø191 to Ø220
NPS (Nominal Pipe Size) 1-1/2" 2" 2-1/2" 3" 4" 5" 6" 8"
DN (Diameter Nominal) 40 A 50 A 65 A 80 A 100 A 125 A 150 A 200 A

Evolution
Symmons Industries, Inc. ■31 Brooks Drive ■Braintree, MA 02184 ■Phone: (800) 796-6667 ■ Fax: (800) 961-9621
Copyright © 2022 Symmons Industries, Inc. ■symmons.com ■gethelp@symmons.com ■ZV-3701 REV 0 ■ 121322
EVOFR200KIT, EVOFR300KIT, EVOFR500KIT,
EVOFR800KIT
Installation - Pipe Clamp-On Flow Sensor EVOFR200KIT & EVODFR300KIT
3. Mounting EVOFR200KIT and EVOFR300KIT
A. Determine the installation orien-
tation of the lower bracket. The
orientation of the main unit’s
display is determined by the in-
stallation orientation of the lower
bracket.
B. Attach the lower bracket and the
upper bracket so that they are
pressed against the pipe, and
then use the metal belts to lightly
fix these brackets in place.
C. Adjust the position of the upper bracket to align the alignment guide with the
lower bracket.
D. Adjust the position of the upper
bracket so that the scale posi-
tion is the same on the left and
right.

Evolution
Symmons Industries, Inc. ■31 Brooks Drive ■Braintree, MA 02184 ■Phone: (800) 796-6667 ■ Fax: (800) 961-9621
Copyright © 2022 Symmons Industries, Inc. ■symmons.com ■gethelp@symmons.com ■ZV-3701 REV 0 ■ 121322
EVOFR200KIT, EVOFR300KIT, EVOFR500KIT,
EVOFR800KIT
Installation - Pipe Clamp-On Flow Sensor EVOFR200KIT & EVODFR300KIT (Cont'd)
E. Firmly tighten the metal belt screws and close the screw covers
F. Fix the main unit in place on the
upper bracket.
G. Connect the unit connection cable to
the main unit and subunit. Fix the unit
connection cable to the cable holders.

Evolution
Symmons Industries, Inc. ■31 Brooks Drive ■Braintree, MA 02184 ■Phone: (800) 796-6667 ■ Fax: (800) 961-9621
Copyright © 2022 Symmons Industries, Inc. ■symmons.com ■gethelp@symmons.com ■ZV-3701 REV 0 ■ 121322
EVOFR200KIT, EVOFR300KIT, EVOFR500KIT,
EVOFR800KIT
Installation - Pipe Clamp-On Flow Sensor EVOFR500KIT & EVODFR800KIT
3. Mounting EVOFR500KIT and EVOFR800KIT
A. Determine the installation orien-
tation of the lower bracket. The
orientation of the main unit’s
display is determined by the in-
stallation orientation of the lower
bracket.
B. Use the metal belt to attach the
lower bracket to the pipe.
D. Adjust the position of the upper bracket so that the scale position is the same
on the left and right. Firmly tighten the metal belt screws
C. Attach the upper bracket so that the
left and right alignment guides are
aligned with the upper bracket.

Evolution
Symmons Industries, Inc. ■31 Brooks Drive ■Braintree, MA 02184 ■Phone: (800) 796-6667 ■ Fax: (800) 961-9621
Copyright © 2022 Symmons Industries, Inc. ■symmons.com ■gethelp@symmons.com ■ZV-3701 REV 0 ■ 121322
EVOFR200KIT, EVOFR300KIT, EVOFR500KIT,
EVOFR800KIT
Installation - Pipe Clamp-On Flow Sensor EVOFR500KIT & EVODFR800KIT (Cont'd)
E. Close the screw covers and fix the main unit in place on the upper bracket.
F. Connect the unit connection cable to the main unit and sub unit and fix the
cable to the cable holders.

Evolution
Symmons Industries, Inc. ■31 Brooks Drive ■Braintree, MA 02184 ■Phone: (800) 796-6667 ■ Fax: (800) 961-9621
Copyright © 2022 Symmons Industries, Inc. ■symmons.com ■gethelp@symmons.com ■ZV-3701 REV 0 ■ 121322
EVOFR200KIT, EVOFR300KIT, EVOFR500KIT,
EVOFR800KIT
Installation - Pipe Clamp-On Flow Sensor & Module (Cont'd II)
4. Mounting Sensor Module
A. These modules have a 4-foot
power cord so find a location
that is within reach where the
box will be accessible and visi-
ble. The boxes are splash proof
but not waterproof so find a dry
place.
B. The modules can be mounted
by either screwing it into a wall
or but using cable ties to at-
tach them to an insulated pipe,
bracket, or hanger.
C. Plug the cable from the flow
sensor into the sensor module.
Once the connector is plugged
in, spinning the locking ring until
it locks into place.
4. Sensor Module App Setup
A. Scan Sensor Module QR Code
B. Complete App Steps
This manual suits for next models
3
Other Symmons Accessories manuals
Popular Accessories manuals by other brands

Omron
Omron ZFV Series user manual

I-note
I-note Mobile Note Taker Pro user guide

Barton
Barton 96078 Owner's manual and safety instructions

MAMAC SYSTEMS
MAMAC SYSTEMS HU-224 technical information

Dometic
Dometic CB40 operating manual

ABC Spa Cover Removal
ABC Spa Cover Removal Universal Spa Cover Lifter Directions for assembly and use