Synaps 15? LCD Touch Screen Monitor Instruction Manual

15˝ LCD Touch Screen Monitor
Installation & User’s Manual
All brand names and trademarks are the property of their respective owners
* Important Notice: Please read this manual carefully

2
Table of Contents
Precautions......................................................................................................................................3
Package Contents ...........................................................................................................................4
Hardware Setup ...............................................................................................................................4
Installation .......................................................................................................................................5
Quick Installation Guide for Touch Screen ................................................................................6-7
Calibration for Touch Screen ......................................................................................................8-9
Mouse Emulator ............................................................................................................................10
Menu Control Buttons................................................................................................................... 11
OSD Menu Mode............................................................................................................................12
Display Modes ...............................................................................................................................13
Securing Monitor to a Surface .....................................................................................................13
Specifications ................................................................................................................................14
Troubleshooting ............................................................................................................................15
Maintaining Your Monitor..............................................................................................................16
FCC and CE Radiation Norm........................................................................................................17

3
Precautions
1. Read all of these instructions and save this manual for later use.
2. Follow all warnings and instructions on the product.
3. Do not cover or block the ventilation holes in the case.
4. Do not insert sharp objects or spill liquid into the LCD monitor through the cabinet slots; this may
cause accidental fire, electric shock or failure.
5. Unplug the unit when not in use for an extended period of time.
6. Unplug the unit from power outlet before cleaning.
7. Do not attempt to service this product yourself, as opening or removing the cover may expose you
to potential electric shock. Only a qualified technician should service this product.
8. Keep the monitor away from extreme heat, cold or humid places.
9. Do not place directly under sunlight, dusty surroundings or near equipment, which may generate
strong magnetic fields.
10.Do not place any object on the power cord.
11.To avoid danger of the monitor falling and possibly causing injury and/or serious damage to the
monitor, do not place this monitor on an unstable or uneven surface.
12.Please wait at least 2 seconds between switching the monitor ON/OFF.

4
Package Contents
15” Touch Screen LCD Monitor
External Univ15 pin D-sub
(RGB Analog) input signal cable
Audio connector : stereo
Phone Jack
Power Cord
USB Cable
User’s Manual
& Driver CD
Screws & Washers
Hardware Setup
Handle the LCD monitor with care. Turn off the LCD’s and PC’s power before beginning setup. Follow the installation
instructions step by step.
Inputs
NO. Terminal Function
AC Input To connect the power cord
VGA In To PC VGA connector
Audio To PC Audio output
USB To connect the USB cable

5
Installation
Important note for Windows User’s
Before attaching your new LCD monitor to your computer, please make sure that your resolution and refresh rates are set
correctly in order that your monitor works properly. The recommended resolution is 1024 x 768 at 75Hz. You can adjust
these settings by right clicking your desktop, select “Properties”, then “Settings”. To adjust the refresh rate, click on
“Advanced” and search for this option.
Video card settings will be different based on the video capability of your computer. Please consult your video graphics card
or computer manual for information in regards to this.
Hardware Installation
Remove neck and conduit covers. Secure USB cable, audio cable, and VGA cable by threading through cable
management plug. Then run all cables through conduit in through neck and then replace the neck and conduit covers.
1. Position your touch screen LCD monitor so that you can see all of the connection ports on the bottom of the monitor.
2. Plug one end of the D-Sub signal cable into the VGA connector on the monitor and plug the other end of the cable into
the 15-pin D-Sub connector at the rear of your PC. Make sure that all of the screws are hand-tightened securely.
3. Plug the Audio connector to the Audio In port on the monitor, and to the computer line out at the rear of your PC. This
is optional if you wish to use a different audio source.
4. Plug the power connector to the AC In port port at the rear of the monitor.

6
5. Plug the USB cable to the USB In port port at the rear of the monitor.
6. Power on the computer and the monitor.
Quick Installation Guide for Touch Screen Monitor Driver
The Driver CD included with your Touch Screen monitor supports the following operating systems: Windows 98 SE, ME, 2000,
XP, and iMac.
Follow these steps to install the Touch Screen Driver.
1. Place the Driver CD into the CD-ROM drive.
2. Allow the Driver CD to auto-run, if it doesn’t run automatically you may browse the Driver CD manually (by clicking on
Start -> Run and select your CD-ROM drive) and select the corresponding operating system on your computer. Double
click on Setup.exe, and Windows will start to run the installation program. (Note: You must have the USB cable plugged
into the system before the installation has been completed.)
Allow the Driver CD to auto-run.

7
Or click on Start -> Run to browse the Driver CD. Browsing the Driver CD and selecting Setup.exe.
3. Click on the [Next >] button to continue installation.
Installing the setup program.
4. You will be prompted with the check box for the PS/2 touch controller is to be installed. Leave the checkbox unchecked.
Then Press [Next >] to continue installation.
Leave the PS/2 checkbox unchecked.

8
5. Select the appropriate folder where set-up files will be installed. Then Press [Next >] to continue installation.
Choosing the destination location. Selecting the program folder.
6. Windows will copy the driver files to your hard drive and the setup is complete. It will request for you to re-boot the
computer. Press [Yes >] to re-boot immediately or [No >] to re-boot later. The installation will not be finished until you
re-start the system.
7. The Driver Setup is now complete. After completion of the Touch Screen Driver installation, the USB monitor device will
be found automatically as soon as it is plugged into the computer. You will then be able to see the new device on the
application program window. The program will disable the USB Device automatically as soon as it is unplugged from your
computer.
Calibration Guide for Touch Screen Monitor
Basic 4 point Touch Screen Monitor Calibration process
1. After the Driver has been installed correctly The Touch Screen monitor panel has to be calibrated before the touch screen
panel will work correctly with your computer.
2. To do this open the Touch Kit software which can be found in the Program Files or by double clicking the icon on the
desktop, click on the “Tools” tab and press on the “4 Point Calibration” button, a new window will pop-up showing you
the guide in order to perform the 4 point calibration process (as shown below).
Calibrating the Touch Screen

9
3. Please follow the guide on your monitor screen to touch and hold the blinking Xsymbol in the calibration window until it
stops blinking. This will assure that the utility can gather essential location data for computation to take place. You may
notice that a time line bar is shown in the bottom of the window to indicate the time elapsed from the moment you touch
the X. If you do not touch the X on the screen before the time line bar finishes going from left to right across the bottom of
the screen the calibration task will be terminated and you will have to repeat this step.
4. If during regular touch screen operation you see that the location of the touch spot is lost, you can re-calibrate the monitor
using this process.
Touch the blinking symbol on the panel until it beeps or stops blinking.
Touch Screen Monitor Linearization process
1. We suggest that you use the 9 or 25 point Linearization Style function if you plan to use a commercial software application,
to assure the most accurate performance of the monitor to the touch points on the screen.
2. The Linearization (9 or 25 points calibration) function is used to coordinate the Touch screen horizontally and vertically
across the monitor screen. After the linearization process is completed, the linearity of the touch screen will be shown in
the Linearity curve window.
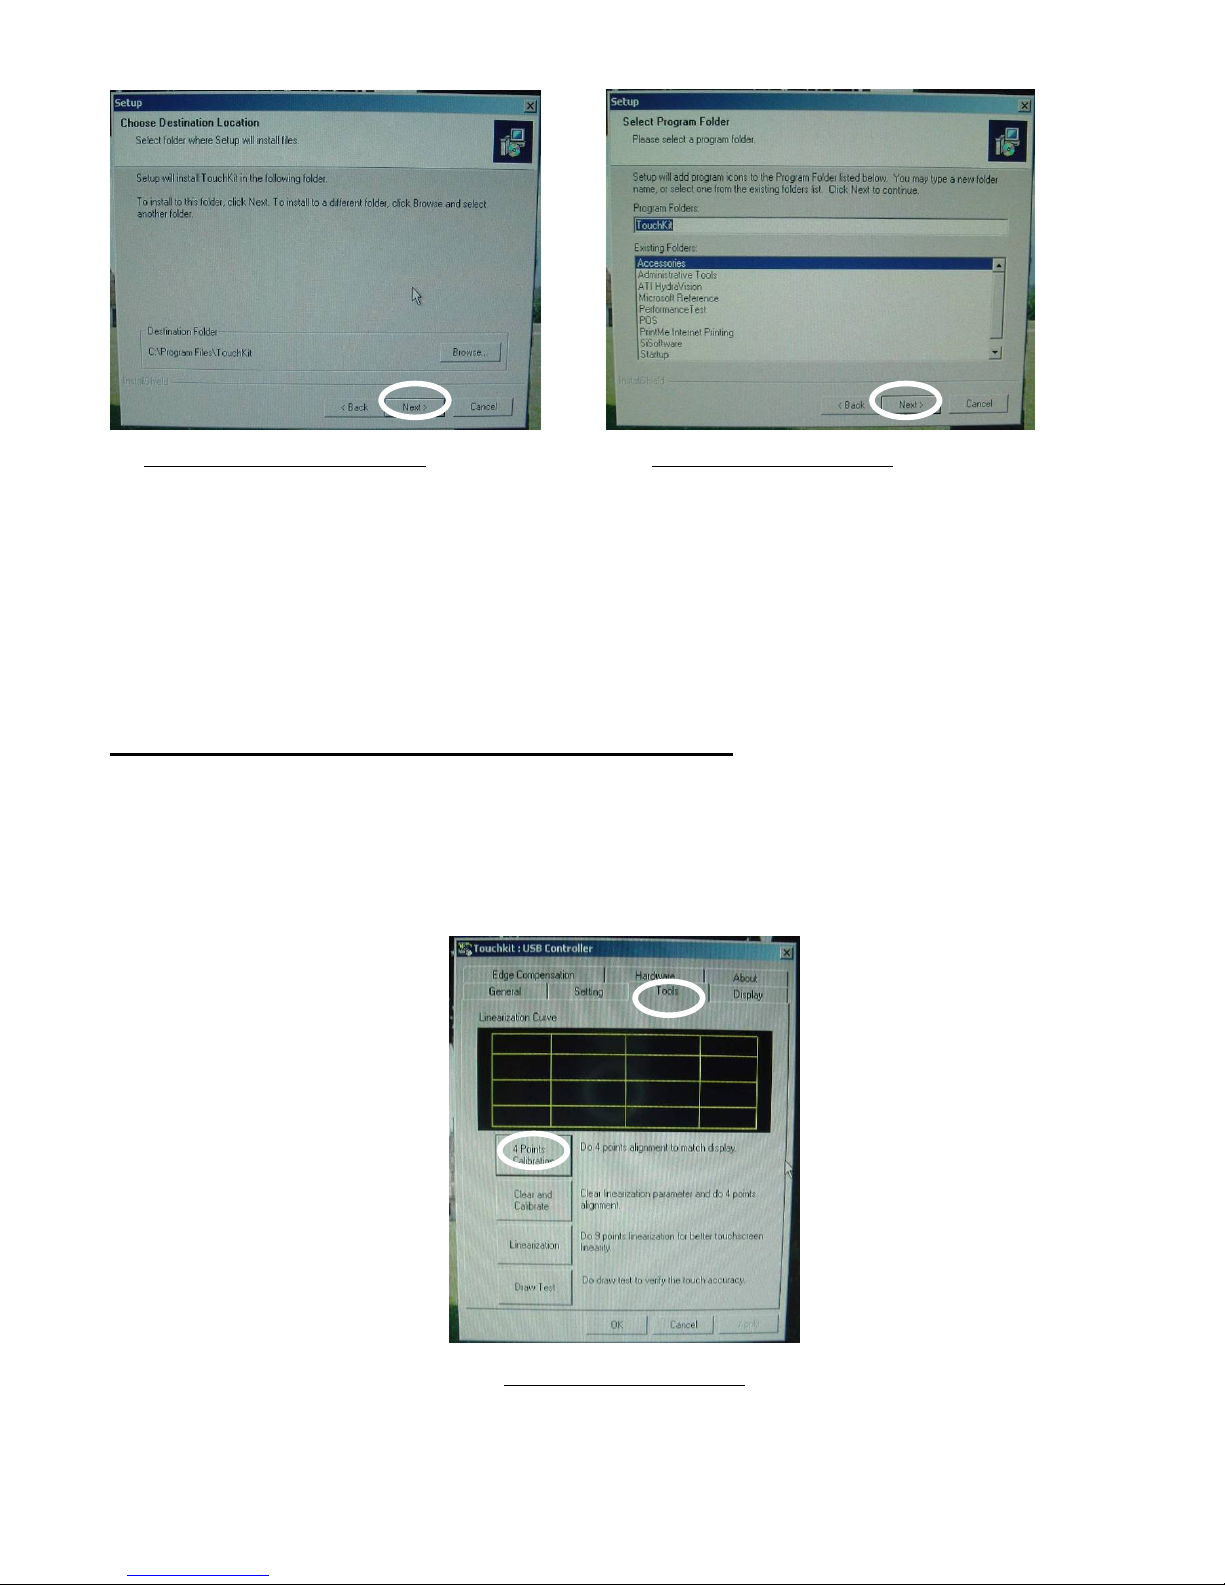
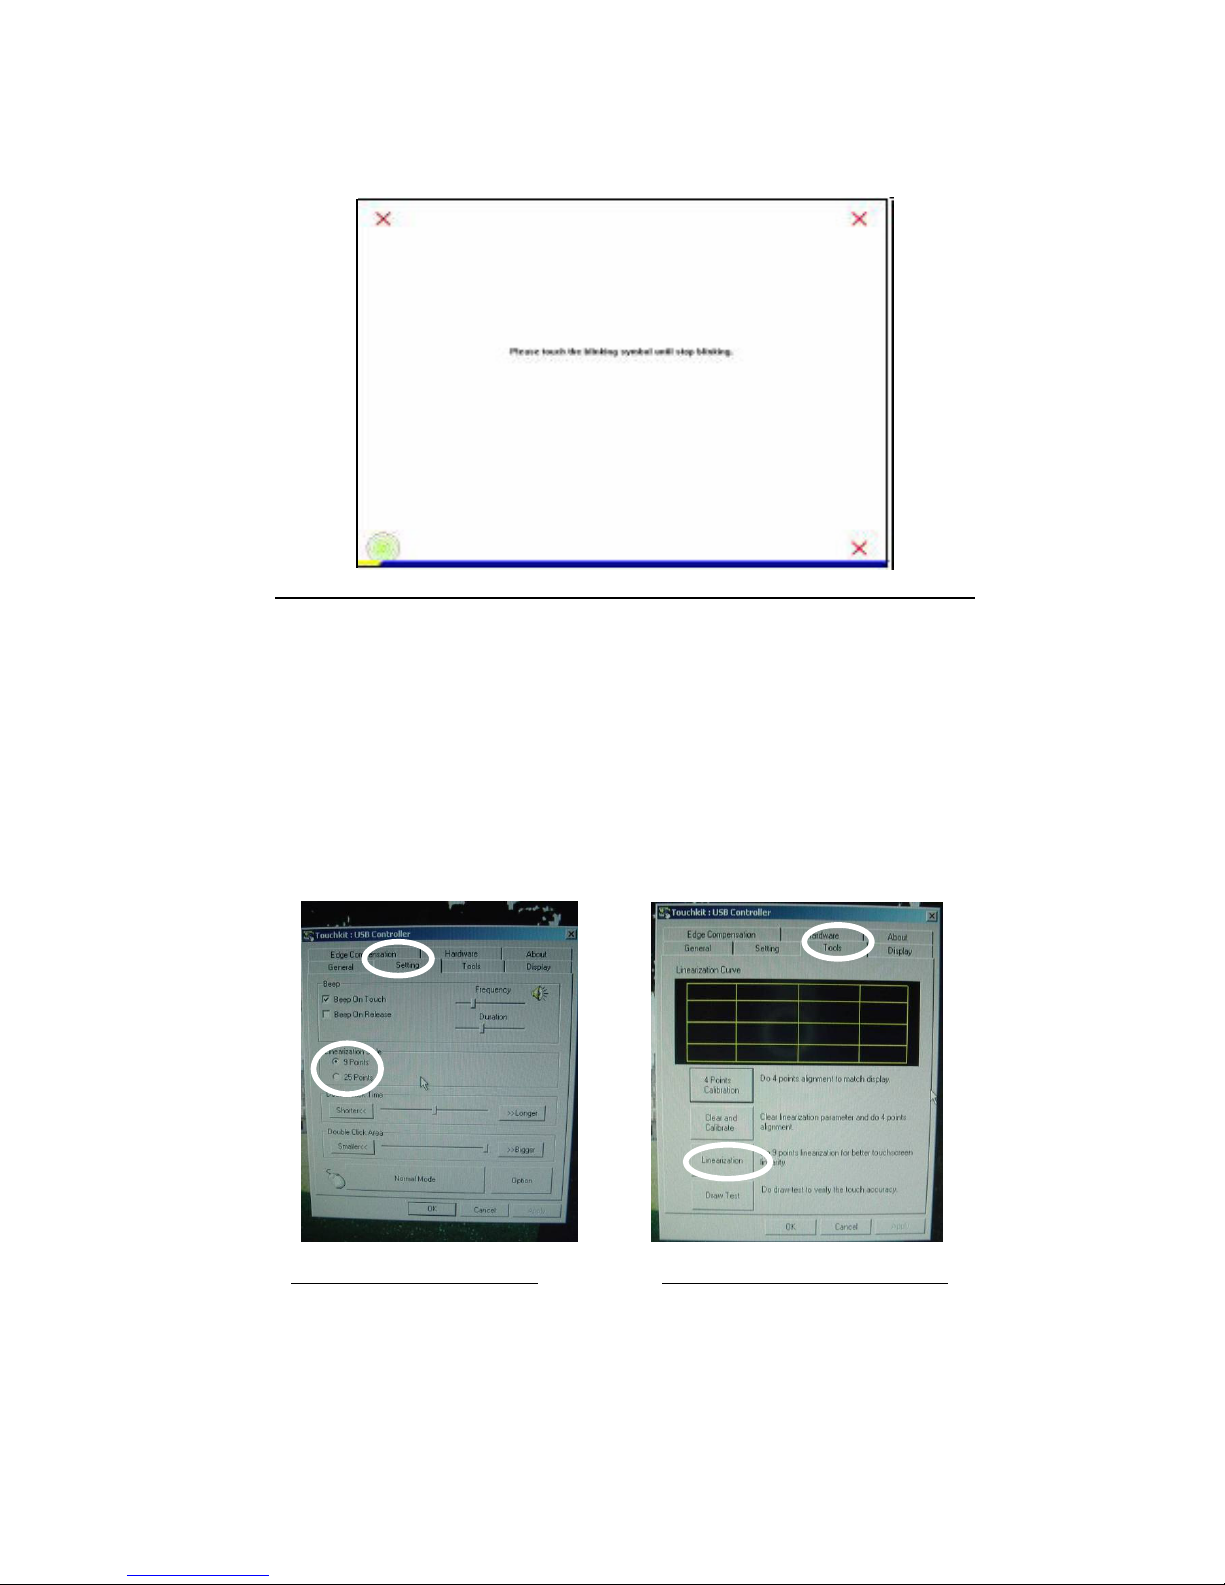
3. To select the 9 or 25 point calibration open the Touch Kit software, click on the “Settings” tab select the linearization style
of 9 or 25 points and then click on the “Tools” tab and press on the “Linearization” button, a new window will pop-up
showing you the guide in order to perform the 9 or 25 points calibration process (as shown below).
Select the Linearization Style. Click on the “Linearization” button.
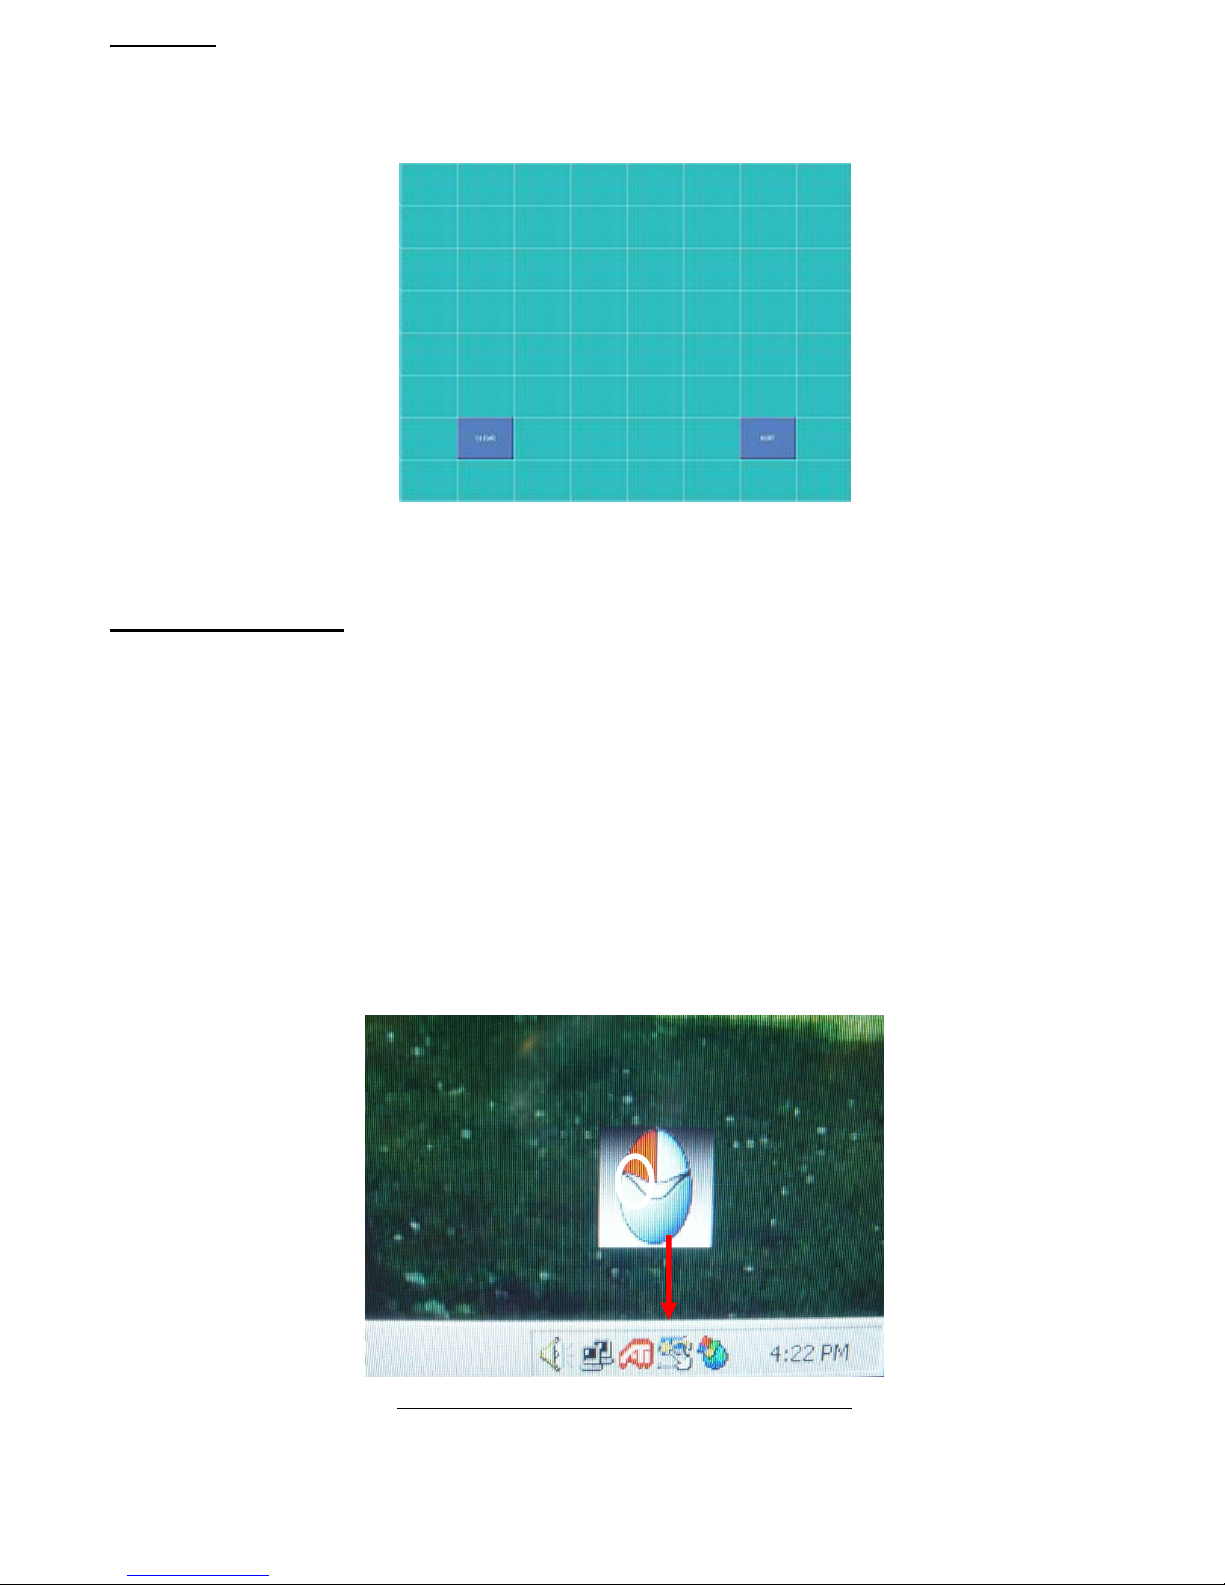
4. Pressing this button, a new window will pop-up at the location where the touch screen was mapped to show this area in
order to guide the user to perform the 25 point calibration. You should follow the guide to touch and hold the blinking X
symbol in the calibration window until it does not blink to make sure that the utility can gather enough data for computation.
In addition, a time line bar is shown at the bottom of the window to indicate time elapsed. If the touch screen was not
touched before the time line bar finishes moving from left to right , the calibration task will be terminated automatically.

10
Draw Test
This function is used for an accuracy and performance check. Draw straight lines with your finger tip to see if the
touch screen is recording your touch contact points in the exact location. If the location is off, please redo the
Linearization process. Press this button and a new pop up window will open in the location where the touch screen
was mapped to the touch system as below:
You can press the Clear Button to clear the window. Press the Quit Button to terminate the draw test. By using this test
window, you can verify the panel linearity, calibration capability, and drawing line quality.
Mouse Emulator
The Touch Screen driver emulates the function of a computer mouse left and right button click function. After installing the
touch panel driver, a Mouse Icon will appear on the computer monitor desktop.
1. You can change the right / left button by clicking the upper small rectangular box of the mouse icon. The Red area will show
you which button has been selected.
2. The Touch Screen driver also provides an option for advanced Mouse Emulation settings. When the user enables the “Auto
Right Button”, it will tell the driver to report a right click mouse event to the computer operating system when you hold your
touch until time has run out. You will no longer need to touch the right button in the Touch tray to activate a right click. This
feature allows you to perform a Right Click with greater ease on the Touch screen monitor.
3. To remove Mouse Emulator right click on TouchKit icon in the menu bar (see arrow) a menu will open. Uncheck the flag on
“Display Button” by clicking on it with your mouse. Menu will close. To return Mouse Emulator repeat process.
Selecting the mouse left and right button click function.

11
Menu Control Buttons
No. Symbol Function
A 1. Auto-adjust.
2. Move the selector highlight bar upward.
M
1. Open the OSD (On Screen Display).
2. Move the selector highlight bar downward.
POWER
1. Turns the power on / off.
2. LED indicator glows green when power is ON,
orange in stand by mode.
1. Decrease the value of the function selected.
+
1. Increase the value of the selected function.
Your monitor was designed with specialized control buttons located under the bezel to virtually reduce accidental resolution
resets and offsets during operation. To activate a button you must press firmly towards the back of the button where a small
brim is located.
•Press the “A” button to auto adjust horizontal and vertical position to default settings.
•Press the “M” button to display the OSD menu.
•Select the desired function menu, by pressing “A” or the “M” button.
•Push the “” or “+” button to increase or decrease the value and change the setting.
•The OSD menu will close automatically after 15 seconds of inactivity.
NO INPUT SIGNAL
If this warning appears,
1. Check the signal connection between the computer and LCD monitor.
2. Check the connector. If it is bent or damaged, the signal cable may be affected.
3. If the monitor is in “sleep” mode to save power, please move the mouse or press any key to “wake” it and return to
working mode.
4. Please check input diagrams, and make sure the monitor has been properly configured.
SIGNAL OUT OF RANGE
This warning indicates that the input signal frequency does not match those supported by this monitor. For this model,
horizontal frequency must be in the range of 31.46 ~ 80.00 KHz and vertical frequency in the range of 56.25~75.03 Hz.
Please make sure your input signal is within these ranges.

12
On Screen Display (OSD) Menu
Press the “M” button to access the OSD menu.
Select the desired function menu, by pressing “A” or the “M” button.
Use the “+” and “ ” buttons to adjust the selected setting’s value(s).
MISCELLANEOUS
CONTRAST Adjusts the difference between light and dark area.
PHASE Adjusts the phase of Phase Lock Loop of the Monitor.
CLOCK Adjusts the frequency of the Phase Lock Loop of the Monitor.
H-POSITION Adjusts the horizontal position of the display.
V-POSITION Adjusts the vertical position of display.
RESET Recalls the default setting.
COLOR TEMPERATURE
Adjusts the color temperature.
RED Adjusts the Red color temperature.
GREEN Adjusts the Green color temperature.
BLUE Adjusts the Blue color temperature.
LANGUAGE Selects the display language of the OSD Menu.
MISCELLANEOUS
“No” will take you to the exit menu. “Yes” will bring you to the sub menus
of the Miscellaneous menu.
EXIT OSD Saves and exit.
BRIGHTNESS Adjusts the brightness of the display.
RETURN Returns to the main menu.
OSD H-POSITION Adjusts the horizontal position of the OSD.
OSD V-POSITION Adjusts the vertical position of the OSD.
OSD DURATION Adjusts the duration of the OSD menu before the OSD closes
AUTO COLOR Adjusts the color automatically.
VOLUME Increases or decreases the sound volume.

13
Display Modes
Display Mode
Resolution Horizontal Frequency (KHz) Vertical Frequency (Hz)
640x480 31.47 59.94
640x480 37.86 72.81
640x480 37.50 75.00
800x600 35.16 56.25
800x600 37.88 60.32
800x600 48.08 72.19
800x600 46.88 75.00
720x400 31.47 70.09
1024x768 48.36 60.00
1024x768 56.48 70.07
1024x768 60.02 75.03
1. Windows® supports the above 11 compatible display modes. Any other mode may not be supported.
2. Interference on your screen while you are adjusting your PC or OSD settings is normal.
3. For optimal performance, please upgrade your video card driver (if available) and choose a mode listed in the
table above.
To Adjust Your Display Properties:
1. Set the resolution: Right click on the Windows® desktop, choose “Properties”, choose “Settings”, and then
Set the resolution
2. Set the refresh rate: See your video card’s user guide for instructions.
Securing Monitor to a Surface
Your monitor is equipped to be attached to a surface for the added benefits of security and to increase the
aesthetics of the workspace around the monitor.

14
Specifications
LCD Panel Type
Viewing Angle
Contrast Ratio
Brightness
Response Time
Display Colors
Max Resolution
Pixel Pitch
Aspect Ratio
15.0” TFT Active Matrix LCD Display
H:140°, V:130°
450 : 1 (Typical)
250 cd/m2(Typical)
8 ms
16.2M colors
1024 X 768
0.279mm(H)x0.279mm(V)
4 : 3
Input Signals RGB Analog
Sync TTL
Frequency FH:30~79KHz; FV:50~75Hz
Compatibility PC / MAC Up to1024 X 768 @75Hz(Non-interlaced)
Connector RGB Analog
Audio
Power
USB
D-sub 15-pins
Stereo Phone Jack,
External Universal AC Adaptor
USB Cable
Power Voltage
Consumption
Power saving mode
100-240V, 50/60Hz(universal)
Active < 30 Watt Max
Standby < 2 Watt
Internal Speaker x 2 (Stereo)
User Interface LED Indicator Active - Green
Off - Turn off
Standby - Orange
Operating Condition Temperature
Air Humidity
5°C~45°C
20% ~ 80% R.H.
Dimensions Physical 14.05”(W) x 13.54”(H) x 8.26”(D)
Net Weight 9.92 lbs
Power Management VESA DPMS
Regulation (Certifications) CE, FCC, UL

15
Troubleshooting
LCD Pixel Criteria
Normally, a 15" SXGA (1024 X 768) display has nearly 4 million sub-pixels. There may be up to 8 non-performing pixels on
the LCD screen, which is only 0.0002% of the total sub-pixels. This percentage is acceptable for any inspection
specifications.
1. Touch panel function will not respond
A. Make sure the Touch screen driver is installed into your PC system, and calibrate the Touch screen monitor before you use
it.
2. There is no picture on the screen
A. Power saving mode may be on. Press any key or move the mouse to deactivate this mode.
B. Signal cable connector pins may be damaged. If there are bent or missing pins consult the warranty information for Tech
Support information.
3. Missing Colors
A. If any of the red, green, or blue colors are missing, check the signal cable to make sure it is tightened securely at both
ends.
B. The pins in the cable could be loose and cause a bad connection. If there are bent or missing pins consult the warranty
card for Tech Support information.
4. No image
A. Make sure the power button is ON.
B. Check whether the LCD monitor and computer power cords are connected and that there is a supply of power.
5. Fuzzy image
A. Adjust the Phase through the OSD menu.
6. Image too bright / Image too dark
A. Adjust the Brightness and Contrast through the OSD menu.
7. Irregular image
A. Check the signal connection between the computer and LCD monitor.
B. Perform an Auto Adjust by pressing the Auto Adjust button.
8. Distorted image
A. Reset the LCD monitor by choosing the Recall function through the OSD menu.
9. Image is not centered
A. Adjust the H. Position and V. Position through the OSD Menu.
B. Perform an Auto Adjust by pressing the Auto Adjust button.
10. Uneven color / Color too dark / Dark area distorted / White color is not white
A. Adjust the Color Settings through the OSD Menu.
B. Perform an Auto Adjust by pressing the Auto Adjust button.

16
Maintaining Your Monitor
Periodically cleaning the exterior of your monitor can reduce the chance of dust being collected, blocking the ventilation holes;
hence, prolonging the life of your monitor. Please refer to the instructions below for cleaning your monitor:
1. Unplug the power
Unplug the LCD monitor from the wall outlet before cleaning the monitor.
2. Avoiding water and liquid
Never spray or pour any liquid directly onto the screen or case. Avoid allowing any water or liquid from entering the LCD
monitor or accessories.
3. Cleaner
Use water or non-ammonia/non-alcohol based glass cleaner. Do not use harsh or abrasive cleaners such as ketene
(acetone), ethanol, toluene, acetic acid, methane, chloride, or other detergents to clean the monitor, these chemicals can
damage the LCD monitor.
4. Screen
To clean your LCD monitor screen, use water or a mild cleaner, as listed above. Moisten a soft, clean cloth. If possible, use a
special screen cleaner sheet or a solution suitable for static electrical appliances. Using any cleaner other than water or a mild
cleaner may damage your monitor and will not be covered under the warranty.
5. Storage of Unit
If the LCD monitor is not in use for a long time, please unplug it and store it in its original box to avoid any damage.
6. Disclaimer
Any damage resulting from use of any cleaner that is not mentioned above is not covered under the terms of the warranty on
this product.
Warning: To prevent electrical shock, do not open the LCD monitor casing. Leave repairing of the monitor to
qualified personnel; please refer to the Warranty for tech support information.
Cleaning Your Monitor
1. Gently wipe the screen with a clean, soft, lens brush or a soft clean, lint-free cloth. This removes dust and other particles
that can scratch the screen.
2. Do not pour or spray any liquid directly onto the screen or case of the LCD monitor. Chemical cleaners may
damage the screen or the LCD monitor.

17
FCC and CE Radiation Norm
FCC
This equipment has been tested and complies with limits for Class B digital devices pursuant to Part 15
of Federal Communications Commission (FCC) rules.
CE
This equipment has been tested and complies with the limits of the European Council Directive on the
approximation of the law of the member states relating to electromagnetic compatibility (89/336/EEC)
according to EN 55022 Class B.
FCC and CE Compliance Statement
These limits are designed to provide reasonable protection against frequency interference in residential
installations. This equipment generates, and radiates radio frequency energy, and if not installed properly
or used in accordance with the instructions, may cause harmful interference to radio communication.
However, there is no guarantee that interference will not occur in television reception, which can be
determined by turning the equipment on and off. Interference may be corrected by one or more of the
following measures:
Reorient or relocate the receiving antenna
Increase the separation between the equipment and the receiver
Plug the equipment into an outlet on a circuit different from that to which the receiver is
connected.
CAUTION!
The Federal Communications Commission warns the user that changes or modifications to the unit not
expressly approved by the party responsible for compliance could void the user’s authority to operate the
equipment.

18
Tabla de Contenidos
Precauciones.................................................................................................................................19
Contenidos de Paquete.................................................................................................................20
Configuración de Hardware..........................................................................................................21
Instalación......................................................................................................................................21
Instalación del Driver de la pantalla Touch Screen ...............................................................22-23
Guía de Calibración para la pantalla Touch Screen...............................................................24-25
Emulador de Ratón ....................................................................................................................... 26
Menú de Botones de Control........................................................................................................27
Modo del Menú OSD......................................................................................................................28
Modos de Imagen ..........................................................................................................................29
Asegurar el monitor a una superficie .......................................................................................... 29
Especificaciones ...........................................................................................................................30
Solucionando Problemas ............................................................................................................. 31
Manteniendo Su Monitor...............................................................................................................32
Norma de Radiación FCC y CE ....................................................................................................33

19
Precauciones
1. Lea todas las instrucciones y guarde este manual para uso en el futuro.
2. Siga todas las precauciones e instrucciones de este producto.
3. No cubra o bloque los hoyos de ventilación del monitor.
4. No inserte objetos metálicos o derrame liquido en el monitor LCD por las aberturas; esto
puede causar fuego, o sacudida eléctrica o dañar el producto.
5. Desenchufe la unidad cuando no la va usar por un tiempo extendido.
6. Desenchufe la unidad antes de limpiarla.
7. No intente de reparar este producto usted mismo, abriendo la tapa lo expone a una sacudida
eléctrica. Solamente un técnico cualificado puede reparar este producto.
8. Mantenga el monitor alejado de lugares calientes, húmedos y frió.
9. No coloque el monitor en lugares donde haya polvo, que le dé rayos del sol directamente o
cerca de equipos que produzcan fuerte campo magnético.
10. No coloque algún objeto en el cordón de alimentación.
11. Para evitar cualquier tipo de peligro o de cualquier fallo y la posibilidad de causar algún daño
al monitor, siempre coloque el monitor en una superficie plana.
12. Por favor espere por lo menos 2 segundos antes de apagar o encender el monitor.

20
Contenidos de Paquete
Monitor LCD TFT 15”
Cable de Señal Externo
Univ15-pines D-Sub
(RGB Analógico)
Conectador de Audio:
estéreo
Cable de Alimentación
Cable USB
Manual de Usuario Y
CD del Driver
Tornillos Y Arandelas
Configuración de Hardware
Use el monitor LCD cuidadosamente. Apague el monitor LCD y la computadora antes de instalarlo. Siga las
instrucciones de instalación paso a paso.
Entradas
NO. Terminal Function
Entrada CA
Entrada de alimentación CA 100~240V,
50/60HZ
Entrada VGA Se conecta al puerto VGA de la PC
Audio Se conecta a la salida de audio de la PC
USB Se conecta al puerto USB de la PC
This manual suits for next models
1
Table of contents
Languages:
Other Synaps Monitor manuals
Popular Monitor manuals by other brands

LG
LG Flatron F920B Service manual

Lenovo
Lenovo ThinkCentre TIO24Gen4Touch user guide

NEC
NEC MD211G3 Installation & maintenance guide

Grundig
Grundig GD-ML-DP2730HD quick guide

Elo TouchSystems
Elo TouchSystems Entuitive ET1724L-7SWB-1-NL user guide

Defender Security
Defender Security DFR-MN-215HD quick start guide