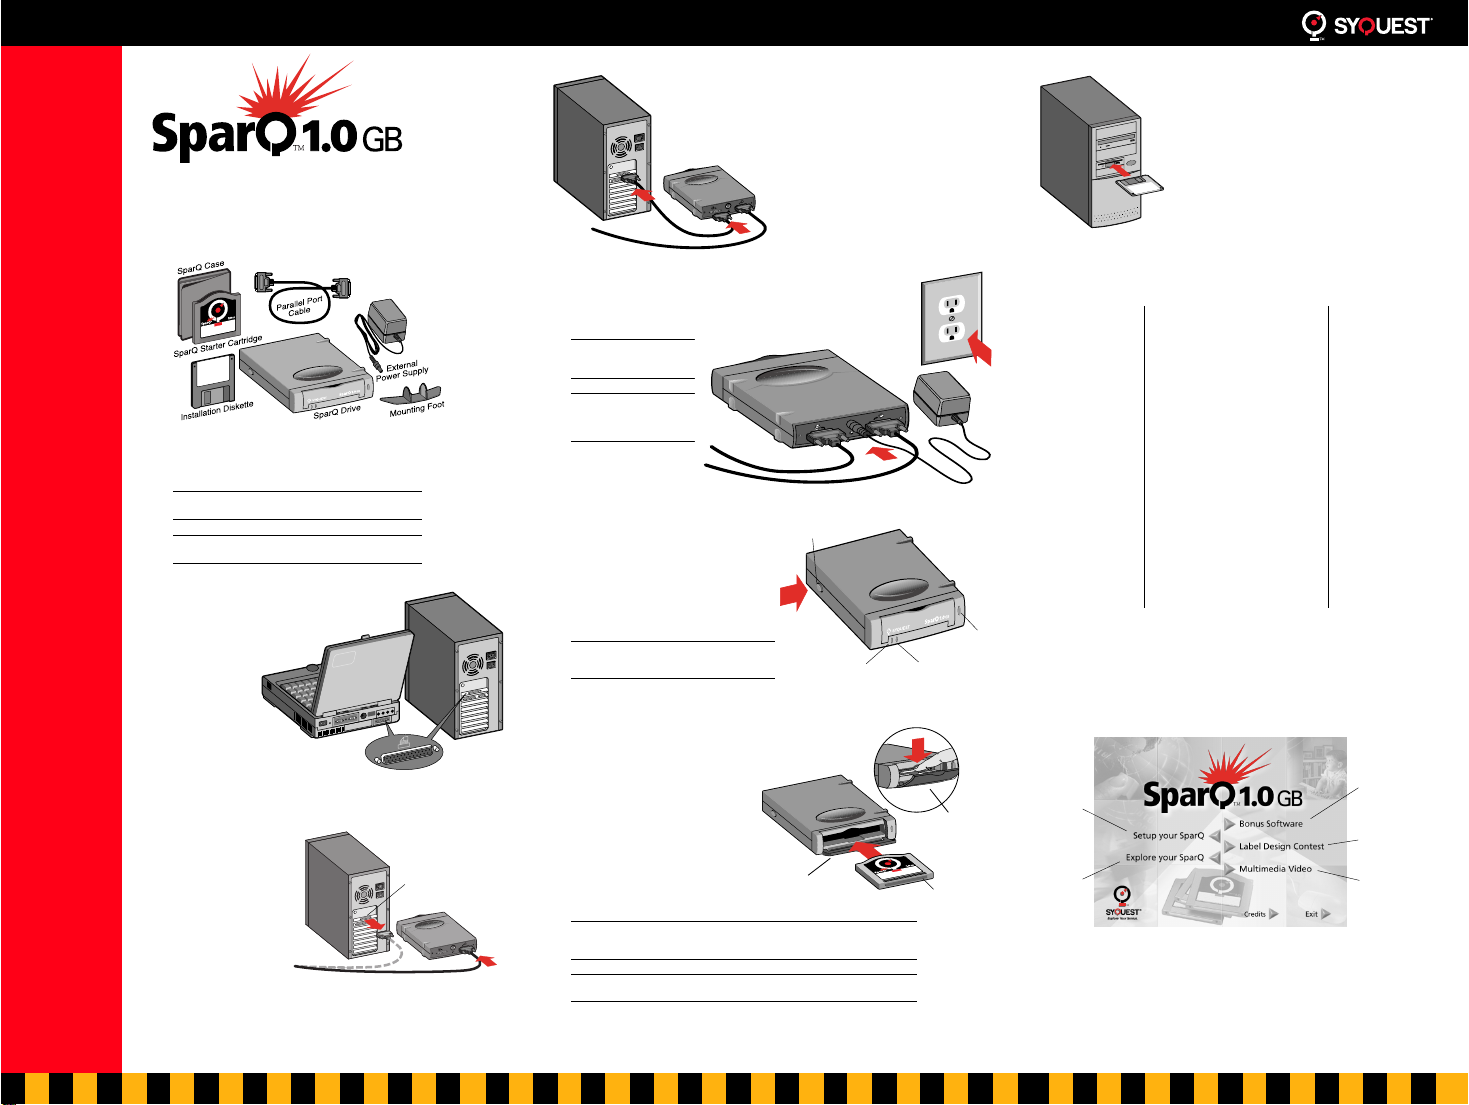
SparQ 1.0 GB Parallel Port Drive
Explore Your Genius
™
Troubleshooting
PROBLEM 1
Your SparQ drive sometimes makes clicking or other sounds
when the drive is not being accessed.
SOLUTION
This is a normal part of the SparQ drive operation. The drive periodically
performs routine housekeeping activities that insure its proper overall
operation.
PROBLEM 2
Your SparQ drive’s power light does not glow solid green
when you supply power.
SOLUTION
1.
Turn off your SparQ drive and your PC.
2.
Check your power connections.
■
Make sure that your power outlet has power (try plugging in a
lamp and turning it on).
■
Make sure that the power supply connectors are securely
attached (the round end at the SparQ drive and the plug end at
the outlet).
3.
Turn on your SparQ drive and your PC.
Make sure that your SparQ drive’s (green) power button is pushed in
to the ON position.
■
If the power light glows steady green, return to step 7 of the
setup procedure.
■
If the power light does not glow steady green, then you may need
to replace your SparQ drive or external power supply. Please
contact SyQuest Technical Assistance.
PROBLEM 3
Your SparQ drive’s activity light does not glow solid green
within 30 seconds after you insert the cartridge with the
power on.
SOLUTION
1.
Press your SparQ drive’s eject button to eject the
cartridge.
Note:
If your SparQ cartridge does not eject, use the eject
procedure described under Problem 6.
2.
Reinsert your SparQ cartridge.
■
Make sure that you are using a SparQ cartridge, and not a SyJet or
other SyQuest cartridge.
■
Make sure that you have pulled the cartridge more than halfway
out before you reinsert it.
■
Make sure that you slide the cartridge all the way into your SparQ
drive. Push in and then firmly press down on the cartridge tab
until the cartridge snaps into place.
3.
Check your SparQ drive’s activity light.
■
If the activity light glows solid green within 30 seconds, go to
step 8 of “Setting Up.”
■
If the activity light does not glow solid green within 30 seconds,
eject the cartridge and continue this procedure at step 4.
4.
Turn off your SparQ drive and your PC.
5.
Check your cable connections.
■
Verify that the provided parallel port cable is connected firmly to
the SparQ drive’s “TO COMPUTER” port and to your PC’s parallel
port (and not to a 25-pin SCSI port). Parallel ports are often
labeled with the word “printer” or a printer symbol.
■
Make sure that the only device attached to your SparQ drive’s “TO
PRINTER” port is a parallel printer. It is also OK if you have no
printer attached to the SparQ drive.
6.
Turn on your SparQ drive and your PC.
■
Insert a SparQ cartridge (see step 2 of this procedure.)
7.
Check your SparQ drive’s activity light.
■
If the activity light glows solid green within 30 seconds, go to
step 8 of “Setting Up.”
■
If the activity light does not glow solid green within 30 seconds,
continue this procedure at step 8.
8.
Eject the cartridge and turn off your SparQ drive.
9.
Disconnect your SparQ drive’s parallel port cable from
your PC, but leave the drive’s power connections in
place.
10.
Turn on your SparQ drive and reinsert the cartridge.
■
If the activity light glows solid green within 30 seconds, then your
PC’s parallel port may need repair or your parallel port cable may
need to be replaced.
■
If the activity light does not glow solid green within 30 seconds,
then you may need to replace your SparQ drive or cartridge.
Please contact SyQuest Technical Assistance.
PROBLEM 4
Windows 95 Only
After the software installation is
complete, you do not see a Removable Disk icon and drive
letter for your SparQ drive when you double-click My
Computer.
SOLUTION
1.
Check your connections and make sure your SparQ drive
is ready.
■
Check all of your SparQ drive connections.
■
Check that the cartridge is fully inserted in your SparQ drive and
that it snaps into place. (See procedure at Problem 3, step 2.)
■
Check that your SparQ’s activity light is glowing solid green.
2.
Run the SyQuest VISIT program.
a.
Restart your PC.
Close all programs, click Start, select “Restart the computer?”,
click Yes.
b.
Observe the startup sequence on screen. When the message
“Starting Windows 95” appears, quickly press F8.
c.
Select “Safe Mode Command Prompt Only” from the menu.
d.
Insert the Installation Diskette and run the program VISIT.EXE
(not VISIT95.EXE).
■
If the VISIT program runs successfully, go to step 5 of this
procedure.
■
If the VISIT program fails (with an error) to initialize the port
adapter, continue to step 3.
3.
Check your parallel port mode setting.
a.
Shut down and restart your PC.
b.
Start your PC’s Setup utility.
Check your PC’s documentation or support facilities for specifics
for your system. Typically, early in the startup “boot” sequence,
you can press a specific key to invoke the setup utility.
c.
Check that your parallel port is set to EPP, ECP, SPP, Standard,
or an equivalent.
■
If your parallel port setting is one of these, start Windows and
go to step 6 of this procedure.
■
If you need to change your parallel port setting, continue to
step 4 of this procedure.
4.
Change your parallel port mode setting.
a.
Set your parallel port to EPP and save the setting.
b.
Restart your PC and run the VISIT program as described in step
2 of this procedure.
■
If the VISIT program runs successfully, continue to step 5 of
this procedure.
■
If the VISIT program fails (with an error) to initialize the port
adapter, continue to step 4c.
c.
Repeat steps 4a and 4b with each of the settings (ECP, SPP,
Standard, or an equivalent) until the VISIT program runs
successfully. Then continue to step 5 of this procedure.
If the VISIT program still fails (with an error) to initialize the
port adapter, contact Syquest Technical Assistance.
5.
Find out if you have solved the problem.
a.
Once the VISIT program runs successfully, restart your PC and
make sure Windows is running.
b.
Double-click My Computer to see if you now have a
Removable Disk icon and drive letter for your SparQ drive.
■
If so, try writing to and reading any file to make sure your
SparQ drive is operating properly.
■
If you still have no Remove Disk icon, continue this procedure
at step 6.
6.
Check for Interrupt Request (IRQ) conflicts.
a.
Click Start and select Settings, Control Panel, and System. Click
the Device Manager tab, and click SCSI controllers.
If your SyQuest Parallel Port device is listed with an error mark (a
yellow “!” or red “X”), then you have an IRQ conflict. Continue
this procedure at step 7.
b.
Double-click SyQuest Parallel Port Device.
c.
Under the General tab, check the Device Status box.
■
If it indicates that you have an IRQ conflict, go to step 7 of this
procedure.
■
If it indicates that the device is working properly, you do not
have an IRQ conflict. Go to “Advanced Troubleshooting for
Problem 4,” or contact SyQuest Technical Assistance.
7.
Identify the IRQ conflict.
a.
Go back to Device Manager and double-click Computer.
b.
View the resources for Setting 05 and 07.
■
If one of these settings shows printer port LPT1 and it has an
error mark (a yellow “!” or red “X”), this is the IRQ conflict.
■
If one of these settings does not show LPT1, then look for
another device such as a sound card or network adapter that
may be assigned the LPT IRQ.
8.
Reassign the IRQ of any conflicting device to an unused
setting other than IRQ 05 or 07.
Refer to your PC’s documentation or contact the appropriate
technical support, if necessary, to find out how to reassign IRQs on
your PC.
9.
Restart your PC and reinstall the SyQuest software.
Double-click My Computer to see if there is a Removable Disk icon and
drive letter for your SparQ drive.
■
If you find the icon and drive letter for your SparQ drive,
your drive is ready to use.
■
If you do not find the icon and drive letter for your SparQ drive,
then continue to “Advanced Troubleshooting for Problem 4,” or
contact SyQuest Technical Assistance.
Advanced Troubleshooting for Problem 4
Note:
This section is for experienced users only.
1.
Check that both Virtual Memory and File System are in
32-bit mode.
a.
Click Start and select Settings, Control Panel, and
System. Click the Performance tab.
If either Virtual Memory or File System is in DOS Compatibility
Mode, you need to correct this error before Windows 95 can
recognize your SparQ drive.
b.
Look for SyQuest DOS driver entries in CONFIG.SYS or
AUTOEXEC.BAT. Also look for the entry SQ_IDE32.386 in the
[386Enh] section of SYSTEM.INI.
Click Start and select Run. In the Run window, type
ÒsyseditÓ
and press Enter to bring up the system editor. The system editor
shows the relevant files.
■
If you find SyQuest DOS driver entries in CONFIG.SYS or
AUTOEXEC.BAT, comment out the lines by typing REM
(followed by a space) at the beginning of those lines.
■
If you find the entry SQ_IDE32.386 in SYSTEM.INI, delete the
line.
■
If these files do not include SyQuest DOS driver entries, refer
to your Windows 95 documentation to resolve the error.
c.
Restart your PC and reinstall your SyQuest software.
d.
Double-click My Computer to see if there is a Removable Disk
icon and drive letter for your SparQ drive.
■
If you find the icon and drive letter for your SparQ drive,
your drive is ready to use.
■
If you do not find the icon and drive letter for your drive,
continue to step 2 of this procedure.
2.
Check for any conflicting Terminate Stay Resident
(TSR) programs and drivers that may be loaded in
Windows 95.
a.
Click Start and select Run. In the Run window, type
ÒexplorerÓ
and click OK to bring up the Exploring window.
b.
From the Explorer’s Tools menu, select Find, then select Files or
Folders to bring up the Find: All Files window.
c.
Search for the drivers of any removable disk devices that you
are no longer using. Rename any such files to
filename
.BAK.
d.
Search for the tape backup drivers DRVWPPQT.VXD and
PARASCAN.VXD. If you find either of these drivers, rename
the file to DRVWPPQT.BAK or PARASCAN.BAK, as
appropriate.
e.
Restart your PC and reinstall your SyQuest software.
f.
Double-click My Computer to see if there is a Removable Disk
icon and drive letter for your SparQ drive.
■
If you find the icon and drive letter for your SparQ drive,
yourdrive is ready to use.
■
If you do not find the icon and drive letter for your drive,
contact SyQuest Technical Assistance.
PROBLEM 5
The cartridge does not eject from the SparQ drive when you
press the eject button on the front of the drive. Your SparQ
drive appears in My Computer as a removable drive with a
drive letter assigned.
SOLUTION
1.
Check for cartridge eject safeguards and perform the
action appropriate for your operating system.
Windows 3.1, Windows 95, and Windows NT 4.0 each handle
cartridge ejection differently. In general, if your cartridge does not
eject when you push the eject button, it is because the operating
system has locked the cartridge to protect your data. The operating
system stores the request to eject and executes it when it is safe to do
so. No message is provided by Windows during this pended-request
period.
Windows 3.1
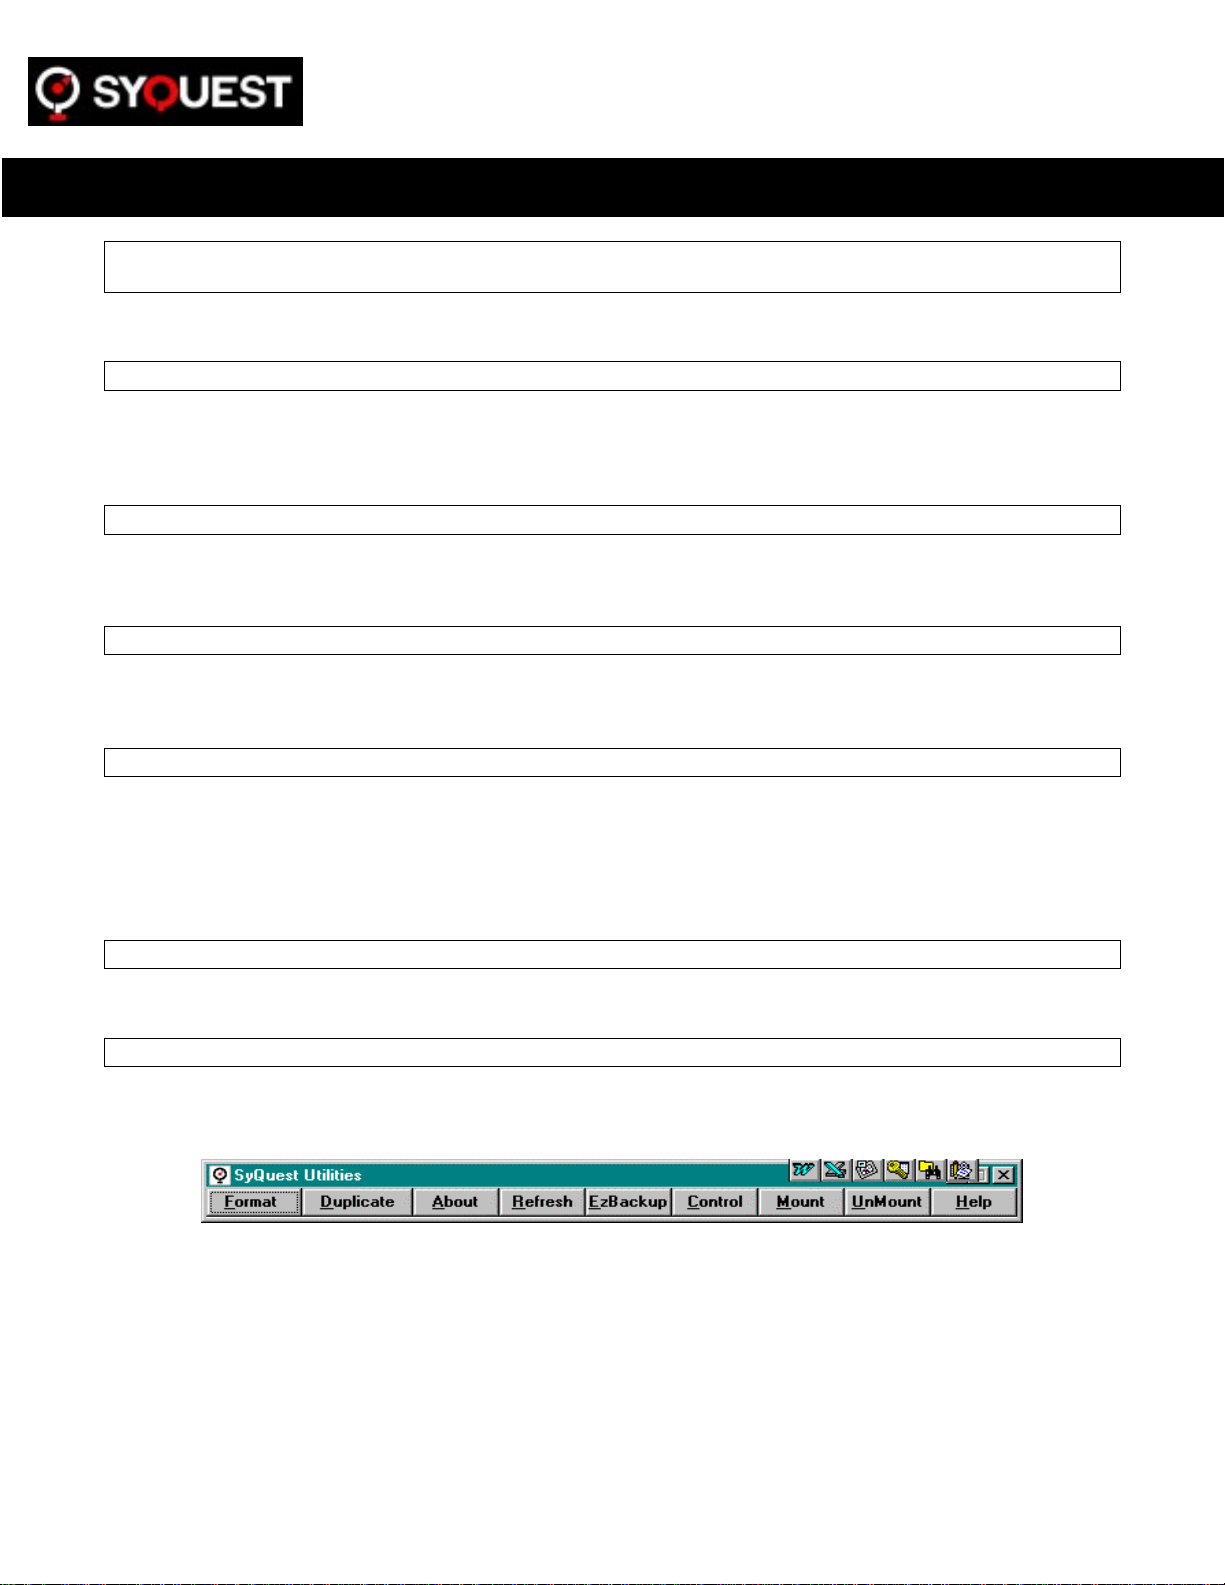
—SyQuest Utilities provide a Lock and Unlock
function for the SparQ drive. You can 1) check the lock status, or 2)
change the lock status by clicking the Lock or Unlock buttons. Lock
and Unlock actions change Windows 3.1 status and can either prevent
or allow a cartridge-eject using the SparQ eject button.
Windows 95 and Windows NT 4.0 in Administrator
mode
—You can make an eject request by right-clicking the
Removable Disk icon in My Computer. This is functionally the same as
pushing the eject button on the front of your SparQ drive.
Windows NT 4.0 in User mode
—Right-clicking the Removable
Disk icon in My Computer does not work as it does in Administrator
mode. An error message is presented by Windows NT 4.0
2.
All Environments—Wait at least 30 seconds to allow
cartridge to eject.
If your cartridge does not eject after using either the eject button or
the Windows Eject command, and at least 30 seconds
have elapsed,
there may be a problem with your drive. You can eject the cartridge
using the procedure in Problem 6 (below). Contact SyQuest Technical
Support for additional help.
Note:
In Windows 3.1, ensure that the drive is unlocked using the
Unlock utility before pressing the SparQ cartridge eject button.
PROBLEM 6
You want to remove the cartridge from your SparQ drive
without power to the drive.
SOLUTION
Be sure there is no power to the drive. Wait 45 seconds after the power has
been removed. Open the SparQ drive door and gently lift up on the
cartridge tab, then pull the cartridge out of the drive.
WARNING!
Never
manually remove a cartridge as described here
while power is on. Damage may result to both drive and cartridge,
and you will void your warranty.
You can find helpful technical bulletins on SyQuest’s
web site at www.syquest.com.
Getting Help
SyQuest® Technology is located at
47071 Bayside Parkway,
Fremont, CA 94538-6517
SyQuest’s main phone number is 510-226-4000.
This number is staffed during business hours and has a 24-hour automated
system to help direct your calls. You may also contact Sales or Technical
Assistance at the phone numbers and online addresses listed below:
Sales Technical Assistance
U.S.A.
Voice:
Email:
1-(510) 226-4000
FTP: ftp://ftp.syquest.com
World Wide Web:
http://www.syquest.com
U.S.A. and Canada
Voice: 1-510-226-5400
Fax: 1-510-226-4110
BBS: 1-510-656-0473
FaxBack System: 1-510-226-4120
Germany
United Kingdom
Note:
Visit SyQuest’s web page at www.syquest.com to get current phone
numbers for worldwide technical assistance.
113016-002, Rev. A
SyQuest® is a registered trademark and SparQ™ is a trademark of SyQuest® Technology, Inc. All other names are trademarks of their respective
companies. This product is covered by issued U.S. and foreign patents and pending U.S. and foreign patents. Made in U.S.A. or Malaysia.