t.a.c. TS-5711-770 850 Series Instruction manual

Printed in U.S.A. 8-06 © Copyright 2006 TAC All Rights Reserved. F-23837-5
TAC
1354 Clifford Avenue
P. O. Box 2940
Loves Park, IL 61132-2940
www.tac.com
Application
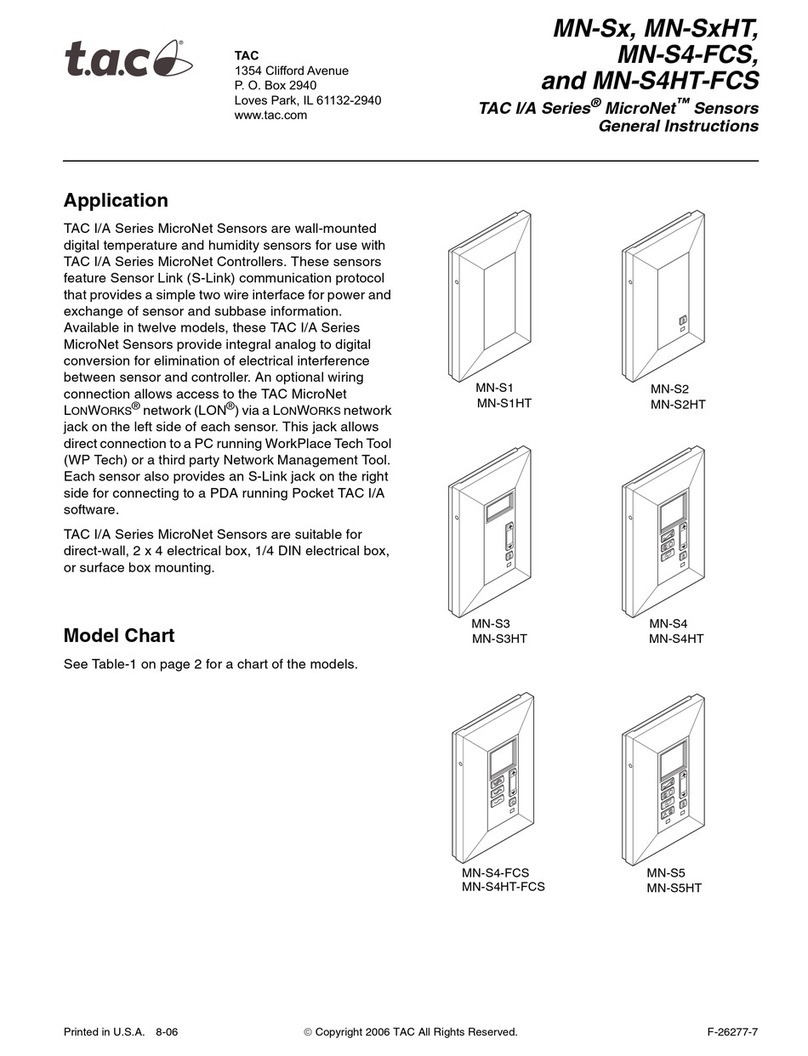
These sensors provide electronic sensing of room
temperature at wall locations for use with
microprocessor-based energy management systems,
including TAC NETWORK 8000®(units with -850
suffix).
Features
•±0.36% accuracy over 100°F operating span.
•±0.045% drift per year maximum over 100°F span.
•-850 units include TAC NETWORK 8000 shunt
resistor.
•10K¾ @ 77°F thermistor sensor.
Applicable Literature
•TAC Environmental Controls Cross-Reference
Guide, F-23638
•TAC Environmental Controls Reference Manual, F-
21683
•TAC Environmental Controls Application Manual, F-
21335
•TAC Pneumatic Products Catalog, F-27383
•TAC NETWORK 8000 Hardware Installation
Practices Manual, F-23061
90
80
70
60
50
TS-5711-770
TS-57011-850
TS-57031
TS-57031-850
TS-5711-850
TS-57011-770
90
80
70
60
50
TS-5711-770, -850 Series
TS-57011-770, -850 Series
TS-57031, TS-57031-850
Electronic Room Temperature Sensors
General Instructions

2© Copyright 2006 TAC All Rights Reserved. F-23837-5
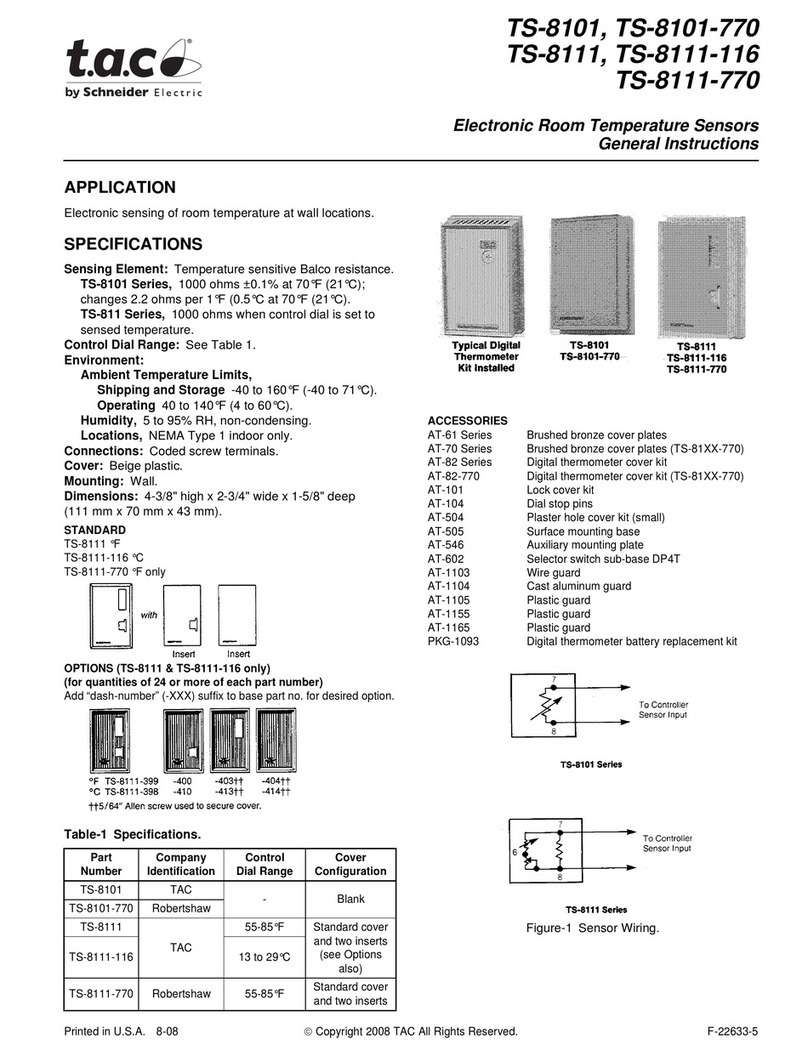
SPECIFICATIONS
Sensor Inputs
Connections: Coded screw terminals.
Environment
Ambient Temperature Limits:
Shipping, -40 to 160°F (-40 to 71°C).
Operating, 40 to 140°F (4 to 60°C).
Humidity: 5 to 95% RH, non-condensing.
Locations: NEMA Type 1.
Options for Temperature Sensors
For the desired option, add the corresponding dash number suffix (-XXX) to the base part
number of the temperature sensor.
ACCESSORIES
AT-504 Plaster hole cover kit (small)
AT-1155 Plastic guard
TS-5711-850 Series
AT-61 Series Brushed bronze cover plates
AT-101 Lock cover kit
AT-505 Surface mounting base
AT-546 Auxiliary mounting plate
AT-602 Selector switch sub-base DP4T
AT-1103 Wire guard
AT-1104 Cast aluminum guard
AT-1105 Plastic guard
AT-1165 Plastic guard
TS-57011-850 Series
AD-8969-951 Wall plates (6 per package)
AD-8969-952 Base plates (6 per package)
AT-80 Replacement cover kit (°F) with 5 inserts
AT-80-116 Replacement cover kit (°C) with 5 inserts
AT-80-774 Replacement cover kit (°F) insert
AT-8801 Non-flush 2" x 4" box adapter
AT-1163 Wire guard (requires AT-504)
TOOLS
N2-4 Cover screw wrench (TS-57031-850 series only)
-403
-413
TS-5711
TS-5711-770
Standard
TS-5711-770
Insert TS-57011-770
Standard
TS-57011-77
0
Insert
5/64" Allen screw
used to secure cover
°F Thermometer (50-90°F)
°C Thermometer (10-30°C)
TAC Barber-Colman Robertshaw only

F-23837-5 © Copyright 2006 TAC All Rights Reserved. 3
Table-1 Specifications.
Table-2 Temperature vs. Resistance.
TYPICAL APPLICATION
Part Number
Cover Thermometer Cover Dimensions
H x W x D
in. (mm)
Temperature Sensing Element
Range Display Description Brand Name Resistance
Maximum Error
Over 100°F
(55.6°C) Span
Resistance
Change
TS-5711-770 55 to 85°F Analog
Beige
Plastic
Robertshaw
4-3/8 x 2-3/4
x 1-5/8
(111 x 70 x 43)
Thermistor 10,000 ¾
at 77°F (25°C)
±0.36°F
(±0.2°C)
See
Table-2
TS-5711-850 None None
TAC Barber-
Colman
Shunted with an 11k
0.1% resistor
TS-5711-851 50 to 90°F
Analog
TS-5711-852 10 to 30 °C
TS-57011-770 50 to 90°F Shadow
White
Plastic
Robertshaw 4-13/16 x 3-1/4
x 1-31/64
(122 x 83 x 38)
Thermistor 10,000 ¾
at 77°F (25°C)
TS-57011-850 None None TAC Barber-
Colman
Shunted with an 11k
0.1% resistor
TS-57031
None None Gray
Plastic
TAC Barber-
Colman
2 x 2 x 1-1/4
(51 x 51 x 32)
Thermistor 10,000 ¾
at 77°F (25°C)
TS-57031-850 Shunted with an 11k
0.1% resistor
Temperature °F (°C)
Nominal Resistance Values (in 1000 ¾)
TS-5711-770, TS-57011-770,
TS-57031 TS-5711-85X, TS-570X1-850
40 (4) 24.55 7.596
50 (10) 18.79 6.938
68 (20) 12.26 5.798
77 (25) 10.0 5.238
86 (30) 8.194 4.696
104 (40) 5.592 3.707
122 (50) 3.893 2.875
140 (60) 2.760 2.206
To Energy Management
System Sensor Input
TS-5711-770, TS-57011-770,
and TS-57031 Sensors
Model Terminals
TS-5711-770
TS-5711-85X Series
TS-57011-770
TS-57011-850
TS-57031
TS-57031-850
1
7
7
1
1
1 (+)
1 (+)
2
8
8
2
2
2 (-)
2 (-)
1
2
10kΩ
Thermistor
11kΩ
0.1%
To TAC NETWORK 8000
System Sensor Input
TS-5711-85X Series, TS-57011-850,
and TS-57031-850 Sensors
1
2
Figure-1 Typical Sensor Wiring.

4© Copyright 2006 TAC All Rights Reserved. F-23837-5
INSTALLATION
Inspection Inspect the package for damage. If damaged, notify the appropriate carrier immediately.
If undamaged, open the package and inspect the device for obvious damage. Return
damaged products.
Requirements •Job wiring diagrams
•Tools (not provided):
– Digital Volt-ohm Meter (DVM)
– Room temperature thermometer in °F or °C
– Appropriate screwdriver(s) for cover, terminals and mounting screws
– Appropriate drill and drill bit for mounting screws
– Diagonal wire cutters for removing mounting tabs
•Appropriate screws for mounting to European 1/4 DIN standard electrical box or for
mullion mounting (not provided)
•TS-5711-770, TS-5711-850, TS-57011-770, and TS-57011-850, two mounting screws
provided for mounting to a 2" x 4" conduit box
•Training: Installer must be a qualified, experienced technician.
•Appropriate accessories
Warning:
•Electrical shock hazard! Disconnect power before installation to prevent electrical shock
or equipment damage.
•Make all connections in accordance with the electrical wiring diagram and in
accordance with national and local electrical codes. Use copper conductors only.
Location
Caution:
•Do not locate the temperature sensor near sources of heat or cold, such as lamps,
motors, sunlight, or concealed ducts or pipes. The accuracy of the system may be
affected by the presence of a room temperature gradient or sources of radiant energy.
•Avoid locations where excessive moisture, corrosive fumes, explosive vapors, or
vibration is present.
•NEMA Type 1 devices are intended for indoor use. Conformance to the NEMA Type 1
requirements primarily provides a degree of protection against contact with the
enclosed components.
Locate the temperature sensor on an inside wall, in a position which represents the average
temperature in the room or space. At this location, the sensor should be exposed to
unrestricted air circulation of 30 ft. per minute (9.2 m per minute), minimum. The selected
location should be out of direct sunlight, away from sources of heat or cold, and away from
concealed ducts or pipes. Locate the sensor in accordance with local building codes and
architectural specifications, as required. Typically, temperature sensors are located 4 to 6 ft.
(1.2 to 1.8 m) from floor level.
Mounting The TS-5711-770 and TS-5711-850 series sensors are designed to be mounted only on
American Standard 2" x 4" electrical boxes. The TS-57011-770 and TS-57011-850 series
sensors may be mounted on either American Standard 2" x 4" electrical boxes or European
DIN Standard electrical boxes. The TS-57031 and TS-57031-850 sensors are mullion
mounted. Refer to the mounting dimensions shown in Figure-2 , Figure-3 , Figure-4 , and
Figure-5 , and mount the sensor according to the applicable procedure that follows.

F-23837-5 © Copyright 2006 TAC All Rights Reserved. 5
Mounting Dimensions
Figure-2 Dimensions for Mounting TS-5711-770 and TS-5711-850 Series on American
Standard 2" x 4" Electrical Box.
1-7/16 (37)
Depth = 1-5/8 (43)
Dimensions shown are in inches
(
mm
)
.
1-5/8
(43)
4-7/16
(113)
3-9/32
(83)
Centered
2-7/8 (73)
4-3/8
(111)
2-3/4
(70)
Figure-3 Dimensions for Mounting TS-57011-770 and TS-57011-850 Series on American
Standard 2" x 4" Electrical Box.
Depth = 1-31/64 (38)
3/16
(5)
1-31/64
(38)
1-5/8
(41)
3-1/4
(83)
3-9/32 (83)
Centered
4-13/16
(122)
3-1/4
(83)
4-13/16
(122)
Dimensions shown are in inches
(
mm
)
.
Figure-4 Dimensions for Mounting TS-57011-770 and TS-57011-850 Series on European
1/4 DIN Standard Electrical Box.
De
p
th = 1-19/64
(
33
)
1-19/64
(33)
Dimensions shown are in inches (mm).
3-1/8
(79)
3-1/8
(79)
2-13/32
(61)
Centered
3-1/8
(79)
1-9/16
(40)
3-1/8
(79)

6© Copyright 2006 TAC All Rights Reserved. F-23837-5
Mounting TS-5711-770 and TS-5711-850 Sensor on American Standard
2" x 4" Electrical Box
1. Remove the cover screw and remove the sensor cover from the base plate (see Figure-
6).
2. Identify the two wires that are to be connected to the sensor. Route these wires to the
electrical box.
3. Strip 1/4" (6mm) of insulation from the ends of the wires.
4. Connect the wires to the screw terminals on the back of the base plate. See the wiring
diagrams in Figure-1 .
5. Using the two mounting screws (#6-32 flathead screws) provided, mount the base plate
onto the electrical box.
Caution:
To prevent damage to the components, do not use excessive force when
mounting the sensor base plate onto the electrical box.
6. Dress the wires down and inside the perimeter of the base plate.
7. Reinstall the cover by inserting its top inside edge over the tab of the base plate and
rotating the cover downward. Secure the cover with the cover screw.
Figure-5 Dimensions for Mullion Mounting TS-57031 and TS-57031-850.
1-1/4
(32)
Dimensions shown are in inches
(
mm
)
.
2 (51)
2 (51)
1-3/8 (35)
Centered
1-13/16 (46)
7/8
(22)
1-13/16
(46)
Figure-6 Mounting of TS-5711-770 or TS-5711-850 on American Standard 2" x 4"
Electrical Box.
Cover
Mounting Screws (2)
(furnished)
Tab
American Standard
Electrical Box
Sensor
Base Plate
Cover
Screw

F-23837-5 © Copyright 2006 TAC All Rights Reserved. 7
Mounting TS-57011-770 or TS-57011-850 Series Sensor on American
Standard 2" x 4" Electrical Box
1. Remove the sensor cover from the base plate, according to the following:
a. Insert the blade of a small-bladed screwdriver into the cover latch slot in the bottom
of the sensor cover (see Figure-7 ).
b. Gently push upward on the screwdriver to release the cover latch.
c. Rotate the cover away from the base plate while removing the screwdriver from the
cover latch slot.
2. Separate the wall plate from the base plate (see Figure-8 ). The wall plate is snapped
onto the base plate.
3. Identify the two wires that are to be connected to the sensor. Route these wires from
the electrical box and through the wire feedthrough opening near the top of the base
plate.
4. Using the two mounting screws (#6-32 x 5/8" flat head screws) provided, mount the
base plate onto the electrical box.
Note:
No more than 6" (152 mm) of wire should remain under the cover.
5. Strip 1/4" (6 mm) of insulation from the ends of the wires.
Figure-7 Removing Sensor Cover.
Bottom View
Cover Latch Slot
(Insert Screwdriver Blade Here)

8© Copyright 2006 TAC All Rights Reserved. F-23837-5
6. Connect the wires to the terminal block on the base plate. See the wiring diagrams in
Figure-1 . When installing a wire in the terminal block, insert the wire from the top side
of the terminal and secure it by tightening the screw located on the front side of the
terminal block.
Caution:
To prevent damage to the components, do not use excessive force when
mounting the sensor base plate onto the electrical box.
7. Dress the wires down and inside the perimeter of the base plate.
8. Snap the wall plate onto the base plate.
9. Reinstall the cover by inserting its top inside edge over the tab on the base plate and
rotating the cover downward. Press the cover to snap it in place.
Figure-8 Mounting of TS-57011-770 or TS-57011-850 Series on 2" x 4" Electrical Box.
American Standard
Electrical Box
Terminal Block
Wire Feedthrough
Opening
Mounting Screws (2)
(furnished)
Wall Plate
Base Plate
Sensing
Element
Printed Circuit
Board
Cover
Cover
Latch

F-23837-5 © Copyright 2006 TAC All Rights Reserved. 9
Mounting TS-57011-770 or TS-57011-850 Series Sensor on European 1/4 DIN
Standard Electrical Box
1. Remove the sensor cover from the base plate, according to the following:
a. Insert the blade of a small-bladed screwdriver into the cover latch slot in the bottom
of the sensor cover (see Figure-7 ).
b. Gently push upward on the screwdriver to release the cover latch.
c. Rotate the cover away from the base plate while removing the screwdriver from the
cover latch slot.
2. Separate the wall plate from the base plate (see Figure-8 ). The wall plate is snapped
onto the base plate. The wall plate may be discarded or used as a cover plate.
3. Using diagonal wire cutters, cut the mounting tabs from the top and bottom of the base
plate (see Figure-9 ).
4. Identify the two wires that are to be connected to the sensor. Route these wires from
the electrical box and through the wire feedthrough opening near the top of the base
plate (see Figure-10 ).
Figure-9 Removing Mounting Tabs.
A
m
e
r
i
c
a
n
T
o
o
l
D
i
a
g
o
n
a
l
C
u
t
t
e
r
s
Sensing Element
Diagonal Wire
Cutters
Cut Mounting
Tab Here
Cut Mounting
Tab Here

10 © Copyright 2006 TAC All Rights Reserved. F-23837-5
5. Using two appropriately sized mounting screws (not provided), mount the base plate
onto the 1/4 DIN electrical box.
Note:
No more than 6" (152 mm) of wire should remain under the cover.
6. Strip 1/4" (6 mm) of insulation from the ends of the wires.
7. Connect the wires to the terminal block on the base plate. See the wiring diagrams in
Figure-1 . When installing a wire in the terminal block, insert the wire from the top side
of the terminal and secure it by tightening the screw located on the front side of the
terminal block.
Caution:
To prevent damage to the components, do not use excessive force when
mounting the sensor base plate onto the electrical box.
8. Dress the wires down and inside the perimeter of the base plate.
9. If the wall plate is to be used, snap it onto the base plate.
10. Reinstall the cover by inserting its top inside edge over the tab on the base plate and
rotating the cover downward. Press the cover to snap it in place.
Figure-10 Mounting Procedure for European 1/4 DIN Electrical Box.
European 1/4 DIN
Standard Electrical Box
Cover
Terminal Block
Wire Feedthrough
Opening
Mounting Screws (2)
(not furnished)
Base Plate
Printed Circuit
Board
Cover
Latch
Sensing
Element

F-23837-5 © Copyright 2006 TAC All Rights Reserved. 11
Mullion Mounting TS-57031 and TS-57031-850
1. Using a 0.062" Allen wrench (tool number N2-4), turn the cover set screw clockwise into
the base plate, to release the sensor cover. Remove the sensor cover. Refer to Figure-
11 .
Note:
The sensor is provided with the printed circuit board assembled to the base plate.
Sufficient room is provided between the printed circuit board and the base plate, so that
removal of the printed circuit board is not necessary when routing the system wires for
connection to the terminal block.
2. Identify the two wires that are to be connected to the sensor. Route these wires through
the base plate, then around the printed circuit board.
3. Strip 1/4” (6 mm) of insulation from the ends of the wires.
4. Connect the wires to the terminal block on the printed circuit board. Refer to the wiring
diagram in Figure-1.
5. Dress the wires down and into the mounting location.
6. Secure the base plate to the mounting location, using two #6 screws (not provided).
7. Position the tabs of the cover into the corresponding holes on the top of the base plate.
Use a 0.062" Allen wrench (tool number N2-4) to turn the cover set screw
counterclockwise, to secure the sensor cover to the base plate.
Figure-11 Mounting Procedure for TS-57031 and TS-57031-850.
Cover
Sensing
Element
Printed Circuit
Board
#6 Mounting Screws (2)
(not furnished)
Hex Nuts (2)
Cover Setscrew
Terminal
Block
Base Plate
Note: The sensor is provided with the printed circuit
board alread
y
assembled to the base
p
late.

Copyright 2006, TAC
All brand names, trademarks and registered
trademarks are the property of their respective
owners. Information contained within this
document is subject to change without notice.
F-23837-5
www.tac.com
TAC
1354 Clifford Avenue
P.O. Box 2940
Loves Park, IL 61132-2940
Wiring
Caution:
•Do not use unshielded sensor cable in the same conduit with 120/240 Vac power
wiring, or in areas with high RFI/EMI generating devices.
•Shielded cable must be used when it is necessary to install the sensor leads in the same
conduit with power wiring, or when it is known that devices generating high RFI/EMI are
near. Ground the shield according to the controller or controlled device manufacturer's
specification.
•For TAC NETWORK 8000 applications, follow the recommended shielding and wiring
practices in the TAC NETWORK 8000 Hardware Installation Practices Manual, F-
23061.
•Do not use the inside of the sensor cover or electrical box as a termination location for
other control circuits.
Wiring connections to the temperature sensor are made during the mounting process. Be
sure to observe the following wiring guidelines:
•Two-conductor twisted pair wires (six turns per foot), Class II, low voltage, are suitable
for the sensor leads.
Use copper conductors only.
•Restrict wiring leads to the shortest practical length. For recommended wiring lengths,
refer to Table-3, below.
Table-3 Typical Sensor Wiring Lengths.
CHECKOUT
Use a Digital Volt-ohm Meter (DVM) to measure the resistance between the two field
connection terminals on the temperature sensor (see Figure-1 for terminal identification).
MAINTENANCE
The temperature sensor requires no maintenance. However, the sensor should be
periodically inspected for dirt and for any blockage of the airflow over the elements.
Regular maintenance of the total system is recommended to assure sustained, optimum
performance.
FIELD REPAIR
None.
Wire Gage Length of Run (Total Wiring in Loop)
ft. (m)
22 150 (46)
18 1,000 (305)
16 2,250 (686)
14 4,000 (1219)
This manual suits for next models
2
Table of contents
Other t.a.c. Temperature Controllers manuals
Popular Temperature Controllers manuals by other brands

TE Technology
TE Technology TC-24-10 instruction manual

Spirax Sarco
Spirax Sarco SA121 Installation and maintenance instructions

Siemens
Siemens RDX Series operating instructions

AMX
AMX VST-TSF Dimensional drawing

Hakko Electronics
Hakko Electronics FG-101 Calibration instructions

Full Gauge Controls
Full Gauge Controls MT-512Ri LOG manual

Vescent
Vescent SLICE-QT quick start guide

RKC INSTRUMENT
RKC INSTRUMENT SA201 INITIAL SETTING MANUAL

Siemens
Siemens RVL482 operating instructions

oventrop
oventrop Unibox TQ RTL operating instructions

Store It Cold
Store It Cold CoolBot PRO instruction manual

GE Security
GE Security ZP720-3 Installation sheet