T-Mobile alcatel LINKZONE 2 Guide

Welcome
Start Guide
P10000243 CJB1RL0TBAAA
Grant R. Brimhall Library - 1401 E. Janss Road, Thousand Oaks, CA 91362
• 805-449-2660
Newbury Park Library - 2331 Borchard Road, Newbury Park, CA 91320 • 805-498-2139
www.tolibrary.org
9 10
Advanced to choose SSID from the list of
available networks.
•From an iOS device: Settings -> Wi-Fi. Choose
SSID from the list of available networks.
•From an Android device: Settings -> Wi-Fi
settings. Choose the SSID from the list of
available networks.
3. Enter password located on the label on the back
panel and click OK.
USE THE WPS
If your Wi-Fi device supports WPS, you do not have to
input the password manually after WPS connection has
been established. Please follow the following steps:
1. Power on your Mobile Hotspot and enable the Wi-Fi
function.
2. Press and hold the WPS key on your device for
3 seconds to start the Wi-Fi Protected Setup
authentication process.
3. Enable the WPS function on your Wi-Fi device in
order to respond to this authentication process.
4. Follow the system prompts on your Wi-Fi device to
finish the connection.
5. If no Wi-Fi device is connected within 2 minutes,
WPS function will automatically close.
MANAGING YOUR MOBILE HOTSPOT
ACCESSING YOUR MOBILE HOTSPOT
You can access your Mobile Hotspot device information
using an Internet browser.
To access using a browser:
1. Connect to your hotspot device through Wi-Fi using
the network connection software on your computer.
Provide the Wi-Fi network password, if requested.
2. Open a browser and enter http://mobile.hotspot or
http://192.168.0.1 in the address bar. The Mobile
Hotspot login screen will appear.
3. Enter your Password in the field provided.
You can find your default admin password and Wi-Fi
password on the label located on the underside of
the battery cover.
1 2
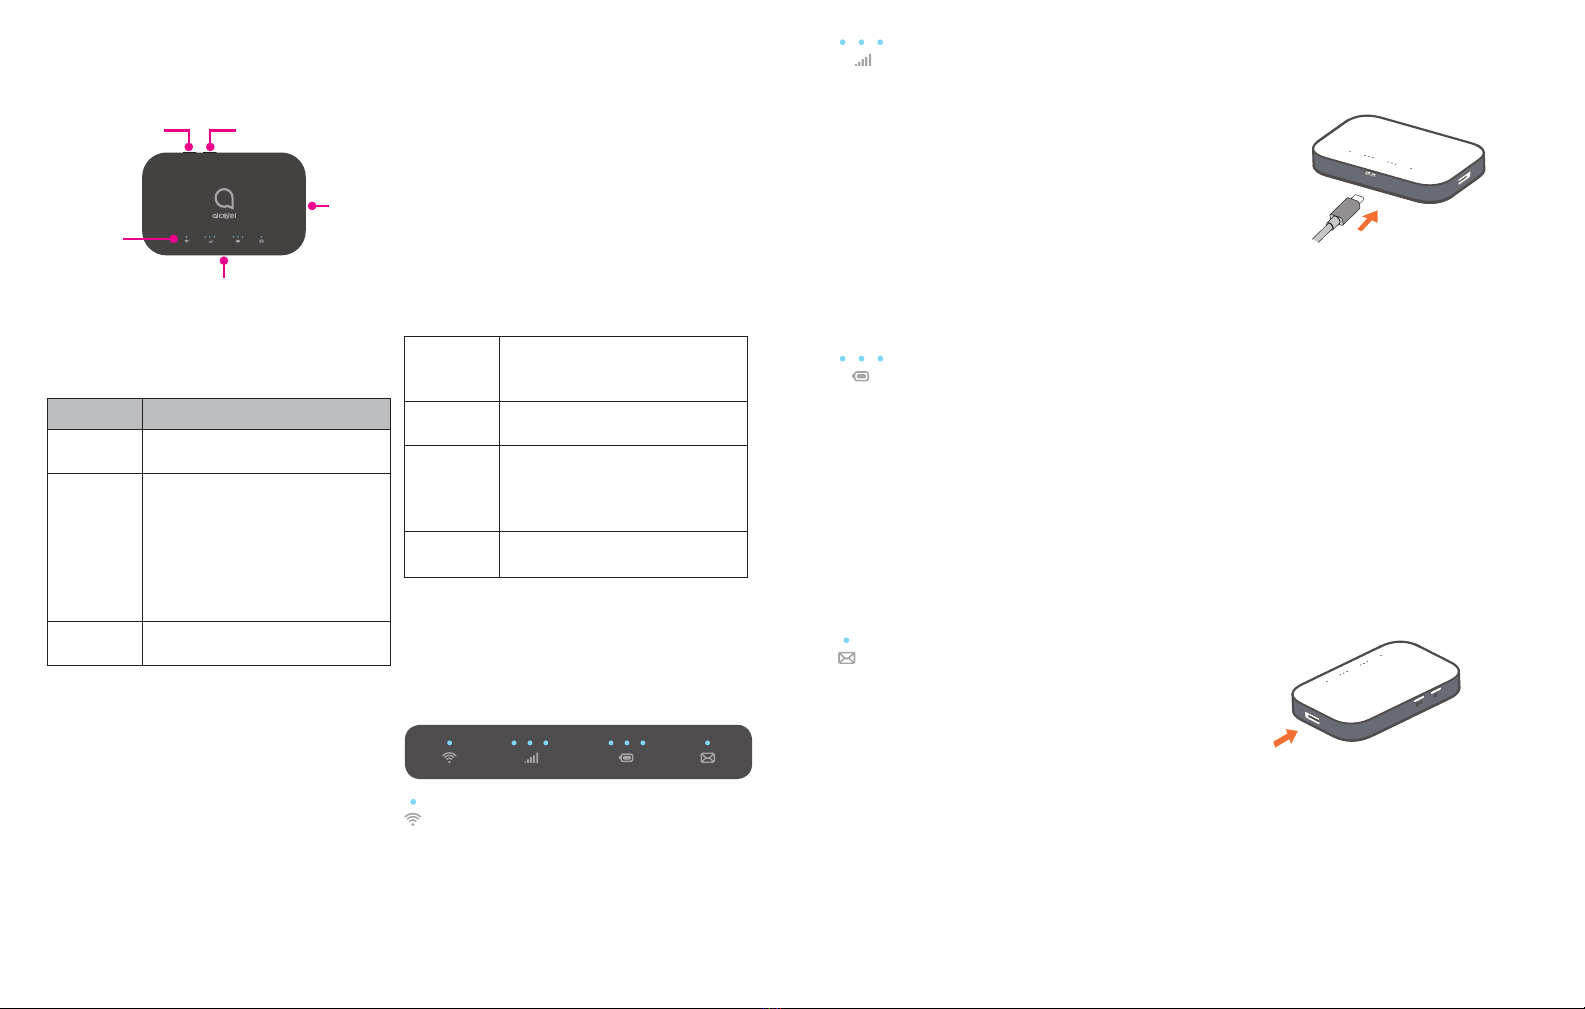
GETTING TO KNOW YOUR MOBILE
HOTSPOT
Power key WPS key
LED DESCRIPTION
Part Description
Power key Hold the Power key for 3 seconds to
power the device on/off.
WPS key Hold the WPS key for 3 seconds to
activate the WPS function. Once
activated, the Wi-Fi LED indicator will
flash every two seconds. If the network
is not accessed within 2 minutes,
device will automatically exit WPS
mode.
LED
indicators
Displays Wi-Fi, signal, battery, and SMS
status.
LED
indicators
Charging
out port
Charging in
port
Charging in
USB Port
Use the USB Type-C port to charge
your device and connect your device
to the client via the USB cable.
Charging out
USB port
Use the USB port to charge other devices,
such as tablets and smartphones.
Reset Press Reset key for 3 seconds to reset
device. All LED indicators will flash
blue 2 times to indicate that the device
has been reset to factory mode.
Reboot Hold Power key for 10 seconds to
restart device.
INDICATORS
When the hotspot is powered on, the following icons will
illuminate. For a description of the icons, please refer to
the table below:
Wi-Fi Indicator (Blue LED)
Solid Blue
Wi-Fi is active.
Flashing Blue
WPS mode is active.
1 2
GETTING TO KNOW YOUR MOBILE
HOTSPOT
Power key WPS key
LED DESCRIPTION
Part Description
Power key Hold the Power key for 3 seconds to
power the device on/off.
WPS key Hold the WPS key for 3 seconds to
activate the WPS function. Once
activated, the Wi-Fi LED indicator will
flash every two seconds. If the network
is not accessed within 2 minutes,
device will automatically exit WPS
mode.
LED
indicators
Displays Wi-Fi, signal, battery, and SMS
status.
LED
indicators
Charging
out port
Charging in
port
Charging in
USB Port
Use the USB Type-C port to charge
your device and connect your device
to the client via the USB cable.
Charging out
USB port
Use the USB port to charge other devices,
such as tablets and smartphones.
Reset Press Reset key for 3 seconds to reset
device. All LED indicators will flash
blue 2 times to indicate that the device
has been reset to factory mode.
Reboot Hold Power key for 10 seconds to
restart device.
INDICATORS
When the hotspot is powered on, the following icons will
illuminate. For a description of the icons, please refer to
the table below:
Wi-Fi Indicator (Blue LED)
Solid Blue
Wi-Fi is active.
Flashing Blue
WPS mode is active.
3 4
Signal Indicator (Red or Blue LED)
Solid Blue
Registered and connected to network.
Good coverage: 3 LEDs all light up
Middle coverage: 2 LEDs light up
Weak coverage: 1 LED lights up
Flashing Blue
Network disconnected.
Solid Red
No network, no SIM card or SIM card error, limited or
no service.
Battery Indicator (Red or Blue LED)
Solid Blue
3 LEDs light up blue: Battery level 80% - 100%
2 LEDs light up blue: Battery level 40% - 79%
1 LED lights up blue: Battery level 15% - 39%
Solid Red
1 LED lights up red: Battery level 0% - 14%.
Flashing
LEDs will flash while charging. Once the battery level is at
100%, 3 LEDs will display solid blue.
SMS Indicator (Blue LED)
Solid Blue
New message
Slowly Flashing Blue
Message inbox is full.
Off
No new messages.
Software update
Fast Flashing Blue
1. New Software version download or installation is
pending.
2. In process of software update installation.
INSERTING THE SIM CARD
1. Open the back cover.
We suggest that you hold the Alcatel LINKZONE 2 in one
hand and put the tip of your thumb of the other hand into
the slot and pull the cover outwards to open it.
5 6
2. Press and push the Nano SIM card to install it in the
SIM card slot.
REMOVING THE SIM CARD
Do not pull the SIM card out forcefully. Press and hold the flat
spring, and then pull the SIM card out.
INSERTING/REMOVING THE BATTERY
Ensure that the pins on the battery are aligned with the
pins on the device before fully inserting the battery.
Close the back cover with the loopholes aligned.
CHARGING YOUR MOBILE HOTSPOT
There are two ways to charge your mobile hotspot:
1. Charge using a charger and USB data cable
Connect the USB cable into the charging port as shown
and connect the charger to a power outlet to start charging.
7 8
When the device is powered off, it takes about 3 hours
before being fully charged.
2. Charge using a computer and USB data cable
You can also charge the device by connecting it to a PC
with the USB cable.
When the device is powered off, it takes about 4 hours
to complete charging.
Note: When red battery indicator lights up, device
should be charged in order to protect the battery.
CHARGING OTHER DEVICES
Use the full-size USB port to charge other devices, such as
tablets and smartphones.
FORGOT YOUR PASSWORD?
If you forget your password, just reset your device and
you will be back up and running in no time.
Use a paperclip or blunt pin to gently press the reset
button.
Reset key
OS SUPPORTED
Windows (32 bit & 64 bit) 7/8/8.1/10
Mac OS X 10.6 to 10.11 with the latest upgrade
CONNECT YOUR WI-FI DEVICE TO
YOUR MOBILE HOTSPOT
1. Power on your mobile hotspot.
2. On your computer or other Wi-Fi enabled device,
search for available Wi-Fi networks and select network
name (SSID) located on the label on the back panel of
your mobile hotspot.
Note: Wi-Fi name (SSID) and Wi-Fi Password is located
on the label inside the back cover of the device.
•From a Windows PC: Left-click Wireless
Network Connection on the task bar to view
available networks. Choose the SSID from the list
of available networks.
•From a Mac computer: Select System
Preferences -> Network -> Airport. Click
Other T-Mobile Automobile Accessories manuals


