T.O.M XQ 400 User manual

DIGITAL VIDEO RECORDER
OPERATION MANUAL (REV.1)
2
Safety precautions
Install this equipment avoiding a direct ray of light, heats and moistures.
-Doing not, can result in lowering efficiency, electric shock or fire.
Do not pull electric wire or do not touch power plug with wet hands.
-Can result in electric shock or fire.
Do not bend the power cable forcedly or do not press it with heavy materials.
-Can result in electric shock or fire.
Do not use damaged power cord or loose outlet plug.
-Can result in electric shock or fire.
Do not use the outlet fully.
-Can result in electronic shock or fire.
Do not disassemble, repair or convert this product without permission.
-Can result in electric shock or fire. When repair is required, contact the service center.
Do not open the cover of the product at your convenience or do not insert inductive stick
into the ventilation hole.
-Especially, SMPS is open, so only professional technicians are allowed to work on.
Failure to follow these instructions could result in serious personal
injury or death.
Failure to follow these instructions could result in personal injury or
property damage.
Notifies user of references to use conveniently.
Do not place equipment on the inclined or uneven plane.
-Can cause lowering of efficiency or malfunction.
Do not vibrate or shock in operation.
-Can cause out of order with equipment and hard disk (HDD).
be caution that do not cover the ventilation hole of HDD or put liquid into the equipment.
-may cause out of order of equipment and hard disk drive (HDD)

3
Contents
DVR Mainframe
Remote Controller
Power Cord Set
USB Mouse (option)
Software CD Operation Manual
Open the box at the clean and even place. And read operation manual thoroughly before you install.
Check the items supplied with your DVR system. Refer to the picture above
and contact your dealer if you find anything is missing or damaged.
The specification and appearance may be changed without prior notice.
Rack Mount

4
Chapter I. System overview
System Specificaiton--------------------------------------------------------------------------------7
System Characteristics-----------------------------------------------------------------------------8
Chapter II. H/W description
System Appearance-------------------------------------------------------------------------------10
DVR Rear Panel------------------------------------------------------------------------------------11
System Rear Connection detail----------------------------------------------------------------13
System Front Descriptipon----------------------------------------------------------------------16
Remote Control Description---------------------------------------------------------------------17
Installation Guide for HDD & ODD devices ---------------------------------------------18
System on / shutdown----------------------------------------------------------------------------19
Chapter III. Monitoring Screen
Monitoring Screen---------------------------------------------------------------------------------21
Screen split, login----------------------------------------------------------------------------------22
Menu – Dispay--------------------------------------------------------------------------------------23
Menu – Spot, PTZ, Alarm------------------------------------------------------------------------24
Menu – Status--------------------------------------------------------------------------------------25
Menu – Record, Camera, Color, OSD-------------------------------------------------------26
Menu – Backup-------------------------------------------------------------------------------------27
Menu – Mute, Logout-----------------------------------------------------------------------------28
Chapter IV. Setup
System------------------------------------------------------------------------------------------------30
System – Information----------------------------------------------------------------------------31
System – Date/Time-----------------------------------------------------------------------------32
System – Disk-------------------------------------------------------------------------------------33
System – User-------------------------------------------------------------------------------------34
System – Log, Logout, Shutdown-----------------------------------------------------------35
Network-----------------------------------------------------------------------------------------------36
Network – LAN------------------------------------------------------------------------------------37
Network – DDNS---------------------------------------------------------------------------------38
Network – Email----------------------------------------------------------------------------------39
Network – Callback------------------------------------------------------------------------------40
Device-------------------------------------------------------------------------------------------------41
Device – Camera---------------------------------------------------------------------------------42
Device – Alarm / Main Monitor----------------------------------------------------------------43
Device– Display / Spot Monitor---------------------------------------------------------------44
Device – Micellaneous--------------------------------------------------------------------------45
Record------------------------------------------------------------------------------------------------46
Record – Record policy / Record------------------------------------------------------------47
Event--------------------------------------------------------------------------------------------------48
Event – Motion------------------------------------------------------------------------------------49
Event – Sensor------------------------------------------------------------------------------------50
Event – Video loss-------------------------------------------------------------------------------51
Event – System-----------------------------------------------------------------------------------52
Index

5
Chapter V. Search
Search screen--------------------------------------------------------------------------------------54
Menu – Display / Calendar search------------------------------------------------------------55
Menu – Event search / Date / Time search------- ----------------------------------------56
Menu – First, Last, Bookmark------------------------------------------------------------------57
Menu – Local device / Backup device-------------------------------------------------------58
Chapter VI. Client program
REMOTE---------------------------------------------------------------------------------------------60
Connection Info / Button-------------------------------------------------------------------------61
Program Info & Setup-----------------------------------------------------------------------------62
Icon Adjustment------------------------------------------------------------------------------------63
Remote search execute & setup--------------------------------------------------------------64
Menu – Remote setup (Camera)--------------------------------------------------------------65
Menu – Remote setup (Alarm)-----------------------------------------------------------------66
Menu – Remote setup (Record)---------------------------------------------------------------67
Menu – Remote setup (Record table)--------------------------------------------------------68
Menu – Remote setup (Record policy)-------------------------------------------------------69
Menu – Remote setup (Motion)----------------------------------------------------------------70
Menu – Remote setup (Motion link)----------------------------------------------------------71
Menu – Remote setup (Sensor)---------------------------------------------------------------72
Menu – Remote setup (Sensor link)----------------------------------------------------------73
Menu – Remote setup (Video loss)-----------------------------------------------------------74
Menu – Remote setup (Video loss link)------------------------------------------------------75
Menu – Remote setup (Sytem)----------------------------------------------------------------76
Menu – Remote setup (Disk error/S.M.A.R.T)---------------------------------------------77
Menu – Remote setup (Disk error/S.M.A.R.T link)----------------------------------------78
Play & Pause / Audio transmission / Mouse click to right------------------------------79
Channel button/Layout change button-------------------------------------------------------80
PTZoperation----------------------------------------------------------------------------------------81
Remote search (Image playback screen / Section)--------------------------------------82
Remote search (Hotkey & Event search)---------------------------------------------------83
Remote search (Connection info / button / playback button)--------------------------84
Remote search (Split screen change / Audio / Image control button)---------------85
Remote search (Saving related button)-----------------------------------------------------86
Remote search (Preview)------------------------------------------------------------------------87
Remote search (Mouse click to right)--------------------------------------------------------88
Remote search (Time table)--------------------------------------------------------------------89
Backup playback-----------------------------------------------------------------------------------90
PLAYER----------------------------------------------------------------------------------------------91
Chapter VII. APPENDIX
Front Key---------------------------------------------------------------------------------------------95
Hot Key-----------------------------------------------------------------------------------------------96
Product Warranty----------------------------------------------------------------------------------97
Index

6
Chapter-I. System Overview

7
Power
Weight
Operation humidity
Operation temp.
Dimension
Front LED
LCD
Watchdog / Power monitor
Remote controller
Front Key
larm Function (In/Out)
PTZ
Console
EIDE
USB
Network
OS
Playback
Frame
Record
Frame
Display
Frame
Video Compression
Recording Resolution
Display Resolution
udio Compression
udio In/Out
Spot Out
VG Out
Monitor Out
Video Display
Video IN / Loop Out
7kg (Without CDRW, HDD)
34 Key, Jog/Shuttle
16/48/44/4
RS485
RS232C
2ch (Max 4E HDD)
USB2.0 (Front 2E , Rear 1E )
10/100 BaseT(1E )
Embedded Linux
Micro TX 115/230V C, 60/50Hz, 6/3
5~85%
0~45℃
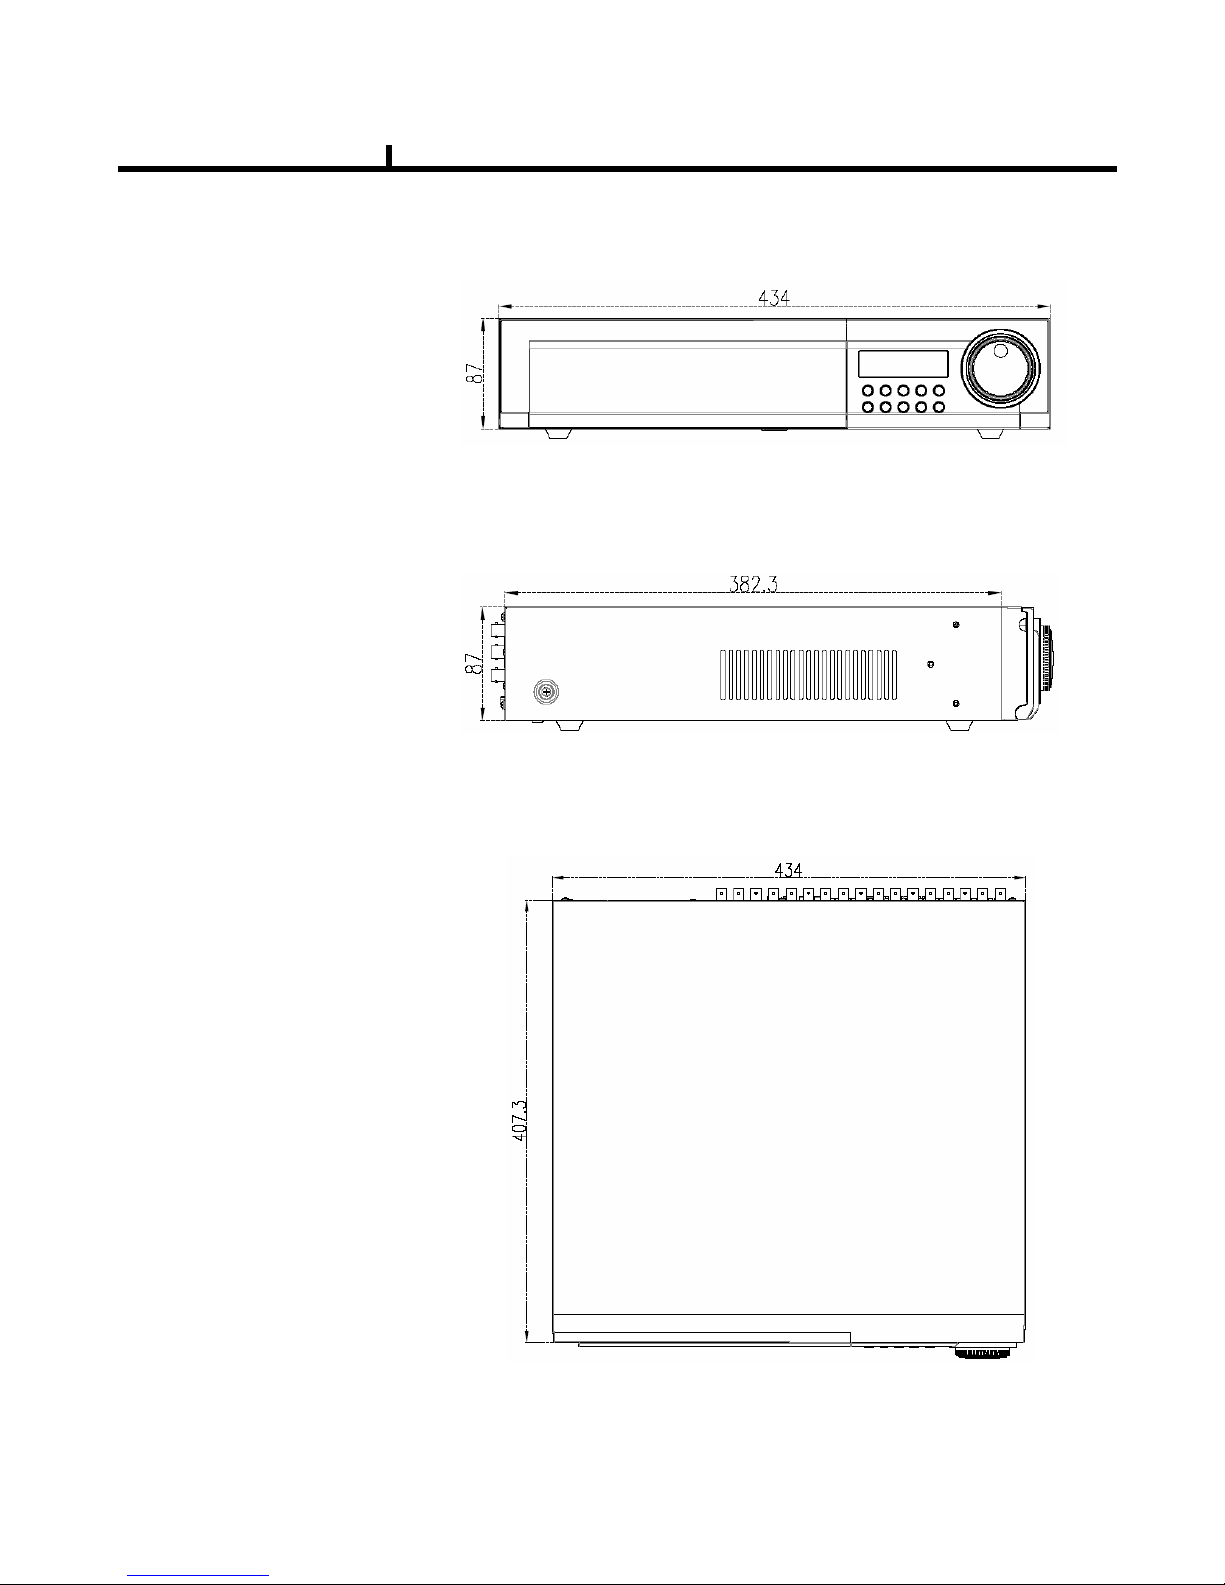
435(W) x 425(D) x 87(H) mm
Power, Network, HDD
16X1 Line green back LCD
Yes
ID Remote controller
200fps200fps100fpsP L
240fps240fps120fpsNTSC
400fps200fps100fpsP L
480fps240fps120fpsNTSC
400fps225fps100fpsP L
480fps270fps120fpsNTSC
Mpeg4 Level 1,2,3
720x480, 720x240, 360x240
720x480
G.723
4 in / 1 out
2ch
1ch
1ch Composition / 1ch S-Video
1, 4, 9, 161, 4, 91, 4
16/169/94/4
XQ 1600XQ 900XQ 400
Chapter I
System Specification

8
System Characteristics
480FPS real-time recording – 16ch / CIF(360*240 at NTSC) standard
High level specification with elegance design and jog/shuttle, easy UI with LCD
Control recording resolution, quality, frame rate by each camera
USB mouse supported
LIVE screen editing, Digital zoom, SPOT monitor supported
Event / Panic / Schedule record, optimized record mode supported
Diversified search by Time, Calendar, Event supported
Diversified backup by USB2.0 and DVD-RW supported
Convenient backup by AVI , Mini viewer etc
10/100 Base-T network
DDNS, NTP, E-MAIL, CALLBACK functions
DISK ID, S.M.A.R.T functions, real-time disk health check
Multi-language supported
Intensive security function by chosen AUTHORITY
Diversified network program by LIVE, SEARCH, CMS, AGENT
Chapter I

9
Chapter-II. H/W Description
10
1) Front View
2) Side View
3) Top View
Chapter II
System appearance

11
DVR rear panel
Video input(4CH) Video out
Alarm
input Alarm
output
Network port
USB port
RS232 port
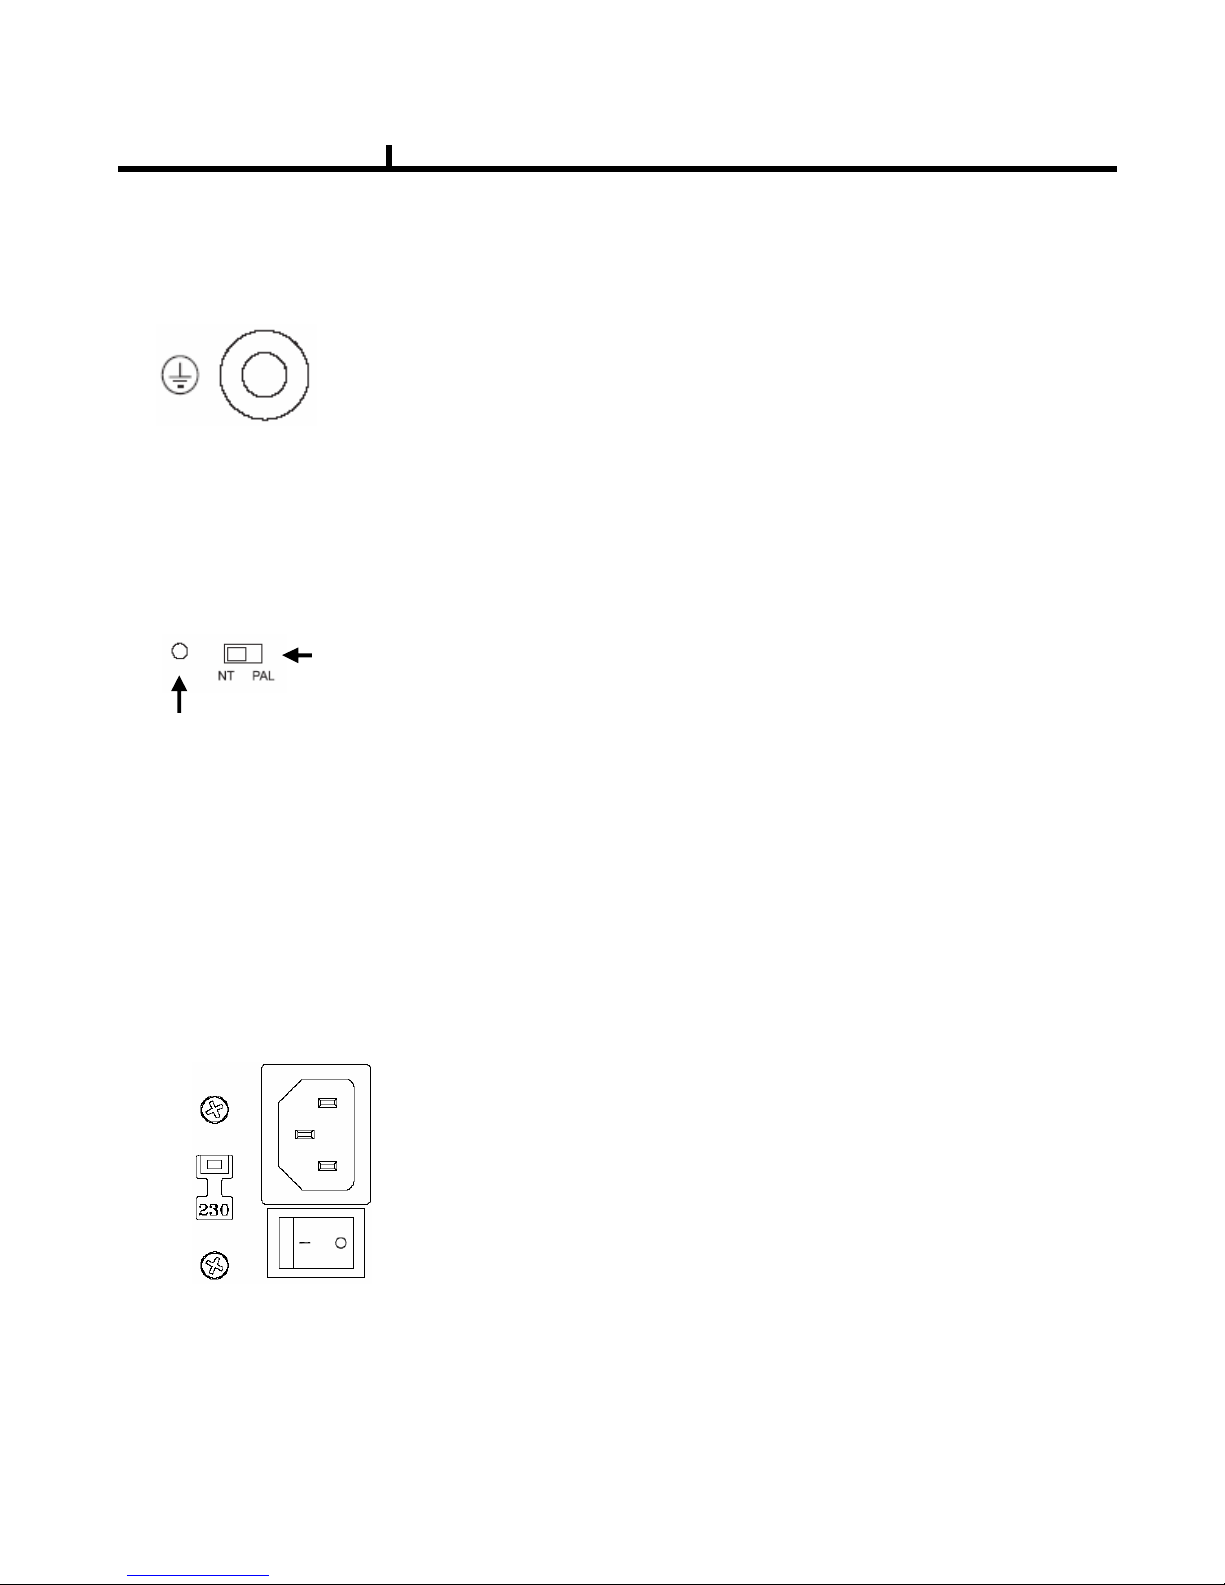
VGA port
S-VHS out
Factory reset switch
NT/PAL switch
Audio in/out SPOT
output
Power
AC115V~230V
switch
Power
switch
Ground
bolt
1) 4CH Rear Panel
Chapter II
Video input(9CH) Video out
Alarm
input Alarm
output
Network port
USB port
RS232 port
VGA port
S-VHS out
Factory reset switch
NT/PAL switch
Audio in/out SPOT
output
Power
AC115V~230V
switch
Power
switch
Ground
bolt
2) 9CH Rear Panel

12
Video input(16CH)
3) 16CH Rear Panel
Chapter II
Video out
Alarm
input Alarm
output
Network port
USB port
RS232 port
VGA port
S-VHS out
Factory reset switch
NT/PAL switch
Audio in/out SPOT
output
Power
AC115V~230V
switch
Power
switch
Ground
bolt

13
2) LOOP OUT Connection
3) Monitor Connection
It connects audio source (mic) to audio
input of RCA and connects speaker to
audio output.
It supports 10/100 BaseT, connects
Cat5 cable with RJ-45
System rear connection detail
1) Video Source Connection
It connects video sources (camera image) to BNC connector via cable.
BNC connector of LOOP OUT can be used other device’s input.
Caution : It may cause low quality of picture when connecting unconnected cable from any device
to LOOP OUT BNC.
CVBS OUT/SPOT : It connects normal CCTV CRT monitor.
S-VHS : It connects monitor that supports S-VHS(S-VIDEO)
VGA : It connects PC monitor or LCD monitor (not supporting DVI)
** Default of video output is designated to CVBS OUT + VGA OUT.
For screen out's conversion, It convert to CVBS OUT only if you press
front panel's DISPLAY button for more then 3 second.
The CVBS OUT's quality will be better If you use CVBS OUT only.
4) Audio Connection 5) Network Connection
Chapter II

14
6) RS232 port Connection.
RS232 port is connected to PC and other devices for specific function and After Sales purpose.
It consists of 2 USB (Front), 1 USB (Rear), its supported devices are such as USB mouse, USB
external HDD and USB memory stick
* Alarm output 1~4CH
It can be on/off for buzzer, headlamp etc.
Alarm input mode consists of NORMAL OPEN and NORMAL CLOSE.
Ref : The spec. Max24V/2A
7) USB port Connection
8) ALARM IN(SENSOR) Connection
It consists of ALARM IN(SENSOR) and SIGNAL+G(GND).
Ref : The spec. is Max 6V/50mA
9) ALARM OUT Connection
Chapter II
front rear
15
9) Ground (Field GND) Connection
It connects bolt with wire to the Ground to protect DVR and user’s safety from surge,
static electricity and noise
The factory reset switch located at the left side of NTSC/PAL switch is used to return to factory
default setup values.
When you need to shift NTSC/PAL mode, turn off the DVR before shift switch, then restart the DVR.
Power Supply is Micro ATX 115/230VAC , 60/50Hz , 6/3A
115/230VAC is changeable with shift switch.
Main power can be turned on/off by switch.
10) Factory Reset Switch and NTSC/PAL Shift Switch
Factory Reset Switch
NTSC/PAL Shift Switch
11) Power Connection <Power cord connector, AC 115V/230 switch, Power switch>
Chapter II
16
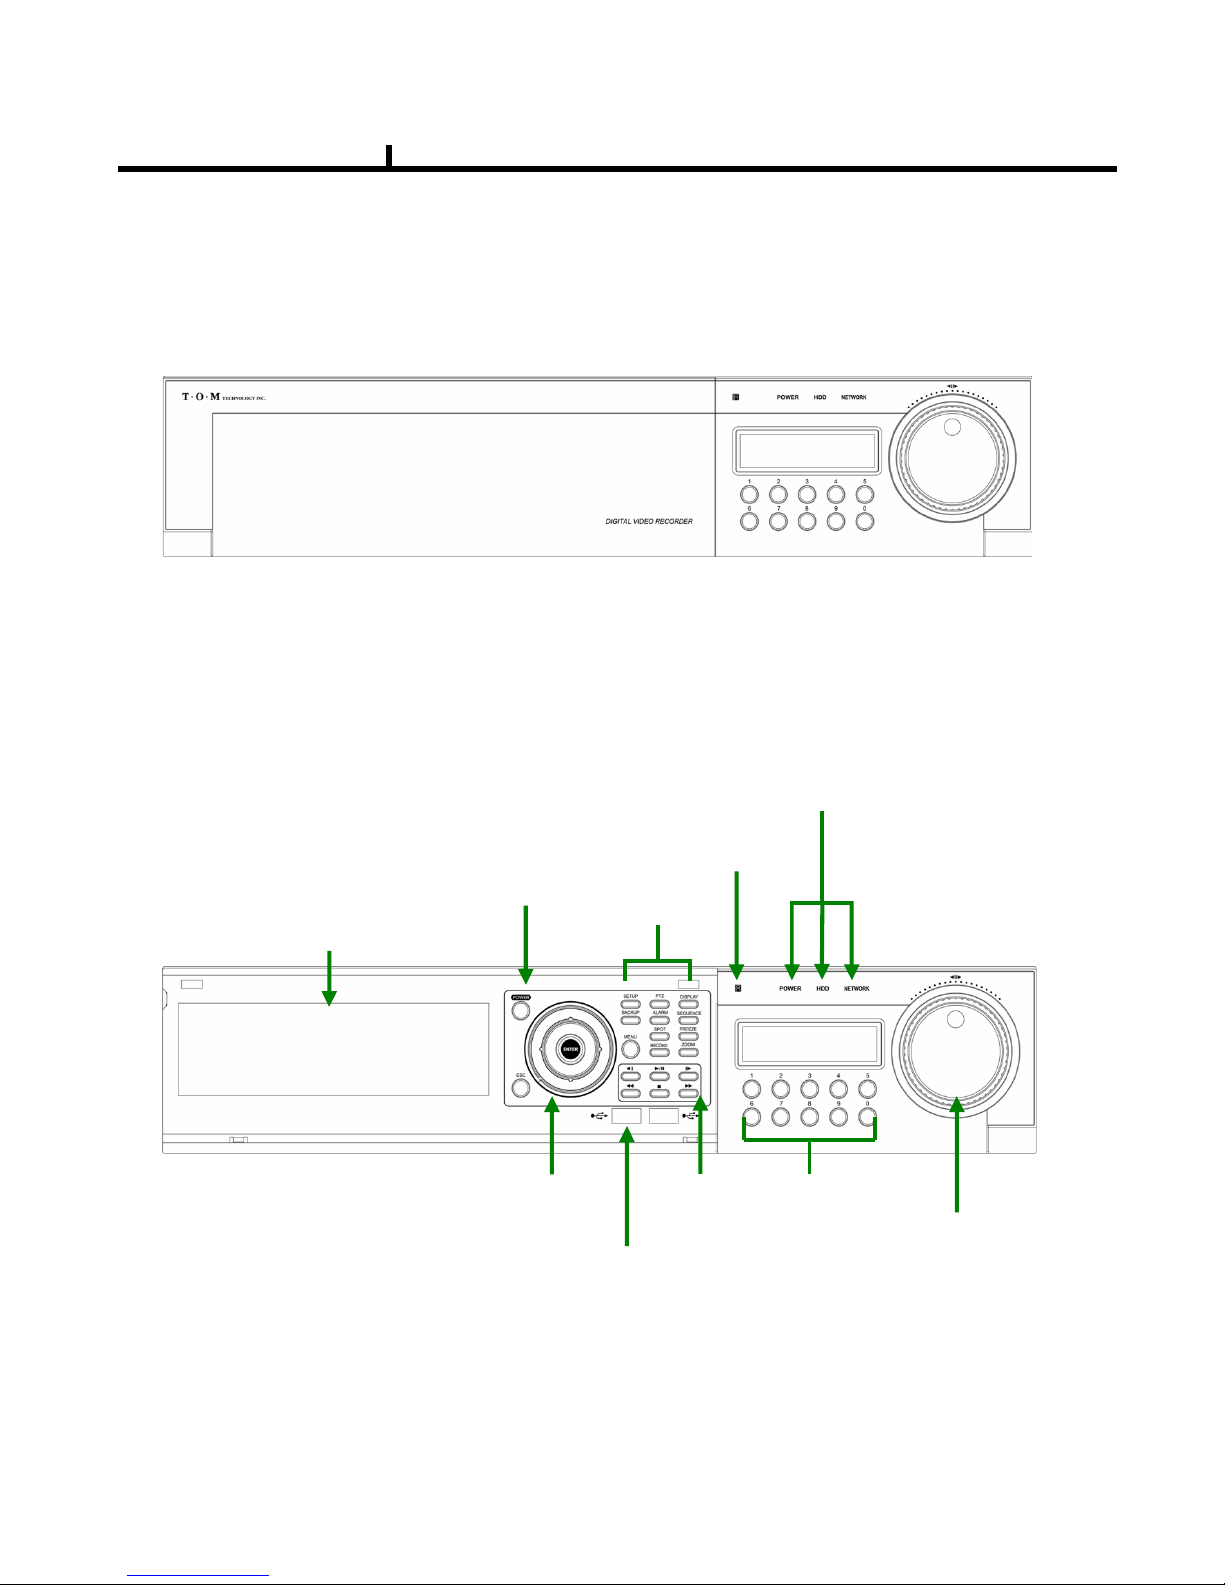
REMOVABLE HDD RACK
CD_RW,DVD_RW
Jog / Shuttle
Power
Direction
Remote control
IR sensor
Menu
USB2.0 port
Playback Number
(1~0)
<Front DOOR CLOSE >
<Front DOOR OPEN >
System Front Description
POWER/HDD/NETWORK LED
Chapter II

17
○How to change remote controller ID
A) Enter 'ID' button for 3seconds
B) Power LED is lightened.
C) Enter 2 letters of digit. (00 ~ 99) – In case 00, means no ID function
- ID set is available from 01 to 99.
D) Save setting value, then LED is off.
E) It enables to communicate the same ID DVR
F) LED is ON every time data is transferred.
Remote controller Description
Chapter II
ICON HOT KEY
LATEST SEARCH
TO LIVE
FIRST SEARCH
LAST SEARCH
CALENDAR SEARCH
EVENT SEARCH
RECORD
SETUP
BACKUP
COLOR
STATUS
ENTER
DIRECTION
MENU
ESCAPE
DISPLAY
SEQUENCE
FREEZE
ZOOM
REWIND
FAST FORWORD
STEP REVERSE
STEP FORWORD
FUNCTION
POWER ON/OFF
PLAYBACK & PAUSE
STOP
||▶
||▶||▶
||▶
■
■■
■
◀◀
◀◀◀◀
◀◀
▶▶
▶▶▶▶
▶▶
◀|
◀|◀|
◀|
|▶
|▶|▶
|▶
▲
▲▲
▲ ◀
◀◀
◀ ▶
▶▶
▶
▼
▼▼
▼
◀
◀◀
◀
▶
18
Chapter II
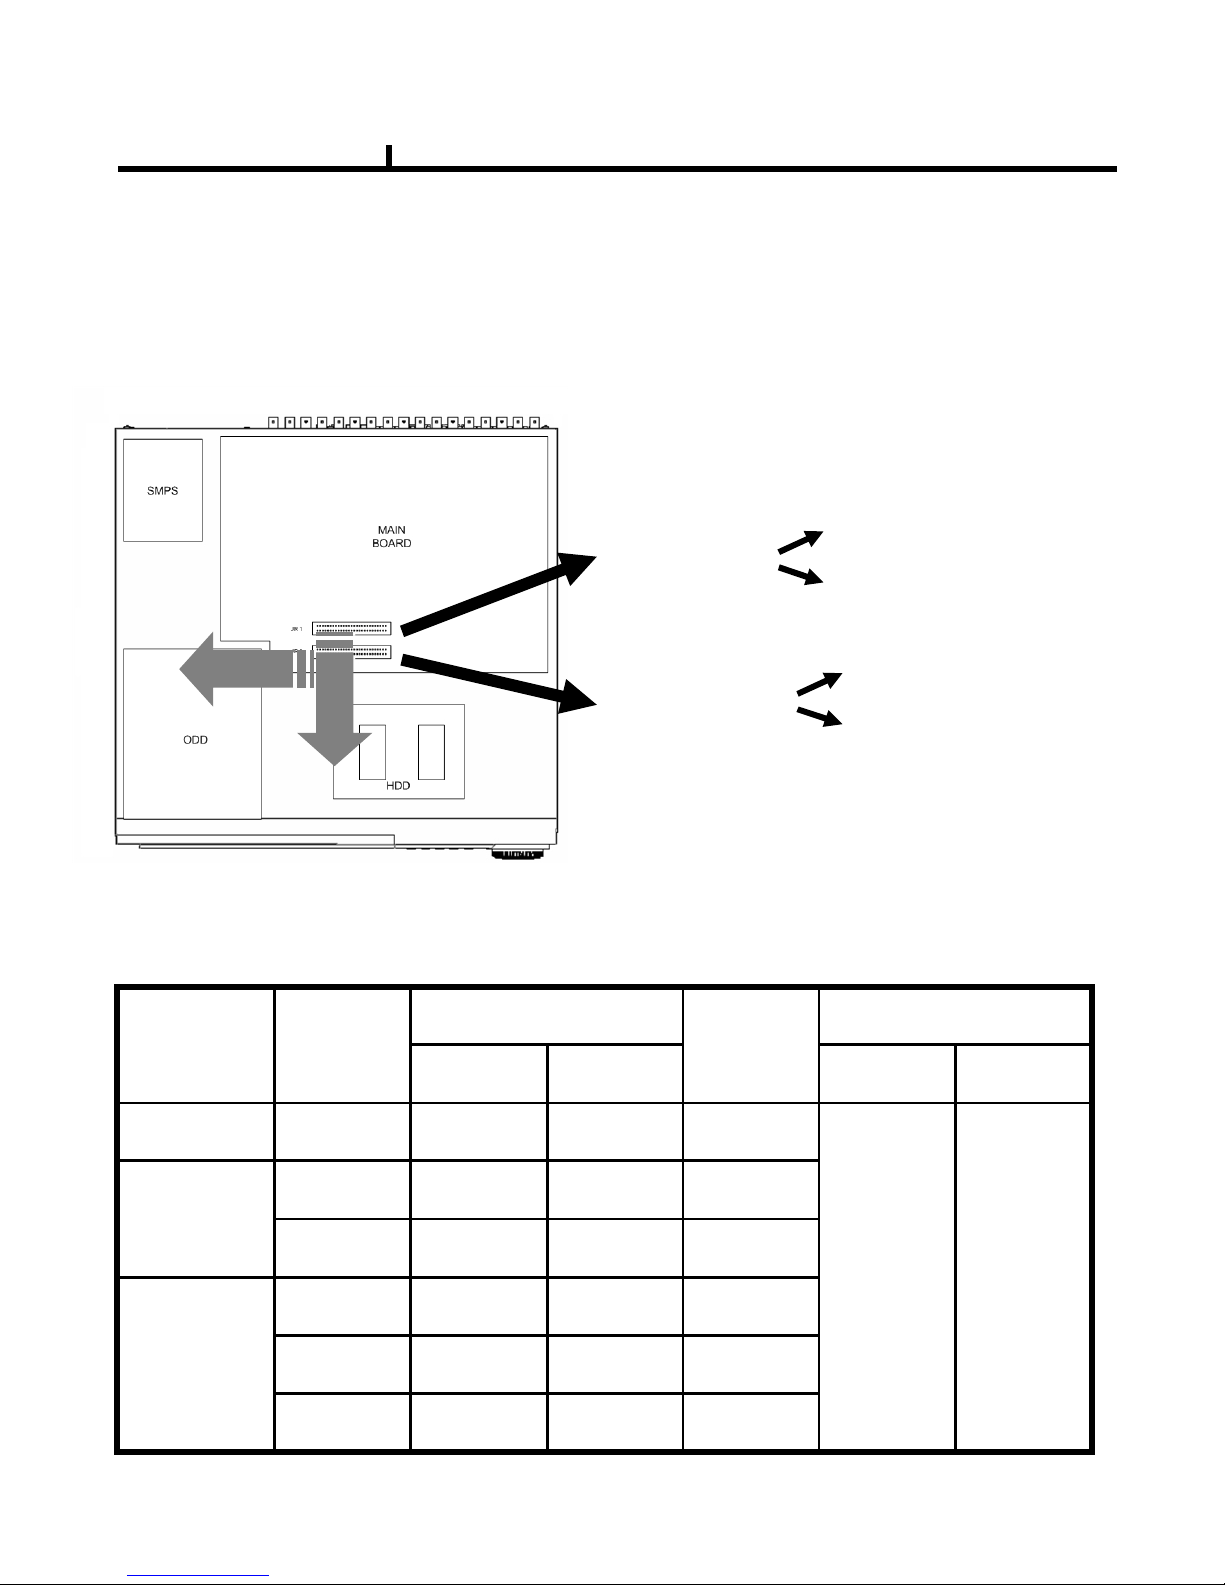
Installation Guide for HDD & ODD devices
Description
JR 1 : PRIMARY
JR 2 : SECONDARY
MASTER : HDD#1
SLAVE : HDD#2
MASTER : HDD#3
SLAVE : ODD(CD/DVD)
1. ODD(CD-RW/DVD-RW) devices should be installed as “Secondary Slave”.
2. HDD for system needs to be installed as “Primary”.
JR 2
SECONDARY
MASTER
HDD#3
JR 1
PRIMARY
SLAVE
HDD#2
SYSTEMJR 1
PRIMARY
MASTER
HDD#1
HDD x 3
JR 1
PRIMARY
SLAVE
HDD#2
SYSTEMJR 1
PRIMARY
MASTER
HDD#1
HDD x 2
JR 2
SECONDARY
SLAVE
SYSTEMJR 1
PRIMARY
MASTER
HDD#1HDD x 1
ConnectorIDEConnectorIDE
ODD(CD-RW/DVD-RW)
Devices
System
HDD
HDDInstalled
Guide Chart for installing several HDDs

19
System On
• Put the power to the DVR.
• Turn on the power switch at the rear and press power button in front.
• It takes about 90 seconds to boot (It may take more when network cable isn’t connected)
System Shutdown
• Press Power button, then shutdown menu appears. Enter power button to shutdown system.
• Or select [SETUP > SYSTEM > SYSTEM SHUTDOWN] to shutdown system.
Chapter II

20
Chapter-III. Monitoring Screen
This manual suits for next models
2
Table of contents


