Velleman DVR4MQAEB User manual

DVR4MQAEB - 1 - VELLEMAN
DVR4MQAEB – DIGITAL 4-CHANNEL MULTIPLEXER QUAD MPEG-4 RECORDER + ETHERNET
1. Introduction
To all residents of the European Union
Important environmental information about this product
This symbol on the device or the package indicates that disposal of the device after its lifecycle could harm
the environment.
Do not dispose of the unit (or batteries) as unsorted municipal waste; it should be taken to a specialised
company for recycling.
This device should be returned to your distributor or to a local recycling service.
Respect the local environmental rules.
If in doubt, contact your local waste disposal authorities.
Thank you for buying the DVR4MQAEB! Please read the manual thoroughly before bringing this device into service. If
the device was damaged in transit, don't install or use it and contact your dealer. Contents: 1 digital video recorder, 1
power adapter, software, accessories, HDD key and this manual.
2. Safety Instructions
Damage caused by disregard of certain guidelines in this manual is not covered by the warranty and the dealer will
not accept responsibility for any ensuing defects or problems.
THIS PRODUCT IS LICENSED UNDER THE MPEG-4 VISUAL PATENT PORTFOLIO LICENSE FOR THE
PERSONAL AND NON-COMMERCIAL USE OF A CONSUMER FOR (i) ENCODING VIDEO IN COMPLIANCE
WITH THE MPEG-4 VISUAL STANDARD (“MPEG-4 VIDEO”) AND/OR (ii) DECODING MPEG-4 VIDEO THAT WAS
ENCODED BY A CONSUMER ENGAGED IN A PERSONAL AND NON-COMMERCIAL ACTIVITY AND/OR WAS
OBTAINED FROM A VIDEO PROVIDER LICENSED BY MPEG LA TO PROVIDE MPEG-4 VIDEO. NO LICENSE IS
GRANTED OR SHALL BE IMPLIED FOR ANY OTHER USE. ADDITIONAL INFORMATION INCLUDING THAT
RELATING TO PROMOTIONAL INTERNAL AND COMMERCIAL USES AND LICENSING MAY BE OBTAINED
FROM MPEG LA, LLC. SEE HTTP://WWW.MPEGLA.COM
3. Features
MPEG4 DVR technology:
ocompression format provides crystal clear image with real time performance
Multiplex:
oallows live display, record, playback, backup, and network at the same time
Long recording period:
o500GB can record more than 18 days. (4CH, Frame Best Quality, 30IPS)
Backup function
obackup files with USB memory stick and network remote recording & backup
Remote surveillance:
oremote surveillance with licensed software AP and IE browser. Web surveillance supports 5 users
simultaneously.
Be very careful during the installation: touching live wires can cause life
-
threatening electroshocks
.
Keep this device away from rain and moisture.
Be aware of the presence of uninsulated dangerous voltage.

DVR4MQAEB - 2 - VELLEMAN
Intelligent motion trigger recording:
owith advanced motion detection function, scheduled motion detection recording
(4 different adjustable factors for motion detection sensitivity) and convenient search function,
customized security environment is achieved.
oalarm trigger recording will send alert with images to designated e-mail and FTP address
osupports pre-alarm recording (8MB).
Covered recording:
oa mask replaces the live image with a blank screen & the monitor shows nothing but recording is still on.
A/V support:
osupports 2 audio-in, 1 audio-out to record sounds.
osupports VGA output to monitor (optional).
General:
osupports multilingual OSD
osystem auto recovery after power restoration.
osupports daylight saving function.
osupports manual / timer / motion / alarm / remote recording functions.
owatermark function ensures authentication of recorded images.
osupports TCP/IP, PPPoE, DHCP and DDNS network connection.
PACKAGE CONTENTS:
- digital video recorder
- adapter (with 2 converters EU and UK)
- licensed software AP (application)
- accessories
- manual and quick start
4. Specifications
•system: NTSC / PAL (switchable)
•video compression format: MPEG4
•video input : 4 channels: composite video signal 1Vpp / 75 ohm BNC
•video loop output: 4 channels composite video signal 1Vpp / 75 ohm BNC
•video output:
omain monitor output: Composite video signal 1 Vp-p 75ΩBNC
ocall monitor output: Composite video signal 1 Vp-p 75ΩBNC
•maximum recording rate
oframe: 720 x 480 pixels @ 30 IPS (NTSC) or 720 x 576 pixels @ 25 IPS (PAL)
oCIF: 352 x 240 pixels @ 120 IPS (NTSC) or 352 x 288 pixels @ 100 IPS (PAL)
•Adjustable Recording Speed
oframe: 30, 15, 7, 3 IPS (NTSC) oder 25, 12, 6, 3 IPS (PAL)
oCIF: 120, 60, 30, 15 IPS (NTSC) oder 100, 50, 25, 12 IPS (PAL)
•image quality Setting: Best, High, Normal, and Basic
•hard disk storage: IDE-Typ, ATA66, IDE type, ATA66, supported HDD *1 , support HDD capacity over 400GB
•HDD Quick Cleaning: Quick clean up the “index system” of the recorded files. 250GB under 2 seconds
•recording mode: manuell, timer, motion, alarm
•watermark: yes
•refresh rate: 120 IPS for NTSC and 100 IPS for PAL
•audio I/O: 2 audio inputs, 1 audio output (mono)
•motion detection area: 16 ×12 grids per camera for all channels
•motion detection sensitivity: 4 adjustable variables with precise calculation for motion detection
•pre-alarm recording: yes (8MB)
•USB interface: supports USB 1.1/2.0 USB memory stick
•backup device: supports USB 1.1/2.0 USB memory stick and network

DVR4MQAEB - 3 - VELLEMAN
•web transmitting compression format: motion JPEG
•Ethernet: 10/100 Base-T; supports remote control and LiveView through Ethernet
•web interface: supports licensed software AP and IE-browser
•network connection: TCP/IP, PPPoE, DHCP und DDNS
•PTZ control: PELCO-D protocol
•dwell time (sequential channel switch): programmable and adjustable
•alarm I/O: 4 inputs, 1 output
•zoom: 2x digital zoom (live mode)
•key lock: ja
•video loss detection: ja
•camera title: up to 6 letters
•video adjustable: hue/colour/contrast/brightness
•date display format: YY/MM/DD, DD/MM/YY, MM/DD/YY and OFF
•power source: 19VDC (included)
•power consumption < 42W
•operating temperature: 10°C ~ 40°C
•dimensions: 343mm (W) ×59mm (H) ×223mm (D)
•optional peripheral
5. Description
a. Front panel
1. LED light
HDD: HDD is reading or recording.
HDD Full: HDD is full.
ALARM: Alarm has been triggered.
TIMER: When timer recording is turned on.
PLAY: Under playing status
REC: Under recording status
2. MENU
Press “MENU” button to enter main menu.
3. ENTER / SET
Press “ENTER” button to confirm.
Press “SET” to change channel display position.
Press “▲▼◄►“ to select the channel which you like to change.
Press “+” or “-” select the channel which you would like to show.
Press “ENTER” button to confirm.
Press "MENU" to leave the menu.
4. SEARCH
Press this button to enter the search mode.
5. SLOW
Under playback mode, press SLOW for a slow playback.
6. ZOOM
Press “ZOOM” button to enlarge the picture of selected channel (under live mode).

DVR4MQAEB - 4 - VELLEMAN
7. / -
Press to show the 4-channel display mode.
Press – to change the setting in the menu.
8. SEQ / +
Press SEQ to activate the call monitor function. Press SEQ again to escape this mode.
Press + to change the settings in the menu.
9. POWER
Turn the DVR4MQAEB on or off with this button. In the recording mode, stop the recording before switching off
the device.
10.CH1, CH2, CH3, CH4
Press one of these buttons to select the channel.
11.REC
Activation of the manual recording.
12.PLAY
Playback of the last recorded files.
13.▲/ , ▼/ ■, ◄/ , ►/
Press ▲▼◄►to move the cursor up, down, left or right.
Under playback mode: press to pause the playback, press ■to stop the playback, press to fast rewind and
press to fast forward.
14.
Press these two buttons to choose live or playback sound of the two audio channels.
15.
Press these two buttons at the same time to enter / exit the PTZ control mode.
16.POWER
Press “POWER” button on the DVR front panel to shutdown, and then press “POWER” + “►“ to switch to PAL
system. (Press the buttons until the monitor show the video image of the DVR.)
Press “POWER” button on the DVR front panel to shutdown, and then press “POWER” + “◄“ to switch to NTSC
system.
(Press the buttons until the monitor show the video image of the DVR.)
17. Press “MENU” + “ENTER” buttons on the DVR front panel to key lock.
b. Rear Panel

DVR4MQAEB - 5 - VELLEMAN
1. 1.75Ω/ HI
Switch to HI when using the LOOP function. If not, switch to 75Ω.
2. VIDEO INPUT / LOOP (channels 1-4)
INPUT: Connect to a video source such as a camera.
LOOP: Video output.
3. MONITOR
Connect to the main monitor.
4. CALL MONITOR
Connect to the call monitor. Show the channel switch display. When the alarm is triggered, the call monitor will
show the image of the triggered channel for a period of time.
5. AUDIO IN (2 x)
Connect to an audio source such as a camera with audio function. When starting the recording function, the audio
input will be recorded.
6. AUDIO OUT
Connect to the monitor or the speaker with 1 mono audio output of the same source.
7. D/V POORT (Digital Video Port)
Connect to a VGA card.
8. EXTERE I/O POORT
Connect to an external device.
9. LAN
Connect to the internet by a LAN cable.
10.LINK / ACT LED
When the internet is activated, the LED will turn on.
11.POWER
Connect to the provided adapter.
12.USB
Supports firmware updates and file backups.
6. Installation and Connection
a. Connection
Connect all the devices to set up a surveillance system, as shown below.
1. Install HDDs:
The HDDs must be installed before the DVR is turned on.
2. Connect cameras.
3. Connect monitors.
4. Connect the external devices.
5. Connect power.
The stand-by LED will be red. Press the POWER button. The power LED will be red.
It takes approx. 10 to 15 second to boot the system.
NOTE: Please refer to Appendix #1 for HDD installation instructions.
NOTE: Please refer to Appendix #2 for pin configurations of the external I/O port.

DVR4MQAEB - 6 - VELLEMAN
7. Basic operation
a. Recording
The DVR offers three recording modes: manual record,
event recording, and timer record. If power is off
accidentally, recorded video files will still be stored in the
HDDs. The DVR will return to the original recording status
after the power has been restored.
1) MANUAL RECORDING (continuous recording):
Recording is initiated by manually pressing the “REC”
button.
2) EVENT RECORDING (triggered by motion or external
alarm): When this function is activated, the recording is
triggered by motion or external alarm and indicated by “ ” and “ ”.
3) TIMER RECORDING (scheduled time): Recording is scheduled by the timer and is indicated by “TIMER
RECORD”.

DVR4MQAEB - 7 - VELLEMAN
NOTE: When the HDDs are full under O/W recording mode, previous recorded files may be overwritten without
further warning notices.
b. Playback
Press PLAY, the DVR will display the last recorded video.
1. FAST FORWARD (F.F.) & FAST REWIND (REW):
You can increase speed to fast forward and rewind.
In the playback mode:
*Press ” ” once to get 4x speed forward, press twice to get 8x speed etc. The maximum speed can reach
32x.
*Press ” ” once to get 4x speed rewind, press twice to get 8x speed etc. The maximum speed can reach
32x.
*The type of recording image size (frame or CIF) will also be shown on the screen.
2. PAUSE / IMAGE JOG:
Press the “ ” button to pause the current image displayed on the screen.
In the Pause mode:
*Press ” ” once to forward frame by frame.
*Press ” ” once to rewind frame by frame.
3. STOP:
Press the “■” button under all circumstances to return the DVR to live monitoring mode.
4. CHANNEL SHIFT:
*Display mode:
Press MODE “ ” button to display 4 channels.
*Full Screen Switch:
Press “+” or “ ” button to show the full screen channels.
*Channel display switch:
Press “SET” to change channel display position.
Press “▲▼◄►“ to select the channel you would like to change.
Press “+” or “-” select the channel you would like show.
Press “ENTER” button to confirm.
5. SLOW PLAYBACK:
Press “SLOW” button to get 1/4x speed playback, press twice to get 1/8x speed.
6. AUDIO:
Press simultaneously to select live or playback sounds of the 2 audio channels.
*AUDIO 1 (L) ; AUDIO 1 (P)
*AUDIO 2 (L) ; AUDIO 2 (P)
L: live audio
P: playback audio

DVR4MQAEB - 8 - VELLEMAN
8. Detailed menu configuration
a. Menu diagram

DVR4MQAEB - 9 - VELLEMAN
b. Main menu options - RECORD
Press “MENU” to enter the main menu. The standard password is 0000. Enter the password and press "ENTER" (
you can change the password later on, see "Advance menu: SYSTEM p.16"
Use the following buttons to set the menu:
Use“▲▼◄►“ to move the cursor.
Use “+, -” to select the numbers.
Press “ENTER“ to enter the submenu / confirm your choice
Press “MENU“ to go the OSD menu / to confirm / to leave the menu.
1. MANUAL RECORD ENABLE:
Start / stop the manual recording function.
2. EVENT RECORD ENABLE:
Start / stop the event recording function. When this function is activated, the recording will be triggered by motion
or external alarm.
3. TIMER RECORD ENABLE:
Start / stop the timer recording function.
4. OVERWRITE:
Select to overwrite the previous recording video in the HDD. When the HDD is full under O/W recording mode,
previous recorded files will be overwritten without further warning notices.
5. RECORD IMG SIZE:
There are two recording options: FRAME & CIF. When changing the recorded image size, stop the recording first.
6. RECORD QUALITY:
There are four quality settings: BEST, HIGH, NORMAL & BASIC
7. MANUAL RECORD IPS:
Recording is activated by pressing the “REC” button. Select the images per second of MANUAL RECORD. The
options are as follows:
NTSC: FRAME: 30, 15, 7, 3 PAL: FRAME: 25, 12, 6, 3
CIF: 120, 60, 30, 15 CIF: 100, 50, 25, 12
8. EVENT RECORD IPS:
Recording is activated by event (alarm and motion trigger). Select the images per second of EVENT RECORD.
The options are as follows:
NTSC: FRAME: 30, 15, 7, 3 PAL: FRAME: 25, 12, 6, 3
CIF: 120, 60, 30, 15 CIF: 100, 50, 25, 12
9. TIMER RECORD IPS:
Recording is activated by timer schedule. Select the images per second of TIMER RECORD. The options are as
follows:
NTSC: FRAME: 30, 15, 7, 3 PAL: FRAME: 25, 12, 6, 3
CIF: 120, 60, 30, 15 CIF: 100, 50, 25, 12
10.TOTAL IPS SHARE:
There are two IPS settings:
FIX: IPS per channel = RECORD IPS ÷ 4 channels
GROUP (suited for Frame Modus):
IPS per channel = RECORD IPS ÷ number of channels under recording
RECORD
MANUAL RECORD ENABLE
EVENT RECORD ENABLE
TIMER RECORD ENABLE
OVERWRITE
RECORD IMG SIZE
RECORD QUALITY
MANUAL RECORD IPS
EVENT RECORD IPS
TIMER RECORD IPS
TOTAL IPS SHARE
(MENU
)
RECORD
TIMER
DATE
ADVANCE

DVR4MQAEB - 10 - VELLEMAN
c. Main menu options: TIMER
Move the cursor to “TIMER” and press ”ENTER”. The screen will show the following options:
1. DATE:
A scheduled record date (SUN/MON/TUE/WED/THU/FRI/SAT/MON–FRI/SAT-SUN/DAILY/OFF) can be set to
activate the timer recording.
NOTE 1: Specific date can be changed with the “+” or “-” buttons.
NOTE 2: If you plan to set the timer recording across midnight, there are two ways for setting the timer recording
schedule:
Example 1: If you only want to set recording timer schedule from every Sunday 23:30 to Monday 23:30, then set
the recording timer schedule as Sunday from 23:30 to 23:30.
Example 2: If you plan to set the timer recording from Sunday 08:00 to Monday 15:00, then set the recording
timer schedule as Sunday from 08:00 to 00:00 and Monday 00:00 to 15:00.
2. START:
Select the starting time for the recording.
3. END:
Select the finishing time for the recording.
d. Main menu options: DATE
Move the cursor to the “DATE” and press ”ENTER”. The screen will show the following
options:
1. DATE:
Set the correct time of the DVR (YEAR / MONTH / DAY / HOUR / MIN / SEC).
2. FORMAT:
There are three date formats: Y-M-D, M-D-Y, D-M-Y.
(MENU)
RECORD
TIMER
DATE
ADVANCE
RECORD
DATE START END
OFF 00 : 00 00 : 00
DAILY 08 : 00 18 : 00
SUN 06 : 00 23 : 00
MON-FRI 00 : 00 00 : 00
OFF 00 : 00 00 : 00
OFF 00 : 00 00 : 00
OFF 00 : 00 00 : 00
(MENU)
RECORD
TIMER
DATE
ADVANCE
DATE
DATE 2006-MAR-28 13: 23: 00
FORMAT Y-M-D
DAYLIGHT SAVING ON

DVR4MQAEB - 11 - VELLEMAN
3. DAYLIGHT SAVING:
Now, you can specify whether to use daylight saving time and time period (ON / OFF). Daylight saving time can
be adjusted manually. Enter the daylight saving menu mode to set start time, end time and to adjust the hour of
the daylight saving.
Note: see picture above: during the daylight saving time (starts from Sunday the 4
th
of March and ends on Sunday
the 4
th
of October) an hour will be added to the DVR system time.
e. Main menu options: ADVANCE
Move the cursor to the “ADVANCE” and press ”ENTER”. The screen will show the following
options:
Advance menu: CAMERA
Move the cursor to "CAMERA" and press "ENTER", the display will show the following possibilities:
1. TITLE:
Move the cursor to the title which you want to change and press “ENTER” to access the setting screen. Assign a
title to each channel (up to six characters (letters or symbols…)); the default title is the channel number.
2. BRIG / CONT / SATU / HUE:
Adjust the brightness/contrast/saturation/hue of each channel.
The level is from 0 to 255. The default value of BRIG is 110, others are 128.
3. COV (COVER):
Select “YES” to mask the selected channel which is under recording.
When this function is activated, the “COV” words will be shown on the screen.
DA
YLIGHT SAVING
ON 4th-SUN-MAR 01 : 00 : 00
OFF 4th-SUN-MAR 01 : 00 : 00
ADJUST 01 : 00
(MENU)
RECORD
TIMER
DATE
ADVANCE
ADVANCE
CAMERA
DETECTION
DISPLAY
ALERT
REMOTE
SYSTEM
NETWORK
BACKUP
HDD INFO
EVENT LOG
CAMERA
TITLE BRIG CONT SATU HUE COV REC
01 110 128 128 128 NO YES
02 110 128 128 128 NO YES
03 110 128 128 128 NO YES
04 110 128 128 128 NO YES
PRE NEXT
DVR4MQAEB - 12 - VELLEMAN
4. REC (RECORD):
Select “YES” to enable the record function; Select “NO” to disable the record function.
5. PRE / NEXT:
Select “PRE” to go to the previous page; Select “NEXT” to go the next page.
Advance-menu: DETECTION
Move the cursor to “DETECTION” and press ”ENTER”. The screen will show the following options:
DETECTION SETUP
1. TITLE:
Show the title of each camera channel.
2. DET:
Select “ON” to activate the motion detect function of each channel.
Select “OFF” to deactivate the motion detect function of each channel.
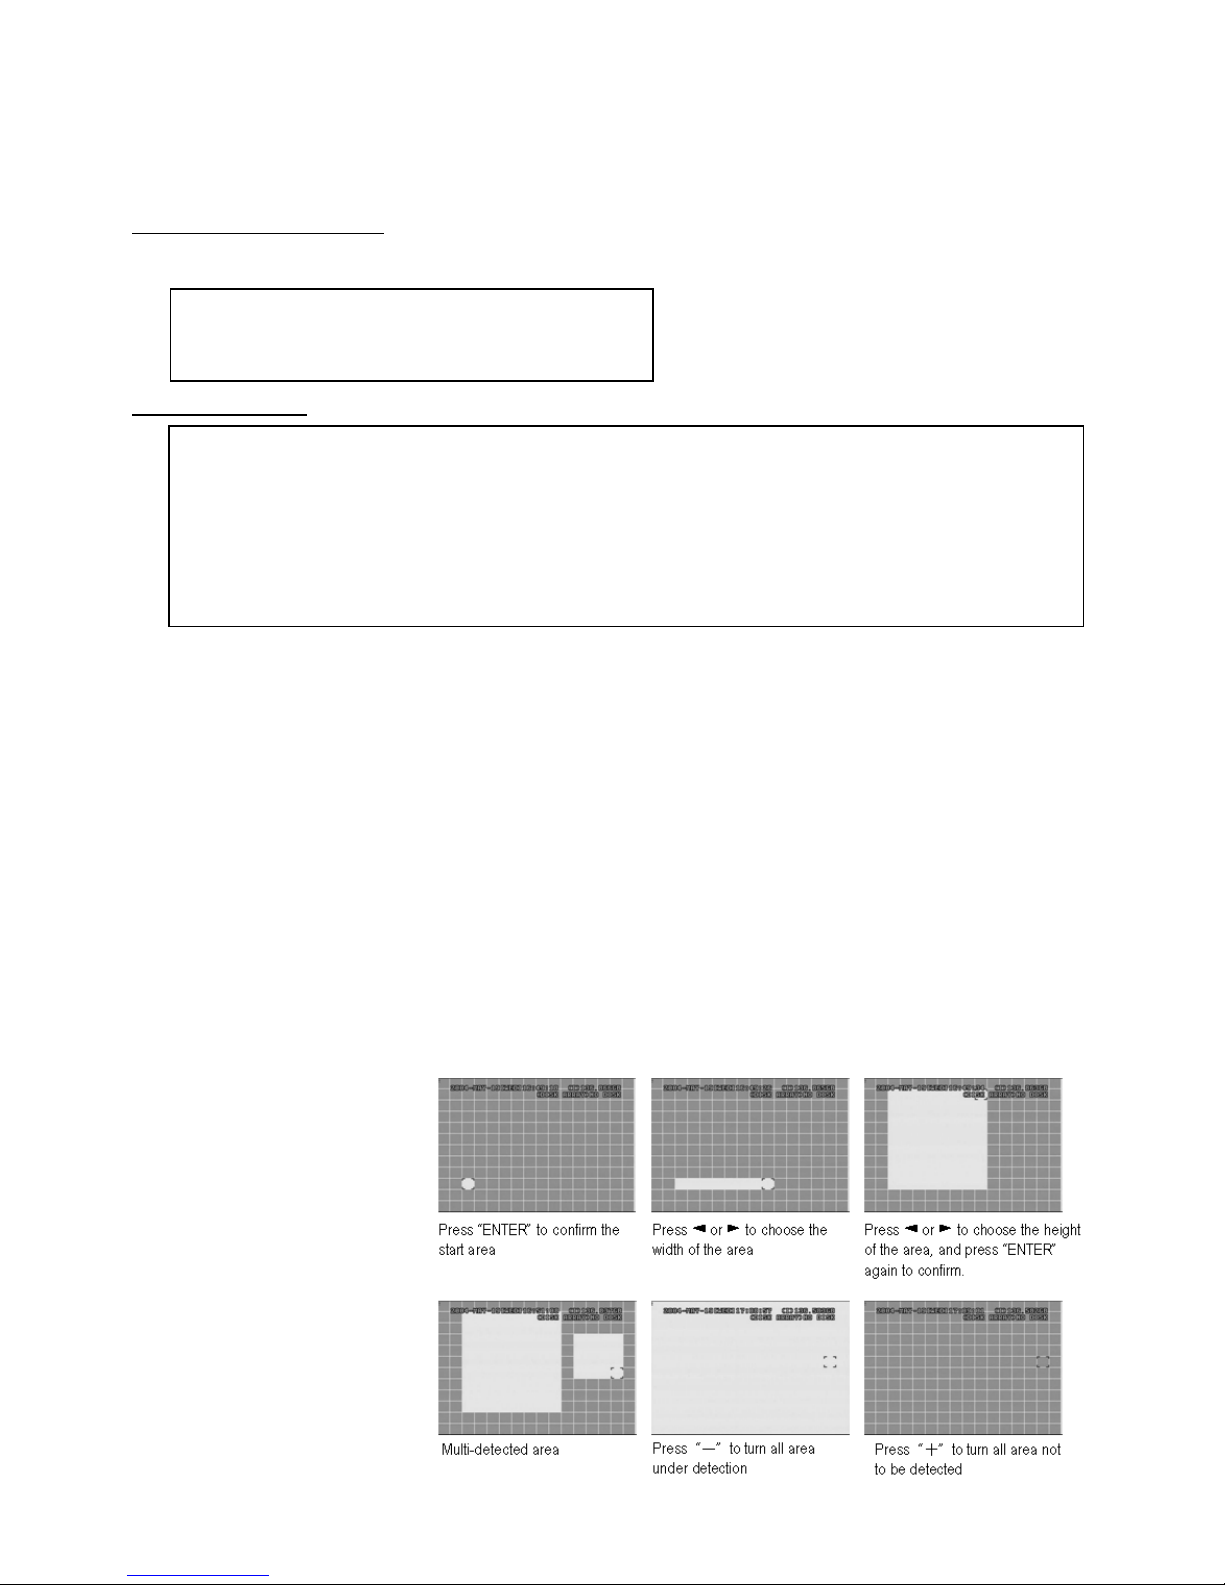
3. AREA:
Press the “ENTER” button to set detection area.
Pink blocks represent the area that is not being detected while the transparent blocks represent the area that is
under detection.
▲▼◄►:to switch between the
different goals.
4. LS:
The sensitivity of comparing
two different images. The
smaller the value, the higher
sensitivity for motion
detection.
The highest sensitivity setting
is 00, the lowest sensitivity
setting is 15. The default value
is 07.
DETECTION
TITLE DET AREA LS SS TS RE ALARM
01 ON SETUP 07 03 02 10 OFF
02 ON SETUP 07 03 02 10 LOW
03 ON SETUP 07 03 02 10 HIGH
04 ON SETUP 07 03 02 10 OFF
PRE NEXT
DETECTION
DETECTION SETUP
DETECTION TIMER

DVR4MQAEB - 13 - VELLEMAN
5. SS:
The sensitivity towards the size of the triggered object on the screen (the number of motion detection grids). The
smaller the value, the higher the sensitivity for motion detection. The highest sensitivity setting is 00 and the
lowest sensitivity setting is 15. The default setting is 03.
NOTE: The default setting of Spatial Sensitivity is 03. This means that, when 3 grids are detected for motion at one
time, the system will get triggered. The value of Spatial Sensitivity must be less than the number of grids
which you set up to motion detection area.
6. TS:
The sensitivity towards how long the object gets triggered. The smaller the value, the higher sensitivity for motion
detection. The highest sensitivity setting is 00 while the lowest sensitivity setting is 15. The default setting is 02.
7. RE:
The value of RE is a reference for detection. The default value is 10, which means the DVR will compare 10
continuous images at one time according to the sensitivity of LS, SS and TS simultaneously. Therefore the bigger
the value, the higher sensitivity for motion detection.
8. ALARM:
Select LOW / HIGH for the alarm polarity. The default alarm value is OFF.
DETECTION TIMER
Set “DATE” to ON. Set the date, start time, end time of the detection function.
Advance menu: DISPLAY
Move the cursor to the “DISPLAY” and press ”ENTER”. The screen will show the following options:
1. TITLE DISPLAY:
Turn the channel title display on / off.
2. DATE DISPLAY:
Turn the date display on / off.
DISPLAY
TITLE DISPLAY ON
DATE DISPLAY ON
HDD INFO ON
LOSS SCREEN BLUE
PLAYBACK INFO NORMAL
DWELL DURATION (SEC) 2
DE-INTERLACE ON
MONITOR OUT MAIN
OSD SETUP
WATERMARK ON
DETECTION TIMER
DATE START END
OFF 00 : 00 00 : 00
DAILY 08 : 00 18 : 00
SUN 06 : 00 23 : 00
MON-FRI 00 : 00 00 : 00
OFF 00 : 00 00 : 00
OFF 00 : 00 00 : 00
OFF 00 : 00 00 : 00

DVR4MQAEB - 14 - VELLEMAN
3. HDD INFO:
Turn the display information of internal HDD on / off.
4. LOSS SCREEN:
Set the colour of video loss screen (Blue or Black)
5. PLAYBACK INFO:
Set the position where playback information will be indicated (centre or normal (on the button of left-hand side of
the screen)).
6. DWELL DURATION (SEC):
Set the duration time of each channel for CALL MONITOR (2, 4, 8, 16 sec.).
7. DE-INTERLACE:
Set the “DE-INTERLACE” function on / off.
8. MONITOR OUT:
Choose a device for outgoing images (main menu / VGA output – optional)
9. OSD:
Set the desired OSD-colour (On Screen Display).
10.WATERMARK:
In the playback mode of the software AP, you can check the authenticity of the backup images. When backup
images have been tampered with, the image will turn light pink and the playback will be paused. See below for
further instructions. This function is always on and cannot be changed.
Advance menu: ALERT
Move the cursor to the “ALERT” and press
”ENTER”. The screen will show the following
options:
1. EXT. ALERT:
Set the sound on / off when external alarm is triggered.
2. INT. BUZZER:
Set the sound of KEY / VLOSS / MOTION / ALARM / HDD FULL on or off.
3. KEY BUZZER:
Set the sound on / off.
4. VLOSS BUZZER:
Set the sound on / off.
5. MOTION BUZZER:
Set the sound on / off when motion alarm is triggered.
6. ALARM BUZZER:
Set the sound on / off when internal alarm is triggered.
7. HDD BUZZER:
Set the sound on / off when the HDD is full.
8. HDD NEARLYFULL (GB):
If HDD buzzer is on, you can choose to have a buzzer notification when the HDD available capacity has only xxx
GB left.
9. ALARM DURATION (SEC):
Press “ENTER” or “+” or “-” button to set the duration time of alarm recording (5, 10, 20, 40 sec.).
ALERT
EXT. ALERT ON
INT. BUZZER ON
KEY BUZZER ON
VLOSS BUZZER ON
MOTION BUZZER ON
ALARM BUZZER ON
HDD BUZZER ON
HDD NEALY FULL (GB) 05
ALARM DURATION (SEC) 05
PRE-ALARM ON

DVR4MQAEB - 15 - VELLEMAN
10.PRE-ALARM:
Set the pre-alarm function on (8MB) / off.
When pre-alarm and event record functions are activated, the DVR will record 8MB file before alarm / motion
triggered.
Advance menu: REMOTE
Move the cursor to “REMOTE” and press ”ENTER”. The screen will show the following options:
1. TITLE:
Title for each camera.
2. DEVICE:
Select to control normal camera or PTZ camera for each channel.
3. ID:
Set the ID number (0 ~ 255) as the ID of each device.
If the PTZ connection is correct, the standard ID number of the PTZ will be shown on the display. See below:
"PTZ connection and control".
4. PROTOCOL:
Select NORMAL or PELCO-D protocol. The baud rate = 2400 bits/sec.
5. RATE:
Set the baud rate of each channel (2400, 4800, 9600, 19200, 57600).
PTZ connection and control:
1. Device: PTZ / Pelco-D protocol PTZ.
2. Connection: for detailed information on connection and instructions, see PTZ manual.
Note: for the PR485A and RS485B-Port, see "5.b Back panel" or "Appendix 2: PIN configuration".
3. "Control mode": see front panel.
4. Detailed instructions: see PTZ manual.
Advance menu: SYSTEM
Move the cursor to the “SYSTEM” and press ”ENTER”. The screen will show the following options:
:
REMOTE
TITLE DEVICE ID PROTOCOL RATE
01 PTZ 001 P – D 02400
02 CAMERA 002 NORMAL 02400
03 CAMERA 003 NORMAL 02400
04 CAMERA 004 NORMAL 02400
SYSTEM
SERIAL TYPE RS-485
BAUD RATE 02400
HOST ID 003
PASSWORD 0000
RESET DEFAULT RESET
CLEAR HDD MASTER
UPGRADE NO
AUTO KEYLOCK NEVER
LANGUAGE ENGLISH
VERSION 1030-08-H3-04-V354-07
VIDEO FORMAT NTSC

DVR4MQAEB - 16 - VELLEMAN
1. SERIAL TYPE:
Press “ENTER” or “+” or “-” button to set the control serial type (RS-485, RS-232) of DVR.
2. BAUD RATE:
Press “ENTER” or “+” or “-” button to set the BAUD RATE of DVR (2400, 9600, 19200, 57600).
3. HOST ID:
Press “ENTER” or “+” or “-” button to set the ID of DVR (0 ~ 255).
4. PASSWORD:
Press “ENTER” or “+” or “-” button to set the password for accessing DVR.
Users with a guest password can only watch the live streaming video and sequence, change the channel display
and lock the keys.
5. RESET DEFAULT:
Press “ENTER” and select “YES” to confirm or “NO” to cancel.
6. CLEAR HDD:
Press “ENTER” and “YES” to clear HDD or “NO” to cancel. In this function, you can press “+” or “-” to select
the MASTER HDD, SLAVE HDD or DISK ARRAY which you plan to clear.
7. UPGRADE:
Press “ENTER” and select “YES” to confirm upgrade or “NO” to cancel.
8. AUTO KEYLOCK:
Set the auto key lock function (Never / 10 sec / 30 sec / 60 sec).
9. LANGUAGE:
Press "ENTER" und pick the OSD language.
10.VERSION:
The firmware version information will be shown on the screen.
11.VIDEO FORMAT:
The information of the DVR’s video format will be shown on the screen.
Advance menu: NETWORK
Move the cursor to the “NETWORK” and press ”ENTER”. The screen will show the following options:
1. NETWORK TYPE (STATIC):
Select NETWORK TYPE and press “+” or “-” button to set the network type as STATIC. Press “ENTER” to go
to the submenu of the network. In the submenu of network type, use “+” or “-” button to set all the information
needed in the DVR. See below.
2. NETWORK TYPE (DHCP):
This DHCP function needs to be supported by router or modem network cable with DHCP service. For detailed
DHCP setting, refer to “9.e. Software AP”.
3. NETWORK TYPE (PPPoE):
This PPPoE function needs to have “username” and “password” from ISP supplier.
For detailed PPPoE setting, refer to “9.e. Software AP”.
NETWORK
NETWORK TYPE STATIC
DNS 61. 66. 138. 53
PORT 0 0 8 0
STATIC
IP 60.121. 46. 236
GATEWAY 60.121. 46. 226
NETMASK 255.255.255.000

DVR4MQAEB - 17 - VELLEMAN
NOTE: DHCP and PPPoE network types need to apply DDNS service to get “Hostname” to correspond to dynamic
IP address. For detailed DDNS setting, refer to “9.e. Software AP – DDNS”.
Advance menu: BACKUP
Move the cursor to the “BACKUP” and press ”ENTER”. The screen will show the following options:
Select “USB BACKUP” and press “ENTER”.
1. START TIME:
Select the start time of the backup.
2. END TIME:
Select the end time of the backup.
3. AVAILABLE SIZE:
The information of the available USB capacity.
4. CHANNEL:
Choose the channels buy pressing "ENTER" and changing the symbol for the channel number.
Symbol "X": the channel is not selected.
Symbool "●" the channel is selected.
5. HDD NUM:
Choose the HDD (master).
6. BACKUP TO USB:
Press “ENTER” to backup the chosen file to USB.
NOTE:
1. The USB format must be “FAT 32”. If this is not the case, first format to “FAT 32”.
2. If the USB is not supported by the DVR, the “USB ERROR” message will be shown on the screen.
3. We suggest clearing all the files in the USB before you backup files in your USB.
4. The backup files can be viewed with the licensed software AP. Users can also convert the file to AVI. For
detailed information on AP playback, see 9.e.
Advance menu: HDD INFO
You can get all the capacity information of the connected HDD.
BACKUP
USB BACKUP
USB BACKUP
START TIME 2005-12-28 10 : 56 : 32
END TIME 2005-12-28 12 : 00 : 00
AVAILABLE SIZE 0512 MB
CHANNEL ●01 ●02 X 03 X 04
HDD NUM MASTER
BACKUP TO USB
START
HDD INFO
HDD NUM HDD SIZE
MASTER 400.517

DVR4MQAEB - 18 - VELLEMAN
Advance menu: EVENT LOG
You can get all the information (event type, time and channel) of the event list (including video loss list, net list, other
lists such as power on / off, key unlock, reset to default). Select the event list you want to see and press “ENTER”.
1. VLOSS LIST:
Show the information of video loss list.
2. NET LIST:
Show the information of net login list.
3. OTHERS:
Show the information of power on / off, unlock, reset to default list.
4. CLEAR ALL:
Clear all the event log lists.
9. Additional Operation
a. Search
Press “SEARCH” button on the front panel of the DVR to enter the search mode. The screen will show the following
options.
1. HDD:
Select the specific HDD.
2. FULL LIST:
List of all recorded files (R: RECORD / S: SYSTEM / A: ALARM / MS: MOTION / T: TIMER).
3. RECORD LIST:
List of manual recorded files.
4. SYSTEM LIST:
List of system-recorded files. Under continuous recording mode, the DVR system will save one recording file
every one hour.
5. ALARM LIST:
List of alarm-triggered recorded files.
6. MOTION LIST:
List of motion-triggered recorded files.
7. TIME SEARCH:
Search by specific time period (YEAR / MONTH / DAY / HOUR / MIN).
EVENT LOG
VLOSS LIST
NET LIST
OTHERS
CLEAR
ALL
SEARCH
HDD MASTER
FULL LIST
RECORD LIST
SYSTEM LIST
ALARM LIST
MOTION LIST
TIME SEARCH

DVR4MQAEB - 19 - VELLEMAN
NOTE: Move the cursor to the specific recorded file and press “ENTER” to play the video, and press stop “” button
to return to live display.
b. Key Lock
1. Key Lock On:
-Press “MENU” + “ENTER” buttons to key lock.
-Auto key lock: refer to “Advance menu: SYSTEM”.
2. Key Lock Off:
Press any key (except “SHIFT” and “POWER” buttons) and key in the password to exit Key Lock mode.
3. Password:
As to the password setting, refer to “Advance menu: SYSTEM”.
c. The N/P System
1. Press “POWER” button to shutdown and press “POWER” + “►“ to switch to PAL system (press till the monitor
shows the video image of the DVR).
2. Press “POWER” button to shutdown and press “POWER” + “◄“ to switch to NTSC system (press till the monitor
shows the video image of the DVR).
d. USB upgrade
You can use the USB to upgrade. Format the USB memory device first.
1. Get the upgraded files from your distributor.
2. Save the upgraded files in your USB device (do not change the file name).
3. Go to the “MAIN MENU – SYSTEM - UPGRADE” and press “ENTER”.
4. Select “YES” and press “ENTER” again to confirm upgrade.
NOTE:
1. The USB format must be “FAT 32”.
2. If the USB is not supported by the DVR then the “USB ERROR” message will be shown on the screen.

DVR4MQAEB - 20 - VELLEMAN
e. Software AP
SOFTWARE INSTALLATION
1. Put the CD in the driver. The applications will be automatically installed onto the PC (also AP and JAVA
programs).
2. The PC will auto run the setup file.
3. After setup, you will see “ “ on the desktop.
Note: For the most recent software AP version, please address your dealer or refer to "Connection to AP through IE
browser"
SOFTWARE OPERATION
1. Connect DVR with the PC via RJ45 network line.
2. LAN Setting:
The default DVR IP is “192.168.1.10”, and default “username” and “password” are both “admin”. Set PC IP
address as “IP: 192.168.1.XXX (1~255, except 10)” (in order to let the PC and DVR under the same domain).
3. Click twice to enter login page. Key in 192.168.1.10, admin, admin into the login page. After connecting the
DVR with local LAN, modify the network setting in the DVR or in the system configuration of the licensed software
AP.
4. Network Type ~ Static IP:
Set the network information in the DVR menu (see “Advance menu: NETWORK) or in System Config of the
licensed software AP (see “Advance menu: BACKUP”).
Network Type ~ Dynamic IP (DHCP and PPPoE):
Set the Network information in System Config of the licensed software AP.
For detailed DHCP and PPPoE setting, please refer to NETWORK DHCP” and PPPoE” p. 25.
5. After setting up the network information, click twice to enter login page.
Key in “Username”, “Password” and “IP” (Static IP) or “Host name” (Dynamic IP). Click the green button to
connect.
6. LOGIN AP Icon Explanation.
Address Book: press this button to add a new
IP into the IP Address Book or choose a preset
IP address to access the video server
Copy: press this button to copy all the
software installation files so you can keep all
the settings of video web server for next
software installation on other PC.
Search: search the available DVR IP address
in local area network and modify the network
setting of the DVR.
Firmware upgrade: press this button in order
to upgrade the DVR firmware or OSD
languages.
First, save the firmware and OSD onto your
PC.
Player: press this button to access and play
the recorded files saved in your PC.
NOTE: The version of the licensed software will appear on the login page.
7. Introduction of basic operation: video web server control panel.
Table of contents
Other Velleman Voice Recorder manuals

Velleman
Velleman MVR6 User manual

Velleman
Velleman DVR4H5 User manual

Velleman
Velleman DVR4MQAE User manual

Velleman
Velleman DVM171THD User manual

Velleman
Velleman DVR8T2 User manual

Velleman
Velleman K8047 User manual

Velleman
Velleman PCRU01 User manual

Velleman
Velleman DVR4H3 User manual

Velleman
Velleman MVR1 User manual

Velleman
Velleman DVR4T1 User manual


