Tab T6-Pro Operational manual

(Note: Please read this instruction carefully before operation to avoid danger or damage to the product.)
Smart Cordless Wet Dry Vacuum Cleanerand Mop
Model: T6-Pro
Product User Manual

Contents
1. Safety Instruction
2. Packing List
3. Packing Icon
4. Product Assembly
5. How to Use
6. Instructions for Icon of Host Screen
7. Product Care and Maintenance
8. Failure Recovery
9. Product Specifications
08
11
12
14
15
05
04
03
01

1
Please read the following safety instructions. Make sure all conditions are compliant with the conventional safety
precautions before operating the product. Please keep the instructions properly in case of temporary or urgent need.
Any inappropriate operation beyond the instructions may cause damage to the product.
Safety precautions related with host and accessories
01. Keep your hands dry or protective during operation in case of electric shock.
02. Operate the product on solid ground instead of high platform of tables, chairs and rooms.
03. Keep the product in shady place in case of damages of the precision electronic equipment.
04. Avoid operation in humid environment, like bathroom.
05. Keep the product away from cigarette butts, lighters and other open flames.
06. Before charging, clean the product first and make sure the charging is disconnected.
07. Remove the battery when it remains unused.
08. In case of damages to the products, make sure the power adapter is connected properly before operation.
09. Remove such items as glasses, lamps, wires and curtains on the ground before operation.
10. Clean the dirty water tank with the product before operation.
11. Cleaning the construction waste is not allowed.
12. Keep the operating temperature range from 0 ° C to 40 ° C.
13. Remove the battery from the machine before scrapping. Do not remove battery before powering off. Please dispose
the waste battery safely and environmentally.
Warning:
01. Unauthorized dismantle, repair or modification to the product is strictly prohibited in case of damages or safety
risks.
02. Keep the product away from fire in case of explosion.
03. Use the original power adapter only.
04. No standing or sitting on the product in case of product damage or slippery.
05. Wipe metal part of the power plug with a dry rag in case of dust.
06. The AC voltage for power adapter is 100-240V. Place it to somewhere beyond children’s reaches.
07. No washing or soaking the host and electronic components.
08. No alteration of the processing power cable, or placing heavy objects on the power cable, or heating the power
cable or pulling or bending the power cord.
09. Pay attention to the safety of young children and elders at home to avoid tripping and danger when the product is
under operating and cleaning. Touching the wheel and side brush with the hands is not allowed to avoid injury from
stranding (Especially, the care to the young children.).
10. No operation outdoor is allowed as it is an indoor product.
11. No contacting the battery with metal and conductive substances, or there will be a risk of short circuit.
12.Children under 8 are not allowed to use the product. Make sure the thorough understanding of the instructions
before operation.
Safety Instructions
Cautions:
Safety Instruction

2
Safety precautions related to rechargeable battery
Danger!
01. Operating with special battery adapter is highly appreciated. Otherwise, there will be a risk of leakage, heating or
cracking.
02. Causing circuit to battery or disassembling the battery is strictly prohibited. Otherwise, there will be a risk of
leakage, heating or cracking.
03. Transporting or storing with metal items, including the necklaces and hairpins is strictly prohibited. Otherwise it will
lead to short circuit, or causing liquid leakage, heating or cracking.
04. Putting the battery into the fire or heating the battery is strictly prohibited. Otherwise, there will be a risk of leakage,
heating or cracking.
Caution!
01. In case of abnormal overheating during charging, you are recommended to stop operating immediately. Otherwise,
there will be a risk of leakage, heating or cracking.
02. You are recommended to pull out the battery and place it in a cool and dry environment in case of long time rest,
which can prolong the service life of the battery.
03. Immersing in water or contacting with liquid is strictly prohibited. Otherwise, there will be a risk of leakage, heating
or cracking.
04. In case of abnormality (including discoloration or deformation), you are recommended to stop operating
immediately. Otherwise, there will be a risk of leakage, heating or cracking.
05. You are recommended to apply adhesive tape to insulate the electrode part when recycling or discarding.
06. You are recommended to wipe the battery with a dry rag and recycle it in time or discard it in case of battery’s leakage.
07. You are recommended to put the recycled batteries in the battery recycling bins or hazardous garbage cans placed
in communities, hotels, schools, large shopping malls, supermarkets, which are collected by professional recycling
institutions. The battery must be removed and discarded in accordance with local laws and regulations in case of
discarding the product battery.
Warning!
01. You are recommended to wash skin or clothes with clean water immediately in case the battery leakage comes into
contact. If failed to handle in time, symptoms of skin inflammation may occur.
02. Applying the rechargeable battery of the product on other equipment is strictly prohibited. The battery is applicable
to intelligent floor washer only.
03. Charging or continue to operating is strictly prohibited to avoid that the outer box of the battery is deformed and
expanded, and the electrolyte flows out.
04. Strongly impacting or throwing the battery is not allowed. Otherwise, there will be a risk of leakage, heating or
cracking.
05. Disassembling to the battery pack is strictly prohibited. Otherwise, there will be a risk of broken battery pack and
the electrolyte will flow out, resulting in fire, explosion and other hazards.
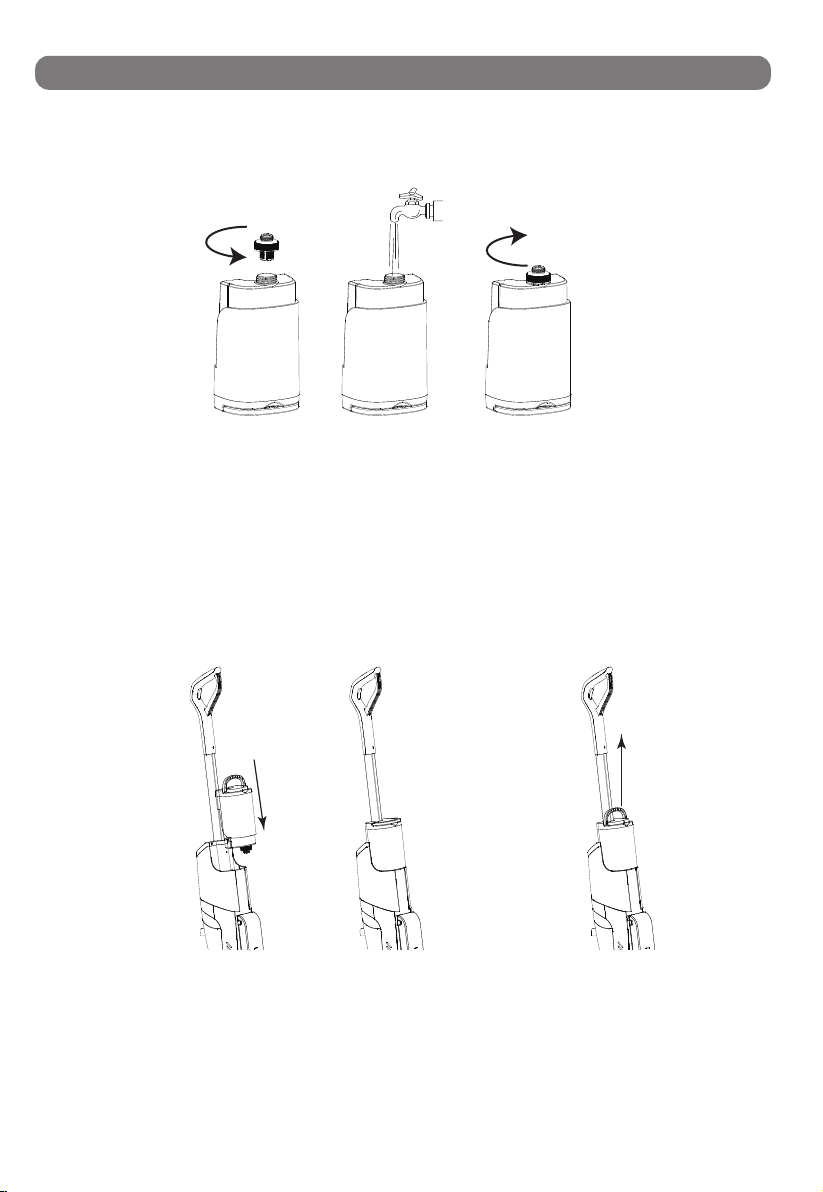
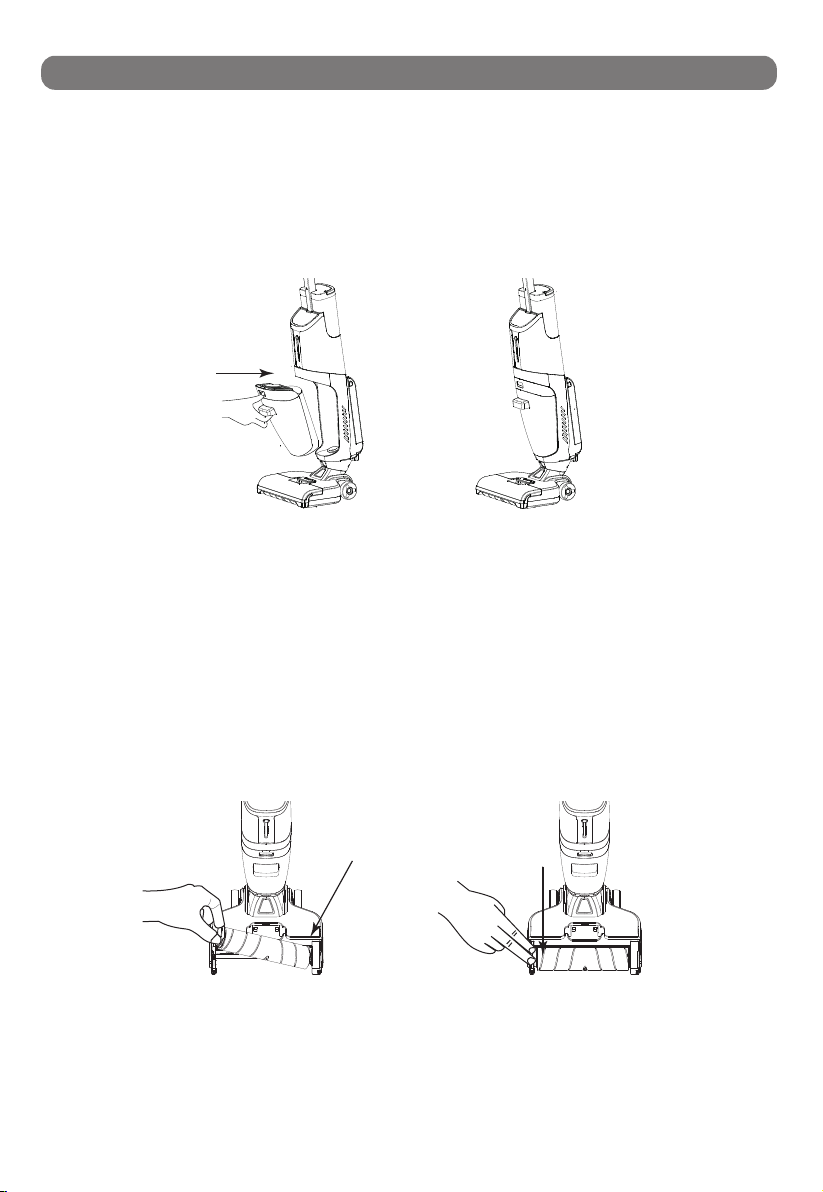
How to remove the battery
You are recommended to hold the key indicated by the arrow in the
figure (located at the protruding position on both sides above the
battery) tightly with your thumb and index finger. Lift it up with proper
force.
(Turn off the power before removing the battery.)
Attention:
When first used, the pump is normal to have an odd sound for a few seconds before it actually starts pumping water.
Safety Instruction

3
There might be some differences in the attached accessories, which shall be subject to actual product received.
Host
Power adapter
Cleaning tools HEPA filter
Roller brush
Accessories storage box
Charging stand
Handle components Clean water tank
hex key
Packing List

4
Part name
Voice switch
MAX
Switch key Self-cleaning key
Handle components
Screen
Dirty water tank
Battery
Clean water tank
Charging stand
Machine body components
Tractor components
Roller brush
Roller cover
Adapter
Packing Icon

5
Tractor components
Rear wheel
Caster
Roller brush
Scraper
As instructed in the Figure, insert the handle component in the top position corresponding
to the machine body until you hear a “snap” sound.
When removing, insert the hex key into the snaphole of the body until it reaches the
bottom. Please slowly pull out the handle components to be removed by hand at this time.
1.Assembly of Body and Handle Components
Hole of Snap
Product Assembly
Packing Icon

2.Installation of clean water tank components
Please rotate counterclockwise to open the cover of the clean water tank and add an
appropriate amount of clean water, and then rotate clockwise to tighten the cover.
Please plug it in the corresponding position of the body in the direction shown in the figure.
There is a snap positioning inside. The assembly shall be completed once you hear the sound
of “Click” after plugging in. You can pull up the handle of clean water tank and lift it up
slightly to remove the tank.
6
Product Assembly

7
3.Installation of dirty water tank components
Please plug dirty water tank components into the corresponding position of the body in
the direction shown in the figure. There is a snap positioning inside of dirty water tank
components. The installation shall be completed once you hear the sound of “Click”
after plugging in.
4.Installation of roller brush components
Please plug roller brush components into the corresponding position of the tractor
components in the direction shown in the figure. There is a snap positioning inside of roller
brush components. The installation shall be completed once you hear the sound of “Click”
after plugging in
Product Assembly

8
5.Installation of roller brush cover
Please plug the roller brush cover into corresponding buckle holes at the bottom of both
sides of the floor brush components in the direction shown in the figure. The installation
shall be completed once you hear the sound of “Click” after plugging in.
buckle hole
buckle hole
Product Assembly
How to Use
*Tip: Please try to complete a complete charging and discharging process before
using the product to ensure the accuracy of the electric quantity program.
1.Water injection of clean-water tank
1.1 Pull up the handle of clean water tank and lift it up slightly to remove the tank. (as shown in
Figure 1).
1.2 Please rotate counterclockwise to open the cover of the clean water tank and add an
appropriate amount of clean water, and then rotate clockwise to tighten the cover. (as shown in
Figure 2).
1.3 Plug the tank in the corresponding position of the body. The assembly shall be completed
once you hear the sound of “Click” after plugging in.(as shown in Figure 3).
1 2 3

9
How to Use
Note:
·Please do not add non-designated cleanser or disinfectant to avoid corrosion of the machine.
·Please add special cleanser according to the specified proportion, and do not add too much.
·Please do not add hot water over 60℃ to avoid deformation of the clean-water tank.
2.Start using
2.1 Step on the upper cover of the floor brush, tilt the machine body to a suitable angle. When
pressing “Switch Key” for 2 seconds, machine starts cleaning. When pressing “Switch Key”
again, the machine will be powered off.
2.2 Please do not put the machine body flat or dump it to avoid dirty water flowing out.
3.Switch mode
3.1 Start the automatic mode by default, and press the mode button to adjust the mode (auto
mode, max mode).
3.2 The default of machine is always discharging water. Press the “Self-Cleaning” key, machine
will stop discharging water, accompanying by the voice prompt “Turn off the water output”.
Press the “Self-Cleaning” key again, machine will start to discharge water, accompanying by the
voice prompt “Turn on the water output”.
MAX
Switch key
Self-cleaning key
4.Water adding and pouring
During use, when the clean water in the clean-water tank runs out, the machine will prompt by
voice and screen: “The water bucket is empty please add water”. At this time, it is necessary to
turn off the switch and add clean water. When the amount of water in the dirty-water tank
reaches the upper limit, the floor scrubber will automatically stop and prompt by voice and
screen: “Please clean the sewage bucket to avoid smell”. At this time, it is necessary to dump
the sewage in the dirty-water tank before continuing to use it.

10
5.Dump the dirty-water tank
5.1 Hold down the button for disassembling the dirty-water tank and remove the dirty-water
tank. (as shown in Figure 1)
5.2 Hold the handle of the dirty-water tank with one hand, and gently pull out the dirty-water
tank cover with the other hand. (as shown in Figure 2)
5.3 After the sewage is poured out, install the dirty-water tank back to the machine body, and it
is successfully installed after hearing the click sound.
How to Use
tank cover
1 2
6.Charging and self-cleaning
Lift the machine vertically, put it into the charging base, and hear the voice prompt
“Charging”, which means that it is in place.
1) Put the floor scrubber into the charging base for charging, and ensure that there is more
clean water in the clean-water tank. Press the self-cleaning button at the top of the handle to
start self-cleaning, which takes about 80 seconds.
Tips:
1. The “self-cleaning function” can only be selected when it is under charging.
2. To avoid odor, please clean the dirty tank after use and place the roller brush on the charging
dock to dry.
3. It is recommended to
self-clean after each use.

11
7.Voice closing/opening
Press the voice button briefly to turn off/on the voice reminding function.
voice switch
How to Use
Instructions for Icon of Host Screen
Icon of roller brush winding: In case the roller brush is no installed, or be stuck or
entangled, there will be a voice prompt “Please install the roller brush” or “
Please check whether the roller brush is entangled”, and the icon of “Roller Brush
Winding” lights up.
Icon of self-cleaning: after completing the self-cleaning mode, the icon flashes,
reminding to perform the self-cleaning. When the machine is placed on the base
and the power of machine is greater than 30%, please press the “Self-cleaning
Key”. Afterwards, the icon lights up, indicating that the machine enters
self-cleaning mode (the self-cleaning will take 80s in total).
Icon of battery power: The power is displayed in range of “0” to “100”, where
“0” means the machine is out of power, while “100” means full power. Normal
lighting means working, and flashing means charging.

12
Instructions for Icon of Host Screen
Icon of wet mode: when turning on wet mode, the icon will light up and the machine
will start to discharge water.
Icon of dry mode: when turning on dry mode, the water outlet will be turned off upon
the lighting-up of the icon.
Icon of water shortage of clean water tank: In case the clean water tank is short
of water, the icon of “Water shortage” will flash on the machine interface, and
there will a voice prompt “water shortage”. When refilling with water and
restarting cleaning, the icon of “water shortage” on the machine interface will
be vanished.
Icon of full dirty water tank: when the amount of dirty water tank reaches the
warning level, the icon of “Full dirty water tank” will light up and the machine
will stop, as well as the voice prompt “Please clean the dirty water tank” will be
released. When the cleaning is restarted after cleaning the dirty water tank, the icon
of “Full dirty water tank” will be disappeared.
Icon of suction amount of fan: when turning on energy saving mode, some of
the grids will be lighted up. When turning on strong mode, all of the grids will be
lighted up, representing the high suction mode.
Icon of light ring: The blue light will be on by default. When charging, the effect will
be displayed dynamically according to the charging condition.
Product Care and Maintenance
1.Product care and maintenance
1.1 Please be sure to use the original parts, or you may not enjoy the warranty service.
1.2 If this product is not used for a long time, please unplug the power adapter after
being fully charged and put it in a cool and dry place, and do not put it in direct sunlight or
humid environment. Charge at least once every 3 months to avoid overdischarge of the battery.
2.Cleaning of the main unit
Wipe and clean the main unit with a soft dry cloth. Before cleaning, please disconnect the
power adapter and ensure that the main unit stops working.

Product Care and Maintenance
3.Cleaning of dirty-water tank and filter screen
3.1 Remove the dirty-water tank, pull out the dirty-water tank cover, and take out the filter
frame inside of dirty water tank slowly and clean up the solid waste inside of filter frame.
3.2 Brush the dirt on the dirty-water tank, dirty-water tank cover, filter, and filter frame with the
attached cleaning tools, and rinse it with cold water.
3.3 Dry all parts thoroughly and put them back.
tank cover
filter frame
* Tips:
1) It is recommended to replace the filter screen once every six months.
2) It takes a long time for the filter screens to dry, and two filters can be used alternately.
3) It is forbidden to touch the surface of the filter screen with hands, brushes or
sharp objects to avoid damaging the filter screen.
4.Cleaning of dirty water pipes
Please remove the dirty-water tank, wipe the dirt in the pipe with a wet rag, and clean the
rolling brush tank and dirty water pipe with cleaning tools before using it.
13

Failure Recovery
14
Common failure
Possible reason
Solution
Main unit does not work
Handle not installed in place
Please reinstall to ensure that it is in
place before use
The main unit has no power or insufficient
power
Please fully charge the main unit
before using it
The rolling brush is not installed in place/the
rolling brush is entangled with hair and stops
rotating
Reinstall or clean the rolling brush
Dirty-water tank is not installed in place
Reinstall the dirty-water tank
Dirty-water tank is full
Dump the dirty water in the
dirty-water tank before use
Machine suction is
weakened
Filter element blockage
Please clean the filter element
Rolling brush cover, filter element and
clean-water tank are not installed in place.
Confirm whether it is installed in
place before use
The rolling brush is entangled with hair
Remove the winding of the rolling
brush before use
Foreign matter or blockage in the pipeline
Please clean the pipeline
There is abnormal noise in
motor operation
Excessive dirty water in the dirty-water tank
Dump the dirty water in the
dirty-water tank before use
The suction port is blocked
C
lear the obstacles in the suction por
t
When charging, the screen
power prompt icon is not
displayed
The power adapter is not connected to a
power socket
Check whether the power adapter is
plugged in
The connection between the power adapter
and the charging base is not in place
Check whether it is in good
connection
The docking between the main unit and the
charging base is not in place
Please confirm that the main unit is
placed correctly
No water from the main
unit
Clean-water tank is not installed in
place/clean-water tank is short of water
Reinstall or add water to the
clean-water tank
Water leakage from air
outlet
The filter element is not dried after cleaning After cleaning, make sure to dry it
before use
Self-cleaning does not
work
The rolling brush may get stuck by large
particles
Open the rolling brush cover for
inspection and cleaning
The machine is not charging
Ensure that the main unit starts the
self-cleaning function again when it
is in the charging state
The power of the machine is less than
10% and cannot start self-cleaning
In the charging state, start the
self-cleaning function when the
power is greater than 10%
Dirty-water tank is not installed in
place/dirty-water tank is full of water
Reinstall or dispose of the dirty-water
tank
Table of contents
Other Tab Vacuum Cleaner manuals