Tahe SUP User manual

INFLATABLE PADDLEBOARD
& KAYAK USER’S GUIDE
Table of Contents
•Section 1.0 Company Info & Warranty Info
•Section 2.0 Safety Warning
•Section 3.0 Quick Start Guide
•Section 4.0 Frequently Asked Questions
Sec 1.0 COMPANY INFO & WARRANTY INFO
For Product Support, Parts and Accessories Email Us at:
WORLDWIDE: [email protected]
USA: contact-[email protected]
AUSTRALIA: contact-[email protected]

WARRANTY INFO
For Warranty Claim Information Visit:
www.tahesport.com/warranty
Tahe Outdoors warrants its products to be free of defects in either materials or
workmanship for a period of 2 (two) years from the date of purchase. This warranty covers
only the original retail customer when the product is purchased from an authorized dealer
and may not be transferred. This warranty does not cover any damage that may be a result
of normal wear and tear, misuse of the product, abuse, unauthorized modification or
repairs, accidents, heat, excessive exposure to sunlight, improper handling, storage,
maintenance or care, incorrect set-up, use in commercial, rental or teaching environments,
or any other irresponsible use.
THIS WARRANTY IS IN LIEU OF AND EXCLUDES ALL OTHER WARRANTIES OF
QUALITY AND PERFORMANCE, WHETHER WRITTEN, ORAL, OR IMPLIED. ALL
OTHER WARRANTIES, INCLUDING ANY IMPLIED WARRANTIES OF
MERCHANTABILITY OR FITNESS FOR A PARTICULAR PURPOSE, ARE HEREBY
DISCLAIMED. IN NO EVENT SHALL BIC SPORT BE LIABLE FOR SPECIAL, INDIRECT,
INCIDENTAL, CONSEQUENTIAL, STATUTORY OR EXEMPLARY DAMAGES,
WHETHER IN CONTRACT, TORT, NEGLIGENCE, STRICT LIABILITY OR OTHERWISE
including, without limitation, loss to property other than this product, loss of use of said
product, or other property or economic losses. Tahe Outdoors shall not be liable for
contribution or indemnification, whatever the cause.
TAHE OUTDOORS WARRANTY PROCEDURE
For products purchased from a physical retail store claims should be referred to the
original point of purchase of the product, and include a description of the problem, photo,
serial number (where applicable), and proof of purchase including the date. For products
purchased from a Tahe Outdoors website, or online retailer, claims may be submitted
directly at www.tahesport.com/warranty Tahe Outdoors will at its sole discretion decide
whether the claim is acceptable and if accepted, whether the product will be repaired or
replaced.
If you have any questions or require further information about your product, warranty, or
on how to contact your local dealer, distributor or Tahe Outdoors, please contact us at
contact-us@tahesport.com

Sec 2.0 SAFETY WARNING
Paddle sports can be very dangerous and physically demanding. The user of this product should
understand that participating in paddle sports may involve serious injury or death. Observe the
following safety standards whenever using this product. The user of this product acknowledges both
an understanding and an assumption of the risk involved in paddle sports.
•Get paddle sport instruction from a licensed or certified instructor.
•Obtain certified first aid and rescue training and carry first aid and rescue equipment.
•Double check the weather forecast just prior to going on the water, and be aware of
appropriate river water levels, wind direction and speed, tidal changes, dangerous
currents and forecast weather changes. Be particularly aware of offshore winds and
currents, that push you away from safety. Never go on the water if the weather forecast
is inappropriate.
•Scout unfamiliar waters and portage where appropriate.
•Do not paddle in flood conditions.
•Never paddle or go on the water alone. Always leave a detailed plan with someone you
know who is not part of your group. Include: Where you have gone, what you are
expected to do, when you are expected back, and what to do if they have no news from
you after the designated return time.
•Never use this product in waves unless you have received the appropriate training, and
have mastered the product on flatwater first. Take lessons regularly with your local
school to ensure that your knowledge and ability is up to date.
•In surf conditions, do not paddle on crowded spots and respect your fellow surfers. Know
the rules of surfing as they also apply to paddling in waves.
•Dress appropriately for weather conditions; cold water and/or cold weather can result in
hypothermia. Protect yourself from the sun.
•Always use a surf leash attaching your leg to the board. However, a leash is not a life-
safety device and is intended for convenience only. It is not intended to compensate for
deficient paddling and swimming ability, ocean knowledge, safety precautions, or
general common sense.
•Always wear a nationally-approved personal flotation device, unless you are using the
board in waves. In waves, where the use of a personal flotation device can be
dangerous, you should have the appropriate swimming and paddling ability not to need
one.
•Always wear a helmet where appropriate.
•Always hold onto your SUP paddle - The SUP paddle is a vital part of your
maneuverability and security. If dropped in the water it should be recovered as quickly
as possible. Never paddle in surf conditions if you cannot control your SUP paddle at all
times - A floating paddle may be dangerous for other water users.
•Check all equipment prior to each use for signs of wear and tear, and potential failure.
Do not use if the risk of failure is suspected. Pay particular attention to the state of your
fin, to ensure that it is smooth and free of cutting edges which can cause serious injury

to either you or somebody else. Buy extra “soft fins” if you are new to the sport and
paddling, they will significantly reduce the chance of injury to either yourself or others.
•Consult your physician prior to beginning your paddle sport training.
•Do not exceed your paddling ability; be honest with yourself.
•Never go further from shore than you are prepared and able to swim back. Equipment
failures can and do occur.
•In the event of an accident, this craft can provide vital flotation. Use it appropriately.
However, the inherent flotation does not compensate for deficient swimming ability.
•Follow the manufacturer’s recommendations for the use of this product. Read this
manual and any additional information available on-line.
•You must not use alcohol or mind-altering drugs while or prior to using this product.
•If you have any uncertainty about your swimming or paddling ability, the state of your
equipment, the weather and/or water conditions, DO NOT GO ON THE WATER. Seek
further advice from a certified instructor, your local dealer and/or the manufacturer, and
try again when you are ready.
•Respect nature, the environment, and all other water users.
•The user of this product acknowledges both an understanding and assumption of the
risk involved in paddle sports. We assume no liability for any damage or injury to you or
others caused by use, misuse, lack of common sense, or inability to use this product.

Section 3
QUICK START GUIDE
Note: This guide covers multiple models. The details of your
particular board/boat and accessories may vary from these
instructions.
For more detailed information please scan the QR Code to
watch the video version of this User’s Manual or visit www.tahesport.com
Sec 3.1
INFLATING YOUR BOARD:
STEP 1: Unroll your board, paying attention to how
it was rolled up. This will help you when deflating
and re-packing your board.
STEP 2: Attach the hose to the inflation
pump ensuring that the hose is threaded
properly and attached securely to the end
that says “INFLATE”.
STEP 3: Unscrew the valve cap from the valve
located at the tail of the board. You will see a
white push-pin in the center of the valve. Press the
pin a few times to see how the pin changes
position from “UP” to “DOWN”. For inflating the
pin must be in the “UP” position.

STEP 4: Ensure there is no dirt or sand in the valve
area or in the hose, then connect the pump hose to the
valve by inserting the hose adapter piece into the valve
and turning clockwise, about ½ of a turn, until it is
securely in place. Pro Tip: If the hose is twisted it can
cause the hose to unscrew from the valve. If this
happens untwist the hose so that the pressure on the
hose is going in the clockwise direction to help keep
the hose attached to the valve.
STEP 5: The pump will have two settings,
One-Way and Two-Way. For the initial
inflation period you will want to use the Two-
Way setting, which means air is going into the
board on both the down and up stroke with
the pump.
STEP 6: Pump air into the board by raising and
lowering the pump handle. As the board starts to
take shape you will feel resistance from the pump.
At this point remove the red screw to switch to the
One-Way setting (some pumps may have a lever
which switches from 1-way to 2-way position).
Continue inflating board to desired pressure, not to
exceed 15psi. We recommend between 12-15psi
for optimal performance.
NOTE: Inflation can take 10-15 minutes depending on the model. The gauge will not read any
pressure until the board is very firm. Keep inflating and monitor the gauge – you will slowly
see the gauge begin to move to a higher pressure.NOTE: Direct sunlight will cause the
pressure in the board to increase. If you will be leaving the board in direct sunlight on a hot
day do not inflate above 13psi.

Sec 3.2
PADDLE ASSEMBLY:
(your paddle may vary from this description)
STEP 1: Unpack all paddle components
STEP 2: Connect the piece with the paddle
blade to the center shaft piece.
STEP 3: For Paddle Board use connect the T-
Grip handle portion. For Kayak use connect the
other paddle blade to the center shaft piece.
STEP 4: For paddle board use, the paddle can
be adjusted to fit the rider height – using both of
your thumbs, push the adjustment clip open
and adjust the T-Handle to your preferred
height. The paddle should be be around 8
inches taller than the user.
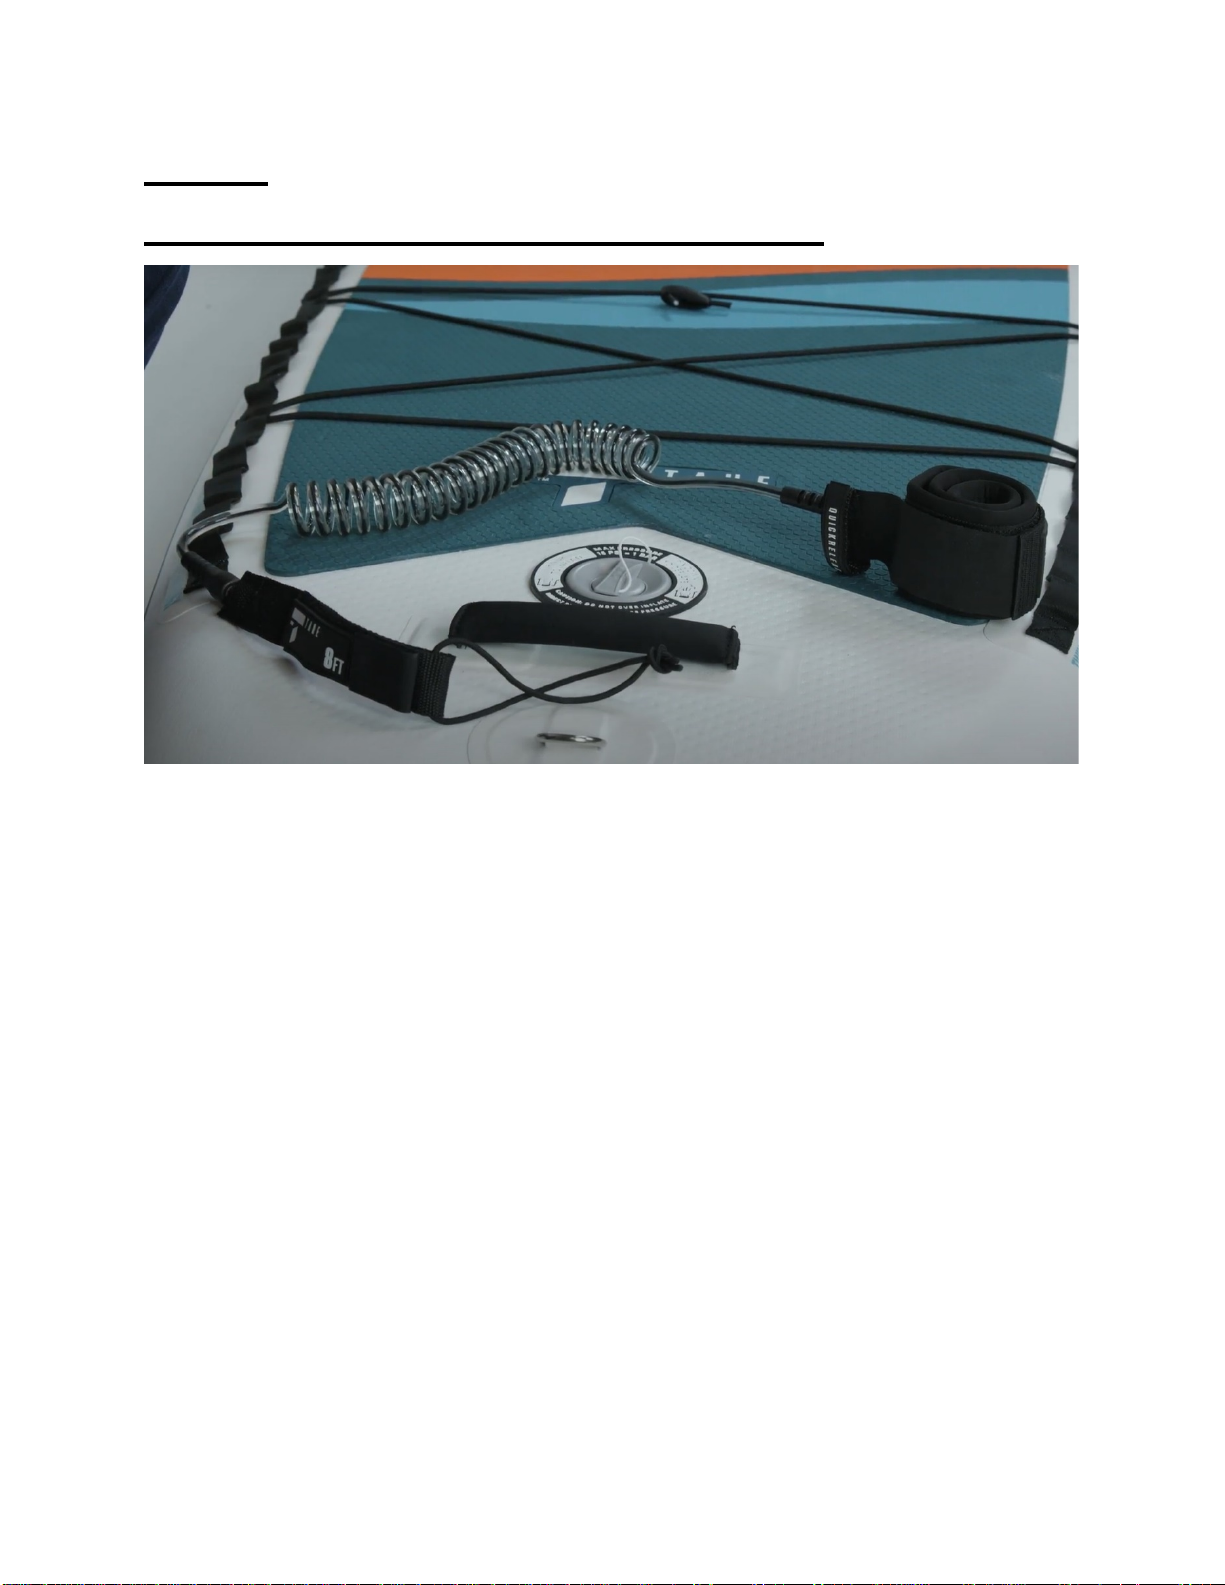
Sec 3.3
SAFETY ANKLE LEASH ATTACHMENT:
STEP 1: Open the Velcro tabs on the end of the leash
STEP 2: Insert the tab through the D-Ring located at the tail of your board.
STEP 3: Fold the tab over itself and onto the Velcro. Repeat for the secondary tab to secure the
leash in place.
STEP 4: Attach the cuff end of the leash just below your knee/above your calf.
The leash prevents you from being separated from your board in the event you fall off and
cannot get back to the board.
The leash can save your life if you fall off your board
and the wind or current pushes your board away from
you faster than you can swim back to it!

Sec 3.4
FIN INSTALLATION:
(Fins may vary from model to model)
For Removable Fins:
STEP 1: Remove the screw and
plate from the fin
STEP 2: Insert the plate FLAT
into the fin box track and slide all
the way to the front of the fin box

STEP 3: With the
fin in the position
shown here insert
the metal tab into
the fin box slot.
Keeping the fin in
the tilted position
slide it to the back
of the fin box.
Press the fin down
firmly into the fin
box until it is flush
with the fin box.
STEP 4: Align the plate in the fin box with the small hole in the front of the fin. Insert the thumb
screw and tighten down, securing the screw to the plate.
For Permanent Fins:
Some boards come with fins permanently installed. These fins are made of a highly durable
material called TPU. This material is flexible allowing the fins to bend and not break. It is
normal for the fins to bend during shipping and storage. If fins are bent you can straighten them
by bending back into place with your hand or using your foot to apply more pressure.
NOTE: Slightly bent fins will NOT affect performance.

Sec 3.5
KAYAK SEAT AND FOOTREST SET-UP:
Daisy Chain Attachment System:
Boards/Boats equipped with
the Daisy Chain Attachment
System let you switch from a
clutter free paddle board to
ergonomic sit on top kayak in
minutes. The ability to
customize the position of
seat(s), footrest(s) and deck
rigging allows for a properly
configured boat for optimal
paddling efficiency and
comfort for all size paddlers.
When attaching the brass clips to the Daisy Chain you will want to use one hand to
open the clip and slide into the webbing loop you choose, while then using a finger from
your other hand to gently press the webbing fully into the clip.
Positioning the Seat:
The standard seat position for one-person use is just behind the central carry handle.
The footrest is then placed in front of the paddler at the optimal location for comfort
based on user height/leg length.
NOTE: Your heels should be pushing against the base of the footrest and be slightly
closer together than your toes. This gives you a solid connection to the boat in the
proper ergonomic position which will allow activation of your core muscles for effective
paddling. Your knees should be bent at about a 30 degree angle – low enough to allow
your paddle to easily swing from side to side, but high enough that you can press firmly
into the footrest to create leverage to “lock” your body into position and engage your
core when paddling.
Installing Seat:
STEP 1: Place the seat cushion on the hull in the desired position with seat back folded
forwards on top of the seat cushion.
STEP 2: Loosen the straps if needed to ensure you have slack to work with.

STEP 3: Clip the two rear brass clips to
the daisy chain directly opposite one
another and slightly behind the seat
cushion. Next count out 11 daisy chain
loops and clip in the front two brass
clips to the daisy chain. When installed
the two front straps should be attached
to the Daisy Chain System
approximately 6 inches in front of the
seat cushion and the two back straps
should be slightly behind the seat
cushion.
STEP 4: Hold the seat-back upright
and tighten down the rear straps by
pulling down on the webbing straps.
Now sit in the seat and tighten the front
two straps by pulling them forwards and
down. Re-adjust rear straps as needed
to ensure the seat back is solidly in
place. The seat will stay upright and
rigid when properly positioned. Use the
elastic bands to secure excess
webbing.

Installing the Footrest:
STEP 1: Sit in the seat
and place the footrest in
front of you in a position
with your knees bent
similar to this image.
STEP 2: Thread the footrest webbing through the Daisy Chain at the appropriate
locations and center the footrest from side to side on the board. Use the board graphics
and or count the number of loops from the seat clips to make sure the installation is
even from side to side. Ensure the webbing is not twisted.
STEP 3: Thread the webbing through
the slide-buckles and pull tight, again
checking to ensure the footrest is
centered from side to side on the
board. Use the small elastic band to
secure excess webbing.

Sec 3.6
DEFLATING AND RE-PACKING YOUR BOARD
Boards may be left inflated in between uses and can be transported on a vehicle using
approved canoe/kayak tie-down straps and racks. Remember that if your board is left in
the sun and hot weather the pressure inside the board can increase. If this is a
possibility we recommend deflating your board by 2-5psi when not on the water.
Boards can also be deflated and transported inside a vehicle.
DO NOT USE VALVE WRENCH TO UNSCREW VALVE FOR DEFLATION!
STEP 1: To deflate, open the valve cover and push the white valve pin in the center of
the valve to the “DOWN” position. This allows all the air to escape. NOTE: This will be
loud!
Step 2A: For Daily Use With the board facing top side up roll/fold the board from nose
to tail. Remove as much air as possible from the board and then press the white push-
pin in the valve to prevent air from going back into the board. Replace the valve cover
once deflation is complete. Fold fins together as originally packaged.

Step 2B: For the most compact re-packing (useful if you have limited storage
space or plan to travel).
To remove the maximum amount of air from the board use your inflation pump in
reverse. To do this attach the hose to the “DEFLATE” side of the pump. When you
pump the air will now be coming out of the board. Once all air is removed press the
white valve pin to close the valve (UP position) to ensure no air can re-enter the board.
Replace the valve cover once deflation is complete.
STEP 3: Use the included compression
strap to keep the board rolled up
securely.
STEP 4: Store the board
inside the included storage
backpack. Additional
accessories can also be
stored in the backpack as
well as on the outside of the
backpack using the
included straps.

Sec 4.0
FREQUENTLY ASKED QUESTIONS
4.1 REMOVABLE FINS
I lost the screw that holds my fin on, how do I get another one?
The fin screw/plate is an accessory item available on our website as well as at most
Paddlesports retail stores.
I broke/lost my fin, how do I get another one?
Boards with removable fins feature a universal US Box style fin box that is compatible
with most styles of longboard/SUP fins. Fins are available at most Paddlesports retailers
nationwide and replacements can also be purchased on our website.
4.2 PERMANENT FINS
Why does my board has fixed fins instead of removable fins?
Fixed fins are used on our hybrid SUP-Kayak models because they work great for both
paddle board and kayak use. They are extremely durable, flexible, cannot get lost and
do not need to be replaced.
I lost the fin protectors, how do I get replacements?
The fin protectors are only needed for shipping from the factory to customer. They are
not needed for storage and we do not offer replacements.
My fins are bent, are they broken?
Permanent fins are flexible and are designed to bend instead of break. In the event they
become bent you can use your foot to push on the fin and straighten it out. Note that
slightly bent fins do not affect performance and are normal.
Can I add a fin to the board?
Adding a fin is not recommended and will void the warranty.
4.3 PUMP & GAUGE
My gauge is not registering any pressure, is it broken?
When inflating your board it will begin to take shape before the gauge reads any
pressure. You must continue pumping until the board becomes very firm before the
gauge will give a reading. Once your board looks “full” keep pumping for 2-3 more
minutes – you should now see the gauge needle begin to move.
The hose is leaking when I pump.

-
Ensure the hose is securely connected to the pump.
-
Check to make sure it is not cross-threaded – if it is you will need to unscrew the
hose and re-thread.
-
Inspect the hose for any holes or cracks. If any are found contact us for a
replacement.
I can’t pull up on the pump when inflating.
Likely you have the plug inserted into the small hole on the pump which means it is in 2-
Way mode. In 2-Way mode the pump is adding air to the board on both the up and
down stroke. Remove the plug and the pump is now in 1-Way mode, meaning it will
only add air to the board on the down stroke. This makes pumping much easier and
should be used once the board takes shape.
Can I lubricate the gasket in my pump?
If needed you can use 5mL (1 teaspoon) of silicone grease to lubricate the pump gasket
inside the pump cylinder. Only needed if the pump becomes difficult to use and seems
“stuck”.
4.4 INFLATION VALVE
How does the valve work?
The valve has two positions. When the white push pin in the center of the valve is in the
UP position the valve only allows air into the board. This is the correct position for
inflation. When the white pin is in the DOWN position the valve allows air in and out of
the board. This is the correct position for deflation.
Image of valve in UP and DOWN position
I pumped up my board and when I removed the hose all the air came rushing out!
You just inflated your board with the valve in the DOWN position, so when the hose was
removed air was able to escape from the board. Press the white pin in the center of the
valve and make sure it is in the UP position. In this position air can only enter the board,
so will not rush out when you remove the hose again.
What do I use the wrench in the repair kit for?
The valve wrench in your repair kit is used ONLY to TIGHTEN your valve in the event it
seems to be leaking air. NEVER USE THE VALVE WRENCH TO DEFLATE YOUR
BOARD
4.5 DEFLATION
How do I deflate the board?
Please refer to the deflation section of our users guide for detailed instructions.

How do I roll up the board to fit back in the bag?
Please refer to the deflation section of our users guide for detailed instructions.
4.6 PADDLE
Will my paddle float if I drop it?
Your paddle is designed to float when fully assembled, however if the paddle is left in
the water and becomes waterlogged it can sink. Be sure to place your paddle on the
board when not in use using the bungee cord deck rigging to prevent it from falling in
the water.
The individual pieces of your paddle can sink if they fall in the water when not
assembled! We recommend assembling and taking your paddle apart on land.
How long should my SUP paddle be?
In general your paddle should be around 8
inches taller than you are. Another rule of
thumb is to extend the T-handle until your
arm is straight. Start here and then adjust as
needed for your personal preference and
paddling style.
I can’t get the adjuster clip to open!
Place the paddle with the two clip tabs facing
you. Use both of your thumbs to press on the
clip tabs at the same time while holding the
paddle with your hands. The adjuster clip
should open approximately 0.25” which
allows the two fins to release from the other
part of the paddle so it can be adjusted or
taken apart.

I can’t get the adjuster clip to close!
Make sure the holes on the other part of the paddle are aligned with the adjuster clip
pins. Slowly slide the T-Handle up or down in the shaft while simultaneously applying
slight pressure with your palm to the adjuster clip. The clip should pop into place.
The adjuster clip came off and I lost it!
In rare cases the paddle adjuster clip can pop off the paddle. If this happens please
contact us and we will send you a replacement.
Do I need to remove the adjuster clip to adjust the paddle length?
No, do not try to completely remove the clip. You only need to open the clip so that the
two metal pins inside are clear of the other paddle piece, allowing the paddle to slide.
To open the clip place the paddle with the two clip tabs facing you. Use both of your
thumbs to press on the clip tabs at the same time while holding the paddle with your
hands.
Which way should I hold the paddle for
SUP use?
The paddle blade should be canted
forwards, towards the nose of the board.
4.7 TRANSPORT
Can I check my board as luggage on an airplane?
Most airlines allow you to check your inflatable paddleboard/backpack. Check with your
airline for specific baggage requirements.
Can I transport my board while inflated on top of the car?
Yes, it will not damage your board to transport it on a vehicle as long as it is securely
attached with approved tie down straps or ropes and affixed to an approved vehicle rack
system. We recommend placing the board upside down with fins in the front. The fins
then act as a “fail safe” – if the straps come loose they will catch on the fins and can
prevent the board from flying off the vehicle.

4.8 REPAIR AND MAINTENANCE
What is included in the repair kit?
The repair kit includes a valve wrench and PVC patches. The wrench is used to tighten
the valve in the event it may be loose, or to remove and replace the valve. These are
not routine maintenance procedures. Please contact us should you need to make any
adjustments to the valve.
The PVC patches are used in case your board has a tear and is leaking. For smaller
repairs this can be done yourself using a PVC glue. For larger repairs or if the seams
are leaking we recommend assistance from a knowledgeable repair shop.
My board seems to be losing air, how can I find the source?
Your board should hold air for many days, however it will eventually lose some air over
time. Note that if the weather cools the board will lose some pressure since colder air
contracts, thus reducing the pressure inside the board. If you suspect your board has a
leak follow these steps to locate the source:
STEP 1: Inflate board to 10psi or more
STEP 2: Take a soapy sponge and rub it on the board. Bubbles will form at the location
of a leak. Start with the valve area, then the rails and finally the deck and bottom. If a
leak is found and repair is needed refer to our repair video or contact us for further
assistance.
How should I clean my board?
Rinse your board with fresh water after each use, paying particular attention to the valve
and fin areas to ensure they are free of debris, sand and dirt. You can use a general
household cleaner on the board and pad to remove dirt and stains. Inspect the
attachment points for damage.
How should I store my board?
Always store your board out of the sun in a cool, dry location. It is fine to leave the
board inflated between uses - leaving the board inflated will not impact the life span of
your board. You may also store the board in the included backpack. It is best to make
sure your board is completely dry before packing into the backpack, especially for long-
term storage, to avoid mold and moisture damage. You may also store your board
inflated to a low pressure for long-term storage if you have the space to do so. Be sure
to avoid storing your board where heat, chemicals or sharp objects could damage
your board!
This manual suits for next models
1
Table of contents
Popular Boat manuals by other brands

Sea Ray
Sea Ray 200 Sundeck Specific information manual

CHILDHOME
CHILDHOME CHILD WOOD WOODROCK CWWRO Series Assembly instructions

Boston Whaler
Boston Whaler 170 Montauk owner's manual

Stearns
Stearns YUKATAT B523 owner's manual

PURSUIT
PURSUIT 2870 Walkaround owner's manual

Rave Sports
Rave Sports Mambo Operator's manual