Talento 472 User manual

1. Contents 2
1. Contents Page
2. Assembly, putting into operation, connection 3
3. Control elements 4
4. Display 4
5. Factory setting 5
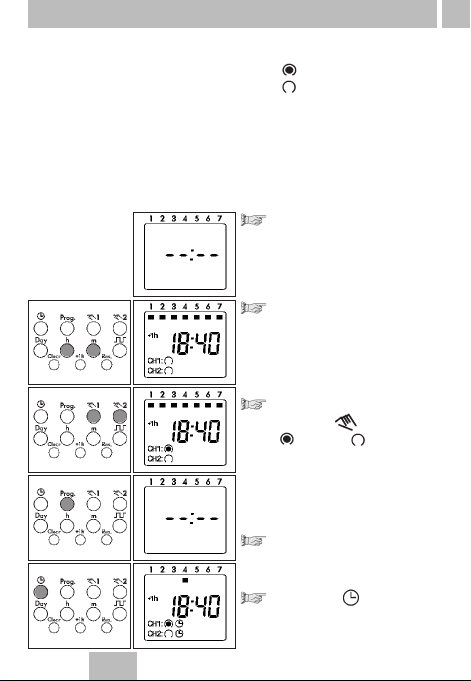
6. Changing settings 6
6.1 Time and day of the week 6
6.2 Calendar month and day 7
6.2.1 AU = Automatic changeover 7
6.2.2 cHA = Weekday-related time change 8 - 9
6.2.3 no = no changeover 10
7. Standard switching commands 11
8. Weekday block formation 12 - 13
9. Impulse switching commands 14 - 15
10. Cycle switching commands 16 - 18
11. Read – change – delete – reset 19 - 20
12. Hand switch 21
13. DCF77 radio operation 21
14. Technical data 22

2. Assembly, putting into operation, connection 3
GB
3.1 Assembly
Fit the time switch
• on a DIN rail
•
optional wall surface-mounting
Surface-mounting set for 2 and 3 module
spacings Article No. 03.53.0083.2
3.2 Putting into operation
The time and date are set at the factory.
The time switch is in Energy-saving mode.
Only the colon flashes.
Press any key:
• The time switch is activated
• It displays the time (day of the week)
3.3 Connection
See information on the unit!
Press any key to activated the timeswitch
• The time and day is displayed
Note:
If no key is pressed the time switch is auto-
matically activated after approx. 1 - 2 minutes.
Safety instruction:
•
When operating the clock safety low voltage,
only safety low voltage may be connected.
•
When operating the clock with function low
voltage, mains voltage (230 ~) or function low
voltage may be connected. The connection of
safety low voltage is not admissible in this case.
AC
DC
+–
AC
DC
+–
AC
DC
+–
AC
DC
+–
CH 1
CH 1
CH 1 CH 2
CH 1 CH 2

3. Control elements 4
Start program input
Set time,
end program input
Select day(s)
of the week
Delete switching time
Set hours, day, year
Hand switch
Enter pulse/
cycle
Reset
Set minutes, month, year
Summer time/winter time switchover
4. Display
Date
Summer time
display
AM/PM
display
DCF 77
reception
Channel 1
Channel 2
Switching state
Automatic mode
1234567 =
days of the week
1 = Monday
Hours - current time
Calendar day
- current date
- start/end
summer time
Minutes - current time
Month - current date
- start/end
summer time
Year - day/month
Pulse/cycle
Continuous operation
Manual operation

GB
5
5. Factory setting
The selections correspond to Central European Time. The time
switch offers 3 Operating modes. The date and time, and also
the Operating mode AU are set.
Operating modes:
•AU Automatic summer time controller switchover
see 6.2.1
The switchover occurs on the dates defined by
the legislator.
•cHA Weekday-related summer time controller
switchover, see 6.2.2
You enter the start and end dates of summer time
which applies to your location/country.
e. g. The first Sunday in April of the current year
(start of summer time)
The last Sunday in October of the year
(end of summer time)
In the following years, changeover always occurs
on the right day of the week in the correct calendar
week.
•no No changeover, see 6.2.3
AM/PM switch-over
Switch clock is in current operating mode
1. Press h and keep pressed
2. – Press Res once
– all segments are displayed
–
after approx. 1 second the following appears:
AM, 12.00 and 3 (Wednesday)
Operating mode AU is active = works setting
3. Release h
4.
Select operating mode as required, see 6.2.1 or 6.2.2 or 6.2.3
5. Set the current time of day and weekday, see 6.1

6
6. Changing settings
Press the key once.
Set the time:
With the h key – hours
With the m key – minutes
Note:
If the Operating mode
no = no change
- see 6.2.3
was selected, the day of the
week must now be set.
With the Day
1 - Monday
key select: 2 - Tuesday
3-
Wednesday
:
7 - Sunday
Press the key once.
The input is ended.
6.1 Time and day of the week
Note:
You can exit/conclude any adjustments, changes you make
at any time with the key .

GB
7
6.2
Calendar month and day – Select the Operating mode
6.2.1
AU = Automatic changeover
Press the key once
Press the + 1h key once,
AU appears
Press the Prog key once
Set the current year:
With the m key or the h key
Confirm with the Prog key
Set the current month and day:
With the m key – calendar month
With the h key – calendar day
Note:
With the Prog key (press once or
twice), read the date for the start
e.g. 29.03. and end e.g. 25.10.
of summer time.
Press the key once.
The input is ended.
6.2.1 AU or 6.2.2 cHA or 6.2.3 no

8
6.2.2 cHA = Weekday – related time change
Press the key once
Press the + 1h key as often as
necessary until cHA appears
Press the Prog key once
Set the current year:
With the m key or the h key
Confirm with the Prog key
Set the current month
and day:
With the m key – calendar month
With the h key – calendar day

GB
9
Confirm with the Prog key
The start of summer time is
displayed.
Set the individual
summer time start:
With the m key – month
With the h key – day
Confirm with the Prog key
Set individual
summer time end:
With the m key – month
With the h key – day
Press the key once.
The input is ended.

6.2.3 no = no changeover
Press the key once
Press the + 1h as often as
necessary until no appears.
The time switch operators
without a date!
Press the key once.
The input is ended.
Note:
Select day of the week
see 6.1
10

GB
Select free memory location:
Press the Prog key as often as
necessary until – –:-– – appears.
Set the switching times:
With the m key – minutes
With the h key – hours
For weekday adjustment, see:
Block formation of weekdays, Point 8
You determine the switching times and the switching state for the relevant
switching output (channel.)
Symbol:
CH1: (ON) = Channel 1
CH2: (OFF) = Channel 2
These assignments are possible:
• Switching commands only for channel 1
• Switching commands only for channel 2
• The same switching commands for channel 1 and channel 2
(the switching time and switching state are identical)
• The same switching time for channel 1 and channel 2 but with
a different switching state.
11
7. Standard switching commands
Set the switching state:
With the key
(ON) or (OFF)
Note:
The switching state for CH1 or
CH2 can be deactivated.
No symbol – no switching.
Press the Prog key once. The input has
ended.
A free memory location is
displayed – for other settings or
Press the key once. The input
is ended.
The display shows the current time.

12
Select free memory location:
Press Prog as often as
necessary until – –:– –
appears
Press the Day key once
All 7 days of the week are
active
Activating/deactivating
days of the week:
Press the Day key once.
There is a cursor under the
number1 (2...7)
Activate/deactivate the day
of week with the Day key
Any combination of weekdays
You determine the weekdays for your switching program.
1 - Monday, 2 - Tuesday, 3 - Wednesday ..., 7 - Sunday
Example: Monday + Wednesday + Friday
(8:00 ON; 20:00 OFF)
8. Block formation of weekdays
Select the next day of the week:
Move the cursor with the Prog
key
activate/deactivate the
day of the week with the
Day key

GB
13
Press the key once.
The weekday selection is
ended.
Note:
Enter the switching times and
the switching state = ON
= OFF
for the relevant switching state
(channel).
For standard switching
commands,
see 7
For Impulse switching
commands, see 9
For cycle switching
commands, see 10
Note:
After the procedures
•read, modify or delete
the time, date, switching
program
•DCF synchronisation
•
restoration of mains power
the switching state of the time
switch is updated automatically.
This means that:
•impulse switching commands
from earlier times are ignored
•
active cycle switching commands
are re-started with the programme
ON-switching time

14
9. Impulse switching commands
If a load is switched ON and OFF with a high switching frequency in
the seconds range, it must be ensured that effects on the quality of
lighting units (flickering) and interference with radio and TV reception
are avoided.
You determine the times for pulse switching commands.
These are executed once at the respective programmed time.
Symbol: =
ON switching duration (1...99 sec. or 1...99 min.)
The preselection for seconds or minutes is explained at the given time.
A pulse switching command consists of: • Start time
• Switching ON operation
Example:
Start time Monday to Friday 09:00
ON switching duration
10 seconds
ON switching duration
Start time
Select free memory location:
Press the Prog key as often as
necessary until – –:– – appears.
Setting the start time:
Set the day(s) of the week
(see Point 8)
With the m key – minutes
With the h key – hours
Preselection for Pulse =
Mark the pulse switching command
with the key (press once).

GB
15
Selecting the switching output:
With the key
CH1 and/or CH2
Confirm with the Prog key.
Preselection for:
– Seconds
– Minutes
with the m key
Set the ON switching duration:
With the key 01...99
Confirm with the Prog key.
The input is ended.
A free memory location is
displayed for further settings
or
press the key once.
The input is ended.
The display shows the current
time.

16
You determine the times for cycle switching commands
Symbols:
= ON switching duration (1...99 sec. or 1...99 min.)
= cycle duration (1...99 sec. or 1...99 min.)
The preselection for seconds or minutes is explained at the given time.
A cycle switching command consists of:
• Start time
• ON switching duration
• Cycle duration (ON switching duration + pause)
• End time
An end time is only required if the cycle must be ended at a certain
time. If you do not set an end time, the cycle switching commands
operate endlessly.
1. Example:
Start time Monday 09:00
ON switching duration
10 minutes
Cycle duration 60 minutes
End time Friday 19:00
2. Example:
Start time Monday to Friday 09:00
ON switching duration
10 minutes
Cycle duration 60 minutes
End time Monday to Friday 19:00
10. Cycle switching commands
Start time End time
Pause Pause
Cycle duration
60 min.
Cycle duration
60 min.
ON switching duration
10 minutes

GB
17
Select free memory location:
Press the Prog key as often as
necessary until – –:– – appears.
Set the start time:
Set the day(s) of the week,
see 8
With the m key – minutes
With the h key – hours
Preselection for Cycle =
Mark the cycle switching command
with the key (press 2x)
Select the switching output:
With the key
CH1 and/or CH2
Confirm with the Prog key
Preselection for:
- Seconds
- Minutes
with the m key
Set the ON switching duration:
With the key 01...99
Confirm with the Prog key

18
Preselection for:
- Seconds
- Minutes
with the m key
Set the ON switching duration:
with the key 01...99
Confirm with the Prog key
A switching OFF time is displayed here with 00:00 for all 7 days of the
week. You can change these individually or delete them with Clear.
The input is ended.
A free memory location is displayed for fu
rther settings or
Press the key 1x. The input is ended.
The Display shows the current time.
Note:
The next switching command in the program sequence ends the
cycle. The switching command can be = ON or = OFF.
Note: After the procedures
•read, modify or delete the time, date, switching program
•DCF synchronisation
•
restoration of mains power the switching state of the time switch is
updated automatically.
This means that:
•impulse switching commands from earlier times are ignored
•
active cycle switching commands are re-started with the programme
ON-switching time

GB
19
Read
Press the Prog key step by step
Each individual content is displayed
until the end of the program.
Then:
•
One free memory location – –:– –
•
One digit (free memory locations)
(ex. Fr 10)
Change
Press the Prog key step by step as
far as the switching command/
contents which you want to change/
overtype.
Change the switching
command/contents:
As described in
8.
Weekday block formation
9.
Impulse switching commands
10.
Cycle switching commands
Delete - individual switching commands
Press the Prog key step by step as
far as the switching command/
contents which you want to delete.
Press the Clear key once.
This switching command is deleted.
Note:
You will completely delete the
cycle switching commands and
pulse switching commands when
you delete the start time.
• You can read the program contents stepwise
• You can change or overtype the program contents
• You can delete the program contents
• You can delete the date and time
11. Read – change – delete – reset

20
Delete - All switching commands
Press the Prog key as often as
necessary until FRxx appears
Press the Clear key once.
CL is in the display
Press the Clear key and hold it down.
All memory locations are deleted!
The display shows the number
of the max. memory locations.
Reset
Press the Reset key once
The set date and time are reset.
The factory setting
AU = automatic s/w-
time changeover is active
(31.12.1997, 00:00)
All segments are visible for
approx. 2 seconds,
then 00:00 appears.
AU = automatic s/w time
changeover
See point 5 and 6 for setting
the current date.

GB
21
You change – manually – the current switching state.
However, the individually set switching program is preserved.
1 for channel 1
2 for channel 2
12. Hand switch
= automatic
= OFF
=ON
The switching state
corresponds to the
entered program.
= Manual mode
=ON
= OFF
You change
–manually–
the current switching
state.
The next switching
command in the
program is executed
automatically again.
FIX = continuous operation
FIX = Continuous ON
FIX = Continuous OFF
You change
–manually–
the current switching
state.
Only with the key
do you switch from
continuous operation
back to Automatic
mode.
13.
DCF 77 radio operation (only 3 and 6 modular spacings)
The time switch receives the time signal DCF77 with an
additional antenna.
! Refer to the separate instruction !
If the time switch is synchronized, the symbol is
permanently on.
Table of contents