Talk To Me Technologies wego A-PLUS Series User manual

Predictable User Guide
For wego A-PLUS Speech-Generating Devices
-PLUS
Find more resources online:
talktometechnologies.com (click Support)


Table of contents
Hardware and features ..........................................2
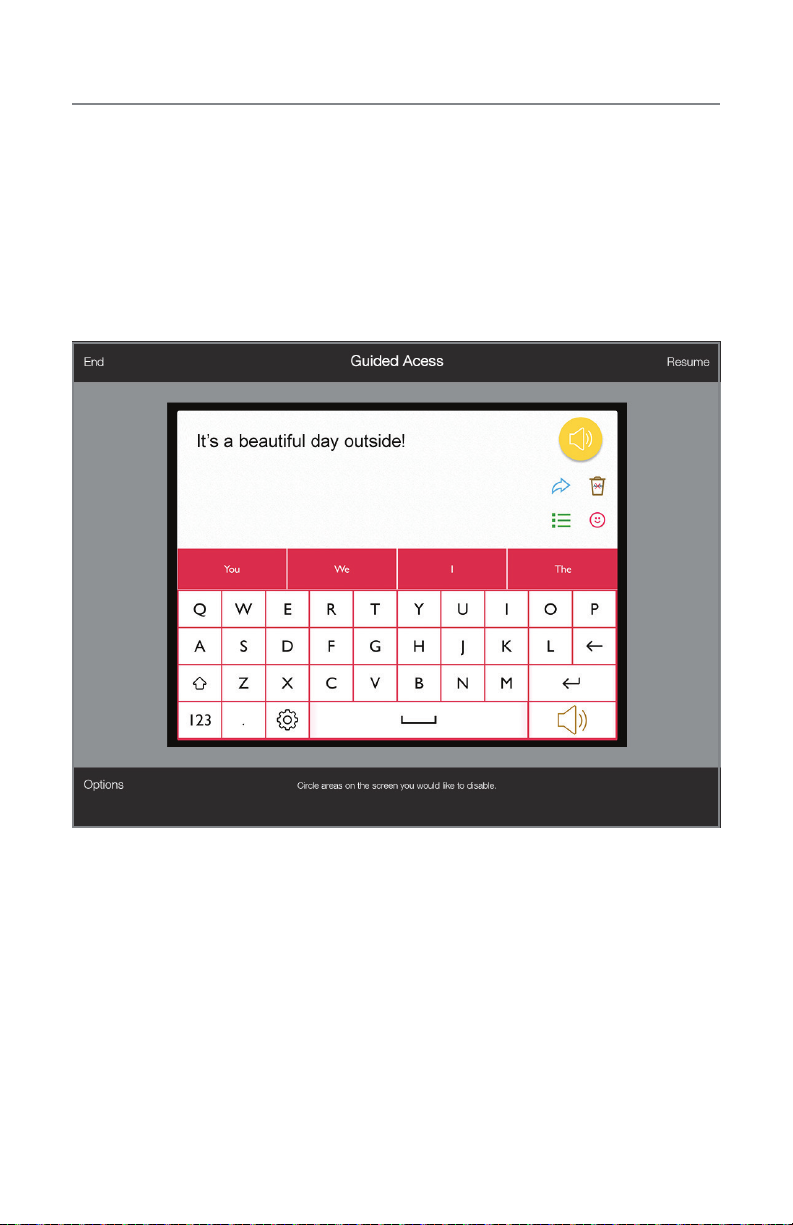
Guided Access ................................................4
Quick Keys.................................................... 5
Settings ...................................................... 5
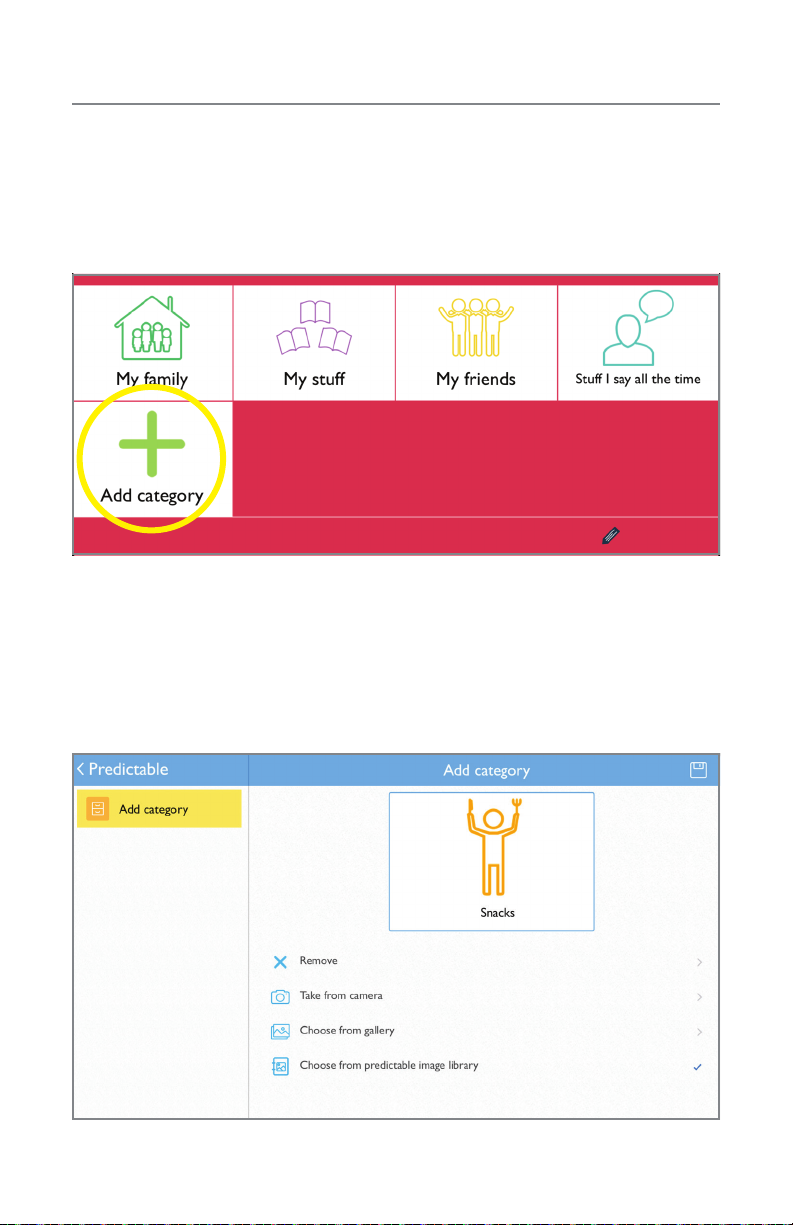
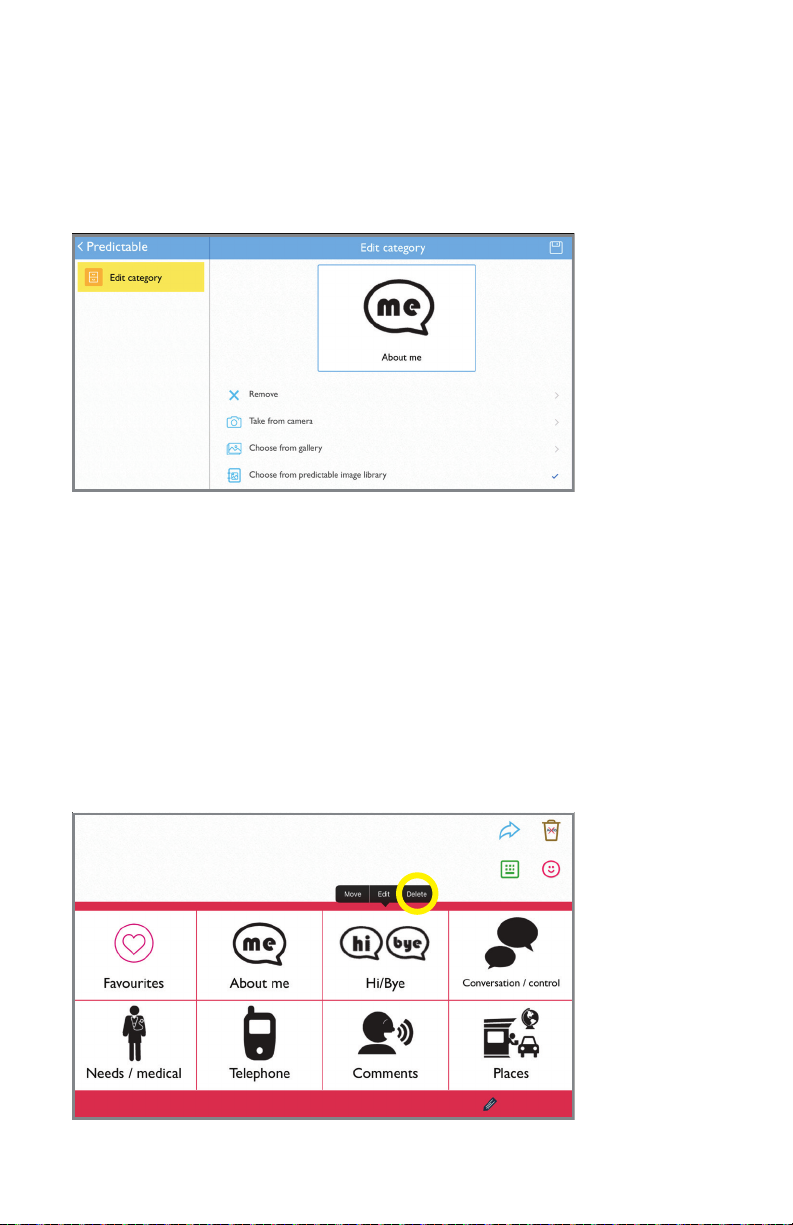
Phrase categories ..............................................6
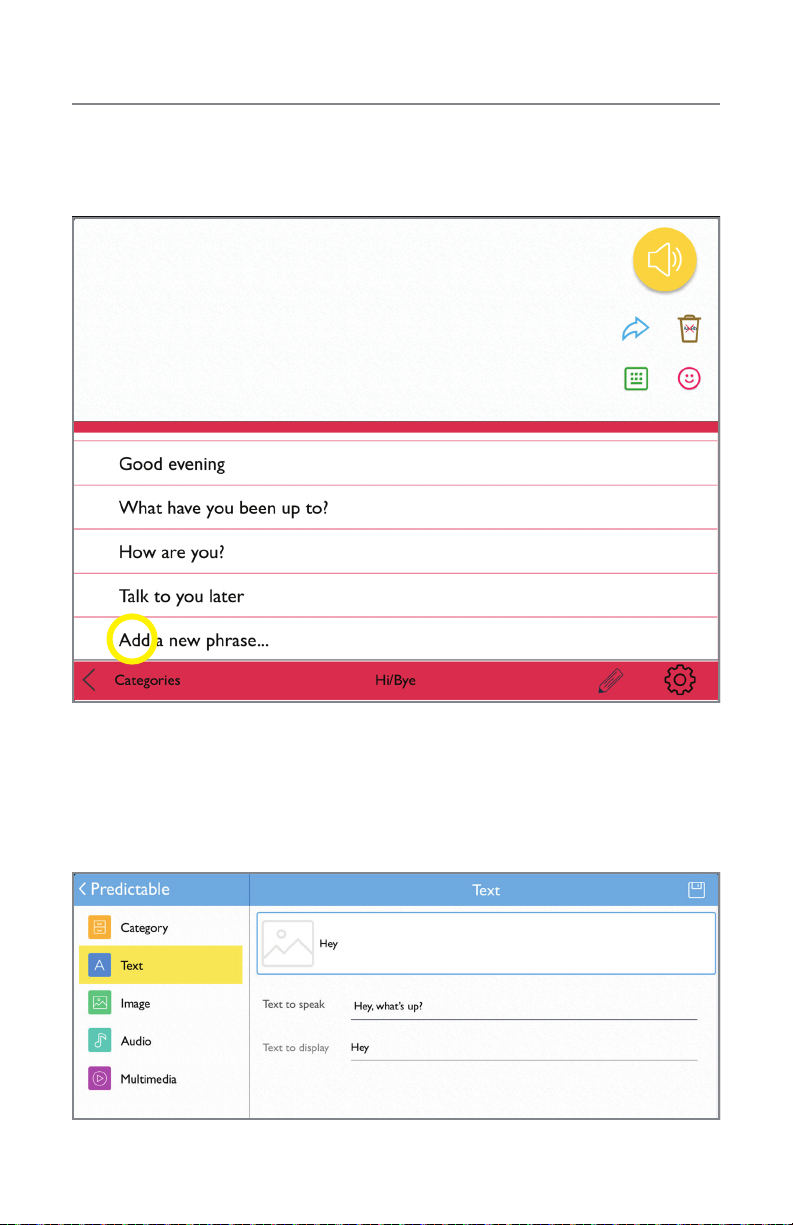
Phrases ......................................................8
Speech...................................................... 11
Pronunciation ................................................ 12
Abbreviations................................................. 13
Word prediction............................................... 14
Use Menu ................................................... 15
Message history .............................................. 16
Newsfeed.................................................... 16
Message sharing.............................................. 17
Emotes...................................................... 18
Floor Hold ................................................... 19
Install communication software updates...........................20
User information and notes .....................................21
Important Note: If these instructions do not match your current vocabulary set, please
contact Technical Support for assistance.

2
Hardware and features
Power
Press and hold this button (plus a volume button on some models) to
turn the device on or off.
Note: Press this button one time while the wego A is on to put it into “Sleep” mode.
This feature will conserve battery life when the wego A is not in use.
1
Volume
Press the volume toggle up or down to adjust volume levels.
2
Home
Tap to return to the home screen. If your wego A model does not have
a Home button, swipe up from the bottom of the screen.
3
Charging the device
Pull down the tab to reveal the device charging port. Charge device
and TTMT Speaker (SPKR) at night or when not in use. Please only
use a TTMT-approved charger with your device.
4

3
wego 7A, 10A & 13A
If your wego A model does not have a Home button,
swipe up from the bottom of the screen.
4
3
1
2
Pull down the
tab to reveal the
device charging
port.
wego 5A
1
2
4

4
Guided Access
Guided Access keeps the user locked into the communication software.
All dedicated devices come with Guided Access enabled, but you may
disable Guided Access after receiving your device. The device will remain
dedicated to communication even with Guided Access disabled.
1. Open Guided Access by quickly triple-clicking the Home button. If your
device does not have a Home button, use the Power button.
2. Enter passcode: default password is all 1s (1111 or 111111).
3. To continue Guided Access: press Resume (top right).
4. To turn off Guided Access: press End (top left).
5. Lock Menu (restrict use of specic buttons/categories): open Guided
Access > use nger to draw a circle around buttons to restrict >
Resume.

5
Quick Keys
Your device has Quick Keys that provide quick access to various menus
and commands.
Settings
Settings allow you to customize your device’s speech and voice,
accessibility settings, word prediction, and appearance. The Settings
button is located at the bottom of your touchscreen.
Speak
Speaks out any text in the message window.
Phrases
Opens your phrase categories page.
Delete
Deletes text in the message window.
Emotes
Opens menu of emotions that sound when pressed.
Use
Opens menu with a variety of ways to use your message.

6
Phrase categories
The device allows you to save common or favorite phrases, and categorize
the phrases for easy access.
Add a phrase category
1. Select Phrases > select Edit at bottom of page > swipe left to the
last category page > tap Add category.
2. Type name of new phrase category at the blue cursor.
3. Select No Image, or select one of the following to add an image:
Take from camera > take photo using camera > Use Photo.
Choose from gallery > tap to select image from gallery.
Choose from Predictable image library > tap to select symbol.
4. When nished, tap Save at the top right of screen.

7
Delete a phrase category
1. Select Phrases > select Edit at bottom of page > tap category to
edit > select Delete.
2. A message will conrm that you want to delete category > select yes.
3. Select Edit at bottom of page to complete.
Edit a phrase category
1. Select Phrases > select Edit at bottom of page > tap category to
edit > select Edit to update category name or image.
2. When nished, tap Save at the top right of screen.
Move a phrase category
1. Select Phrases > select Edit at bottom of page > tap category to
edit > select Move.
2. Press and hold the category to move until it “pops” > drag category to
new location (this will only work if the current page is full).
3. When nished, tap Done.

8
Phrases
Save a phrase
1. Phrases > select desired category > select Add a new phrase… at
the bottom of the list of saved phrases.
2. Select Tex t from left navigation menu.
3. On Text to speak line: type message to speak when phrase is selected.
4. On Text to display line: type text (label) to display in phrase bank.
5. When nished, tap Save at the top right of screen.

9
Quick-save a phrase from the homepage
1. Type phrase using keyboard on homepage > select Use > select
Add from pop-up menu.
2. Select category to save new phrase > tap Save at the top right of
screen.

10
Edit a saved phrase
1. Phrases > select desired category > select Edit at bottom of
page > tap phrase to edit > choose Edit from pop-up menu.
2. Follow steps 2-5 from Save a phrase to nish editing.
Delete saved phrase
1. Phrases > select desired category > select Edit at bottom of
page > choose Delete from pop-up menu > tap Edit to nish editing.
Change saved phrase order
1. Phrases > select desired category > select Edit at bottom of
page > tap phrase to move > choose Move from pop-up menu.
2. Tap button to the right of phrase to move > drag phrase up/down to
desired order within phrase bank > tap Edit to nish editing.

11
Speech
The Speech settings allow you to personalize your voice by selecting your
favorite voice option, and make it your own by adjusting the speaking pitch
and rate.
Change voice
1. Select Settings > select Speech from left menu > select from
Predictable Voices, ModelTalker, Ivona or Acapela to open voice menu
> tap to select new voice.
Change speaking rate, pitch, speed
1. Select Settings > select Speech from left menu > select
Speech Settings at the top right of the page.
2. To adjust speaking rate: Use nger to slide and adjust your voice rate.
Slide to the left to slow and to the right to increase speed.
3. To adjust pitch: Use nger to slide and adjust your voice pitch. Slide to
the left to lower and to the right to raise pitch.
Edit speech options
Speech Options contains preferences for speech timing and message
window appearance. To access: Select Settings > Speech >
Speech Settings > Speak Options > tap buttons to turn options on
and off.

12
Pronunciation
Change pronunciation of a word
1. Select Settings > select Speech from left menu > select
Speech Settings at the top right of the page > Custom Words >
select Custom Pronunciation.
2. On Display text line: type word with correct spelling (i.e. fajita).
3. On Pronunciation text line: type word as you want pronounced (i.e.
faheeta).
4. Press Play next to pronunciation to hear how word will sound.
5. When nished, tap Save at the top right of screen.
Edit pronunciation
At any point, you can edit your custom pronunciation.
1. Select Settings > select Speech from left menu > Custom
Words > select Custom Pronunciation.
2. Tap word from pronunciation list to edit > select Edit from menu.
3. Follow steps 2-5 above to complete editing.

13
Abbreviations
Tip: Your abbreviation must have at least two letters or symbols to save.
To save time and keystrokes, you can create custom abbreviations. For
example, if you create an abbreviation for boulevard or laugh out loud,
then “boulevard” or “laugh out loud” will speak when you type blvd or lol,
respectively.
Add abbreviation
1. Select Settings > select Speech from left menu > select
Speech Settings at the top right of the page > Custom Words >
select Abbreviation.
2. On Display text line: type word to speak and display (i.e. boulevard)
3. On Shortcut line: type abbreviation for word (i.e. blvd).
4. When nished, tap Save at the top right of screen.
Edit abbreviation
1. Select Settings > select Speech from left menu > select
Speech Settings at the top right of the page > Custom Words >
select Abbreviation.
2. Tap word from abbreviation list to edit > select Edit from pop-up menu.
3. Follow steps 2-3 above to complete editing.

14
Word prediction
Prediction strip
The word prediction strip appears at the top of the on-screen keyboard,
displaying up to four text predictions at any time.
1. Tap word in text prediction strip to add it to message window.
Word prediction is another great time and keystroke-saving feature
built into your device. It analyzes as you are typing (letters and words
already typed, the context from previous words/messages, and your own
vocabulary) to provide real-time word predictions. The word prediction tool
is self-learning and will become more accurate over time as it learns from
your usage pattern along with your preferred grammar and speech style.
You may adjust the prediction text settings to meet your needs. To access:
Settings > Word Prediction > Prediction type.

15
Use Menu
The Use Menu provides options on how to use or share your message. To
access: press Use.
Tip: You must have a message typed in the window to access many of the menu options.
Options that are not available appear in gray.
Manage Use Menu
You can choose which options display in the Use menu.
1. Settings > Layout > Use menu selection > tap options to
select or deselect.

16
Message history
Clearing history
1. Select Use > select History > select Edit at bottom of page
> tap phrase to delete > select to either Delete Phrase or Delete All >
Yes > tap Edit to nish editing.
Newsfeed
Newsfeed provides top headlines from a news source. View your
newsfeed: Select Use > select Newsfeed > tap headline to view
article OR press Speak to the right of headline to hear it read aloud.
Change newsfeed provider
Settings > Layout > scroll down and select News Feeds > select
news source.
Your message saves to message history each time you press Speak.
1. Select Use > select History > select phrase to add to message
window.

17
Message sharing
Unlocked devices feature message sharing via social media, email or text
message.
Copy a message
1. Type message > select Use > select Copy.
2. The selection is now copied onto your device’s clipboard and can be
pasted to other applications on your device, such as an email or notes.
Paste a message
You can copy and paste text from another application into Predictable.
1. Copy text from another application > open Predictable > tap Use >
select Paste. The text will appear in the message window.
Share a message via social media
1. You must be signed into social media accounts to share messages:
exit Predictable > open Device Settings > scroll down left menu
to Mail to add email or to social media account of your choice >
Add account > follow prompts to add account.
2. In Predictable, write message in message window > tap Use > select
application to share message.

18
Emotes
Your device contains a menu of emotions that sound when pressed.
Access the emotes menu via your Quick Keys.
Manage Emote Menu
You can customize your Emotes menu to display the options you want to see.
1. Settings > Layout > Manage emotes > tap emote options to
select or deselect.
Custom Emotes
In addition to the pre-recorded emotes, you can create your own emote
sounds.
1. Settings > Layout > Manage emotes.
2. Create new emote > give new emote a name.
3. Record a new emote sound or choose an existing message:
Record audio now: Press Record audio now > press Record >
say your emote message > press Stop to nish > press Play to
test message.
Choose from Predictable message bank: Press Choose from
Predictable message bank > press emote you want to use.
4. When nished, tap Save at the top right of screen.
This manual suits for next models
4
Table of contents
Other Talk To Me Technologies Cell Phone manuals