Talon AC210516 User manual

1
GENERAL SAFETY RULES GB
WARNING! When using electric tools, basic safety precautions, including the following, should always be followed to
reduce the risk of fire, electric shock and personal injury.
Read all these instructions before operating this product and save these instructions.
MODEL NO. AC210516, AC210518
USER MANUAL
Electric Chain Saws
6096-210509
WARNING • PLEASE READ
Beware of kickback. Hold chain saw firmly with both hands when using. For your own
safety, please read and follow the safety precautions in this manual before attempting to
operate your chain saw. Improper use can cause serious injury.
DOUBLE INSULATED
1. Keep work area clean
Cluttered areas invite injuries. Do not start cutting
until you have a clear work area, secure footing, and
a planned retreat path from the falling tree.
2. Consider work area environment
Use extreme caution when cutting small sized brush
and sapling, as slender material may catch the saw
chain and be whipped toward you or pull you off bal-
ance. Do not operate a chain saw in a tree unless you
are specifically trained to do so. When cutting a limb
that is under tension, be alert for spring back so that
you will not be struck when the tension in the wood
fibers is released. Do not expose the chain saw to
rain. Do not use the chain saw in damp or wet loca-
tions. Do not use the chain saw in the presence of
flammable liquids or gases.
3. Store idle chain saw
When not in use, tools should be stored in a dry, high
or locked up place, out of reach of children.
4. Do not force the chain saw
The chain saw will do a better and safer job when
used at the rate for which it was intended.
5. Use the right tool
Cut wood only. Do not use the chain saw for purpos-
es for which it was not intended. For example, do not
use the chain saw for cutting plastic, masonry, or
non-building materials.
6. Dress properly
Do not wear loose clothing or jewelry, as they can get
caught in moving parts. Non-skid footwear is recom-
mended when working outdoors. Wear protective hair
covering to contain long hair.
7. Use safety gear
Use safety glasses, safety footwear, snug fitting
clothing, protective gloves, and protective hearing
and head gear.
8. Carrying the saw
Carry the saw by the front handle with the saw
stopped. Keep your finger off the switch, and make
sure that the guide bar and saw chain are to the rear.
9. Do not abuse the cord
Never carry the tool by the cord or pull it to discon-
nect it from the socket. Keep the cord away from
heat, oil and sharp edges.
10. Secure work
Use clamps or a vice to hold the work.
11. Do not overreach
Keep proper footing and balance at all times.
12. Maintain the chain saw with care
Inspect the chain saw cords periodically and, if
damaged, have them repaired by an authorized
service facility. Keep the cord clear of the chain and
operator at all times. Never carry the saw by the cord
or pull it to disconnect from receptacle. Keep the cord
from oil and sharp edges. Inspect the extension cords
periodically and replace if damaged. Keep tools
sharp and clean for better and safer performance.
Follow instructions for lubricating and changing
accessories. Keep handles dry, clean and free from
oil and grease.
13. Disconnect the chain saw
Disconnect the chain saw when not in use, before
servicing, and when changing accessories and
attachments such as saw chain and guard.
14. Remove adjusting keys and wrenches
Form the habit of checking to see that keys and
adjusting wrenches are removed from the tool before
turning it on.
15. Avoid unintentional starting
Do not carry a plugged-in tool with a finger on the
switch. Ensure switch is off when plugging in.
16. Use outdoor extension leads
Use only extension cords that are intended for out-
door use and which are so marked.
17. Stay alert
Watch what you are doing. Use common sense. Do
not operate the chain saw when you are tired. Keep
all parts of your body away from the saw chain when
the motor is operating. Before you start the saw,
make sure the saw chain is not contacting anything.
18. Check damaged parts
Before further use of the tool, a guard or other part
that is damaged should be carefully checked to deter-
mine that it will operate properly and perform its
intended function. Check for alignment of moving
parts, free running of moving parts, breakage of
parts, mounting and any other conditions that may
affect its operation. A guard or other part that is dam-
aged should be properly repaired or replaced by an
authorized service centre unless otherwise indicated
in this instruction manual. Have defective switches
replaced by an authorized service facility. Do not use
the tool if the switch does not turn it on and off.
Meaning of symbols marked on the product
Read the user manual before using the machine
Wear safety goggles to protect your eyes
Wear ear protector to protect against noise
Wear gloves to protect your hands
Wear safety boots to protect against electric shock
Do not expose to rain
Wear dust mask to protect against dust
Remove plug from the mains immediately if cable is damaged or cut
WARNING: Take care not to expose this tool
to rain and remove plug from mains immedi-
ately if the supply cable is damaged.

GB
3
GB
2
SPECIFICATIONS
MODEL NO. . . . . . . . . . . . . . . . . . . . . . . . . . . . . . . . . .AC210516 . . . . . . . . . . . . . . . .AC210518
Input . . . . . . . . . . . . . . . . . . . . . . . . . . . . . . . . . . . . . . .
1800Watt . . . . . . . . . . . . . . . . . . . .1800Watt
No Load Speed . . . . . . . . . . . . . . . . . . . . . . . . . . . . . . .7,000/min. . . . . . . . . . . . . . . . .7,000/min.
Cutting Speed . . . . . . . . . . . . . . . . . . . . . . . . . . . . . . . .12 m/sec . . . . . . . . . . . . . . . . .12 m/sec
Cutting Length . . . . . . . . . . . . . . . . . . . . . . . . . . . . . . . .16” (40cm) . . . . . . . . . . . . . . . .18” (45cm)
Tension Ajustment . . . . . . . . . . . . . . . . . . . . . . . . . . . .Chain-Rigid-Toolless . . . . . . . .Chain-Rigid-Toolless
Net Weight . . . . . . . . . . . . . . . . . . . . . . . . . . . . . . . . . .4.3 Kg . . . . . . . . . . . . . . . . . . . .4.3 Kg
Oil Capacity . . . . . . . . . . . . . . . . . . . . . . . . . . . . . . . . . .200ml . . . . . . . . . . . . . . . . . . . .200ml
Braking Time . . . . . . . . . . . . . . . . . . . . . . . . . . . . . . . . .200ml . . . . . . . . . . . . . . . . . . . .200ml
Vibration . . . . . . . . . . . . . . . . . . . . . . . . . . . . . . . . . . . .8.4m/s2. . . . . . . . . . . . . . . . . . .8.4m/s2
Sound Power Level . . . . . . . . . . . . . . . . . . . . . . . . . . . .106.1 dB(A) . . . . . . . . . . . . . . .106.1 dB(A)
• HOW TO READ SYMBOLS AND COLORS (FIG. 1)
GREEN RECOMMENDED
Recommended cutting procedure.
WARNING
1. Beware of kick back.
2. Do not attempt to hold saw
with one hand.
3. Avoid bar nose contact.
RECOMMENDED
4. Hold Saw properly with both
hands.
• DANGER! BEWARE OF KICKBACK!
BEWARE OF: ROTATIONAL KICKBACK
(Fig. 2A)
A = Kickback path
B = Kickback reaction zone
THE PUSH (PINCH KICKBACK) AND PULL REAC-
TIONS (Fig. 2B)
A = Pull
B = Solid objects
C = Push
KICKBACK may occur when the NOSE or TIP of the
guide bar touches an object, or when wood closes in and
pinches the saw chain in the cut.
Tip contact in some cases may cause a lightning-fast
reverse reaction, kicking the guide bar up and back
toward the operator.
PINCHING the saw chain along the BOTTOM of the guide
bar may PULL the saw forward, away from the operator.
PINCHING the saw chain along the TOP of the guide bar
may PUSH the guide bar rapidly back toward the opera-
tor.
Any of these reactions may cause you to lose control of
the saw, which could result in serious personal injury.
IMPORTANT SAFETY
WARNING: RED Used to warn that an
unsafe procedure should not be performed.
1
3
2
4
WARNING: Kickback can lead to dangerous
loss of control of the chain saw and result in
serious or fatal injury to the saw operator or to
anyone standing close by. Always be alert
because rotational kickback and pinch kickback
are major chain saw operational dangers and
the leading cause of most accidents.
A
A
B
A
C
B
A
B
19. Warning!
The use of any accessory or attachment, other than
those recommended in this instruction manual, may
present a risk of personal injury.
20. Have your tool repaired by a qualified person
This electric tool is in accordance with the relevant
safety requirements. Repairs should only be carried
out by qualified persons using original spare parts,
otherwise this may result in considerable danger to
the user.
21. Guard against KICKBACK
A. GRIP SAW FIRMLY: Hold the chain saw firmly
with both hands when the motor is running.
Keep a good firm grip on the saw with both
hands, the right hand on the rear handle, and
the left hand on the front handle.
B. Do not over reach.
C. Keep proper footing and balance at all times.
D. Do not let the nose of the guide bar contact a
log, branch, ground or other obstruction.
E. Do not cut above shoulder height.
F. Use devices, such as low-kickback chain, guide
bar nose guards, chain brakes and special guide
bars, which reduce the risks associated with
kickback.
G. Use only replacement bars and chains
specified by the manufacturer or the equivalent.
22. Power supply
Connect the chain saw to correct voltage; be sure
that the voltage supplied is the same as that specified
on the nameplate of the tool.
23. DO NOT operate a chain saw that is damaged,
improperly adjusted, or not completely and securely
assembled. Be sure that the saw chain stops moving
when the trigger is released.
24. DO NOT attempt operations beyond your capacity or
experience.
25. DO NOT operate a chain saw with one hand! Serious
injury to the operator, helpers, or bystanders may
result from one-handed operation. A chain saw is
intended for two-handed use.
26. TO REDUCE potential for electric shock, do not oper-
ate the saw on wet or slippery surfaces, or during
snow storms, rain storms, and other adverse weath-
er conditions.
27. Keep the handles dry, clean, and free of oil or grease.
28. DO NOT allow dirt, debris or sawdust to build up on
the motor or outside air vents.
29. Follow the manufacturer’s sharpening and mainte-
nance instructions for the saw chain.
30. Cut at high motor speeds.
31. Operation of a chain saw should be restricted to
mature, properly instructed individuals.
32. Your chain saw is intended for occasional
homeowner use. It is not made for heavy continuous
use.
33. DO NOT FORCE a small saw to do a job requiring a
heavier duty unit.
34. Examine the electrical switches. Do not use the
chain saw if the switches do not properly turn on and
off. Do not attempt to make any repairs to the electric
switches. Take your saw to a Talon Authorized
Service Center.
35. Maintain extension cords Inspect the extension
cords periodically and replace if damaged. Only use
power cords that are suitably marked for outdoor use.
36. DO NOT operate your chain saw near or around
flammable liquids or gases, whether in or out of
doors. An explosion and/or fire may result.
37. All chain saw service, other than the items listed in
the user manual safety and maintenance
instructions, should be performed by competent
chain saw personnel. Do not attempt to repair it your-
self; there are no user serviceable parts inside.
38. NEVER REMOVE, modify or make inoperative any
safety device furnished with your unit. The CHAIN
BRAKE®/Hand Guard is a major safety feature. The
saw will not run when the CHAIN BRAKE®is tripped.
39. It is intended for infrequent use by homeowner’s, cot-
tagers and campers, and for such general applica-
tions such as clearing, pruning, cutting firewood, etc.
It is not intended for prolonged use. If the intended
use involves prolonged periods of operation, this may
cause circulatory problems in the user’s hands due to
vibration. It may be appropriate to use a saw having
an anti-vibration feature.
40. Safety clothing required by government regulations,
or your employer should be used; otherwise, snug fit-
ting clothing, safety footwear, and hand and ear pro-
tection should be worn.
WARNING: Kickback may occur when the
nose or tip of the guide bar touches an
object, or when the wood closes in and
pinches the saw chain in the cut. Tip contact
in some cases may cause a lightning-fast
reverse action, kicking the guide bar rapidly
back towards the operator. Pinching the saw
chain along the top of the guide bar may
push the guide bar rapidly back towards the
operator. Either of these reactions may
cause you to lose control of the saw, which
could result in serious injury to the user. The
following precautions should be followed to
minimize kickback.

4
GB
GENERAL INFORMATION
1
2
1. Rear Handle
2. Oil Tank Cap
3. Trigger Start
4. Sprocket cover
5. Chain Cover Control Knob
6. Chain Tension Ring
7. Electric Motor
8. Electric Cord
9. Chain Brake Lever / Hand
Guard
10. Lock / Button
11. Front Handle
12. Guide Bar
13. Saw Chain
14. Spiked Bumper
15. Rear hand Guard
16. Guide Bar Nose
17. Oil Tank Inspection Window
18. Cord Retainer
19. Chain Catcher
3
7
4
13
6
8
910
11
12
14 15
16
17
18
• SAFETY FEATURES
Numbers preceding the descriptions correspond with the numbers above to help you locate the safety feature.
3 TRIGGER START / STOP SWITCH stops saw motor when released.
9 CHAIN BRAKE LEVER / HAND GUARD activates the chain brake and protects the operator’s left hand in the
event it slips off the front handle while saw is running.
7 ELECTRIC MOTOR is double insulated for added safety.
10 LOCK / OFF BUTTON prevents accidental acceleration of the saw motor. The trigger cannot be squeezed unless
lock/off button is pushed forward to end.
13 LOW-KICKBACK CHAIN helps significantly reduce kickback, or the intensity of kickback, due to specially
designed depth gauges and Guard links.
19 CHAIN CATCHER reduces the danger of injury in the event saw chain breaks or derails during operation. The
catcher is designed to intercept a whipping chain.
5
19
5
GB
•INTRODUCTION
This unit is designed for occasional homeowner use and
should not be used for commercial purposes or subjected
to heavy continuous use.
Your new chain saw can be used for a variety of projects
such as cutting firewood, making fence posts, felling small
trees, limbing, pruning at ground level, and light carpentry.
Cut only wood or wood products with your saw.
• ASSEMBLY REQUIREMENTS
Your new chain saw will require adjustment of chain and
filling the oil tank with lubricating oil before the unit is
ready for operation. Do not start the saw motor until the
unit is properly prepared. Read all instructions carefully.
Do not install any other size bar and chain than what is
recommended for your model.
• GUIDE BAR / SAW CHAIN INSTALLATION
TO INSTALL GUIDE BAR & SAW CHAIN:
1. Place power unit on flat surface.
2. To remove the side cover (A), turn the knob (B) count-
er-clockwise. (Fig. 3A)
3. Screw (C) the tension plate (D) on the bar. (Fig. 3B)
4. Spread the chain out with the cutting edges (E) of the
chain pointing in the DIRECTION OF ROTATION (Fig.
3C).
5. To fit the chain on the bar, turn the tension plate (D)
counter-clockwise to the end. Install the chain and bar
on the power unit, turn the tension plate (D) clockwise
and then put the side cover (A) on. (Fig. 3D)
6. Turn the knob clockwise, adjust the chain tension pin
and then fasten the knob.
7. After running the chain saw around 1 hour, adjust the
chain tension to 2mm.
• SAW CHAIN TENSION ADJUSTMENT
Proper tension of the saw chain is extremely important
and must be checked before starting, as well as during,
any cutting operation. Taking the time to make needed
adjustments to the saw chain will result in improved cut-
ting performance and prolonged chain life.
NOTE: A new chain and bar will need readjustment after
as few as 5 cuts. This is normal during the break-in peri-
od, and the interval between future adjustments will
lengthen quickly (Fig. 4).
TO ADJUST SAW CHAIN TENSION:
NOTE: Make sure the chain brake is disengaged.
Disengage the chain brake (A) by pulling it backward (Fig.
5A).
1. To adjust the chain tension release locking knob (B)
by turning counter clockwise. (Fig. 5B)
2. To tighten chain tension turn adjustment ring (A)
clockwise. (Fig. 5B)
3. Lock bar in place by tightening locking knob (B).
NOTE: If the chain is difficult to rotate or if it binds on the
guide bar, too much tension has been applied and must
be adjusted as follows:
4. Release locking knob (B).
5. Release chain tension by turning adjustment ring (A)
counter clockwise.
6. Tighten locking knob.
ASSEMBLY INSTRUCTIONS
CAUTION: Disconnect the chain saw from
mains before checking adjusting the chain
saw tension.
Fig. 3A
B
A
Fig. 3B
C
D
Fig. 3C
D
Fig. 3D
A
E
CAUTION: If a chain is TOO LOOSE or TOO
TIGHT, the bar chain and saw bearings will
wear more rapidly. Study Fig. 4 for informa-
tion concerning correct cold tension (A), cor-
rect warm tension (B), and as a guide for
when saw chain needs adjustment (C).
CAUTION: If the chain is too loose, more
than 3mm after applying down force with fin-
ger, as shown in Fig. 4. It needs to be adjust-
ed, otherwise the stopping time might be
over the limit.
Fig.4
ABC
B
AA

GB
7
GB
6
• FILLING OIL TANK
Using a funnel, fill oil tank with Talon Chain, Bar and
Sprocket oil. Wipe up any spills. Make sure no dirt gets
into the oil tank.
The saw chain requires lubrication while in use to mini-
mize friction with the guide bar. The oil tank holds 200ml
of oil, enough to lubricate the chain for 15-20 minutes of
sawing.
We recommend using Talon Chain, Bar and Sprocket Oil,
which contains additives to reduce friction wear and
reduce resin residue formations.
NOTE: Your chain saw is equipped with an Automatic
Oiler system and is the ONLY source of lubrication for the
bar and chain (Fig. 6)
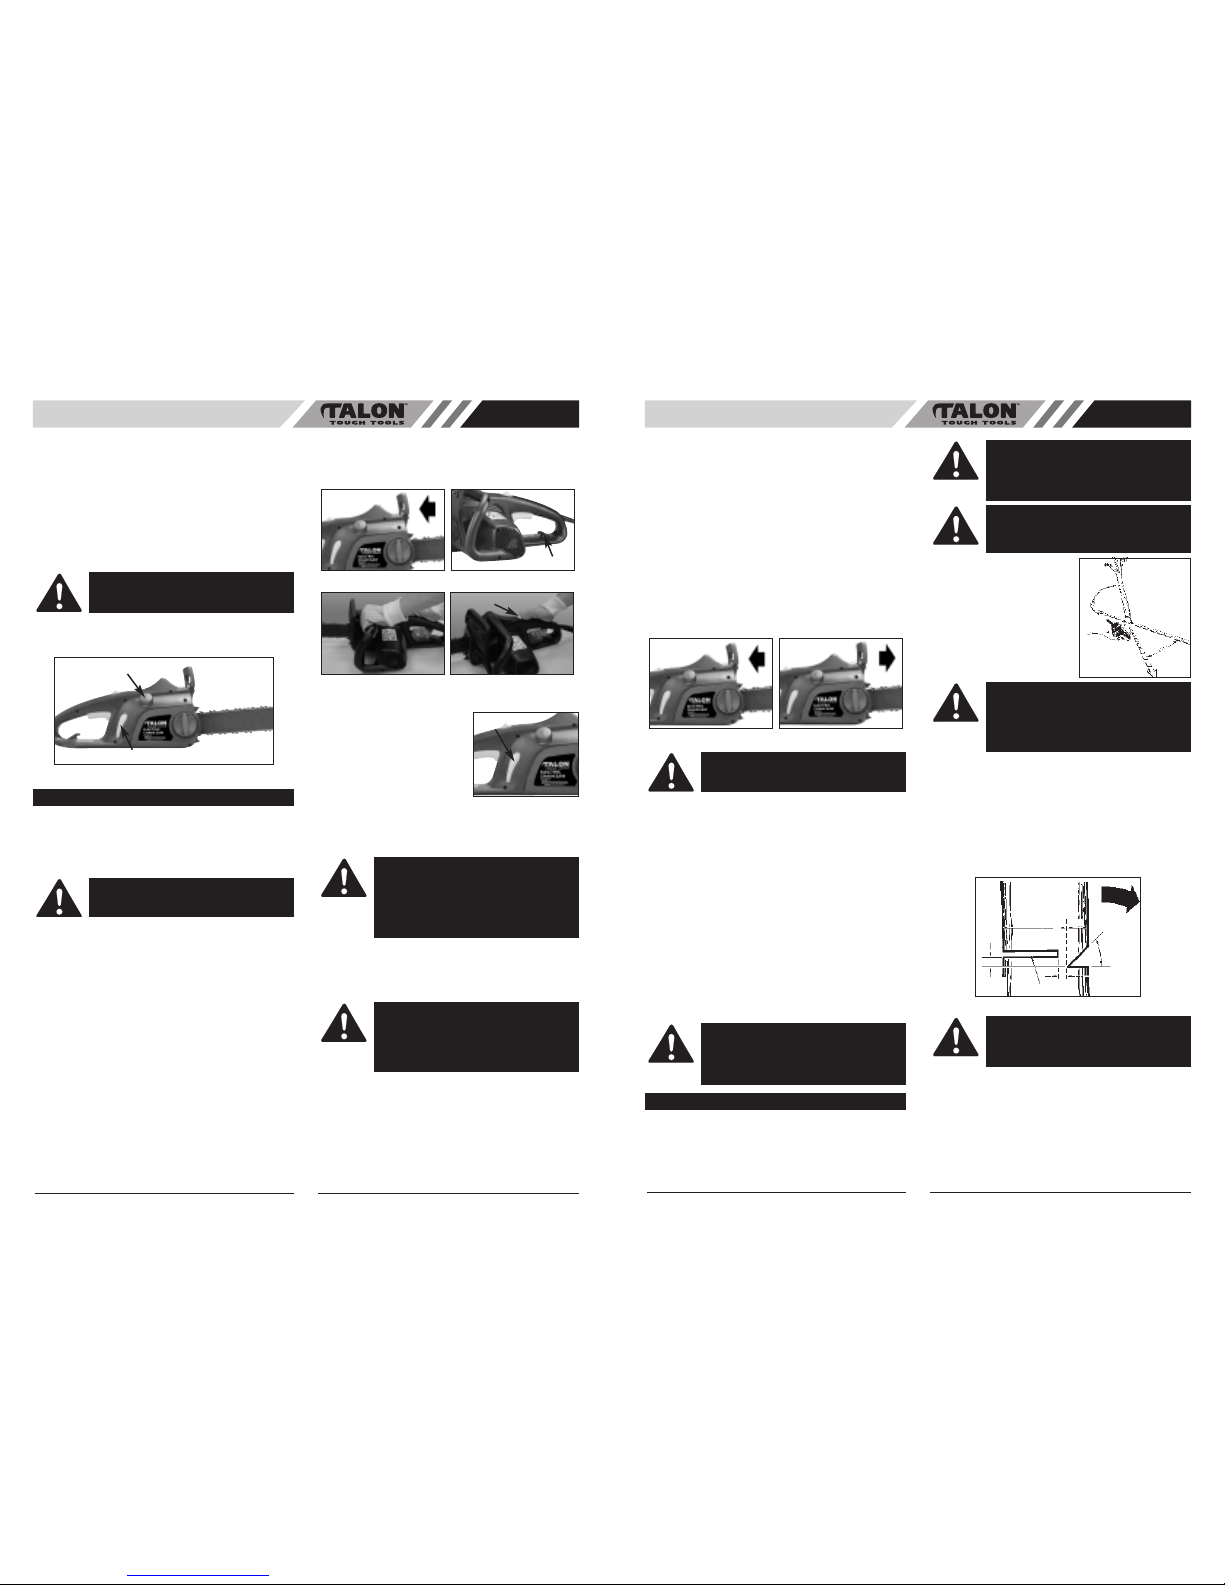
• TO START SAW
1. Make sure the chain brake IS DISENGAGED. The
motor will not start if the chain brake is in the
ENGAGED position. Disengage the chain brake by
pulling backward toward the motor (Fig. 7A).
2. An extension cord retainer is built into the switch han-
dle that prevents the extension cord from pulling out of
the handle. To use this feature, simply double the
extension cord, about a foot from the end, and insert it
into the end of the handle. Hook the loop formed by
doubling the cord over the tab. Gently tug on the cord
to ensure that it is firmly retained in the saws handle.
Plug the receptacle end of the extension cord into the
tool;s power supply cord. (Fig. 7B)
3. Grip the saw with both hands, left hand holding the
front /handle (DO NOT HOLD CHAIN BRAKE ) and the
right hand holding the rear handle. Thumbs and fingers
should encircle both handles (Fig. 7C).
4. With your RIGHT THUMB, push the LOCK/OFF button
(C) forward at end the top of the rear handle, and at the
same time squeeze the trigger. To stop the saw,
release the trigger (Fig. 7D).
NOTE: It is not necessary to maintain pressure on the
LOCK/OFF button once the trigger is squeezed and the
motor is running. The LOCK/OFF button is a safety device
to avoid accidental starting.
• TO STOP MOTOR
The saw motor will automatically stop when the trigger is
released. The LOCK/OFF button will have to be
depressed and the trigger squeezed to restart the motor.
• CHAIN AND BAR LUBRICATION
Adequate lubrication of the saw
chain during cutting operations is
essential to minimize friction with
the guide bar.
Your chain saw is equipped with
an automatic oiler system. The
oiler automatically delivers the
proper amount of oil to the bar
and chain. There is no flow
adjustment.
The oil tank level can be checked in the inspection win-
dow (A) provided on the right side of the saw. Tank is full
when oil is at the top of the slot (Fig. 8).
NOTE: The saw chain stretches during use, particularly
when it is new, and occasional adjustment will be needed.
A new chain requires more frequent adjustment during the
break-in period. This is normal. See Section for Saw
Chain Tension Adjustment instructions.
•CHAIN BRAKE / HAND GUARD
All Talon chain saws are equipped with a Chain brake
/Hand guard which stops a moving chain in milliseconds,
helping to reduce the hazard of kickback, a fast upward
motion of the guide bar which occurs when the saw chain
at the nose of the bar accidentally strikes an object or is
pinched in the cut.
The Hand Guard also protects your left hand in the event
it slips off the front handle.
CAUTION: The oil tank level should be fre-
quently checked during operation to avoid
starving the bar and chain of lubrication.
Fig. 6
Oil Cap
OPERATING INSTRUCTIONS
WARNING: Ensure the extension cord is of
the proper size and type for your saw.
Fig. 7C
C
Fig. 7D
Fig. 7A
A
Fig. 7B
Fig. 8
A
CAUTION: Never starve the bar and chain of
lubrication oil. Running the saw DRY or with
TOO LITTLE OIL will decrease cutting effi-
ciency, shorten chain saw life, and cause
rapid dulling of the chain and excessive wear
of the bar from overheating. Too little is evi-
denced by smoke or bar discoloration.
CAUTION: A loose chain can jump off the
bar while you are cutting, as well as wear the
bar and chain. A chain that is too tight can
damage the saw. Either situation, chain too
loose or too tight, could cause serious per-
sonal injury.
The chain brake is a safety feature which is activated if
pressure is applied against the guard or when, in the
event of kickback, the operator’s hand strikes the lever.
When the chain brake is activated, chain movement
abruptly stops and the power supply to the motor is imme-
diately cut off.
The purpose of the chain brake is to reduce the possibili-
ty of injury due to kickback. The chain brake cannot,
however, provide the measure of intended protection if the
saw is carelessly operated.
The chain brake is disengaged (chain can move) when
the brake is pulled back and locked. This is the normal
running position (Fig. 9A).
The chain brake is engaged (chain cannot move) when
the brake is in forward position (Fig. 9B).
NOTE: The motor will not start if the chain brake is in the
engaged position.
CHAIN BRAKE TEST
Before cutting with your saw, the chain brake should be
tested as follows:
A. Make sure the chain brake is disengaged (Fig. 9A).
B. Place the saw on a firm, flat, dry surface that is clear
of any debris. Do not let the saw come in contact
with any objects.
C. Plug the unit into the power source.
D. Grasp the front handle (not the Chain Brake / Hand
Guard Lever) with your left hand. Thumb and fingers
should encircle the handle.
E. Grasp the rear handle with your right hand. Thumb
and fingers should encircle the handle.
F. Depress the LOCK/OFF button with your right thumb.
Squeeze the trigger with your index finger. (Fig. 7D.)
G. While the motor is running, activate the chain brake
by rolling your left hand forward against the lever.
H. Chain and motor should stop abruptly.
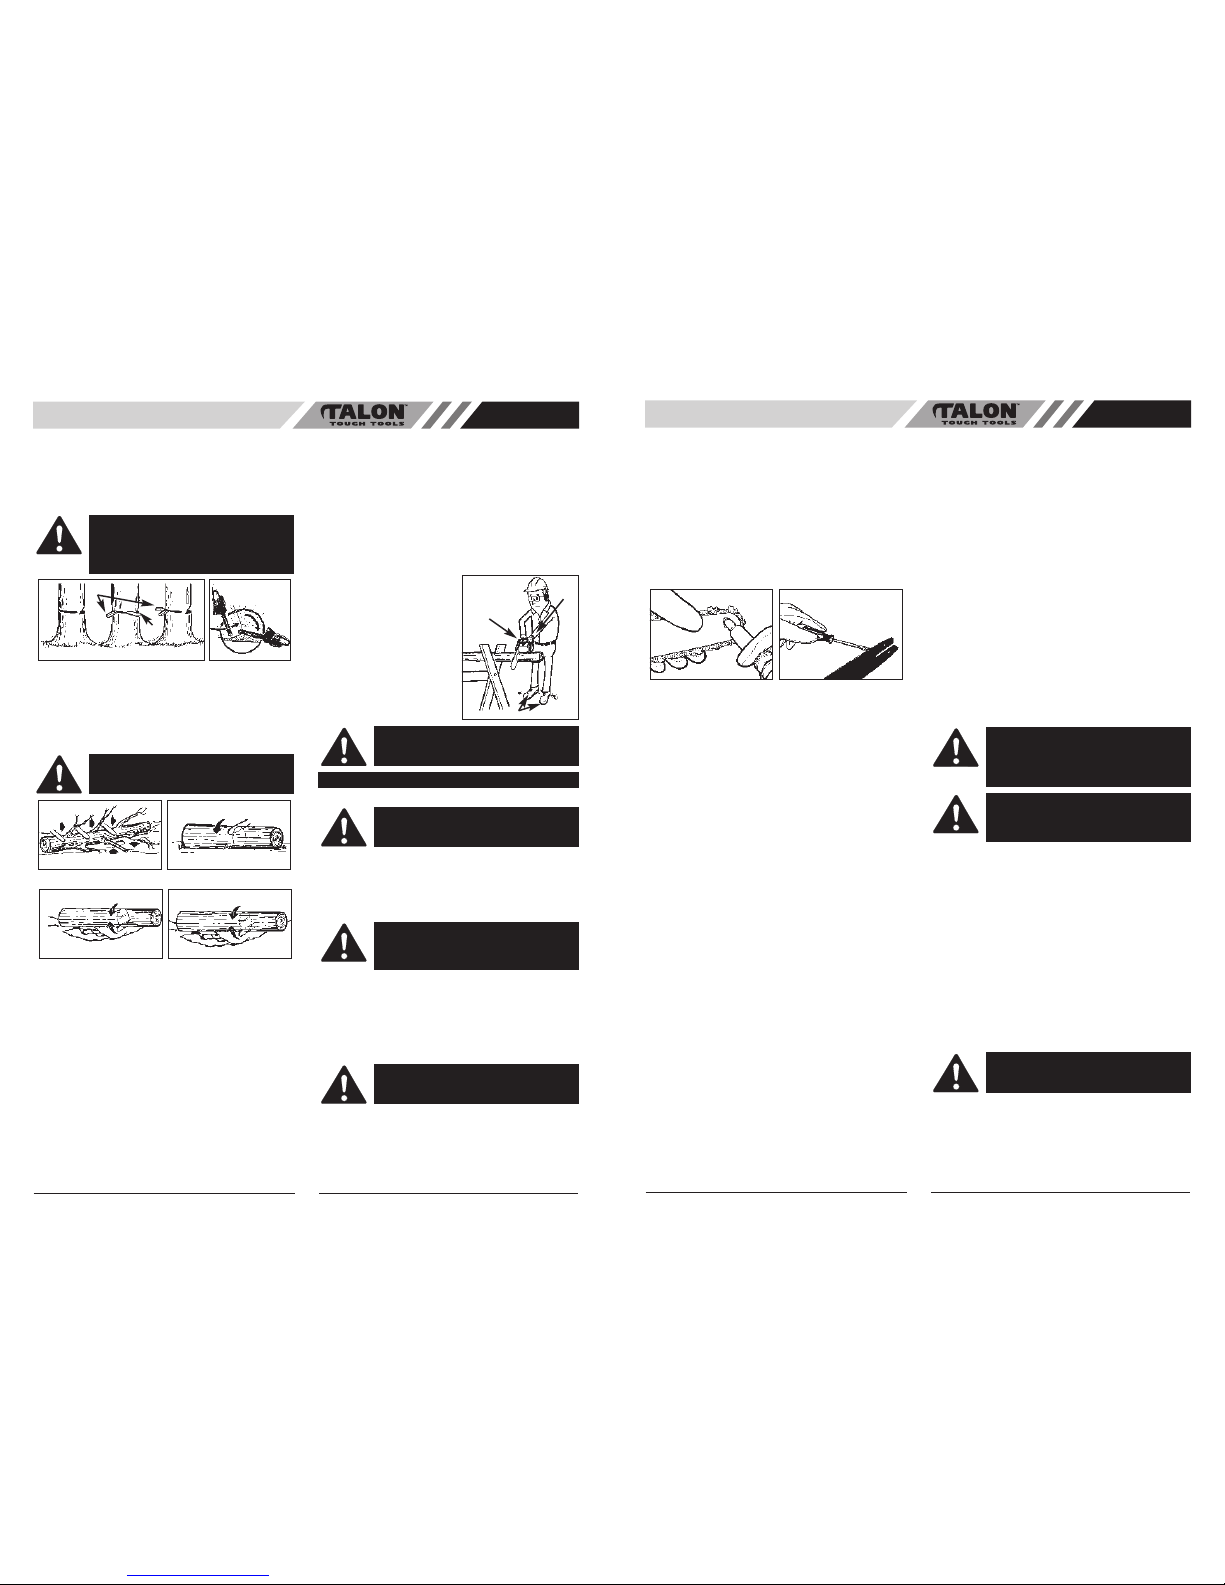
• FELLING
Felling is the term for cutting down a tree. Small trees up
to 15-18cm in diameter are usually cut in a single cut.
Larger trees require notch cuts. Notch cuts determine the
direction the tree will fall.
FELLING A TREE:
NOTE: Direction of fall (B) is
controlled by the notching cut.
Before any cuts are made,
consider the location of larger
branches and natural lean of
the tree to determine the way
the tree will fall.
• GENERAL GUIDELINES FOR FELLING TREES:
Normally felling consists of 2 main cutting operations,
notching (C) and making the felling cut (D).
Start making the upper notch cut (C) on the side of the
tree facing the felling direction (E). Be sure you don’t
make the lower cut too deep into the trunk.
The notch (C) should be deep enough to create a hinge
(F) of sufficient width and strength. The notch should be
wide enough to direct the fall of the tree for as long as
possible.
Never saw completely through the trunk. Always leave a
hinge. The hinge guides the tree. If the trunk is complete-
ly cut through, control over the felling direction is lost.
Insert a wedge or felling lever in the cut well before the
tree becomes unstable and starts to move. This will pre-
vent the guide bar from binding in the felling cut if you
have misjudged the falling direction. Make sure no
bystanders have entered the range of the falling tree
before you push it over.
Fig. 9A
CAUTION: The chain brake should not be
used for starting and stopping the saw during
normal operation.
Fig. 9B
WARNING: If the chain and motor fail to
stop when the chain brake is engaged, take
the saw to the nearest professional Service
Center. Do not use the saw if the chain
brake is not in proper working order.
GENERAL CUTTING INSTRUCTIONS
WARNING: A retreat path (A) should be
planned and cleared as necessary before cuts
are started. The retreat path should extend
back and diagonally to the rear of the expect-
ed line of fall, as illustrated in Fig. 10.
CAUTION: If felling a tree on sloping ground,
the chain saw operator should keep on the
uphill side of the terrain, as the tree is likely
to roll or slide downhill after it is felled.
Fig. 10A
A
B
WARNING: Do not cut down a tree during
high or changing winds or if there is a danger
to properly. Consult a tree professional. Do
not cut down a tree if there is a danger of
striking utility wires; notify the utility company
before making any cuts.
F
C
3/4
D
3.5cm
E
Fig. 10B
WARNING:
Never walk in front of a tree that
has been notched. Make the felling cut (D)
from the other side of the tree and 3-5cm
above the edge of the notch (C) (Fig. 10B).

9
GB
8
GB
FELLING CUT:
1. Use wooden or plastic wedges (G) to prevent binding
the bar or chain (H) in the cut. Wedges also control
felling (Fig. 10C).
2. When diameter of wood being cut is greater than the
bar length, make 2 cuts as shown (Fig. 10D).
• LIMBING
Limbing a tree is the process of removing the branches
from a fallen tree. Do not remove supporting limbs (A)
until after the log is bucked (cut) into lengths (Fig. 11).
Branches under tension should be cut from the bottom up
to avoid binding the chain saw.
• BUCKING
Bucking is cutting a fallen log into lengths. Make sure you
have a good footing and stand uphill of the log when cut-
ting on sloping ground. If possible, the log should be sup-
ported so that the end to be cut off is not resting on the
ground. If the log is supported at both ends and you must
cut in the middle, make a downward cut halfway through
the log and then make the undercut. This will prevent the
log from pinching the bar and chain. Be careful that the
chain does not cut into the ground when bucking as this
causes rapid dulling of the chain.
When bucking on a slope, always stand on the uphill side.
1. Log supported along entire length: Cut from top
(overbuck), being careful to avoid cutting into the
ground (Fig. 12A).
2. Log supported on 1 end: First, cut from bottom
(underbuck) 1/3 diameter of log to avoid splintering.
Second, cut from above (overbuck) to meet first cut
and avoid pinching (Fig. 12B).
3. Log supported on both ends: First, overbuck 1/3
diameter of log to avoid splintering. Second, under-
buck to meet first cut and avoid pinching (Fig.
12C).
NOTE: The best way to hold a log while bucking is to use
a sawhorse. When this is not possible, the log should be
raised and supported by the limb stumps or by using sup-
porting logs. Be sure the log being cut is securely sup-
ported.
•BUCKING USING A SAWHORSE
For personal safety and ease
of cutting, the correct position
for vertical bucking is essen-
tial (Fig. 13).
VERTICAL CUTTING:
A. Hold the saw firmly with
both hands and keep the
saw to the right of your
body while cutting.
B Keep the left arm as
straight as possible.
C. Keep weight on both feet.
• GUIDE BAR MAINTENANCE
Proper maintenance of the guide bar, as explained in
this section, is essential to keep your saw in good
working order.
SPROCKET TIP LUBRICATION:
(For units supplied with sprocket tip guide bars only.)
Lubrication of the sprocket tip is recommended after each
saw use. Always thoroughly clean the guide bar sprocket
tip before lubrication.
Tool for lubrication: Talon Lube Gun (disposable)
This grease gun is designed to fit the small lubrication
point on the guide bar.
The disposable Lube Gun is packed with grease.
WARNING:
As the felling cut gets close to
the hinge, the tree should begin to fall. When
tree begins to fall, remove saw from cut,
unplug, put chain saw down, and leave area
along retreat path (Fig. 10A).
Fig. 10C Fig. 10D
G
H
WARNING:
Never cut tree limbs while stand-
ing on tree trunk.
Fig. 11 Fig. 12A
Fig. 12B
A
2
12
1
Fig. 13
A
B
C
CAUTION: While the saw is cutting, be sure
the chain and bar are being properly lubri-
cated.
BAR / CHAIN MAINTENANCE
WARNING:
Ensure that the power cord is
disconnected before performing any mainte-
nance on your saw.
CAUTION: Failure to lubricate the guide bar
sprocket tip as explained below will result in
poor performance and seizure, voiding the
manufacturer’s warranty.
WARNING:
Wear heavy duty work gloves
when performing this application to reduce
risk of personal injury.
To Lubricate Sprocket Tip:
1. Unplug the chain saw from the power source.
NOTE: It is not necessary to remove the saw chain to
lubricate the guide bar sprocket tip. Lubrication can be
done on the job.
2. Clean the guide bar sprocket tip.
3. Using disposable Lube gun, insert needle nose into
the lubrication hole and inject grease until it appears
at the outside edge of the sprocket tip (Fig.14).
4. Make sure that the chain brake is deactivated. Rotate
the saw chain by hand. Repeat the lubrication proce-
dure until the entire sprocket tip has been greased.
To Clean Guide Bar Rails:
1. Remove sprocket cover, bar and chain.
2. Using a screwdriver, putty knife, wire brush or other
similar instrument, clear residue from the rails on the
guide bar. This will keep the oil passages open to pro-
vide proper lubrication to the bar and chain. (Fig. 15)
3. Reinstall the bar, chain, sprocket cover and bar bolt
retaining nuts. (See Section GUIDE BAR / SAW
CHAIN INSTALLATION).
• GUIDE BAR MAINTENANCE
Most guide bar problems can be prevented merely by
keeping the chain saw well maintained.
Incorrect filing and non-uniform cutter and depth gauge
settings cause most guide bar problems, primarily result-
ing in uneven bar wear. As the bar wears unevenly, the
rails widen, which may cause chain clatter and diffi-
culty in making straight cuts.
Insufficient guide bar lubrication and operating the saw
with a chain that is TOO TIGHT will contribute to rapid bar
wear (see Section CHAIN MAINTENANCE INSTRUC-
TIONS).
To help minimize bar wear, the following guide bar main-
tenance is recommended.
BAR WEAR - Turn guide bar frequently at regular inter-
vals (for example, after 5 hours of use), to ensure even
wear on top and bottom of bar.
BAR GROOVES - Bar grooves (or rails which support and
carry the chain) should be cleaned if the saw has been
heavily used or if the saw chain appears dirty. Rails
should always be cleaned every time the saw chain is
removed.
OIL PASSAGES - Oil passages at bar pad should be
cleaned to ensure proper lubrication of the bar and chain
during operation. This can be done using a soft wire small
enough to insert into the oil discharge hole.
NOTE: The condition of the oil passages can be easily
checked. If the passages are clear, the chain will auto-
matically give off a spray of oil within seconds of starting
the saw. Your saw is equipped with an automatic oiler
system.
•CHAIN MAINTENANCE INSTRUCTIONS
WARNING:
Unless you have experience and specialized training for
dealing with kickback (see Safety Precautions), always
use a low-kickback saw chain, which significantly reduces
the danger of kickback. Low-kickback saw chain does not
completely eliminate kickback. A low-kickback or “safety
chain”, should never be regarded as total protection
against injury.
A low-kickback saw chain should always be used in con-
junction with other kickback protection devices such as
the chain brake / Hand Guard furnished with your unit.
Always use a replacement saw chain designed as “low-
kickback” or a saw chain which meets the low-kickback
performance.
A standard saw chain (a chain which does not have the
kickback reducing guard links) should only be used by an
experienced professional chain saw operator.
• What is a Low-Kickback Saw Chain?
A low-kickback saw chain is a chain which has met the
kickback performance requirements of ISO 9518.
By keeping the chain brake and saw chain in good work-
ing condition and correctly serviced as recommended in
this manual, you will be able to maintain the safety system
of your chain saw over the life of the product.
•CHAIN TENSION:
Check the chain tension frequently and adjust as often as
necessary to keep the chain snug on the bar, but loose
enough to be pulled around by hand. (See Section SAW
CHAIN TENSION ADJUSTMENT).
• BREAKING IN A NEW SAW CHAIN
A new chain and bar will need readjustment after as few
as 5 cuts. This is normal during the break-in period, and
the interval between future adjustments will begin to
lengthen quickly.
Over a period of time, however, the moving parts of the
saw chain will become worn, resulting in what is called
CHAIN STRETCH. This is normal. When it is no longer
possible to obtain correct chain tension adjustment, a link
will have to be removed to shorten the chain. See your
Talon Authorized Service Center to have this repair per-
formed.
Fig. 14 Fig. 15
WARNING:
Never remove, modify or make
inoperative any safety device furnished with
your unit. The Chain Brake/Hand Guard and
low-kickback saw chain are major safety
features provided for your protection.
WARNING:
Always wear heavy duty
protection work gloves and disconnect the
extension cord when working on the saw
chain.
WARNING:
Never have more than 3 links
removed from a loop of chain this could
cause damage to the sprocket.

• CHAIN LUBRICATION:
Always make sure the automatic oiler system is working
properly. Keep the oil tank filled with Talon Chain, Bar and
Sprocket Oil.
Adequate lubrication of the bar and chain during cutting
operations is essential to minimize friction with the guide
bar.
Never starve the bar and chain of lubricating oil. Running
the saw dry or with too little oil will decrease rapid cutting
efficiency, shorten saw chain life, cause rapid dulling of
the chain, and lead to excessive wear of the bar from
overheating. Too little oil is evidenced by smoke or bar
discoloration.
•PREVENTATIVE MAINTENANCE
SERVICING A DOUBLE INSULATED APPLIANCE
In this double-insulated appliance, two systems of insula-
tion are provided instead of grounding. No grounding
means is provided on a double-insulated appliance, nor
should a means for grounding be added to the appliance.
There are no owner serviceable parts inside. A double-
insulated appliance is marked with the words, “DOUBLE
INSULATION” or “DOUBLE INSULATED”. The symbol
(square within a square) may also be marked on the appli-
ance.
Any service must only be carried out by a qualified tech-
nician at an authorized service centre.
1. Place switch in “OFF” position and unplug the power
supply before the appliance is serviced, cleaned or
maintenance is performed.
2. Keep air intake clean and air vents free of debris to
avoid overheating the motor.
3. Clean with a damp sponge and mild soap. Do not
squirt with water, hose with water or other liquids.
4. No lubrication is necessary as the motor is equipped
with lifetime lubricated bearings.
5. If the saw does not operate, turn switch to “OFF”
position and disconnect extension from power supply
first, then from blower. Check power supply for blown
fuses or tripped circuit breakers. Do not attempt to
repair it yourself. There are no serviceable parts
inside.
10
GB
This manual suits for next models
1
Table of contents
Other Talon Chainsaw manuals