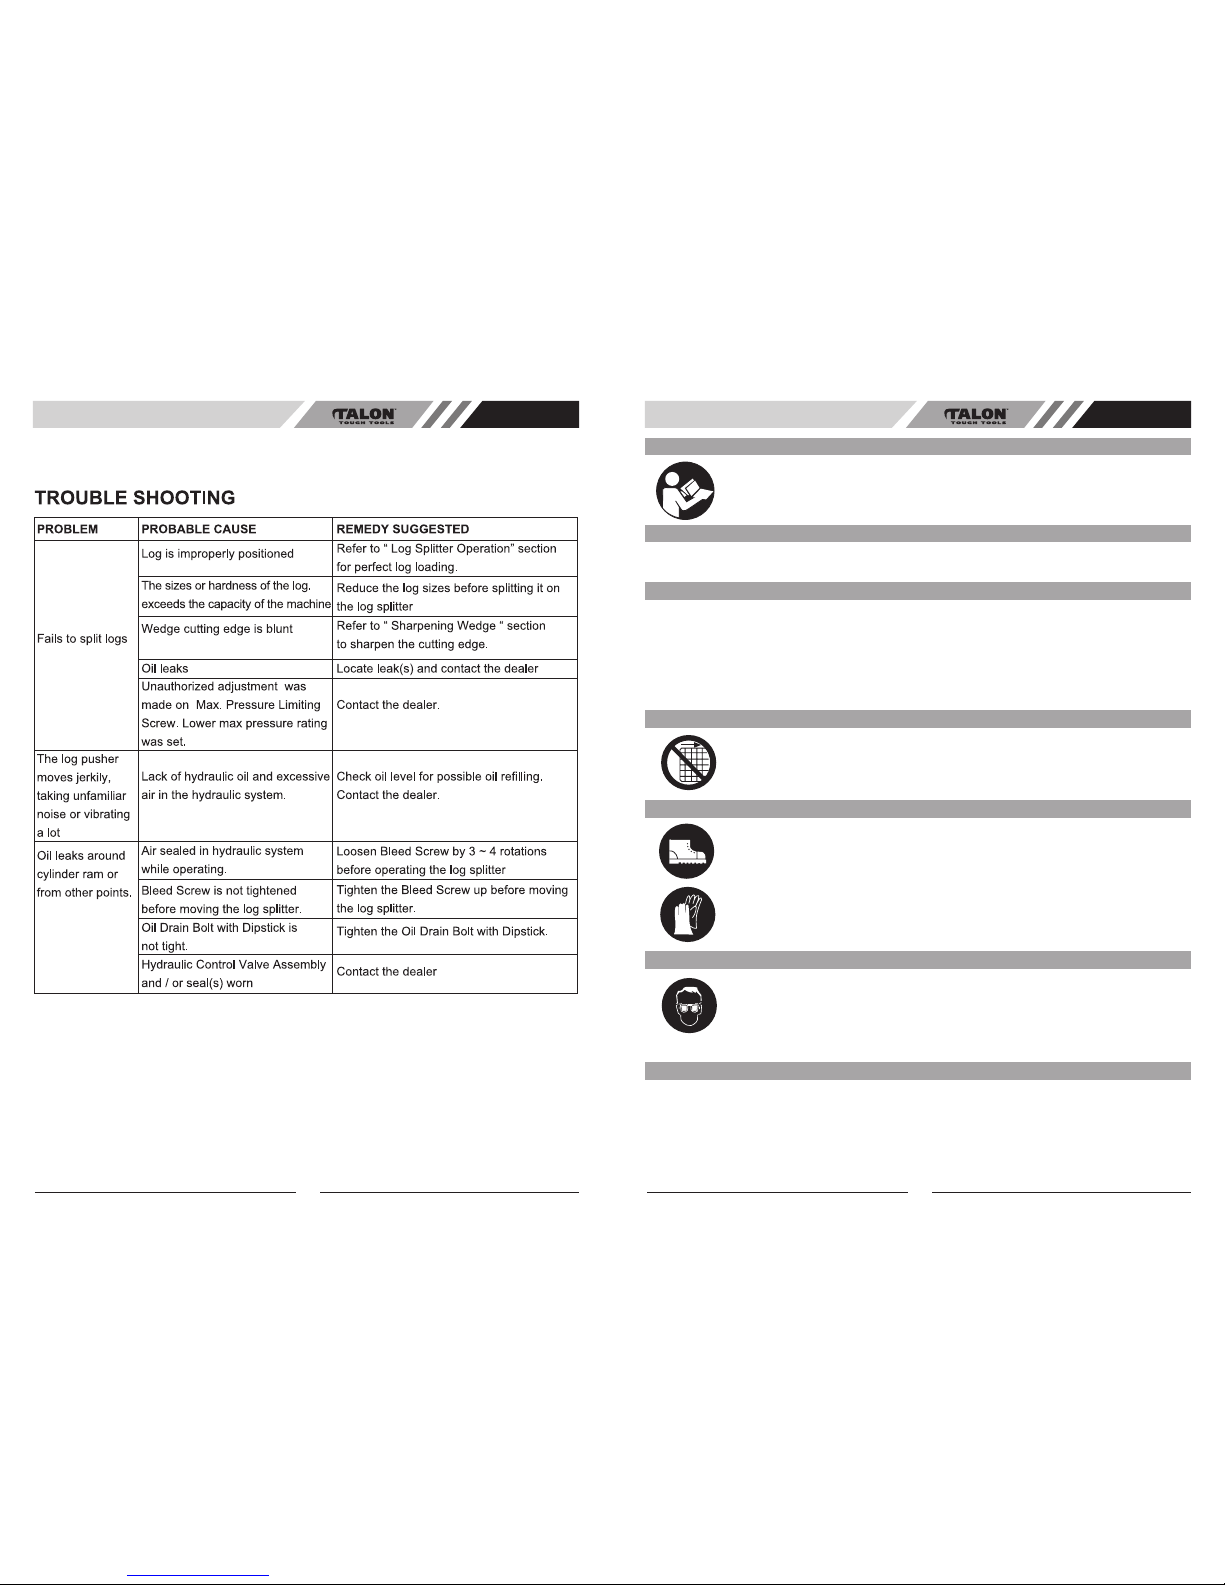
Talon FB4052 User manual

1
MODEL NO. FB4052
WARRANTY INFORMATION AU
Safety Operation Assembly Maintenance
User Manual
4 TON LOG SPLITTER
For your own safety please read this manual before attempting to operate your new unit. Failure to follow
instructions can result in serious personal injury. Spend a few moments to familiarise yourself with your
log splitter before each use. Keep this manual as reference for operation and maintenance of your
log splitter.
WARNING - PLEASE READ
LOG SPLITTER WARRANTY
The benefits conferred by this warranty are in addition to all other conditions and warranties in respect of this
product which the consumer may have taken under the Trade Practices Act 1974 or by any legislation of a
State or Territory of Australia. This product is warranted for home use by Talon Tools Australia (ABN 12 099
520 939)(the “Company”) to be free from defects in material and workmanship for a period of 24 months from
the date of original purchase. The Company during the period of the warranty, will at its option, and subject
to the conditions stated herein, repair or replace without charge this product or any component part, which
upon examination by an Authorised Service Agent or by the Company is found to be defective.
Warranty conditions
This warranty will not apply:
(i) where this product has been subjected to misuse, abuse, accident or want of care;
(ii) where this product has been used for a purpose for which it was not designed or is not suited;
(iii) where the service of this product has been undertaken by a person not authorised by the Company
to carry out such work or where parts that have not been approved by the Company have been used;
(iv) where this product has been used for industrial or commercial purposes.
Should service become necessary during the warranty period, the purchaser should contact an Authorised
Service Agent or the Company. In order to obtain warranty service, the purchaser must present the store
receipt showing the name of the retailer and the date of purchase together with a completed Warranty
Card. The period of the warranty begins from the original date of purchase, notwithstanding any subse-
quent repair or parts replacement. No additional warranty or guarantee other than set out in this document,
whether written or verbal, is authorised to be made on the Company's behalf. The purchaser shall be
responsible for delivery or causing the product to be delivered to the Company or the Authorised Service
Agent and the purchaser shall be responsible for all charges in connection with re-delivery of the product
and/or the delivery of parts. Damage in transit is not covered by this warranty and purchasers should
remove from the product any liquids (if applicable) before sending and pack the product securely to pre-
vent damage.
Warranty exclusions
Normal wear parts or components are subject to separate terms as follows: Normal wear parts, compo-
nents or service required when performing normal and regular maintenance of this product are not covered
by warranty unless it is found to be defective by an Authorised Service Agent or by the Company. Normal
wear parts include, but are not limited to:
Returns based on the above listed normal wear parts will not be accepted under this warranty as they
are considered consumable items and are at the expense of the purchaser.
Hydraulic Fluid

23
TROUBLE SHOOTING AU
SAFETY WARNINGS & INSTRUCTIONS
AU
Read and understand the owner's manual and labels affixed to the log splitter. Learn
its application and limitations as well as the specific potential hazards peculiar to it.
• UNDERSTAND YOUR LOG SPLITTER
• DRUGS, ALCOHOL AND MEDICATION
Do not operate the log splitter while under the influence of drugs, alcohol, or any medication that
could affect your ability to use it properly.
• AVOID DANGEROUS CONDITIONS
Put the log splitter on a 60 - 75cm high, stable, flat, and level work bench where there is plenty of
room for handling, and help the operator stay altert. Bolt the log splitter to the work surface if it
tends to slip, walk, or slide.
Keep your work area clean and well lighted. Cluttered areas invites injuries.
Do not use the log splitter in wet or damp areas or expose it to rain.
Do not use it in areas where fumes from paint, solvents or flammable liquids pose a potential haz-
ard.
• INSPECT YOUR LOG SPLITTER
Check your log splitter before turning it on. Keep guards in place and in working
order. Form a habit of checking to see that keys and adjusting wrenches are
removed from tool area before turning it on. Replace damaged, missing or failed
parts before using it.
• DRESS PROPERLY
Do not wear loose clothing, gloves, neckties or jewelry (rings, wrist watches). They
can be caught in moving parts.
Protective electrically non conductive gloves and non-skid footwear are recom-
mended when working. Wear protective hair covering to contain long hair, prevent-
ing it from get caught in machinery.
• PROTECT YOUR EYES AND FACE
Any log splitter may throw foreign objects into the eyes. This can cause permanent
eye damage. Always wear safety goggles. Everyday eyeglasses have only impact
resistant lenses. They are not safety glasses.
Do not put the log splitter on the ground for operations. This is awkward operating
position that the operator has to bring his face close to the machine, and thus risks
being struck by wood chips or debris.
• EXTENSION CORDS
Improper use of extension cords may cause inefficient operation of the log splitter which can result
in overheating. Be sure the extension cord is no longer than 10m and its section is no less than
2.5mm2 to allow sufficient current flow to the motor.
Avoid use of free and inadequately insulated connections. Connections must be made with pro-
tected material suitable for outdoor use.
The following basic troubleshooting checks can be easily carried out to determine whether or not the unit
is running correctly. If the unit will not operate after these checks then the product should be taken to an
Authorised Service Agent for further inspection.

4
SAFETY WARNINGS & INSTRUCTIONS
AU AU
5
Unplug when not in use, before making adjustments, changing parts, cleaning, or
working on the log splitter; Consult technical manual before servicing.
• DISCONNECT POWER
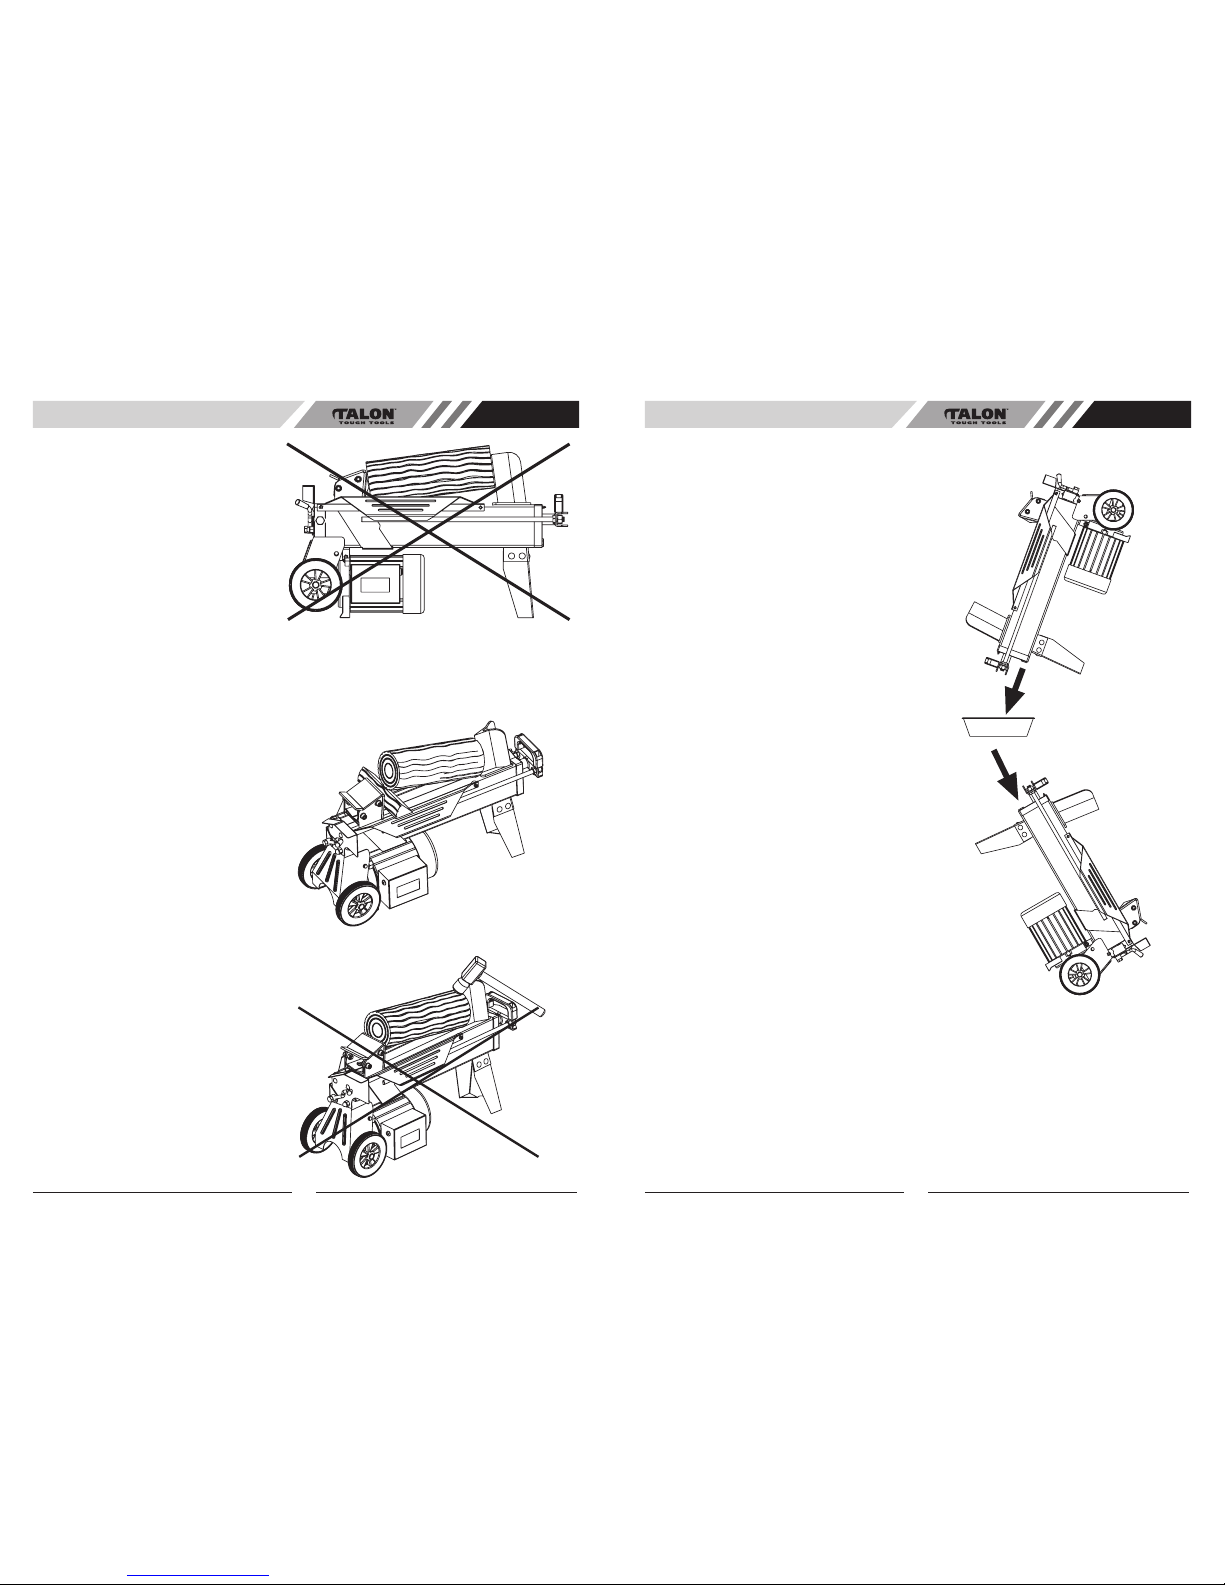
Take used oil to an authorized collection point or follow the stipulations in the coun-
try where the log splitter is used.
Do not discharge into drains, soil or water.
• PROTECT THE ENVIRONMENT
• MAINTAIN YOUR LOG SPLITTER WITH CARE
Keep the log splitter clean for best and safest performance.
• MAKE THE WORKSHOP CHILDPROOF
Lock the shop. Disconnect master switches. Store the log splitter away from children and others
not qualified to use it.
TABLE OF CONTENTS
Warranty . . . . . . . . . . . . . . . . . . . . . . . . . . . . . . . . . . . . . . . . . . . . . . . . . . . . . . . . . . . . . . .1
Trouble Shooting . . . . . . . . . . . . . . . . . . . . . . . . . . . . . . . . . . . . . . . . . . . . . . . . . . . . . . . . .2
Safety Warnings & Cautions . . . . . . . . . . . . . . . . . . . . . . . . . . . . . . . . . . . . . . . . . . . . . . . .3
Application Conditions . . . . . . . . . . . . . . . . . . . . . . . . . . . . . . . . . . . . . . . . . . . . . . . . . . . . .6
Specifications . . . . . . . . . . . . . . . . . . . . . . . . . . . . . . . . . . . . . . . . . . . . . . . . . . . . . . . . . . . .6
Electrical Requirements . . . . . . . . . . . . . . . . . . . . . . . . . . . . . . . . . . . . . . . . . . . . . . . . . . . .6
Set up and Preparation for Operation . . . . . . . . . . . . . . . . . . . . . . . . . . . . . . . . . . . . . . . .7
Wiring Diagram . . . . . . . . . . . . . . . . . . . . . . . . . . . . . . . . . . . . . . . . . . . . . . . . . . . . . . . . . .8
Plumbing Diagram . . . . . . . . . . . . . . . . . . . . . . . . . . . . . . . . . . . . . . . . . . . . . . . . . . . . . . .8
Log Splitter Operation . . . . . . . . . . . . . . . . . . . . . . . . . . . . . . . . . . . . . . . . . . . . . . . . . . . . .9
Freeing a Jammed Log . . . . . . . . . . . . . . . . . . . . . . . . . . . . . . . . . . . . . . . . . . . . . . . . . . . .10
Replacing Hydraulic Oil . . . . . . . . . . . . . . . . . . . . . . . . . . . . . . . . . . . . . . . . . . . . . . . . . . . .11
Sharpening Wedge . . . . . . . . . . . . . . . . . . . . . . . . . . . . . . . . . . . . . . . . . . . . . . . . . . . . . . .11
Parts Schematic . . . . . . . . . . . . . . . . . . . . . . . . . . . . . . . . . . . . . . . . . . . . . . . . . . . . . . . .12
• AVOID ELECTRICAL SHOCK
Check that the electric circuit is adequately protected and that it corresponds with the power, volt-
age and frequency of the motor. Check that there is a ground connection, and a regulation differ-
ential switch upstream.
Ground the log splitter. Prevent body contact with grounded surfaces: pipes, radiators, ranges, and
refrigerator enclosures.
Never open the pushbutton box on the motor. Should this be necessary, contact a qualified electri-
cian.
Mark sure your fingers do not touch the plug's metal prongs when plugging or unplugging the log
splitter.
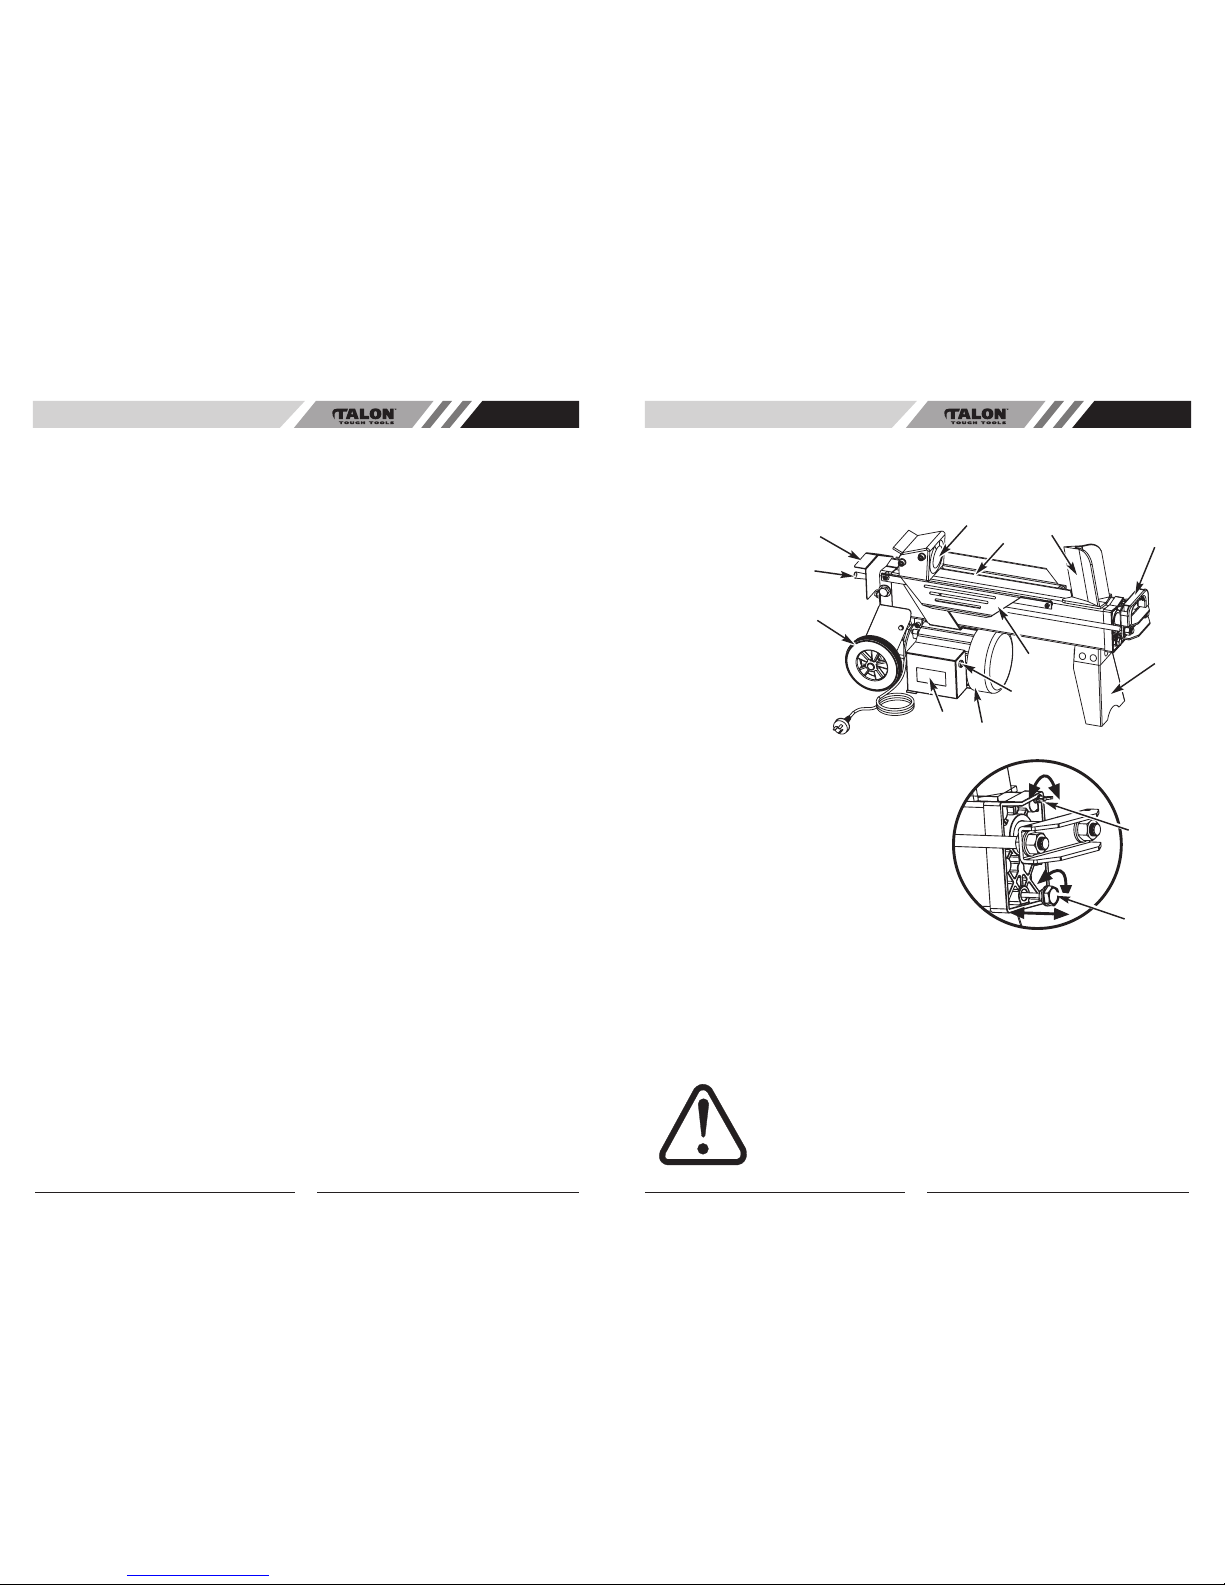
The log splitter must be always operated by one person only. Other people
should keep a safe distance from the work area, especially when the log splitter
is under operations. Never use other people to help you with freeing jammed log.
• KEEP VISITORS AND CHILDREN AWAY
• INSPECT YOUR LOG
Make sure there are no nails or foreign objects in logs to be split. The ends of the logs must be cut
square. Branches must be cut of flush with the trunk.
• DON'T OVERREACH
Floor must not be slippery.
Keep proper footing and balance at all times.
Never stand on log splitter. Serious injury could occur if the tool is tipped or if the cutting tools is
unintentionally contacted. Do not store anything above or near the log splitter where anyone might
stand on the tool to reach them.
Always pay full attention to the movement of the log pusher.
Do not attempt to load the log on until the log pusher has stopped.
Keep hands out of the way of all moving parts.
• AVOID INJURY FROM UNEXPECTED ACCIDENT
Keep you hands away from splits and cracks which open in the log; They may close
suddenly and crush or amputate your hands.
Do not remove jammed logs with you hands.
• PROTECT YOUR HANDS
• DON'T FORCE TOOL
It will do a better and safer job at its design rate. Never try to split logs larger than those indicated
in the specifications table. This could be dangerous and may damage the machine.
Don't use log splitter for a purpose for which it was not intended.
• NEVER LEAVE TOOL RUNNING UNATTENDED
Don't leave tool until it has come to a complete stop.
If supply cord is damaged return to supplier for repair.

6 7
APPLICATION CONDITIONS AU AU
This log splitter is a home use model. It is designed for operating under ambient temperatures
between +5˚C and 40˚C and for installation at altitudes no more than 1000m above M.S.L. The sur-
rounding humidity should be less than 50% at 40˚C. It can be stored or transported under ambient
temperatures between -25˚C and 55˚C.
SPECIFICATIONS
Model Number . . . . . . . . . . . . . . . . . . . . . . . . . . . . . . . . . . . . . . . . . . . . . . . . . . .FB4052
Motor . . . . . . . . . . . . . . . . . . . . . . . . . . . . . . . . . . . . . . . . . . . . . . . . . . . . . . . . . .240V~50Hz ,IP54
Input . . . . . . . . . . . . . . . . . . . . . . . . . . . . . . . . . . . . . . . . . . . . . . . . . . . . . . . . . . .1500W
Log Capacity
Diameter * . . . . . . . . . . . . . . . . . . . . . . . . . . . . . . . . . . . . . . . . . . . . . . . . . . . .50~ 250mm
Length . . . . . . . . . . . . . . . . . . . . . . . . . . . . . . . . . . . . . . . . . . . . . . . . . . . . . . .520mm
Splitting Force . . . . . . . . . . . . . . . . . . . . . . . . . . . . . . . . . . . . . . . . . . . . . . . . . .4 tonnes
Hydraulic Pressure . . . . . . . . . . . . . . . . . . . . . . . . . . . . . . . . . . . . . . . . . . . . . . .16Mpa
Hydraulic Oil Capacity . . . . . . . . . . . . . . . . . . . . . . . . . . . . . . . . . . . . . . . . . . . .3.5L
Overall Size
Length . . . . . . . . . . . . . . . . . . . . . . . . . . . . . . . . . . . . . . . . . . . . . . . . . . . . . . .940mm
Width . . . . . . . . . . . . . . . . . . . . . . . . . . . . . . . . . . . . . . . . . . . . . . . . . . . . . . . .270mm
Height . . . . . . . . . . . . . . . . . . . . . . . . . . . . . . . . . . . . . . . . . . . . . . . . . . . . . . . .510mm
Weight . . . . . . . . . . . . . . . . . . . . . . . . . . . . . . . . . . . . . . . . . . . . . . . . . . . . . . .42kg
The diameter of the log is indicative - a small log can be difficult to split when it has knobs or a par-
ticularly tough fiber. On the other hand, it may not be difficult to split logs with regular fibers even
if its diameter exceeds the max. figure indicated above.
ELECTRICAL REQUIREMENTS
Connect the main leads to a standard 240V±10% (50Hz±1Hz) electrical supply which has protection
devices of under-voltage, over-current as well as a residual current device (RCD) which maximum
current rated at 0.03A.
1. Log Pusher
2. Work Table
3. Wedge
4. Lift Handle
5. Support Leg
6. Log Retaining Plates
7. Switch
8. Motor
9. Pushbutton Box
10. Wheels for Minor Moving ONLY.
11. Hydraulic Control Lever
12. Control Lever Guard
13. Bleed Screw
14. Oil Drain Bolt w/ Dipstick
12 23
10
4
SET UP AND PREPARATION FOR OPERATION
1. Bolt the Support Leg to the Log Splitter, lift the log splitter by the handles at both ends and place it on
a 60 - 75cm high, stable, flat and level work surface.
2. Familiarize yourself with the controls and features of this log splitter in the illustrations.
11
5
7
8
9
1
Before operating the log splitter, the Bleed Screw should be loosened by some rotations until air
can go in and out of the oil tank smoothly.
Air flow thru the Bleed Screw hole should be detectable while the log splitter is under operations.
Before moving the log splitter, make sure the Bleed Screw is tightened to avoid oil leaking from this
point.
6
FAILURE TO LOOSEN THE BLEED SCREW WILL KEEP THE SEALED AIR IN
HYDRAULIC SYSTEM BEING COMPRESSED AFTER BEING DECOM-
PRESSED. SUCH CONTINUOUS AIR COMPRESSION AND DECOMPRES-
SION WILL BLOW OUT THE SEALS OF THE HYDRAULIC SYSTEM AND
CAUSE PERMANENT DAMAGE TO THE LOG SPLITTER.
14
13

98
AU LOG SPLITTER OPERATION AU
DO NOT ADJUST THE MAX
PRESSURE LIMITING SCREW !.
Max pressure was set before the log splitter to
work and the max pressure limiting screw is
sealed with glue to ensure the log splitter works
under pressure no more than 4 tons. The setting
was done by qualified mechanic with profes-
sional instruments.
Unauthorized resetting will cause the hydraulic
pump to fail to output enough splitting pressure
or RESULT IN SERIOUS INJURY AS WELL AS
DAMAGE TO THE MACHINE .
WIRING DIAGRAM PLUMBING DIAGRAM
15. Max Pressure Limiting Screw
15
This log splitter is equipped with “ZHB” control system that requires it to be operated by both hands of the
user - Left hand controls the hydraulic control lever while right hand controls the pushbutton switch. The
log splitter will freeze upon absence of either hand. Only after both hands release the controls, the log push-
er starts to return backward to the starting position.
Never force the log splitter for more than 5 seconds by keeping pressure on it to
split excessively hard wood.
After this time interval, the oil under pressure will be overheated and the machine could be damaged. For
such extremely hard log, rotate it by 90˚to see whether it can be split in a different direction. In any case,
if you are not able to split the log, this means that its hardness exceeds the capacity of the machine and
thus that log should be discarded to protect the log splitter.
Trigger type lock-out device is adopted to avoid accidental Hydraulic Control Lever pushdown. To
operate the Hydraulic Control Lever, draw the Trigger backward with the index finger before push
the Hydraulic Control Lever forward.

10 11
AU AU
Always set logs firmly on the log retaining
plates and work table. Make sure logs will
not twist, rock or slip while being split. Do
not force the blade by splitting the log on
the upper part. This will break the blade or
damage the machine.
Break log in the direction of its growing grain. Do not place log across the log splitter for splitting. It may be
dangerous and may seriously damage the machine.
Do not attempt to split 2 pieces of logs at the same time. One of them may fly up and hit you.
FREEING A JAMMED LOG
• Release both controls.
• After the log pusher moves back and
completely stops at its starting posi-
tion, insert a wedge wood under the
jammed log.
• Start the log splitter to push the
wedge wood to go completely under
the jammed one.
• Repeat above procedure with sharper
slope wedge woods until the log is
completely freed.
Do not try to knock the jammed log off.
Knocking about will damage the machine or
may launch the log and cause accident.
REPLACING HYDRAULIC OIL
Replace the Hydraulic oil in the log splitter after every
150 hours of use. Take following steps to replace it.
• Make sure all moving parts stops and the log split-
ter is unplugged.
• Unscrew Oil Drain Bolt with Dipstick to remove it.
• Turn the log splitter on the Support Leg side over
an 4 liters capacity container to drain the hydraulic
oil off.
• Turn the log splitter on the the motor side.
• Refill fresh hydraulic oil at the volume as per the
hydraulic oil capacity of a particular model indicat-
ed in above specifications table.
• Clean the surface of Dipstick on the Oil Drain Bolt
and put it back into the oil tank while keep the log
splitter vertically.
• Make sure the level of the refilled oil is just
between 2 grooves around the Dipstick.
• Clean the Oil Drain Bolt before inserting it. Make
sure they are tightened to avoid leakage before
place the log splitter horizontally.
Periodically check oil level to ensure it is between
2 grooves around the Dipstick. Upon Lower oil
level, oil refilling is required.
Following hydraulic oils or equivalent are recommend for the log splitter's hydraulic transmission
system:
SHELL Tellus 22
MOBIL DTE 11
BP Energol HLP-HM 22
SHARPENING WEDGE
After using the log splitters for some time, sharpen the wedge of the log splitter using a fine-toothed file and
smooth any burrs or crushed area along the cutting edge.

12
AU
PARTS SCHEMATIC
This manual suits for next models
1
Table of contents
Other Talon Log Splitter manuals
Popular Log Splitter manuals by other brands

Palax
Palax C900.2 instruction manual

Productos McLand
Productos McLand GARLAND CHOPPER 452 ZE Series instruction manual

Villager
Villager LS 7 T Original Operator's Manual

Craftsman
Craftsman 247.794510 owner's manual

Clarke
Clarke LOGBUSTER 8 Operation & maintenance instructions

PALDU
PALDU 1100-12 operating instructions