T&D RTR-5 US User manual
User's Manual
Thank you for purchasing our product.
Carefully read this instruction manual
before using this unit.
© Copyright T&D Corporation. All rights reserved.
2010.08 16504450006 6th Edition

i
■Important Notices and Disclaimers
- In order to properly use this product, please carefully read this manual
before using.
- T&D Corporation accepts no responsibility for any malfunction of and/or
trouble with this product or with your computer that is caused by the
improper handling of this product and will deem such trouble or malfunction
as falling outside the conditions for free repair outlined in the attached
warranty.
- All rights of this User’s Manual belong to T&D Corporation. It is prohibited to
use, duplicate and/or arrange a part or whole of this User’s Manual without
the permission of T&D Corporation.
- Microsoft and Windows are registered trademarks of Microsoft Corporation
in the United States and/or other countries.
- Windows Vista is either a registered trademark or trademark of Microsoft
Corporation in the United States and/or other countries.
- All registered trademarks, company names, product names and logos
mentioned herein are the property of T&D Corporation or of their respective
owners.
- Specifications, design and other contents outlined in this manual are subject
to change without notice.
- On-screen messages in this manual may vary slightly from the actual
messages.
- Please notify the shop where you purchased this product or T&D
Corporation of any mistakes, errors or unclear explanations in this manual.
-T&D Corporation accepts no responsibility for any damage or loss of income
caused by the use of our product.
- This product has been designed for private or industrial use only. It is not for
use in situations where strict safety precautions are necessary such as in
connection with medical equipment, whether directly or indirectly.
- We are not responsible for any malfunction or trouble caused by the use of
our product or by any problem caused by the use of measurement results of
our unit. Please be fully aware of this before using our product.
- This User’s Manual cannot be reissued, so please keep it in a safe place.

ii
Software User Agreement
■Disclaimers
- T&D Corporation does not guarantee the operation of T&D Recorder for
Windows.
- T&D Corporation shall not accept any responsibility for any damage,
whether direct or indirect, that results from the usage of T&D Recorder for
Windows.
- Specifications of T&D Recorder for Windows may be subject to change and
service may be terminated without advance notice to the user. In such a
case, T&D Corporation shall not be responsible for any damages, whether
direct or indirect, from the inability to use T&D Recorder for Windows.
- T&D Corporation has no obligation to correct any defects found in T&D
Recorder for Windows.
■Copyright
- The Copyright for T&D Recorder for Windows, including the program and
relevant documents, belongs solely to T&D Corporation.
- The reprinting or redistribution for commercial purposes whether in part or
in whole, in magazines or as a part of any product is strictly forbidden
without the expressed consent of T&D Corporation. Any inquires concerning
commercial redistribution should be directed to the Sales Department of
T&D Corporation.
- Please do not attempt to make any changes or modifications to T&D
Recorder for Windows.

iii
Table of Contents
User's Manual ......................................................1
■Important Notices and Disclaimers .................. i
Software User Agreement ........................ii
■Disclaimers ..................................................... ii
■Copyright ......................................................... ii
Using the Software with Windows 7 / Vista 1
■Notes about graph operation ..........................1
■About the Saving Location for Data Files ........1
Before Using… ........................................ 2
What is T&D Recorder for Windows? ...... 3
■Outline .............................................................3
■Basic Functions ...............................................3
Basic Procedures .................................... 5
■
USB Communication for Windows 7 / Vista / 2000
..5
■USB Communication for Windows XP ............6
■Communication via RS-232C ........................7
Installing the Software ............................. 8
■For Windows XP/2000 ....................................9
■For Windows 7/ Vista ...................................10
Operating the Software .......................... 13
■Opening the Software ...................................13
■Main Window .................................................13
■Help ...............................................................14
Forms of Communication: A Quick Look ................ 15
Communication between RTR-5 Series Loggers and
Data Collectors
.......................................... 17
■Wireless Communication ..............................17
■Optical Communication .................................18
Communication between Data Collector(s) and
Computers
............................................... 19
■USB Communication (RTR-57U) ..................19
■Serial Communication (RTR-57C/57U) .........20
Communication between RTR-5 Series Data Loggers
and Computers
.......................................... 21
Installing the USB Driver ....................... 23
■For Windows 7 / Vista / 2000 .......................23
■For Windows XP ...........................................25
If USB Device Driver Installation Fails ... 29
■How to Re-install ...........................................29
Setting Up the Communication Port ...... 31
■ Communication via USB ...............................31
■ Communication via RS-232C ........................32
Remote Unit Registration ...................... 33
■Registering a Remote Unit ............................33
■[Collect Registration Info] Button ...................35
■[New Registration] Button .............................36
■Confirming after Registration ........................38
Other Remote Unit Registration Functions
39
■
Saving Registration Contents to File: [File] Menu
39
■Saving as Text File: [File] Menu ....................39
■
[Set Number of Possible Registrations] Button ...
40
■ [Return to Original] Button ............................41
■[Change/Delete] Button .................................41
■ [Transfer List Info] Button ..............................42
■ [View Remote Info] Button ............................43
RTR-51/52/52Pt: Start Recording .......... 44
■Sensor Settings (RTR-52Pt) ........................47
RTR-51/52/52Pt: Downloading Recorded Data
48
RTR-51/52/52Pt: Value Adjustment Function
. 50
■Temperature: 1-point Adjustment ..................50
■Temperature: 2-point Adjustment ..................51
■Adjustment Settings ......................................51
RTR-53 : Start Recording ...................... 53
RTR-53: Downloading Recorded Data .. 56
RTR-53 : Value Adjustment Function ..... 58
■Temperature/Humidity:1-point / 2-point
Adjustment ........................................................58
■Adjustment Settings ......................................58
RVR-52A: Start Recording ..................... 61
RVR-52A: Downloading Recorded Data ..
65
RVR-52A : Value Adjustment Function .. 67
■Voltage : 1-point / 2-point Adjustment ...........67
■Adjustment Settings ......................................67
■Moisture Probe Settings ................................69
RTR-57C/57U: Downloading Recorded Data
. 71
■Collect RTR-57C/57U Data Info ....................71
■Download Recorded Data .............................73
■Downloading Several Sets of Data at One Time
75
■
About other Buttons .......................................77
Setting the RTR-57C/57U Clock ............ 78
RTR-57C/57U : Upper and Lower Limits
.. 79
Setting the Date Display Format ............ 81
Temperature/Humidity Graph ................ 83
■Display Names and Functions ......................83

iv
Table of Contents
■Zooming In and Out on the Graph ................85
■Data List Display ...........................................86
Editing the Graph: [View] Menu ............. 87
■
Changing graph display colors :From the [View] Menu
.87
■
Selected Channels ON/OFF: From the [View] Menu
.87
Editing the Graph: [Tools] Menu ............ 88
■
Setting High, Low, Average Calculation Range: From the
[Tools] Menu
.............................................................. 88
■
Editing Recording Conditions : From the [Tools] Menu
.89
■
Re-ordering Channel Data: From the [Tools] Menu
90
■
Erasing Selected Channel Data:From the [Tools]
Menu
..................................................................91
■
Shifting Unit (℃/ ゜F): From the [Tools] Menu ..
91
■Changing Graph Colors: From the [Tools] Menu
91
■Copying Display to Clipboard:From the [Tools]
Menu ..................................................................92
■Graph:From the [Graph] Menu ......................93
Multi-scale Graph .................................. 94
■Display Names and Functions ......................95
■Zooming In and Out on the Graph ................97
■Data List Display ...........................................98
Editing the Graph ................................... 99
■
Selected Channels ON/OFF:From the [View] Menu
.99
■Scale Display ON/OFF: From the [View] Menu 99
■Setting High, Low, Average Calculation Range:
From the [Tools] Menu .....................................100
■
Editing Recording Conditions:From the [Tools] Menu
101
■
Re-ordering Channel Data: From the [Tools] Menu
102
■
Merging Channel Data : From the [Tools] Menu
103
■
Erasing Selected Channel Data :From the [Tools] Menu
104
■
Vertical Axis Range Display Settings: From the [Tools] Menu
105
■
Scale and Unit Conversion: From the [Tools] Menu
106
■
Changing Graph Colors: From the [Tools] Menu
107
Event Viewer ........................................ 108
■Display Names and Functions ....................108
■
Shifting Display: From the [View] Menu or Toolbar
.110
■Shifting Ascending/Descending: From the [View]
Menu or Toolbar ...............................................110
File Info ................................................ 111
Print Preview and Printing ................... 112
Saving a File ........................................ 113
■Temp/Humid Graph and Multi-scale Graph .113
■Event Viewer ...............................................114
Saving Data in Text File ....................... 115
■ Temp/Humid Graph and Multi-scale Graph .115
■Event Viewer ...............................................116
Opening a File ..................................... 117
■Opening a File with the Temp/Humid Graph and
Multi-scale Graph ............................................117
■Opening a File with the Event Viewer .........118
How to Re-install ................................. 119
■For Windows XP/2000 ................................119
■For Windows 7/ Vista .................................120
Troubleshooting ................................... 121
Specification ........................................ 127

1
Using the Software with Windows 7 / Vista
■Notes about graph operation
- Opening a Temp / Humidity Graph, Multi-scale Graph or other data file
(.trx, etc…) by dropping it into the Graph window
If you wish to open a file by dropping it into a Graph, it will not appear if the
Graph has been opened using [Run as Administrator]. Please open the
Graph as a general User. In general, we suggest when using Vista to only
use [Run as Administrator] to open the Graphs the first time in order to link
the type of data files (extension) to the Graph programs. After that please
open as a general user and carry out the opening of data as usual.
■About the Saving Location for Data Files
The application automatically creates a new data file each time an Auto-
Download session occurs. Note that when using the Vista OS the [Virtual
Store] function will redirect files from the default folder into which the program
was installed to separate folders under [Program Files] for each user, as
shown below: [C:\User\(AccountName)\AppData\Local\VirtualStore\Program
Files\(Application)].
( EX:
If login was carried out using the account name [myname] and [T&D Recorder
for Windows] is the application being run, the saving location will appear in the
application window as: [C:\Program Files\T&D Recorder for Windows\data] but
due to the [Virtual Store] function the actual saving location will be [C:\User\
myname\AppData\Local\VirtualStore\Program Files\T&D Recorder (RTR-5)
US].
If the login was carried out from [Run as Administrator], the file will be saved
to the folder as it appears in the application window.

2
Before Using…
Important Notes about the Installation Procedure (for using this
product with USB communication).
Thank you for choosing T&D Products.
In order to use a USB connection to communicate between this
product and a PC, it is necessary to install the application and the
USB driver.
Before connecting this product to a PC with a USB cable, it is
necessary to first install the application and the USB driver.
If you use the USB cable to connect the product to a PC before
installation, the USB driver may not properly install.
If you have connected the product to a PC without first installing the
driver, please make sure to press [Cancel] in the [Installation Wizard]
window when it pops up the PC screen and then disconnect the
USB cable from the product.
For details about how to use, see [Basic Procedures] on P.5-7.

3
What is T&D Recorder for Windows?
■Outline
By using T&D Recorder for Windows, you can easily display the data
measured and recorded with the RTR-51/52/52Pt/53, RVR-52A via
our exclusive short-wave wireless technology in table or graph form
and control printing with your computer.
Upon opening T&D Recorder for Windows, a launcher window in
which icons are displayed will appear. By clicking an icon, the graph,
settings, and /or communication screen for that type of unit will be
displayed.
This software requires the following operating environment:
Compatible OS Microsoft Windows 7 32/64bit English
Microsoft Windows Vista 32bit English
Microsoft Windows Xp 32bit (SP2 or above)English
Microsoft Windows 2000 (SP3 or above) English
* For Windows 2000, XP ,Vista and 7, in order to install [T&D Recorder
for Windows], it is necessary to have Administrator rights (Computer
Administrator) for the computer in which you wish to install it.
PC/CPU IBM compatible equipped with more than Pentium 90MHz or NEC 98
Series with serial communication (RS-232C D-Sub 9 pin).
Memory More than 16MB memory capacity
Hard Disk More than 4MB of empty hard disc space
Monitor VGA (Above SVGA (800 ×600) is recommended)
More than 256 colors can be displayed
■Basic Functions
●Group and Remote Unit Registration
If you wish to carry out wireless communication between an RTR-57C/57U
unit and RTR-51/52/52Pt/53, RVR-52A unit, it is necessary to first complete
via computer the Remote Unit Registration of the RTR-51/52/52Pt/53,
RVR-52A unit to the RTR-57C/57U. Remote Units can be operated and
managed in Groups.
●Display of Data List Collected in RTR-57C/57U
A list of all data collected at the time of downloading is displayed, from
which all or part of the data can be used to create files or graphs.

4
●Mixed Use with Other Units
You can make graphs in which data from RTR-51/52/52Pt/53 and RVR-52A
units are mixed. If TR-5 / TR-7 Series data have been read into the
RTR-57C/57U unit, management of such mixed data is also possible.
●Temperature/Humidity Graph / Multi-Scale Graph
In Temperature/Humidity graphs, the graph or list of temperature and
humidity data is displayed. In Multi-scale Graphs, the graph or list of
voltage, pulse, temperature and humidity data is displayed. You can also
set the scale or units to match the type of downloaded data.
●Displaying 8 Channels of Data in One Graph
You can simultaneously display up to 8 channels of recorded data
downloaded from a main unit in one graph.
●Printing Graphs and Data Lists
You can print graphs displayed on screen in full color. When printing a data
list, the printing of every recording date is possible.
●Measured Data List Display
In the measured data list display, the highest, lowest, and average values
are shown in different colors.
●Event Viewer
In the Event Viewer, a data list showing the time of events is displayed.
●Print Preview and Printing
Select the data to be printed and after checking it in the preview window
you can proceed to print.
●Creating Text File
Recorded data can be saved in universal Text file format (such as CSV
Format) to be read and manipulated by all common spreadsheet software
such as Excel or Lotus.

5
Basic Procedures
NOTE:
- To make sure that the USB driver is properly installed, please follow the correct
procedure as outlined here.
■USB Communication for Windows 7 / Vista / 2000
RTR-57U
Installing the provided software see P.9-11
Please follow the directions to install [T&D Recorder for Windows] .
▼
Connecting the Data Collector to the Computer see P.19
Enable communication by connecting the Data Collector to the computer with a USB
cable. Once the USB cable is connected, the USB driver will automatically be installed.
▼
Setting Up the COM Port see P.31
▼
Registering a Remote Unit see P.33
In order to communicate via Wireless Communication, it is first necessary to register the
data logger as a Remote Unit to an RTR-57U.
▼
Making Recording Start Settings
see [Basic Functions] for each type of device
NOTE:
- Before making [Record Start] Settings make sure that your computer clock settings
are correct. If your computers clock is not correct, it will effect the date and time of
the recording start.
▼
Downloading Recorded Data
see [Basic Functions] for each type of device
Before downloading it is possible to make settings in the [Detailed Settings] to specify the
what kind of processing should be done with the data after downloading, i.e. open a Graph
or assign a file name and save.
NOTE:
- Before making Downloading Data make sure that your computer clock settings are
correct. If your computers clock is not correct, it will effect the date and time of the
data being downloaded.

6
■USB Communication for Windows XP
RTR-57U
Installing the provided software see P.9
Please follow the directions to install [T&D Recorder for Windows] .
▼
Connecting the Data Collector to the Computer see P.19
Enable communication by connecting the Data Collector to the computer with a USB cable.
▼
Installing the USB Device Driver see P.25
Please follow the directions to install the USB device driver after installing the USB device
driver, your computer will be able to detect and recognize data loggers that have been
connected with a USB cable.
▼
Setting Up the COM Port see P.31
▼
Registering a Remote Unit see P.33
In order to communicate via Wireless Communication, it is first necessary to register the
data logger as a Remote Unit to an RTR-57U.
▼
Making Recording Start Settings
see [Basic Functions] for each type of device
NOTE:
- Before making [Record Start] Settings make sure that your computer clock settings
are correct. If your computers clock is not correct, it will effect the date and time of
the recording start.
▼
Downloading Recorded Data
see [Basic Functions] for each type of device
Before downloading it is possible to make settings in the [Detailed Settings] to specify the
what kind of processing should be done with the data after downloading, i.e. open a Graph
or assign a file name and save.
NOTE:
- Before making Downloading Data make sure that your computer clock settings are
correct. If your computers clock is not correct, it will effect the date and time of the
data being downloaded.
7
■Communication via RS-232C
RTR-57U, RTR-57C
Installing the provided software see P.9
Please follow the directions to install [T&D Recorder for Windows] .
▼
Connecting the Data Collector to the Computer see P.20
Enable communication by connecting the Data Collector to the computer with the
provided or optional Serial Communication Cable.
▼
Setting Up the COM Port see P.32
Set the serial port you wish to use with [T&D Recorder for Windows].
▼
Registering a Remote Unit see P.33
In order to communicate via Wireless Communication, it is first necessary to register the
data logger as a Remote Unit to an RTR-57U.
▼
Making Recording Start Settings
see [Basic Functions] for each type of device
NOTE:
- Before making [Record Start] Settings make sure that your computer clock settings
are correct. If your computer’s clock is not correct, it will effect the date and time of
the recording start.
▼
Downloading Recorded Data
see [Basic Functions] for each type of device
Before downloading it is possible to make settings in the [Detailed Settings] to specify the
what kind of processing should be done with the data after downloading, i.e. open a
Graph or assign a file name and save.
NOTE:
- Before making Downloading Data make sure that your computer clock settings are
correct. If your computers clock is not correct, it will effect the date and time of the
data being downloaded.

8
Installing the Software
- Is Windows working properly?
If Windows is not activated properly, it may be impossible to install and run T&D Recorder
for Windows.
- Quit all applications.
If you are running other applications, make sure to quit them before installation. If you have
any permanently active software, such as a virus check or scan program in your computer,
make sure to also quit it.
- In order to install [T&D Recorder for Windows], it is necessary to have Administrator rights
(Computer Administrator) for the computer in which you wish to install it.
- The layout of the installation window for “Windows 7” closely resembles that of “Windows
Vista”. When using “Windows 7” to install the Software, please refer to the installation
instructions found under “Windows Vista” in the User’s Manual provided with the product
and follow on-screen messages as they appear.
- For information about operating the software, please carefully read the important notices
and instructions found in the User’s Manual.

9
■For Windows XP/2000
1.
Start Windows.
2.
Place the CD-ROM in the appropriate drive, and the [Install Program]
window will automatically open.
*If the [Install Program] Window does not automatically open, please open it
by double clicking on the CD-ROM icon in [My Computer].
[Execute]
Button
[Install T&D Recorder
for Windows]
3.
Select [Install T&D Recorder for Windows] and by clicking on the
[Execute] Button the installation will begin.
Confirming the contents as you go, install the software according to the
directions.
After installation is completed, an icon for [T&D Recorder for Windows] will
appear in the Start Menu.

10
■For Windows 7/Vista
1.
Start Windows.
2.
Place the CD-ROM in the appropriate drive.
* If the window automatically appears, under [Install or run program],
click on [Run start.exe].
For some applications, the above may appear as [Run first.exe]
Check
3.
The [Install Program] window will appear.
*If the [Install Program] Window does not automatically open, please
open it by double clicking on the CD-ROM icon in [Computer].
[Execute]
Button
[Install T&D Recorder
for Windows]
4.
Select [Install T&D Recorder for Windows], click the [Execute] Button,
then the [User Account Controls] window should appear.
5.
Click [Next] to start the installation.
Confirming the contents as you go, install the software according to the
directions.

11
6.After the application has been installed, the following message will
appear.
Click the [Install ] Button.
[Install]
Button
*After installation is completed, an icon for [T&D Recorder for Windows]
will appear in the Start Menu.

12

13
Operating the Software
■Opening the Software
Open the software by clicking on [T&D Recorder for Windows] from the list of
programs in the Start Menu.
■Main Window
Upon opening T&D Recorder for Windows, a launcher window in which icons
are displayed will appear. By clicking an icon, the graph, settings, and/or
communication screen for that type of unit will be displayed.
Menu Bar
Icons
Toolbar
[Menu Bar]
In the Menu Bar are Menus containing an array of commands. Click on the desired menu in
the menu bar to set or display functions for each type of device.
By clicking [Display] - [Change Icon Size], you can select how you wish the Main Window
to appear.
[Toolbar]
Can choose to view or hide icons. You can also make this setting from the Menu Bar by
clicking [Display] - [Toolbar].
[Icons]
By clicking on an icon, the graph or communication display will appear for that type of unit.
The graph and communication displays for each type of unit can also be viewed by clicking
on that unit's type name in [Start] of the Menu Bar.

14
■Help
- See the [Help] Menu of the software for more detailed information
about how to use the software.
- To search for unclear words or terms, click the [Help] Menu that
appears in the Menu Bar and then click on one of the tabs
[Contents], [Index] or [Search].
[Contents]
Tab
[Index]
Tab
[Search]
Tab
[Contents] Tab
By clicking the mark of the classified topic, an explanation will be displayed.
[Index] Tab
Select a key word from the key word list and by clicking the [Display] Button, the
explanation will be displayed.
[Search] Tab
Enter the key word you wish to search for and click the [Start Search] Button and the topic
in which the key word is included will be displayed. Then select the topic and click the
[Display] Button to have the explanation displayed.
- Click on the [Help] Button in any dialog box and explanations about the dialog box will be
displayed.
- In the graph display window, after clicking on the [ ] in the toolbar, you can click on
any Menu, any Icon, or any part of the Main window and an explanation will be displayed.
15
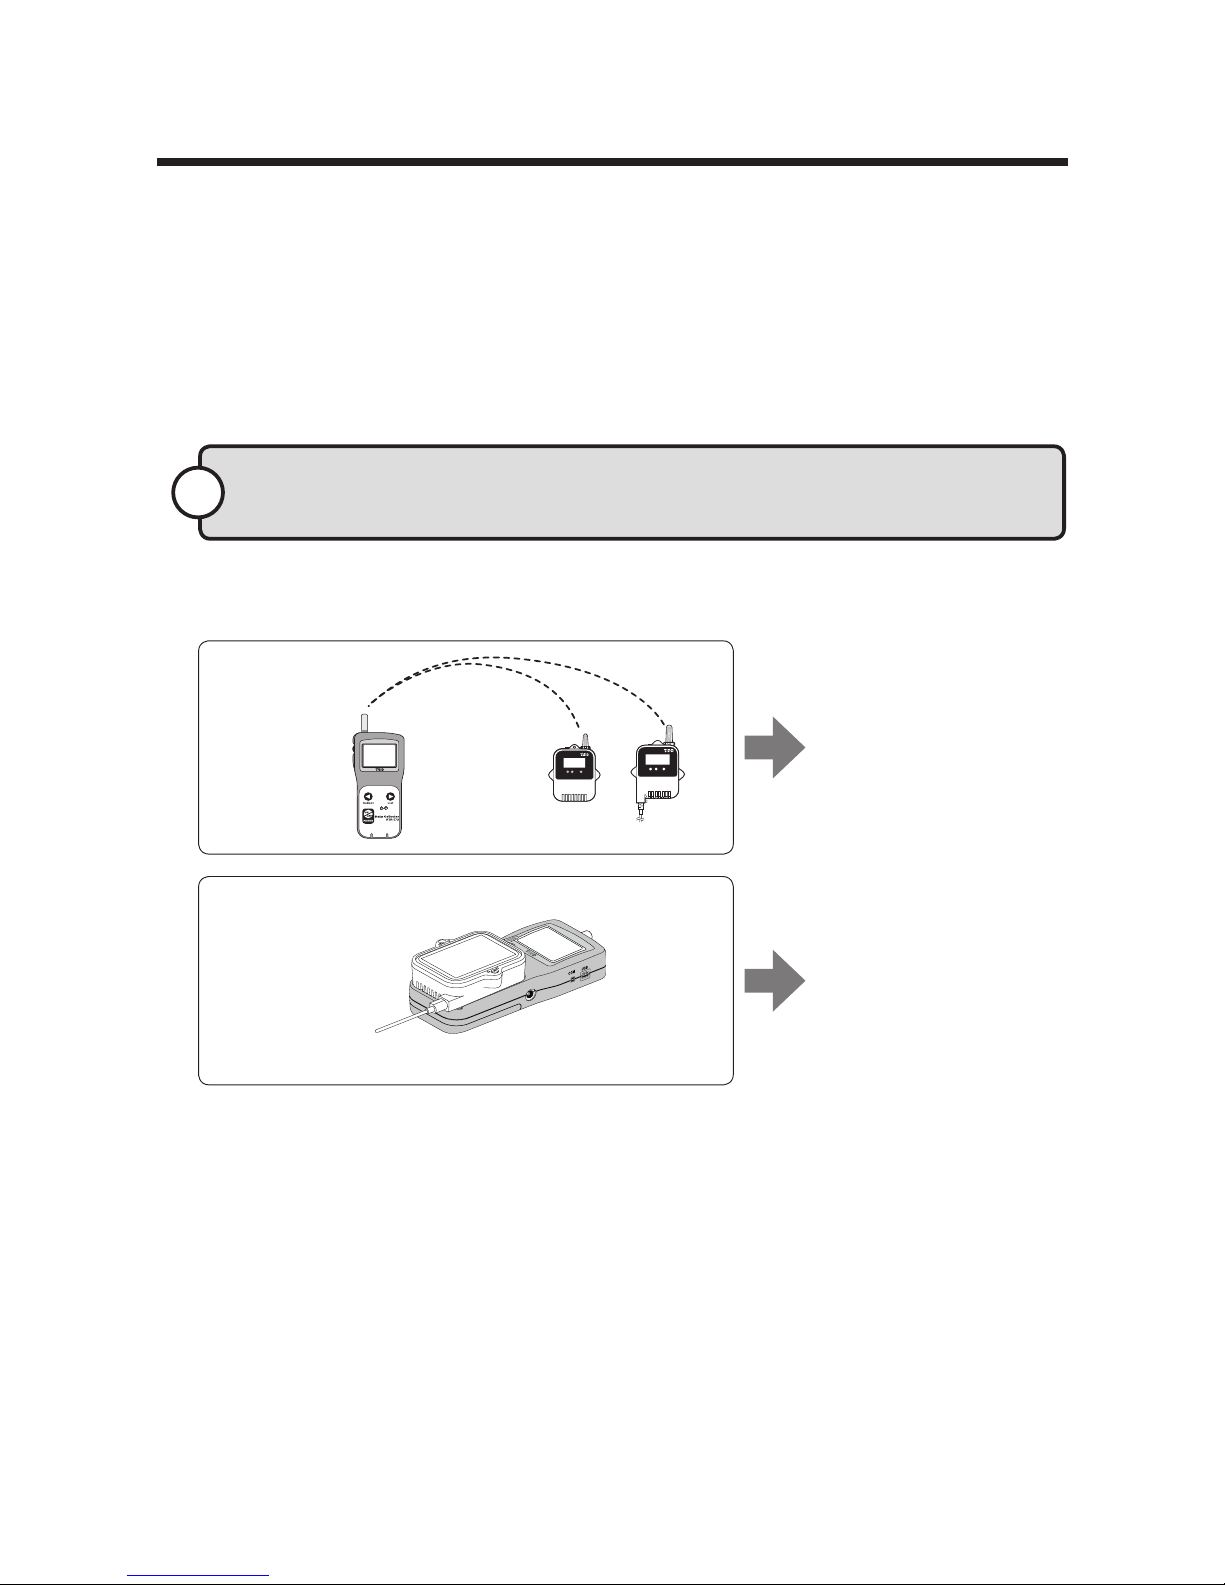
Forms of Communication: A Quick Look
There are various ways that communication can be carried out
between RTR-5 Series Loggers and Data Collectors, Data Collectors
and your Computer, and Loggers and your Computer. For each type
of communication the set-up and procedure varies. Please take a
quick look at the chart below and see the pages noted under each
type of communication for more details.
Communication between
RTR-5 Series Loggers and Data Collectors
1
There are two ways to carry out communication between a Data Logger
and a Data Collector: Wireless and Optical.
See P.17 or RTR-57U
User's Manual.
Wireless
* To carry out wireless communication you must first register the Remote Units with
which you wish to communicate into the Collector.
(For details about registration, see P.39)
Optical
See P.18 or RTR-57U
User's Manual.
Table of contents
Other T&D Recording Equipment manuals


