T&D VLD-5US User manual

© Copyright 2006 T&D Corporation. All rights reserved.
2009.04 16010004060 2nd Edition
T&D Recorder VLD
for Windows ®
User's Manual
Thank you for purchasing our product.
Carefully read this instruction manual
before using this unit.
VLD-5US

i
ɡNotices about this User's Manual
In order to properly use this product, please carefully read this manual before
using.
ɜAll rights of this User's Manual belong to T&D Corporation. It is prohibited to use,
duplicate and/or arrange a part or whole of this User's Manual without the
permission of T&D Corporation.
ɜMicrosoft®and Windows®are registered trademarks of Microsoft Corporation USA
and are binding in the USA and all other countries.
ɜCompany names and product names are trademarks or registered trademarks of
each company.
ɜSpecifications, design and other contents outlined in this manual are subject to
change without notice.
ɜOn screen messages in this manual may vary slightly from the actual messages.
ɜPlease notify the shop where you purchased this product or T&D Corporation of
any mistakes, errors or unclear explanations in this manual. T&D Corporation
accepts no responsibility for any damage or loss of income caused by the use of
our product.
ɜThis software has been designed for private or industrial use only. It is not for use
in situations where strict safety precautions are necessary, whether directly or
indirectly.
ɜSome of our products, which come under the category of strategic goods in
foreign trade law, need the permission of the Japanese government to be
exported outside of Japan.
ɜPlease read the warranty and provisions for free repair carefully.

ii
Before Using this Software
ɡLicense Agreement
ɜAll users wishing to use this software must first agree to the Software License
Agreement accompanying this software. Please carefully read the Software
License Agreement before using this software.
ɡCopyright
ɜThe Copyright for T&D Recorder VLD for Windows, including the program and
relevant documents, belongs solely to T&D Corporation.
ɜThe reprinting or redistribution for commercial purposes whether in part or in
whole, in magazines or as a part of any product is strictly forbidden without the
expressed consent of T&D Corporation. Any inquires concerning commercial
redistribution should be directed to the Sales Department of T&D Corporation.
ɜPlease do not attempt to make any changes or modifications to T&D Recorder VLD
for Windows.

iii
Table of Contents
ɡIntroduction
Before Using this Software ...............................................................ii
What is T&D Recorder VLD for Windows®?......................................1
Basic Procedures .............................................................................5
ɡGetting Ready
Installation ........................................................................................7
Operating the Various Applications
ȆHow to Open.......................................................................................... 9
ȆUsing Help............................................................................................ 10
User Management Tools: User Registration ....................................11
: Other Functions ......................................13
Connecting the Data Collector to the Computer
ȆConnecting with the USB Cable ........................................................... 17
ȆConnecting with RS232C (Serial) Communication Cable .................... 18
Setting up the COM Port
ȆCommunicate via USB.......................................................................... 19
ȆUsing Serial (RS232C) Communication ............................................... 22
Connecting the Data Logger to the Computer
ȆCommunicate via the Data Collector.................................................... 25
ȆCommunicate via the Communication Port .......................................... 26
Remote Unit Registration
ȆRegistering a Remote Unit.................................................................... 27
ȆConfirming Communication ................................................................. 30
Remote Unit Registration: Other Functions.............................................. 31
ɡBasic Functions
RTR-51/52: Recording Settings.......................................................37
: Downloading Recorded Data .......................................40
: Value Adjustment Function...........................................42
RTR-53: Recording Settings............................................................45
: Downloading Recorded Data ............................................49
: Value Adjustment Function................................................51
Data Collector: Downloading Recorded Data..................................54
: Other Functions ......................................................58
: Clock and Calendar Settings ..................................60
: Upper and Lower Limit Settings..............................61
TR-51A/52: Recording Settings.......................................................62
: Downloading Recorded Data .......................................64

iv
ɡTemp/Humidity Graph
Operating the Temp/Humidity Graph
ȆTemperature/Humidity Graph Display Names and Functions .............. 66
ȆData List Display................................................................................... 68
Making Changes to the Graph Display
ȆChanging Colors of Data Display Area................................................. 70
ȆViewing and Hiding Channels in Graph ............................................... 70
ȆSetting the Max. Min. Avg Calculation Range ..................................... 71
ȆEditing Recording Conditions............................................................... 72
ȆReordering Channel Data..................................................................... 73
ȆErasing Selected Channel Data ........................................................... 75
ȆShift Unit (Ɏʌȃ
F) ................................................................................ 76
ȆChange Graph Colors .......................................................................... 76
ȆCopy Display to Clipboad .................................................................... 77
Operating the Graph
ȆReturning to Original Size..................................................................... 78
ȆZooming In and Out.............................................................................. 78
ȆMoving the A/B Cursors Right and Left ................................................ 78
ȆMoving Right and Left on the Graph .................................................... 78
ȆMoving Up and Down on the Graph..................................................... 78
ȆVertical Axis Settings ............................................................................ 78
Printing the Graph
ȆPrint Graph ........................................................................................... 79
ȆUpload Saved Print Settings................................................................. 80
Saving Recorded Data ....................................................................81
Creating Text File.............................................................................82
Opening a Saved File ......................................................................83
ɡOther Functions
Archive Viewer .................................................................................85
Re-installing.....................................................................................90
About Transferring the System ........................................................91
About T&D Recorder Access Control ..............................................92
ɡOther
Troubleshooting ...............................................................................93
Specifications ..................................................................................97

1
What is T&D Recorder VLD for Windows®?
ɡOutline
In order to comply with FDA 21 CFR Part 11, T&D Recorder VLD for
Windows is complete with the following functions.
ȆSoftware Operation Password Protection
To use these applications it is necessary to have a User ID and
Password; only those people with authorization can operate this
software. Also, these applications can only be run in Windows 2000
and Windows XP, so it is possible to further restrict access via the OS
settings.
ȆPrevention of Data Manipulation via Password
To use these applications it is necessary to have a User ID and
Password; only those people with authorization can manage and
manipulate downloaded data. Moreover, the downloaded data is
encoded and if the data is manipulated, the file will not be able to be
opened.
ȆRecording of Software Operations History
An archive of operations (audit trail) is automatically recorded and
kept.
In addition, the easy-to-use software offers a variety of useful
functions at your fingertips including: control of data logger recording
settings, data downloading, graph display, table creation, printing,
and file output.
Also, if you wish to use wireless communication between the Data
Logger (Wireless Communication Type: RTR-51/52/53) and a Data
Collector (Wireless Communication Type: RTR-57U/57C), it is possible
to make the necessary Remote Unit Registrations.
ȆIn the Manual the phrase Data Collector refers to both types (Wireless
Communication Types: RTR-57U/57C) and (Non-Wireless Types: TR-57U/57C).

2
ɡBasic Functions
ȆUser Registration
T&D Recorder VLD for Windows can only be used by Users who
have been registered to use the contained applications. Each user
must Login using his or her registered User ID and Password. Even if
Login is accomplished, it is possible to make settings to restrict the
operations allowed for each user and to make settings so that if no
operations are preformed for a set period of time the application will
automatically timeout and it will be necessary to login again in order
to perform any operations.
ȆGroup/Remote Unit Registration
If you would like to use wireless communication between the Data
Collector (Wireless Types: RTR-57U/57C) and the Data Logger
(Wireless Types: RTR-51/52/53) it is necessary to first register via
computer the Data Logger as a Remote Unit into the Data Collector It
is possible to carry out operations and manage the Remote Units in
Groups.
ȆRecording Settings
All types of Recording Settings can be made here: Channel Name(s),
Recording Mode, Recording Interval and so on. By setting a date
and time in the main unit you can easily program to start recording
on that date at the set time.
ȆData Collection
Download recorded data to a computer and create files.
When data is downloaded and viewed in a Graph an encoded data
file will be created and saved that will require a User ID and
Password to open. Using the Data Collector, it is possible to view the
collected data in a list and specify which data files to download to
the computer. Moreover, recorded data from various type of Data
Loggers (RTR-51/52/53/TR-51A/52) can be processed at one time.

3
ȆViewing the Temp/Humidity Graph
Here, it is possible to view in Graph form, the temperature and
humidity data recorded by the Data Logger.
ȺView 8 channels of data in 1 displayȻ
Downloaded temperature and humidity data from both the Logger
and the Collector can be viewed in a single Graph. Up to eight
channels of data can be added to a single Graph.
ȺEasy zoom in and out with mouseȻ
By selecting a range with your mouse you can easily zoom in and
out on data.
ȆCalculate and view the highest, lowest and average
readings for a desired range.
In the Graph, for each channel it is possible to designate a desired
range from which the highest, lowest and average readings will be
calculated and displayed.
ȆCreating Text File
It is possible to convert the data for a specified range (time period) to
common text file format (CSV type format), so that it can be exported
to spreadsheet software such as Excel®or Lotus®.
ȆPrinting the Temp/Humidity Graph
It is possible to easily print in color the Graph as it is being displayed.
It is also possible to save printing settings to enable the printing of a
previously printed graph in exactly the same way.
ȆView and Print Measured Data List
You can view the data displayed in the graph window as a list and
then choose to print.
ȺView in Easy to Distinguish ColorsȻ
In the data list, the highest value will appear in red, the lowest in
blue, and the average in pink.
ȺPrinting the Data ListȻ
It is possible to print the entire list as displayed or to select pages
for printing.

4
ȆView Operations History
All operations within the application which require authorization to
carry out will be recorded in the Operations History and saved in the
History File in the same Folder into which T&D Recorder VLD for
Windows was installed. It is also possible to save the archived
information in text file.
ɡCompatible Devices
The validation function of T&D Recorder VLD for Windows can be
used with the following models.
ȆData Logger
RTR-51, RTR-52, RTR-53, TR-51A, TR-52
ȆData Collector
RTR-57U, RTR-57C
ȆCommunication Port
TR-50C

5
Basic Procedures
ɡGetting Ready
1: Installing the T&D Recorder VLD for Windows
Install T&D Recorder VLD for Windows to the computer in which you
wish to use it.
By installing T&D Recorder VLD for Windows, all applications
contained will be installed, including User Management Tools,
Archive Viewer, Remote Unit Registration Tools, Data Logger Settings
Tools, and Temp/Humidity Graph. ʋpp.7
ȆIt is only possible to install to Windows 2000/XP.
ȆDo not install both versions of the software T&D Recorder VLD for Windows and
T&D Recorder for Windows (the provided software with each unit/collector) on
the same computer.
2: User Registration (User Management Tools)
Set up and register all User ID's and Passwords that will be
necessary for logging into the various T&D Recorder VLD for
Windows applications, and register which operations will require
operation authorization. ʋpp.11
3: Getting the Data Collector and Computer Ready for
Communication
Install batteries, connect the communication cable and make
communication port settings (USB communication or RS232C
communication) so that the computer can carry out communication
with the Data Collector. ʋpp.17
4: Getting the Data Logger(s) and Computer Ready for
Communication
Place a Data Logger face down on a Data Collector connected to a
computer to enable communication. ʋpp.25
6
5: Register the Remote Units
( for wireless communication)
If you are using a data logger which has wireless capability and
would like to use wireless communication between the Data Collector
and the Data Logger, it is necessary to register the Data Logger as a
Remote Unit. It is possible to carry out operations and manage the
Remote Units in Groups. ʋpp.27
ɡBasic Operations
1: Recording Settings
Set up the recording conditions for each Remote Unit via the Data
Collector or other suitable means.
2: Downloading Recorded Data
Here it is possible to download recorded data from the Data Logger
directly to the computer, or, download the collected data from the
Data Collector to your computer.
Then you can edit, print and view the downloaded data in graph form
using the Temp/Humidity Graph.
ɡTemp/Humidity Graph
It is possible to view the recorded data downloaded to your computer
in graph form, in table form, printed form or convert into text file data.
It is possible to simultaneously view 8 channels of data.
It is also possible to hide, re-order and delete channels, edit
recording start times, and make changes to graph colors among
other useful functions.

7
Installation
ɜIs Windows®operating properly ?
If Windows is not operating properly, the applications within T&D Recorder VLD
for Windows may not be installed correctly or it may not operate properly.
ɜPlease quit all other applications.
If other programs are open, please close and quit all of them, making sure to
quit all Quick Start programs such as a virus checker.
ɜPlease uninstall T&D Recorder for Windows.
Do not install both versions of the software T&D Recorder VLD for Windows and
T&D Recorder for Windows (the provided software with each unit/collector) on
the same computer. If T&D Recorder for Windows is already installed on your
computer, please uninstall it before installing T&D Recorder VLD for Windows.
ɜIt is only possible to install to Windows 2000/XP.
ɜTo install T&D Recorder VLD for Windows, it is necessary to
have Administrator rights (Windows Administrator) for the
computer in which you wish to install it.
8
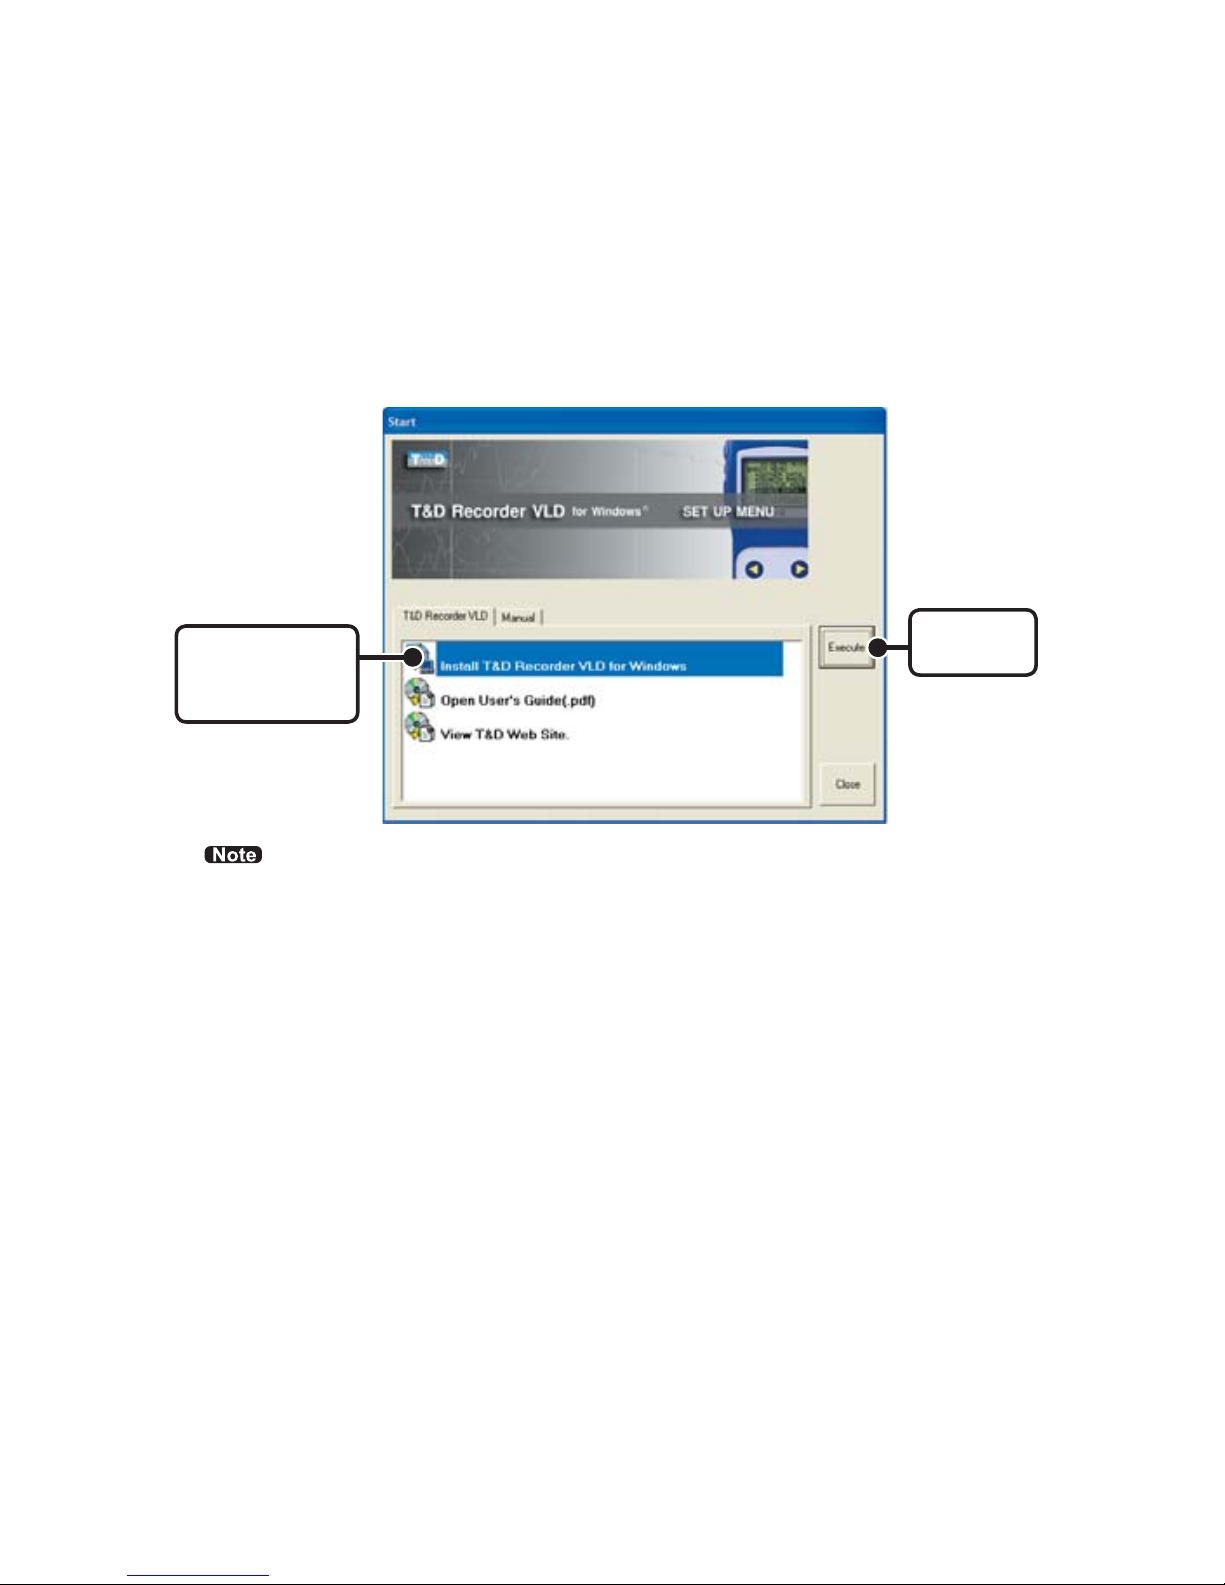
1. Open Windows®.
2. Place the accompanying CD-ROM into your CD-ROM drive. In
a few seconds, the Install Program window will appear.
[Install T&D
Recorder VLD
for Windows]
[Execute]
button
ȆIf that window does not automatically open, please open it by double clicking the
CD-ROM icon in [My Computer] on your desktop. Or, if after double clicking the
CR-ROM drive, the file appears in the CD-ROM folder, double click on the [start.
exe] icon.
3. Select [Install T&D Recorder VLD for Windows] and click the
[Execute] button to start the installation.
4. A screen will appear where you can enter the product serial
number. The product serial number is printed on the sticker
inside the software package. Make sure that it is properly
entered and click the [Next] button.
5. Continue the installation by following the directions as they
appear.
After installation has been completed, T&D Recorder VLD for
Windows will be registered in the Window's [Start] Menu.
9
Operating the Various Applications
ɡHow to Open
To open any application in T&D Recorder VLD for Windows it is
necessary to enter a "User ID" and "Password".
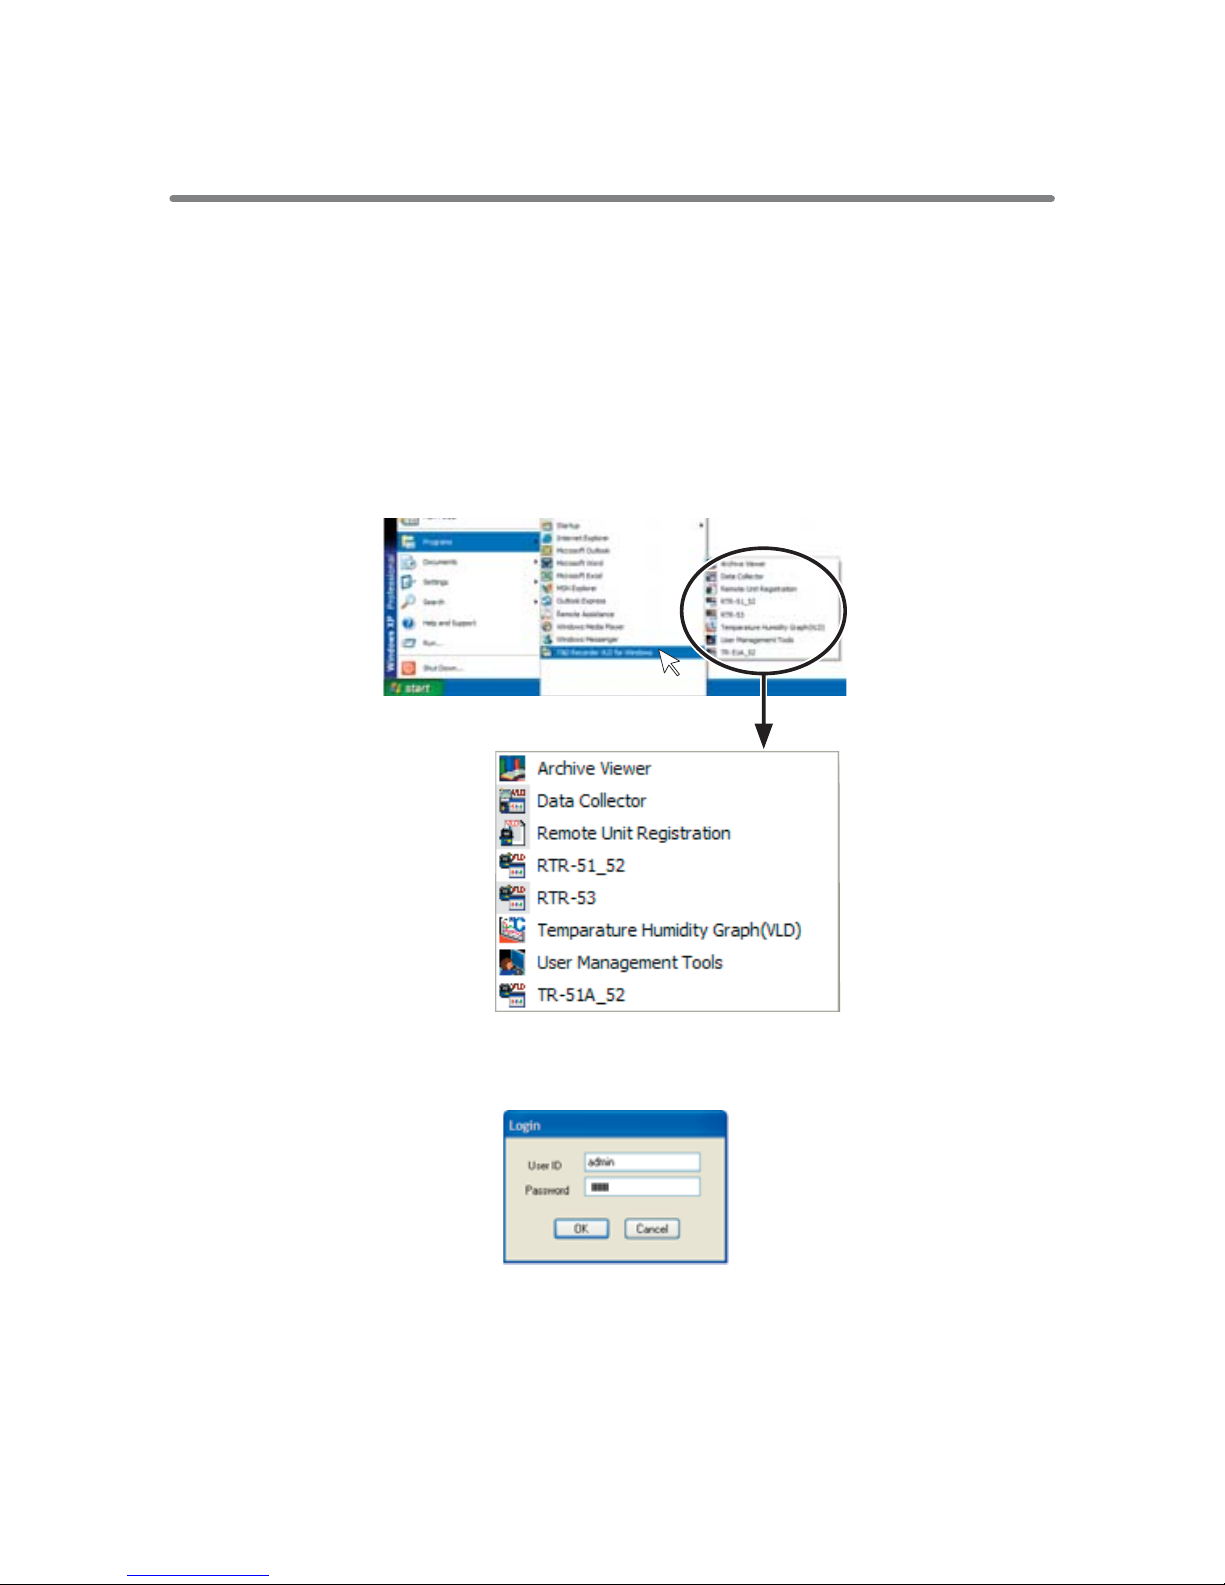
1. Open the application you wish to use by going to Windows
[Startup Menu]
-
[Programs]
-
[T&D Recorder VLD for Windows]
and clicking on it.
2. Upon opening the application, the Login Dialog will appear.
To Login, enter a valid User ID and Password, and click [OK].
ȆUser ID and Password (User Registration) settings can be made in [User
Management Tools]. The default settings for User ID and Password are as
follows: (User ID: admin/Password: passwd).
ȆOnly the Administrator (User ID: admin) can enter and login to [User
Management Tools].

10
ɡUsing Help
For details about how to use an application, please see the
explanations in that application's Help Menu.
ȆIn the Menu Bar, click [Help] - [Help] or [Help] - [Search by Topic], then click on
one of the tabs [Contents], [Index], or [Search Text] to search for the topic or
term you are unsure about or have questions about.
Tabs to search for the topic or term
(The type of tabs used may differ with each application.)
Contents :
By clicking on one of the topics listed, you can find detailed information
for that subject.
Index :
To get an explanation from a keyword, select a keyword from the Index list, and
then click the [View] button.
Search :
Enter the keyword you wish to search for and click the [Start Search] button. All
topics that contain the keyword will be displayed. By selecting a topic and clicking
the [View] button at the bottom, a detailed explanation will appear.
By clicking the [help] button in a dialog box, an
explanation for that dialog box will appear.
In the Graph Window, by clicking on the [Help Icon] in the
toolbar, you can have short explanations appear the next
time you click on a menu, an icon, or anything in the main
window.
11
User Management Tools: User Registration
To carry out various operations in T&D Recorder VLD for Windows
it is necessary to have a User ID, a Password and operation
authorization. In [User Management Tools], User ID's, Password's
and Operation Authorization Registration settings can be made for
each user.
ɡLogging into the [User Management Tools]
Only the Administrator can enter and login to [User Management
Tools]. First, login using the default User ID: "admin" and Password:
"passwd".
* Passwords can be changed using [Modify User Authorization].
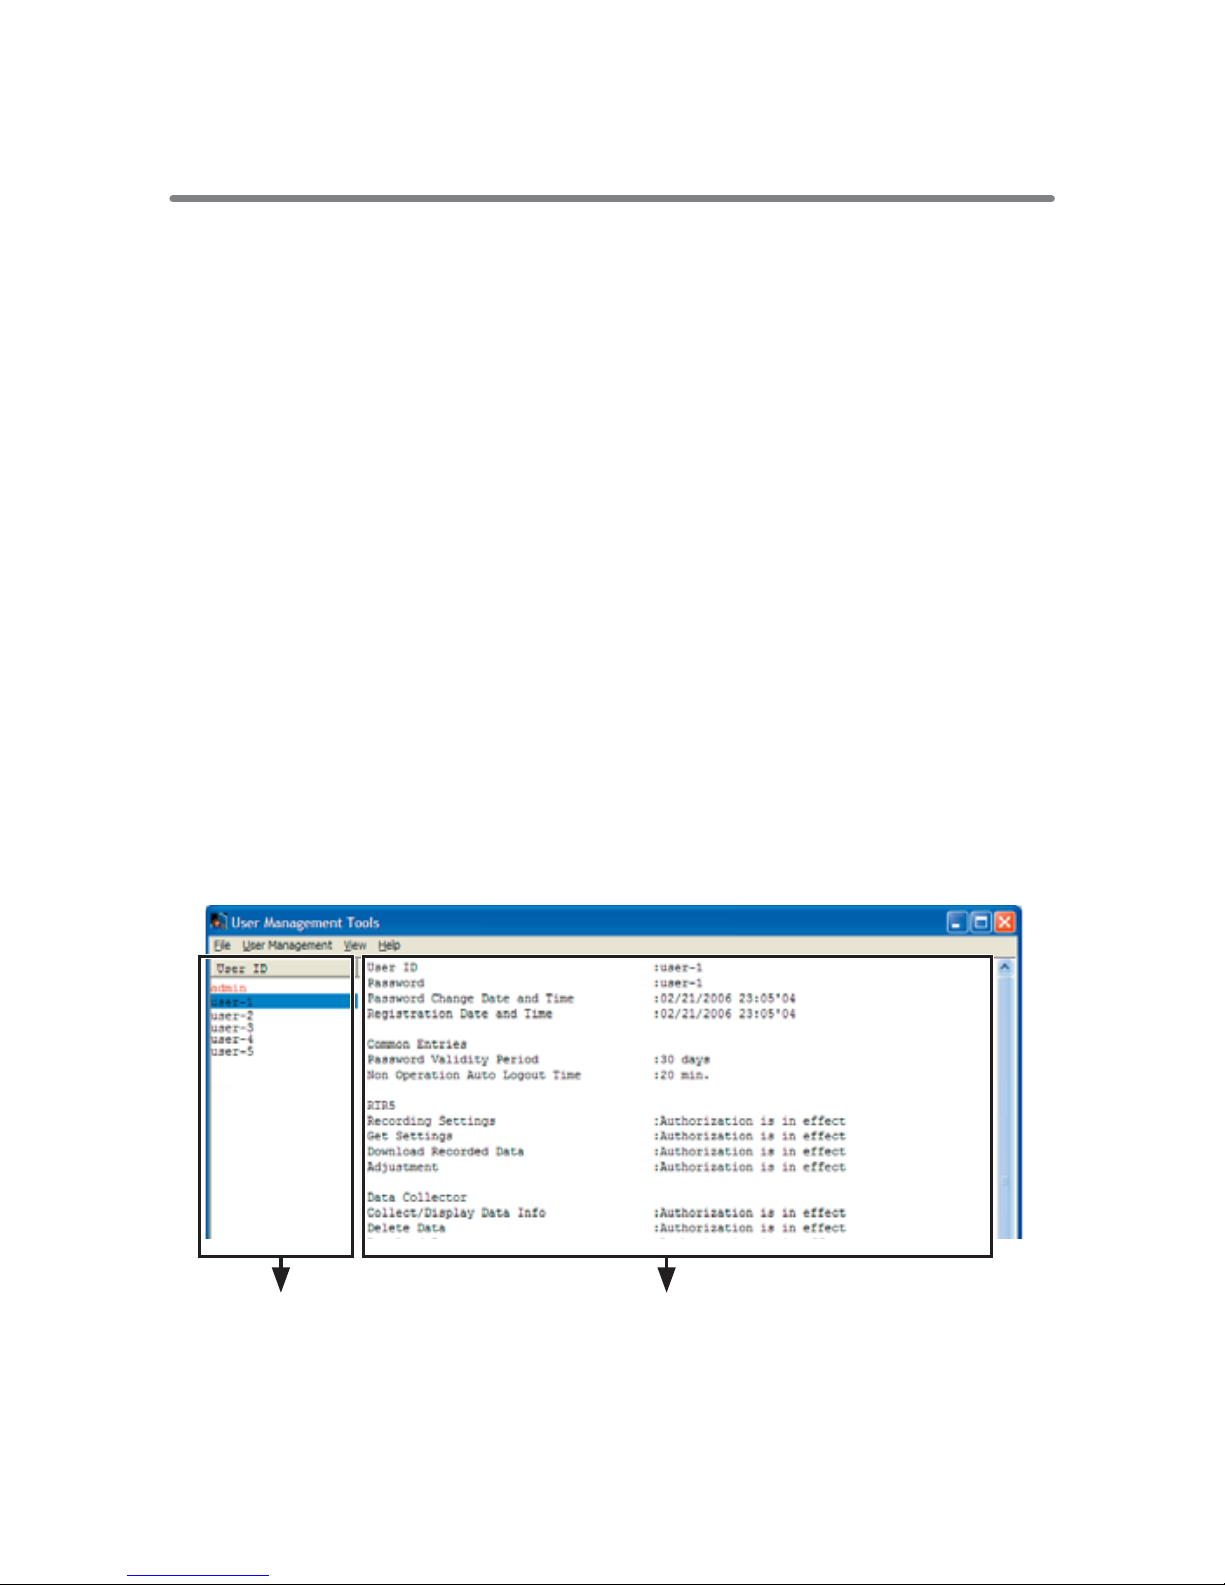
ɡUser Management Tools Functions
The following operations can be carried out using the User
Management Tools.
ȆUser Registration.
ȆUser Operation Authorization Settings
ȆCommon Entry Settings (Only can be done by the Administrator "User ID: admin")
ȆDelete User ("Administrator" cannot be deleted.)
Registration InfoUser ID List
* In the User ID List, the Administrator will appear in red letters.

12
ɡMaking User Registrations
1. In the [User Management] menu, select [User Registration]
to display the window in which you can make User ID and
Password entries. Enter User ID and Password.
ȆThe User ID and Password can be made up of between 5 and 16 characters
using alphabet, numbers, " - " (hyphens) and " _ " (under bars).
ȆA distinction will be made between upper and lower case alphabet, so please
be careful. Ex. abc123 and ABC123 will be treated as different.
ȆAny already registered and in use User ID cannot be used in any other
registration.
[OK]
button
[User Manegement] menu
Make User
Operation
Authorization
Settings
Enter User ID
and
Password
2. Make User Operation Authorization Settings for the operation of
each application.
ȆIt is possible to make settings to restrict the carrying out of any operations
considered critical. So, even if a user is able to login without the necessary
authorization that user will be unable to carry out various operations.
ȆThe memo area can contain up to 64 characters.
ȆA User without any authorizations cannot be registered.
3. Click the [OK] button to finish the registration.

13
User Management Tools: Other Functions
The following operations can also be carried out using the User
Management Tools.
ɡ
Modify User Authorization: [User Management] Menu
*The [Modify User Authorization] window can also be opened in the pop up menu that
appears by right clicking on a User ID in the User ID List.
Here you can make modify authorizations for an already registered
user.
ȆThe only modifications that can be carried out for the Administrator (User ID:
admin) are to make changes to the Password and the memo contents.
ȆThe User ID cannot be modified.
1. From the [User Management] Menu, select [Modify User
Authorization].
2. Click on the Password or other tab to make changes.
ȆThe User ID and Password can be made up of between 5 and 16 characters
using alphabet, numbers, " - " (hyphens) and "_" (under bars).
ȆA distinction will be made between upper and lower case alphabet, so please
be careful. Ex. abc123 and ABC123 will be treated as different.
3. After having finished the desired modifications, click the [OK]
button to finish.
[User Manegement] menu
[OK] button

14
ɡ
Common Entry Settings: [User Management] Menu
ȆThe [Common Entry Settings] window can also be opened in the pop
up menu that appears by right clicking on a User ID in the User ID
List.
ȆMake Password Validity Period settings, as well as, make settings to
allow for an automatic logout when no operations are performed for a
set period of time.
ȆThe Administrator (User ID:admin) has no password time-limit.
ȆNote that if an automatic logout occurs, whether or not you login
again, the Title bar in the Window will remain operable. From [Quit]
button in the Title bar it is possible to quit and close the application.
No Windows common dialog windows, such as the "Specify File
Name" dialog will be affected by a timeout.
1. From the [User Management] Menu, select [Common Entries].
2. If necessary, please make changes to the settings.
ȆPassword Validity Period:
30 days/90 days/120 days/Unlimited Period
ȆNon Operation Auto Logoff Time:
5 minutes/10 minutes/20 minutes/Unlimited Period
3. Click the [OK] button to finish the modifications.
[OK] button
15
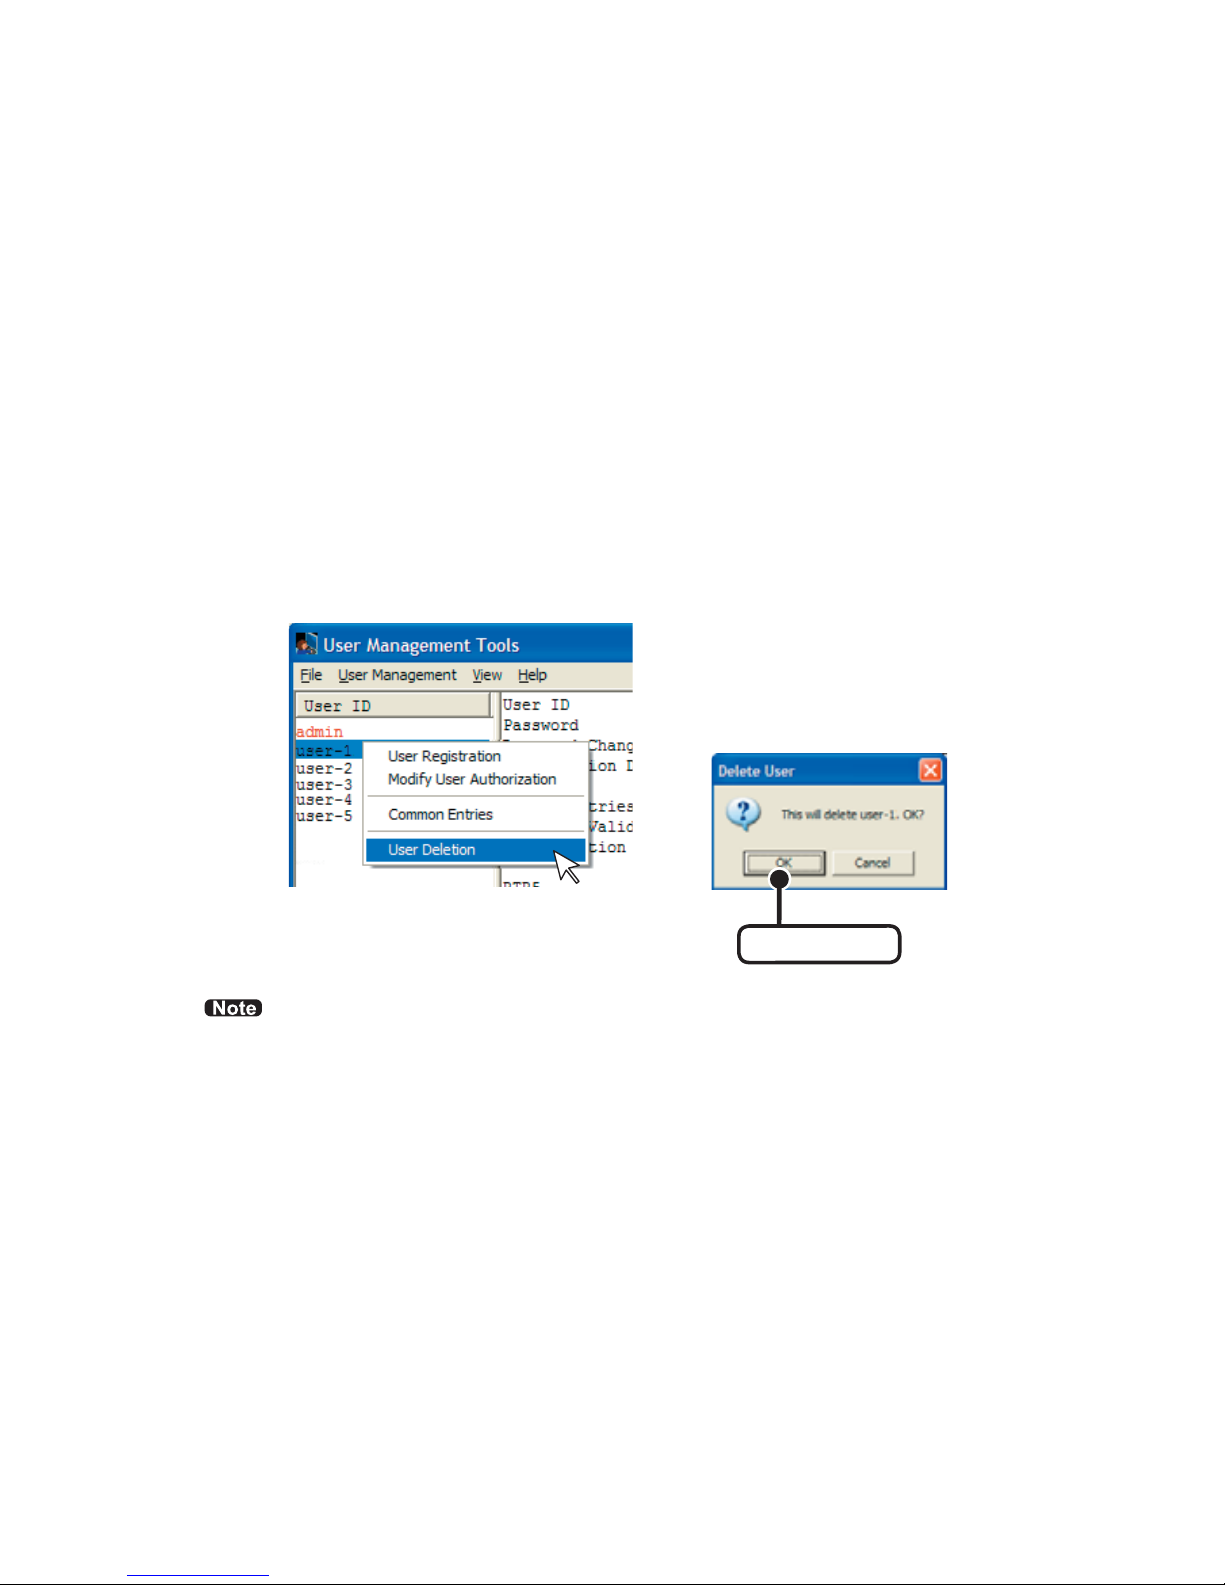
ɡUser Deletion: [User Management] Menu
The [User Deletion] window can also be opened in the pop up
menu that appears by right clicking on a User ID in the User ID
List. Here you can delete an already registered user.
1. From the User ID list, select the User you wish to delete.
2. From the [User Management] Menu, select [User Deletion].
3. A message will appear, click the [OK] button to complete the
deletion process.
[Pop up menu]
[OK] button
ȆThe Administrator (User ID: admin) cannot be deleted.
Table of contents
Other T&D Recording Equipment manuals


