TAS 40-060578 User manual
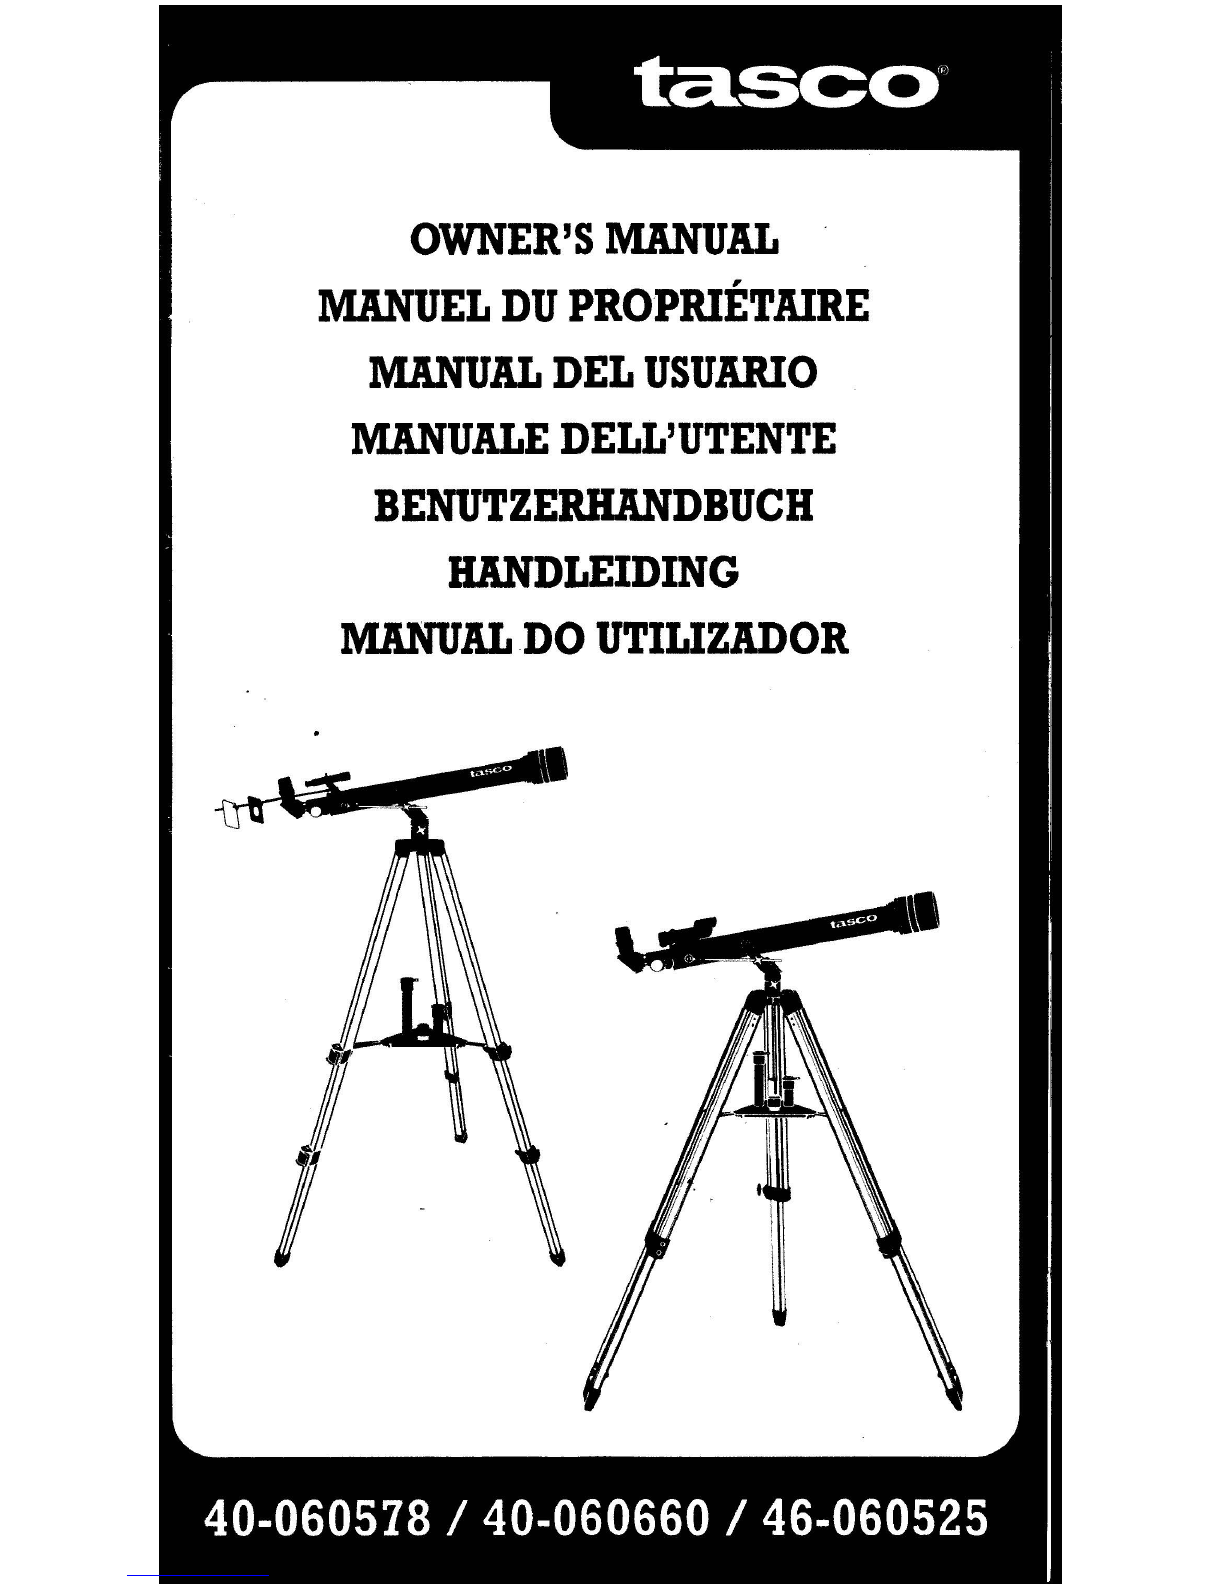
OWNER'SMANUAL
MANUELDUPROPRIETAIRE
MANUALDELUSUARIO
MANUALE
DELL'UTENTE
BENUTZERB.ANDBUCH
HANDLEIDING
MANUALDOUTILIZADOR

H
G J
K
D B A
p
Q
R
46-060525
H
E F G J
K
A 4()-()60578/ 40-060660
2

A. Micro-adjustable
Altitude control
B. Focus knob
C. Focus tube
D. Diagonal
E. Eyepiece
F. Finderscope I StarPointer
bracket
G. Finderscope I StarPointer
H. Telescope main body
A. Micro-reglage de !'altitude
B. Bouton de focalisation
C. Tube de focalisation
D. Diagonale
E. Oculaire
F. Support du telescope
chercheur
G. Telescope chercheur I
StarPointer
H. Corps Principal du telescope
A. Control micoajustable
de la altitud
B. Bot6n de enfoque
C. Tubo de enfoque
D. Diagonal
E. Mirilla
F. Abrazadera del telesc6pico
buscador
G. Telesc6pico buscador I
StarPointer
A. Controllo altitudine
microregolabile
B. Manopola fuoco
C. Tubo di messa a fuoco
D. Diagonale
E. Oculare
F. Supporto cercatore
G. Cercatore I StarPointer
H. Corpo principale telescopio
I. Protezione solare
A. Fein einstellbarer
Hohenregler
B. Fokussierknopf
C. Fokussiertubus
D. Diagonalspiegel
E. Okular
F. Sucherklammer
G. Sucher I StarPointer
H. Teleskopkorper
I. Sonnenblende
A. Microafstelbare
hoogteregelaar
B. Scherpteregelaar
C. Scherpstellingbuis
D. Diagonaal
E. Oogstuk
F. Klem van de zoeklens
G. Zoeklens/StarPointer
H. Telescoopbuis
I. Zonneklep
A. Micro alavanca de ajuste do
eixo polar
B. Botao rotativo de focagem
C. Tubo de focagem
D. Espelho diagonal
E. Ocular
F. Suporte do dispositivo
Finderscope
G. Dispositivo Finderscope I
StarPointer
I. Sun shade
J. Objective lens (not shown)
K. Dust Cap
(remove before viewing)
L. Yoke locking knob
M. Altitude control
Locking knob
N. Yoke mount
0. Azimuth lock
P. Accessory tray
I. Pare-soleil
J. Lentille de l'objectif
(pas sur le dessin)
K. Coiffe de protection
(a Enlever avant
L'observation)
L. Bouton de verrouillage
du Tube
M. Bouton de verrouillage
du controle de !'altitude
H. Cuerpo principal
del ytelesc6pico
I. Protecci6n contra el sol
J. Lentilla de objetivo
(no mostrado)
K. Capa protectors contra el
Polvo (quitar antes de mirar)
L. Bot6n de bloqueo
de la horquilla
J. Lenti obiettivo (non visibili)
K. Copertura antipolvere (da
rimuovere prima di operare)
L. Manopola fermo cavalletto
M. Manopola fermo
controllo altitudine
N. Montatura cavalletto
0. Fermo Azimuth
P. Scatola porta accessoti
0. Gamba treppiedi
J. Objektivlinse (nicht gezeigt)
K. Staubkappe (vor dem
Beobachten abnehmen)
L. Jochsperrknopf
M. Hohenregler-Sperrknopf
N. Jochhalterung
0. Azimutsperre
P. Zusatztablett
Q. Stativbein
A. Stativbein-Einstellschraube
J. Objectieve lens (niet op
de tekening)
K. Stofkapje (verwijderen
voor het kijken)
L. Vergrendelknop van het juk
M. Vergrendelknop van de
hoogteregelaar
N. Montagestuk van het juk
0. Azimutslot
P. Accessoirebakje
H. Corpo principal do
telesc6pio
I. Parasol
J. Lentes da objectiva
(nao ilustradas)
K. Tampa de proteCQaodo p6
(retire antes de efectuar
observagoes)
L. Botao rotativo de fixagao da
culatra
3
Q. Tripod leg
A. Tripod leg adjusting
Screw I Clamp
S. Sun projection screen
N. Monture du tube
0. Verrouillage de l'azimut
P. Plateau pour accessoires
0. Pied du trepied
A. Vis de reglage pour le pied
S. Ecran de projection du soleil
M. Bot6n de bloqueo del
Control de la altitud
N. Base de la horquilla
0. Bloque acimut
P. Bandeja para los Accesorios
Q. Pata del tripode
A. Tomillo de ajuste de la pata
del trfpode
S. Pantalla protectora contra
el sol
A. Vite regolazione
gamba treppiedi
S. Schermo proiezione solare
S. Sonnenprojektionsschirm
Q. Driepoot
A. Afstelschroef van
de driepoot
S. Zonneprojectiescherm
M. Botao rotativo de fixagao
e controlo da altitude
N. Montagem de culatra
0. Qispositivo de fixagao
do azimute
P. Tabuleiro de acess6rios
0. Perna do tripe
A. Parafuso de ajuste das
P,emasdo tripe
S. Ecran de projecgao do sol
4. a.
6.
b.~
/
/
/
O•OL____ []_
·~~
a. b.
a. 0 b.
a.
~
+ a
~
+
~
( . I O• ~= JJM._i;:::___=:J
4
TELESCOPEASSEMBLYINSTRUCTIONS
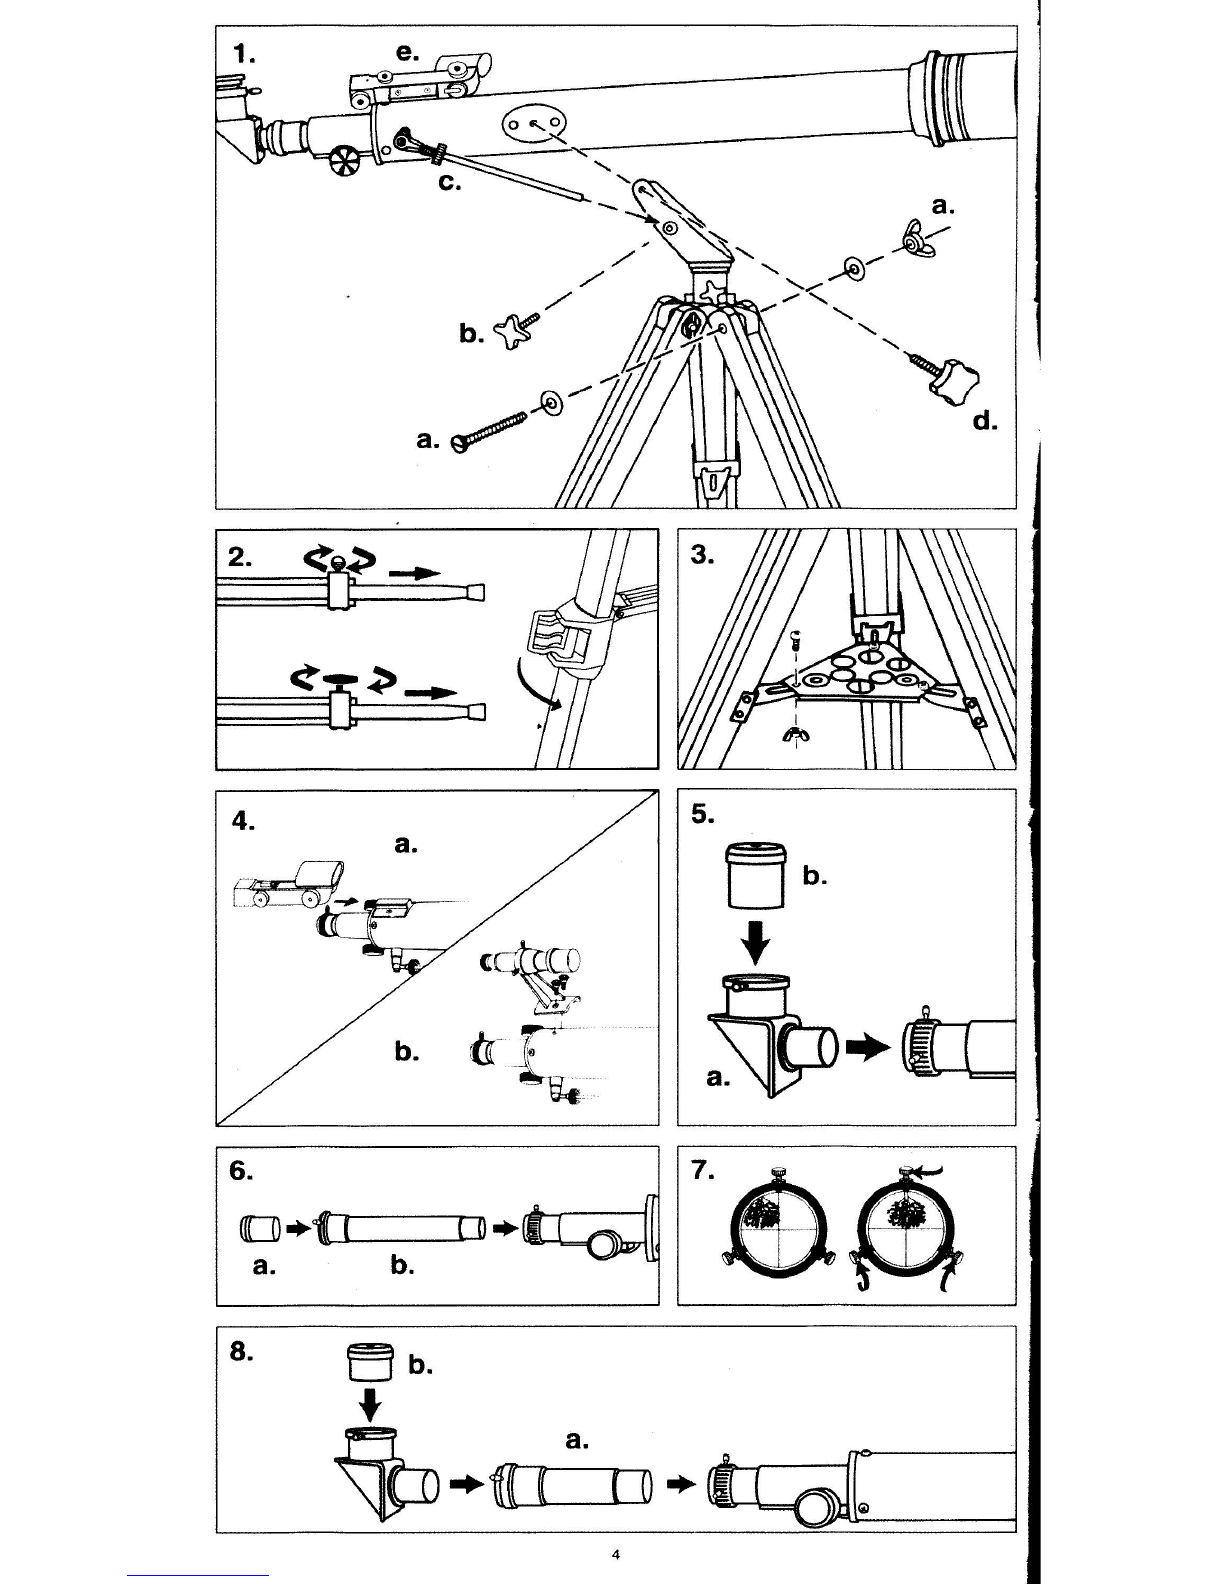
1. Remove the tripod (Q) from the box. To attach tripod legs to yoke mount align the holes of the
tripod legs with those of the yoke mount. Secure each leg by inserting a large (3") bolt with
washer into the hole and secure with a wing nut and washer. Tighten bolts (Fig.1a).
NOTE: When attaching tripod legs to tripod head, be sure that hinge flange on each leg
faces inward. The tripod accessory tray (P) will attach to these flanges.
2. Stand tripod and spread legs. Loosen the three legs' adjusting locks. Grab yoke mount and lift.
Extend the tripod legs to the desired height (at equal lengths) and tighten each leg's adjusting
locks to hold them in position (Fig. 2).
3. Using the small machine screws and wing nuts provided, attach the accessory tray to each of
the flanges on the tripod legs (Fig. 3).
NOTE: Flanges fit under accessory tray when attached.
4. Remove telescope main body (H) from the box. Thread the micro-adjustable altitude control (A)
through the altitude control locking knob (Fig. 1c). Attach telescope main body (H) by aligning
the hole in the telescope saddle with the holes in the yoke. Screw yoke locking knobs through
both holes and tighten the knobs (Fig. 1b).
5. Models 40-060578 and 40-060660: Remove the finderscope with finderscope bracket (F) from
the box. Remove the two knurled thumbscrews from the telescope main body. Position the find-
erscope bracket on the telescope main body so that the holes in the base of the bracket line up
with the exposed holes in the telescope main body. Replace the two knurled thumbscrews and
tighten securely (Fig. 4b).
6. Model 46-060525: Remove the StarPointer finderscope with finderscope bracket (F) attached
from the box. Remove the two knurled thumbscrews from the telescope main body. Position the
finderscope bracket on the telescope main body so that the holes in the base of the bracket
line up with the exposed holes in the telescope main body. Replace the two knurled thumb-
screws and tighten securely (Fig. 4a).
7. Insert diagonal (D) into the focus tube (Fig. 5a). Secure by tightening small retaining screw.
NOTE: Diagonal is only to be used in combination with the eyepieces (oculars). Never use
the diagonal and Barlow at the same time.
8. Insert eyepiece (E) into diagonal (Fig. Sb). Secure by tightening small retaining screw.
9. Insert Barlow (Fig. 6b) into the focus tube. Secure by tightening small retaining screw. Insert
eyepiece into open end of Barlow and secure (Fig. 6a).
NOTE: In all astronomical telescopes, the image appears upside down. With the use of the
diagonal the image appears erect but with a left to right inversion (mirror like). To use the
telescope for terrestrial viewing and to correct the mirrored image, remove the diagonal
and replace with the erecting eyepiece. We recommend the use of the low magnification
eyepiece when the telescope is used for terrestrial viewing.
Only refractor telescopes come with an erecting eyepiece. Reflectors are used mainly for
astronomical purposes.
The telescope is now fully assembled and ready for use.
CAUTION! Viewing the sun can cause permanent eye damage. Do not view the sun with
this telescope or even with the naked eye.
TOUSETHEFINDERSCOPE(MODELS40-060578AND40-060660)
The finderscope is a small low-powered and wide field of view telescope mounted alongside the
main telescope and is used to search for the target and aim the main telescope at it. Before you
can use the finderscope, you will need to line it up with the telescope. This procedure will become
easier with practice.
1. Install the lowest power eyepiece (20mm) into the eyepiece tube. Pick out an easily recognized,
unmoving object no closer than a thousand yards away. The higher the object is from the
horizon, the easier it will be to position the telescope. Aim your telescope toward your object
until its image is centered in the eyepiece. Lock all the knobs on the equatorial mount so the
telescope will not move.
5
2. Look through the finderscope. If the object you lined up in the telescope is not visible, loosen
the adjustment screws and move the finderscope around until you see it. Once it gets within
range, tighten the adjustment screws while centering the object in the scope. You will note that
the image will shift toward the screw you are tightening (Fig. 7).
3. Adjust screws to center object on the finderscope cross hairs. Recheck your telescope to make
certain it is still on target. If it moved, realign it and adjust your finderscope. If it hasn't, you're
all set. Your finderscope is now operational.
TOUSETHESTARPOINTER(MODEL46-060525)
1. The StarPointer is the quickest and easiest way to point your telescope exactly at a desired
object in the sky (Fig. 1e). It's like having a laser pointer that you can shine directly into the
night sky. The StarPointer is a zero magnification pointing tool that uses a coated glass window
to superimpose the image of a small red dot onto the night sky. Like all finderscopes, the
StarPointer must be properly aligned with the main telescope before it can be used.
2. To turn on the StarPointer, rotate the variable brightness control clockwise until you hear a
"click." To increase the brightness level of the red dot, continue rotating the control knob about
180° until it stops.
3. Locate a bright star or planet and center it in a low power eyepiece in the main telescope.
If the StarPointer is perfectly aligned, you will see the red LED dot overlap the alignment star. If
the StarPointer is not aligned, take notice of where the red dot is relative to the bright star.
Without moving the main telescope, turn the StarPointer's azimuth and altitude alignment con-
trols until the red dot is directly over the alignment star.
If the LED dot is brighter than the alignment star, it may make it difficult to see the star. Turn the
variable brightness control counterclockwise, until the red dot is the same brightness as the
alignment star. This will make it easier to get an accurate alignment. The StarPointer is now
ready to be used. Remember to always turn the power off after you have found an object. This
will extend the life of both the battery and the LED.
FINDINGOBJECTS
1. Loosen the altitude locks on the sides of the telescope tube and the silver azimuth lock on the
base of the altazimuth mount, then move the telescope in the desired direction.
2. Look through the StarPointer finderscope and pan the telescope until the object appears in the
field of view. Once it's in the field, tighten the altitude and azimuth locks.
3. To center the object with the red dot in the StarPointer, use the fine adjustment ring on the alti-
tude slow motion rod assembly. FOCUSING
1. Once you have found an object in the telescope, turn the focus knob until the image is sharp.
2. To focus on an object that is nearer than your current target, turn the focusing knob toward the
eyepiece (i.e.. so that the focus tube moves away from the front of the telescope). For more
distant objects, turn the focus knob in the opposite direction.
3. To achieve a truly sharp focus, never look through glass windows or across objects that pro-
duce heat waves, such as asphalt parking lots.
IMAGEORIENTATION
1. When observing with a diagonal, the image will be right side up but reversed from left to right.
2. When observing straight through, with the eyepiece inserted directly into the telescope, the
image will be inverted. Also, the image in the finderscope will be inverted.
MAGNIFICATION
The magnification (or power) of a telescope varies depending upon the focal length of the
eyepiece being used and the focal length of the telescope.
To calculate magnification, use the following formula, in which FL= focal length:
Magnification = FL (telescope) in mm
FL (eyepiece) in mm
SOLAROBSERVATION
CAUTION! Viewing the sun can cause permanent eye damage. Do not view the sun with
this product or even with the naked eye. Never leave a telescope unattended during the
daytime; a child could look at the sun with it and suffer permanent damage to vision.
6
I
i
i
J
!
j

PREPARINGTHETELESCOPEFORPROJECTINGTHESUNONASCREEN(S)
CAUTION! Cover the objective lens of the finderscope so no one can look through it.
1. Insert the projection screen rod by sliding it through the opening in the finderscope bracket with
the washer end of rod toward the objective. (The washer acts as a stop. preventing the sun
screen assembly from slipping completely through the finderscope bracket.)
2. If the diagonal is in place. remove it. It will not be used for solar observation.
3. Select the lowest power eyepiece (the one with the highest numerical designation in millime-
ters) and insert it. without the diagonal. into the focus tube.
4. Select the black plate of the sun projection assembly. Slip it onto the rod. position it near the
eyepiece so that the hole is centered with the lens of the eyepiece and lock it in place. This
plate shades the white projection screen which will be put in place in a later step. The tele-
scope is now ready to observe the sun.
OBSERVINGTHESUN
1. Point the telescope in the general direction of the sun without looking through it or the
finderscope. Looking at the shadow of the telescope on the ground will help in aiming 1t.
2. Hold the white plate a few inches behind the finderscope eyepiece and move the telescope
gently until you see the sun projected on the white plate. You will see a round "picture" of the
sky with the sun somewhere in the ··picture:· Move the telescope. using the flexible control
cables until the sun 1scentered in this proiected image of the sky.
3. Next. slip the white plate into place on the sun projection assembly rod. Position it directly in
line with the telescope's eyepiece and lock it in place.
4. Use the flexible control cables to make any small corrections necessary to center the sun's
image on the white screen.
5. Focus the sun·s image cin the white screen using the focus knob.
6. The proiected image will show sunspots. the ··rice-grain" structure of the solar disk, and that the
sun is brighter at the center of the disk than at the edge.
THEMOONFILTER
A moon filter has been included with your telescope for removing glare and increasing contrast
when v1ew1ngthe moon. To attach it to the telescope eyepiece. screw the filter onto the threaded
end of the eyepiece.
CAUTION! The moon filter should only be used to view the moon. It is not intended for
viewing the sun. Viewing the sun through this telescope (with or without the filter), or
even with the naked eye, can cause permanent eye damage.
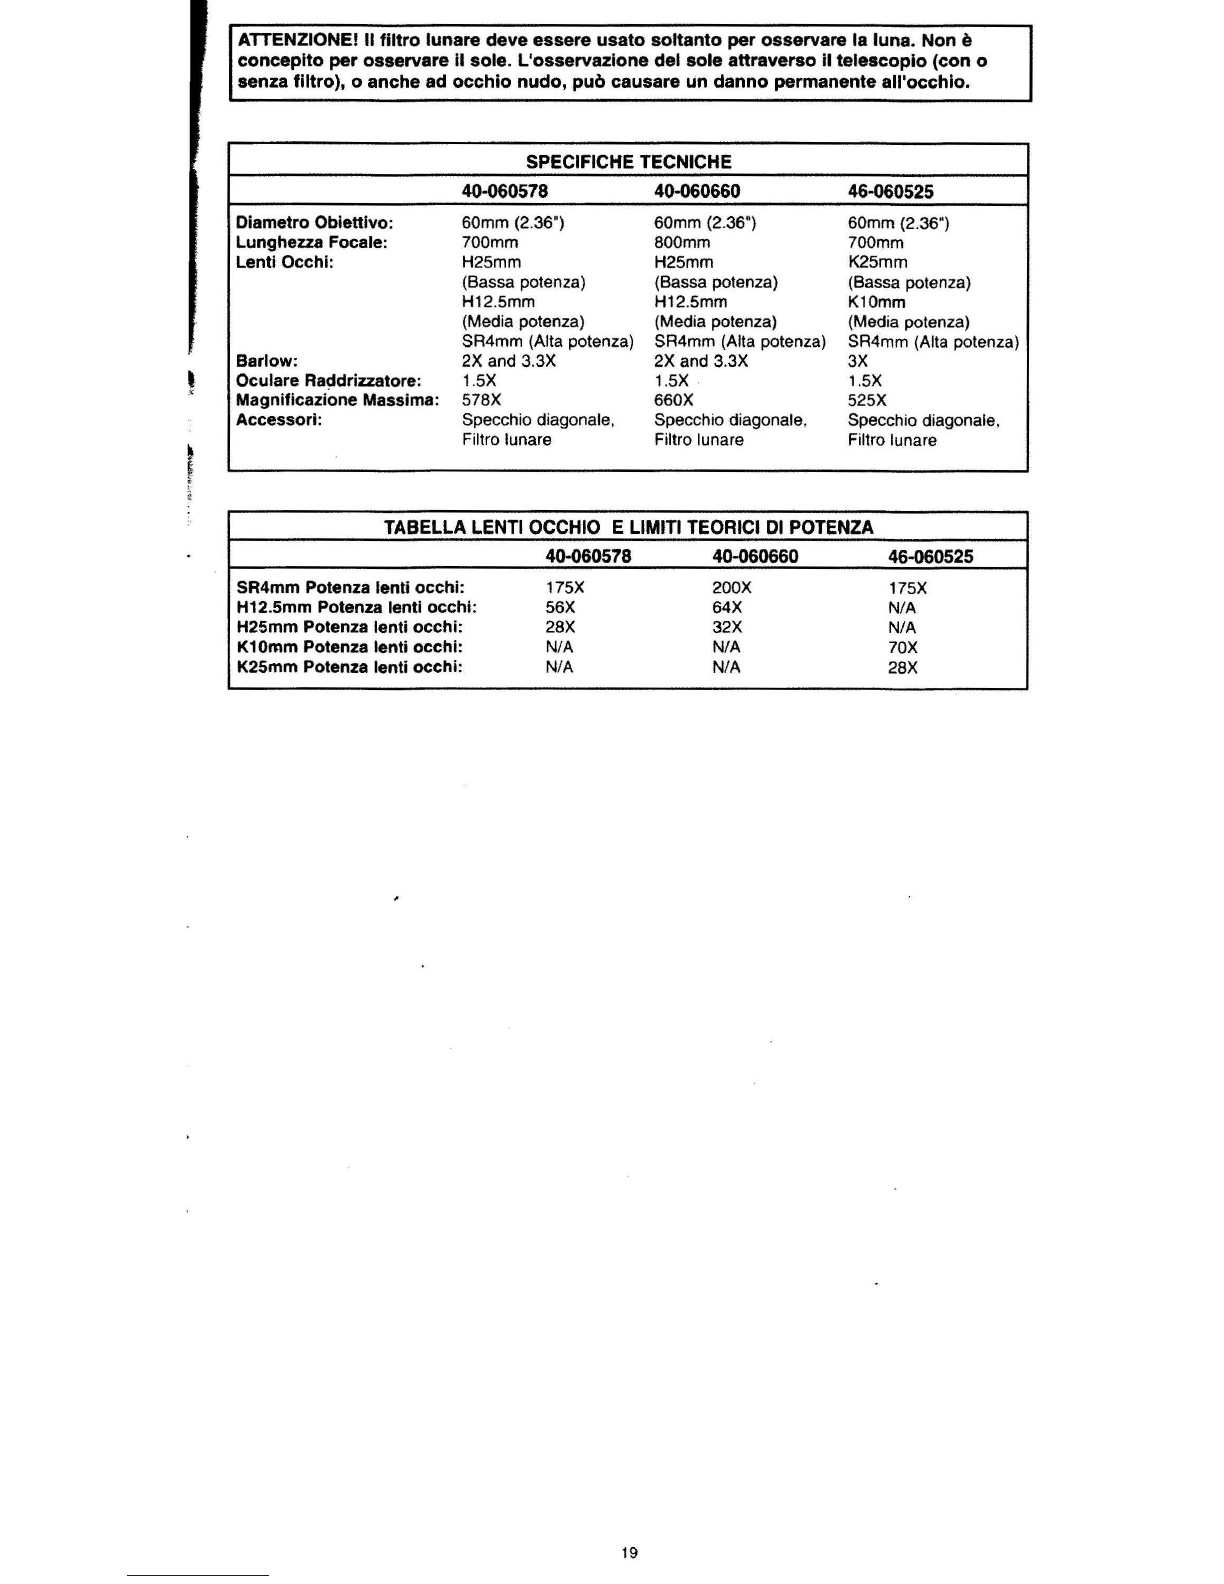
TECHNICALSPECIFICATIONS
40-060578 40-060660 46-060525
Objective Diameter: 60mm (2.36") 60mm (236") 60mm (2 36")
Focal Lengt~: 700mm 800mm 700mm
Eye Lenses: H25mm (Low Power) H25mm (Low Power) K25mm (Low Power)
H12.5mm (Medium Power) H12.5mm (Medium Power) K10mm (Medium Power)
SR4mm (High Power) SR4mm (High Power) SR4mm (High Power)
Barlow: 2X and 3 3X 2X and 3.3X 3X
Erecting Eyepiece: 1.5X 1.5X 1.5X
MaximumMagnification:578X 660X 525X
Accessories: Diagonal mirror. Diagonal mirror. Diagonal mirror.
Moonf1lter Moonf1lter Moonfilter
EYE LENS CHART & THEORETICAL POWER LIMITS
40-060578 40-060660 46-060525
SR4mm Eye Lens Power: 175X 200X 175X
H12.5mm Eye Lens Power: 56X 64X N/A
H25mm Eye Lens Power: 28X 32X N/A
K10mm Eye Lens Power: NIA NIA ?OX
K25mm Eye Lens Power: N/A N/A 28X
7
INSTRUCTIONSPOURL'ASSEMBLAGEDUTÉLESCOPE
1. Sortez les trois pieds (Q) du trépied de la boîte. Pour rattacher les pieds au corps du trépied,
alignez les trous dans les pieds par rapport à ceux de la monture du tube. Serrez chaque pied
en introduisant un gros (3") boulon avec rondelle dans le trou et serrez à l'aide d'un écrou à
oreilles et d'une rondelle. Serrez les boulons (Fig.1a).
NOTE: Lorsque vous rattachez les pieds au corps du trépied, veillez à ce que les
charnières se trouvent tournées vers l'intérieur. Elles serviront à attacher le plateau pour
accessoires (P).
2. Levez le trépied et étendez les pieds. Desserrez le verrou de réglage de chaque pied.
Saisissez la monture du tube et levez-la. Etirez les pieds du trépied jusqu'à la longueur voulue
(à hauteur égale). En plus, resserrez les verrous de réglage de chaque pied afin de les main-
tenir en position (Fig. 2).
3. En vous servant des petites vis et des boulons à oreilles fournis, rattachez le plateau pour
accessoires aux charnières sur les pieds du trépied (Fig. 3).
NOTE: Lorsque vous rattachez les pieds au corps du trépied, veillez à ce que les charnières se
trouvent tournées vers l'intérieur. Elles serviront à attacher le plateau pour accessoires (P).
4. Sortez de la boîte le corps principal du télescope (H). Vissez le micro-réglage de l'altitude (A) à
travers le bouton de verrouillage de l'altitude (Fig. 1c). Rattachez le corps principal du téle-
scope (H) en alignant le trou dans le support du télescope face aux trous dans le tube. Vissez
les boutons de verrouillage du tube à travers les deux trous et serrez bien (Fig. 1b).
5. Modèles 46-060578 et 40-060675: Sortez le télescope chercheur avec support (F) de la boîte.
Enlevez les deux petites vis à molettes du corps principal du télescope. Placez le support du
télescope sur le corps principal du télescope, de sorte à ce que les trous dans la base du
support se trouvent alignés par rapport aux trous dans le corps principal du télescope (Fig. 4b).
6. Modèle 46-060525: Enlevez le télescope chercheur StarPointer avec son support (F) de la
boîte. Enlevez les deux petites vis à molettes du corps principal du télescope. Placez le
support du télescope chercheur sur le corps principal du télescope, de sorte à ce que les trous
dans la base du support se trouvent alignés par rapport aux trous dans le corps principal du
télescope. Serrez bien les vis à molettes (Fig. 4a).
7. Introduisez la diagonale (D) dans le tube de focalisation (Fig. 5a). Serrez à l'aide de la petite
vis.
NOTE: la diagonale doit uniquement être utilisée en combinaison avec les oculaires,
n'utilisez jamais en même temps la diagonale et l'oculaire Barlow.
8. Introduisez l'oculaire (E) dans la diagonale (Fig. 5b). Serrez à l'aide de la petite vis.
9. Introduisez l'oculaire Barlow (Fig. 6b) dans le tube de focalisation. Serrez à l'aide de la petite
vis. Introduisez l'oculaire dans l'extrémité ouverte de l'oculaire Barlow et serrez (Fig. 6a).
NOTE: Tous les télescopes astronomiques rendent une image sens dessus dessous. La
diagonale sur les télescopes à lentilles corrige cette inversion, mais rend une inversion
gauche-droite (comme un miroir). Lorsque vous utilisez le télescope pour des observations
terrestres, enlevez la diagonale et remplacez-la par l'oculaire afin de corriger cet effet de
miroir. Nous recommandons l'utilisation de l'oculaire à grossissement faible pour les
observations terrestres.
Seuls les télescopes à lentilles ont un oculaire de redressement. Les réflecteurs sont essentielle-
ment destinés pour les observations astronomiques.
Le télescope est à présent entièrement assemblé et est prêt à être utilisé.
ATTENTION! L'observation du soleil peut entraîner des lésions permanentes aux yeux.
N'observez jamais le soleil ni à travers ce télescope, ni à l'œil nu.
COMMENTUTILISERLETELESCOPECHERCHEUR
(MODELES40-060578ET40-060660)
Le télescope chercheur est un télescope à basse puissance et à angle large qui se situe le long
du télescope principal et il sert à chercher l'objectif et à diriger le télescope principal sur cet objec-
tif. Avant de pouvoir vous en servir, il vous faudra l'aligner par rapport au télescope. Il s'agit d'une
opération simple qui demande un peu de pratique.
1. Introduisez l'oculaire le plus faible (20 mm) dans le tube de l'oculaire. Sélectionnez un objet
immobile facile à reconnaître, à au moins un kilomètre. Plus l'objet est élevé par rapport à
l'horizon, plus il est facile de bien positionner le télescope. Dirigez votre télescope vers l'objet
jusqu'à ce que l'image se trouve bien au centre de l'oculaire. Serrez tous les boutons sur le
support équatorial afin que le télescope ne bouge plus.
8

2. Regardez à travers le télescope chercheur. Si l'objet que vous avez aligné à travers le téle-
scope n'est pas visible, desserrez les vis de réglage et déplacez le télescope chercheur jusqu'à
ce que vous voyiez l'objet. Reserrez alors les vis de réglage alors que l'objet se trouve au
centre de la lunette. Vous remarquerez que l'image se déplacera vers la vis que vous serrez
(Fig. 7).
3. Réglez les vis afin de centrer l'objet par rapport à la croix du télescope chercheur. Vérifiez si
l'objet se voit toujours à travers le télescope. s'il s'est déplacé, réalignez et réglez à nouveau
votre télescope chercheur. Votre télescope chercheur est à présent opérationnel.
UTILISATIONDUSTARPOINTER(MODELE46-060525)
1. Le StarPointer constitue la façon la plus simple et la plus rapide de pointer votre télescope
avec précision sur un objet voulu au firmament. C'est comme si vous pointiez un rayon laser
dans le ciel nocturne. Le StarPointer est un outil de pointage à grossissement zéro qui utilise
un verre revêtu destiné à afficher en surimpression un petit point rouge dans le ciel nocturne.
Comme tous les télescopes chercheurs, le StarPointer doit être parfaitement aligné par rapport
au télescope principal.
2. Pour activer le StarPointer, tournez le contrôle variable de la clarté dans le sens des aiguilles
d'une montre, jusqu'à ce que vous entendiez un "click". Pour augmenter le niveau de clarté du
point rouge, tournez le bouton de contrôle sur environ 180°.
3. Localisez une étoile brillante ou une planète et centrez-la à travers un oculaire de faible puis-
sance du télescope principal. Si le StarPointer est parfaitement aligné, vous verrez le point LED
rouge en surimpression sur l'étoile. Si le StarPointer n'est pas bien aligné, prenez note de la
position du point rouge par rapport à l'étoile. Sans bouger le télescope principal, tournez les
contrôles de l'azimut et de l'altitude du StarPointer jusqu'à ce que le point rouge se trouve sur
l'étoile. Si le point LED est plus clair que l'étoile visée, vous aurez du mal à observer l'étoile.
Tournez le bouton de contrôle variable de la clarté dans le sens inverse des aiguilles d'une
montre, jusqu'à ce que le point rouge ait la même clarté que l'étoile visée. Ceci facilitera
l'alignement précis. Le StarPointer est à présent prêt pour l'utilisation. Songez toujours à
couper l'alimentation une fois l'objet trouvé. Ceci augmentera la durée de vie des piles et de
l'affichage LED. TROUVERDESOBJETS
1. Relâchez les leviers pour l'altitude sur les côtés du tube du télescope et le levier argent& pour
l'azimut au bas de la monture de l'altazimut, puis déplacez le télescope dans la direction
voulue.
2. Regardez à travers le StarPointer et tournez le télescope jusqu'à ce que l'objet se trouve à l'in-
térieur du champ d'observation. Serrez alors les verroos pour l'altitude et azimut.
3. Pour centrer l'objet à l'aide du point rouge du StarPointer, utilisez l'anneau de réglage précis
sur le dispositif de la tige pour l'altitude.
FOCALISER
1. Une fois que vous avez trouvé un objet à travers le télescope, tournez le bouton de focalisation
jusqu'à l'obtention d'une image nette.
2. Pour focaliser sur un objet plus rapproché que l'objet actuellement observé, tournez le bouton
de focalisation dans la direction de l'oculaire (de sorte à ce que le tube s'éloigne de l'avant du
télescope). Pour des objets plus éloignés, tournez le bouton dans le sens inverse.
3. Pour obtenir une focalisation absolument nette, ne regardez jamais à travers des fenêtres ou à
travers des objets produisant des buées de chaleur, par exemple des parkings asphaltés.
ORIENTATIONDEL'IMAGE
1. Lorsque la diagonale est utilisée, le rendu vertical sera correct mais la gauche et la droite
seront inversées.
2. Lorsque vous regardez à travers l'oculaire introduit directement dans le télescope, l'image sera
inversée. L'image dans le télescope chercheur sera également inversée.
GROSSISSEMENT
Le grossissement (ou la puissance) d'un télescope varie en fonction de la longueur de focalisation
de l'oculaire utilisé et de la longueur de focalisation du télescope.
Pour calculer le grossissement, utilisez la formule suivante, sachant que LF =longueur de focali-
sation:
9
Grossissement = LF (télescope) en mm
LF (oculaire) en mm
OBSERVATIONDUSOLEIL
ATTENTION! L'observation du soleil peut entraîner des lésions permanentes aux yeux.
N'observez jamais le soleil ni à travers ce télescope, ni à l'œil nu. N'abandonnez jamais le
télescope durant la journée; un enfant risquerait d'observer le soleil à travers le télescope,
et de souffrir de lésions permanentes aux yeux.
PREPARERLETELESCOPEPOURLAPROJECTIONDUSOLEILSURUNÉCRAN(S)
ATTENTION! Couvrez la lentille du téléobjectif afin que personne ne puisse regarder à travers.
1. Insérez la tige de l'écran de projection en la glissant à travers le support du télescope
chercheur, le côté avec la rondelle tourné du côté de l'objectif. (La rondelle sert de système de
blocage afin que le dispositif de l'écran ne glisse pas entièrement à travers le support).
2. Si la diagonale est installée, enlevez-la. Elle ne sera pas utilisée pour l'observation du soleil.
3. Prenez l'oculaire le plus faible (celui dont la désignation en millimètres est la plus élevée) et
introduisez-la, sans la diagonale, dans le tube de focalisation.
4. Prenez la plaquette noire du dispositif de projection solaire. Glissez-la le long de la tige et posi-
tionnez-la près de l'oculaire de sorte à ce que le trou se trouve bien aligné par rapport à la
lentille de l'oculaire, et serrez-la. Le télescope permet à présent l'observation du soleil.
OBSERVERLESOLEIL
1. Pointez le télescope environ dans la direction du soleil, sans regarder à travers le télescope ou
le télescope chercheur. L'ombre du télescope sur le sol peut vous aider à viser.
2. Gardez la plaquette blanche quelques centimètres derrière l'oculaire du télescope pointeur et
bougez lentement le télescope jusqu'à ce que le soleil se trouve projeté sur la plaquette
blanche. Vous verrez une "image" circulaire du soleil, le soleil se trouvant quelque part sur
"l'image". Bougez le télescope à l'aide des câbles de contrôle flexibles, jusqu'à ce que le soleil
se trouve au centre de la projection du ciel.
3. Glissez ensuite la plaquette blanche en place sur la tige du dispositif de projection du soleil.
Positionnez-la dans l'alignement de l'oculaire du télescope et serrez,la en place.
4. Servez-vous des câbles de contrôle flexibles pour les petites corrections nécessaires pour bien
centrer la projection du soleil sur l'écran blanc.
5. Focalisez l'image du soleil sur l'écran blanc à l'aide du bouton de focalisation.
6. L'image projetée montrera les taches solaires, la structure en 'papier de riz' du disque solaire et
vous verrez que le soleil est plus brillant en son centre que sur les bords.
LEFILTRELUNAIRE
Un filtre lunaire accompagne votre télescope, destiné à éliminer les éclats et à augmenter le con-
traste lorsque vous observez le soleil. Pour l'attacher à l'oculaire du télescope, vissez le filtre le
long du bout fileté de l'oculaire.
ATTENTION! Le filtre lunaire ne doit être utilisé que pour observer la lune. Il n'est pas des-
tiné à observer le soleil. L'observation du soleil à travers le télescope (avec ou sans filtre),
voire même à l'œil nu, peut blesser définitivement l'œil.
10

SPÉCIFICATIONS TECHNIQUES
40-060578 40-060660 46-060525
Diamètre de l'objectif: 60mm (2.36") 60mm (2.36") 60mm (2.36")
Longueur de focalisation: 700mm BOOmm 700mm
Lentilles oculaires: H25mm (Puissance H25mm (Puissance K25mm (Puissance
faible) faible) faible)
H12.5mm (Puissance H12.5mm (Puissance K10mm (Puissance
moyenne) moyenne) moyenne)
SR4mm (Puissance SR4mm (Puissance SR4mm (Puissance
élevée) élevée) élevée)
Barlow: 2X et 3.3X 2X et 3.3X 3X
Oculaire de redressement: 1.5X 1.5X 1.5X
Grossissement maximal: 578X 660X 525X
Accessoires: Miroir diagonal Miroir diagonal Miroir diagonal
Filtre lunaire Filtre lunaire Filtre lunaire
TABLEAU LENTILLE OCULAIRE & LIMITES DE PUISSANCE THÉORIQUES
40-060578 40-060660 46-060525
SR4mm Puissance de la lentille oculaire : 175X 200X 175X
H12.5mm Puissance de la lentille oculaire: 56X 64X N/A
H25mm Puissance de la lentille oculaire: 28X 32X N/A
K10mm Puissance de la lentille oculaire: N/A NIA 70X
K25mm Puissance de la lentille oculaire: N/A N/A 28X
11

INSTRUCCIONESPARAELMONTAJEDELTELESCÓPICO
1. Quitar el trípode (Q) de la caja. Para fijar las patas del trípode a la cabeza del mismo. Se
deben alinear los agujeros de las patas del trípode con las patas de la base de la horquilla.
Fijar cada pata introduciendo un perno grande (3") con arandela en el agujero en fijar con una
tuerca mariposa y una arandela. Fijar los pernos (dib. la) .
OBSERVACIÓN: Al fijar las patas del trípode a la cabeza del mismo, asegurarse de que la
brida de bisagra en cada pata esté dirigida hacia el interior. La bandeja para los accesorios
del trípode (P) debe fijarse en estas bridas.
2. Poner el trípode en el suelo y extender las patas. Soltar los bloqueos de ajuste para las tres
patas. Coger I¡;¡base de la horquilla y levantar. Extender las patas del trípode hasta alcanzar la
altura deseada (con longitudes iguales) y fijar los bloqueos de ajuste para asegurar que que-
den en la posición deseada (dib. 2).
3. Con al ayuda de pequeños tornillos para máquinas y tuercas mariposa fijar la bandeja para los
accesorios a cada una de las bridas situadas en las patas del trípode (dib. 3).
OBSERVACION: Las bridas encajan por debajo de la bandeja para los accesorios una vez
que hayan sido fijadas.
4. Sacar el cuerpo principal del telescópico (H) de la caja. Insertar el control de la altitud microa-
justable (A) a través del botón de bloqueo del mismo (dib. la). Fijar el cuerpo principal del
telescópico (H) alineando el agujero en el alojamiento del telescópico con los agujeros en la
horquilla. Fijar los botones de bloqueo de la horquilla en ambos agujeros en fijar los botones
(dib. lb) .
5. Modelos 40-060578 y 40-060660: Sacar el telescópico buscador con la abrazadera del
telescópico buscador (F) de la caja. Quitar los dos tornillos mariposa del cuerpo principal del
telescópico. Posicionar la abrazadera del telescópico buscador en el cuerpo principal del
telescópico de tal manera que los agujeros en la base de la abrazadera queden aUneadoscon
los agujeros expuestos en el cuerpo princip¡:ildel telescópico. Volver a posicionar los dos tornil-
los mariposa y fijar fuertemente (dib. 4b).
6. Modelo 46-060525: Sacar el telescópico buscador StarPointer con la abrazadera del telescópi-
co buscador (F) de la caja. Quitar los dos tornillos mariposa del cuerpo principal del telescópi-
co. Posicionar la abrazadera del telescópico buscador en el cuerpo principal del telescópico de
tal manera que los agujeros en la base de la abrazadera queden alineados con los agujeros
expuestos en el cuerpo principal del telescópico. Volver a posicionar los dos tornillos mariposa
y fijar fuertemente (dib. 4a).
7. Introducir la diagonal (O) en el tubo de enfoque (dib. 5a). Fijar atornillando el pequeño tornillo
de sujeción.
OBSERVACIÓN: La diagonal solamente se puede utillzar en combinación con la mirilla
(oculares). Nunca utilizar la diagonal y el Barlow al mismo tiempo.
8. Introducir la mirilla (E) en la diagonal (dib. Sb). Fijar atornillando el pequeño tornillo de sujeción.
9. Introducir el Barlow (dib. 6b) en el tubo de enfoque. Fijar atornillando el pequeño tornillo de
sujeción. Introducir la mirilla en la extremidad abierta del Barlow y fijar (dib. 6a).
OBSERVACIÓN: En todos los telescópicos astronómicos, la imagen aparece al revés .
Utilizando la diagonal en los modelos refractores, la imagen aparece recta, pero con una
Inversión de la izquierda a la derecha (como en el caso de un espejo). Para utilizar el
telescópico para vistas terrestres y para corregir la imagen reflejada se debe quitar la diag-
onal y sustituirla por la mirilla de erección. Recomendamos el uso de la mirilla con baja
magnificaclón cuando se utiliza el telescópico para vistas terrestres.
Solamente los telescópicos refractores vienen con una mirilla de erección. Los reflectores se uti-
lizan principalmente para propósitos astronómicos.
Ahora el telescópico está completamente montado y listo para ser utilizado.
CUIDADO! Mirar al sol puede causar daños permanentes de su vista. No mirar al sol con
este telescópico o incluso con el ojo desnudo.
PARAUTILIZARELTELESCOPICOBUSCADOR(MODELOS40-060578Y40-060660)
El telescópico buscador es un pequeño telescópico con baja potencia y un amplio campo de
vista montado al lado del telescópico principal y se utiliza para buscar el blanco y para apuntar el
telescópico principal al mismo. Pero antes de que usted pueda utilizar el telescópico buscador,
tendrá que alinearlo con el telescópico. Se trata de un procedimiento simple, una vez que sepa
cómo hacerlo y después de haber practicado un poco.
12
1. Instalar la mirilla con la potencia más pequeña (20mm) en el tubo de la mirilla. Escoger un
objeto que se puede reconocer fácilmente y que no se mueve, a una distancia máxima de mil
yardas. Cuanto más alejado está el objetivo del horizonte, más fácil se podrá posicionar el
telescópico. Apuntar su telescópico a su objeto hasta que su imagen haya sido centrada en la
mirilla. Bloquear todos los botones en la base ecuatorial de tal manera que el telescópico no se
moverá.
2. Mirar por el telescópico buscador. Si el objeto que usted ha alineado en el telescópico no se
puede ver, se deben soltar los tornillos de ajuste y girar el telescópico buscador para verlo.
Una vez que haya visto el objeto, se deben fijar los tornillos de ajuste centrando el objeto en el
telescópico. Notará que la imagen se desplazará hacia el tornillo que está cerrando en este
momento (dib. 7).
3. Ajustar los tornillos para centrar el objeto en el telescópico buscador. Volver a controlar su
telescópico para asegurar que sigue apuntando al blanco. Si se mueve, volver a alinear y ajus-
tar su telescópico buscador. Si no se mueve, el ajuste ha sido llevado a cabo correctamente.
Ahora su telescópico buscador está listo para ser utilizado.
PARAUTILIZARELSTARPOINTER(MODELO46-060525)
1. El StarPointer es la manera más rápida y más fácil para apuntar su telescópico exactamente al
objeto deseado en el cielo. Es como un indicador láser que puede enviar directamente al cielo
nocturno. El StarPointer es una herramienta de puntería con magnificación cero que utiliza una
ventana de cristal recubierto para sobreponer la imagen de un pequeño punto rojo en el cielo
nocturno. Como todos los telescópicos buscadores, el StarPointer tiene que ser alineado cor-
rectamente con el telescópico principal antes de poder ser utilizado.
2. Para activar el StarPointer se debe girar el control de la claridad variable en dirección de las
agujas del reloj hasta oír un "clic". Para aumentar el nivel de claridad del punto rojo se debe
continuar girando el botón de control aproximadamente 180º hasta que pare.
3. Buscar una estrella o un planeta claro y centrarla en la mirilla de baja potencia en el telescópi-
co principal. Si el StarPointer ha sido alineado correctamente, usted podrá ver que la LEO del
pequeño punto rojo coincide con la estrella de alineación. Si el StarPointer no ha sido alineado,
usted tendrá que fijarse dónde el punto rojo se encuentra en relación con la estrella clara.
Sin mover el telescópico principal, girar el acimut del StarPointer y los dispositivos de control
para la alineación de la altitud hasta que el punto rojo se encuentre exactamente por encima
de la estrella de alineación.
Si la LEO del punto está más clara que la estrella de alineación, quizá resultará difícil ver la
estrella. Girar el dispositivo de control para la claridad variable en sentido contrario a las agu-
jas del reloj hasta que el punto rojo tenga la misma claridad que la estrella de alineación. De
esta manera se facilitará una alineación precisa. Ahora el StarPointer está listo para ser utiliza-
do. No olvidar de desconectar la potencia después de haber detectado un objeto. De esta
manera se aumentará la vida tanto de la batería como de la LEO.
BUSCANDOOBJETOS
1. Soltar los bloqueos de altitud en los lados del tubo telescópico y en bloque de acimut de plata
en la base el acimut, y luego mover el telescópico en la dirección deseada.
2. Mirar por el telescópico buscador del StarPointer y panoramizar el telescópico hasta que el
objeto aparezca en el campo de vista. Una vez que el objeto está en e! campo de vista, fijar
los bloqueos de la altitud y del acimut.
3. Para centrar el objeto con el punto rojo en el StarPointer se debe utilizar el anillo de ajuste en
la barra de altitud de movimiento retardado.
CÓMOENFOCAR
1. Una vez que haya encontrado el objeto en el telescópico girar el botón de enfoque hasta con-
seguir una imagen clara.
2. Para enfocar un objeto que está más cerca que su blanco actual, girar el botóA de enfoque
hacia la mirilla (para que el tubo de enfoque se aleje de la parte frontal del telescópico). Para
objetos situados a más distancia. girar el botón de enfoque en sentido contrario.
3. Para conseguir un enfoque realmente claro, nunca mirar por las ventanas de cristal o a través
de objetos que producen ondas calientes, como partes de aparcamientos de asfalto.
ORIENTACIÓNDELAIMAGEN
1. Al observar con una diagonal. la imagen estará recta, pero inversa desde la izquierda a la
derecha.
13

;:::,-·· --·-·- ····-···--· -...-·-·· - ·-·-·..--_______..--- ......----------~
MAGNIFICACIÓN
La magnificación (o potencia) de un telescópico difiere en función de la longitud de enfoque de la
mirilla que se utiliza y de la longitud de enfoque del telescópico .
Para calcular la magnificación se debe utilizar la fórmula siguiente, en la cual FL =longitud de
enfoque:
FL (telescópico) en mm
Magnificación = FL (mirilla) en mm
OBSERVACIONSOLAR
CUIDADO! Mirar al sol puede causar daños permanentes en su vista. No mirar al sol con
este telescópico o incluso con el ojo desnudo. Nunca dejar un telescópico sin supervisión
durante el día; un niño podría mirar al sol y sufrir daños permanentes a la visión.
COMOPREPARARELTELESCOPICOPARAPROYECTARELSOL
ENUNAPANTALLA(S}
CUIDADO! Cubrir el lente del objetivo para que nadie pueda ver atravez.
1. Insertar la barra de la pantalla de proyección deslizándola por el orificio en la abrazadera del
telescópico buscador con la extremidad de la arandela de la barra dirigida hacia el objetivo. (La
arandela actúa como una parada, impidiendo que la pantalla del solar deslice completamente
por la abrazadera del telescópico buscador) .
2. Si la diagonal está en posición se debe quitar. No se utilizará para la observación solar.
3. Elegir la mirilla con la potencia más baja (la mirilla con la designación numérica en milímetros
más alta) e insertarla, sin la diagonal, en el tubo de enfoque.
4. Seleccionar la placa negra de la proyección solar. Deslizarla en la barra, posicionarla cerca de
la mirilla de tal manera que el agujero quede centrado con las lentillas de la mirilla, y fijarla en
su posición. Esta placa protege la pantalla de proyección blanca que se instalará en un paso
posterior. Ahora el telescópico está listo para observar el sol.
PARAOBSERVARELSOL
1. Apuntar el telescópico en la dirección general del sol sin mirar por el telescópico o por el
telescópico buscador. Mirar a la sombra del telescópico en el suelo será una gran ayuda con
motivo de la puntería.
2. Sostener la placa blanca algunas pulgadas detrás de la mirilla del telescópico buscador y
mover el telescópico suavement~ hasta que pueda ver el sol proyectado en la placa blanca.
Verá una "imagen" redonda del cielo con el sol en algún lado en la "imagen". Mover el
telescópico , utilizando los cables de control flexibles hasta que el sol quede centrado en esta
imagen proyectada del cielo.
3. A continuación poner 13placa blanca en posición en la barra la de proyección del sol.
Posicionarla directamente en línea cQnla mirilla del telescópico y bloquearla en su posición.
4. Utilizar los cables de control flexibles para llevar a cabo todas las pequeñas correcciones nece-
sarias para centrar la imagen del sol en la pantalla blanca.
5. Enfocar la imagen del sol en la pantalla blanca utilizando el botón de enfoque.
6. La imagen proyectada mostrará manchas del sol, la estructura de "granos de arroz" del disco
solar. y notará que el sol está más claro en el centro del disco que en la esquina.
ELFILTROLUNAR
Un filtro lunar ha sido incluido en el suministro de su telescópico para quitar el contraste de brillo
y de aumento al mirar a la luna. Para fijar el filtro lunar en la mirilla del telescópico se debe
atornillar el filtro en la extremidad fileteada de la mirilla.
14

CUIDADO! El filtro lunar solamente se puede utilizar para mirar a la luna. No ha sido con-
struido para mirar al sol. Mirar al sol a través de este telescópico (con o sin el filtro), o
incluso con el ojo desnudo, puede causar daños permanentes a la vista.
ESPECIFICACIONES TÉCNICAS
40-060578 40-060660 46-060525
Diámetro del Objetivo: 60mm (2.36") 60mm (2.36") 60mm (~.36")
Longitud de Enfoque: 700mm 800mm 700mm
Lentillas: H25mm (potencia baja) H25mm (potencia baja) K25mm (potenciabaja)
H12.5mm H12.5mm K10mm
(potencia media) (potencia media) (potencia media)
SR4mm (potenciaalta) SR4mm (potencia alta) SR4mm (potencia alta)
Barlow: 2X y 3.3X 2X y 3.3X 3X
Mirilla de Erección: 1.5X 1.5X 1.5X
Magnificación Máxima: 578X 660X 525X
Accesorios: espejo diagonal, espejo diagonal, Espejodiagonal,
Filtro lunar Filtro lunar Filtro lunar
DIAGRAMA DE LAS LENTILLAS & LÍMITES DE POTENCIA TEORÉTICAS
40-060578 40-060660 46-060525
SR4mm potencia de la lentilla: 175X 200X 175X
H12.5mm potencia de la lentilla: 56X 64X N/A
H25mm potencia de la lentilla: 28X 32X N/A
K10mm potencia de la lentilla: N/A N/A 70X
K25mm potencia de la lentilla: N/A N/A 28X
15
•...,• ••..,_._. ••• • -• .,.-- •~•--•*"•-™'*'•..•w-www_..o,..m"www""""w...--,-.....,,_-----......,-...,.._,..
1. Rimuovete dal contenitore il treppiedi (O). Per collegare le gambe del treppiedi alla testa del
treppiedi allineate i fori delle gambe del treppiedi con quelli della montatura del cavalletto.
Assicurate ciascuna gamba mediante l'inserzione di un bullone largo (3") con rondella nel foro
e stringete con un dado a alette e rondella. Stringete i bulloni (Fig.1a).
NOTA: Nel collegare le gambe del treppiedi alla testa di questo, assicuratevi che la cerniera
della flangia per ciascuna delle gambe sia rivolta all'interno. La scatola porta accessori del
treppiedi (P) sarà collegata a queste flange.
2. Posizionate il treppiedi e allargatene le_gambe.Allentate i fermi su ciascuna delle tre gambe.
Prendete adesso la montatura del cavalletto e sollevatela. Estendete le gambe del treppiedi
all'altezza desiderata (a pari altezza). In aggiunta, stringete i fermi di regolazione di ciascuna
gamba per ténerle ferme in posizione (Fig. 2).
3. Adoperando le piccole viti di macchina e i dadi ad alette in dotazione, collegate la scatola porta
accessori a ciascuna delle flange sulle gambe del treppiedi (Fig. 3).
NOTA: Le flange quando collegate si .incastrano sotto la scatola porta accessori.
4. Rimuovete dal contenitore il corpo principale del telescopio (H). Infilate il controllo di microrego-
lazione altitudine (A) attraverso la manopola fermo controllo altitudine (Fig. 1c). Fissate il corpo
principale del telescopio (H) allineando il foro nella sella del telescopio con i fori nel cavalletto.
Awitate le manopole di fermo cavalletto attraverso entrambi i fori e stringete le manopole
(Fig. 1b).
5. Modelli 40-060578 e 40-060660: Rimuovete dal contenitore il·cercatore con il relativo supporto
(F). Rimuovete le viti ad alette dal corpo principale del telescopio. Collocate il supporto del cer-
catore sul corpo principale del telescopio in modo che i fori alla base del supporto restino
allineati ai fori risultanti sul corpo principale del telescopio. Riposizionate nuovamente le due viti
ad alette zigrinate e avvitate bene (Fig. 4b).
6. Modello 46-060525: Rimuovete dal contenitore il cercatore StarPointer con il suo relativo
supporto (F). Rimuovete le viti ad alette zigrinate dal corpo principale del telescopio. Collocate
il supporto del cercatore sul corpo principale del telescopio in modo che i fori alla base del
supporto restino allineati ai fori risultanti sul corpo principale del telescopio. Riposizionate
nuovamente le due viti ad alette zigrinate e avvitate bene (Fig. 4a).
7. Inserite la diagonale (D) nel tubo di messa a fuoco (Fig. Sa).Assicuratela stringendo la piccola
vite di bloccaggio.
NOTA: La diagonale va usata s~lo in combinazione ron gli oculari. Non usate mai
diagonale e Barlow insieme.
8. Inserite l'oculare (E) nella diagonale (Fig. Sb).Assicuratelo stringendo la piccola vite di
bloccaggio.
9. Inserite il Barlow (Fig. 6b) nel tubo di messa a fuoco. Assicuratelo stringendo la piccola vite di
bloccaggio. Inserite l'oculare nel terminale aperto del Barlow e assicuratelo (Fig. 6a).
NOTA: In tutti i telescopi astronomici, l'immagine appare sottosopra. Con l'uso della diago-
nale, l'immagine compare diritta ma con un'inversione sinistra/destra (come in uno spec-
chio). Per adoperare il telescopio per osservazioni terrestri e per correggere l'immagine
riflessa, rimuovete la diagonale e sostituitela con un oculare raddrizzatore.
Raccomandiamo l'uso dell'oculare a bassa magnificazione quando il telescopio viene usato
per osservazioni terrestri.
Soltanto i telescopi rifrattori sono corredabili di oculari raddrizzatori. I telescopi riflettori vengono
principalmente usati per fini astronomici.
Il telescopio è adesso assemblato completamente ed è pronto per l'uso.
ATTENZIONE! Guardare il sole può causare _dannigravi e permanenti alla vista.
Non guardate al sole con questo apparecchio e neppure ad occhio nudo.
16
I
{'
..
t
r
L
USODELCERCATORE(MODELLI40-060578E40-060660)
Il cercatore è un piccolo telescopio di bassa potenza ma con un ampio campo di visuale, montato
lungo il telescopio principale e adoperato per cercare il bersaglio e puntare verso questo il tele-
scopio principale. Ma prima di poter usare il cercatore è necessario allinearlo al telescopio. Come
procedere diventerà più facile con la pratica.
1. Installate l'oculare a più bassa potenza (20mm) nel tubo dell'oculare . Scegliete un oggetto facil-
mente riconoscibile e fermo, non più vicino della distanza di mille yarde. Quanto più l'oggetto si
presenterà alto sull'orizzonte, tanto più facile risulterà il posizionamento del telescopio. Puntate
il vostro telescopio verso l'oggetto fino a quando la immagine di questo si trovi al centro dell'oc-
ulare. Bloccate tutte le manopole sulla montatura equatoriale in modo tale che il telescopio non
possa muoversi.
2. Guardate ora nel cercatore. Se l'oggetto con il quale vi siete allineato nel telescopio non è visi-
bile, allentate la vite di regolazione e muovete il cercatore finché non lo inquadrate. Una volta
raggiunto, stringete le viti di regolazione tenendo sempre l'oggetto al centro dello scopio.
Noterete che l'immagine tenderà a spostarsi verso la vite che state serrando (Fig. 7).
3. Regolate le viti per centrare l'oggetto sul mirino a croce del cercatore . Ricontrollate il telescopio
per essere certo che si trovi ancora fermo sul bersaglio. Se si è mosso, riallineatelo e regolate
il cercatore. Se non si è mosso, è tutto a posto. Il cercatore è ora operativo.
USODELLOSTARPOINTER(PUNTATORESTELLARE)(MODELLO46-060525)
1. Lo StarPointer rappresenta il modo più facile e rapido di puntare col telescopio esattamente al
punto scelto del cielo (Fig. 1e}. E' come disporre di un puntatore laser che potete irradiare
direttamente nel cielo notturno. Lo StarPointer è un apparecchio a magnificazione zero che fa
uso di una finestra a vetro trattato per sovraimporre l'immagine di un piccolo punto rosso nel
cielo notturno. Come tutti i cercatori, lo StarPointer deve essere correttamente allineato con il
telescopio principale prima di poter essere usato.
2. Per awiare lo StarPointer, ruotate il controllo variabile della luminosità nel senso orario finché
non udite un "click' . Per aumentare il livello di luminosità del punto rosso, proseguite nella
rotazione della manopola di controllo di circa 1·80° fino a che si fermi.
3. Identificate una stella brillante o un pianeta e centratela nell'oculare a bassa potenza del
telescopio principale. Se lo StarPointer è allineato correttamente , vedrete il punto del LED
rosso sovrapporsi alla stella.di guida. Se lo StarPointer non si trova in linea come dovuto,
prendete nota di dove il punto rosso si trova rispetto alla stella di guida.
Senza muovere il telescopio principale, girate i controlli di allineamento dell'azimuth e dell'altitu-
dine fino a quando il punto rosso si trovi totalmente sulla stella di guida.
Se il punto del LED è più luminoso della stella di guida, può rendere difficoltosa l'osservazione
della stella stessa. Ruotate allora il controllo variabile della luminosità in senso antiorario, fino a
quando il punto rosso abbia la stessa luminosità della stella di guida. Ciò renderà più agevole
ottenere un allineamento accurato. Lo StarPointer adesso è pronto per l'uso. Non dimenticate
di spegnere l'apparecchio dopo di aver localizzato un oggetto. Potrete cosi prolungare la vita
della batteria e del LED.
RICERCADEGLIOGGETTI
1. Allentate i fermi di altitudine sui lati del tubo del telescopio ed il fermo dell'azimuth alla base
della montatura altazimutale, quindi muovete il telescopio nella direzione desiderata.
2. Guardate nel cercatore StarPointer e ruotate il telescopio finché l'oggetto compaia nel campo di
visuale. Una volta inquadrato, stringete i fermi dell'azimuth e dell'altitudine.
3. Per centrare l'oggetto con il punto rosso nello StarPointer, usate l'anello di regolazione fine sul-
l'insieme dell'asta dell'altitudine a lento movimento.
MESSAAFUOCO
1. Una volta inquadrato l'oggetto sul telescopio, ruotate la manopola della messa a fuoco fino ad
ottenere un'immagine nitida.
2. Per mettere a fuoco un oggetto che si trovi più vicino del vostro bersaglio normale, ruotate la
manopola della messa a fuoco in direzione dell'oculare (in modo tale che il tubo della messa a
fuoco si sposti dalla parte anteriore del telescopio) . Per oggetti più distanti invece, ruotate la
manopola della messa a fuoco nella direzione opposta.
3. Per ottenere una messa a fuoco veramente netta, non guardate mai attraverso finestre di vetro
o ad oggetti che producano onde di calore, come ad esempio parcheggi asfaltati.
17
ORIENTAMENTOIMMAGINI
1. Nelle osservazioni con diagonale, l'immagine apparirà diritta ma invertita da sinistra a destra.
2. Osservando diritto avanti, con l'oculare inserito direttamente nel telescopio. l'immagine apparrà
invertita. E così apparirà invertita anche nel cercatore.
MAGNIFICAZIONE
La magnificazione (o potenza) del telescopio varia in dipendenza della lunghezza focale dell'ocu-
lare usato e della lunghezza focale del telescopio .
Per calcolare la magnificazione. adoperate la formula seguente, in cui FL =lunghezza locale:
Magnificazione = FL (telescopio) in mm
FL (oculare) in mm
OSSERVAZIONESOLARE
ATTENZIONE! Guardare il sole può causare danni gravi e permanenti alla vista. Non guar-
dat~ ... »ole con questo apparecchio e neppure ad occhio nudo. Non lasciate mai il tele-
scopio non sorvegliato, durante il giorno; un bambino potrebbe guardare il sole con l'ap-
parecchio, ricevendo così un danno permanente alla vista.
PREPARAZIONEDELTELESCOPIOPERLAPROIEZIONEDELSOLE
SUUNOSCHERMO(S)
ATTENZIONE: Cop.rire le lenti dell'obiettivo di modo che nessuno possa guardarci dentro.
1. Inserire l'asta dello schermo di proiezione lasciandola scivolare attraverso l'apertura del suppor-
to del cercatore con il terminale della rondella dell'asta verso l'obiettivo. (La rondella agisce da
stop, impedendo all'insieme dello schermo solare di scivolare completamente attraverso il
supporto del cercatore .)
2. Se la diagonale è installata , è necessario rimuoverla . Non potrà essere usata per l'osser-
vazione del sole. 9)
3. Scegliete l'oculare a più bassa potenza (quello con la più alta designazione numerica in mil-
limetri) ed inseritelo , senza la diagonale, nel tubo di messa a fuoco .
4. Scegliete la lastra nera dall'assemblaggio della proiezione solare . Fatela scivolare sull'asta ,
posizionatela vicino all'oculare in modo tale che il foro sia centrato con le lenti dell'oculare e
bloccatela nella posizione. La lastra fa ombra allo schermo bianco di proiezione che sarà
messo in posizione in una fase successiva . Il telescopio è ora pronto per le osservazioni solari.
OSSERVAZIONEDELSOLE
1. Puntate il telescopio nella direzione generale del sole senza guardare con esso o con il cerca-
tore. Sarete aiutati nel puntamento osservando l'ombra del telescopio sul suolo .
2. Tenete la lastra bianca pochi pollici dietro all'oculare del cercatore e muovete delicatamente il
telescopio fino a quando non vedrete il sole proiettarsi sulla lastra bianca. Vedrete una "immag-
ine" del cielo con il sole da qualche parte nella "immagine" stessa . Muovete il telescopio , usan-
do i cavi di controllo flessibili sino a che il sole non venga centrato in questa immagine proietta-
ta del cielo.
3. Successivamente . fate scivolare la lastra bianca in posizione sull'asta dell'assemblaggio di
proiezione solare. Posizionatela direttamente in linea con l'oculare del telescopio e fermatela
nella posizione. ·
4. Usate i cavi di controllo flessibili per apportare le piccole correzioni che si presentino neces-
sarie per centrare l'immagine del sole sullo schermo bianco.
5. Mettete a fuoco l'immagine del sole sullo schermo bianco usando la manopola di messa a
fuoco.
6. L'immagine proiettata mostrerà macchie solari , la struttura a "grano di riso" del disco solare e
che il sole è più luminoso al centro del disco che ai margini.
FILTROLUNARE
Un filtro lunare vi è stato fornito in dotazione per eliminare l'abbagliamento e aumentare il con-
trasto nell'osservazione della luna. Per fissarlo all'oculare del telescopio . avvitate il f1!tro sul termi-
nale filettato dell'oculare.
18
ATIENZIONE! Il filtro lunare deve essere usato soltanto per osservare la luna. Non è
concepito per osservare Il sole. L'osservazione del sole attraverso il telescopio (con o
senza filtro), o anche ad occhio nudo, può causare un danno permanente all'occhio.
SPECIFICHETECNICHE
40-060578 4()-060660 46-060525
Diametro Obiettivo : 60mm (2.36") 60mm (2.36') 60mm (2.36")
Lunghezza Focale: 700mm 800mm 700mm
Lenti Occhi: H25mm H25mm K25mm
(Bassa potenza) (Bassa potenza) (Bassa potenza)
H12.5mm H12.5mm K10mm
(Media potenza) (Media potenza) (Media potenza)
SR4mm (Alta potenza) SR4mm (Alta potenza) SR4mm (Alta potenza)
Barlow: 2X and 3.3X 2X and 3.3X 3X
Oculare Raddrizzatore: 1.5X 1.5X 1.5X
Magnificazione Massima: 578X 660X 525X
Accessori: Specchio diagonale, Specchio diagonale, Specchio diagonale,
Filtro lunare Filtro lunare Filtro lunare
TABELLA LENTI OCCHIO E LIMITI TEORICI DI POTENZA
40-060578 40-060660 46-060525
SR4mm Potenza lenti occhi: 175X 200X 175X
H12.5mm Potenza lenti occhi : 56X 64X N/A
H25mm Potenza lenti occhi: 28X 32X N/A
K10mm Potenza lenti occhi: N/A N/A 70X
K25mm Potenza lenti occhi: N/A N/A 28X
19
ANWEISUNGENZUMZUSAMMENBAUDESTELESKOPS
1. Nehmen Sie das Stativ (Q) aus der Schachtel. Zur Befestigung der Stativbeine am Stativkopf
fluchten Sie die Öffnungen der Stativbeine mit denen der Jochhalterung . Sichern Sie jedes Bein
durch Einsetzen eines großen (3" bzw. 7,62 cm) Bolzens mit Unterlegscheibe in die Öffnung
und befestigen Sie ihn mit einer Flügelmutter und Unterlegscheibe . Ziehen Sie die Bolzen an
(Abb.1a).
ANMERKUNG: Wenn Sie die Stativbeine am Statlvkopf befestigen, achten Sie darauf, dass
der Scharnierflansch an jedem Bein nach innen zeigt. Das Stativ-Zusatztablett (P) hält sich
an diesen Flanschen fest.
2. Stellen Sie das Stativ auf und spreizen Sie die Stativbeine. Lösen Sie die drei Einstellsperren
der Beine. Ergreifen Sie die Jochhalterung und heben Sie sie hoch. Fahren Sie die Stativbeine
bis zur gewünschten Höhe aus (bei gleichen Längen) und ziehen Sie die Einstellsperren jedes
Beines an, um sie in Positiori zu halten (Abb. 2).
3. Verwenden Sie die mitgelieferten kleinen Maschinenschrauben und Flügelmuttern , um mit
ihnen das Zusatztablett an jedem der Flansche an den Stativbeinen zu befestigen (Abb. 3).
ANMERKUNG: Die Flansche passen unter das Zusatztablett, wenn es befestigt ist.
4. Nehmen Sie das Hauptteil des Teleskops, also den Teleskopkörper (H), aus der Schachtel.
Fädeln Sie den fein einstellbaren Höhenregler (A) durch den Höhenregler-Sperrknopf ein (Abb.
1c). Befestigen Sie das Teleskop (H) durch Fluchten der Öffnung im Teleskopsattel mit den Öff-
nungen im Joch. Schrauben Sie die Jochsperrknöpfe durch beide Öffnungen und ziehen Sie
die Knöpfe fest (Abb. 1b).
5. Modelle 40-060578 and 40-060660: Nehmen Si& den Sucher mit Sucherklammer (F) aus der
Schachtel. Entfernen Sie die beiden gerändelten Flügelschrauben vom Teleskop. Positionieren
Sie die Sucherklammer am Teleskop, so dass die Öffnungen in der Basis der Klammer mit den
frei liegenden Öffnungen im Teleskop fluchten . Setzen Sie die beiden gerändelten
Flügelschrauben wieder ein und ziehen Sie gut fest (Abb. 4b).
6. Modell 46-060525: Nehmen Sie den StarPointer-Sucher mit der anhängenden Sucherklammer
(F) aus der Schachtel. Entfernen Sie die beiden gerändelten Flügelschrauben vom Teleskop.
Positionieren Sie die Sucherklammer am Teleskopkörper, so dass die Öffnungen in der Basis
der Klammer mit den frei liegenden Öffnungen im Teleskop fluchten. Setzen Sie die beiden
gerändelten Flügelschrauben wieder ein und ziehen Sie sie gut fest (Abb. 4a).
7. Setzen Sie den Diagonalspiegel (D) in den Fokussiertubus ein (Abb..Sa). Sichern Sie ihn durch
Anziehen der kleinen Anschlagschraube.
ANMERKUNG: Der Diagonalspiegel ist nur In Verbindung mit den Okularen zu verwenden.
Verwenden Sie niemals gleichzeitig Diagonalspiegel und Barlowlinse!
8. Setzen Sie das Okular (E) in den Diagonalspiegel (Abb. Sb) ein. Sichern Sie durch Anziehen
der kleinen Anschlagschraube.
9. Setzen Sie die Barlowlinse (Abb. 6b) in den Fokussiertubus ein. Sichern Sie sie durch
Anziehen der kleinen Anschlagschraube . Setzen Sie das Okular in das offene Ende der
Barlowlinse ein und sichern Sie es (Abb. 6a).
ANMERKUNG: In allen astronomischen Teleskopen erscheint das Bild auf dem Kopf ste-
hend. Bei Verwendung des Diagonalspiegels erscheint das Bild aufrecht, aber seiten-
verkehrt (spiegelbildlich). Um das Teleskop für Erdbeobachtungen zu verwenden und das
Spiegelbild zu korrigieren, nehmen Sie den Diagonalspiegel heraus und ersetzen Sie ihn
durch das Aufrlchtokular. Wir empfehlen die Verwendung des Okulars mit schwacher
Vergrößerung, wenn das Teleskop für Erdbeobachtungen benutzt wird.
Nur Refraktorteleskope werden mit einem Aufrichtokular geliefert. Reflektorteleskope werden
hauptsächlich für astronomische Zwecke verwendet.
Das Teleskop ist nun vollständig montiert und gebrauchsfertig .
20
This manual suits for next models
2
Table of contents
Languages:
Other TAS Telescope manuals


Popular Telescope manuals by other brands

Discovery Telecom
Discovery Telecom 3-in-1 Micro Viewer instruction manual

Explore One
Explore One ARIES 88-10050 instruction manual

ORION TELESCOPES & BINOCULARS
ORION TELESCOPES & BINOCULARS Observer 70mm EQ 9802 instruction manual

William Optics
William Optics Ferrari ZenithStar Anniversary user guide

Celestron
Celestron Ultima 52248 instruction manual

SKY-WATCHER
SKY-WATCHER 607AZ instruction manual


