TAS 2TPN User manual

OWNER’S MANUAL
MANUEL DU PROPRIÉTAIRE
MANUAL DEL USUARIO
MANUALE DELL’UTENTE
BENUTZERHANDBUCH
HANDLEIDING
MANUAL DO UTILIZADOR
#2TPN/5TN/54TN
2TPN
54TN
5TN
K
G
H
I
J
K
P
N
L
B
D
F
5TN
I
H
G
F
E
P
N
A
B
C
D
M
L
J
2TPN
54TN

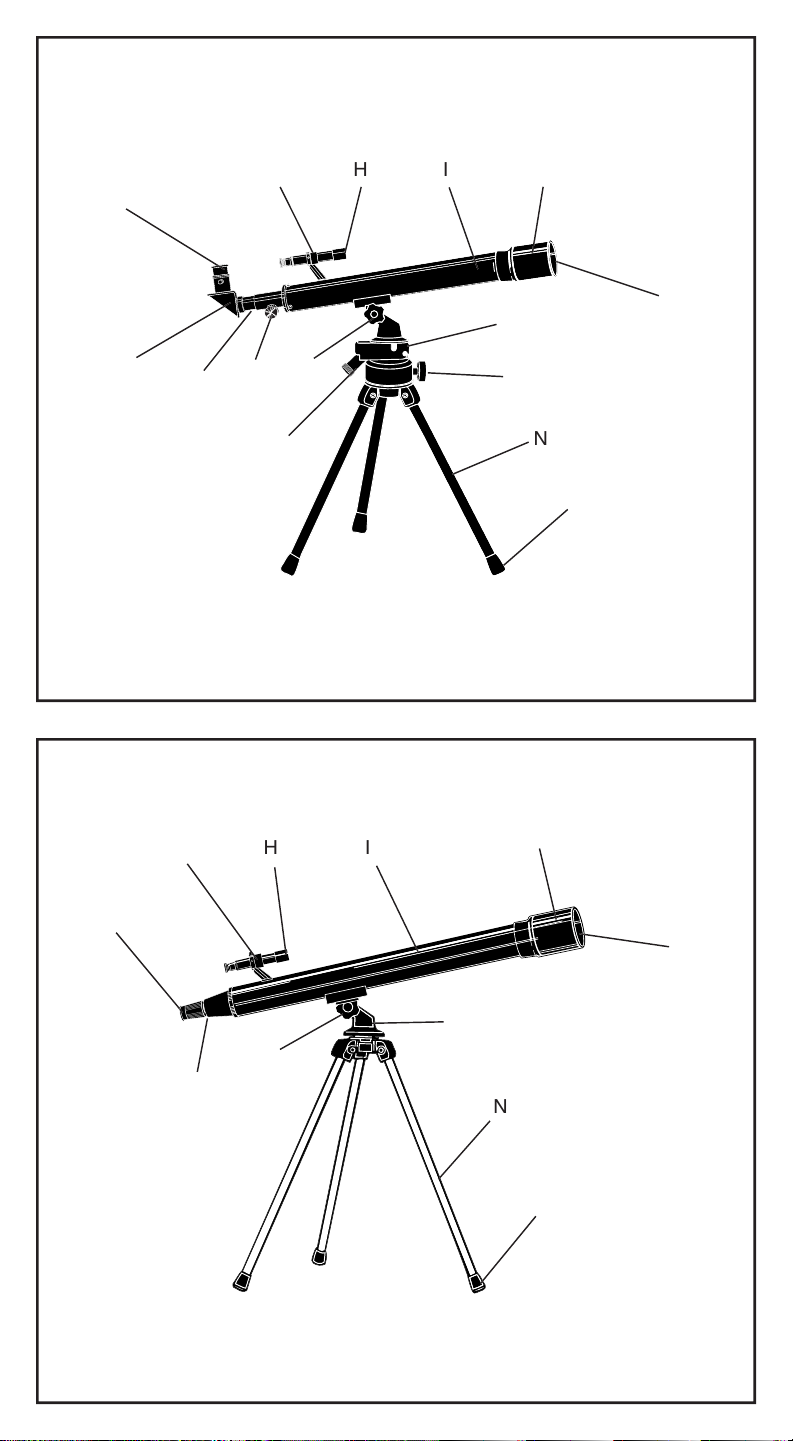
A. Micro Altitude
Adjustment Knob
B. Altitude Knob
C. Focus Knob
D. Focus Tube
E. Diagonal Mirror
F.
Eyepiece
G. Finderscope Bracket
H. Finderscope
I.
Telescope Tube
J.
Sunshade
K.
Objective Lens
L.
Scope Mount
M.
Azimuth Adjustment
Knob
N. Tripod Legs
O.
Leg Clamp
P.
Rubber-Tipped Feet
Q.
Accessory Tray
A.
Mikroknopf zur
Höheneinstellung
B.
Höhenknopf
C.
Fokussierknopf
D.
Fokussiertubus
E.
Diagonalspiegel
F.
Okular
G.
Sucherfernrohrklammer
H.
Sucherfernrohr
I.
Teleskoptubus
J.
Sonnenblende
K.
Objektivlinse
L.
Fernrohrhalterung
M.
Azimuteinstellknopf
N.
Stativbeine
O.
Beinklammer
P.
Mit Gummi überzogene
Füße
Q.
Zubehörtablett
A.
Micro botão rotativo
de ajuste da altitude
B.
Botão rotativo
da altitude
C.
Botão rotativo
de focagem
D.
Tubo de focagem
E.
Espelho diagonal
F.
Ocular
G.
Suporte do dispositivo
Finderscope
H.
Dispositivo Finderscope
I.
Tubo do telescópio
J.
Pára-sol
K.
Lente da objectiva
L.
Suporte da mira
M.
Botão rotativo de ajuste
do Azimute
N.
Pernas do tripé
O.
Abraçadeira da perna
P.
Pés com extremidades
em borracha
Q.
Tabuleiro de acessórios
A. Micro-bouton de réglage
de lʼaltitude
B. Bouton pour lʼaltitude
C. Bouton de focalisation
D. Tube de focalisation
E. Miroir diagonal
F.
Oculaire
G. Support viseur
H.
Viseur
I.
Tube du télescope
J.
Pare-soleil
K.
Lentille téléobjectif
L.
Monture du télescope
M.
Bouton de réglage pour
lʼazimut
N.
Pieds du trépied
O.
Serrage du pied
P.
Pied avec base
en caoutchouc
Q.
Plateau pour
accessoires
A.
Manopola di regolazione
micro altitudine
B.
Manopola Altitudine
C.
Manopola Fuoco
D.
Tubo di messa a fuoco
E.
Diagonale a specchio
F.
Oculare
G.
Sostegno cercatore
H.
Cercatore
I.
Tubo telescopio
J.
Schermo sole
K.
Lenti obiettivo
L.
Montatura scopio
M.
Manopola regolazione
azimutale
N.
Gambe treppiedi
O.
Reggi gambe treppiedi
P.
Piedini gommati
Q. Scatola porta accessori
A.
Botón de Ajuste
micro-altura
B.
Botón de altura
C.
Botón de enfoque
D.
Tubo de enfoque
E.
Espejo diagonal
F.
Mirilla
G.
Abrazadera del
telescopio buscador
H.
Telescopio buscador
I.
Tubo telescópico
J.
Protección contra el sol
K.
Lentilla de objetivo
L.
Base del telescopio
M.
Botón de ajuste acimut
N.
Patas trípode
O.
Abrazadera de la pata
P.
Pies recubiertos
de goma
Q.
Bandeja de accesorios
A.
Micro-hoogteregelaar
B.
Hoogteregelaar
C.
Scherpteregelaar
D.
Scherpstellingbuis
E.
Diagonaalspiegel
F.
Oogstuk
G.
Klem van de zoeklens
H.
Zoeklens
I.
Telescoopbuis
J.
Zonneklep
K.
Objectieve lens
L.
Vizierhouder
M.
Azimuth-regelaar
N.
Driepoot
O.
Pootklem
P.
Voetstukjes met
rubberen dopjes
Q.
Bakje voor accessoires
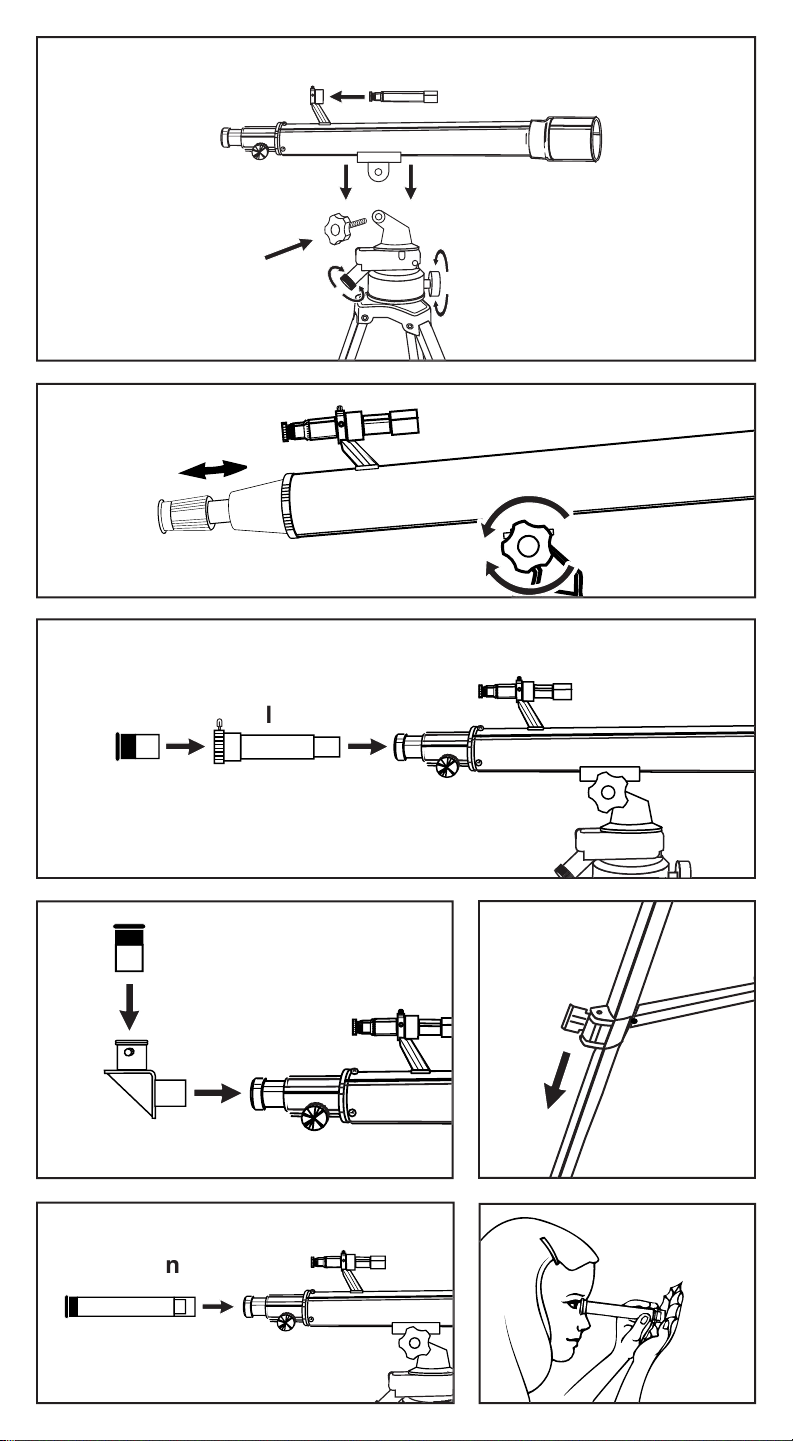
Fig. 1
Fig. 2
Fig. 3
Fig. 4
Fig. 6
Fig. 7
Fig. 5
b
a
d
e
c
k
m
n
l
F

EYE LENS CHART & THEORETICAL POWER LIMITS
2TPN
5TN
54TN
12.5mm Eye Lens Power:
30X
50X
40X
18mm Eye Lens Power:
NA
35X
NA
TECHNICAL SPECIFICATIONS
2TPN
5TN
54TN
Objective
Diameter:
40mm (1.57”)
50mm (1.96”)
40mm (1.57”)
Focal Length:
NA
600mm
NA
Eye Lenses:
Fixed
H12.5mm
Fixed
Erecting
Eyepiece:
NA
35X
NA
Maximum
Magnification:
30X
50X
40X
Accessories:
2X Finderscope
Diagonal Mirror,
2X Finderscope
2X Finderscope
INSTRUCTIONS FOR TELESCOPE MODELS 5TN / 54TN / 2TPN
1.
Remove tripod (N) from box.
2.
Stand tripod and spread legs.
3.
Remove telescope main body (I) from the box. Unscrew mounting bolt (B) from telescope base
(5TN) or remove from the box (54TN). Place telescope onto tripod mount (Fig. 1). Insert bolt
through tripod mount (Fig. 1c) and tighten securely.
4.
Remove the finderscope (Fig. 1a) from the box. Place the finderscope (H) in the finderscope bracket
(G) and secure with three finderscope bracket set screws.
5.
Model 5TN: Insert diagonal into the focus tube (Fig. 4m). Secure by tightening small retaining
screws.
6.
Model 5TN: Use the micro-altitude adjusting knob (Fig. 1d) and the azimuth adjusting knob (Fig. 1e)
in the tripod mount to move the telescope as desired.
NOTE: Diagonal is only to be used in combination with the eyepieces (oculars).
7.
Model 5TN: Insert eyepiece (Fig. 4k) into diagonal (Fig. 4m). Secure by tightening small retaining
screw.
NOTE (5TN): In all astronomical telescopes, the image appears upside down. With the use of
the diagonal the image appears erect but with a left to right inversion (mirror like). To use the
telescope for terrestrial viewing and to correct the mirrored image, remove the diagonal and
replace with the erecting eyepiece.
8.
To obtain focus on models 2TPN and 54TN push or pull the focusing tube (D) until the image is
sharp (Fig. 2).
The telescope is now fully assembled and ready for use.
CAUTION: Viewing the sun can cause permanent eye damage. Do not view the sun with this
product or even with the naked eye.
CAUTION: Viewing the sun can cause permanent eye damage. Do not view the sun with this
product or even with the naked eye.

INSTRUCTIONS POUR LES TELESCOPES MODELES 5TN / 54TN / 2TPN
1.
Sortez le trépied (O) de la boîte.
2.
Posez le trépied par terre et étendez les pieds.
3.
Sortez le corps du télescope (I) de la boîte. Desserrez le boulon de montage (B) de la base du
télescope (5TN) ou sortez-le de la boîte (54TN). Placez le corps du télescope sur la monture du
trépied (Fig. 1). Insérez le boulon (Fig. 1c) à travers la monture du trépied (Fig. 2c) et serrez bien.
4.
Sortez le viseur (Fig. 1a) de la boîte. Placez le viseur (H) dans le support pour viseur (G) et serrez
les trois vis pour le support du viseur (Fig. 2a).
5.
Modèle 5TN: Introduisez le miroir diagonal dans le tube de focalisation (Fig. 4m). Serrez bien les
petites vis.
6.
Modèle 5TN: Utilisez le bouton de réglage pour lʼaltitude (Fig. 1d) et le bouton de réglage pour
lʼazimut (Fig. 1e) dans la monture du trépied pour déplacer le télescope selon vos souhaits.
NOTE: Le miroir diagonal nʼest utilisé quʼen combinaison avec les oculaires.
7.
Modèle 5TN: Introduisez lʼoculaire (Fig. 4k) dans le miroir diagonal (Fig. 4m). Serrez à lʼaide des
petites vis.
NOTE (5TN): Tous les télescopes astronomiques rendent une image inversée. Le miroir
diagonal rétablit cette inversion verticale mais inverse le champ horizontal (comme un
miroir). Pour observer la terre et obtenir une image correcte, enlevez le miroir diagonal et
remplacez-le par lʼoculaire de redressement.
8.
Jusquʼà lʼobtention dʼune image nette (Fig. 2).
Le télescope est à présent complètement assemblé et prêt pour lʼusage.
ATTENTION: Lʼobservation du soleil peut causer des lésions permanentes à lʼœil. Nʼobservez
jamais le soleil, ni à lʼœil nu, ni à travers ce télescope.
ATTENTION: Lʼobservation du soleil peut causer des lésions permanentes à lʼœil. Nʼobservez
jamais le soleil, ni à lʼœil nu, ni à travers ce télescope.
TABLEAU LENTILLE OCULAIRE & LIMITES DE PUISSANCE THEORIQUES
2TPN
5TN
54TN
12.5mm Puissance lentille Oculaire:
30X
50X
40X
18mm Puissance Lentille Oculaire:
NA
35X
NA
SPECIFICATIONS TECHNIQUES
2TPN
5TN
54TN
Diamètre objectif:
40mm (1.57”)
50mm (1.96”)
40mm (1.57”)
Longueur de focalisation:
NA
600mm
NA
Lentilles:
Fixes
H12.5mm
Fixes
Oculaire de redressement:
NA
35X
NA
Grossissement maximal:
30X
50X
40X
Accessoires:
2X Viseur
2X Viseur
2X Viseur
Miroir diagonal,

INSTRUCTIOCIONES PARA LOS MODELOS TELESCOPICOS 5TN / 54TN / 2TPN
1.
Quitar el trípode (N) de la caja.
2.
Posicionar el trípode y extender las patas.
3.
Quitar el cuerpo principal del telescopio (I) de la caja. Destornillar el perno de montaje (B) de la
base del telescopio (5TN) o quitar de la caja (54TN). Poner el telescopio en la base del trípode
(Dib. 1). Insertar el perno por la base del trípode (Dib. 1c) y fijar fuertemente.
4.
Quitar el telescopio buscador (Fig. 1a) de la caja. Poner el telescopio buscador (H) en su
correspondiente abrazadera (G) y fijar con tres tornillos previstos para este fin.
5.
Modelo 5TN: Insertar la diagonal en el tubo de enfoque (Dib. 4m). Fijar atornillando pequeños
tornillos de sujeción.
6.
Modelo 5TN: Utilizar el botón de ajuste micro-altura (Dib. 1d) y el botón de ajuste acimut (Dib. 1e)
en la base del trípode para mover el telescopio como usted desea.
OBSERVACION: La diagonal solamente se puede utilizar en combinación con la mirilla
(oculares).
7.
Modelo 5TN: Insertar la mirilla (Fig. 4k) en la diagonal (Dib. 4m). Fijar atornillando los pequeños tor-
nillos de sujeción.
OBSERVACION (5TN): En todos los telescopios astronómicos, la imagen aparece al revés.
Con al utilización de la diagonal la imagen aparece recta, pero con una inversión de izquierda
a derecha (como un espejo). Para utilizar el telescopio para vistas terrestres y para corregir la
imagen reflejada, hay que quitar la diagonal y sustituirla por la mirilla recta.
8.
Para obtener el enfoque en los modelos 2TPN y 54TN se debe empujar o tirar del tubo de enfoque
(D) hasta conseguir una imagen clara (Dib. 2).
Ahora el telescopio está completamente montado y listo para ser utilizado.
CUIDADO: Mirar al sol puede causar daños permanentes a la vista. No mirar al sol con este
producto o incluso con el ojo desnudo.
CUIDADO: Mirar al sol puede causar daños permanentes a la vista. No mirar al sol con este
producto o incluso con el ojo desnudo.
TABLA DE LAS LENTILLAS OCULARES & LIMITES DE POTENCIA TEORETICAS
2TPN
5TN
54TN
12.5mm Potencia Lentilla Ocular:
30X
50X
40X
18mm Potencia Lentilla Ocular:
NA
35X
NA
ESPECIFICACIONES TECNICOS
2TPN
5TN
54TN
Diámetro objetivo:
40mm (1.57”)
50mm (1.96”)
40mm (1.57”)
Longitud de enfoque:
NA
600mm
NA
Lentillas oculares:
Fijas
H12.5mm Fijas
Mirilla recta:
NA
35X
NA
Magnificación máxima:
30X
50X
40X
Accesorios:
2X Telescopio buscador
2X Telescopio buscador
2X Telescopio buscador
Espejo Diagonal,

ISTRUZIONI PER TELESCOPI MODELLI 5TN / 54TN / 2TPN
1.
Estraete il treppiedi (N) dal contenitore.
2.
Posizionate il treppiedi e allargate le gambe dello stesso.
3.
Estraete il corpo principale del telescopio (I) dal contenitore. Svitate il bullone di montaggio (B)
dalla base del telescopio (5TN) o rimuovetelo dal contenitore (54TN). Posizionate il telescopio nella
montatura del treppiedi. (Fig. 1). Inserite il bullone attraverso la montatura del treppiedi (Fig. 1c) e
stringete fortemente.
4.
Estraete dal contenitore il cercatore (Fig. 1a) Posizionate il cercatore (H) nellʼapposito sostegno (G)
e assicuratelo con tre viti del suo set.
5.
Modello 5TN: Inserite la diagonale nel tubo di messa a fuoco (Fig. 4m). Assicuratela stringendo la
piccola vite di sostegno.
6.
Modello 5TN: Usate la manopola di regolazione della micro altitudine (Fig. 1d) e la manopola di
regolazione azimutale(Fig. 1e) nella montatura del treppiedi per muovere il telescopio come
desiderato.
NOTA: La diagonale può essere usata solo in combinazione con gli oculari.
7.
Modello 5TN: Inserite lʼoculare (Fig. 4k) nella diagonale (Fig. 4m). Assicuratela stringendo la piccola
vite di sostegno.
NOTA (5TN): In tutti i telescopi astronomici, lʼimmagine appare sotto sopra. Con lʼuso della
diagonale lʼimmagine apparirà diritta ma con unʼinversione sinistra/destra (come in uno
specchio). Per adoperare il telescopio per observazioni terrestri e per correggere lʼimmagine
riflessa, rimuovere la diagonale e sostituirla con lʼoculare raddrizzatore.
8.
Per mettere a fuoco sui modelli 2TPN e 54TN spingete o tirate il tubo di messa a fuoco (D) fin
quando lʼimmagine appaia nitida (Fig. 2).
Il telescopio è adesso completamente assemblato e pronto per lʼuso.
ATTENZIONE! Guardare il sole può causare danni gravi e permanenti alla vista. Non guardate
al sole con questo apparecchio e neppure ad occhio nudo.
TABELLA LENTE OCCHIO & LIMITI TEORICI POTENZA
2TPN
5TN
54TN
12.5mm Potenza lente occhio:
30X
50X
40X
18mm Potenza lente occhio:
NA
35X
NA
SPECIFICHE TECNICHE
2TPN
5TN
54TN
Diametro obiettivor:
40mm (1.57”)
50mm (1.96”)
40mm (1.57”)
Lunghezza focale:
NA
600mm
NA
Lenti occhio:
Fixed
H12.5mm
Fixed
Oculare raddrizzatore:
NA
35X
NA
Magnificazione massima:
30X
50X
40X
Accessori:
2X cercatore
2X cercatore
2X cercatore
Diagonale a specchio,
al sole con questo apparecchio e neppure ad occhio nudo.

ANWEISUNGEN FÜR DIE TELESKOPMODELLE 5TN / 54TN / 2TPN
1.
Nehmen Sie das Stativ (N) aus der Schachtel.
2.
Stellen Sie das Stativ auf und breiten Sie die Beine aus.
3.
Nehmen Sie den Körper des Teleskops (I) aus der Schachtel. Schrauben Sie den
Befestigungsbolzen (B) aus der Teleskopbasis (5TN) oder nehmen Sie ihn aus der Schachtel
(54TN). Stellen Sie das Teleskop auf die Stativhalterung (Abb. 1). Setzen Sie den Bolzen durch die
Stativhalterung (Abb. 1c) ein und ziehen Sie gut fest.
4.
Nehmen Sie das Sucherfernrohr (Abb. 1a) aus der Schachtel. Legen Sie das Sucherfernrohr
(H) in die Sucherfernrohrklammer (G) und sichern Sie es mit drei Anschlagschrauben für die
Sucherfernrohrklammer.
5.
Durch Anziehen der kleinen Anschlagschrauben.
6.
Modell 5TN: Verwenden Sie den Mikroknopf für die Höheneinstellung (Abb. 1d) und den Azimut-
Einstellknopf (Abb. 1e) in der Stativhalterung zum Bewegen des Teleskops nach Ihren Wünschen.
ANMERKUNG: Der Diagonalspiegel ist nur in Verbindung mit den Okularen zu verwenden.
7.
Modell 5TN: Setzen Sie das Okular (Abb. 4k) in den Diagonalspiegel ein (Abb. 4m). Sichern Sie es
durch Anziehen der kleinen Anschlagschraube.
ANMERKUNG (5TN): In allen astronomischen Teleskopen erscheint das Bild auf dem Kopf
stehend. Bei Verwendung des Diagonalspiegels erscheint das Bild aufrecht, aber seiten-
verkehrt (spiegelbildlich). Zur Verwendung des Teleskops für Erdbeobachtungen und zur
Korrektur des Sptegelbildes entfernen Sie bitte den Diagonalspiegel und ersetzen Sie ihn
durch die aufrichtende Okular.
8.
Zum Erhalten des Brennpunktes bei den Modellen 2TPN und 54TN ziehen oder schieben Sie am
Fokussiertubus (D), bis das Bild scharf ist (Abb. 2).
Das Teleskop ist nun vollständig zusammengesetzt und gebrauchsfertig.
VORSICHT: Die Betrachtung der Sonne kann bleibende Augenschäden verursachen.
Schauen Sie daher mit diesem Produkt oder sogar mit dem bloßen Auge nie in die Sonne!
OKULARTABELLE UND THEORETISCHE LEISTUNGSGRENZEN
2TPN
5TN
54TN
Vergrößerung des 12,5mm-Okulars:
30X
50X
40X
Vergrößerung des 18mm-Okulars:
NA
35X
NA
TECHNISCHE ANGABEN
2TPN
5TN
54TN
Objektiv-durchmesser:
40mm (1.57”)
50mm (1.96”)
40mm (1.57”)
Brennweite:
NA
600mm
NA
Okulare:
Fest
H12.5mm
Fest
Aufricht-Okular:
NA
35X
NA
Maximale Vergrößerung:
30X
50X
40X
Zubehör:
2X Sucherfernrohr
2X Sucherfernrohr,
2X Sucherfernrohr
Diagonalspiegel
VORSICHT: Die Betrachtung der Sonne kann bleibende Augenschäden verursachen.
Schauen Sie daher mit diesem Produkt oder sogar mit dem bloßen Auge nie in die Sonne!

INSTRUCTIES VOOR TELESCOOPMODELLEN 5TN / 54TN / 2TPN
1.
Neem de driepoot (N) uit de doos.
2.
Zet de driepoot recht en spreid de poten.
3.
Neem het hoofdonderdeel van de telescoop (I) uit de doos. Draai de montagebout (B) los uit het
voetstuk van de telescoop (5TN) of neem uit de doos (54TN). Plaats de telescoop op de driepoot
(Fig. 1). Breng de bout aan door de montageplaat van de driepoot (Fig. 1c) en maak stevig vast.
4.
Neem de zoeklens (Fig. 1a) uit de doos. Plaats de zoeklens (H) in de klem voor de zoeklens (G)
en maak vast met drie bevestigingsschroeven.
5.
Model 5TN: Breng de diagonaal in de scherpstellingbuis (Fig. 4m). Vastzetten door de borg-
schroefjes vast te draaien.
6.
Model 5TN: Gebruik de micro-hoogteregelaar (Fig. 1d) en de azimuth-regelaar (Fig. 1e) aan de dri-
epoot om de telescoop naar wens te bewegen.
N.B.: De diagonaal mag enkel gebruikt worden in combinatie met de oogstukken (occulairen).
7.
Model 5TN: Breng het oogstuk (Fig. 4k) in de diagonaal (Fig. 4m). Vastzetten door de borg-
schroefjes vast te draaien.
N.B. (5TN): Bij alle astronomische telescopen verschijnt het beeld ondersteboven. Door
gebruik te maken van de diagonaal verschijnt het beeld in de juiste richting, maar in spiegel-
beeld. Om de telescoop te gebruiken voor observsties op aarde en om het gespiegelde beeld
te corrigieren, verwijdert u de diagonal en vervangt die door het rechtzettingsoogstuk.
8.
Voor scherpstelling op modellen 2TPN en 54TN moet u aan de scherpstellingbuis duwen of trekken
(D) totdat het beeld scherp is (Fig. 2).
De telescoop is nu helemaal gemonteerd en klaar voor gebruik.
OPGEPAST: Naar de zon kijken kan onherstelbare schade aanrichten aan uw ogen. Gebruik
dit product niet om naar de zon te kijken en doe het ook niet met het blote oog.
OOGLENSTABEL & THEORETISCHE KRACHTLIMIETEN
2TPN
5TN
54TN
12,5mm Ooglens:
30X
50X
40X
18mm Ooglens:
NVT
35X
NVT
TECHNISCHE SPECIFICATIES
2TPN
5TN
54TN
Objectieve diameter:
40mm (1,57”)
50mm (1,96”)
40mm (1,57”)
Focuslengte:
NVT
600mm
NVT
Ooglenzen:
Vast
H12,5mm
Vast
Rechtzettings-oogstuk:
NVT
35X
NVT
Maximale vergroting:
30X
50X
40X
Accessoires:
2X Zoeklens
2X Zoeklens,
2X Zoeklens
Diagonaalspiege
OPGEPAST: Naar de zon kijken kan onherstelbare schade aanrichten aan uw ogen. Gebruik
dit product niet om naar de zon te kijken en doe het ook niet met het blote oog.

INSTRUÇÕES DE UTILIZAÇÃO DOS TELESCÓPIOS MODELOS 5TN / 54TN / 2TPN
1.
Retire o tripé (N) da caixa.
2.
Coloque o tripé na vertical e estique as pernas.
3.
Retire o corpo principal do telescópio (I) da caixa. Desaperte o perno de montagem (B) da base do
telescópio (5TN) ou retire a base da caixa (54TN). Coloque o telescópio no suporte do tripé (Fig. 1)
e introduza o perno através do suporte do tripé (Fig. 1c) apertando-o firmemente.
4.
Retire o dispositivo finderscope (Fig. 1a) da caixa. Coloque o dispositivo finderscope (H) no seu
suporte (G) e fixe-o com os três parafusos de fixação do suporte do dispositivo finderscope.
5.
Modelo 5TN: Introduza o espelho diagonal no tubo de focagem (Fig. 4m) e fixe-o apertando os
pequenos parafusos de retenção.
6.
Modelo 5TN: Utilize o micro botão rotativo de ajuste da altitude (Fig. 1d) e o botão rotativo de ajuste
do azimute (Fig. 1e) existentes no suporte do tripé para movimentar o telescópio como pretendido.
NOTA: O espelho diagonal apenas deverá ser utilizado em conjunto com as oculares.
7.
Modelo 5TN: Introduza a ocular (Fig. 4k) no espelho diagonal (Fig. 4m) e fixe-a apertando o peque-
no parafuso de retenção.
NOTA (5TN): Em todos os telescópios astronómicos a imagem aparece invertida. Com a uti-
lização do espelho diagonal a imagem aparece direita mas com uma inversão da esquerda
para a direita (como num espelho). Para utlizar o telescopio para observações terrestres e
para corrigir a imagen espelhada, é necessário retirar o espelho diagonal e substitui-lo pela
ocular erectora de imagen.
8.
Para focar os objectos com os modelos 2TPN e 54TN é necessário empurrar ou puxar o tubo de
focagem (D) até que a imagem esteja nítida (Fig. 2). O telescópio encontra-se agora totalmente
montado e pronto para ser utilizado.
CUIDADO: A observação do sol pode provocar lesões oculares permanentes. Não observe
o sol com este produto nem a olho nu.
TABELA DAS LENTES DA OCULAR E LIMITES TEÓRICOS DOS AUMENTOS
2TPN
5TN
54TN
Lente de ocular com aumento de 2,5 mm:
30X
50X
40X
Lente de ocular com aumento de 8 mm:
Indisponível
35X
Indisponível
ESPECIFICAÇÕES TÉCNICAS
2TPN
5TN
54TN
Diâmetro da Objectiva:
40 mm (1,57”)
50 mm (1,96”)
40 mm (1,57”)
Distância focal:
Indisponível
600 mm
Indisponível
Lentes da ocular:
Fixas
H12,5 mm
Fixas
Ocular erectora de imagem:
Indisponível
35X
Indisponível
Aumento máximo:
30X
50X
40X
Acessórios:
Dispositivo Finderscope
Dispositivo Finderscope
Dispositivo Finderscope
c/ aumento de 2X
c/ aumento de 2X
c/ aumento de 2X
Espelho diagonal
CUIDADO: A observação do sol pode provocar lesões oculares permanentes. Não observe
o sol com este produto nem a olho nu.

COPYRIGHT 2004 BPO. TML-708
This manual suits for next models
2
Table of contents
Languages:
Other TAS Telescope manuals

TAS
TAS Spotting Scope User manual

TAS
TAS 7 TE 304 User manual

TAS
TAS 30-050312 User manual

TAS
TAS WC712060 User manual

TAS
TAS Spacestation 49060700 User manual

TAS
TAS Space Station User manual

TAS
TAS 40-060578 User manual

TAS
TAS Infocus 514fmy User manual

TAS
TAS Novice 402x60mm User manual

TAS
TAS Red Dot BKRD42 User manual


Popular Telescope manuals by other brands


Apertura
Apertura DT Series Assembly instructions and user guide

Meade
Meade LXD 75 instruction manual

Celestron
Celestron NexStar 90 MAK instruction manual

DÖRR
DÖRR Danubia Atlas 2000 instruction manual

ORION TELESCOPES & BINOCULARS
ORION TELESCOPES & BINOCULARS Observer 60mm EQ instruction manual

NPZ
NPZ TAL-75R instruction manual


