TasmanEco Europa change table User manual

RECYCLED
1
Change Table
Europa
Assembly Instructions
TM
Packaging and instructions
printed on recycled materials
SJC Brands Pty Ltd abn. 58 106 988 578
9 Lincoln St, MINTO, NSW 2566 p.o. box 5878 MINTO DC, NSW 2566
Save these instructions for future reference.
Assembly of this furniture is best undertaken by two people.
TM

Phillips Screws x 4
Metal Locking Dowels x 4
Metal Locking Pins x 4
Connector Bolts x 8
Locakble Castors x 2
Freewheeling Castors x 2
Side Panels x 2 Upper Cross Braces x 2
Top Shelf x 1
Bottom Shelf x 1
Drawer Front Panel x 1
Drawer Left Side Panel x 1
Drawer Right Side Panel x 1
Drawer Rear Panel x 1
Drawer Base x 1
Lower Cross Braces x 2
Allen Key x 1
2
Parts List

3
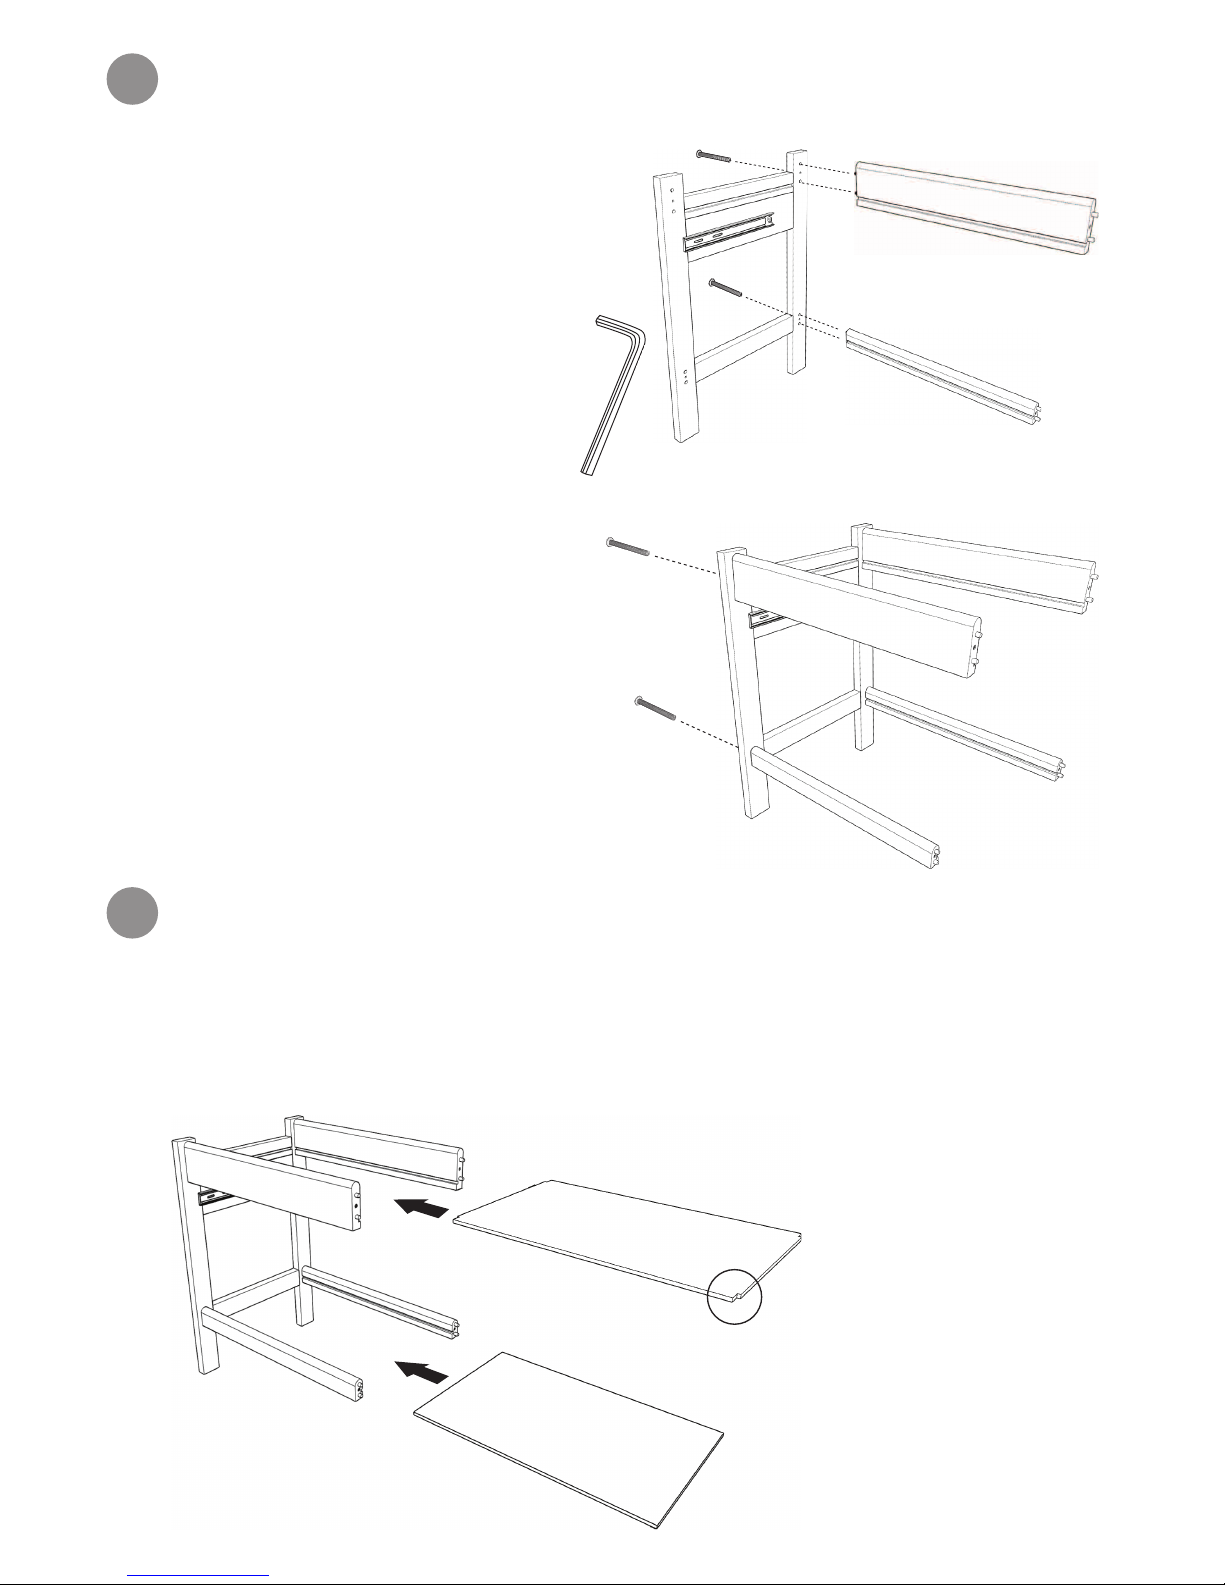
Fit The Cross Braces To The Left Hand Side Panel
Fit The Top and Bottom Shelves
A) Begin by assembling an upper and lower cross
brace to the rear of the left hand side frame.
Note the location of the drawer slide on the side
frame. Note the location of the grooves in the
cross braces.
Secure each cross brace with one connector
bolt. Do not fully tighten the bolts at this stage.
B) Complete the assembly by tting the remaining
upper and lower cross braces to the front of the
side frame.
Note the location of the grooves in the cross
braces.
Secure each cross brace with one connector
bolt. Do not fully tighten the bolts at this stage.
Top Shelf: Slide the top shelf into the grooves in the upper cross braces. Note the white face of the shelf
must face upwards. Note the cutouts at the corners of the top shelf.:
Note: the cutouts at the
corners of the top shelf.
Top Shelf / White Face Up
Bottom Shelf / White Face Up
Bottom Shelf: Slide the bottom shelf into the grooves in the lower cross braces.
Note the white face of the shelf must face upwards.
1
2

4
4Fit The Castors
Fit The Right Hand Side Panel
To t the castors, turn the frame over so the bottoms of the legs are facing upwards.
Push - t the castors into the locating holes.
When the castors have been
tted, return the frame to the
upright position.
There are two lockable and two freewheeling castors included in the pack and they may be placed in any
combination as required.
Fit the right hand side frame to the ends of the cross braces.
Secure the side frame using 4 connector bolts.
Now tighten all bolts on both sides. Tighten rmly but do not overtighten.
3

5
5
6
Drawer Unit - Connect The Rear and Side Panels
Drawer Unit - Fit the Base
Connect the left and right sides to the rear panel. Note the location of the grooves on the face of
each panel. Secure the side panels using two phillips screws on each side.
Slide the base into position ensuring it is positioned correctly in the grooves on the
faces of the panels.
Note the grooves in the
faces of the panels.
Note the orientation of the side panels - with the tab
on the metal slider at the front of the side panels.

6
8
7
9
Drawer Unit - Fit The Locking Pins to the Front Panel
Drawer Unit - Fit The Locking Dowels To The Side Panels
Drawer Unit - Connect The Front Panel
Fit the locking pins to the front panel.
Tighten the pins rmly using a phillips screwdriver.
Fit the locking dowels to the side panels. Note the positon of the + & - symbols on the dowels. The
dowels must be tted so that they are in the open position (as shown).
Connect the front panel to the drawer assembly.Tighten the two locking
dowels on each side until they stop rotating.

7
10
!
Fit The Drawer Assembly To The Change Table
Assembly is now complete.
Maintaining Your Change Tray
Align the sliders on the drawer and gently the push the drawer into place.
To remove the drawer, slide it out as far as possible and grip the ends of the black plastic latches on both sides of
the drawer. Gently pull the latches up while at the same time pulling the drawer forward to release.
To clean, wipe down with a soft cloth and soapy water.
Avoid scourers and steel wool as these will damage the nish.
Two months after assembling the change table, re-tighten all connector
bolts as some may loosen as the change table settles.

8europa_ins_0911
TM
Would you like us to assemble your Tasman Eco furniture for you?
It’s a great way to enjoy the benets of your furniture with a minimum of fuss. And you know the assembly will be done right - in
fact, we guarantee it. If there is any damage resulting from our assembly service - it’s automatically our responsibility. Service is
prompt, reliable, and friendly.
Booking
This service is available only in the Sydney metro area. For more information, including pricing, see our website www.tasmaneco.
com.au. Or just call 02-9603-5000 during business hours to arrange a time and a day, so one of our assembly professionals can
come to your home to assemble your newly purchased Tasman Eco furniture.
100% Satisfaction Guarantee
If, within 3 months of the date of purchase of this product, the purchaser is not completely satised with this product for any reason, subject
only to the conditions below, the purchaser can return the product to the place of purchase or to SJC Brands Pty Ltd for a refund of the full
purchase price of this product.
Conditions.
The 100% Satisfaction Guarantee is void and nullied in circumstances where:
1. There are modications to the product or to parts of the product that were not authorised in writing by SJC Brands Pty Ltd.
2. There is damage to the product and that damage is deemed by SJC Brands Pty Ltd to be caused by incorrect assembly, misuse or by use or
storage outside of the physical or environmental specications of the product.
5 Year Materials and Workmanship Guarantee
If within 5 years of the date of purchase of this product, there is found any defect in materials or workmanship of this product, SJC Brands
Pty Ltd, will replace the product free of charge, subject to the conditions below. The replacement product will be identical to the originally
purchased product wherever possible, though in situations where the identical model is discontinued or out of stock, then SJC Brands Pty Ltd
will replace the product with a model that is functionally equivalent.
This Guarantee is made to the purchaser and/or original owner only. For purposes of this Guarantee, the original owner is considered to be the
person who rst makes use of the product. Note: In situations where a person purchases this product for the purpose of gifting to another, the
recipient is considered to be the original owner.
Conditions.
The ‘5 Year Materials and Workmanship Guarantee’ will be void and nullied in circumstances where:
1. The item is improperly assembled or adjusted and or not assembled strictly in accordance with the written instructions provided by the seller
in the box containing the item.
2. There is damage to the product and that damage is deemed by SJC Brands Pty Ltd to be caused by incorrect assembly, misuse or by use or
storage outside of the physical or environmental specications of the product.
3. There are modications to the product or to parts of the product that were not authorised in writing by SJC Brands Pty Ltd.
4. The item is transferred, gifted or disposed of by the original owner to another.
Registration and Claims
To be eligible for the above Guarantees, the original owner must register their details online at
www.tasmaneco.com.au immediately upon receipt of the product.
For claims under either the 100% Satisfaction Guarantee or the 5 year Materials and Workmanship Guarantee, please email us via our claims
section on our website at www.tasmaneco.com.au or visit the store where the product was purchased.
The product must be returned to SJC Brands Pty Ltd or to the place of purchase with proof of purchase, including date and purchase price.
Furniture Assembly Service
SJC Brands Pty Ltd abn. 58 106 988 578
9 Lincoln St, MINTO, NSW 2566 p.o. box 5878 MINTO DC, NSW 2566
The Tasmaneco Guarantee
TM
Table of contents
Other TasmanEco Indoor Furnishing manuals
Popular Indoor Furnishing manuals by other brands

Boahaus
Boahaus 1612 Assembly instructions

Lightolier
Lightolier Calculite C6P30L specification

Mocka
Mocka Livi Bar Seat Assembly instructions

Whalen
Whalen Toledo Bookcase ECOM-TO30BK Assembly instructions

Pine Crafter Furniture
Pine Crafter Furniture 11 Assembly instructions

Rodler
Rodler AMALFI Assembly instructions

Ballard Designs
Ballard Designs Grace MN037 quick start guide

BIG FURNITURE WAREHOUSE
BIG FURNITURE WAREHOUSE DAUPHINE G-DPHSSFLGH quick start guide

Venjakob
Venjakob 3885 Assembly instructions

Powell
Powell 358-315AT2 Assembly instructions

Ameriwood HOME
Ameriwood HOME 5969500COM Assembly manual

Next
Next BRONX 183381 Assembly instructions