Tatung TDR-22 Series User manual

TATUNG TDR series Digital Recording System Page 0
TDR
-
22XX
series
Digital Recording System
Installation and OperationManual
V 1.03 03/10/2003
TATUNG COMPANY OF AMERICA. INC
2850 El Presidio St., Long Beach CA 90810 USA
Tel: 310-637-2105 Fax: 310-638-2180
www.tatungusa.com

TATUNG TDR series Digital Recording System Page 0

TATUNG TDR series Digital Recording System Page 0
CONTENTS
Chapter 1:
Installation
1
Step 1 Connect the cables 2
Step 2 Turn on the system 2
Chapter 2: Watch Mode 3
2.1Channel display window 5
2.2Selection of Split screen 6
2.3Motion Tracker 7
2.4Mode switch button 8
2.5On/Off button 8
Chapter 3: Setup Mode 9
3.1 Channel 11
3.2 Schedule 13
3.3 Speed 15
3.4 Color 17
3.5 Motion 18
3.6 P/T/Z Control 20
3.7 Password 21
3.8 Voice 24
3.9 Exit 25
Chapter 4: Search Mode 26
4.1 Channel Play back window 28
4.2Buttons on Play Back Console 29
4.3Date/Time 30
4.4Log 32
4.5Save Disk 33
4.6Print 34
4.7Storage Capacity 35
4.8Exit 35
Chapter 5: Backup Mode 36
5.1 Auto Backup 37
5.2 AVI Backup 39
5.3 Explorer 40
5.4 Cancel 40
Chapter 6: Control Mode 41
6.1 Camera Control 41
6.2 Exit 42
Appendix
A: Alarm Connector Configuration 43
B: AVI PLAYER Instruction 45
C: Backup Viewer Instruction 49
D: Technical Specification 55
E: Charts for recordint time 57

TATUNG TDR series Digital Recording System Page 0

TATUNG TDR series Digital Recording System Page 1
1.Camera Inputs
2.Loop Through Outputs
3.CCTV Monitor Output
4.COM Series Port 1
5.COM Series Port 2
6.XGA Output
7.SCSI Port
8.Audio In
9.Audio Out
10.Mouse (PS/2)
11.Keyboard (PS/2)
12.Parallel (Printer) Port
13.USB Ports (2)
14.Network Port (RJ-45)
15.Phone Port (RJ-11)
16.Alarm Inputs
17.Alarm Outputs
18.AC Power Input
19.115/230 VAC Power Switch (option)
20.Power Supply Switch (option)
CHAPTER 1: INSTALLATION
Place the Digital Recording System on a flat surface or
mount it on the 19” rack.
* For TDR
-
2209 there are only 9 camera Inputs and 9 Loop through outputs on
the back board. For TDR-2204 there are only 4 camera Inputs and 4 Loop
through outputs on the back board.

TATUNG TDR series Digital Recording System Page 2
Step 1: Connect the Cables
Connect all the necessary signal cables, inputs, and devices into the correct
ports.
Step 2: Turn on the System
Turn on the power by pushing the power button on the front panel.
Reset
Power
Removable Storage
CDRW
* For TDR-2209 there are only 9 camera Inputs and 9
Loop through outputs on the back board. For TDR-2204
there are only 4 camera Inputs and 4 Loop through
outputs on the back board.
* For TDR-2204 there are only 8 alarm inputs and 4
alarm outputs on the back board. For TDR-2209 and
TDR-2216 there are 16 alarm inputs and 8 alarm
outputs.
* For the storage more than 320 GB, there is no
removable kit available because two more Hard
Drives are usedin one system.

TATUNG TDR series Digital Recording System Page 3
CHAPTER 2:
WATCH MODE
Turn on the system. The main screen of TATUNG TDR-22XX series will appear as shown below.
The buttons and icons on the screen are described
below:
1.Company LOGO
This is the logo of TATUNG Company of America.
2.DATE/TIME Window
This window displays the date and time (military time).
3.1 Sequence Button
Click to select the 1-window (1x1) format. Only 1 camera can be
displayed at a time. The sequential dwell time can be adjusted in
SETUP mode.
4.4 Sequence Button
Click to select the 4-window (2x2) format. Up to 4 cameras can be
displayed at the same time. The sequential dwell time can be adjusted
in SETUP mode.
5.9 Sequence Button
Click to select the 9-window (3x3) format. Up to 9 cameras can be
displayed at the same time.The sequential dwell time can be adjusted
in SETUP mode.
6.16 Button
Click to select the 16-window (4x4) format. Up to 16 cameras can be
displayed at the same time.The sequential dwell time can be adjusted
in SETUP mode.
Note
: For TDR
-
2209 there are
only 9 channels divided within
the screen. For TDR-2204 there
are only 4 channelsdivided
within the screen
Note
: For TDR
-
2209, the Button
for 9 Sequence and the button
for 16 will show the all 9
channelsat same time. For
TDR-2204, the Button for 4,9,
and 16 Sequencewill show all 4
channelsat same time.

TATUNG TDR series Digital Recording System Page 4
7
.
Full SCR Button
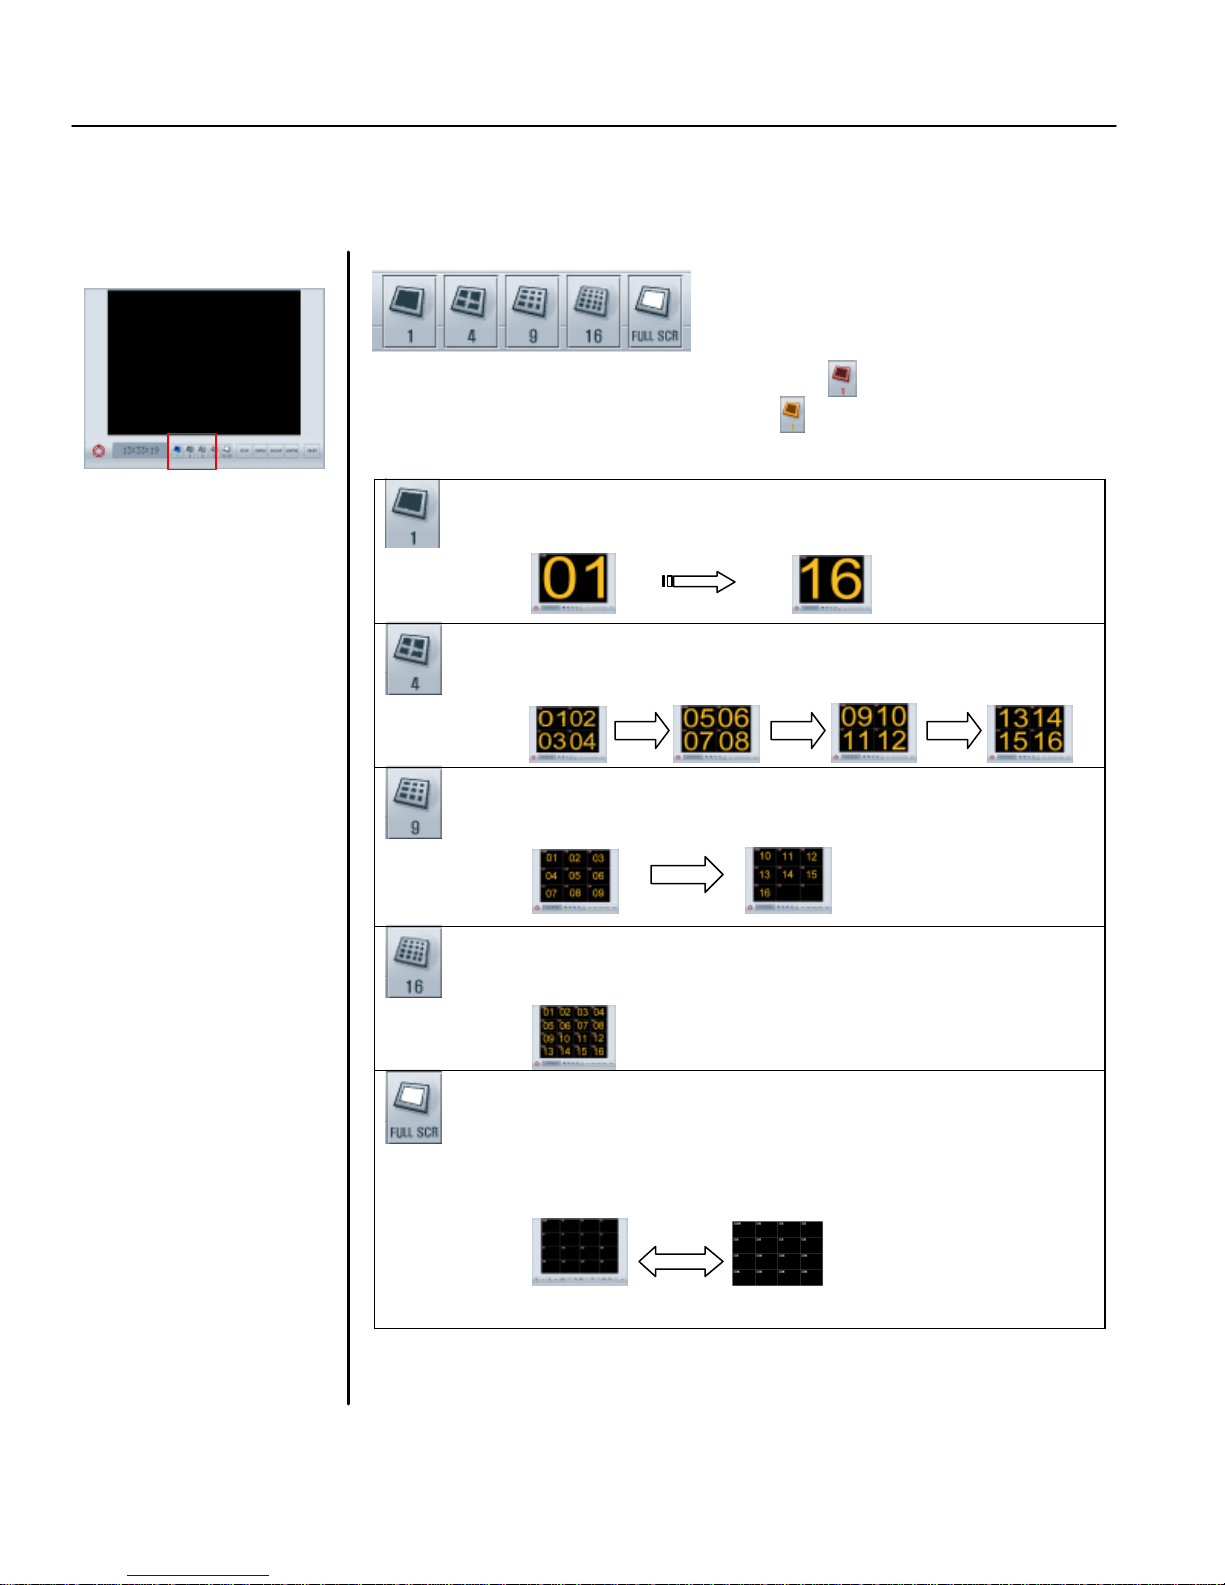
This button allows you to hide all buttons and icons and enlarge the
display windows to the FULL SCREEN. To get back to the normal
screen you must right click.Once you get the full screen, if you LEFT
click, the screen will not go back to normal;instead, the picture the
mouse arrow is sitting on will be enlarged to full screen.
8.Motion Button
Click to enable the motion tracking function. This is a very powerful
function which allows you to track a moving object from one channel
to another. All image windows this object passed by will be enlarged
one by one.
9.Setup Button
Click to switch to SETUP MODE. The setup mode includes buttons
for CHANNEL, SCHEDULE, SPEED, COLOR, MOTION, P/T/Z
PROTOCOL, PASSWORD, and VOICE. With these buttons your
system can be custom-programmed to fit your operation needs.
10.Search Button
Click to switch to SEARCH MODE. In this mode, you may either use
either the LOG or DATE/TIME button to check the image database
and access the recorded images within seconds. You can either
PRINTor SAVE the images found to a floppy disk for your emergency
needs. You can also check the capacity of storage used/available
with the STORAGE button.
11.Backup Button
Click to switch to BACKUP MODE. In this mode, you may either
choose the AUTO backup function to save images to a second
removable hard disk or choose the AVI backup function to save
images onto a CDRW available from this system.
12.Control Button
Click to switch to CONTROL MODE. In this mode the
PAN/TILT/ZOOM features of each camera can be controlled by
clicking the appropriate buttons on the screen.
13.On/Off Button
Click to turn off the entire system.
14.Display windows
Display camera images on 1, 4, 9 or 16 windows depending on your
selection. Left clicking a window will enlarge the picture in that
specific window. And left clicking again will return the picture back to
the normal size. RIGHT clicking any window will hide all buttons and
icons and enlarge all pictures to full screen. And right click again will
go back to normal screen
15.On Screen Display (OSD)
Display the camera name and recording status. The recording status
indicates whether the camera is active or inactive and the recording
method it is recording (continuous, motion,or alarm sensor
recording).

TATUNG TDR series Digital Recording System Page 5
2.1 Channel display window
1. Channel (Camera) name
2. Image display window
3. Record status lamp
1
.
Channel
(Camera)
name
Identify the name for each channel. You may assign the channel name in
SETUP mode.
2.Image Display window
This area displays the image coming from the corresponding camera.
3.Recording status lamp
This lamp turns red when continuously recording
When motion recording, this lamp becomes blue and transparent.
(on and off)
When sensor recording, this lamp turns yellow and transparent.
(on and off)

TATUNG TDR series Digital Recording System Page 6
2.2 Selection of Split screen
Selection of window division mode that is available in 1 division window(sequence from channel 1
to channel 16), 4 window, 9 window, 16 window, and Full screen display.
Click these buttons one time (the button turns RED) to get sequential display.
Click second time (the button turns ORANGE) to stop sequence. More Click to
switch between sequence (RED) and stop sequence (ORANGE)
One-window sequence
Four-window sequence
Nine-window sequence
All channeldisplay
FULL screen
Click this button to hide all buttons and icons and enlarge the display
windows to FULL screen. You must right click on the mouse or touch
pad to go back to the normal.
Note
:
You can
always
use
the right-click button on the
mouse to switch between
the Full screen status and
the normal screen status.
Note
: On
all
Ch Display, left
click a specific camera and
the image of this camera will
be enlarged without
sequencing. And left-click
again can go back to the
normal status.
Note
: For TDR
-
2209, the 9
and
16 sequencebuttonw ill show all
9 channelsat same time. For
TDR-2204, the 4,9, and 16
sequence buttonwill show all 4
channelsat same time.

TATUNG TDR series Digital Recording System Page 7
2.3 Motion Tracker
This function allows you to track the path of a moving object from one channel to another. The
specific image window that the object activates will be enlarged. Therefore, the object will always be
displayed on an enlarged window.
Click on this button to enable the motion tracking function.
Note
: To enable this
function, all channels
mustto be programmed
to motion recording.

TATUNG TDR series Digital Recording System Page 8
2.4 Mode Switch button
There are four function modes that can be selected in this system.
SETUP: Click to switch to SETUP MODE. The setup mode
includes the buttons:CHANNEL, SCHEDULE, SPEED,
COLOR, MOTION, P/T/Z PROTOCOL, PASSWORD, and
VOICE. With these buttons,your system can be custom-
programmed to fit your specific operation requirements.
SEARCH: Click to switch to SEARCH MODE. In this mode, you may
either use the LOG button to searchthe image database
or use the DATE/TIME button to retrieve the recorded
images within seconds. The images found may either be
printed out or savedto a floppy disk for your emergency
needs. The status of the storage drive can be checked by
the STORAGE button.
BACKUP: Click to switch to BACKUP mode. You can backup the
data to the other storage or other type of media which is
available for this system. This mode include the auto-
backup function, immediate AVItype backup function and
have a windows explorer opened for your convenience.
CONTROL: Click to switch to CONTROL MODE. In this mode the
PAN/TILT/ZOOM of specific camerascan be controlled
by clicking the appropriate buttons on the screen.
2.5 ON/OFF Button
Click
one of these buttons to perform its specific function
C
lick on this button
to shutdown the syst
em. Confirm
with
“YES” as the system
prompts: “ARE YOU SURE?” to complete the shutdown the DVR system.

TATUNG TDR series Digital Recording System Page 9
CHAPTER 3: SETUP
MODE
The first screen of the setup mode will be the channel setting screen displayed below
The control buttons contained in the main screen are
as
described below:
1.Channel
Click to setup the channel and channel (OSD) name. There are two
different ways to setup the channel: automatically scan or manually
designate. You may also set the name for each channel.
2.Schedule
Click to setup the recording schedules. There are 16 recording groups and
three recording modes (continuous, motion, sensor) that may be separately
set up for your application. Alarm outputs can also be set up separately.
3.Speed
Click to setup the recording speed and other options. The recording speeds
include speeds on normal, motion, and sensor recording. You can also set
up the time delay for the display sequence as well as pre alarm, pre motion
and post alarm, post motion recording in this mode.
4.Color
Click to adjust the image attributes including the adjustment of Brightness,
Contrast, Color (saturation), and TINTfor each individual channel.
5.Motion
Click to setup the motion function. You can set up each individual
channel’s motion detection area (up to 10 zones for each channel),
sensitivity, and beep time for motion detection.
Note
: For TDR
-
2209, CH 10 to
CH 16 will be empty by the
factory’s setting. For TDR-2204,
CH 05 to CH 16 will be empty by
factory’ssetting

TATUNG TDR series Digital Recording System Page 10
6
.
P/T/Z camera protocol
Click to setup the communication port and protocol used to communicate
between TATUNG’s DVR and your specific camera connected.
7.Password
Click to setup the user name and password for multi-level security access.
The passwords are divided into four levels: SETUP, VIEWER, SHUTDOWN,
and REMOTE. Hiding camerascan also be programmed within this setup.
8.Audio
Click to setup the audio recording function.
9.Exit
Click to exit the setup mode and go back to main Watch mode.

TATUNG TDR series Digital Recording System Page 11
3.1 Channel
This function button (as shown below) can be used to setup the channels. There are two different
types of channel setting: manual or automatic.
1.Setup the Channel
You can setup the channel either by auto setting or manual setting.
Auto
Setting Click on and setup will be executed automatically
Manual
Setting
Select the Board (B01-B04) and Channel
(C01-C04) from the list to setup the
Channel Name
CH01
This is the first
Board and first
Camera
Click to
drop
-
down
the
list. Select the Board #
and Camera #from the
list. Then left-click.
Click this button to start the channel setu
p and the screen will be shown as below.
First Channel
Note
: For TDR
-
2209, CH 10 to
CH 16 will be empty by the
factory’s setting. For TDR-2204,
CH 05 to CH 16 will be empty by
factory’ssetting

TATUNG TDR series Digital Recording System Page 12
2.Setup the name
Setup the channel name with following the procedure
1.Click the channel number
2.Key in the name of the channel
3.Limited to 14 characters including space.
3.EXIT
You may click any other icon to exit Channel Setup Mode and go directly into
another setup mode. Click EXIT button, you will be back to Watch Mode.
1
.
Click to
choose channel
2
. Key in the
channel name
here
Note:
When complete the
setup and exit to the LIVE
mode, the system will
spend about 20 second to
compensate and install
the new setting. This
operation may cause the
image of the cameras
stop motion or
discontinuous motion.
The recorded data also
have the same effect.

TATUNG TDR series Digital Recording System Page 13
3.2 Schedule
This function button (as shown below) is used to setup the schedules.
1.Select the Group
Select the Group number (total 16 groups are available and
programmable).
2.Activate Group
Activate the group by checking the box.
3.Schedule the Recording DATE/TIME and DVR Shutdown Time
•Setup the days of the week (Sunday to Saturday) by checking the box of the
day.
•If you want to assign the recording time (default is 24 hours), setup [Start
Time] and [End Time] by using military time system. (00:00 to 00:00
corresponds to 24 hours).
•If you want to assign ashutdown time, check the box of Shutdown Time and
set the shut down time.
Click on this button to start schedule setup and the screen will display as
follow. (Please follow the 7 steps below)
Note:
The shutdown time is
to set the time for turning off
the system, which is different
to the restart system.
Note
: For TDR
-
2209, Camera’s
CH 10 to CH 16 and Motion’s
CH 10 to CH 16 will be useless
even if you activate it. For TDR-
2204, Camera’s CH 05 to CH 16
and Motion’s CH 05 to CH 16 will
be useless even if you activate it.
Note
: Alarm Out
0
9 to 16
is
not
configured in all TDR-22XX
series DVRs.

TATUNG TDR series Digital Recording System Page 14
4.Activate the camera
Click the camera icon to activate the camera(s)which will be used in this group.
5.Select the Recording mode
Select the recording mode for each channel. There are three recording modes.
6.Setup Alarm Out: Alarm Output may be setup when either a sensor is triggered
or motion is detected.
7.Set up another group
Repeat the step from 1 to 6 if you want to set up another group.
8.Exit
You may click any other icon to exit Schedule Setup Mode and go directly
into other setup mode. Click EXIT button to go back to Watch Mode.
DEFAULT Continuous recording
Motion Record while motion detected
Sensor Record while Sensor is active
Note:
When complete the
setup and exit to the LIVE
mode, the system will
spend about 20 second to
compensate and install
the new setting. This
operation may cause the
image of the cameras
stop motion or
discontinuous motion.
The recorded data also
have the same effect.

TATUNG TDR series Digital Recording System Page 15
3.3 Speed
This function button (as shown below) can be used to setup the recording speeds.
Normal Recording Speed
Dragging the cursor can designate normal recording speed (frame rate) for each
camera or all cameras (Separate frame rate for each camera is available).
Motion Recording Speed
Dragging the cursor can designate motion recording speed (frame rate) foreach
camera or all cameras (Separate frame rate for each camera is available).
Sensor Recording Speed
Dragging the cursor can designate sensor recording speed (frame rate) for each
camera or all cameras (Separate frame rate for each camera is available).
Sequential Time
Adjust the dwell time interval for sequential display.
Post Motion Time
Keepsrecording for a period of time after motion detection is over.
Post Alarm Time
Keepsrecording for a period of time after sensor alarm is finished.
Click this button and the screen will display as shown below.

TATUNG TDR series Digital Recording System Page 16
MISC
Check on the box if you want the following features to be enabled.
Image Quality
Dragging the cursor can adjust the compression rate, the higher the compression the
worse the image quality. The recorded image with best quality (100%) is clear and
vivid. But the size of a frame is the largest (15KB-20KB). At lower percentage of
quality (higher compression rate) image quality is relatively low. But the size of a
frame is relatively small (2KB-8KB). 34%-50% of image quality is recommended.
Frame Size**
Compression Rate Image Quality Range Average
0% 2400-7200 byte
5.0 KB
10%
2600-8100 byte
5.5KB
20%
2900-9300 byte
6.0 KB
30%
3500-10300 byte
7.0 KB
40%
4100-12000 byte
8.0 KB
50%
5000-14000 byte
9.5 KB
60%
6000-16000 byte
11.0 KB
70%
6600-17000 byte
12.0 KB
80%
8200-20000 byte
14.0 KB
90%
9200-22000 byte
16.0 KB
HIGH
LOW 100%
14000-24000 byte
19.0 KB
*Frame size may vary from image to image according to the situation of site
EXIT
You may click any other icon to exit Speed Setup Mode and go directly into other
setup mode. Click EXIT button to go back to Watch Mode.
Sensor Beep Activatesbeeping sound when sensor is triggered.
Proportion When activated, only 1, 4, 9, & 16 divisions are available to
keep the horizontal and vertical ratio of each channel window.
Motion Log Activates Motion log function.
Recording While
Searching Continuesto record when the system in search mode.
Removable HDD System Will BEEP when the removable HDD is almost full.
Pre-Alarm Set up PRE-ALARM and PRE-MOTION in SECONDS
Note:
When complete the
setup and exit to the LIVE
mode, the system will
spend about 20 second to
compensate and install
the new setting. This
operation may cause the
image of the cameras
stop motion or
discontinuous motion.
The recorded data also
have the same effect.
Table of contents