Taurus ALPATEC VILNA 600 User manual


B
D
A
C
E
F
G
MODE
PRG
1
4
7
2
3
5
6
E
II III IVV
H
I VI
b ac

Fig.1
25
cm
25
cm
50
mm
25cm
Fig.2 Fig.3 Fig.4
Fig.5 Fig.6
Fig.4

Fig.7 Fig.8
Fig.9 Fig.10

Español
Emisor Térmico
Vilna 600
Vilna 900
Vilna 1200
Vilna 1500
Vilna 2000
Estimado cliente,
Le agradecemos que se haya decidido por la
compra de un producto de la marca TAURUS
ALPATEC.
Su tecnología, diseño y funcionalidad junto con
el hecho de superar las más estrictas normas de
calidad le comportarán total satisfacción durante
mucho tiempo.
Descripción
A Interruptor marcha /paro
B Panel de control
C Pantalla LCD
D Salida de calor
E Pies
F Soporte mural
G Tornillos
Iconos en panel de control
1 Botón +/-
2 Tecla temperatura
3 Botón de tiempo
4 Botón de modo
5 Botón de programación
6 Botón Enter
7 Botón marcha/paro
Iconos de función en pantalla LCD
I Modo en espera
II Modo anticongelante
III Modo confort
IV Modo económico
V Modo de programa
VI Bloqueo del teclado
aFuncionamiento en modo confort
bFuncionamiento en modo económico
cEn espera
Leer atentamente este folleto de instrucciones
antes de poner el aparato en marcha y guardarlo
para posteriores consultas.
Consejos y advertencias
de seguridad
PRECAUCIÓN: Algunas
partes de este producto
pueden ponerse muy calie-
ntes y causar quemaduras.
Debe ponerse atención par-
ticular cuando los niños y
las personas vulnerables
estén presentes.
- El aparato no debe colocarse de-
bajo de una base de toma de corr-
iente.
- Los niños menores de 3 años
deben mantenerse fuera del alca-
nce del aparato a menos que sean
continuamente supervisados
-Los niños desde 3 años y menor-
es de 8 años deben sólo encend-
er/apagar el aparato siempre que
éste haya sido colocado o instala-
do en su posición de
funcionamiento normal prevista y
que sean supervisados o hayan
recibido instrucciones relativas al
uso del apara-to de una forma se-
gura y entiendan los riesgos que
el aparato tiene.
- Este aparato puede ser utilizado
por personas con capacidades fís-
icas, sensoriales o mentales redu-
cidas, o personas con falta de ex-
periencia en el manejo del mismo,
siempre que ac-túen bajo vigilanc-
1

ia o habiendo recibido instruccio-
nes sobre el manejo seguro del
aparato y entiendan los posibles
riesgos.
- Los niños no deben realizar oper-
aciones de limpieza o mantenimie-
nto del aparato a menos que teng-
an la supervisión de un adulto.
- Los niños desde 3 años y menor-
es de 8 años no deben enchufar,
regular y limpiar el aparato o realiz-
ar operacio-nes de mantenimiento
- Este aparato no es un juguete.
Los niños deben estar bajo vigilan-
cia para asegurar que no jueguen
con el aparato.
- No utilizar el aparato en las inme-
diaciones de una bañera, ducha o
piscina.
- Si la conexión a la corriente está
da-ñada, debe sustituirse. Llevar el
apara-to a un Servicio de Asisten-
cia Técnica autorizado. No intente
desmontarlo o repararlo ya que
puede existir peligro.
Este símbolo indica que el
aparato no se debe cubrir.
- ATENCIÓN: A fin de evitar un
sobre-calentamiento, no cubrir
el aparato.
- Antes de conectar el aparato a la
red,verificar que el voltaje indicado
en la placa de características coin-
cide con el voltaje de red.
- Conectar el aparato a una base
de toma de corriente provista de
toma de tierra y que soporte como
mínimo 16 amperios.
- La clavija del aparato debe coinc-
idir con la base eléctrica de la toma
de corriente.Nunca modificar la cl-
avija. No usar adaptadores de
clavija.
- Usar el aparato en una zona bien
ventilada.
- Debe estar prevista una
ventilación adecuada de la sala, si
en la misma sala donde se instale
el aparato pueden utilizarse simul-
táneamente otros aparatos alime-
ntados a gas u otro combustible.
- Mantener alejados a niños y
curiosos mientras maneje este
aparato.
- El aparato debe utilizarse solam-
ente con la base suministrada.
- Situar el aparato sobre una supe-
rficie hori-zontal, plana, esta- ble y
apta para soportar altas temperat-
uras, alejada de otras fuentes de
calor y de posibles salpicaduras de
agua.
- Situar el aparato lejos de mat-
erial combustible, tales como
materiales textiles, cartón, pa-
pel, etc.
- Situar el aparato a una distancia
mínima de 50 cm de materiales 2

combustibles, tales como cortinas,
muebles…
- No situar material combustible en
las inmedia-ciones del aparato.
- Evitar que tanto la entrada como
la salida de aire queden total o
parcialmente tapadas por
muebles, cortinajes, ropas, etc.,
existiría riesgo de incendio.
- No usar el aparato asociado a un
programador, temporizador u otro
dispositivo que conecte el aparato
automáticamente.
- No utilizar el aparato con el cable
eléctrico o la clavija dañados.
- Si alguna de las envolventes del
aparato se rompe, desconectar
inmediatamente el aparato de la
red para evitar la posibilidad de
sufrir un choque eléctrico.
- ADVERTENCIA: Mantener el
aparato seco.
- ADVERTENCIA: No utilizar el
aparato cerca del agua.
- No utilizar el aparato con las
manos o los pies húmedos, ni con
los pies descalzos.
- Nunca usar el cable eléctrico
para levantar, transportar o
desenchufar el aparato.
- No enrollar el cable eléctrico de
conexión alre-dedor del aparato.
- No dejar que el cable eléctrico
de conexión quede atrapado o
arrugado.
- No dejar que el cable eléctrico
quede en contac-to con las supe-
rficies calientes del aparato.
- Verificar el estado del cable eléc-
trico de cone-xión. Los cables dañ-
ados o enredados aumentan el
riesgo de choque eléctrico.
- Este aparato no es apto para su
uso en el exterior.
- El cable de alimentación debe
ser examinado regularmente en
busca de signos de daño, y si está
dañado, el aparato no tiene que
usarse
- Es recomendable como protecc-
ión adicional en la instalación eléc-
trica que alimenta el aparato, el di-
sponer de un dispositivo de corrie-
nte diferencial con una sensibilidad
máxima de 30. Pregunte a un inst-
alador competente.
- No utilizar ni guardar el aparato a
la intemperie.
- No exponer el aparato a la lluvia
o condiciones de humedad. El ag-
ua que entre en el aparato aume-
ntará el riesgo de choque eléctrico.
- No tocar la clavija de conexión
con las manos mojadas.
- No usar el aparato, en el caso de
personas insensibles al calor (ya
que el aparato tiene superficies
calefactadas). 3

- Antes de cada uso, desenrollar completamente
el cable de alimentación del aparato.
- No usar el aparato si sus accesorios no están
debidamente acoplados.
- No usar el aparato si su dispositivo de puesta
en marcha/paro no funciona.
- No retirar los pies base del aparato.
- No mover el aparato mientras está en uso.
- Utilizar las asas del aparato para sostenerlo o
desplazarlo.
- No utilizar el aparato inclinado, ni darle la vuelta.
- No dar la vuelta al aparato mientras está en uso
o conectado a la red.
- Si se usa el aparato en un cuarto de baño o si-
milar, desenchufar el aparato de la red cuando no
se use, aunque sea por poco tiempo, ya que la
proximidad del agua presenta un riesgo, incluso
en el caso de que el aparato esté desconectado.
- Desenchufar el aparato de la red cuando no se
use y antes de realizar cualquier operación de
limpieza.
- Este aparato está pensado únicamente para
un uso doméstico, no para uso profesional o
industrial.
- Guardar este aparato fuera del alcance de los
niños y/o personas discapacitadas.
- No guardar el aparato si todavía está caliente.
- No exponer el aparato a temperaturas extre-
mas.
- Mantener y guardar el aparato en un lugar seco,
sin polvo y alejado de la luz del sol.
no queden obstruidas por polvo, suciedad u otros
objetos.
- No dejar nunca el aparato conectado y sin
vigilancia. Además ahorrará energía y prolongará
la vida del aparato.
- No utilizar el aparato sobre ninguna parte del
cuerpo de una persona o animal.
- No usar el aparato para secar prendas textiles
de ningún tipo.
- Cerciorarse de que el servicio de mantenimiento
del aparato sea realizado por personal especiali-
zado, y en el supuesto de precisar consumibles/
recambios, éstos sean originales.
- PRECAUCIÓN: Existe el riesgo de incendio en
caso de que la limpieza del aparato no se realice
conforme a estas instrucciones.
- Toda utilización inadecuada, o en desacuerdo
con las instrucciones de uso, puede comportar
peligro, anulando la garantía y la responsabilidad
del fabricante.
Instalación
- Situar el aparato lejos de material combustible,
tales como materiales textiles, cartón, papel, etc.
- Situar el aparato a una distancia mínima de
50 cm de materiales combustibles, tales como
cortinas, muebles…
- Evitar que tanto la entrada como la salida de
aire queden total o parcialmente tapadas por
muebles, cortinajes, ropas, etc., existiría riesgo
de incendio.
- Caso de montar el aparato en la pared de un
aseo, situarlo de modo que la toma, el cable de
corriente, los interruptores y demás controles no
queden al alcance de las personas que utilicen la
bañera, la ducha o el lavamanos.
- El aparato necesita ventilación adecuada para
funcionar correctamente. Dejar un espacio de 30
cm de distancia entre las paredes u otros obstá-
culos y 30 cm encima del suelo.
- No cubrir u obstruir ninguna de las aberturas del
aparato.
- No cubrir ni obstruir los laterales del aparato,
dejar un espacio mínimo de 2cm alrededor del
aparato.
- La clavija debe ser fácilmente accesible para
poder desconectarla en caso de emergencia.
situarse en una ubicación donde la temperatura
ambiente se encuentre entre 12 y 32ºC.
posible instalar el aparato en una pared fría (que
de ventilación.
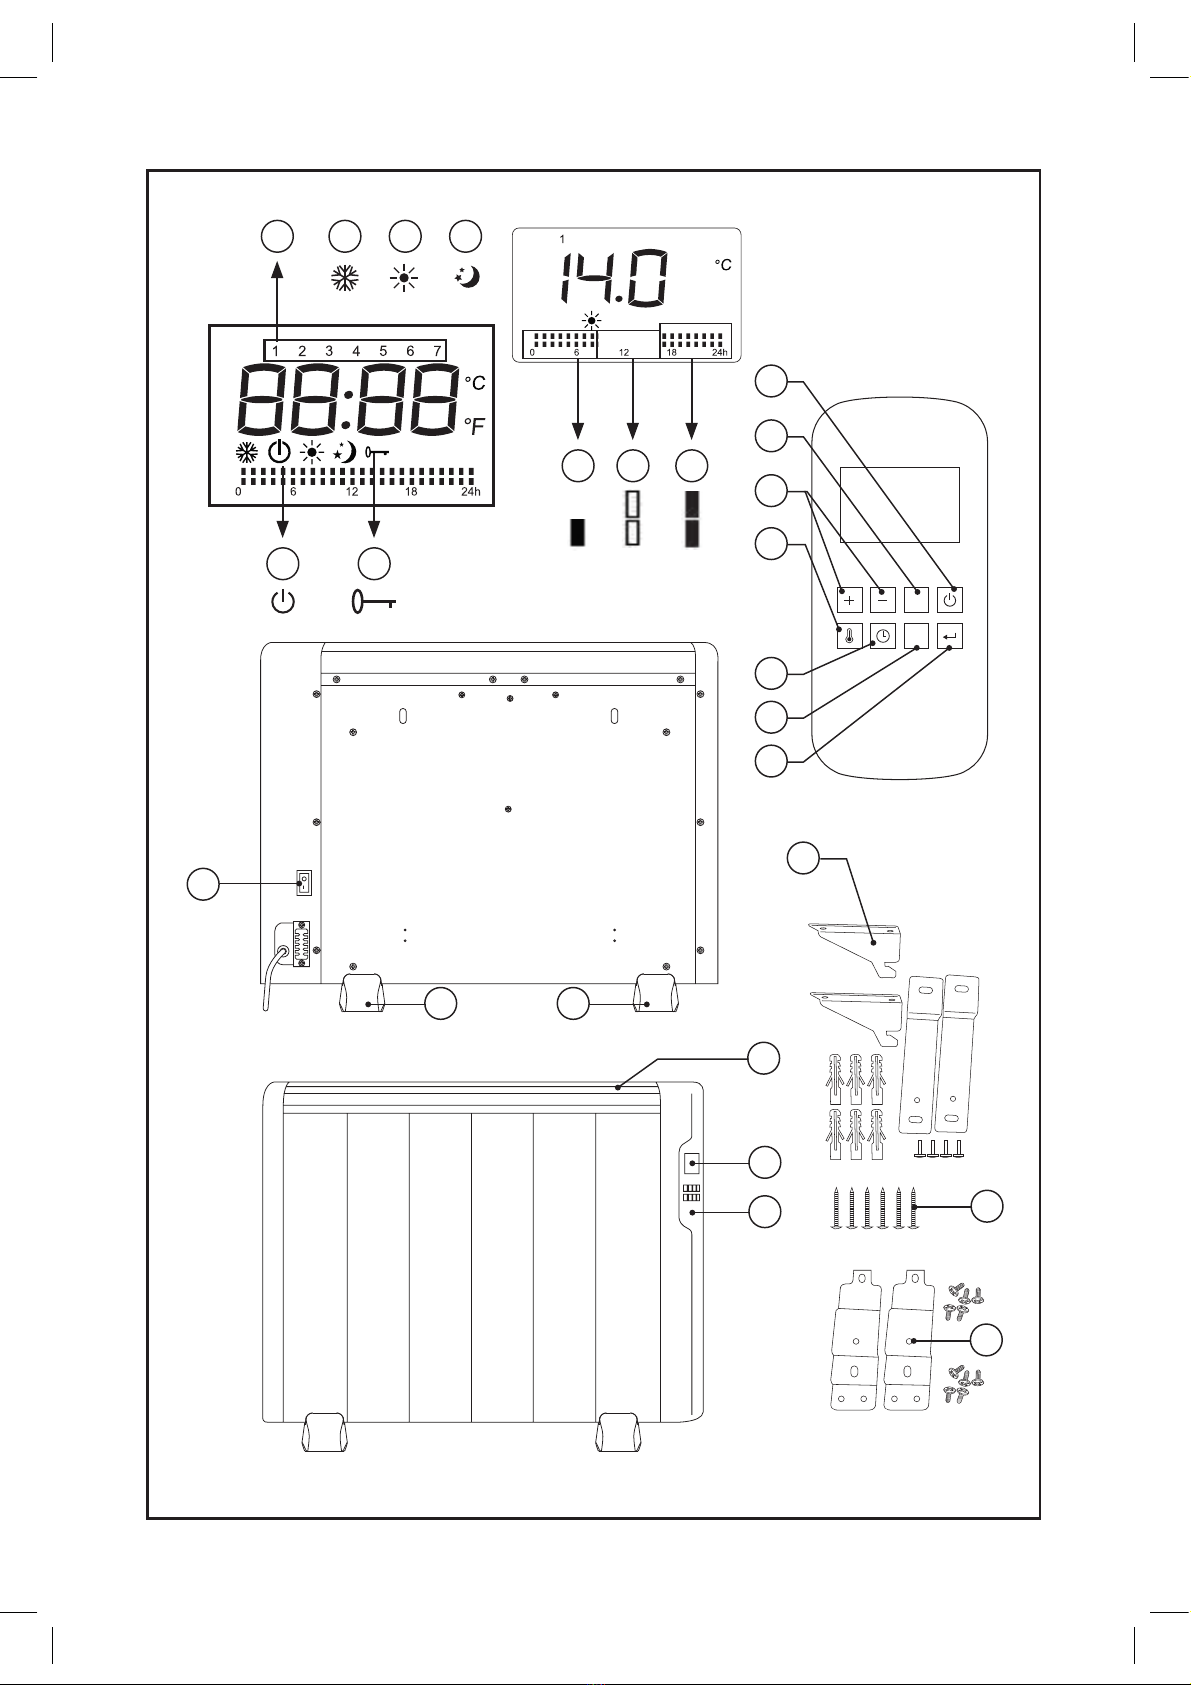
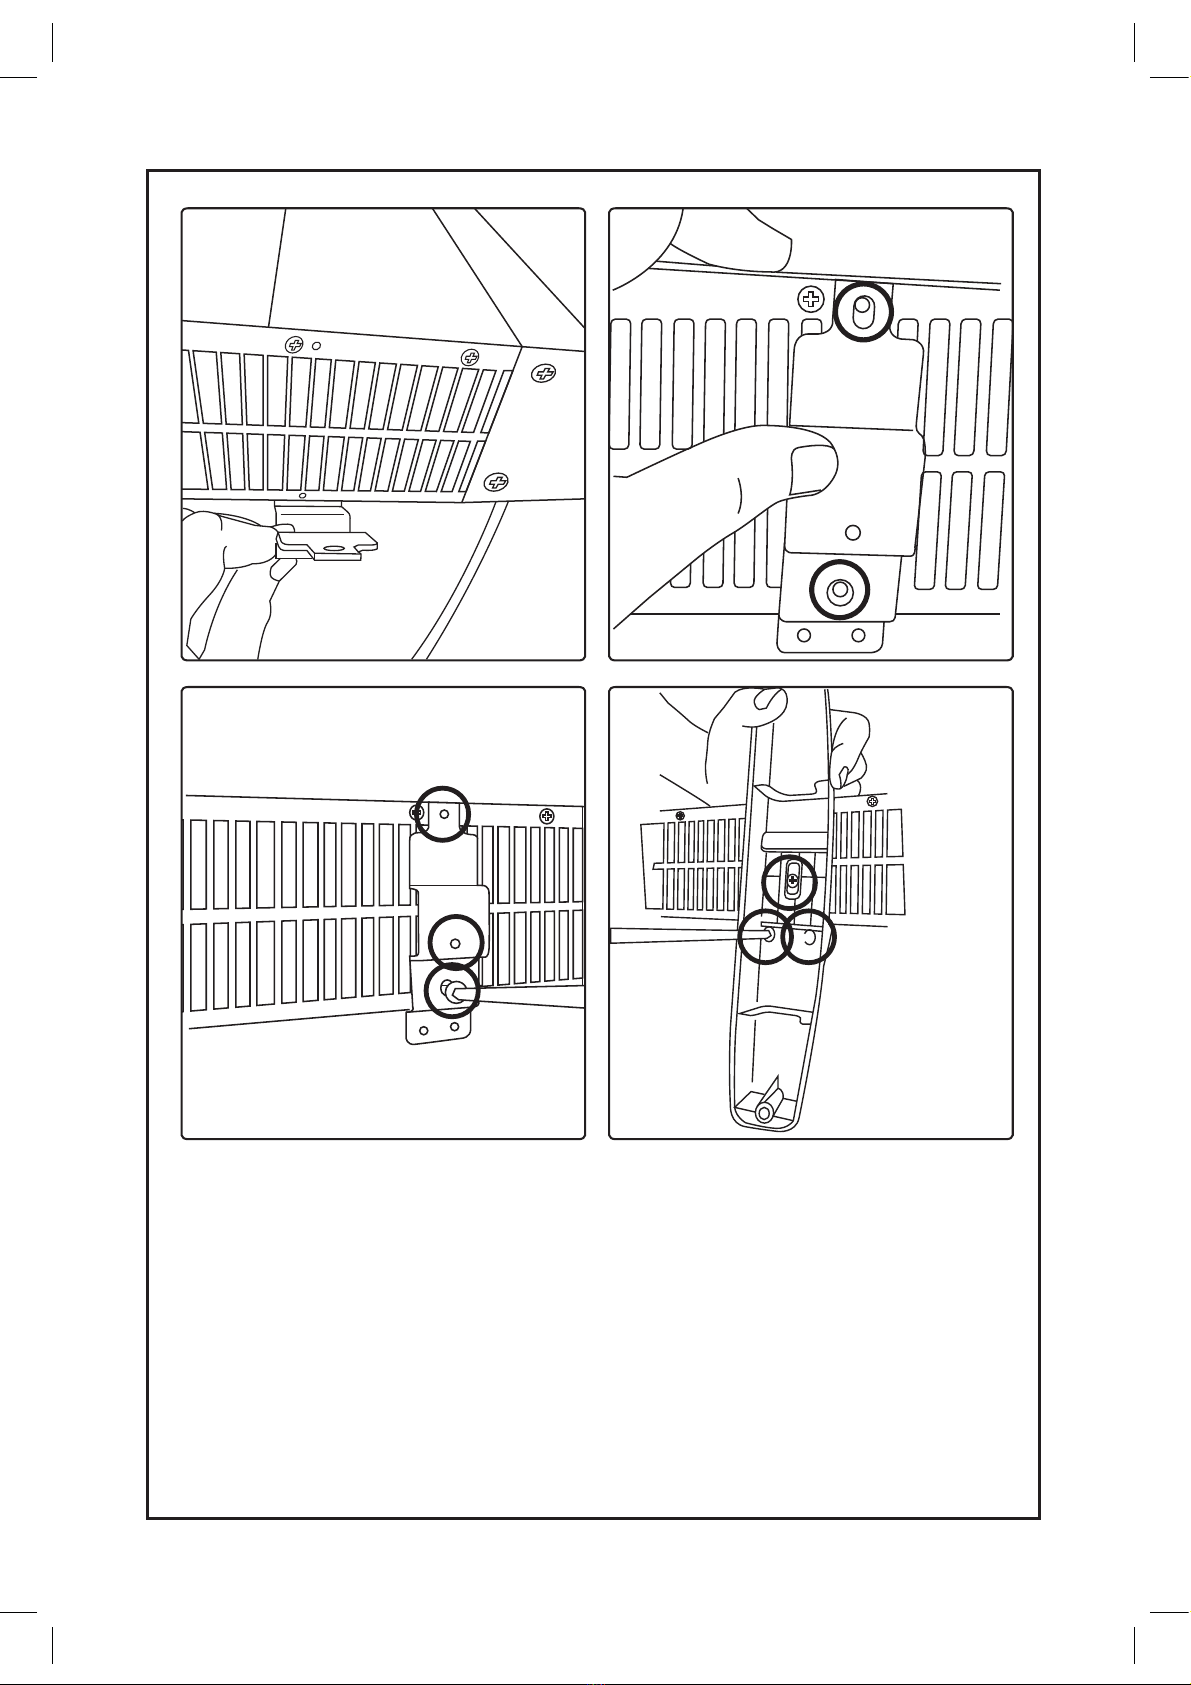
- El aparato debe funcionar con su soporte mural
acoplado o con su base/pies base acoplados.
sobre el que se puede apoyar el producto.
que pueden ser apoyado.
- Teniendo en cuenta las distancias de separa-
ción del aparato señaladas anteriormente, posi-
- No tocar las partes calefactadas
del aparato, ya que puede
provocar graves quemaduras.
- La temperatura de las superficies
accesibles puede ser elevada
cuando el aparato está en
funcionamiento.
4

cionar el soporte mural en la posición deseada y
- Taladrar en la pared donde se han marcado los
- Colocar el soporte más grande en la parte trase-
pueda soportar al menos el doble del peso del
aparato.
- Encajar el aparato en su soporte mural.
- Colocar el soporte largo en la parte trasera del
los tornillos pequeños (2 tornillos pequeños para
- Antes de insertar los tacos en la pared, asegu-
rarse de que las distancias entre cada taco sea
según la tabla a continuación:
Modelo Distancia
Vilna 600 139mm
Vilna 900 226mm
Vilna 1200 313mm
Vilna 1500 400mm
Vilna 2000 574mm
-
te pequeño y hacer que se queda recto
- Fijar el último agujero en el soporte largo des-
- Para montar los pies, colocar el aparato boca
abajo.
-
- Volver a dar la vuelta al aparato y comprobar el
correcto funcionamiento de los pies.
Modo de empleo
- Comprobar que se ha retirado todo el material
de embalaje del producto.
- Preparar el aparato acorde a la función que
desee realizar:
- Desenrollar completamente el cable antes de
enchufar.
Conectar el aparato a la corriente.
- Poner el aparato en marcha, accionando el
botón marcha/paro.
- Cuando el calentador esté encendido, el reloj
aparato entrará automáticamente en modo de
espera de manera predeterminada.
- Presionar el botón de modo de espera para
hacer que el calentador comience a funcionar.
Para el primer uso, presionar el botón para
encender el aparato en modo confort.
En caso de un corte de corriente eléctrica,
después de volver a conectar la alimentación, la
unidad estará en modo de espera. Pulsar el bo-
tón de modo de espera SOLO ES NECESA-
RIO CONFIGURAR NUEVAMENTE EL RELOJ
PARA TENER LA HORA ACTUAL y la unidad
funcionará como en el modo y en la temperatura
de funcionamiento antes del corte de corriente
eléctrica.
Pulsar el botón M continuamente para selec-
cionar entre los 3 modos: Modo económico
Modo anticongelante y Modo confort
Modo confort (ajuste de la temperatura
Modo económico (el modo ECO mantiene
la misma temperatura que la del modo confort
menos 3,5° C. Este modo reduce la temperatura
sin alterar la temperatura deseada del modo de
(el dispositivo mantie-
ne la temperatura ambiente a aproximadamente
5

Pulsar el botón para mostrar la temperatura
Pulsar el botón para seleccionar la tempe-
ratura desde 5º C hasta 30º C.
Presionar el botón -
ción, o, esta terminará automáticamente después
de 5 segundos. El sensor de temperatura
puede analizar automáticamente la temperatura.
Cuando la temperatura ambiente sea superior a
la temperatura seleccionada, el aparato dejará
de calentar.
la hora es ajustar la hora actual y el día de la
semana.
El ajuste de la fecha y la hora sólo se relaciona
con el programa de modo (P1/P2/P3/Individual
Este ajuste se considerará también como la últi-
ma vez que el aparato entró en funcionamiento.
El ajuste del día de la semana y de la hora en
todos los programas (ver V, P1/P2/P3/personali-
Pulsar el botón . Continuar pulsando el
la hora/minuto/día de la semana.
Pulsar los botones para ajustar la hora/mi-
nuto/día de la semana.
1 2 3 4 5 6 7
Selección Icono
Lunes 1
Martes 2
Miércoles 3
Jueves 4
Viernes 5
Sábado 6
Domingo 7
Hora 00-23
Minuto 01-59
Presione el botón -
-
NOTA: Si se corta el suministro de energía,
después de la recuperación, la unidad estará en
modo de espera . Pulsar el botón de espera
para introducir el modo y la temperatura antes de
P1/P2/P3 son programas preinstalados. Después
alternativamente el icono del programa y la tem-
Mon-Sun
01:00
00:00 08:00
24:00
Mon-Fri
01:00
00:00 05:00
24:00
Week-end
01:00
00:00 08:00
24:00
13:00 20:00
19:00
09:00
11:00 16:00
Mon-Fri
01:00
00:00 05:00
24:00
12:00 18:00
09:00 16:00
Week-end
01:00
00:00 05:00
24:00
Pulsar el botón “PRG” continuamente para se-
leccionar entre el ajuste del “día de la semana”,
“período” y “modo de funcionamiento”.
Pulsar el botón Enter
10
6

pulsando los botones
Seleccionar diferentes períodos de tiempo (1-
Seleccionar diferentes modos de funcionamien-
to (confort , económico , y en espera
pulsando el botón .
Pulse el botón -
el modo de funcionamiento para toda la semana
-
Por ejemplo:
por 24 horas:
ajuste personalizado.
Pulsar el botón
después pulsar el botón para seleccionar 1:00
a.m., y pulsar el botón para seleccionar el
modo económico
para la próxima hora 2:00 y 3:00 hasta 12:00.
1
ºC
0 6 12 18 24h
el botón PRG y repetir los dos pasos anteriores
Bloqueo del teclado
Pulse durante tres segundos para activar
la función de bloqueo de teclado para
desbloquear, pulse de nuevo durante tres
segundos.
1
ºC
0 6 12 18 24h
Notas:
y se pulsa el botón
teclado.
-
grama, el calentador funciona en el MODO (sin
importar si es CONFORT, ECO, ANTICONGE-
- Apagar el aparato accionando el botón marcha/
paro.
- Desenchufar el aparato de la red eléctrica
- Limpiar el aparato.
- El aparato dispone de un dispositivo térmico de
seguridad que protege al aparato de cualquier
sobrecalentamiento.
- Cuando el aparato se conecta y desconecta
alternativamente, sin que ello se deba a la acción
o salida normal del aire.
- Si el aparato se desconecta por sí mismo y no
vuelve a conectarse él solo, no volver a ponerlo
en marcha y acudir a uno de los servicios de
asistencia técnica autorizados.
7
PRG
PRG

- En caso de avería llevar el aparato a un Servicio
de Asistencia Técnica autorizado. No intente des-
montarlo o repararlo ya que puede existir peligro.
Para productos de la Unión Europea y/o en caso
de que así lo exija la normativa en su país de
origen:
- Los materiales que constituyen el envase de
este aparato, están integrados en un sistema de
Si desea deshacerse de ellos, puede utilizar los
contenedores públicos apropiados para cada tipo
de material.
- El producto está exento de concentraciones de
sustancias que se puedan considerar dañinas
para el medio ambiente.
deshacerse del producto, una vez
transcurrida la vida del mismo, debe
depositarlo por los medios adecuados a
manos de un gestor de residuos
autorizado para la recogida selectiva de
Residuos de Aparatos Eléctricos y Electrónicos
Este aparato cumple con la Directiva 2014/35/EU
de Baja Tensión y con la Directiva 2014/30/EU
de Compatibilidad Electromagnética.
Limpieza
- Desenchufar el aparato de la red
y dejarlo enfriar antes de iniciar
cualquier operación de limpieza.
-Limpiar el aparato con un paño
húmedo impreg-nado con unas
gotas de detergente y secarlo
después.
-No utilizar disolventes, ni produc-
tos con un factor ph ácido o bás-
ico como la lejía, ni productos abr-
asivos, para la limpieza del
aparato.
- No sumergir el aparato en agua u
otro líquido, ni ponerlo bajo el grifo.
-NOTA: Cuando se ponga el apar-
ato en marcha en función calefact-
or, después de estar una larga te-
mporada parado o funcionado
solo con la función ventilador, es
posible que desprenda al principio
un ligero humo, sin ninguna cons-
ecuencia, debido a que se está
quemando el polvo y otras partícu-
las acumuladas en el elemento
calefactor.
8

English
Vilna 600
Vilna 900
Vilna 1200
Vilna 1500
Vilna 2000
Dear customer,
Many thanks for choosing to purchase a TAURUS
ALPATEC brand product.
Thanks to its technology, design and operation
and the fact that it exceeds the strictest quality
standards, a fully satisfactory use and long pro-
duct life can be assured.
Description
A On/Off main switch
B Control panel
C LCD screen
D Heat Outlet
E Base Feet
F Wall bracket
G Screws
Icons on Control panel
1 +/- button
2 Temperature button
3 Time button
4 Mode button
5 Programm button
6 Enter button
7 Button Standby
Functional Icons on LCD screen
I Mode Stand by
II Mode Anti-freeze
III Mode Comfort
IV Mode Economic
V Mode Programme
VI Keyboard lock
aWorking under Comfort Mode
bWorking under Economic Mode
c Stand by
- Read these instructions carefully before swit-
ching on the appliance and keep them for future
reference. Failure to follow and observe these
instructions could lead to an accident.
Safety advice and
warnings
CAUTION: Some parts of
this product can become
very hot and cause burns.
Particular attention has to
be given where children
and vulnerable people are
present.
- The appliance must not be plac-
ed below a power socket.
- Children of less than 3 years sho-
uld be kept away unless
continuously supervised.
- Children aged from 3 years and
less than 8 years shall only switch
on/off the appliance provided that it
has been placed or installed in its
intended normal operating position
and they have been given super-
vision or instruction concerning use
of the appliance in a safe way and
understand the hazards involved.
- This appliance can be used by
children aged from 8 years and
above and persons with reduced
physical, sensory or mental capa-
bilities or lack of experience and
knowledge if they have been given
supervision or instruction concern-
ing use of the appliance in a safe
way and understand the hazards
involved.
- Cleaning and user maintenance 9

shall not be made by children unle-
ss they are supervised.
- Children aged from 3 years and
less than 8 years shall not plug in,
regulate and clean the appliance
or perform user maintenance.
- This appliance is not a toy.
Children should be supervised to
ensure that they do not play with
the appliance.
- Do not use the appliance
near bathtubs, showers or sw-
imming pools.
- If the connection to the mains has
been damaged, it must be repla-
ced, take the appliance to an
authorised technical support serv-
ice. Do not attempt to disassemble
or repair the appliance by yourself
in order to avoid a hazard.
This symbol means that
product can’t be covered.
- CAUTION: In order to prevent
over-heating do not cover the app-
liance.
- Ensure that the voltage indicated
on the rating label matches the
mains voltage before plugging in
the appliance.
- Connect the appliance to a base
with an earth socket withstanding a
minimum of 16 amperes.
- The appliance’splug must fit into
the mains socket properly. Do not
alter the plug. Do not use plug
adaptors.
- Use the appliance in a well vent-
ilated area.
- If other gas or fuel appliances can
be used at the same time in the
room where the appliance is to be
used, that room must be well vent-
ilated.
- Keep children and bystanders
away when using this appliance.
- The appliance must only be used
with the stand provided.
- Place the appliance on a
horizontal, flat,stable surface, sui-
table for withstanding high tempe-
ratures and away from other heat
sources and contact with water.
- Keep the appliance away from
flammable material such as texti-
les, cardboard or paper, etc.
- Place the appliance a minimum
distance of 50cm away from com-
bustible materials, such as curt-
ains, furniture …
-Do not place inflammable material
near the appliance.
- Ensure that neither the air access
nor exit become either totally or
partially covered by drapery, cl-
othing,etc., as this increases
the risk of fire.
- Do not use the appliance in ass-
ociation with a programmer, timer
10

- Fully unroll the appliance's power cable before
each use.
- Do not use the appliance if its accessories are
- Do not use the appliance if the on/off switch
does not work.
or other device that automati-cally
switches it on.
- Do not use the appliance if the
cable or plug is damaged.
- If any of the appliance casings
breaks, immedia-tely disconnect
the appliance from the mains to
prevent the possibility of an electric
shock.
- CAUTION: Maintain the app-
liance dry.
- CAUTION: Do not use the app-
liance near water.
- Do not use the appliance with
damp hands or feet, or when
barefooted.
- Do not force the power cord.
Never use the power cord to lift up,
carry or unplug the appliance.
- Do not wrap the power cord arou-
nd the appliance.
- Do not clip or crease the power
cord.
- Do not allow the power cord to
come into contact with the applia-
nce's hot surfaces.
- Check the state of the power
cord. Damaged or tangled cables
increase the risk of electric shock.
- The appliance is not suitable for
outdoor use.
- Supply cord should be regularly
examined for signs of damage,
and if the cord is damaged, the
appliance must not be used.
- As an additional protection to the
electrical supply for the appliance, it
is advisable to have a differential
current device with a maximum
sensitivity of 30 mA. Ask for advice
from a competent installer.
- Do not use or store the appliance
outdoors.
- Do not leave the appliance out
in the rain or exposed to moistu-
re. If water gets into the
appliance, this will increase the
risk of electric shock.
- Do not touch the plug with wet
hands.
- Do not use the appliance, in
the case of persons insensitive
to heat (the appliance has hea-
ted surfaces).
- Do not touch the heated parts of
the appliance, as it may cause ser-
ious burns.
- The temperature of the access-
ible surfaces may be high when
the appliance is in use.
- Do not remove the support feet of the appliance.
- Do not move the appliance while in use.
- Use the appliance handle/s, to catch it or move it.
- Do not use the appliance if it is tipped up and do
11

controls are not within the reach a person in the
bath, shower or at the wash-hand basin.
- The appliance requires suitable ventilation in
order to work properly. Leave a space of 30 cm
appliance, leave a minimum space of 2cm around
the appliance.
- The plug must be easily accessible so it can be
disconnected in an emergency.
-
ce it should be situated in a place where the atmos-
pheric temperature is between 12 and 32ºC.
appliance and so as to be able to install the
-
low a window. But never obstructing or covering a
ventilation area.
- The appliance should work well with its wall
support attached or with its base/feet attached.
can be supported.
can be supported.
- Taking into account the separation distances
mentioned above, place the wall support in the
required position and mark the drilling points on
- Drill into the wall where marked and insert the
-Take 1 Long bracket on the back housing, align
screws for 1 long bracket.
-Before Insert the expansion bolts to the wall,
please make sure the distance between bolts as
below table :
Model Distance
Vilna 600 139mm
Vilna 900 226mm
Vilna 1200 313mm
Vilna 1500 400mm
Vilna 2000 574mm
should be able to support twice the weight of the
appliance.
- Insert the bolts onto the wall
- Fix the short bracket in right position
-Hang the heater to the bracket
-Fix the last hole on long bracket after hanging on
the wall
- Place the support by matching the holes with
between walls or other obstacles and 30cm from
- Do not cover or obstruct any of the openings of
the appliance.
- Do not cover or obstruct the sides of the
-
as proximity to water involves a risk, even if the
appliance is disconnected.
- Unplug the appliance from the mains when not
in use and before undertaking any cleaning task.
- This appliance is for household use only, not
professional, industrial use.
- This appliance should be stored out of reach of
children and/or the disabled.
- Do not store or transport the appliance if it is still
hot.
- Do not expose the appliance to extreme tempe-
ratures.
- Keep the appliance in a dry, dust-free place, out
of direct sunlight.
- Make sure that dust, dirt or other foreign objects
do not block the fan grill on the appliance.
- Never leave the appliance connected and
unattended if is not in use. This saves energy and
prolongs the life of the appliance.
- Do not use the appliance on any part of the
body of a person or animal.
- Do not use the appliance to dry textiles of any kind.
- Make sure that the appliance is serviced only by
specialist personnel, and that only original spare
parts or accessories are used to replace existing
parts/accessories.
appliance’s cleaning is not done according to
these instructions.
- Any misuse or failure to follow the instruc-
tions for use renders the guarantee and the
manufacturer's liability null and void.
Installation
rial such as textiles, cardboard or paper, etc.
- Install the appliance a minimum distance of
50cm away from combustible materials, such as
curtains, furniture …
- Ensure that neither the air access nor exit beco
me either totally or partially covered by drapery,
- In the event that the appliance is mounted on a
bathroom wall, position it in such a way that the
socket, power supply cable, switches or other
not turn it over.
- Do not turn the appliance over while it is in use
or connected to the mains.
- If you use the appliance in a bathroom or similar
place, unplug the appliance from the mains when
it is not in use, even if it is only for a short while,
12

- Fit the appliance into the wall support.
- To assemble the base feet, place the appliance
face down.
- Stand the appliance up again so as to check
that the base feet work properly.
Instructions for use
- Make sure that all the product’s packaging has
been removed.
- Prepare the appliance according to the function
you wish to use:
- Unroll the cable completely before plugging it in.
- Connect the appliance to the mains.
- Turn the appliance on, by using the on/off main
switch.
- When the heater is switched on, the clock will
pop out on the display for setting.
-
tically enter standby mode as defaulted.
-Press stand-by mode button to make the heater
start working.
to turn the
device into Comfort mode.
In case of power failure, after reconnecting the
power supply, the unit will be in standby mode.
Pressing the standby button JUST RE-SET
THE TIME TO BE CURRENT TIME and the unit
will be worked as the mode and temperature
before power failure.
Press M button continuously to select among the
3 modes: Economic mode Antifreeze mode
and Comfort mode
Comfort mode (Setting the desired tempera-
Eco mode (ECO Maintains temperature
which is equal to the comfort temperature lowe-
red by 3.5° C. This mode reduces the tempera-
ture without disturbing the desired comfort mode
(the device maintains the
Press button to display the set temperature.
Press button to select the desired tempera-
ture between 5ºC to 30ºC.
Press
-
ture sensor can automatically test the tempera-
ture. When the room temperature is higher than
the selected temperature, the heater will stop
heating.
The purpose of Clock & Day of Week Setting is to
set the current time and day of week.
Clock& Day setting is only related to Mode Pro-
This setting will also be regarded as the last time
the machine started operation.
The ‘day of week’ setting and ‘time period’ setting
will be based on this setting.
Press button. Continue to press button to
select among hour/minute/day of week setting.
Press buttons to set the hour/minute/ day
of week
1 2 3 4 5 6 7
Selection
Monday 1
Tuesday 2
Wednesday 3
Thursday 4
Friday 5
Saturday 6
Sunday 7
Hour 00-23
Minute 01-59
5
13

Press
week. Or after 10 seconds, it will automatically
NOTE: If the power supply is cut, after recovery,
the unit is in standby mode. Press the button
standby to enter the mode and temperature
before the power failure. Please set the clock
again.
P1/P2/P3 are preinstalled programs. After con-
set temperature will be displayed alternately on
the screen.
Mon-Sun
01:00
00:00 08:00
24:00
Mon-Fri
01:00
00:00 05:00
24:00
Week-end
01:00
00:00 08:00
24:00
13:00 20:00
19:00
09:00
Mon-Fri
01:00
00:00 05:00
24:00
12:00 18:00
11:00 16:00
09:00 16:00
Week-end
01:00
00:00 05:00
24:00
Press “PRG “button continuously to select among
the setting of “day of week”,”time period” and
“working mode”.
Press the button enter
Select different working mode (comfort , eco-
nomic , and stand by
button.
Press
For example:
To select 1 Monday, economy mode for 24
hours:
setting mode.
Press button to start the settings and enter
button to select
1:00am, and press button to select economy
mode . Repeat this setting for the next hour
2:00am, and then 3:00am…. until 24:00pm.
1
ºC
0 6 12 18 24h
and repeat above steps 2 to set for following
Press for three seconds to activate the key-
board lock function in order to unlock, press
again for three seconds.
1
ºC
0 6 12 18 24h
14

Cleaning
- Disconnect the appliance from
the mains and allow it to cool
before undertaking any clean-
ing task.
- Clean the equipment with a
damp cloth with a few drops of
washing-up liquid and then dry.
- Do not use solvents, or prod- ucts
with an acid or base pH such as bl-
each, or abrasive products, for cle-
aning the appliance.
- Do not let water or any other
liquid get into the air vents to avoid
damage to the inner parts of the
appliance.
- Never submerge the appliance in
water or any other liquid or place it
under running water.
- Remark: When the appliance is
used as a heater after long periods
in storage or after having been
used solely as a fan a small
amount of smoke may be prod-
uced. This is not important and
is due to the heater burning
dust deposits which have
accumulated on the heating
element. This phenomenon
may be avoided by cleaning the
inside of the appliance before-
hand through the grill with a
vacuum cleaner or pressurised air.
Notes:
If the PRG is under setting is pressed, it
locking
works on the MODE (no matter COMFORT, ECO,
blocked.
- Turn the appliance off, using the on/off main
switch.
- Unplug the appliance from the mains.
- Clean the appliance.
- The appliance has a safety device, which pro-
tects the appliance from overheating.
- When the appliance switches itself on and off
repeatedly, for reasons other than the thermostat
control, check to ensure that there are no obsta-
cles that impede correct air entry or expulsion.
- If the appliance turns itself off and does not
switch itself on again, not start again seek autho-
rised technical assistance.
Anomalies and repair
- Take the appliance to an authorised technical
support service if product is damaged or other
problems arise. Do not attempt to disassemble
or repair the appliance yourself as this may be
dangerous.
For EU product versions and/or in case that it is
requested in your country:
- The materials of which the packaging of this
appliance consists are included in a collection,
wish to dispose of them, use the appropriate
public recycling bins for each type of material.
- The product does not contain concentrations of
substances that could be considered harmful to
the environment.
This symbol means that in case you wish
to dispose of the product once its working
life has ended, take it to an authorised
waste agent for the selective collection of
Waste from Electric and Electronic
This appliance complies with Directive 2014/35/
EU on Low Voltage and Directive 2014/30/EU
on Electromagnetic Compatibility. 15
PRG

Conseils et mesures de
sécurité
PRÉCAUTION : Certaines
par-ties du produit peuvent
être très chaudes et causer
des brûlures. Il faut prêter
spécialement attention lors-
que les enfants et les perso-
nnes vul-nérables seront
présents.
- L’appareil ne doit pas être placé
sous une prise électrique.
- Les enfants de moins de 3 ans
doivent se tenir hors de la portée
de l’appareil, à moins d’être const-
amment supervisés.
- Les enfants de 3 ans à 8 ans po-
urront allumer/éteindre l’appareil
tant que celuici aura été placé ou
installé dans sa position de foncti-
onnement normal et sous la supe-
rvision d’un adulte ou après avoir
reçu les instructions relatives au
fonctionnement sûr de l’appareil et
sachant les risques potentiels de
l’utilisation.
- Cet appareil peut être utilisé par
des personnes dont les capacités
physi-ques, sensorielles ou ment-
ales sont réduites ou des person-
nes dénuées d’expérience conc-
ernant son utilisation, et ce, sous
surveillance ou après avoir supe-
Français
Radiateur à inertie
Vilna 600
Vilna 900
Vilna 1200
Vilna 1500
Vilna 2000
Nous vous remercions d’avoir choisi d’acheter un
appareil ménager de marque TAURUS ALPATEC
Sa technologie, son design et sa fonctionnalité,
s’ajoutant au fait qu’elle répond amplement aux
normes de qualité les plus strictes, vous permet-
tront d’en tirer une longue et durable satisfaction.
Description
A Interrupteur marche/arrêt
B Panneau de commande
C Écran LCD
D Sortie de chaleur
E Pieds
F Support mural
G Vis
Icônes du panneau de contrôle
1 Bouton +/-
2 Touche de température
3 Touche du temps de cuisson
4 Touche de mode
5 Touche de programmation
6 Touche Enter
7 Bouton marche/arrêt
I Mode veille
II Mode antigel
III Mode confort
IV Mode économique
V Mode de programme
VI Blocage du clavier
aOpération en mode confort
bOpération en mode économique
cEn veille
- Lire attentivement cette notice d’instructions
avant de mettre l’appareil en marche, et la con-
server pour la consulter ultérieurement.
16
This manual suits for next models
4
Table of contents
Languages:
Popular Transmitter manuals by other brands

MTT
MTT MS3710-01 user manual

CYP
CYP PU-507TX-1H Operation manual

Dwyer Instruments
Dwyer Instruments 3400 Series Specifications-installation and operating instructions

Fema Electronica
Fema Electronica ASGARD CCT Series manual

Moore Inductries
Moore Inductries Smart HART HTZ manual

Lectrosonics
Lectrosonics T4 instruction manual