TAUSANA TWIST User manual
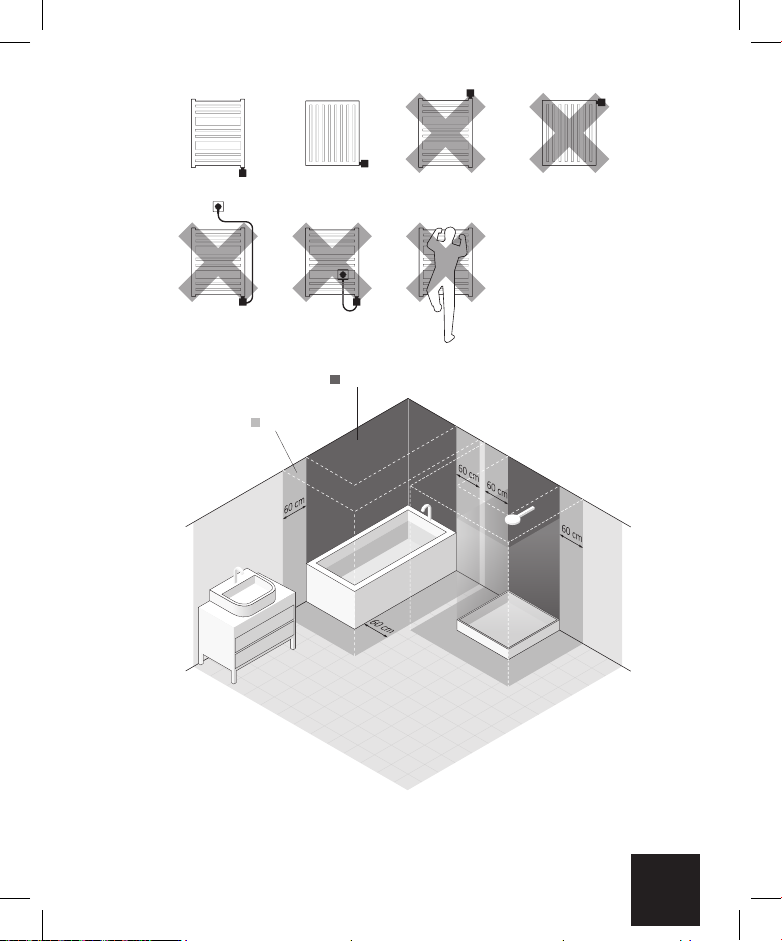
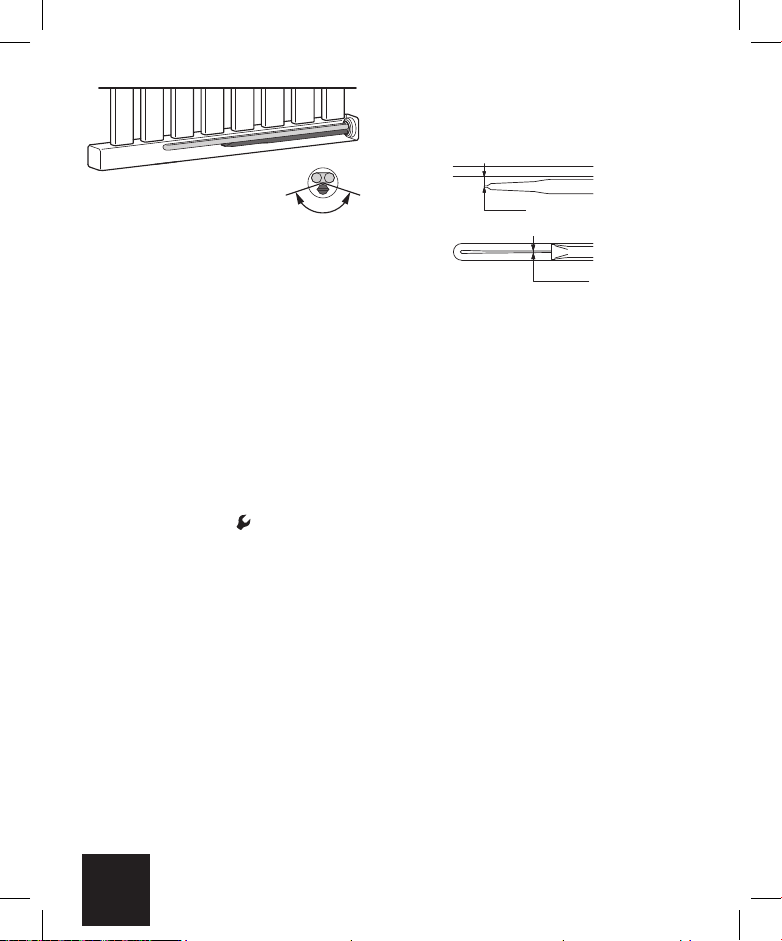
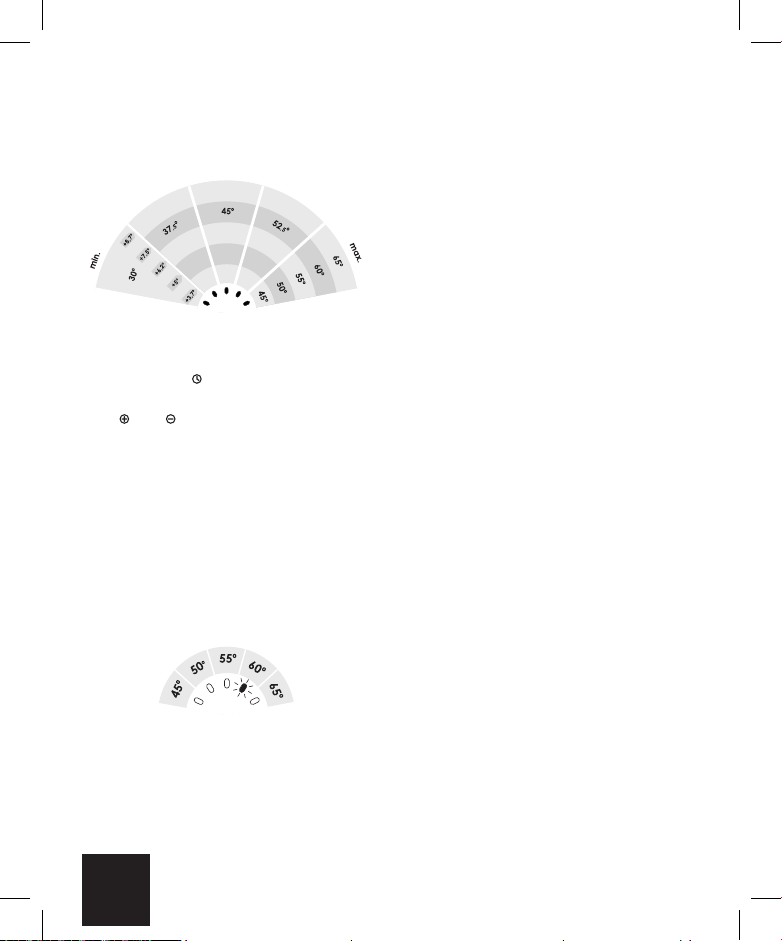
User Manual
Electric Heang Element
LT
LT
Vartotojo instrukcija — Elektriniai kainimo elementai
RU
RU
Инструкция по применению — Электронагреватель
TWIST
LT RUEN

2
User Manual
Our products have been designed and manufactured in such
a way to ensure that all quality, funconality and aesthec
requirements are met. We would like to congratulate you on
the purchase of this great product and wish you a pleasant
experience with it.
Electric radiator
Guide to safe installaon and use.
1. Do not install the heater under an electrical socket point.
2. Your electric heater should be lled with a carefully meas-
ured amount of liquid. In the case of loss of heang medi-
um, or in any other case which demands its supplemen-
taon, contact your supplier.
3. The device is not equipped with an external tempera-
ture controller.

3
EN
Do not use the device in a small room if unsupervised
disabled or incapacitated individuals are inside it. On-
ly use the device if those individuals are under constant
supervision.
4. Electric heater is not a toy. Children under the age of
3 should not be allowed within close proximity of the
device without the supervision of an adult.
Children aged 3 to 8 should only be allowed to operate
the heater when it has been properly installed and con-
nected. The child must be under adult supervision or have
been trained to safely operate the device while under-
standing the risks.
5. Note: Some parts of the radiator can be very hot and
can cause burns. Pay special aenon to the presence
of children or people with disabilies.
6. If the device is used as a clothes and towel dryer, ensure
that the fabrics drying on it have only been washed in
water, avoiding contact with any harsh chemicals.
7. To ensure the safety of very small children, install the
electric dryer so that the lowest tube is at least 600 mm
above the oor.

4
8. The device should only be installed by a qualied install-
er in accordance with the applicable regulaons regard-
ing safety and all other regulaons.
9. All installaons to which the device is connected should
comply with regulaons applicable in the country of in-
stallaon and use.
10. Extension leads or electric plug adapters should not be
used in order to supply power to the heater.
11. While connecng the radiator to electric installaon en-
sure that the cur cuit has a 30 mA residual-current circuit
breaker and an appropriate over current circuit breaker.
With the permanent installaon (cable connec on with-
out plug) it is also mandatory to provide an omnipolar cut-
o switch with a minimum contact opening of 3 mm for
disconnecng the device on all poles.
12. The device version labelled PB can be installed in bath-
rooms in zone 1, as dened by applicable law, subject to
any addional regulaons con cerning electrical installa-
ons in wet areas.
Other versions of the device can be installed in Zone 2
or beyond.

5
EN
13. The device is recommended for use solely as described
in the manual.
14. Ensure that the heater has been installed on a wall in ac-
cordance with its installaon manual.
15. Please forward this instrucon manual to the end user.

6
Zone 1
Zone 2

7
EN
Electric Heang Element
Safety requirements — installaon
1. Fing and connecon of the heang element should
only be performed by a qualied installer.
2. Connect the unit to a sound electrical installaon (see
the rangs on the heater).
3. Switching on the heang element in the open air to test
the device is permied for a maximum of 3 seconds.
4. Never test a heang element that is already installed. Do
not turn the heang element on in an empty radiator!
5. Ensure that the power cord does not touch the hot parts
of the heang element or radiator.
6. Before installing or removing the device, make sure it is
disconnected from the power source.
7. Do not open the device — any interference with internal
components will invalidate the warranty.
8. The heang element’s power output must not exceed the
radiators power output for the parameters 75/65/20° C.

8
9. The pressure in the radiator should not exceed 10 atm.
Ensure that an air cushion is preserved in electric radia-
tors. In central heang systems, leave one valve open to
prevent pressure build up due to the thermal expansion
of the liquid.
10. The device is intended for home use only.
11. Fing and Installaon of the device must be carried out
in accordance with all local regulaons for electrical safe-
ty, including installaon within permissible locaons on-
ly. Observe bathroom electrical zone regulaons.
Safety requirements — use
1. The heang element must be fully submerged in the
heang liquid during its operaon.
2. Regularly check the device for damage to ensure it is safe
to use.
3. If the power cord is damaged the device should not be
used. Unplug the device and contact the manufacturer
or distributor.
4. Do not allow ooding into the heang element casing.

9
EN
5. Do not use the heang element in heang systems where
the water temperature exceeds 82° C.
6. The heang element and radiator can heat up to high
temperatures. Please be cauous — avoid direct contact
with the hot parts of the equipment.
7. Do not open the heang element casing.
8. In the central heang system, always make sure that one
valve of the radiator remains open.
9. Ensure that minors aged 8 and above or those with
a physical or mental disability are supervised if operat-
ing the device.
10. The device is not a toy. Keep it out of the reach of children.
11. The device must be disconnected from the mains dur-
ing cleaning and maintenance.
12. Cleaning of the equipment by children under 8 years of
age is only permied under appropriate supervision.

10
INTENDED USE OF DEVICE
The heang element is an electric de-
vice intended solely for installaon in ra-
diators (standalone or connected to the
central heang system).
Heang element power output should
be matched with radiator output for pa-
rameters of 75/65/20° C
TECHNICAL INFORMATION
Model markings
(power cable type):
PB (Straight cable without plug)
PW (Straight cable with plug)
SW (Spiral cable with plug)
Power supply: 230 V / 50 Hz
Class I
G 1/2"
INSTALLATION OR REMOVAL
Detailed informaon demonstrang the
different ways of installing or remov-
ing a radiator heang element is avail-
able from the manufacturer or importer
(see footnotes at the end of the manual).
Below we list some basic requirements
and principles which must be followed
to ensure long term, reliable operaon
of the product.
8% (20°C)

11
EN
150°
When installing the heating element
horizontally, the single tube (capillary)
where the temperature sensor is locat-
ed, should be posioned to be as close
to the boom of the radiator as possible.
BEFORE INSTALLATION OR FIRST USE:
1. Read the chapter Safety requirements
— Installaon.
2. Fit the heang element using the cor-
rect spanner (size 22).
3. The heang element must be installed
at the boom of the radiator, perpen-
dicular to the radiator pipes, while pre-
serving space for the proper circula-
on of the heang medium.
4. Use a suitable heang medium for ll-
ing the electric radiator, i.e. (water,
special products based on water and
glycol for use in central heang sys-
tems, or oil which complies with the
requirements of the manufacturer of
the radiator and heang element).
5. Check the distances between the in-
dividual heang element tubes and
bend if necessary.
5 mm
2-3 mm
6. Do not switch the heang element
on if it is not fully immersed in radia-
tor heang medium.
7. Make sure an adequate air cushion is pre-
sent to protect against excessive pres-
sure build up within the heater (always
leave one of the radiator valves open).
8. When lling the radiator with hot liq-
uid insure that the liquid temperature
does not exceed 65° C.
9. Follow the subsequent guidelines when
connecng the electrical installaon:
a. Brown wire — live connecon to the
circuit (L).
b. Blue wire — connect to neutral (N)
c. Yellow & green wire — earth con-
necon (PE).
10. Before lling the radiator with heang
medium, ensure that the heang ele-
ment is ed properly and that it is wa-
ter ght.

12
11. In central heang installaon radiator
must be ed with the valves enabling
disconnecon of the radiator from the
rest of the system.
12. The temperature of the heang agent
in the central heang system must not
exceed 82° C!
13. For detailed installaon hints — see
the last pages of this manual.
NOTES PRIOR TO REMOVAL:
1. Before dismantling permanently, dis-
connect the heang element from the
mains and ensure that the radiator is
not hot.
2. Be aware. A radiator lled with liquid
can be very heavy. When moving the
radiator, ensure that you take the nec-
essary safety precauons.
3. Before disassembly, close the appropri-
ate valves and drain the radiator com-
pletely to avoid causing any damage.
PRODUCT DISPOSAL
This product should not be disposed of
as general waste but should be brought
to the appropriate collecon point for re-
cycling of electric and electronic devices.
This informaon is provided by the sign
on the product, user manual and pack-
aging. Informaon on the appropriate
point for used devices can be provided
by your local authority, product distribu-
tor or the store from where the product
was purchased. Thank you for your eort
towards protecng the environment.
MAINTENANCE
• Before performing maintenance, always
unplug the unit from the mains system.
• Periodically check the uid level in the
radiator and ensure the heang element
is completely submerged.
• Clean the product with a dry or damp
cloth. If necessary, use a very small
amount of detergent, ensuring that it
contains no solvents or abrasives.

13
EN
TWIST
Turning the device on with the buon
will result in the radiator heang up to
the set temperature. Aer reaching the
set temperature the device will turn o
and on regularly in order to maintain the
set temperature.
The construcon of the device as well as
the physical characteriscs of the heat-
ing agent inside the radiator, inuence
the way in which the heat is distributed
— the temperature of the boom pipes
on the radiator (especially the two lo-
cated at the very boom of the radia-
tor), may be lower than the temperature
of the remaining parts of the radiator —
this is a normal phenomenon.
TEMPERATURE INCREASE
In order to increase the temperature
of the radiator, press once or sever-
al mes as required; the correct num-
ber of diodes will start blinking. The last
blinking diode indicates the set temper-
ature, whilst the last diode which shines
constantly, indicates the current tem-
perature. The remaining diodes will start
shining constantly on reaching subse-
quent temperature levels.
TEMPERATURE DECREASE
In order to decrease the temperature
of the radiator, press once or several
mes as required; the correct number of
diodes will start blinking. The last diode,
which shines connuously, indicates the
set temperature whilst the last blinking
diode indicates the current temperature.
The remaining diodes will start fading on
reaching subsequent temperature levels.
dryer funcon
turn on/o buon
temperature regulaon

14
When the device is o and the temper-
ature surrounding the temperature sen-
sor drops to below 6° C, the device will
switch on automacally. This is to pre-
vent the heang agent inside the radia-
tor from freezing. The acvaon of An-
freeze mode is indicated by the blinking
of the middle diode.
The DRYER mode switches the appli-
ance on for a specied me, e.g. to dry
the towel. After this time the device
will automacally return to its previous
mode or seng. The default operaon
me of the dryer mode is 2 hours.
To modify it (1-5 hours), press and hold
the key – single LEDs will ash one af-
ter the other. Each of them shines for
two seconds and indicates a specic set-
ng of Timer – the rst LED means 1h,
the second – 2h etc. Aer the 5th di-
ode stops ashing, the 1st one starts the
ashing loop from the beginning. At the
moment of releasing the buon, the se-
lected LED lights up for 2 seconds. This
means that the corresponding seng
has been saved.
1. To enable the DRYER funcon – press
the key briey while the appliance
is in operaon. The temperature level
can be freely adjusted ( and but-
tons), and aer a programmed me
the heater will return to the previ-
ous temperature seng (before the
DRYER funcon was acvated).
2. To use the funcon as a mer, the
heang element must be switched
o. Turn it on by pressing the but-
ton. Aer the set me has elapsed,
the heater will turn o automacally.
Press the buon at any me to inter-
rupt the DRYER / TIMER mode.
CALIBRATING THE TEMPERATURE SPAN
The standard temperature span of the
heang element is 30-60° C. It is possible
to increase or decrease that span by set-
ng a maximum temperature of between
45° C and 65° C, (minimum temperature
of 30° C stays unchanged). This allows the
user to achieve a maximum temperature
which is higher than the standard or to ef-
fecvely heat a space with the device dur-
ing lower surrounding temperatures.
Example: for the temperature regulaon
span of up to 45° C (30-45° C) modi-
caon by one step (one diode), means
increase/decrease of temperature by

15
EN
3.75° C, while for the temperature reg-
ulaon span of up to 65° C (30-65° C)
modification by one step means in-
crease/decrease by 8.75° C.
In order to modify the temperature span,
unplug the device and plug it back in,
while pressing buon. A single diode
will start blinking on the display panel.
Use and buons to set one of the
5 possible maxi- mum temperatures. The
rst diode stands for 45° C. The follow-
ing diodes refer to the following maxi-
mum temperatures: 50° C, 55° C, 60° C
and 65° C.
After selecting the new temperature
span press on/o buon to store the
new sengs.

16
PROBLEM SOLVING
Problem Possible cause Soluon
The device is plugged in,
no diodes are on.
Problem with the
connecon.
Check the connecon of
the power wire, the plug
and the socket.
Heang element is not
heang, outside diodes
are blinking alternately.
Temperature sensor has
been damaged.
Disconnect the device
completely, wait unl the
radiator cools down and
re-connect it again.
Overheang of device.
Check that the radiator
has been lled with the
correct heang agent in
a proper manner, i.e. ac-
cording to the manufac-
turer’s instrucons.
The device is heang de-
spite turning it o with
the buon.
Damaged electronics.
Disconnect the device
completely, wait unl the
radiator cools down and
re-connect it.
If the problem connues please contact Your local Distributor.

17
EN
WARRANTY TERMS & CONDITIONS
1. The subject of this warranty is a elec-
tric heang element with control head.
The product name and characteriscs
are specied on the packaging.
2. By accepng the device on purchase, the
Client conrms that the product is of full
value. The Client should immediately in-
form the Seller of any discovered faults —
otherwise it will be understood that the
Product was faultless at the me of pur-
chase. This refers especially to any faults
or damages of the control panel case.
3. The Warranty period for the Product is
24 months from the date of purchase,
but no longer than 36 months from the
date of producon.
4. The proof of purchase (receipt, invoice,
etc.) constutes the basis for warranty
claims. Lack of the proof of purchase al-
lows the manufacturer to reject a war-
ranty claim.
5. This warranty does not cover any faults
that are due to:
— incorrect (not in accordance with
the manual) installation, use or
disassembly,
— incorrect use of the heang element
(i.e. for any purpose that is not spec-
ied by the Manufacturer as intend-
ed for this type of product),
— Product being handled by unauthor-
ized persons,
— Customers aer the purchase.
6. The Central Heang installaon should
be ed with lock-shield valves, ena-
bling disassembly of the radiator or the
heang element and its control head
without the necessity of emptying the
whole system of the heang agent. Any
problems or expenses arising from the
absence of lock-shield valves in your in-
stallaon cannot be used as grounds for
any claims against the Manufacturer.
7. The aached Product Manual is an in-
tegral element of the Warranty. Please
read it carefully prior to the installaon
and use of the Product.
8. The Manufacturer is obliged to remove
any producon fault within 14 work-
ing days of receipt of the faulty device
at the Manufacturer’s premises.
9. Should the repair be impossible, then
the manufacturer is obliged to replace
the faulty Product with a new, full-val-
ue unit of idencal parameters.

18
Vartotojo instrukcija
Mūsų gaminiai yra sukur ir pagamin taip, kad aktų visus
kokybės, funkcionalumo ir esteškumo reikalavimus. Norime
Jus pasveikin, įsigijus šį puikų gaminį ir palinkė sėkmingo
naudojimo.
Elektrinis rankšluosčių
džiovintuvas
Saugaus montavimo ir naudojimo
vadovas
1. Nemontuokite džiovintuvo po arba virš elektros lizdo.
2. Elektrinis džiovintuvas turi bū užpildytas ksliai pama-
tuotu kiekiu skysčio. Tuo atveju, kai skysčio nepakanka,
ar reikalingas papildymas, kreipkitės į gamintoją.

19
LT
3. Prietaise nėra sumontuoto išorinio temperatūros regu-
liatoriaus. Nenaudokite prietaiso mažose patalpose, jei-
gu jose yra neprižiūrimų, neįgalių ar neveiksnių asmenų.
Naudokite prietaisą k tokiu atveju, jeigu šie asmenys yra
nuolatos prižiūrimi.
4. Elektrinis džiovintuvas nėra žaislas. Vaikams iki 3 metų ne-
leiskite bū labai ar prietaiso be suaugusiųjų priežiūros.
Vaikams nuo 3 iki 8 metų galima leis naudos prietaisu
k jį nkamai sumontavus. Vaikus turėtų prižiūrė suau-
gusieji, arba apmoky saugiai naudos prietaisu, kad su-
prastų galimą pavojų.
5. Dėmesio: kai kurios džiovintuvo dalys gali labai įkais ir
sukel nudegimo pavojų. Ypač saugokite vaikus ar neį-
galius asmenis.
6. Prietaisas naudojamas rūbų arba rankšluosčių džiovinimui,
įsikinkite kad džiovinimui skir audiniai būtų išskalb k
vandeniu, nenaudojant jokių sprių chemikalų.
7. Labai mažų vaikų saugumui užtikrinti, montuokite
rankšluosčių džiovintuvą mažiausiai 600 mm aukštyje
nuo grindų.
8. Prietaisas turi bū montuojamas k kvalikuoto speci-
alisto pagalba laikans galiojančių saugumo reikalavimų
ir nuostatų.

20
9. Visa įranga, prie kurios yra montuojamas prietaisas, tu-
ri bū įrengta laikans toje šalyje galiojančių reikalavimų
saugiam įrengimui ir naudojimui.
10. Energijos ekimui į kainimo elementą, nenaudokite pra-
ilgintuvo ar elektros kištuko adapterio.
11. Prijungdami radiatorių prie elektros instaliacijos, įsikinki-
te, kad komplekte yra 30 mA nuolanės srovės pertrauki-
klis ir nkamas viršįtampio jungiklis. Norint atlik esioginį
jungimą (laido prijungimas be kištuko), taip pat privaloma
įdieg visų polių jungiklį su mažiausiai 3 mm kontakne
anga, kad įrenginys būtų atjungtas nuo visų polių.
12. PB įrenginio versiją galima montuo 1 zonos vonios kam-
bariuose, kaip apibrėžta galiojančiuose įstatymuose, at-
sižvelgiant į bet kokias papildomas taisykles dėl elektros
instaliacijos drėgnose vietose.
Kitos įrenginio versijos gali bū įdiegtos 2 zonoje ar už jos
ribų.
13. Prietaisą naudokite k pagal paskir nurodytą instrukcijoje.
14. Įsikinkite, kad rankšluosčių džiovintuvas buvo sumon-
tuotas laikans instrukcijos nurodymų.
15. Perduokite šią instrukciją galuniam vartotojui.
Table of contents
Languages: