tbs electronics TBS2603AU User manual

1
TBS2603AU HDMI Video Encoder/Decoder User Manual
Preparations:
1. Connect HDMI signal to Encoder
2. Connect LAN cable to Encoder. You can connect Encoder to network switch or a Router.
3. Prepare a PC/Laptop and then power on for your Encoder.
DC 12V: power port. These recommended power adapters are “DC 12V/2A or 5V/2A”. DC 12V/1A
adapter is also ok.
Eth: RJ.45 port, 1000M.
Reset: Reset button. Press and hold it around 9 seconds and then release, reset active.
After reset, IP will back to the default 192.168.1.217. And also configuration will back to the
default.
HDMI OUT: Decode and then HDMI out.
HDMI IN: HDMI signal input.
A-OUT: Decode and audio out. Jack 3.5mm.
A-in: Extra audio in (Line in), Jack 3.5mm
LED display: display basic information. Like device IP, input size, CPU consumption and ect.
Encoder control: web UI
Login:
Default username: admin; pwd: admin

2
Encoder is pre-set to a static IP “192.168.1.217”, not DHCP to get IP. For the first time, please
make sure your PC/Laptop also has an ip which same range as Encoder “19.168.1.xxx”.
Two different Devices who have 2 different IP does not support communicating directly.
The web UI control is consisted of six parts:
Dashboard, Encode, Stream, Overlay, Extend, Options.
Dashboard:
To monitor device status. Like CPU, RAM consumption; traffic: Ethernet port tx, rx;
HDMI input & input preview.
As above, if the input is correctly detected by Encoder, it will indicate the input: resolution and
frequency, also the input media content in Preview.
For the “Previewer”, it’s not live channel, it is some pictures only which is captured very several
hundred milliseconds. So, it looks not smooth enough or intermittent.

3
Encode:
Encode configure. Like video output size, codec, bitrate, GOP, bitrate control, and Network stream
in.
Video side: the output size. “auto” means same size as the input. For instance, the input size is
1920x1080, if it’s set to “auto”, the output size will be also 1920x1080.
Another, we do not recommend small size in and set to large size out. For instance, 1280x720 in
and then 1920x1080 out or smaller size like 576 in and then 1280x720 or 1920x1080 out. This
means screen will be scaled and will affect the video quality.
We do not list all common size, in “video size”. If you find the size you want not list here, you can
go to “Advanced Encode config” to define a new. Like this:
Codec:
Video codec: H.264 baseline; H.264 main; H.264 high; H.265 main.
Audio codec: AAC, MP3, MP2, PCMA. PCMA is only compatible with RTSP protocol.
video/audio separate encode:
Video codec to “close” means disable video encode, and only keep audio out;
Audio codec to “close” means disable audio encode, and only video out.
4
Frame rate:
Supports to 60fps maximum. More frame rates, video will be more smooth.
For this Encoder, the maximum performance/ability is 1-channel 1920x1080p_60hz in and then
Encoder to 1-channel 1920x1080p_60fps out.
Please to balance the resource for all encode processing. If encode processing out of the
maximum performance/ability, Encoder could not work properly.
For example, HDMI channel encode to 1920x1080_60fps and also Mix channel encode
1920x1080_60fps.This means there’re 2-channel 1920x1080_60fps encoding simultaneously. It’s
over the maximum performance/ability.
You can HDMI channel to 1920x1080_30fps while Mix channel to 1920x1080_30fps
simultaneously.
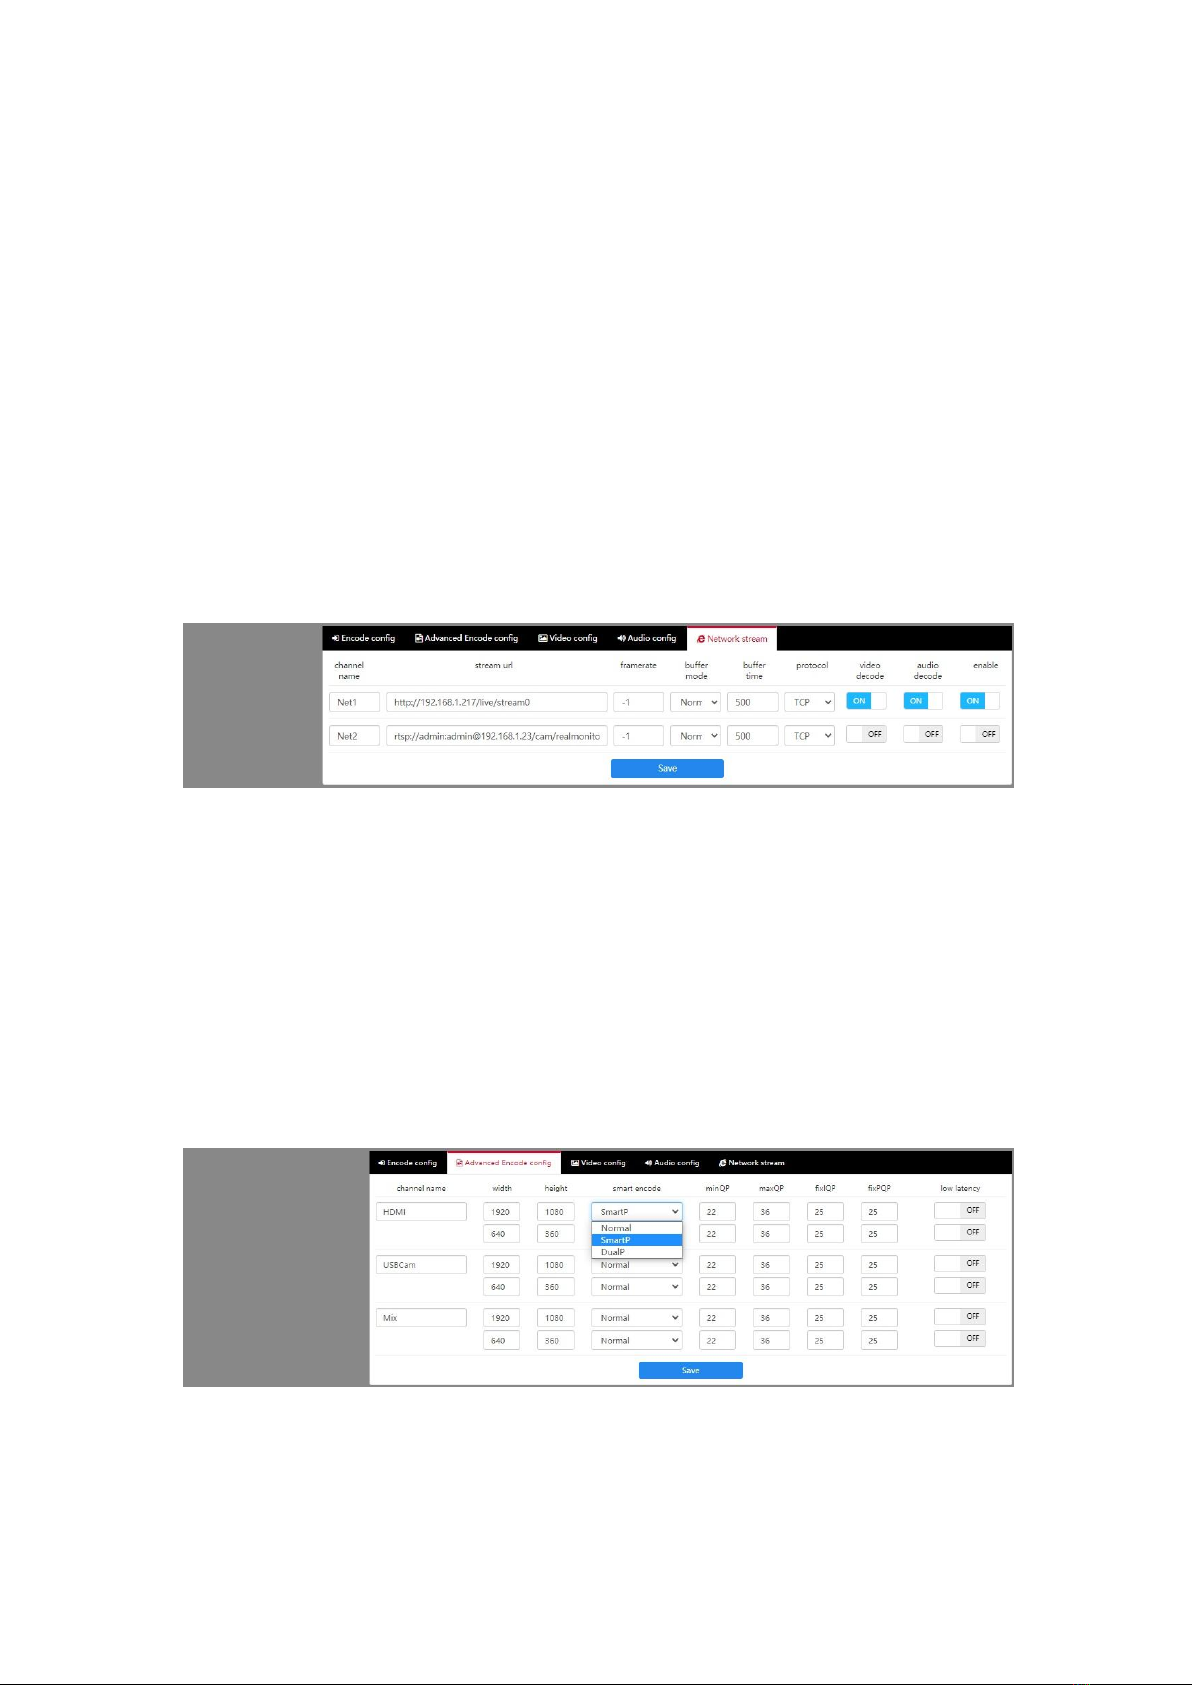
Network stream:
Network stream in for protocol-converting, or for channel mix. http, hls, rtsp, udp, srt stream is
suitable.
Enable: means do not change any codec of the network stream. For protocol-converting;
Video decode & audio decode: may change codec of the network stream, input to do
transcoding.
This Encoder does not support “B-frame encode” network stream in.
There’re tricks to help you get more video quality:
1. For example, If your source is 1920x1080_60_hz in, please encode to 60fps or 30fps out; If
your source is 50hz in, please set “Encode”to 50fps or 25fps out.
2. Some media content like sport channel which is moving fast, please try smart P or Dual P
encode. Like this:
Stream:
Output configure
It supports http, hls, rtsp, rtmp/rtmps, udp unicast/multicast, srt, ndi | hx.

5
Choose one or multiple protocols and enable it, and URL will be auto created in “Play URL”:
NDI | HX output config: just enable it
For NDI | HX stream receiving tools, please try the following:
1. NDI officially provided:
https://ndi.tv/tools/
install and launch “Studio Monitor”, then it will auto to detect your Encoder NDI | HX stream
2.Vmix
https://www.vmix.com/software/download.aspx
Ts Config (ts properties configure):
PID, PMT ID, Service ID, Stream ID; TTL; Package Size.

6
Overlay:
OSD overlay
Add “text, logo, mosaic, time (system time)” to video.
If you upload your logo, please make sure logo is “*.png” format, and also the name must be
legal. For example, here’s an illegal name “my log.png”, the name contains a “space”. For long
name, we recommend you name it to “my_logo.png”.
Logo position configure: X, Y
For example, this is an output and size 1920x1080. X=1920; Y: 1080. The screen should be:
So, if you’ll put your logo to position A, X will be around 1800; and Y is around 80;
If you’ll put your logo to position B, X will be around 60; Y will be around 1000.
For another size and position definition, you can also refer to the above.
7
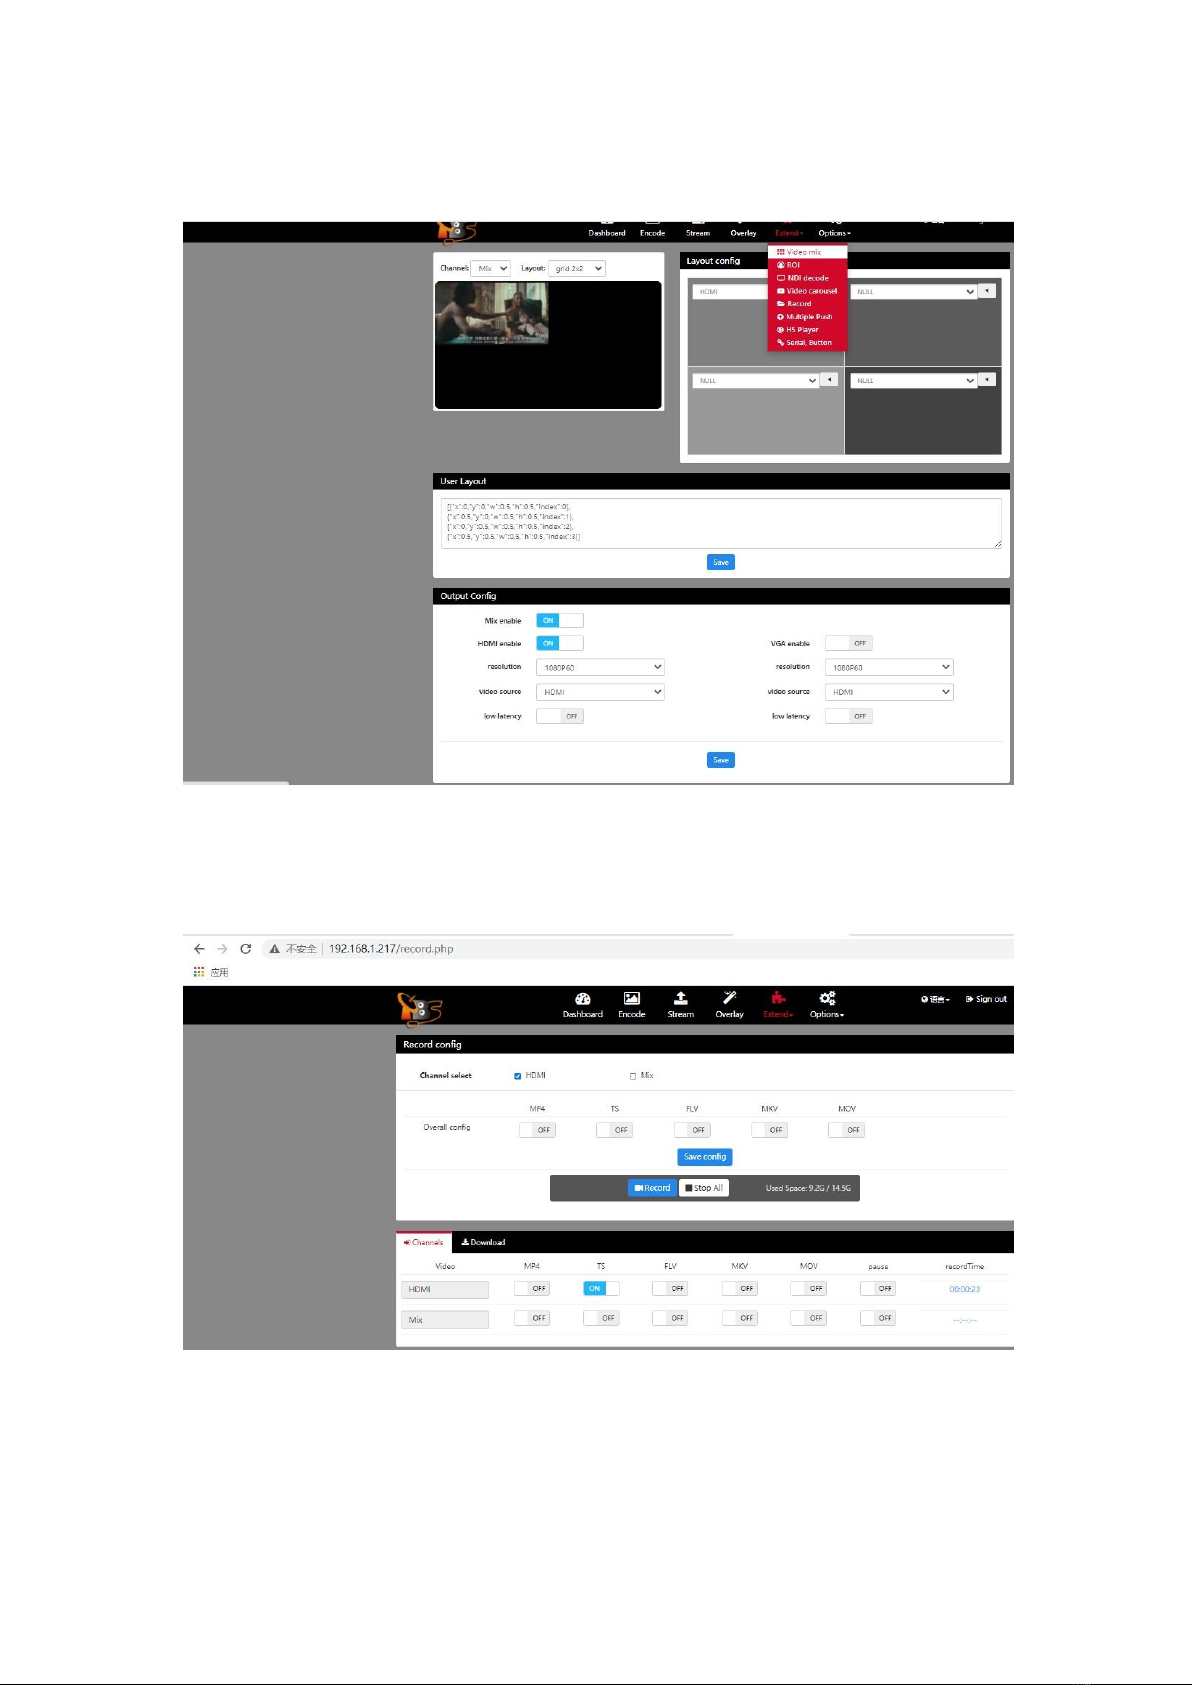
Extend:
extra features
Video mix: different media mixed to a same screen. Need to enable “Mix” in page “Encode” first.
NDI decode: decode NDI | HX stream
Record: record Media and store to USB hard disk. Please prepare a USB hard disk, and it should
be FAT32 or EXT4:
Multiple push: push to different platforms simultaneously. For example, you can push your
stream to Youtube, Facebook, Twtich simultaneously.
H5 player: here’s to play flv stream. So, to use this player, please enable “rtmp” protocol first.

8
Output config:
Set the output resolution and source. VGA output is not available, this device does not leave VGA
port.
Options (system setting):
Upgrade firmware: any new firmware release, please upgrade for your Encoder here. Select
“*.bin” and upload it. Last, do not forget to reboot Encoder to active the upgrade.
Port config: configure port for protocols. HLS protocol is using a same setting as HTTP. For
example:
FAQ:
1.Can not ping or enter Encoder web GUI?
Re: please check your PC/laptop works in same network as Encoder or not. Also, it means

9
PC/laptop should have an ip which range is 192.168.1.xxx.
2 devices which have different 2 ip ranges, could not communicate directly. So, you can configure
an ip 192.168.1.xxx for your PC/Laptop for first time to configure Encoder.
Once enter Encoder web GUI, you can change ip to adjust your local network.
Encoder IP will display on LED, please check there.
2.Encoder not detect input?
Re: please check whether HDMI cable is tightly connected to both your source device side and
also Encoder side.
Check any output from source device or not, any media is playing or not.
3.Can’t play Encoder stream in VLC player?
Re:
1>: maybe your PC/Laptop does not work in a same Network.
2>: If Encoder is UDP out, and your PC/Laptop is connected by wireless like wifi. In this case, UDP
3>: stream does not support transporting by wifi.
4>: maybe something wrong with Encoder, please try reboot Encoder or reset for Encoder and try
again.
4.Encoder stream does not work properly in my Decoder?
Re:
1>Please check your Decoder ability, does it support decode H.264 high; and also does it have the
ability to 1920x1080p_60fps. Maybe need to lowdown the codec to baseline? And also, to
lowdown the resolution and frame rate.
And audio codec, does it support AAC.
2>Did your choose a proper protocol (http, rtsp, udp and ect.) for your Decoder? Maybe your
Decoder does nto support this stream.
5.Encoder rtmp push not work?
Re:
1> To push stream to outside/internet, please make sure Encoder is connected to internet.
In another word, Encoder “ip, netmask, gateway, dns”must be correctly configured. And Encoder
Lan port to Router or switch which can be connected to Internet.
2> please check your media server url, port, stream name is correct or not.
3> some media server, it’s needed Safety certification, like “whitelist”.
6.have tried everything but Encoder still not working properly?
Re: please try reset Encoder. Or please write to us:
support@tbsdtv.com
Other tbs electronics Media Converter manuals


Popular Media Converter manuals by other brands


OT Systems
OT Systems ET2212-A-SA Installation and operation manual

Cobalt Digital Inc
Cobalt Digital Inc 9262 user manual

Lightronics
Lightronics IDW112 owner's manual

SoundTraxx
SoundTraxx Kato HO P42 Application note

Ingersoll-Rand
Ingersoll-Rand QC-DIO-8CH installation manual

URIT Medical Electronic
URIT Medical Electronic VRN DA-20 user manual


