TD Systems K32DLM8HS User manual

TELEVISOR LED 32”/40”/50”
K32DLM8HS
K40DLM8FS
K50DLM8FS
Lea atentamente este manual antes del uso y consérvelo
como referencia en el futuro.
MANUAL DEL USUARIO
www.tdsystems.es
EN USER MANUAL ............................................................................ 40
FR MANUEL UTILISATEUR ............................................................... 79
DE BENUTZERHANDBUCH ..............................................................118
PT MANUAL DO USUÁRIO ...............................................................157
ES MANUAL DEL USUARIO .................................................................1
ITA MANUALE DELL'UTENTE ...........................................................196

Table of Contents
1. WARNINGS AND CAUTIONS
………………….............…………………
Page40
1.1
Important safety instructions .......………………………..…………..
Page40
1.2
Antenna safety instructions ........………………………..…………..
Page42
2. LED TV OVERVIEW
...................……………….............…………………
Page43
2.1
What's In the Box .....................………………..………..…………..
Page43
2.2
LED TV settings ...........……………………….................……….…..
Page43
2.3
Your LED TV ...........…......…………………….................……….….
Page45
2.4
Remote Control...........…………....…………….................………….
Page49
3. LED TV SET UP
...................………………......................…………………
Page52
3.1
Cable TV or antenna connection …………….................…………..
Page52
3.2
Connecting an AV device via YPbPr ……….................…………..
Page54
3.3
Connecting an AV device via HDMI …….....................…………..
Page55
3.4
Connecting an AV device via DVI/HDMI .....................…………..
Page56
3.5
Connect a PC ............................................................…………..
Page57
4. Home Page
........................................…………….........…………………
Page58
4.1
what's New ...................................................................…………..
Page58
4.2
Featured APP................................................................…………..
Page58
5. TV Apps
.............................………………......................…………………
Page66
5.1
INPUT ENTRADA........................................................…………..
Page66
5.2
Main Menu....................................................................…………..
Page67
5.3
Function .....................................................................…………..
Page72
5.4
Setup ........................................................................…………..
Page73
5.5
MEDIA PLAYER FORMAT ..........................................…………..
Page74
5.6
Resolution ................................................................………...…..
Page76
6. TROUBLESHOOTING
....………………......................……….…………
Page76
7. SPECIFICATIONS
...………………..............................…………………
Page77
4.3
APPS ............................................................................…………..
Page59
4.4
Sports & Music .............................................................…………..
Page59
4.5
Setting ..........................................................................…………..
Page60
4.6
Media Player ...............................................................…………..
Page63

This symbol indicates
danger
This symbol indicates
mandatory actions
1.WARNINGS AND CAUTIONS
1.1 Important Safety instructions
In order to avoid accidents, the following safety measures must be followed when
setting up, using and carrying out maintenance on the device.
Before using this device, please carefully read this manual.
In order to reduce the risk of fire or electric shock, do not expose the device to rain
or humidity.
DO NOT REMOVE THE COVER (OR BACK).
DO NOT TOUCH THE INTERNAL COMPONENTS.
REFER MAINTENANCE OR REPAIRS TO A QUALIFIED TECHNICAL
SERVICE.
IMORTANT SAFETY INSTRUCTIONS
This symbol indicates
forbidden actions
Do not set up the device on trolleys, tables or shelves uneven or unstable.
The product may fall, causing serious injury to a child or adult and serious
damage to the product.
The equipment must be handled and transported carefully. Sudden stops,
excessive force and uneven surfaces may make the device and its platform
to fall.
Do not defeat the grounding pin of the power plug. The removal of the
grounding pin will increase the risk of device damage.
If the power plug cannot be connected to the socket, ask an electrician to
install a compatible plug.
Use this device always with the power socket marked in the rating label,
located in the rear part of the device.
Never overload sockets.
Use the power cable carefully. Do not put heavy objects on the power cable.
Do not pull the mains lead. Do not handle the mains lead with wet hands.
40
Do not touch the mains cable or the antenna during electrical storms.
Disconnect the mains cable from the socket if the device will not be used for a
long time.
Do not place or use this device near water.
Never expose the device to liquids, rain or humidity. Contact an authorized
technical service if any of the previous items is spilled on the device.
Do not expose the device to extreme temperatures or direct sunlight, it could
overheat and get damaged.
Do not set up the device near heat sources such as radiators, stoves, ovens
or any other device that can cause heat.
Do not try to repair the device on your own.
Opening and removing the covers can expose you to dangerous voltage or
other risks, and can void the warranty. It must be repaired by qualified
personnel.
Do not put or let fall any foreign object on the device.
Do not insert anything in the ventilation slots of your device. Inserting a
metallic or flammable object can cause fire or electric shock.
Do not obstruct the ventilation slots. Leave open space around the device.
Never set up the device on: beds, sofas, rugs or similar surfaces; close to
curtains, walls, shelves, cupboards or any other place where there may be
insufficient ventilation.
Always disconnect the mains cable of the socket before cleaning the device.
Never use liquid or spray cleaners on the device.
Wipe it only with a clean, dry cloth.
Use only accessories recommended by the manufacturer.
EARPHONE USE
Use the earphones with a moderate volume to avoid damaging your hearing.
To avoid damaging your hearing, set the volume to the minimum before
playing, and increase the level as you desire when the playing begins.
If you cannot hear anything when playing, do not increase the volume, the
music may start suddenly at a very high volume. An excessive sound
pressure from the earphones can cause hearing loss.
WARNING
:
This user manual is only for reference, the actual unit may be
slightly different.
41
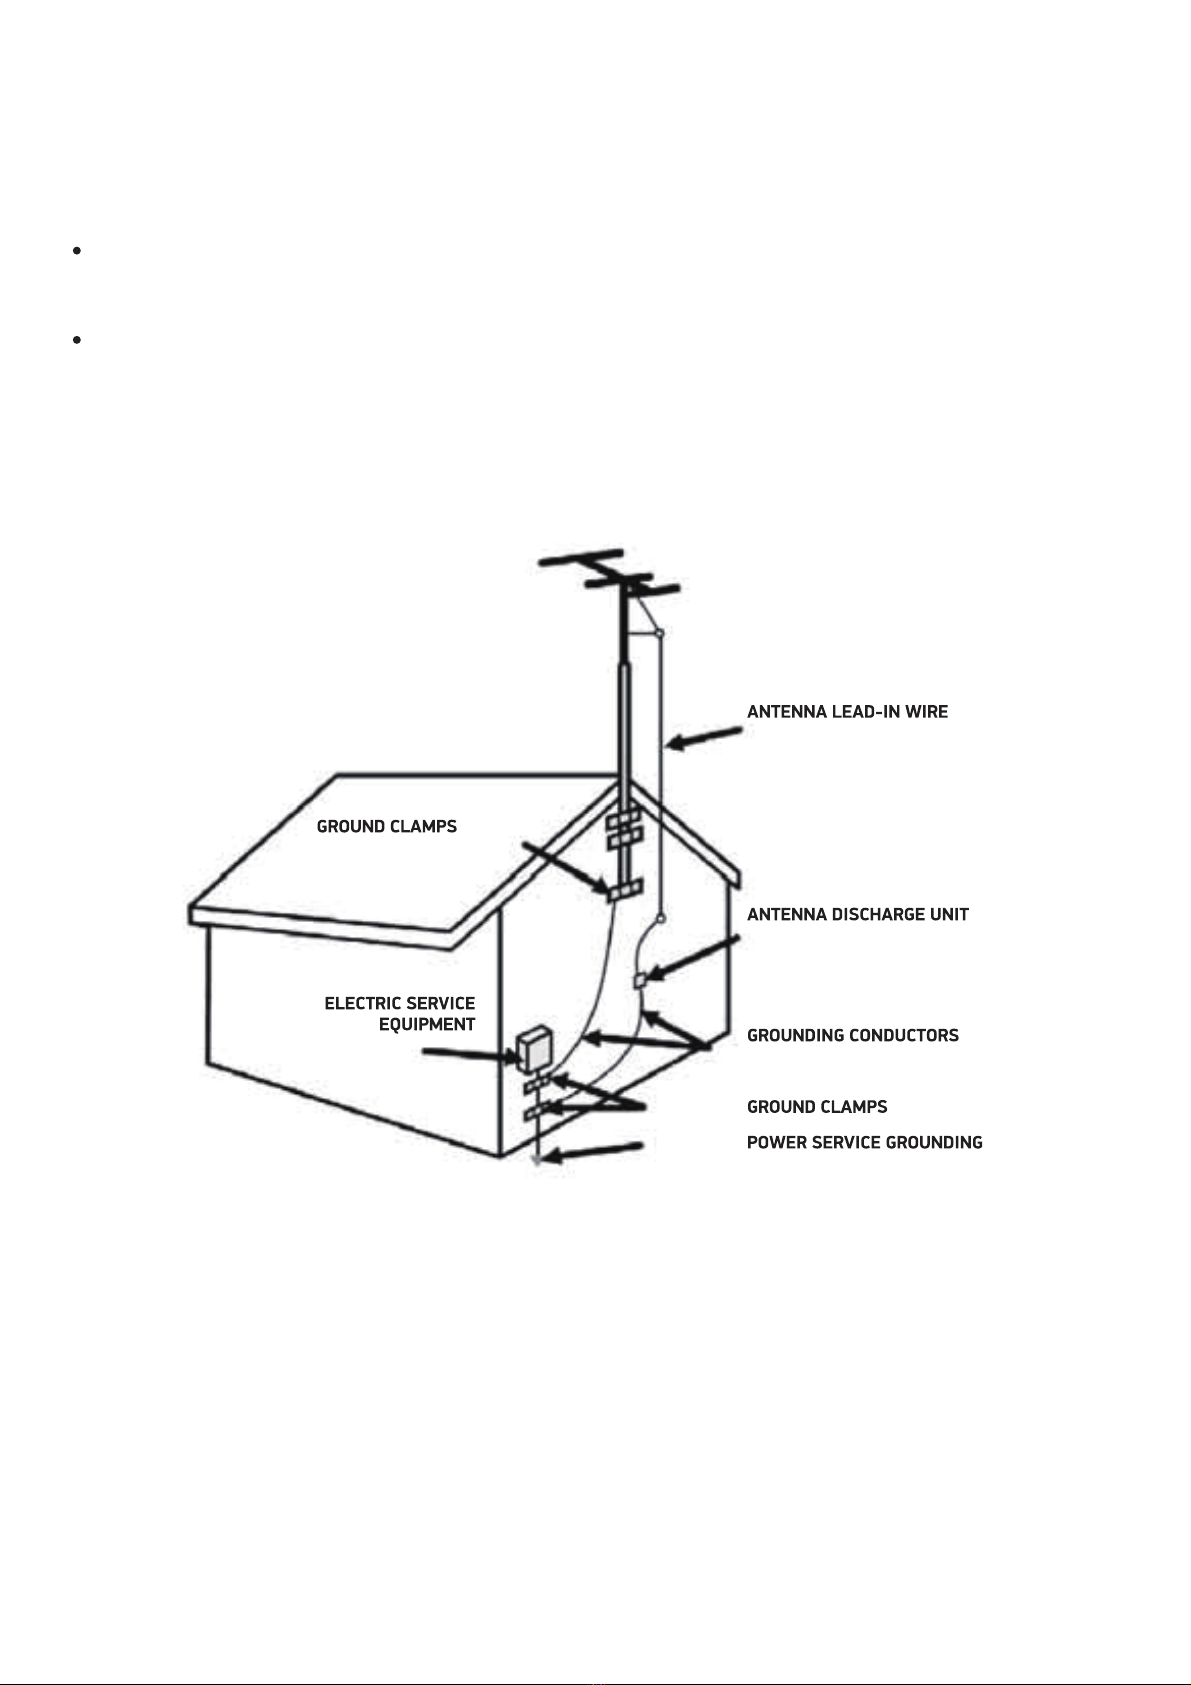
1.2 Antenna safety instructions
If an external antenna is connected, please follow these cautions:
An external antenna must not be placed in locations where it can contact
overhead electrical cables, lights or circuits.
When installing an external antenna, extreme care must be taken to avoid
contact with electrical overhead installations. Direct contact with electrical
mains can be lethal and must be avoided.
ANTENNALEAD-IN WIRE
:ANTENNALEAD-IN WIRE
ANTENNA DISCHARGE UNIT
:ANTENNA DISCHARGE UNIT
GROUNDING CONDUCTORS
:GROUNDING CONDUCTORS
GROUND CLAMPS
:GROUND CLAMPS
POWER SERVICE GROUNDING
:POWER SERVICE GROUNDING
ELECTRIC SERVICE EQUIPMENT
:ELECTRIC SERVICE EQUIPMENT
42

43
2.- LED TV OVERVIEW
2.1. What's In the Box
AAA BATTERIES
LED TV UNIT REMOTE
CONTROL
INFO
MENU
OK
SALIR
SUB
1 2 3
4 5 6
7 8 9
0
VOL P
TAMAÑOSONIDO GUÍAIMAGEN
TS DETENER GRABAR
TXT
AUDIO
ENTRADA
DTV/RADIO
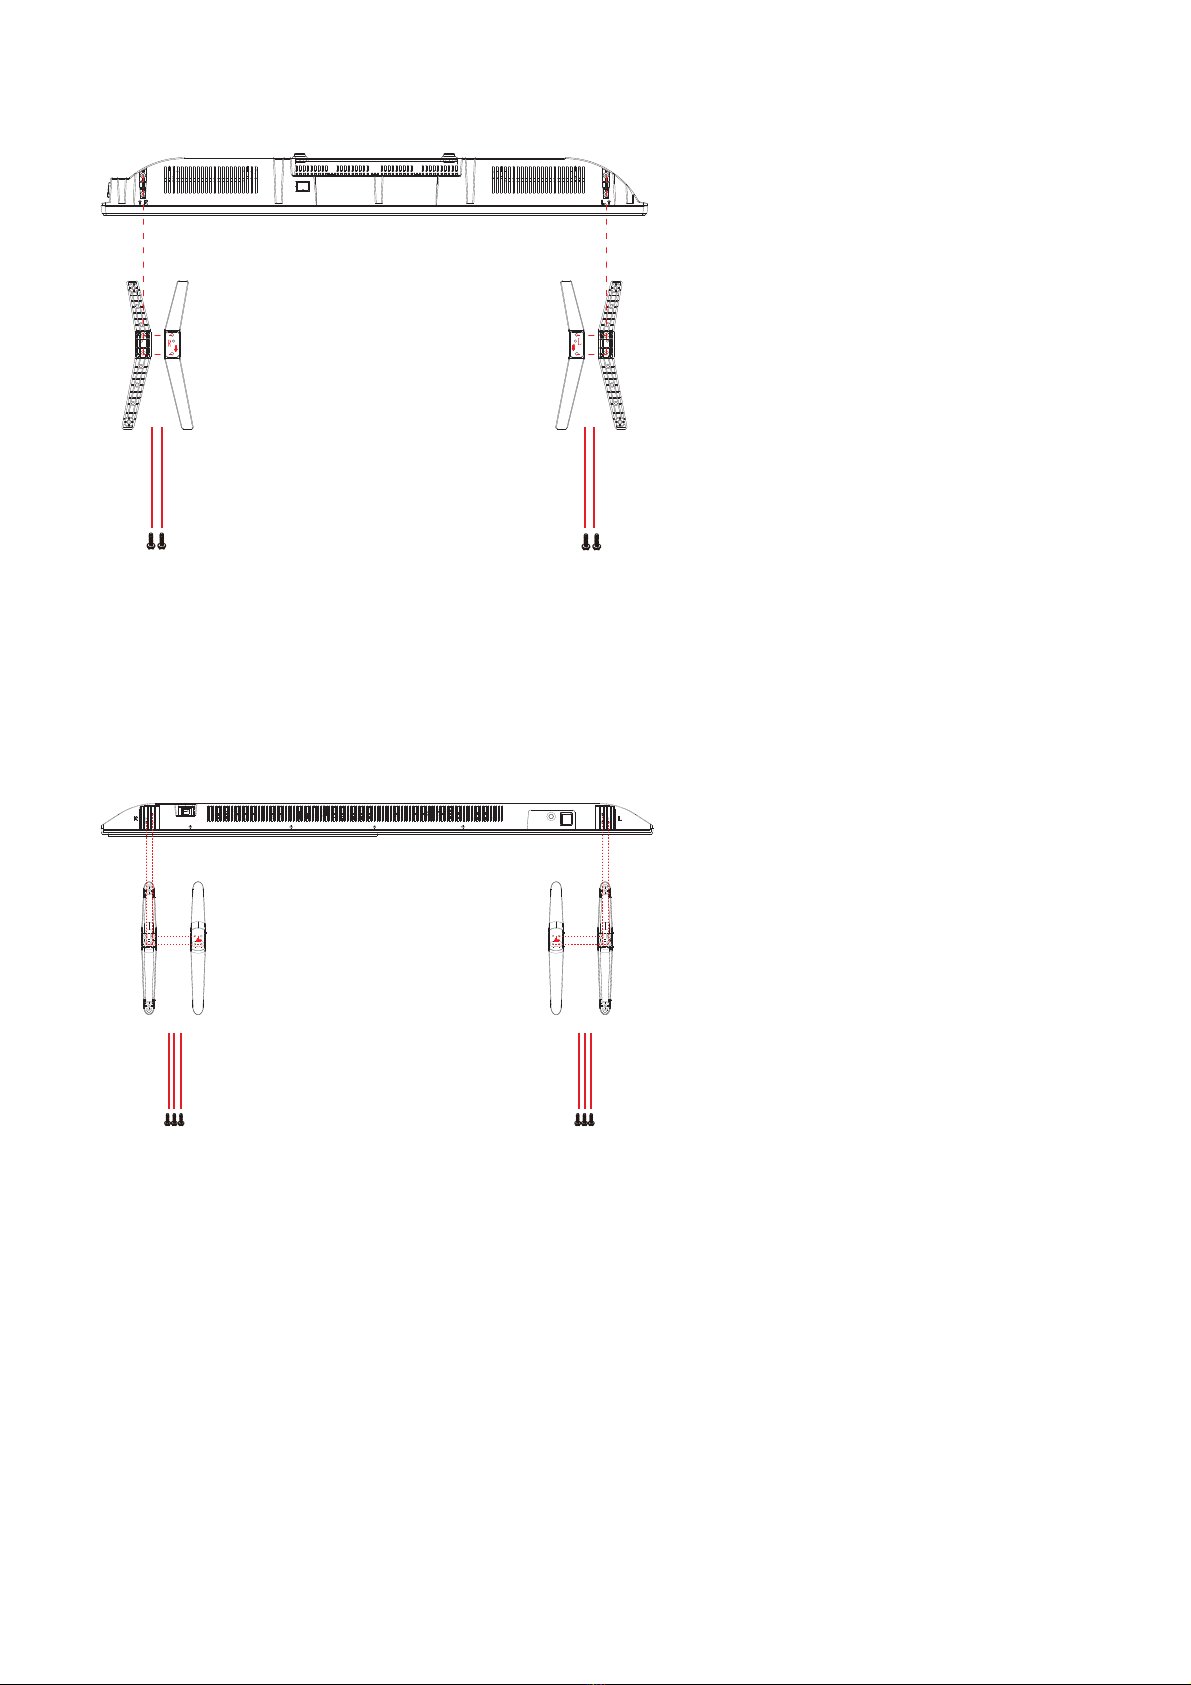
2.2 LED TV settings
HOW TO INSTALL THE TV SUPPORT/STAND
1. Install the support in the LED TV.
2. Fix the support screws to the LED TV
USER MANUAL
TELEVISOR LED 32”/40”/50”
INSTRUCTION MANUAL
www.tdsystems.es
Please, carefully read the instructions before
use and keep them appropriately
K32DLM8HS
K40DLM8FS
K50DLM8FS
K32DLM8HS
2
Screws
4*15BBH
2
Screws
4*15BBH
44
K40DLM8FS
2
Screws
4*15BBH
2
Screws
4*15BBH
K50DLM8FS
3
Screws
4*22BBH
3
Screws
4*22BBH
WARNING:If you want to hang the TV, do not install the stand.

45
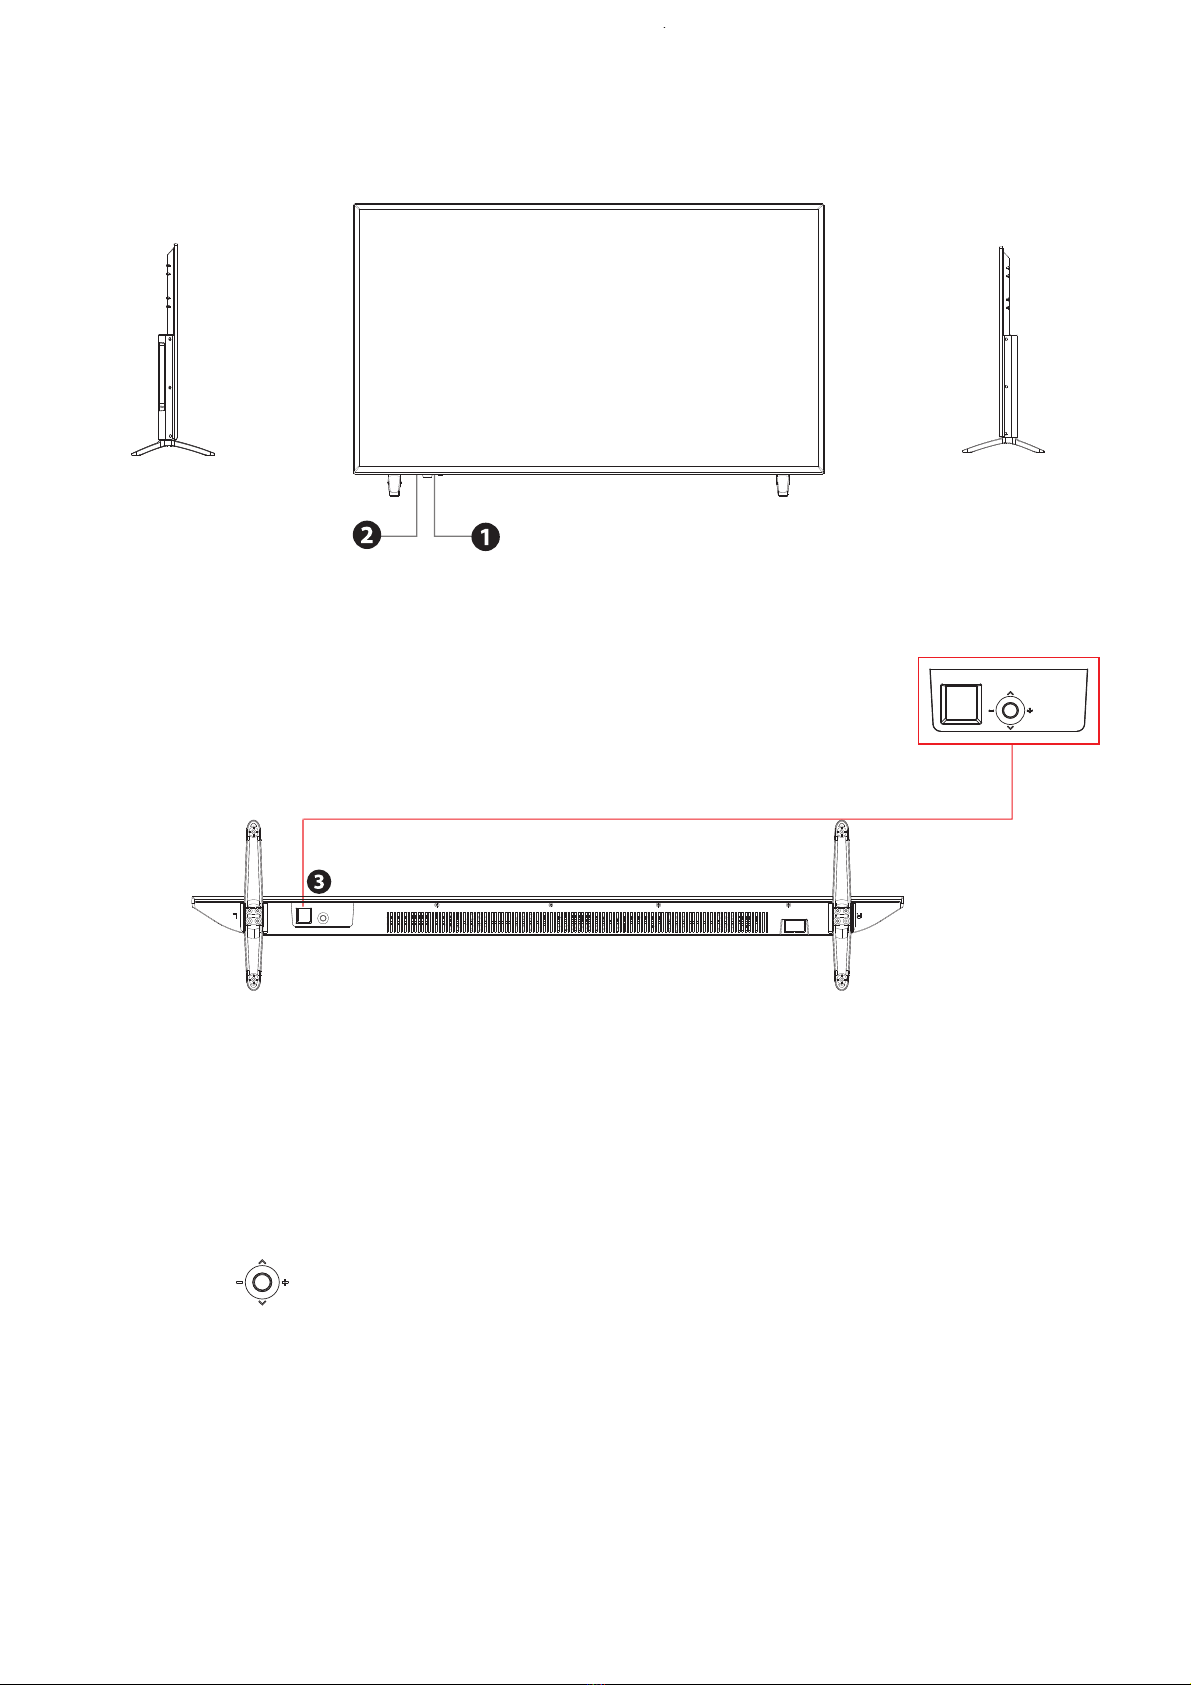
2.3. Your LED TV
FRONT/LEFT/RIGHT VIEW AND CONTROLS
Right side view Front view Left side view
Button Functions
1. : To turn ON/OFF the TV.
2. ENTRADA: To select the input source.
3. MENÚ : To enter menu setting page.
4. VOL-: To decrease the volume level.
5. VOL+: To increase the volume level.
6. P-: To select previous channel.
7. P+: To select next channel.
8. IR RECEIVER: Receives infrared signals from the remote control.
9. INDICATOR LED: Status indicator.
P+ P-
VOL+ VOL-
MENÚ ENTRADA
K32DLM8HS
46
Button Functions
1.POWER LED:Lights green when the TV is on. The TV will be in standby mode.
The LED will change from red to green when the timer programming (PVR) starts
in standby mode.
2.IR:Receives infrared signals from the remote control.
Do not put anything near the sensor, it may affect its operation.
3. EPress the to power on.
To change the source, press forward and keep pressed 1-2 seconds.
Menu: To access the menu, press backwards and keep pressed 1-2 seconds.
Once in the user menu, move to left/right or press forward/ backward to change
the wheel use,and change the volume +/- moving to right or left.
Right side view Front view Left side view
K50DLM8FS

47
INPUTS
PC AUDIO VGA RJ45 YPbPr(mini) AV(mini) HDMI1 ANTENA
CI+ AuricularesHDMI2
(ARC) HDMI3 USB
5Vdc 0.5A S.SONIDO
DIGITAL
USB
5Vdc 0.5A
1 2 3 4 5 6 7
6
8
9
10
8
11
1.
PC AUDIO IN: 3.5 mm jack connector, to enter the tv the sound from a
device connected to VGA port.
Green Y Luma+sync
Blue Pb Difference of signal between BLUE and Luma
Red Pr Difference of signal between RED and Luma
2.
VGA: Common VGA e video connector is an "E" size D-sub connector,
with 15 pins in three rows, useful to connect external desktop or laptop. The
sound must be sent separately to the tv through the PC AUDIO IN port.
3.
RJ45: RJ45 Ethernet port. This port is compliant 10/100 mbs
4.
YPbPr mini: This is an input port to tv, to connect any device using the
normal three component video signal. The colour of connectors are as follows:
In the event you need to use this port, you must have the appropriate cable
male – to – male RCA Y PbPr, and connect to the female RCA adaptor. The
sound from this device must be input through the RED and WHITE of the AV
mini input port of the tv.

48
5.
AV mini: This is an input port to tv, to connect any device using the normal
composite video signal, and the analogic stereo left & right channels. The colour
of connectors are as follows:
Yellow Video
White Audio Left channel
Red Audio Right channel
In the event your device only has SCART EUROCONNECTOR output port, you
can find a wide range of adaptors in the market to convert your SCART to male
RCA connector, then connect this cables to the female adaptor in the tv.
6.
HDMI: HDMI 1, 2 and 3. The HDMI ports are to connect a wide range of
devices, and enjoy the maximum performance and resolution. All of them are
CEC, and HDMI 2 is also ARC. The version used is 1.4 a.
7.
ANTENA: Antenna connection.you can tune both DVB-T,DVB-T2 and DVB-
C.Take into account this is not a 4K tv,so no 4K channel Will be shown, even if
IRXQGDQGVWRUHGLQFKDQQHOOLVW7KLVLVQRWDIDLOXUHȍ
8.
USB: USB 2.0 port, can be used to record and playback DTV programs,
recorded with this tv. This port can also be used to playback your own films,
see photographs or listen to your music. Some files will not be readable due
to licensee restriction.
Do not use the usb port of the tv to charge your mobile phone. It may result in
damage for your tv. The maximum size storage that can be read by the tv is 1
Terabyte. FAT32 and NTFS.
9.
CI+: This a multimedia common interface, that can be used to obtain access
to some pay per view programms/ channels. The user must put attention to the
insertion position, or any pin may result bended or damaged, with the result of not
reading the CAM. This fault is not covered by the guaranty.
10.
Auriculares: The headphones set must be connected here. The speakers
of the tv will not sound.
11.
S.SONIDO DIGITAL: Coaxial digital output port. This port must be used to
connect the tv to external amplifier. The sound from all the sources of the tv will
pass through this port. The sound level of this port will not be affected by volume
key of the tv remote control. You will enjoy full digital sound in your multi speakers
audio system. Your amplifier must have the DIGITAL IN coaxial port.

2.4 Remote Control
Step 1. Slide the rear cover to open the battery compartment in the remote
control.
Step 2. Insert two AAA size batteries. Make sure the polarities (+) and (-) match
the (+) and (-) symbols marked in the battery compartment. Slide again the rear
cover in position.
Do not use abrasive cleaners (porcelain, stainless steel, bathroom or oven
cleaners) on the remote control, it may be damaged.
49

50
INFO
MENU
1 2 3
4 5 6
7 8 9
0
VOL P
2
5
12
24
8
11
14
17
20
29
25
21
28
1
4
3
7
6
10
9
13
18
22
26
16
15
27
23
19
AUDIO SUB
DTV/RADIO
ENTRADA
OK
SALIR
IMAGEN SONIDO TAMAÑO GUÍA
TS DETENER GRABAR
TXT
1 :
Turn on the TV/ standby.
2 :
Press to open the Home Page.
4 AUDIO:
Switch the audio channel when
playing DVD or multimedia.
3 :
Power off timer.
5 SUB:
Select subtitle of media video file.
(needs the support of disk or flie)
6 0-9:
Changes the channel directly.
7 DTV/RADIO:
In DTV mode, press the
DTV/radio button to access the DTV or
radio mode.
8 :
Returns to the previously tuned channel.
9 :
Mute or resume the sound.
10 VOL:
Increase and decrease the volume.
11 P:
Next and previous channel.
12 :
Smart TV mouse model.
13 INFO:
Shows extended information.
14 ENTRADA:
Press to change signal source.
15 /OK:
moves in the menus and
confirms settings.
16 MENU:
Shows the menu.
17 SALIR:
Exit the menu.
18 IMAGEN:
Lets you change between the different preset picture settings.
:
Shows the main page in the teletext mode.
19 SONIDO:
Lets you change between the different preset equalization types.
:
Shows hidden information, such as the answers to a teletext quiz.

51
INFO
MENU
1 2 3
4 5 6
7 8 9
0
VOL P
2
5
12
24
8
11
14
17
20
29
25
21
28
1
4
3
7
6
10
9
13
18
22
26
16
15
27
23
19
AUDIO SUB
DTV/RADIO
ENTRADA
OK
SALIR
IMAGEN SONIDO TAMAÑO GUÍA
TS DETENER GRABAR
TXT
20 GUÍA:
Shows the program guide in screen
in DTV mode.Press again to switch off the EPG.
:
Freezes the page change in teletext mode.
21 TAMAÑO:
Lets you change between the
different aspect ratios:16:9, 4:3 and
:
Shows the upper, lower section or the whole
page.
22 TS:
In DTV mode, press the button to active
the TIMESHIFT function.
:
Play/Pause.
23 DETENER/ :
Stops the playing or recording
on USB.
24 TXT:
Turns on and off the Teletext function.
25 GRABAR/ :
Stops the playing or recording
on USB.
26 :
Previous file or chapter.
27 :
Next file or chapter.
28 :
Quickly rewind the playing.
29 :
Quickly advance the playing.
:
Press the correct button for
the TELETEXT direct access functions or the EPG/SD.

3.- LED TV SET UP
Use the manufacturer manual as a reference to connect any external device.
When connecting any external device, do not connect any power cable to the wall
sockets until the other connections are finished.
3.1 Cable TV or antenna connection
ANTENNA CONNECTION
Next you will find a brief explanation of the connection type provided with the
different antenna systems.
A 75 Ohm system is usually a round cable (not included) with an IEC type
connector that can be easily attached to a terminal without tools.
IEC type connector
Coaxial 75 Ohm cable (round)
Use the following schematic to connect the external antenna.
VHF/UHF antenna
300-75 Ohm adaptor
(not included)
Double 300 Ohm cable
VHF/UHF antenna
Coaxial 75 Ohm cable
52
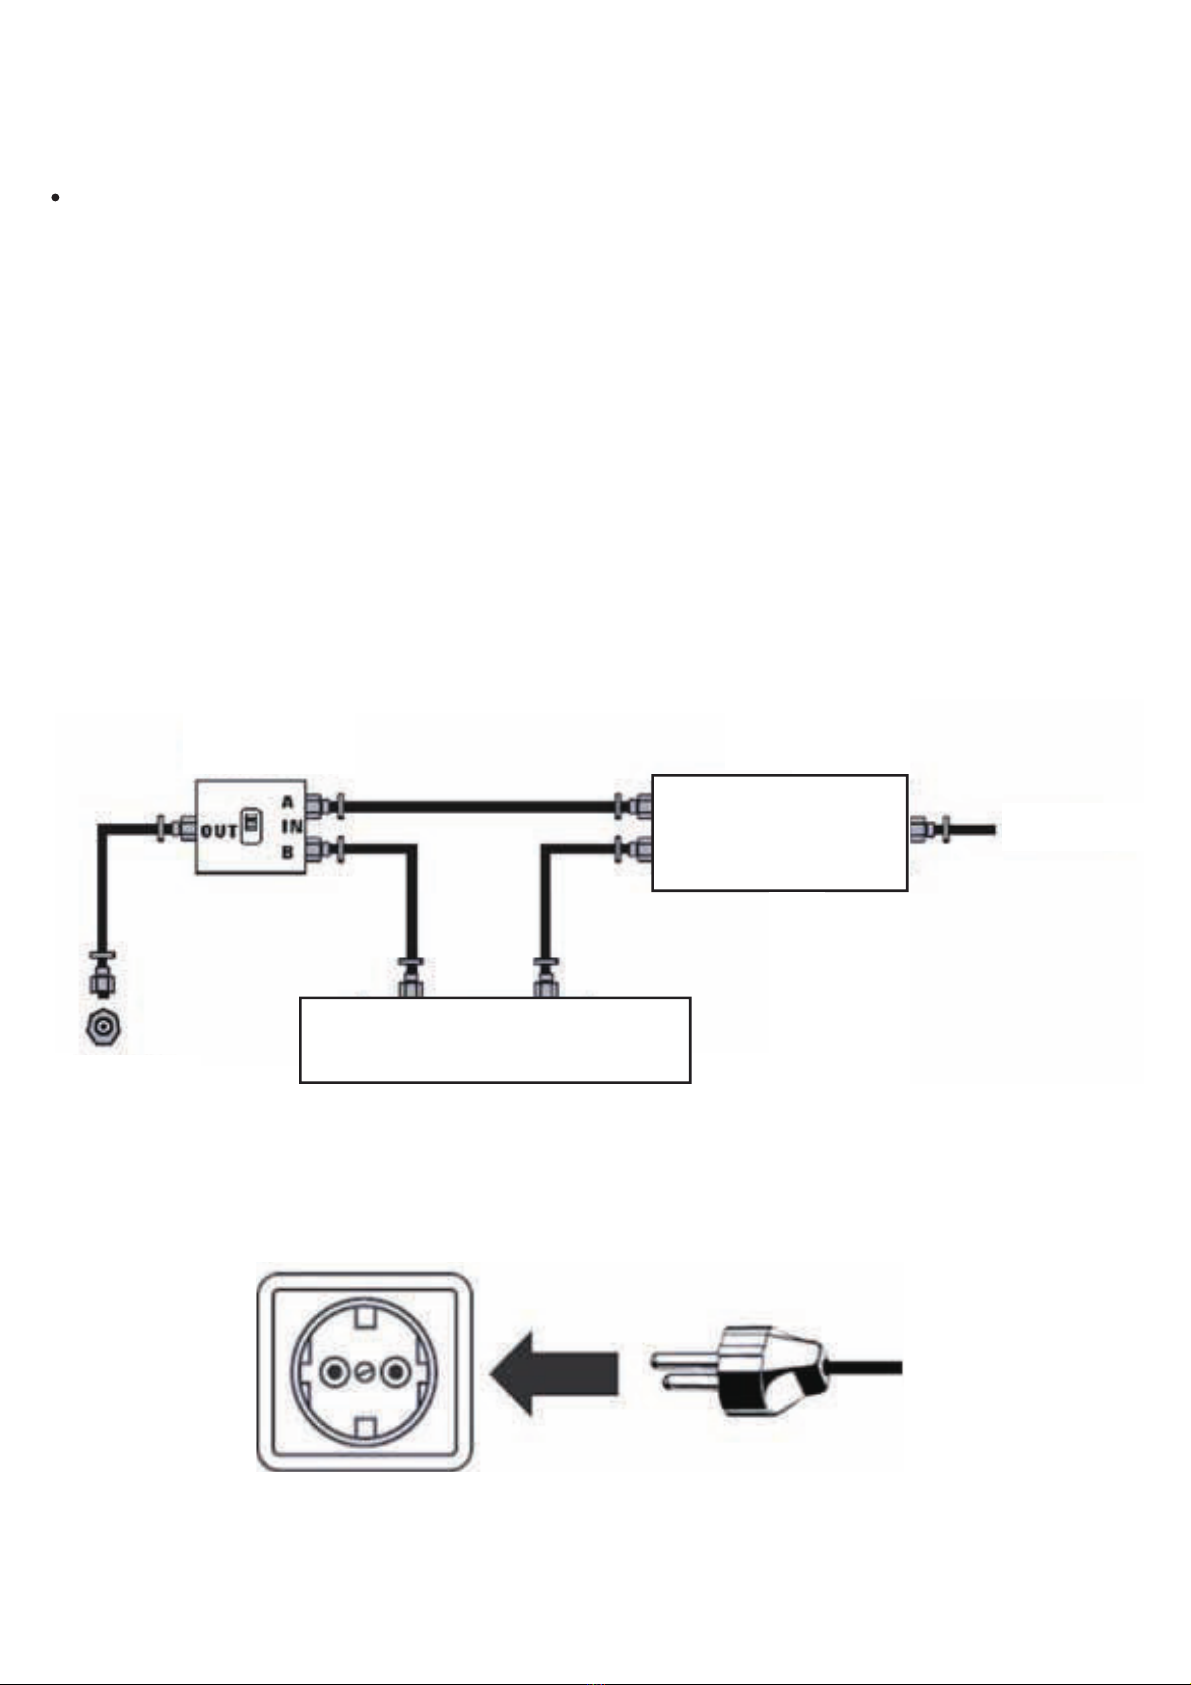
CABLE TV CONNECTION
Some cable TV companies offer paying Premium channels. Since these
channels’ signal is coded, normally a converter/decoder for cable TV is provided
to the customer by the cable TV company.
This converter/decoder is needed to view normally the coded channels.
To obtain specific instructions on the installation of cable TV, ask your cable TV
company.
In the following schematic is shown an example on how to connect the
converter/decoder provided by your cable TV company:
RF switch: radiofrequency socket (not
included)
2 set signal splitter:
2 sets of signal
splitters (not included) Cable TV line: cable
TV line.
Cable TV: cable TV decoder (not
included)
Then connect the mains adaptor to a power outlet.
53
VHF/UHF IN:
VHF/UHF input
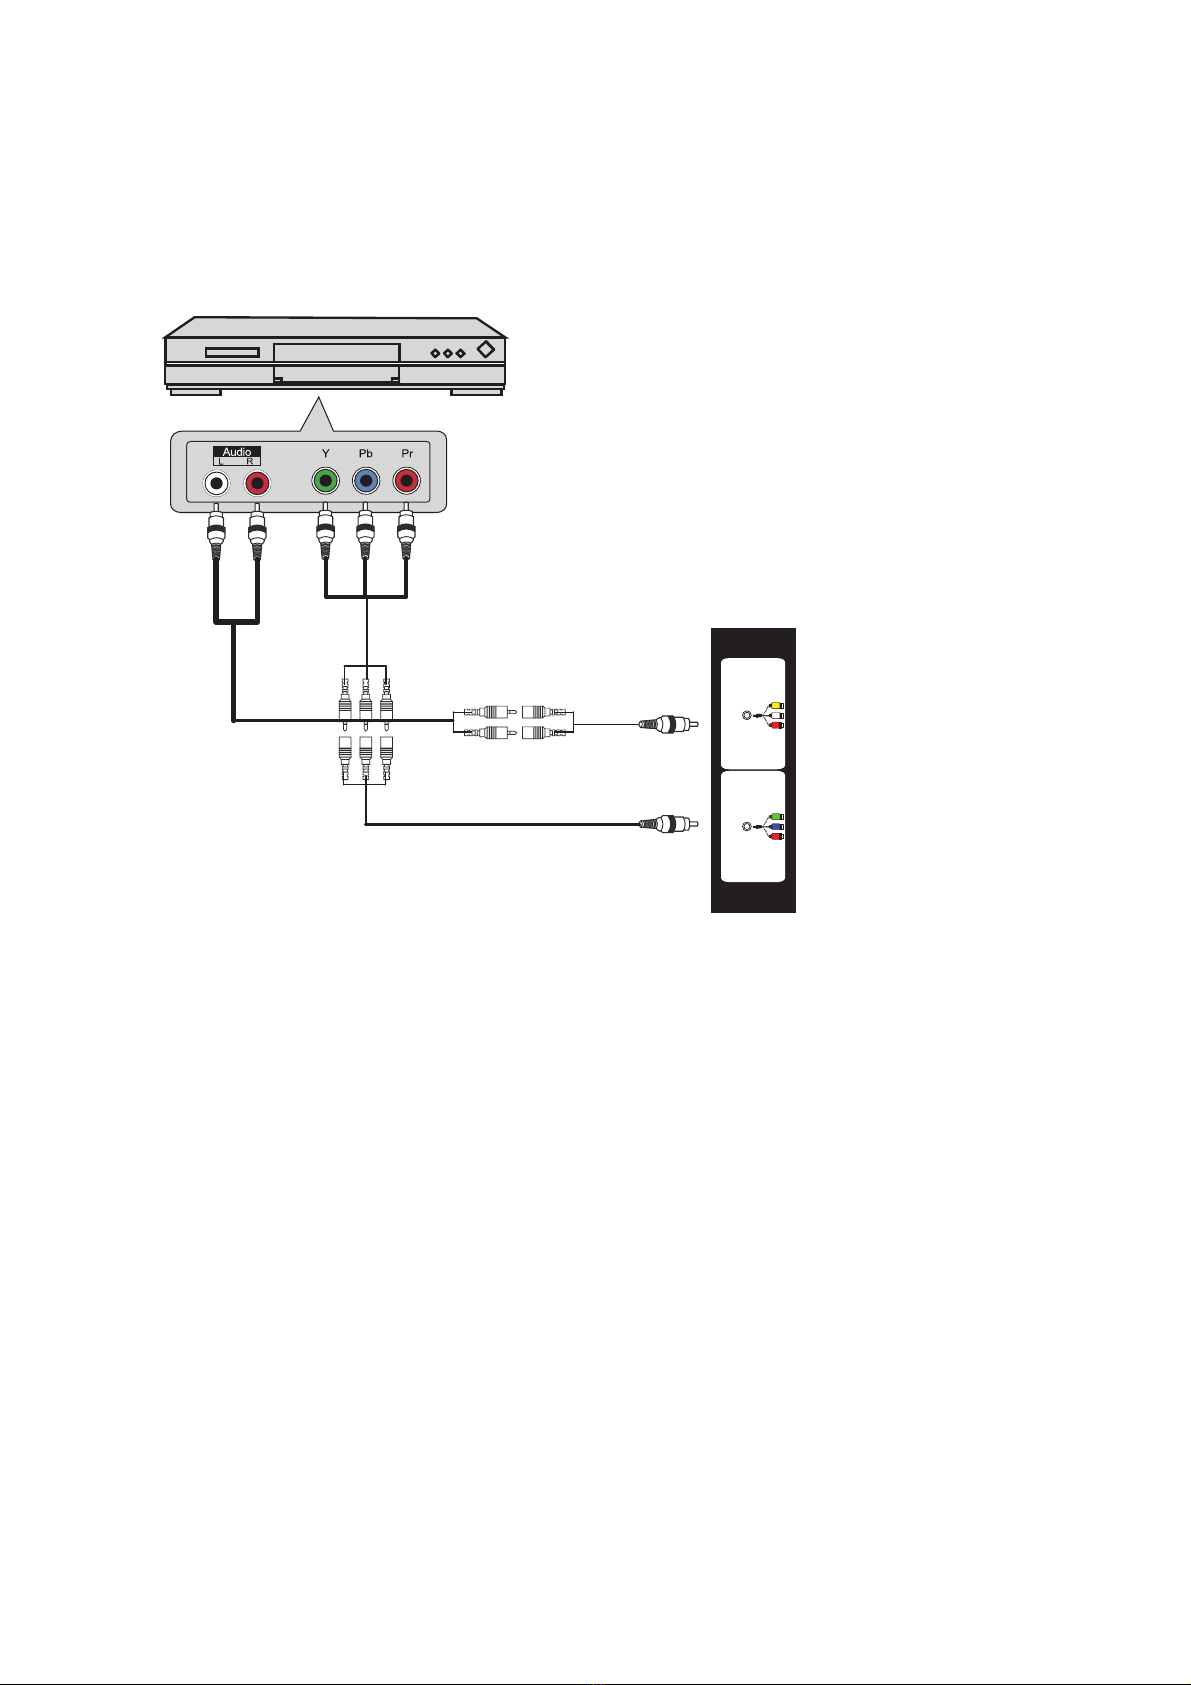
3.2. Connecting an AV device via YPbPr (cable not included)
DVD or VCR
Rear part of the DVD or VCR
Audio cable
YPbPr cable
1. Use the YPbPr cable to connect the output connectors of the external
audio/video device to the YPbPr connection of your LED TV. Use an audio
cable to connect the audio output connectors from your audio/video device to
the audio YPbPr connection of your LED TV.
2. Connect all connections before powering on your LED TV or another
connected device.
3. Press the power button on your remote control to power on the LED TV.
3UHVVWKHVRXUFHNH\RQWKHUHPRWHFRQWURODQGXVHWKHŸRUźEXWWRQVWR
select YPbPr, and press OK.
The YPbPr connectors of your device can be labelled as YPbPr or YCbCr. For
more information on this connection, check the user manual of your audio/video
device.
YPbPr(mini) AV(mini)

3.3 Connecting an AV device via HDMI (cable not included)
HDMI Cable
Rear part of the DVD or VCR
DVD or VCR
1. Use an HDMI cable to connect the HDMI output connectors of your device to
the HDMI connection of your LED TV.
2. Connect all connections before powering on your LED TV or another
connected device.
3. Press the power button on your remote control to power on the LED TV.
4. Press the FUENTENH\RQWKHUHPRWHFRQWURODQGXVHWKHŸRUźEXWWRQVWR
select HDMI, and press OK.
The HDMI connector provides audio and video signals, there is no need to
connect the audio cable.
55
HDMI1 HDMI2
(ARC)
HDMI3

3.4 Connecting an AV device via DVI/HDMI (cable not included)
Audio cable
Rear part of the
DVD or VCR
HDMI to
DVI cable
DVD or VCR
1. Use an HDMI to DVI cable to connect the DVI output connectors of your
device to the HDMI connection of your LED TV.
2. Connect all connections before powering on your LED TV or another
connected device.
3. Press the power button on your remote control to power on the LED TV.
4. Press the FUENTENH\RQWKHUHPRWHFRQWURODQGXVHWKHŸRUźEXWWRQVWR
select HDMI, and press OK.
If the LED TV is connected to the DVI connector of your audio/video device, you
will need an HDMI to DVI cable or an HDMI adaptor (not included) and an audio
cable.
56
HDMI3
HDMI1 HDMI2
(ARC)
AV(mini)
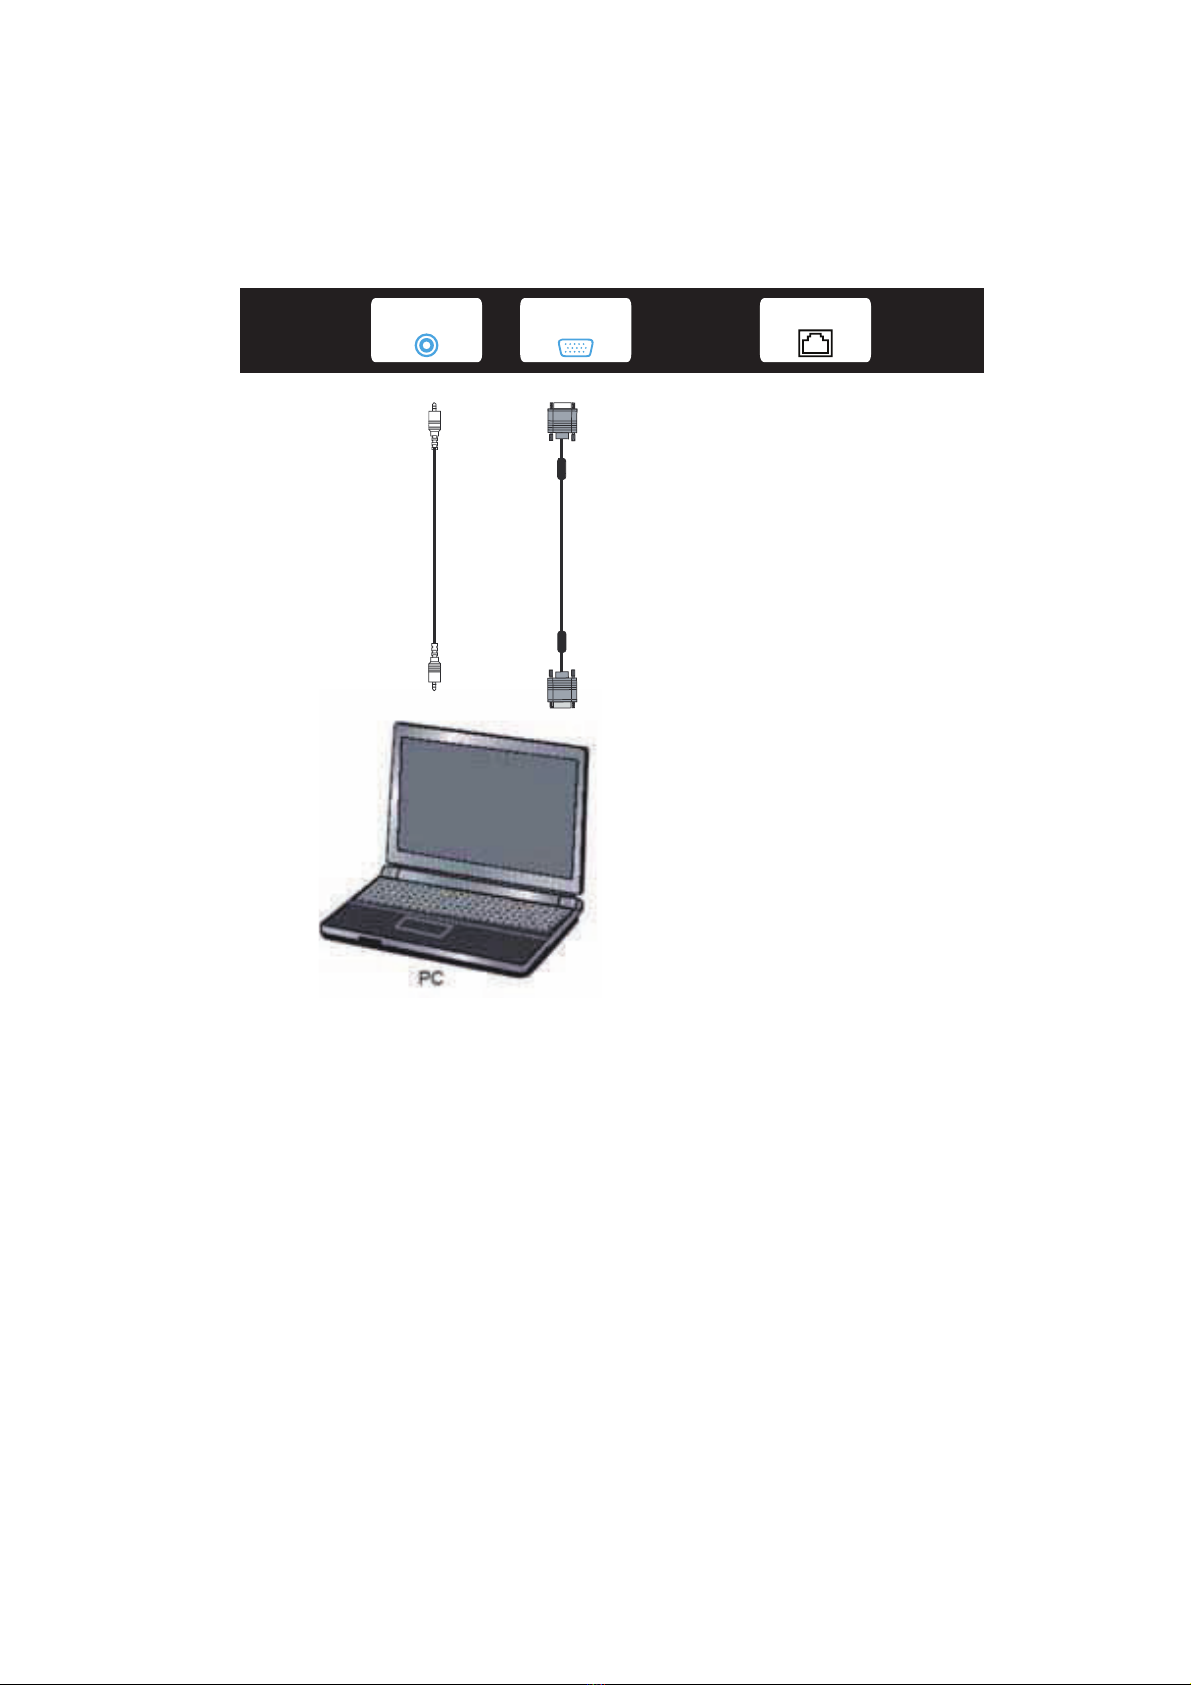
3.5. Connect a PC (cables not included)
Audio cable VGA cable
1. Use a VGA cable to connect the VGA output connector from your PC to the
VGA input connection of your LED TV. Use an audio cable to connect the
audio output connector from the PC to the LED TV.
2. Connect all connections before powering on your LED TV or another
connected device.
3. Press the power button on your remote control to power on the LED TV.
4. Press the FUENTENH\RQWKHUHPRWHFRQWURODQXVHWKHŸRUźEXWWRQVWR
select PC, and press OK.
57
PC AUDIO VGA RJ45
This manual suits for next models
2
Table of contents
Other TD Systems LED TV manuals

TD Systems
TD Systems K24DLM7F User manual

TD Systems
TD Systems K55DLM7U User manual

TD Systems
TD Systems K40DLT5F User manual

TD Systems
TD Systems K40DLM7F User manual

TD Systems
TD Systems K32DLM7H User manual

TD Systems
TD Systems K50DLJ12US User manual

TD Systems
TD Systems K49DLM8U User manual

TD Systems
TD Systems K24DLM10H User manual


