TD Systems K40DLM7F User manual
Televisor LED de 40”
Lea atentamente este manual antes del uso,
y consérvelo como referencia en el futuro.
MODELO:K40DLM7F
ES MANUAL DE USUARIO.............................................................1
EN USER MANUAL .......................................................................41
FR MANUEL UTILISATEUR...........................................................81
DE BENUTZERHANDBUCH........................................................121
PT MANUAL DO USUÁRIO.........................................................161
2017.08.1
6 08:57:20
+08'00'
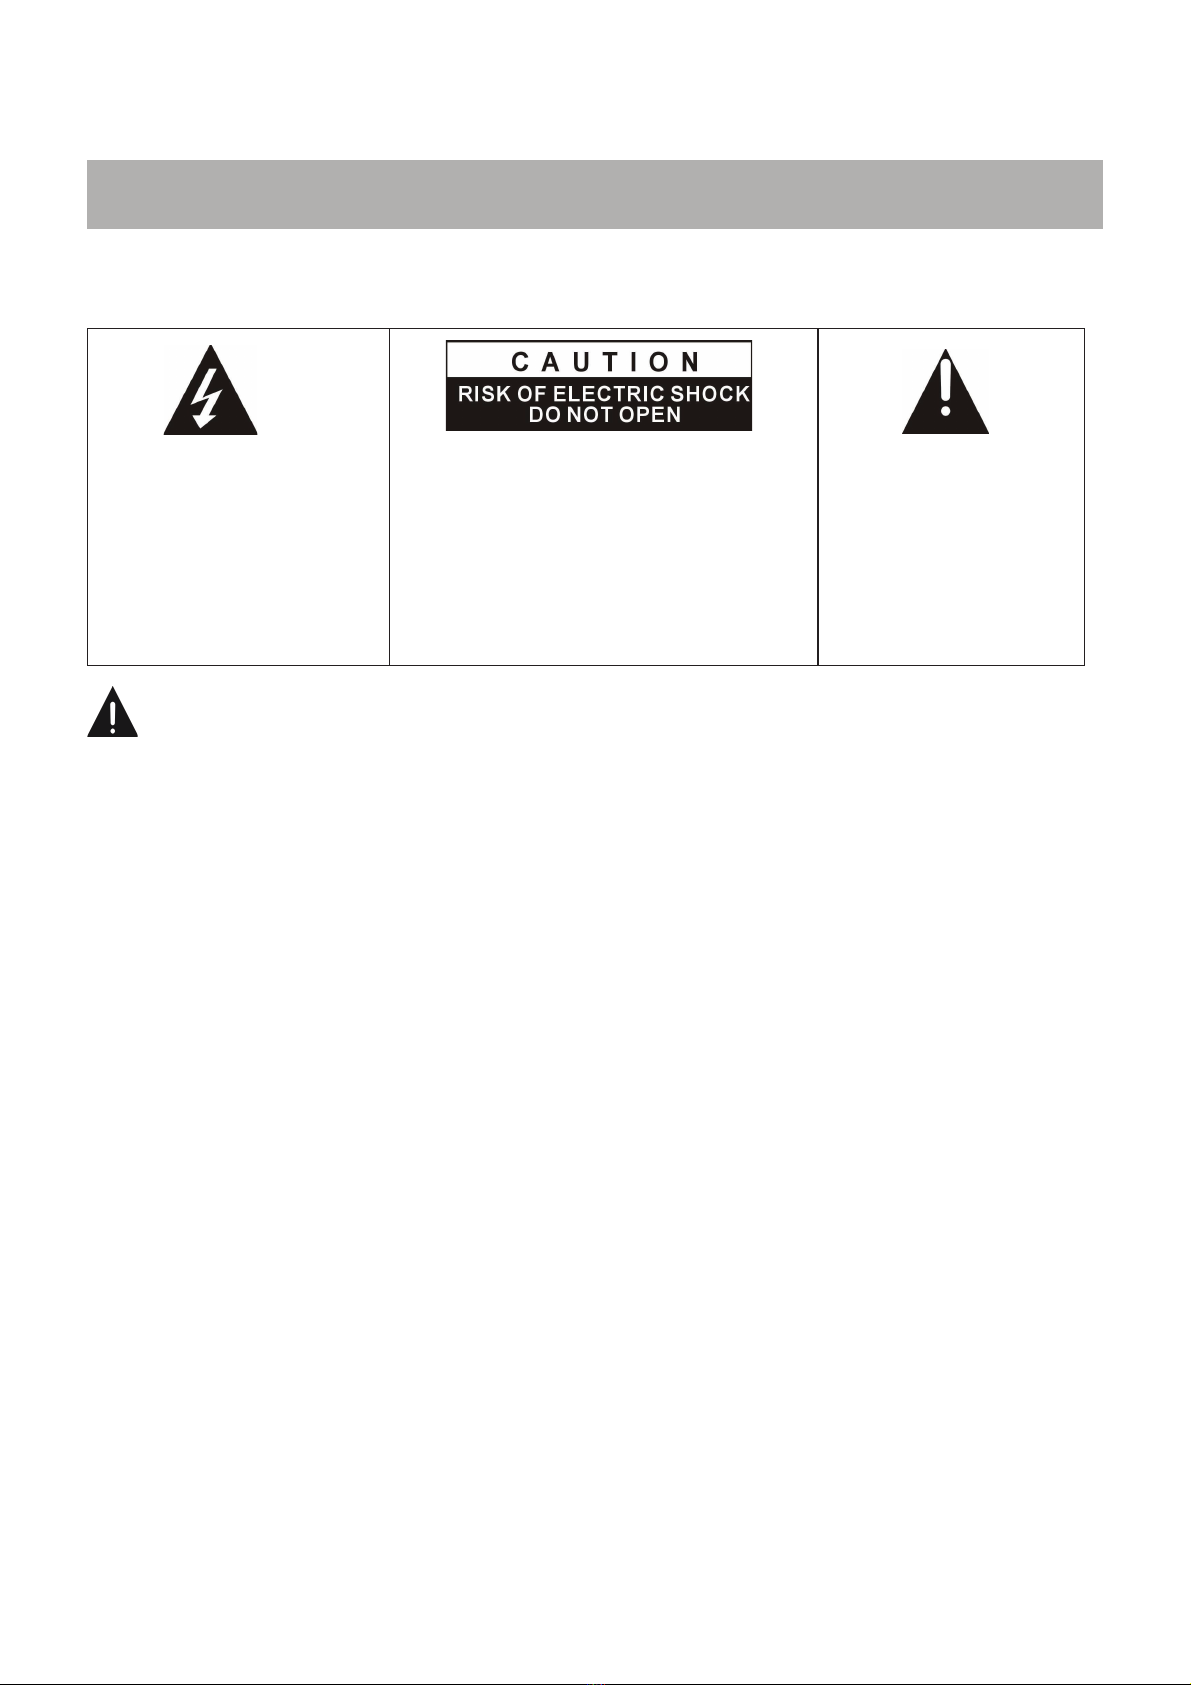
SAFETY INSTRUCTIONS
WARNING–TOREDUCETHERISKOFFIRE,ELECTRICSHOCK,OR
SERIOUSPERSONALINJURY:
IMPORTANT INSTRUCTIONS
dŚĞůŝŐŚƚŶŝŶŐŇĂƐŚĂŶĚ
ĂƌƌŽǁŚĞĂĚǁŝƚŚŝŶƚŚĞ
ƚƌŝĂŶŐůĞŝƐĂǁĂƌŶŝŶŐ
ƐŝŐŶĂůĞƌƟŶŐLJŽƵŽĨ
ĚĂŶŐĞƌŽƵƐǀŽůƚĂŐĞ
ŝŶƐŝĚĞƚŚĞƉƌŽĚƵĐƚ
CAUTION: TO REDUCE THE RISK
K&>dZ/^,K<KEKd
ZDKsKsZ;KZ<Ϳ
NO USER SERVICEABLE PARTS
/E^/Z&Z^Zs//E'dK
Yh>/&/^Zs/WZ^KEE>
dŚĞĞdžĐůĂŵĂƟŽŶ
ƉŽŝŶƚǁŝƚŚŝŶƚŚĞ
ƚƌŝĂŶŐůĞŝƐĂǁĂƌŶŝŶŐ
ƐŝŐŶĂůĞƌƟŶŐLJŽƵŽĨ
ŝŵƉŽƌƚĂŶƚ
ŝŶƐƚƌƵĐƟŽŶƐ
ĂĐĐŽŵƉĂŶLJŝŶŐƚŚĞ
ƉƌŽĚƵĐƚ
●/ĨƚŚĞĐŽƌĚŝƐĚĂŵĂŐĞĚŚĂǀĞŝƚƌĞƉĂŝƌĞĚďLJƚŚĞŵĂŶƵĨĂĐƚƵƌĞƌŝƚƐƐĞƌǀŝĐĞŽƌĂƐŝŵŝůĂƌůLJ
ƋƵĂůŝĮĞĚƉĞƌƐŽŶŝŶŽƌĚĞƌƚŽĂǀŽŝĚĂŶLJŚĂnjĂƌĚ
●dŚĞĐŽƌĚƐŚŽƵůĚĂůǁĂLJƐďĞƌĞĂĚŝůLJĂĐĐĞƐƐŝďůĞ
●dŚĞĂƉƉĂƌĂƚƵƐƐŚĂůůŶŽƚďĞĞdžƉŽƐĞĚƚŽĚƌŝƉƉŝŶŐŽƌƐƉůĂƐŚŝŶŐŽĨǁĂƚĞƌŽƌůŝƋƵŝĚƐĂŶĚƚŚĂƚ
ŶŽŽďũĞĐƚƐĮůůĞĚǁŝƚŚůŝƋƵŝĚƐƐƵĐŚĂƐŇŽǁĞƌƐǀĂƐĞƐƐŚĂůůďĞƉůĂĐĞĚŽŶƚŚĞƉƌŽĚƵĐƚ
●dŚĞŶŽƌŵĂůǀĞŶƟůĂƟŽŶŽĨƚŚĞƉƌŽĚƵĐƚƐŚĂůůŶŽƚďĞŝŵƉĞŶĚĞĚĨŽƌŝŶƚĞŶĚĞĚƵƐĞ
●ůǁĂLJƐůĞĂǀĞĂŵŝŶŝŵƵŵĚŝƐƚĂŶĐĞŽĨϭϬĐŵĂƌŽƵŶĚƚŚĞƵŶŝƚƚŽĞŶƐƵƌĞƐƵĸĐŝĞŶƚ
ǀĞŶƟůĂƟŽŶ
●EĂŬĞĚŇĂŵĞƐŽƵƌĐĞƐƐƵĐŚĂƐĐĂŶĚůĞƐƐŚŽƵůĚŶŽƚďĞƉůĂĐĞĚŽŶƚŽƉŽĨƚŚĞĚĞǀŝĐĞ
●dŚĞĚĞǀŝĐĞŝƐŝŶƚĞŶĚĞĚĨŽƌƵƐĞŽŶůLJŝŶĂƚĞŵƉĞƌĂƚĞĐůŝŵĂƚĞ
●^ŝƚƵĂƚĞƚŚŝƐƉƌŽĚƵĐƚĂǁĂLJĨƌŽŵŚĞĂƚƐŽƵƌĐĞƐƐƵĐŚĂƐƌĂĚŝĂƚŽƌƐŚĞĂƚƌĞŐŝƐƚĞƌƐƐƚŽǀĞƐŽƌ
ŽƚŚĞƌĂƉƉůŝĂŶĐĞƐ;ŝŶĐůƵĚŝŶŐĂŵƉůŝĮĞƌƐͿƚŚĂƚƉƌŽĚƵĐĞŚĞĂƚ
●ůĞĂŶƚŚĞƉƌŽĚƵĐƚŽŶůLJĂƐƌĞĐŽŵŵĞŶĚĞĚďLJƚŚĞŵĂŶƵĨĂĐƚƵƌĞƌ;ƐĞĞDĂŝŶƚĞŶĂŶĐĞ
ƐĞĐƟŽŶĨŽƌĚĞƚĂŝůƐͿhŶƉůƵŐƚŚĞƉŽǁĞƌƉůƵŐĨƌŽŵƚŚĞǁĂůůŽƵƚůĞƚďĞĨŽƌĞĐůĞĂŶŝŶŐ
●hŶƉůƵŐƚŚĞƉŽǁĞƌƉůƵŐĨƌŽŵƚŚĞǁĂůůŽƵƚůĞƚǁŚĞŶůĞŌƵŶƵƐĞĚĨŽƌĂŶĞdžƚĞŶĚĞĚƉĞƌŝŽĚ
●WƌĞǀĞŶƚŽďũĞĐƚƐůŝƋƵŝĚƐĨƌŽŵĨĂůůŝŶŐŽƌƐƉŝůůĞĚŽŶƚŚĞƉƌŽĚƵĐƚ
●KƉĞƌĂƚĞƚŚĞƉƌŽĚƵĐƚŽŶůLJǁŝƚŚƚŚĞƐƵƉƉůŝĞĚƉŽǁĞƌĐŽƌĚZŽƵƚĞƉŽǁĞƌĐŽƌĚƐƐŽƚŚĞLJĂƌĞ
ŶŽƚůŝŬĞůLJƚŽďĞǁĂůŬĞĚŽŶŽƌƉŝŶĐŚĞĚďLJŝƚĞŵƐƉůĂĐĞĚƵƉŽŶŽƌĂŐĂŝŶƐƚƚŚĞŵƉĂLJŝŶŐ
ƉĂƌƟĐƵůĂƌĂƩĞŶƟŽŶƚŽƉůƵŐƐĐŽŶǀĞŶŝĞŶĐĞƌĞĐĞƉƚĂĐůĞƐĂŶĚƚŚĞƉŽŝŶƚǁŚĞƌĞƚŚĞLJĞdžŝƚĨƌŽŵ
ƚŚĞƉƌŽĚƵĐƚ
●tŚĞƌĞƚŚĞD/E^ƉůƵŐŽƌĂŶĂƉƉůŝĂŶĐĞĐŽƵƉůĞƌŝƐƵƐĞĚĂƐƚŚĞĚŝƐĐŽŶŶĞĐƚĚĞǀŝĐĞƚŚĞ
ĚŝƐĐŽŶŶĞĐƚĚĞǀŝĐĞƐŚĂůůƌĞŵĂŝŶƌĞĂĚŝůLJŽƉĞƌĂďůĞ

●ŽŶŽƚŽƉĞƌĂƚĞƚŚŝƐƉƌŽĚƵĐƚƵŶĚĞƌƚŚĞĨŽůůŽǁŝŶŐĐŽŶĚŝƟŽŶƐ
ͲtŚĞŶƚŚĞƉŽǁĞƌͲƐƵƉƉůLJĐŽƌĚŽƌƉůƵŐŝƐĚĂŵĂŐĞĚ
Ͳ/ĨůŝƋƵŝĚŚĂƐďĞĞŶƐƉŝůůĞĚŝŶƚŽŽƌŽďũĞĐƚƐŚĂǀĞĨĂůůĞŶŝŶƚŽƚŚĞƉƌŽĚƵĐƚ
Ͳ/ĨƚŚĞƉƌŽĚƵĐƚŚĂƐďĞĞŶĞdžƉŽƐĞĚƚŽƌĂŝŶŽƌǁĂƚĞƌ
Ͳ/ĨƚŚĞƉƌŽĚƵĐƚĚŽĞƐŶŽƚŽƉĞƌĂƚĞǁŚĞŶƵƐĞĚĂĐĐŽƌĚŝŶŐƚŽƚŚĞŽƉĞƌĂƟŶŐŝŶƐƚƌƵĐƟŽŶƐ
Ͳ/ĨƚŚĞƉƌŽĚƵĐƚŚĂƐďĞĞŶĚƌŽƉƉĞĚŽƌĚĂŵĂŐĞĚŝŶĂŶLJǁĂLJ
●ŽŶŽƚĂƩĞŵƉƚƚŽƐĞƌǀŝĐĞƚŚĞƉƌŽĚƵĐƚƚĂŬĞŝƚƚŽƚŚĞĞůĞĐƚƌŽŶŝĐƐƌĞƉĂŝƌƐŚŽƉŽĨLJŽƵƌĐŚŽŝĐĞ
ĨŽƌĂŶLJƐĞƌǀŝĐŝŶŐŽƌƌĞƉĂŝƌ
●ŽŶŽƚŽǀĞƌůŽĂĚǁĂůůŽƵƚůĞƚƐĞdžƚĞŶƐŝŽŶĐŽƌĚƐŽƌŝŶƚĞŐƌĂůĐŽŶǀĞŶŝĞŶĐĞƌĞĐĞƉƚĂĐůĞƐ
●ŽŶŶĞĐƚƚŚŝƐƉƌŽĚƵĐƚƚŽƚŚĞƉŽǁĞƌŽƵƚůĞƚǁŚŝĐŚŚĂƐƉƌŽƚĞĐƟǀĞĞĂƌƚŚĐŽŶŶĞĐƟŽŶ
CAUTION-TOREDUCETHERISKORPERSONALINJURYOR
PRODUCT/PROPERTYDAMAGE:
●dŚŝƐƉƌŽĚƵĐƚŝƐŝŶƚĞŶĚĞĚƐŽůĞůLJĨŽƌŶŽŶͲĐŽŵŵĞƌĐŝĂůŶŽŶͲŝŶĚƵƐƚƌŝĂůƉĞƌƐŽŶĂůƵƐĞĂƐĂ
ƚĞůĞǀŝƐŝŽŶŽŶŽƚƵƐĞƚŚŝƐƉƌŽĚƵĐƚĨŽƌĂŶLJŽƚŚĞƌƉƵƌƉŽƐĞ
●ŽŶŽƚƐƵďũĞĐƚƚŚĞƉƌŽĚƵĐƚƚŽǀŝŽůĞŶƚƐŚŽĐŬƐĞdžƚƌĞŵĞƚĞŵƉĞƌĂƚƵƌĞƐŽƌůĞŶŐƚŚLJƉĞƌŝŽĚƐŽĨ
ĚŝƌĞĐƚƐƵŶůŝŐŚƚ
●<ĞĞƉƚŚĞƉƌŽĚƵĐƚĂǁĂLJĨƌŽŵŵĂŐŶĞƟĐŽďũĞĐƚƐŵŽƚŽƌƐĂŶĚƚƌĂŶƐĨŽƌŵĞƌƐ
●ŽŶŽƚƵƐĞŽƵƚĚŽŽƌƐŝŶŝŶĐůĞŵĞŶƚǁĞĂƚŚĞƌ
●ŽŶŽƚƵƐĞƚŚĞdsǁŚŝůĞĚƌŝǀŝŶŐƚŚŝƐŝƐĚĂŶŐĞƌŽƵƐĂŶĚŝƐŝůůĞŐĂůŝŶƐŽŵĞĂƌĞĂƐ
BATTERYHANDLINGANDUSAGE:
●hd/KEĂŶŐĞƌŽĨĞdžƉůŽƐŝŽŶŝĨďĂƩĞƌLJŝƐŝŶĐŽƌƌĞĐƚůLJƌĞƉůĂĐĞĚŽƌŶŽƚƌĞƉůĂĐĞĚďLJƚŚĞ
ƐĂŵĞƚLJƉĞŽƌĞƋƵŝǀĂůĞŶƚ
●dŚĞďĂƩĞƌLJƐŚŽƵůĚŶŽƚďĞĞdžƉŽƐĞĚƚŽĞdžĐĞƐƐŝǀĞŚĞĂƚƐƵĐŚĂƐƐƵŶƐŚŝŶĞĮƌĞŽƌƐŝŵŝůĂƌ
●ŝīĞƌĞŶƚƚLJƉĞƐŽĨďĂƩĞƌŝĞƐŶĞǁĂŶĚƵƐĞĚďĂƩĞƌŝĞƐƐŚŽƵůĚŶŽƚďĞŵŝdžĞĚ
●dŚĞďĂƩĞƌLJŵƵƐƚďĞŝŶƐƚĂůůĞĚĂĐĐŽƌĚŝŶŐƚŽƚŚĞƉŽůĂƌŝƚLJ
●/ĨƚŚĞďĂƩĞƌLJŝƐǁŽƌŶŝƚŵƵƐƚďĞƌĞŵŽǀĞĚĨƌŽŵƚŚĞƉƌŽĚƵĐƚ
●dŚĞďĂƩĞƌLJŵƵƐƚďĞĚŝƐƉŽƐĞĚŽĨƐĂĨĞůLJůǁĂLJƐƵƐĞƚŚĞĐŽůůĞĐƟŽŶďŝŶƐƉƌŽǀŝĚĞĚ;ĐŚĞĐŬ
ǁŝƚŚLJŽƵƌĚĞĂůĞƌͿƚŽƉƌŽƚĞĐƚƚŚĞĞŶǀŝƌŽŶŵĞŶƚ
●<ĞĞƉďĂƩĞƌŝĞƐĂǁĂLJĨƌŽŵĐŚŝůĚƌĞŶĂŶĚƉĞƚƐKŶůLJĂĚƵůƚƐƐŚŽƵůĚŚĂŶĚůĞďĂƩĞƌŝĞƐ
●EĞǀĞƌƚŚƌŽǁďĂƩĞƌŝĞƐŝŶƚŽĂĮƌĞŽƌĞdžƉŽƐĞƚŚĞŵƚŽĮƌĞŽƌŽƚŚĞƌŚĞĂƚƐŽƵƌĐĞƐ
●&ŽůůŽǁƚŚĞďĂƩĞƌLJƐĂĨĞƚLJĂŶĚƵƐĂŐĞŝŶƐƚƌƵĐƟŽŶƐ

To avoid possible hearing damage, do not listen at
high audio volume for long periods of time.
IMPORTANT INSTRUCTIONS
……………………………………………………………………41
BATTERY HANDLING AND USAGE
……….……………….……………………………………42
FEATURES
……………………………..…….………………………………………………45
Getting Started
………………………………….….…………………………………………….…47
All the pictures in this manual are just for your reference, appearance and display should
subject to the final product.
ACCESSORIES
DISPOSALOFOLDELECTRICALAPPLIANCES
dŚĞƵƌŽƉĞĂŶĚŝƌĞĐƟǀĞϮϬϬϮϵϲŽŶtĂƐƚĞůĞĐƚƌŝĐĂůĂŶĚůĞĐƚƌŽŶŝĐƋƵŝƉŵĞŶƚ;tͿ
ƌĞƋƵŝƌĞƐƚŚĂƚŽůĚŚŽƵƐĞŚŽůĚĞůĞĐƚƌŝĐĂůĂƉƉůŝĂŶĐĞƐŵƵƐƚŶŽƚďĞĚŝƐƉŽƐĞĚŽĨŝŶƚŚĞŶŽƌŵĂů
ƵŶƐŽƌƚĞĚŵƵŶŝĐŝƉĂůǁĂƐƚĞƐƚƌĞĂŵKůĚĂƉƉůŝĂŶĐĞƐŵƵƐƚďĞĐŽůůĞĐƚĞĚƐĞƉĂƌĂƚĞůLJŝŶŽƌĚĞƌƚŽ
ŽƉƟŵŝnjĞƚŚĞƌĞĐŽǀĞƌLJĂŶĚƌĞĐLJĐůŝŶŐŽĨƚŚĞŵĂƚĞƌŝĂůƐƚŚĞLJĐŽŶƚĂŝŶĂŶĚƌĞĚƵĐĞƚŚĞŝŵƉĂĐƚŽŶ
ŚƵŵĂŶŚĞĂůƚŚĂŶĚƚŚĞĞŶǀŝƌŽŶŵĞŶƚ
dŚĞĐƌŽƐƐĞĚŽƵƚǁŚĞĞůĞĚďŝŶƐLJŵďŽůŽŶƚŚĞƉƌŽĚƵĐƚƌĞŵŝŶĚƐLJŽƵŽĨLJŽƵƌŽďůŝŐĂƟŽŶƚŚĂƚ
ǁŚĞŶLJŽƵĚŝƐƉŽƐĞŽĨƚŚĞĂƉƉůŝĂŶĐĞŝƚŵƵƐƚďĞƐĞƉĂƌĂƚĞůLJĐŽůůĞĐƚĞĚ
ŽŶƐƵŵĞƌƐƐŚŽƵůĚĐŽŶƚĂĐƚƚŚĞŝƌůŽĐĂůĂƵƚŚŽƌŝƚLJŽƌƌĞƚĂŝůĞƌĨŽƌŝŶĨŽƌŵĂƟŽŶĐŽŶĐĞƌŶŝŶŐƚŚĞ
ĐŽƌƌĞĐƚĚŝƐƉŽƐĂůŽĨƚŚĞŝƌŽůĚĂƉƉůŝĂŶĐĞ

TABLE OF CONTENTS
Connecting to External Devices
........................................................................................49
COAXIAL CONNECTION
.....................................................................................................54
USB CONNECTION
.........................................................................................................55
INSERT A CI CARD
...............................................................................................................55
EARPHONE CONNECTION
..............................................................................................55
FIRST TIME INSTALLATION
................................................................................................56
PICTURE MENU
...................................................................................................................58
PICTURE MODE
.............................................................................................................58
ASPECT RATIO
...............................................................................................................59
DIGITAL MANUAL SEARCH
……..………………….……………………………………............65
CHANNEL
..............................................................................................................................61
AUTO SEARCH TO SEARCH..
.............................................................................................65
FEATURE MENU
...................................................................................................................66
LOCK CHANNEL
................................................................................................................67
OSD TIMER.......
…………………………………………………………………………...............73
USB FORMAT MODE
………………………………………………………………………............78
SPECIFICATIONS..................................................................................................................79

40" LED Display
This unit has a built-in LED display window to provide clear vision and low
radiation.
With Hotel Lock
Support Auto TV Scanning
Support Digital Broadcasting Reception
Support TV Guide Function
Support TELETEXT (Europe) Function
Support USB Multimedia Playback
Support Multi-languages On Screen Display
Support Full Function Remote Control
Support HDMI,YPBPR AV, VGA, PC AUDIO and CI Input
Support EARPHONE and COAXIAL Output
Support PVR Function
Support TIME SHIFT Function
With Detachable Stand Holder
With External Antenna Jack
With Built-in Speakers
FEATURES

What is Included/TV Placement Setup
TV Stand Installation/Removal
Wall Mounting
The TV is provided with mounting holes for a VESA approved wall mounting bracket
(NOT SUPPLIED). The VESA mounting pattern is 200 x200mm. Remove the screws
holding the base to the base bracket and lift the base away (do not remove the base
mounting brackets). Mount the VESA bracket using 4 x M6 x 10 isometric threaded
screws (not supplied). Do not use screws longer than 10 mm; damage will occur to
the internal components.
Caution: Your new TV is heavy; please consult with a professional wall mount installer
to perform this installation.
Unit and Accessories
TV Set
Remote Control
with Batteries
Base Stand
Stand Support
4 Screws
User’s Manual
Four mounting holes
(size M6 screw)
2 Screws
4*15BBH
2 Screws
4*15BBH
IMAGEN SONIDO TAMAÑO
FAV.
MENU
VOL P
SALIR
FUENTE
.
+
_
+
_
OK
GUÍA
40” WIDESCREEN LED TV
MODELO:K40DLM7F
Please read this manual carefully before using,
d keep it for future reference.
200mm
200mm
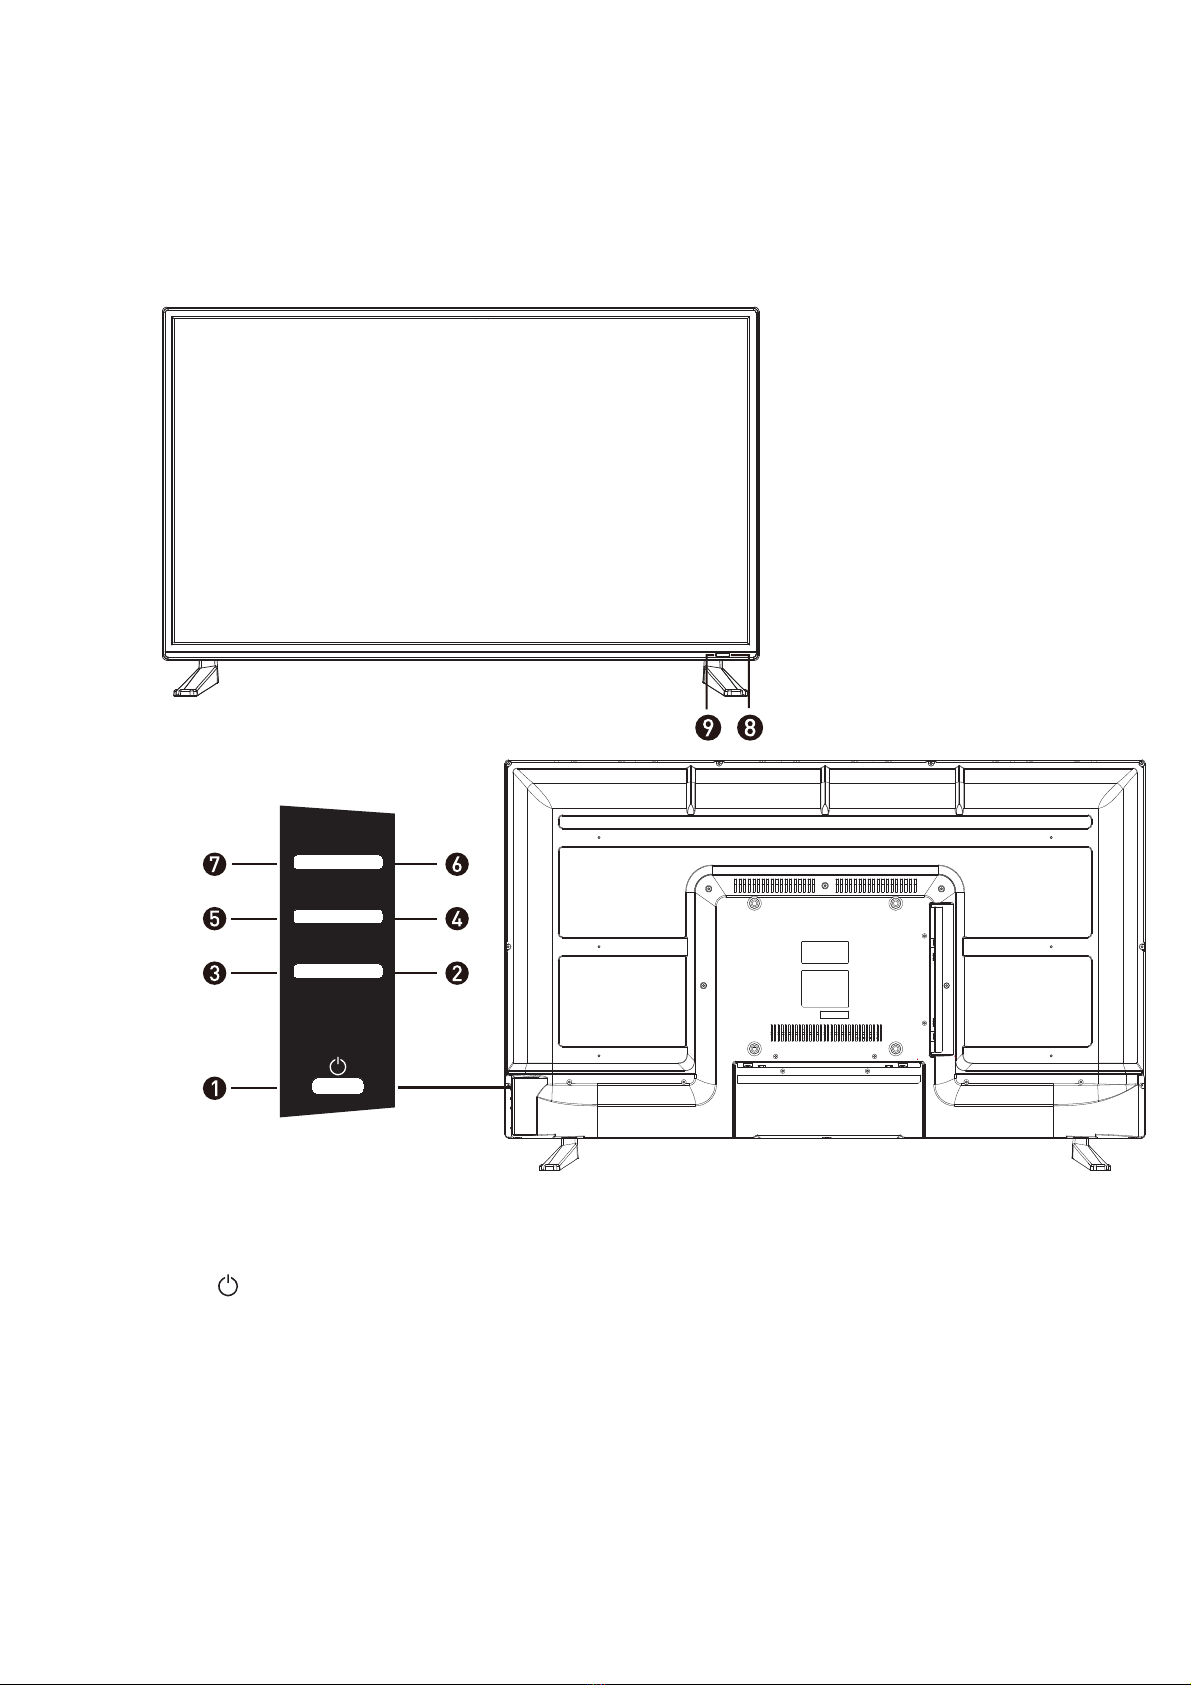
Getting Started
Front/Back View
Button Functions
1. : Turn on TV/Standby
2. ENTRADA: Audio/Video input source selection
3. MENÚ: Open settings menu
4. VOL-: Decrease volume
5. VOL+: Increase volume
6. P-: Previous channel
7. P+: Next channel
8. IR RECEIVER: Receives infrared signals from the remote control
9. INDICATOR LED: Status indicator
P+ P-
VOL+ VOL-
MENÚ ENTRADA
10
USB1/USB2
5V 0.5A
HeadphoneS.SONIDO DIGITAL YPbPr AV CI+HDMI2 HDMI3
HDMI1VGA PC AUDIO
USB2.
5.
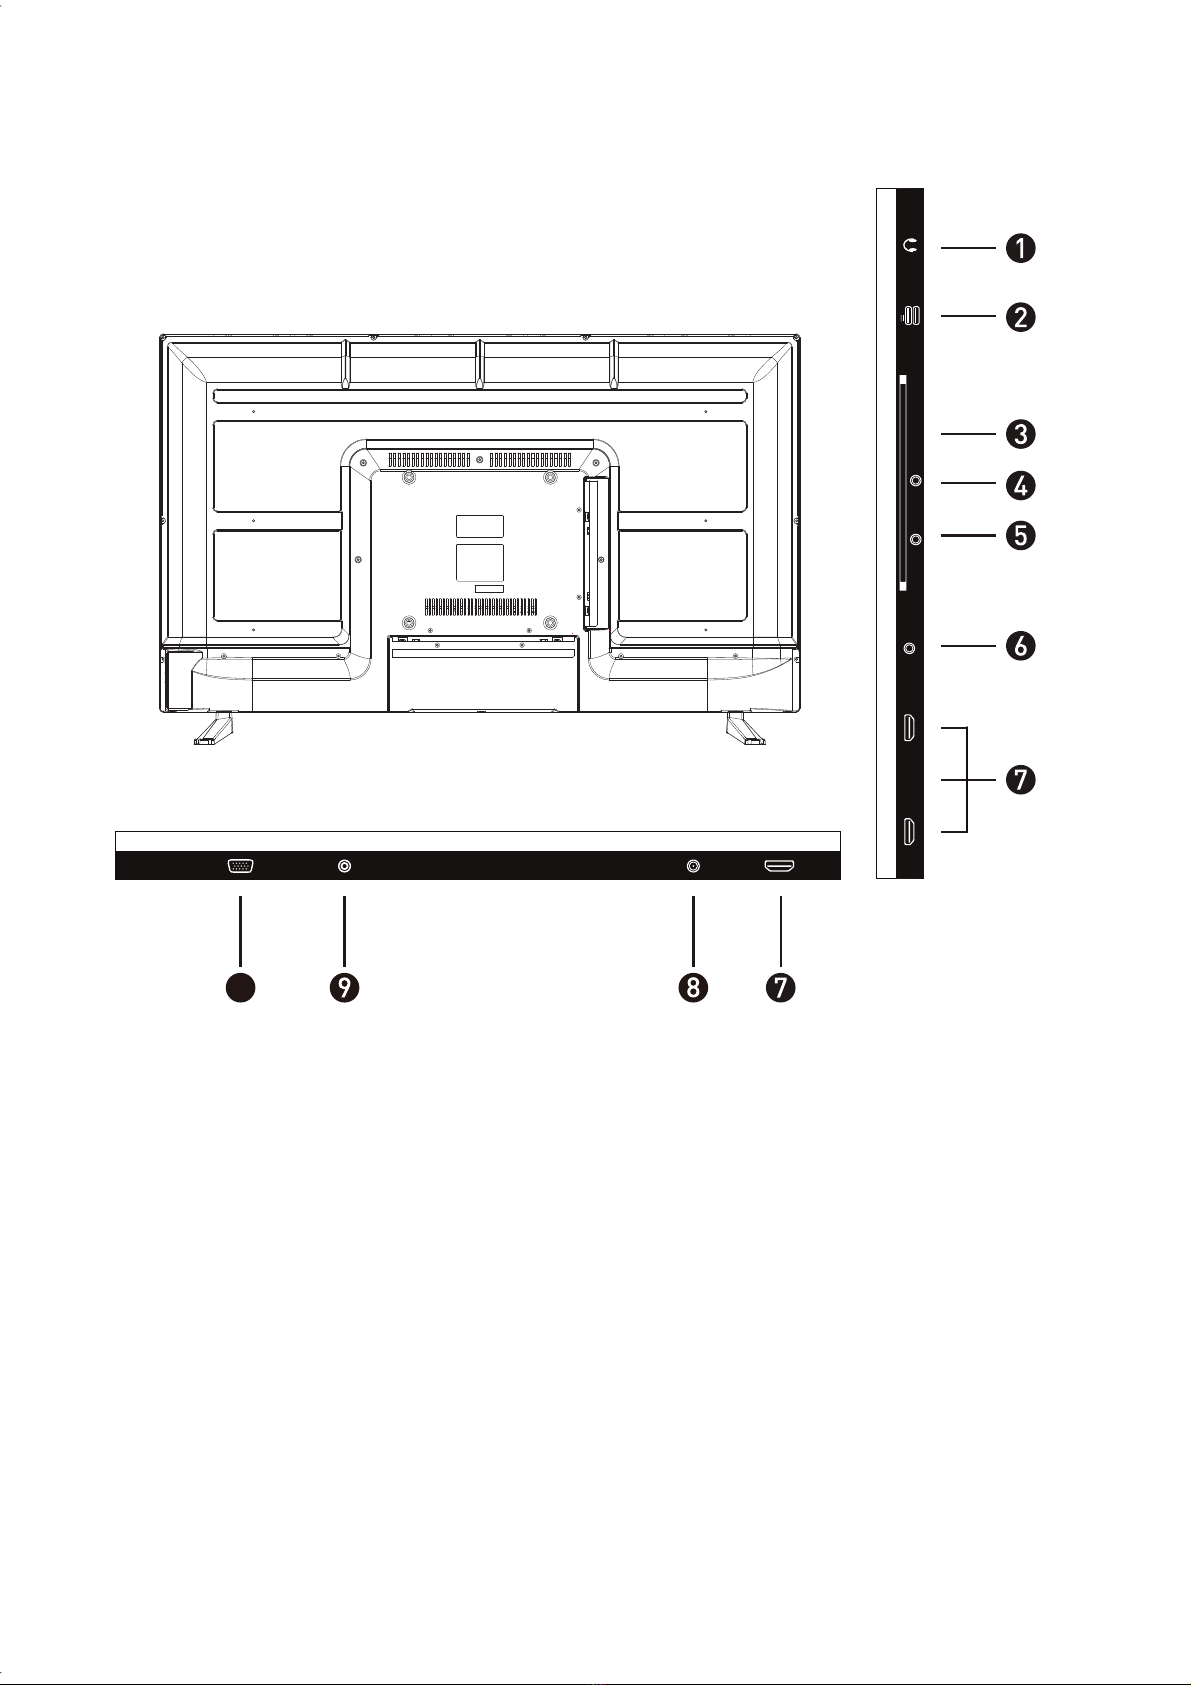
YPbPr: Connect to the YPbPr video
output terminal of the DVD
ANTENA: Antenna connection
8.
7. HDMI1/2/3:CEC HDMI1:ARC
6. S.SONIDO DIGITAL
PC AUDIO: Connect it to the audio
output terminal of the PC
9.
VGA: PC video input10.
1. HEADPHONES
3. CI+: Connect a CI module
4. AV: Connect video output from a
DVD or VCR
ANTENA

Connecting to External Devices
Component
cable
Composite
cable
cable TV
company
VHF/UHF
antenna
cable receiver/satellite box
VGA
cable
Audio
cable
Connecting external devices to your LED TV
RF Coaxial
cable
HDMI
cable
USB1/USB2
5V 0.5A
Headphone
S.SONIDO DIGITAL YPbPr AV CI+HDMI2 HDMI3
HDMI1VGA PC AUDIO ANTENA
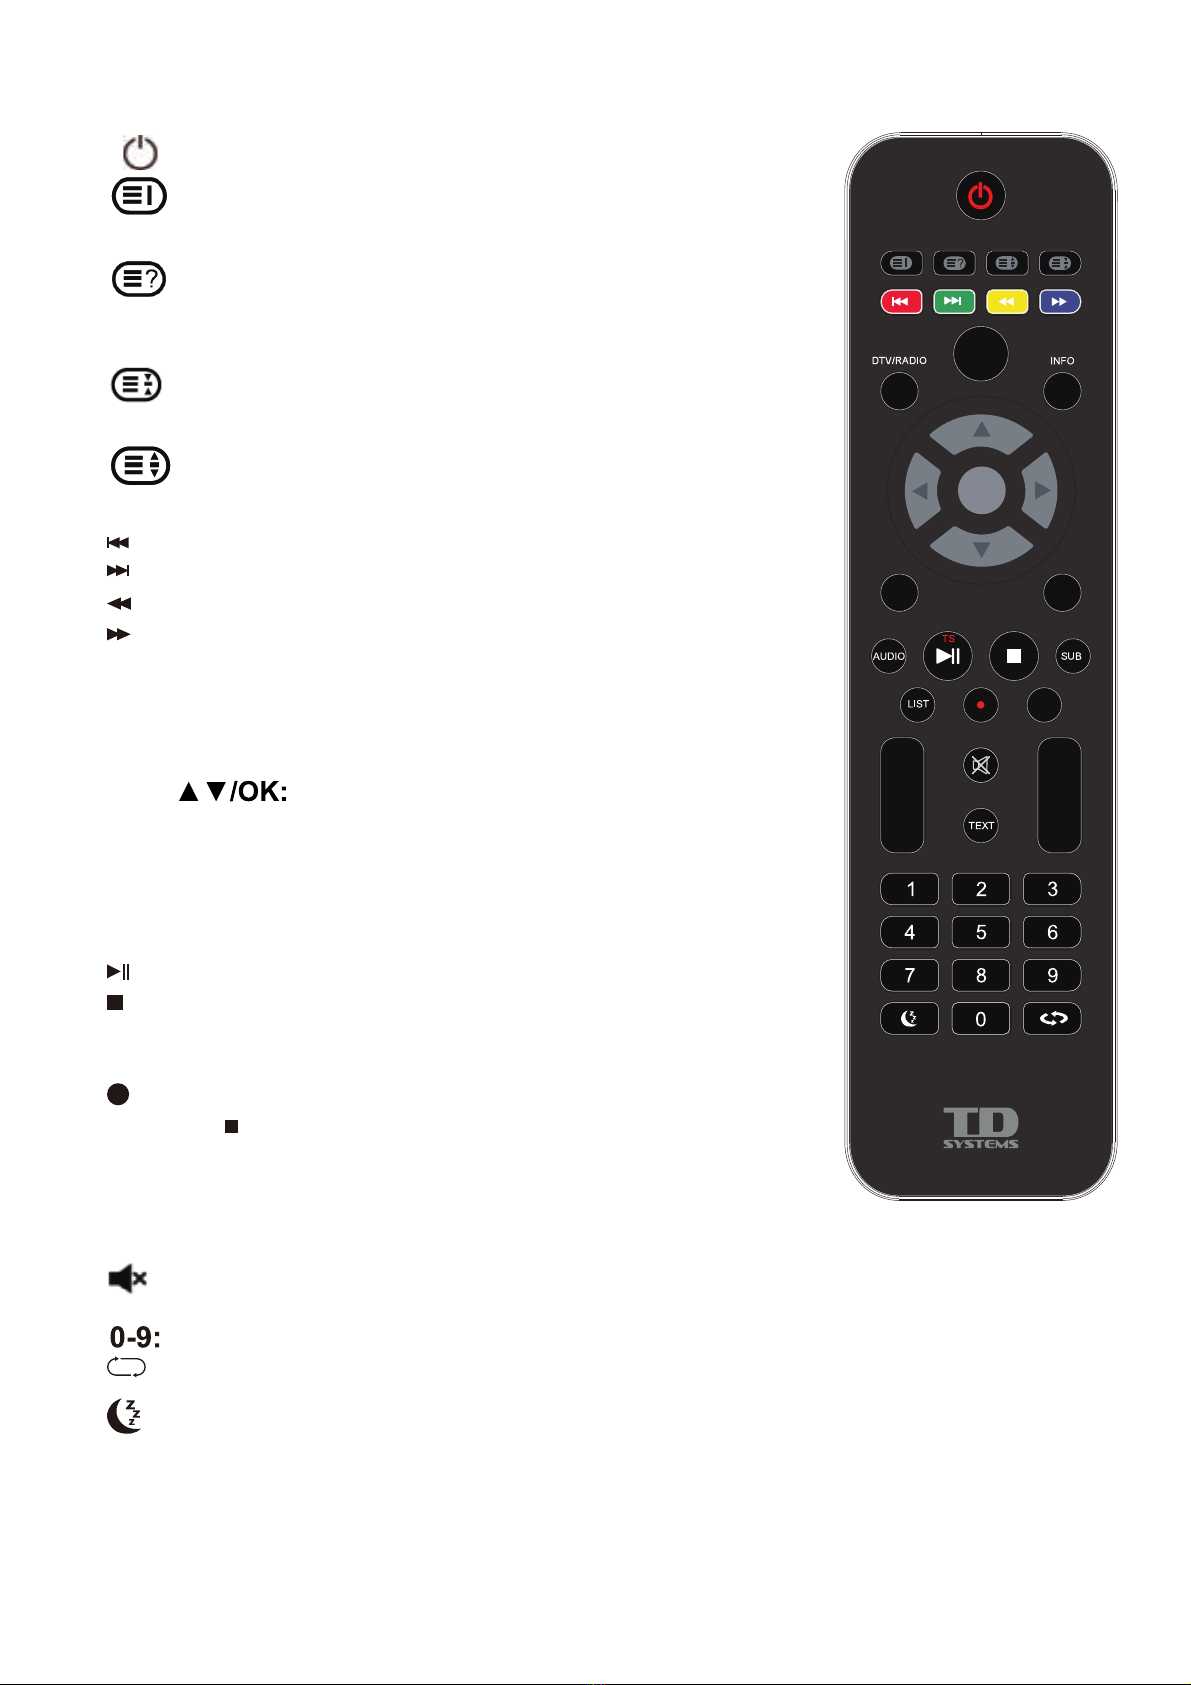
IMAGEN SONIDO TAMAÑO
FAV.
MENU
VOL P
SALIR
FUENTE
.
+
_
+
_
OK
GUÍA
:Displays the main index in Teletext mode.
:Reveals hidden information such as the answers
to a quiz in TELETEXT mode.
:Freeze a multi-page changing on Teletext mode.
:Displays the top, buttom or all of page.
: Previous file or chapter.
: Next file or chapter.
: Fast rewind playback.
: Fast forward playback.
DTV/RADIO: In DTV mode, press DTV/RADIO button to
enter DTV or RADIO mode.
INFO:System information display switch.
FUENTE: Press to change signal source.
To move in the menus and confirm settings.
MENU: Show Menu.
EXIT: Exit the Menu.
AUDIO: Switch the audio channel when DVD
or multimedia playing.
: Play/Pause.
TS:In DTV mode, press TS button to start the delay.
: Stop playback.
SUB:Select subtitle of media video file. (needs
the support of disk or flie)
FAV: Show the list of favourite channels.
VOL: Increase and decrease volume.
P:Next and Previous channel.
: Mute or restore the sound.
TEXT: Turns on and off the Teletext function.
Change the channel directly.
: Return to the previous channel tuned.
LIST: In DTV mode, displays the executed PVR LIST.
:Turn on the TV/Standby.
Auto Power Off Timer.
:
In DTV mode , press REC button to start recording,
press button to stop recording.
:
GUÍA:Show the Electronic Program Guide.
TAMAÑO:Press to select the different picture size.
SONIDO:Zoom in/Zoom out the displayed frame.
IMAGEN:Output image mode selection.
Ż Ź
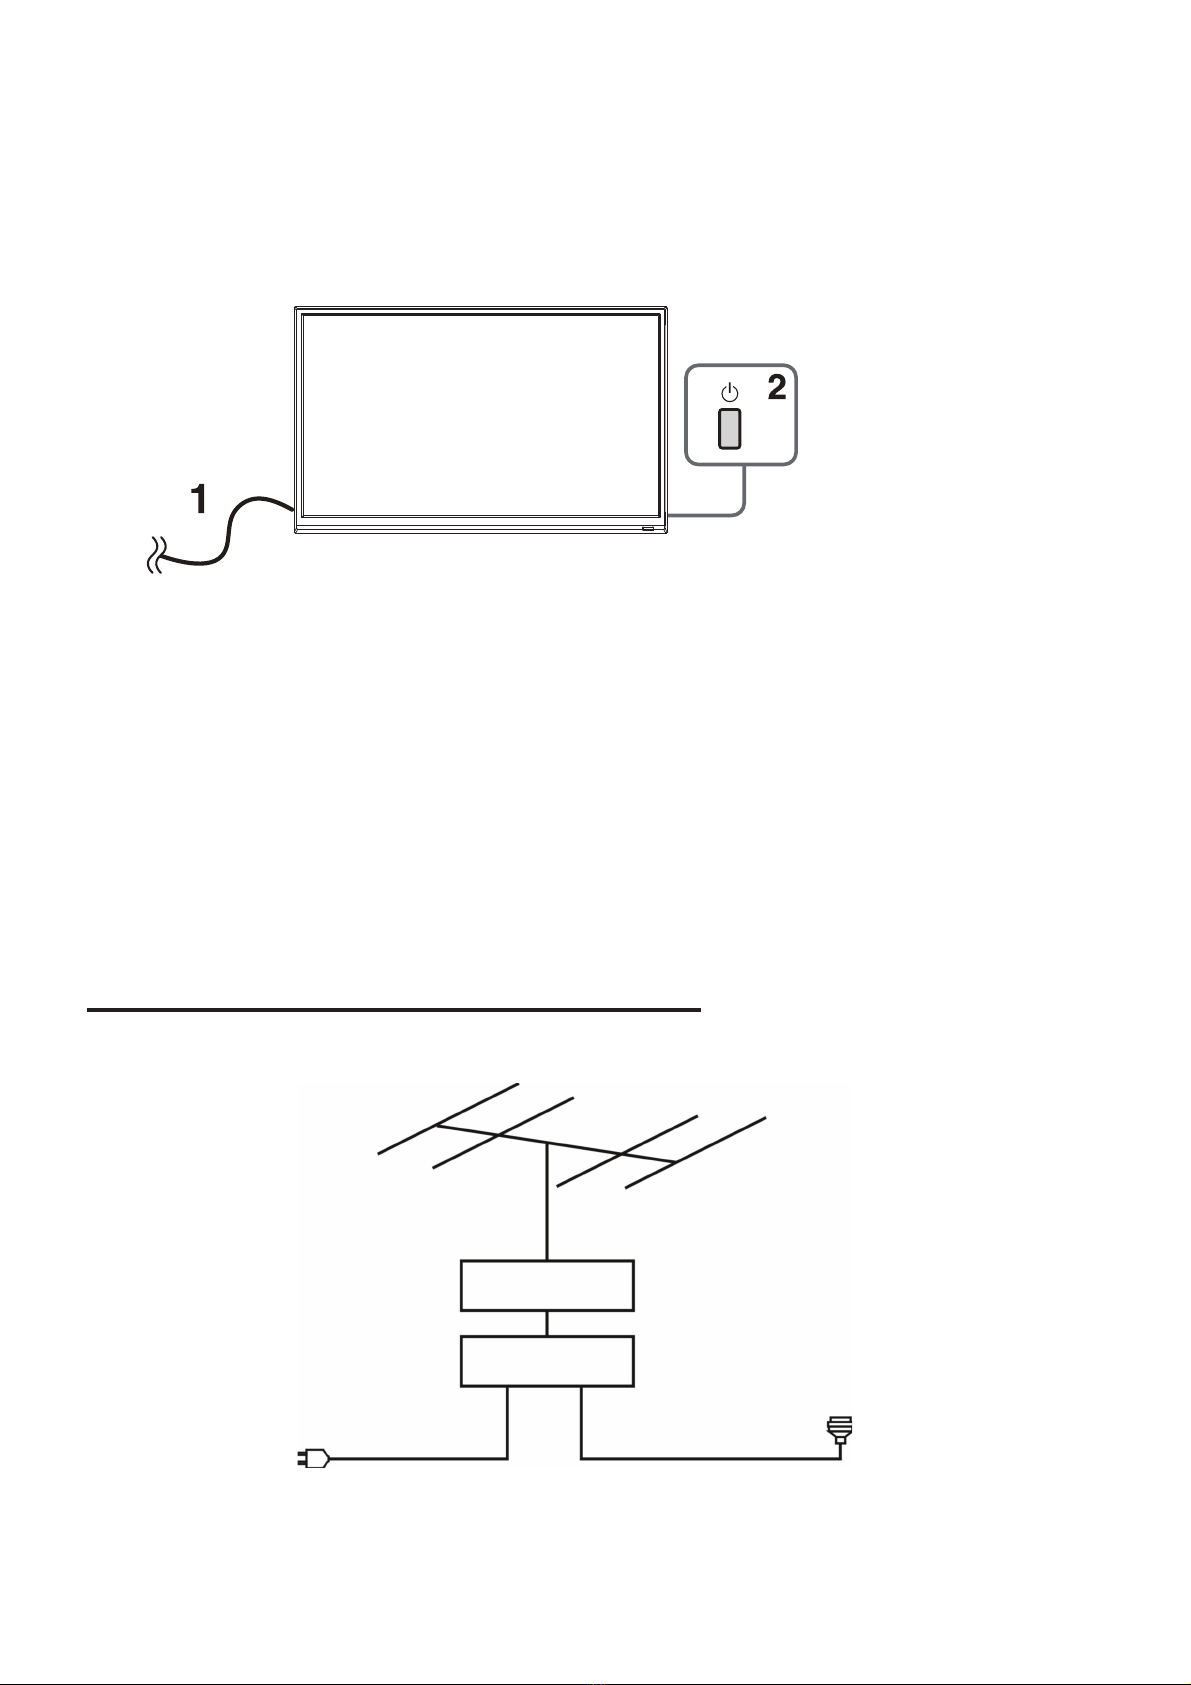
NNECT EXTERNAL ANTENNA TO UNIT
Install external antenna into antenna jack for best picture.
Antenna
Outdoor
antenna
amplifier
Indoor
antenna
amplifier
Power plug
of antenna
amplifier
75 OHM
antenn
plug
Settings
Initial Setup
1. Connecting your TV on the poweroutlet;
2. Press the POWER button on the remote to turn on the TV in green for the LED light.
CAUTION:Always disconnect the TV from the power outlet when the TV will
not be used for a long period of time. The POWER button on the front panel is only
used for switching the TV into standby, it does not disconnect the device from the
main voltage. To completely disconnect the main voltage, please remove the power
plug from the socket.
3. Press the key▼/▲/Ż/ Źand following the picture as bellow to operate the subject.
NOTE:
The picture is for reference only.

HDMI CONNECTION
PC/VGA CONNECTION
HDMI cable
Back of DVD/VCR
Back of PC
USB1
Use HDMI cable to connect the unit w
other devices to receive high-definitio
multimedia signal.
Use VGA cable and Audio cable to
connect the unit with TV or PC, and
use this product as a monitor.
PC AUDIO
VGA
HDMI2 HDMI3
S.SONIDO DIGITAL
CI+YPbPr AV
Audi cable
VGA cable
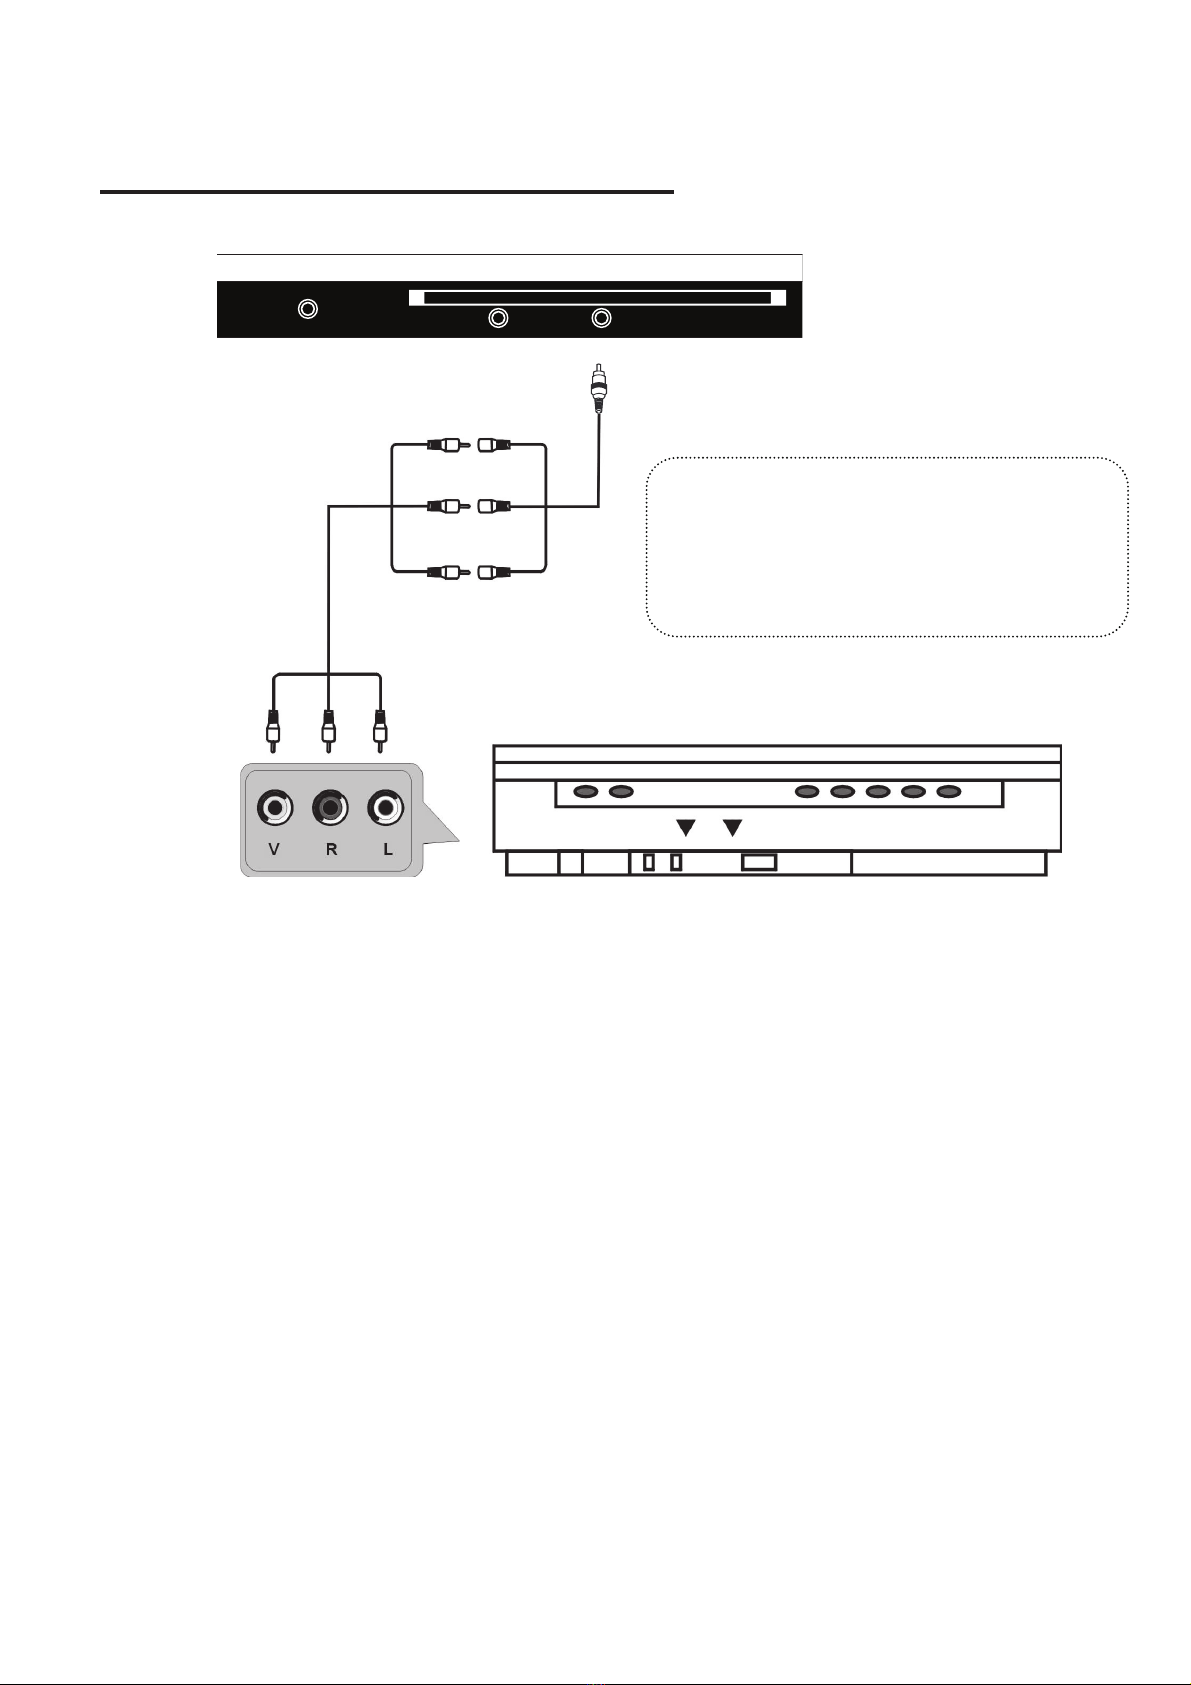
AV (COMPOSITE VIDEO) CONNECTION
Back of DVD/VCR
For basic connection, use the composite Audio
L/R (white/red) and CVBS (yellow) cable to
connect the unit with other devices.
AV cable
Mini AV cable
HDMI3
S.SONIDO DIGITAL
CI+YPbPr AV
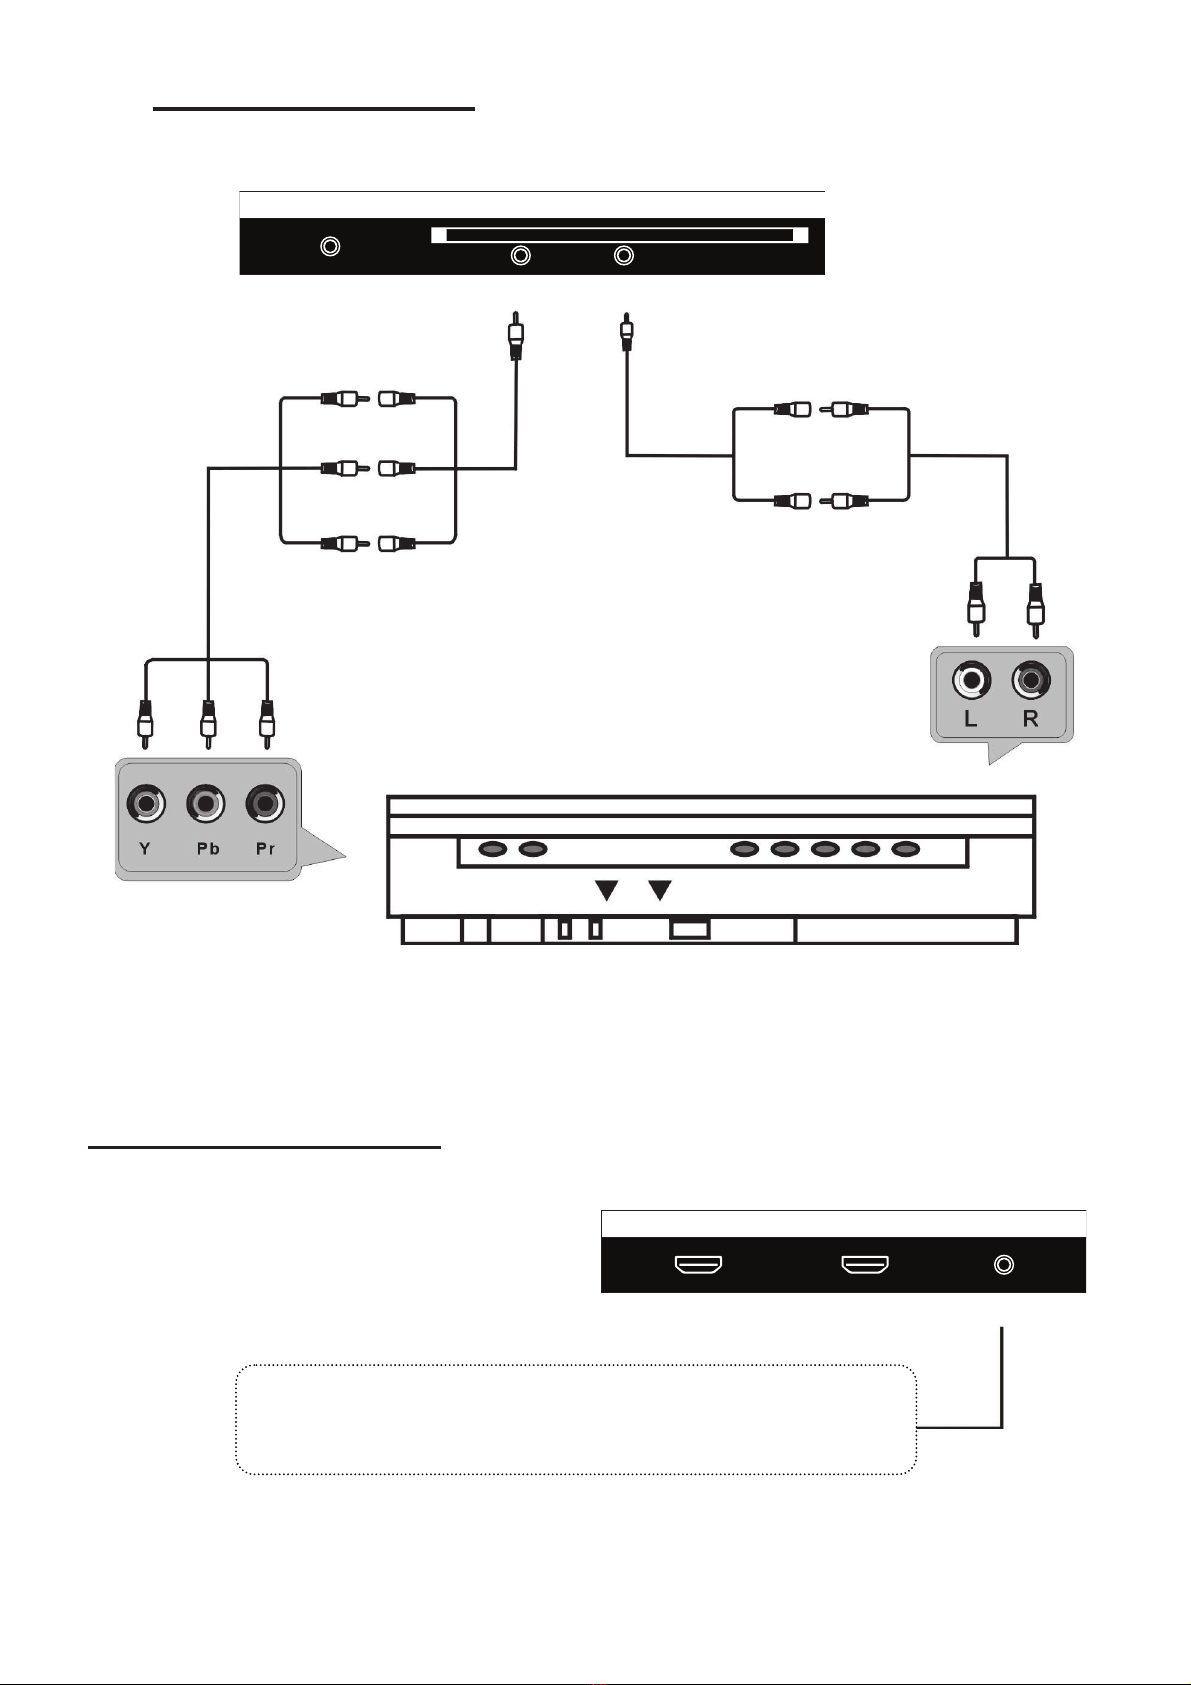
Back of DVD/VCR
Mini YPbPr cable
Mini AV cable: L/R
YPBPR CONNECTION
COAXIAL CONNECTION
Use coaxial cable (not included) to connect the unit with amplifier
or other audio decoding devices for coaxial audio signal output.
AURICULAR
AURICULAR SCART PC AUDIO VGA ANTENA S.SONIDO
DIGITAL
HDMI2 HDMI3
S.SONIDO DIGITAL
HDMI3
S.SONIDO DIGITAL
CI+YPbPr AV

USB CONNECTION
INSERT A CI CARD
EARPHONE CONNECTION
Insert your CI card (Conditional Access
Module) to watch special digital
channels in your area.
AURICULAR SCART PC AUDIO VGA ANTENA S.SONIDO
DIGITAL
HDMI1 HDMI2 HDMI3
(ARC)
USB2
USB1
YPbPr AV
CI+
5V 0.5A
USB1/USB2
Auriculares
USB Memory Device
5V 0.5A
USB1/USB2
Auriculares
Earphone cable
HDMI3
S.SONIDO DIGITAL
CI+YPbPr AV
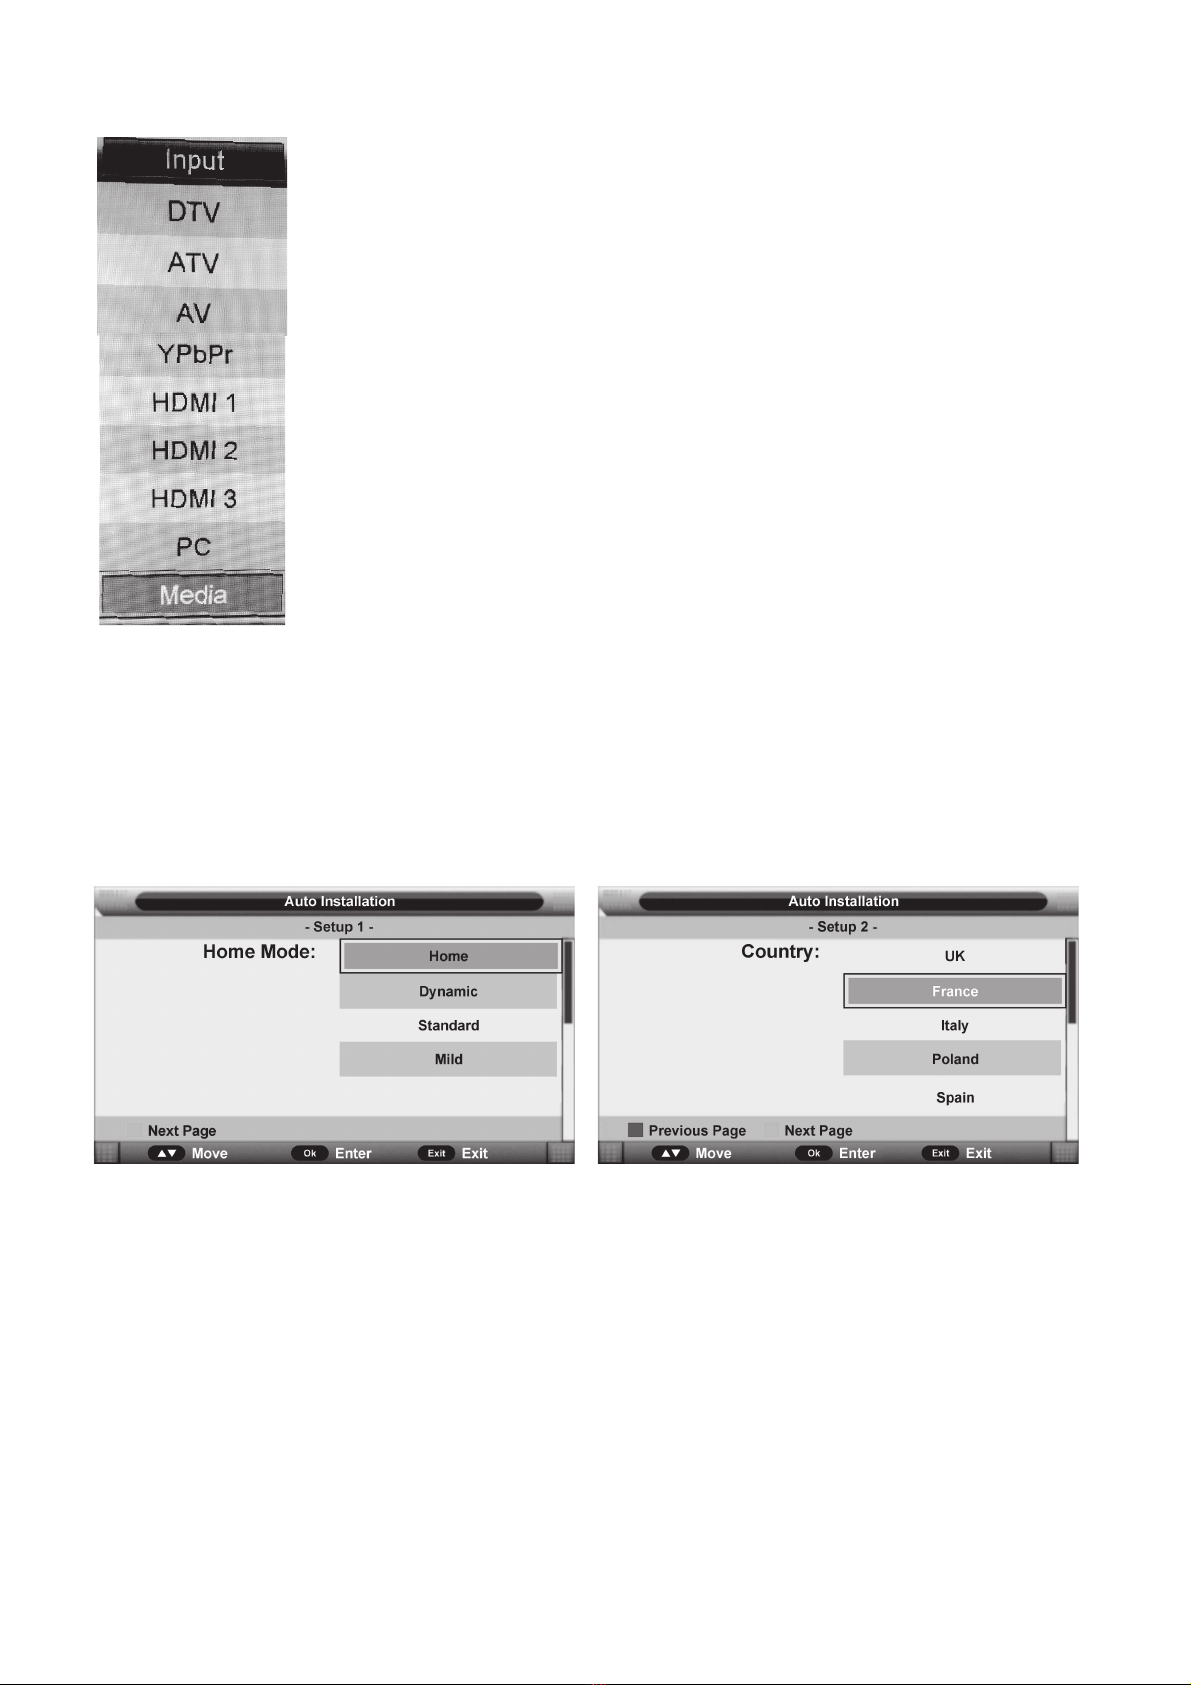
Select Input Source
Press FUENTE to display the input source list.
Press ▼/▲ to highlight the input source and press
OK to confirm.
Press EXIT to hide the On-Screen menu.
(The way to set the disappered time: MENU-TIME
Menu-OSD Timer)
First Time Installation
Connect to power source and turn on this TV, the
first time below installation menu page
will display on the screen:
Setup 1
Press
▼/▲
navigation button to select desired picture Mode.
Press OK button to call out a dialog box. Select OK to confirm selection and
turn to next page; select Cancel to dismiss the dialog box.
Setup 2
Press
▼/▲
navigation button to select the cou ntry that you are living in.
Press OK button to confirm selection and turn to next page.
OK
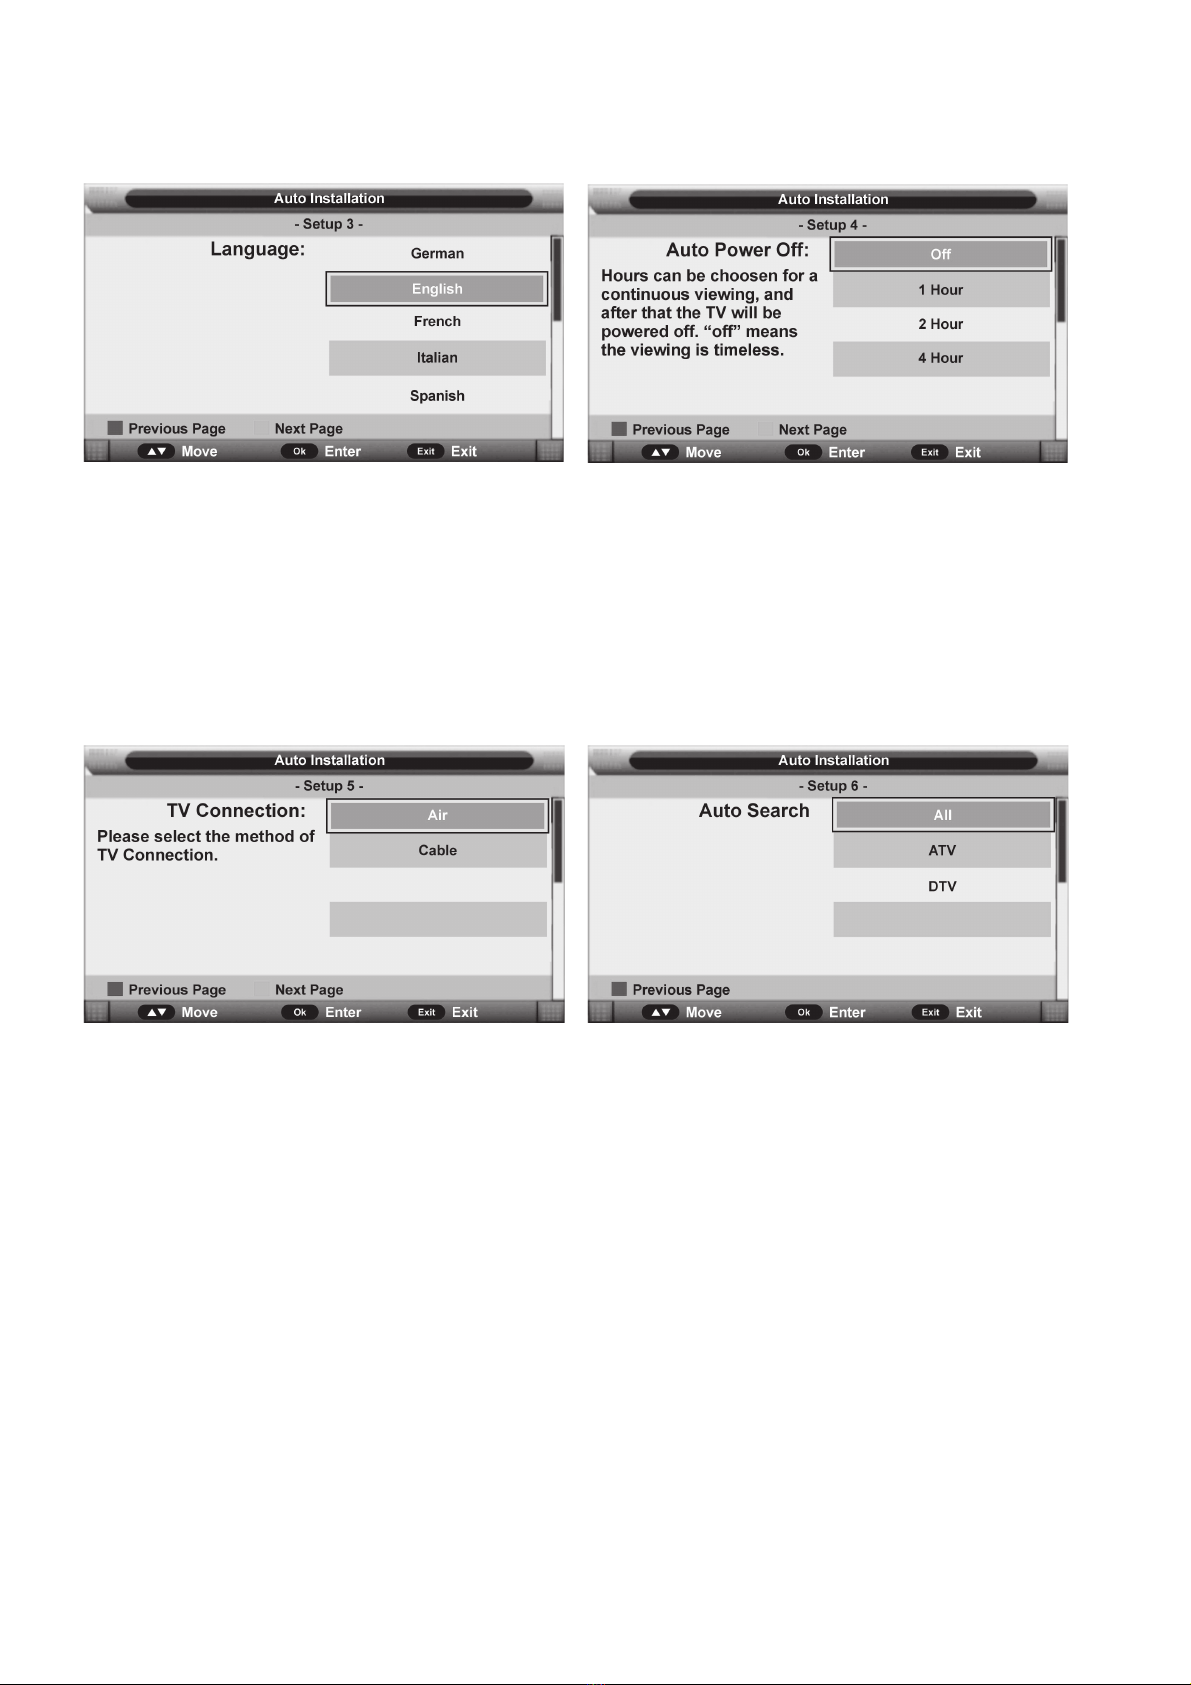
Setup 3
Press
▼/▲
navigation button to select desired menu language.
Press OK button to confirm selection and turn to next page.
Setup 4
Press
▼/▲
navigation button to select desired auto power off time.
Press OK button to confirm selection and turn to next page.
Setup 5
Press
▼/▲
navigation button to select desired connection type.
Press OK button to confirm selection and turn to next page.
Setup 6
Press
▼/▲
navigation button to select desired searching type.
Press OK button to confirm selection and then this unit will search programs
automatilcally.
NOTE:
To skip ATV or DTV tuning, press MENU button on remote control to call out
a dialog box,and select OK to skip it; select Cancel to dismiss the dialog box.
To exit tuning, press EXIT button on remote control to call a dlalog box,and
select ok to exit tuning; select Cancel to dismiss the dialog box.
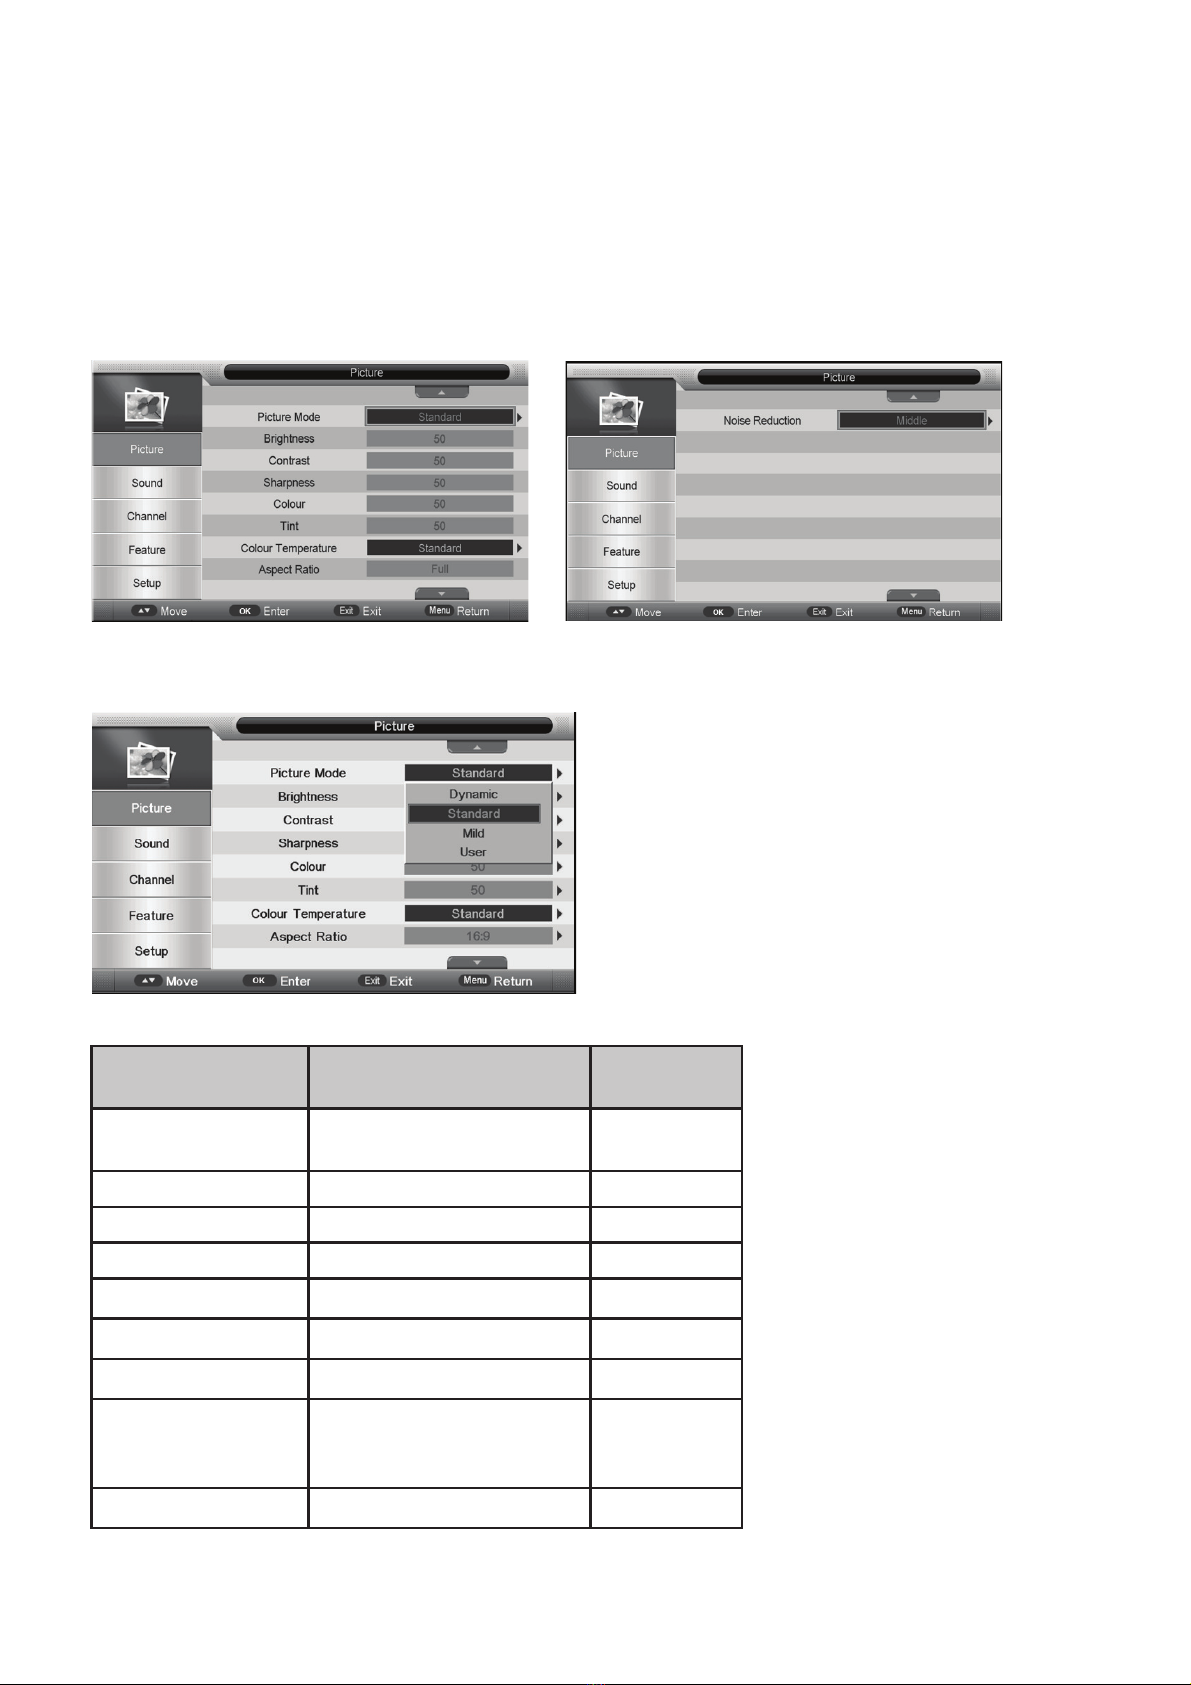
Picture Menu
This chapter will describe the function of Picture in mainmenu.
It will open the mainmenu by pressing ▼ the button “MENU” on the remote.
The focus will move to the sub items in the Picture menu by pressing down the
button “ Ź” and then functions in the Picture can be set. The Picture menu is
shown as follows:
Picture Mode
Selecting Picture Mode – Standard,Mild,
Dynamic or User is the same as the function
when pressing button IMAGEN on the
remote.
Picture Menu
Items Value Default
Picture Mode Standard,
Mild,Dynamic, User
Standard
0~100 50
0~100 50
0~100 50
Colour 0~100 50
100~0 tniT 50
Colour Temp Standard, Warm, Cool Standard
Aspect Ratio Full;Auto;4:3;16:9;Zoom1;Zoom2;Panorama;Just Scan.Full
Noise Reduction Off,Low,Middle,High Middle
Brightness
Contrast
Sharpness
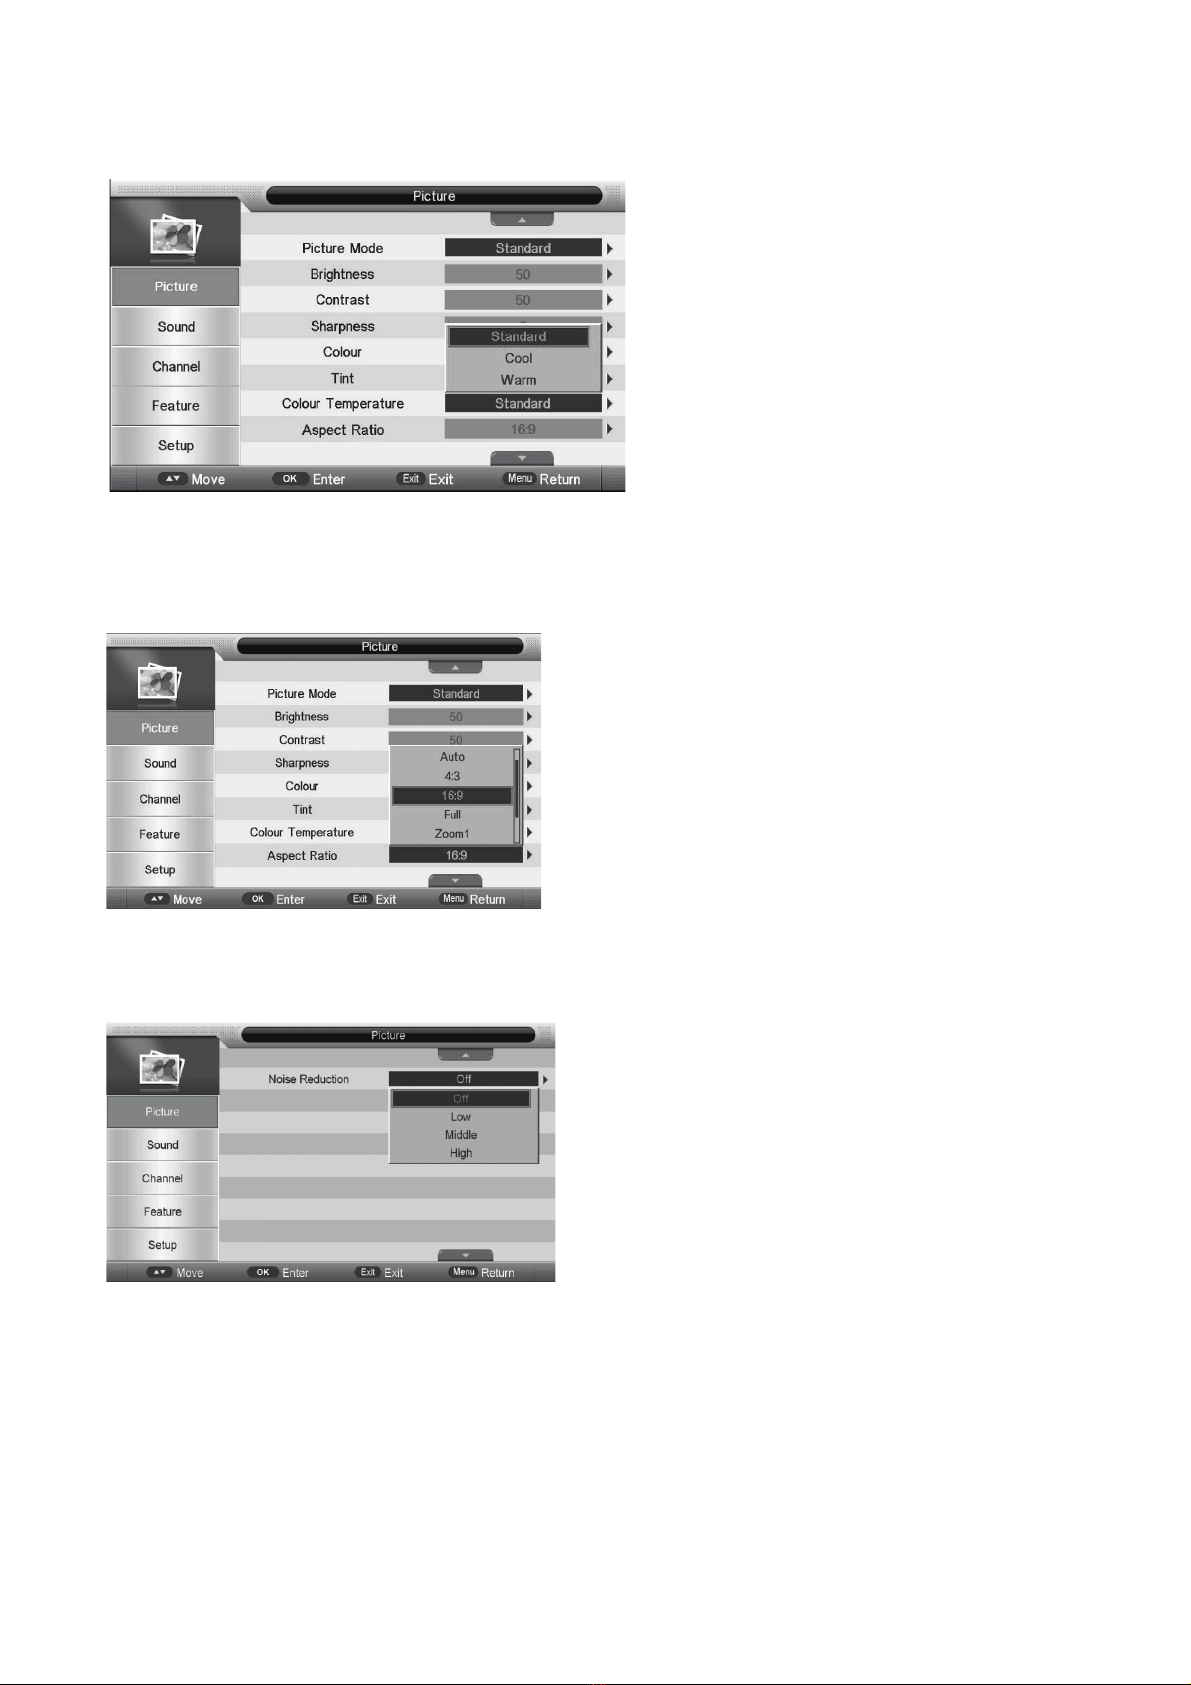
Colour temperature adjusting. There are three choices:standard、warm、cool.
Colour Temperature
Aspect Ratio
Aspect Ratio – Auto,4:3,16:9,Zoom1,Zoom2 or
Panorama is the same as the function when
pressing button TAMAÑO on the remote.
Noise Reduction
Noise reduction of the picture. To reduce
noise and improve the appearance of the
picture. No noise reduction operation if it’s
“off”.
From Low->Middle->High, noise reduction
effects better but it will cause a blur on
picture.
Table of contents
Other TD Systems LED TV manuals

TD Systems
TD Systems K32DLM8HS User manual

TD Systems
TD Systems K24DLM10H User manual

TD Systems
TD Systems K32DLM7H User manual

TD Systems
TD Systems K55DLM7U User manual

TD Systems
TD Systems K24DLM7F User manual

TD Systems
TD Systems K40DLT5F User manual

TD Systems
TD Systems K50DLJ12US User manual

TD Systems
TD Systems K49DLM8U User manual


