Teac TE-605s User manual

CAR CD/MP3 PLAYER/FM-AM RADIO
/Bluetooth(For TE-615s Only)
MODEL: TE-605s/ TE-615s
Take the time to read this user manual. Familiarity with the
manual will help you to obtain the best performance from
your new device. The descriptions and features in this
manual only serve as general information and do not
represent a guarantee. In order to offer you a product of the
highest quality, we reserve the right to make possible
improvements or changes without prior notification.

Safety instructions
This user manual contains important safety instructions and information for proper use of
the device. Please follow the instructions in this manual carefully.
A Please keep the device away from places with high temperatures, high humidity or dust.
B Do not give your car radio and especially the accessories to children.
CAvoid shocks and do not let the device fall, as that may cause damage to the device.
D We are not responsible for data losses that are caused by damage to the product, repairs
or any other reasons.
EDo not disassemble the device. Doing so will void your warranty claims.
F Do not use alcohol, thinners or petrol to clean the display. Use only a dry cloth.
Accessories
Package contains the following accessories for installation and operation the unit.
Washer, spring
Washer, M5 Nut 1
Rubber
cushion 1
WEEE (Waste Electrical and Electronic Equipment Directive)
Waste electrical products should not be disposed of with household waste. Please
recycle where facilities exist. Check with your Local Authority or retailer for recycling advice.
Copyright Information
©2009 All rights reserved. This document may not in whole or in part be reproduced, stored in a retrieval
system, transmitted in any form or by any means, electronic, mechanical, photocopying, recording, or
otherwise, or reduced to any electronic medium or machine-readable form without prior consent, in
writing, from [COMPANY].
[PRODUCT] and [BRAND] are registered trademarks of [COMPANY]. The logo’s, standards, software,
and/or product names mentioned herein are manufacturer and publisher trademarks and are used only
for the purpose of identification.
Disclaimer
The publishers and author assume no responsibility whatsoever for the uses made of this material or for
decisions based on its use. Further, [COMPANY] makes no warranties, either expressed or implied,
regarding the contents of this product, its completeness, accuracy, merchantability, or fitness for any
particular purpose. Neither the publisher nor anyone else who has been involved with the creating,
production, or delivery of the material shall be liable for any reason.
All brand and product names used throughout this document are trademarks or registered trademarks of
their respective companies. The brand and product names are used in editorial fashion only and for the
benefit of such companies.
Product specifications are subject to change without prior notice
www.phonic-teacaudio.com

Mounting Strap 1 Screw 4
Bolt 1 key 2
Screw 1 sleeve 1
ISO Cable 1
Manual 1
Installation in Dashboard
If your car is fitted with a one (1x) DIN size opening for a car audio system, you can install the Car Radio
according these steps.
Note: Unit should be installed horizontally in an angle less than 30°.
1) Insert the mounting bracket into the 1X DIN opening of your dashboard.
2) Bend the mounting tabs outwards with a screwdriver, to tighten and fix the mounting bracket in its place.
3) Connect the M5 Bolt to the rear of the unit.
4) Check electrical connections as described earlier (either an ISO connection or separate wiring)
5) Insert the ISO connector into the unit.
6) Push the unit into the mounting bracket until you hear a click
7) Move the assemble bar (metal strip with holes) over the M5 bolt. And use the M5 nut to tighten the
assemble bar.
8) Use the screw Bt5x20 to fix the other side of the assemble bar to the car body.
9) Place the front rim over the unit to finish the installation.
Wiring Connections
Note: Never connect cable to the system while it is connected to the battery power. Whenever the unit is
disconnected from the battery, the preset memory will be erased and the unit will go back to its factory
defaults.
1X DIN
S
L
O
T

Panel
Note:
If the control panel is dirty, wipe off the dirt with soft, dry cloth only. And use a cotton swab
soaked in isopropyl alcohol to clean the socket on the back of the control panel.
Basic Operations
Reset the unit
Operating the unit for the first time or after replacing the car battery, you must reset the unit.
Press RESET button to restore the unit to its original factory settings.
Power on/off
Press PWR button to turn on the unit. Hold PWR button on front panel to switch the unit off.
Volume control
Rotate VOL knob on the front panel or press VOL+/- button on RC to adjust the volume level.
Turning the sound off
Short press PWR button on the front panel or press MUTE button on RC to turn the sound off. Press it again
to turn the sound on.
Setting the sound characteristics
Repeatedly press SEL button on the front panel or RC to select the audio settings: BASS => TRED => BAL
=> FAD=> X-BASS=> DSP=> DX=> STEREO=> VOLUME. Rotate VOL knob on front panel adjust each
setting.
Setting other features
Press and hold SEL button on the panel, and then shortly press this button repeatedly to select a setting. Or
repeatedly press SEL button on the RC to select a setting. Rotate Volume knob on the panel or press
VOL+/VOL- on the RC to adjust each setting, press SEL button to confirm the each setting: VOL ADJ→
AREA EUR(Only for Radio mode)→CLOCK 24HR→SUBWOOF ON/OFF →BEEP ON/OFF
VOL
When VOL is selected, rotate the volume knob clockwise to boost the default startup volume, rotate the
volume knob counterclockwise to decrease the default startup volume.
DIS
Long press DIS button to enter time setting (default hour setting), rotate the volume knob clockwise to
increase the hours, short press VOL button to switch to minutes setting. Then rotate the volume knob
clockwise to increase the minutes, press DIS button to confirm input.
BEEP
10) Present 1/Play or pause button
11) Present 2/Repeat button
12) Present 3/Introduce button
13) Present 4/Random button
14) Present 5/Down 10 button
15) Present 6/Up 10 button
16) AUX-IN Jack
17) Release button
18) USB slot
19) Open button
20) IR sensor
21
)
DISC Slot
1)Mode button
2)Power /mute button
3)EQ button
4)Volume /Sel button /Subwoofer on or off
5)AS/PS button
6)DIS button
7)Fast rewind/Previous track/
Accept (For TE-615s Only)
8)Band button
9)Fast forward/Next track/Reject (For TE-615s Only)

Long press VOL button till LAST displayed on the LCD, short press VOL button to select BEEP mode, then
rotate the VOL knob to select BEEP on or off for all modes.
- Beep on: The beep sound is on when any key is pressed.
- Beep off: The beep sound is disabled.
DX
When DX is selected, rotate the volume knob to select ON or OFF. ON to select the long distance radio
station mode (DX), select OFF for short or local distance radio stations (LOC).
STEREO
Press the VOL knob to select STEREO or MONO in radio reception.
Subwoofer
Connect the subwoofer cable to the unit using sub output (see electrical diagram). Press and hold SEL
button choose expert and set subwoofer ON to enable subwoofer.
X-BASS
Set X-BASS on or off. X-BASS function is to emphasize the bass output.
Mode setting
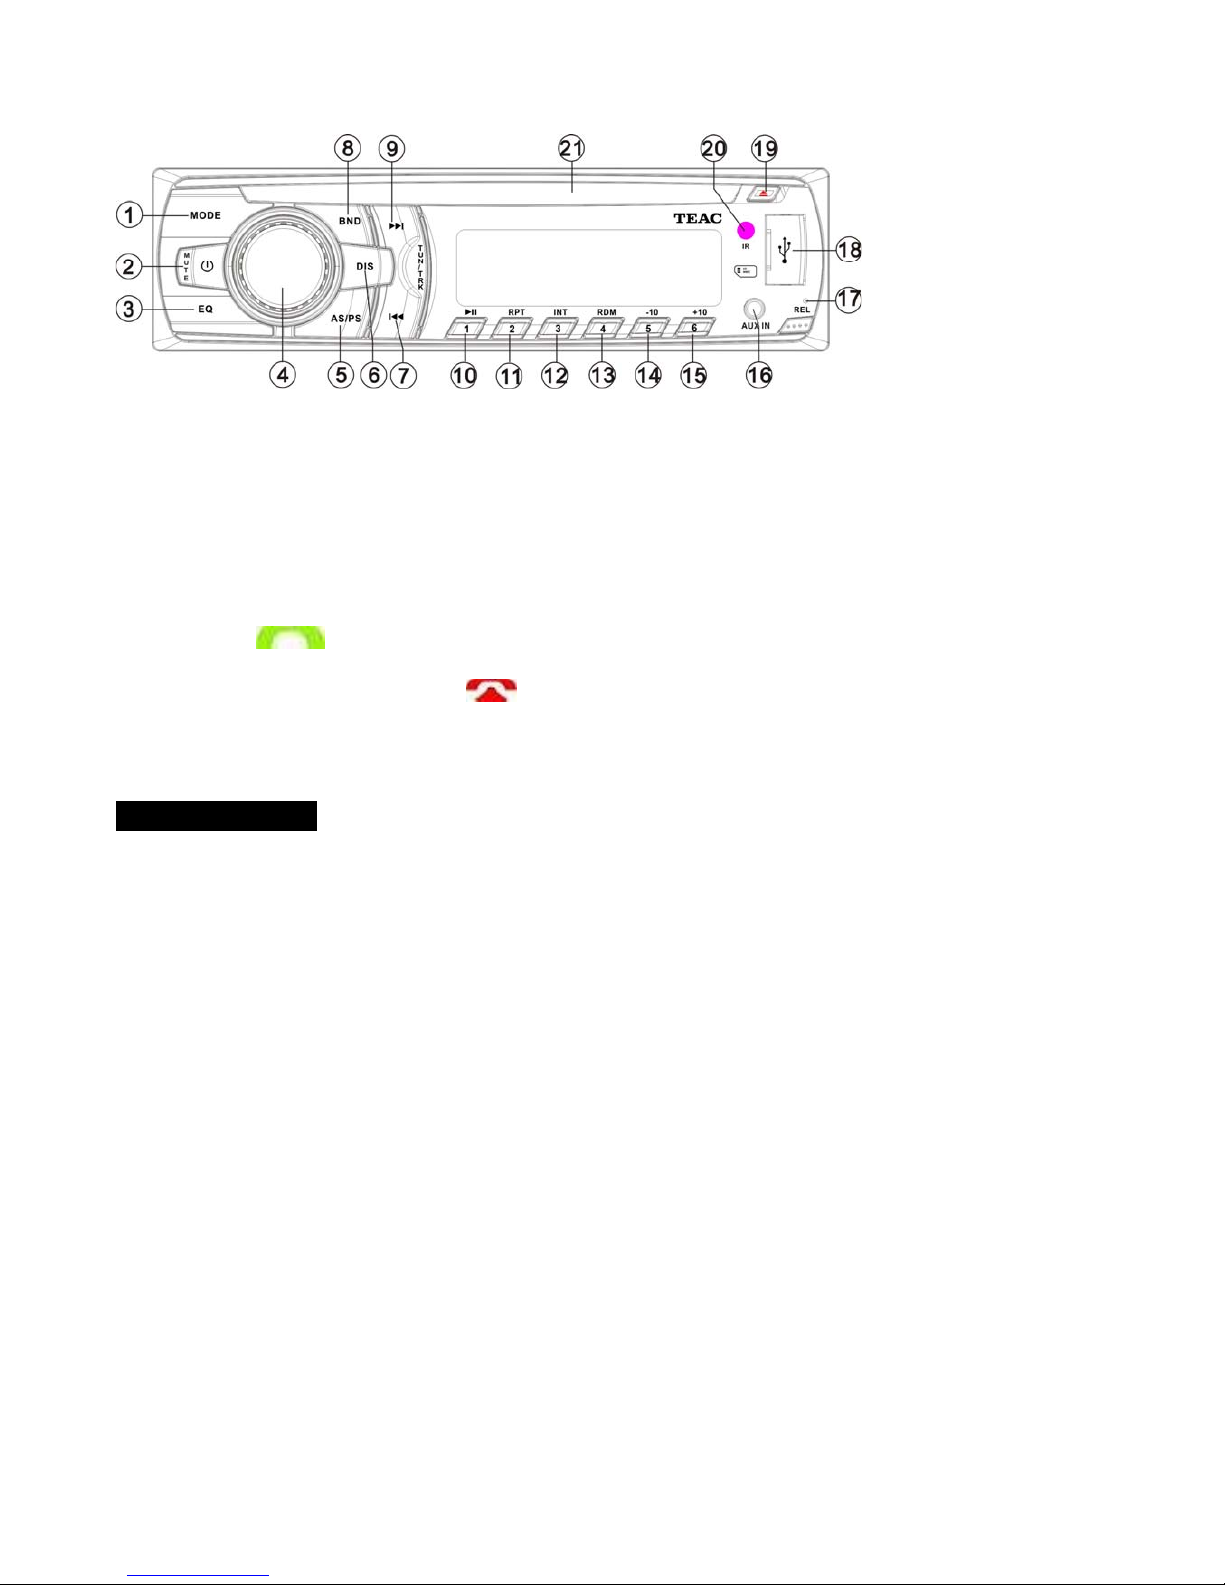
Press MODE button to select a mode: FM1->DISC->USB->SD/MMC->AUX->FM1.
(*Disc, USB, and CARD modes will only show on the display when a disc, a USB device, or a memory card
is inserted into the unit).
EQ setting
Press EQ button to select a predefined equalizer sound effect according your liking in the following
sequence: ROCK →POP →CLASSIC →DISP OFF.
Press and hold EQ button for two seconds to set x-bass on off.
AUX jack
AUX-in jack is intended for a connecting external audio to amplify the sound. If connection is made correctly,
the audio signal from the external source will be translated through the acoustics of the head unit. This
enables to adjust the volume and quality of the sounding. For example, you can connect an MP3-player to
listen to tracks using the car acoustic system.
Digital Tuner Operations
Press BAND button repeatedly on the panel or RC to select TUNER mode.
Press BAND to select: FM1->FM2->FM3->MW1->MW2.
Manual / Auto tuning
- Automatic search mode:
Press the or button briefly to launch the automatic search forwards or backwards. The radio will
search up or down for a strong signal radio station within the current band.
- Manual search mode:
Press and hold the or button until “MANUAL” appears on display, it will change into manual
searching mode. Press the or button repeatedly to manually search upward or downward step by
step for the desired radio station within the current band.
To store / recall a preset radio stations
You can store up to a total of 18FM or 12MW radio stations in the memory, manually or automatically.
Auto memory store
Select a band, press AS/PS button and hold for 2 seconds on the front panel to enter auto store mode. The
radio will automatically store 6 stations to the 6 preset memories of the current band. To stop auto store,
press this button again.
Preset scan
Select a band, press AS/PS button on the front panel to scan all preset stations in the memories of the
current band, each preset scan for 5 seconds. To stop preset scan, press the button again.
CD - USB – SD/MMC Card Operation
Inserting the SD/MMC card/USB device
Insert the SD/MMC card or USB device into SD/MMC slot or USB socket. Then the playing mode will be
changed into SD/MMC, USB mode automatically.
Note: When SD/MMC card and USB device are both inserted, the playing mode will be changed into the
mode of the device inserted later.
Playing/pausing
Press PAUSE button on the front panel to break playback, press it again to resume playback.
Select track
1. Press the button to play the next track, press button to play from the beginning of the current
track.

2. Press 5 / -10 button on the front panel to rewind 10 tracks. And press 6 / +10 button on the front panel to
skip 10 tracks.
Fast forward/rewind
Keep the or button pressed to start fast forward or rewind.
Intro playback
Press the 3 / INT button on the front panel to scan all tracks. “INTRO” is shown on the display. All tracks are
played in sequence for around 10 seconds. Press again to resume normal playback.
Repeat function
Repeatedly press the 2 / RPT button on the front panel to repeat playing in different mode: repeat
one/repeat DIR /repeat off.
Random function
During playback press 4 / RDM button on the front panel to activate random playing mode, press once more
to return to normal playing.
File/Folder Search (for MP3 files)
The search modes work with CD/MP3/USB/SD/MMC with MP3 files.
• File Number Search
Press AS/PS button to enter file search, the “*” is displayed, meaning the unit is ready to accept file number
for search. Rotate VOLUME knob to input the first alphabet (from A to Z) or digit (from 0 to 9) of file you
want to search. Press VOLUME button twice to see total file number displayed on the LCD.
• File Name Search
See total file number displayed on the LCD, then rotate VOLUME knob to select file name you want to listen
to. Press VOLUME button to play.
• Folder Search
Press AS/PS button to enter DIR search, after see total folder number displayed, rotate VOLUME knob to
choose folder, then press VOLUME button to enter subfolder. After complete, press VOLUME button to play.
NOTE: If entered wrong letter or number, just press AS/PS button to delete it.
ID3 TAGS DISPLAY
Pressing the DIS button on the front panel will show the following current tuning information and time: CT
(Clock/Time)
Bluetooth Operation (only for TE-615s)
This unit offers you the option of using a Bluetooth-enabled mobile phone. The function radius is limited to
around 3 meters depending on the device.
Do not set the volume too high. Doing so may lead to feedback (whistling) from the speakers.
Pairing devices (PAIRING)
Before you can use the car radio to make phone calls, you must pair the units.
Redial
The unit stores the last call numbers automatically. To access this, proceed as follows: Short press Mode
button on the front panel to go into BT menu, press the BT key on the panel to dial out the last
number which called before.
The LCD display “CALLING” and phone display phone number
Incoming call
In coming calls the LCD display phone number and the LCD display phone number only.
Music playback via A2DP (BT AUDIO)
Enter BT mode, short press 1/Play or pause button to select BT AUDIO mode.
To control the source remotely, the playback unit must support the AVRCP profile (Audio Video Remote
Control Profile).
After you have connected the units to each other, start playing the music in your mobile phone
Press or button to select the next or previous track
Technical Specifications
General
Operational Voltage: 12 Vdc (10.8 ~16V allowable)
Fuse: 10 A
Installation Angle: Vertical 0° to +30°, horizontal ±15°
Audio Input (AUX, Stereo): 1 (Front, 3.5mm)

Audio Output (RCA): 4 Channel
Maximum Power Consumption: 10 A
Installation Size (W x H x D): 178 x 50x 165 mm
Station Memory: 30 (18 FM / 12 MW)
Maximum Power Output: 4 x 50 Watt
Impedance: 4 – 8 Ω
Supported Medium: SD, USB, CD, MMC, (Bluetooth for TE-615s)
Supported Formats: MP3, WMA
FM / MW RADIO
FM Frequency Range: 87.5 – 108.0 MHz
MW Frequency Range: 522 – 1620 kHz
Antenna Impedance: 75 Ω
AUX AUDIO
Frequency Range (± 3 dB): 20 Hz – 20 KHz
Audio Input Level: 500mV (2V Max)
RCA Output Level: 2V
Subwoofer Output Level: 2V
Specifications are subject to change without notice. Mass and dimension are
approximate.

www.phonic-teacaudio.com
This manual suits for next models
1
Table of contents
Other Teac Car Receiver manuals
Popular Car Receiver manuals by other brands

Medion
Medion MD 42540 manual

Pioneer
Pioneer X-CM30 operating instructions

Sony
Sony CDX-SW330 - Fm/am Compact Disc Player Installation/connections

Sony
Sony MEX-BT38UW - Bt Slot Usb 1wire operating instructions

Kenwood
Kenwood KDV-MP735 Service manual

Sony
Sony CDX-F5700 - Fm/am Compact Disc Player operating instructions