Teac KUD75WT808AN User manual

KUD75WT808AN

1

2

3

Important Information
4
Table of Contents
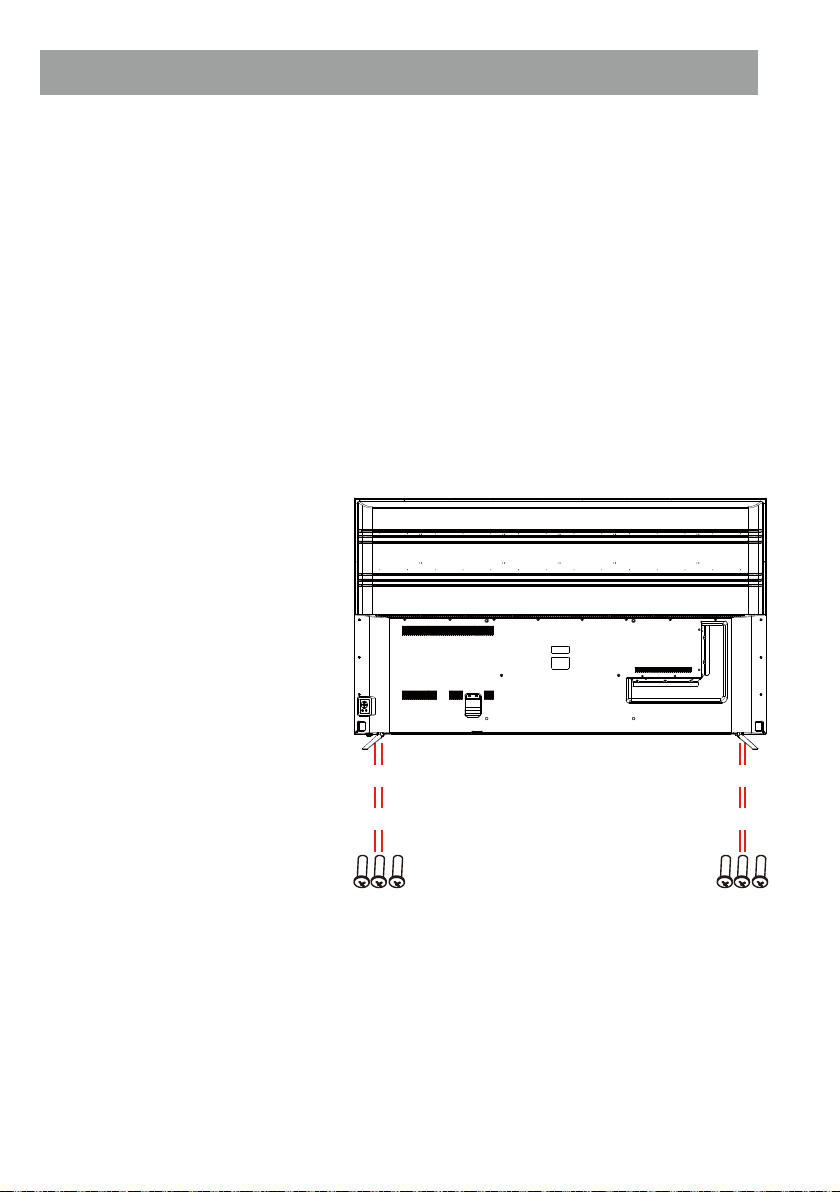
If a television is not positioned in a sufficiently stable location, it can be potentially hazardous
due to falling. Many injuries, particularly to children, can be avoided by taking simple precautions
such as:
8VLQJFDELQHWVRUVWDQGVUHFRPPHQGHGE\WKH manufacturer of the television.
2QO\XVLQJIXUQLWXUHWKDWFDQVDIHO\VXSSRUWWKH television.
(QVXULQJWKHWHOHYLVLRQLVQRWRYHUKDQJLQJWKHedge os the supporting furniture.
1RWSODFLQJWKHWHOHYLVLRQRQWDOOIXUQLWXUHIRUHxample, cupboards or bookcases) without
anchoring both the furniture and the television to a suitable support.
1RWVWDQGLQJWKHWHOHYLVLRQVRQFORWKRURWKHUmaterials placed between the television and
supporting furniture.
(GXFDWLQJFKLOGUHQDERXWWKHGDQJHUVRIFOLPELng on furniture to reach the television or its
controls.
.HHSVPDOODFFHVVRULHVRXWRIUHDFKRIFKLOGUHn so they are not mistakenly swallowed.
5
7
9
10
11
15
17
27
29
37
39
58
,167$//$7,21 --------------------------------------------------------------------------------------------------------
&21752/6$1'&211(&7,216 ------------------------------------------------------------------------------
63(&,),&$7,216 -----------------------------------------------------------------------------------------------------
5(027(&21752/ --------------------------------------------------------------------------------------------------
*HWWLQJ6WDUWHGZLWKZHE2679
+RZWR2SHUDWH79
(QMR\/LYH79
------------------------------------------------------------------------------------
---------------------------------------------------------------------------------------------------
-----------------------------------------------------------------------------------------------------------
(1-2<,1*&217(176725(
&211(&7,1*(;7(51$/'(9,&(6
------------------------------------------------------------------------------------
---------------------------------------------------------------------------
0$.,1*7+(02672)60$5779
6(77,1*6
7528%/(6+227,1*
-----------------------------------------------------------------------------
------------------------------------------------------------------------------------------------
---------------------------------------------------------------------------------------------------------------

Install the stand as described below, or if you want to mount it to a wall, please contact a
professional installer.
Please ensure the TV is not plugged into the wall socket and furthermore we recommend
to get another person to assist in the following task.
Attaching the stand
Step 1
Place a soft cushioned material on top
RIDÀat surface to prevent damaging the
screen panel. Then place the TV screen
Àat on top, with the screen side facing
down, as illustrated on the right.
Step 2
Align the stand leg to the installation
point, as illustrated below.
Step 3
Tighten the screws (supplied) with a
panel, as illustrated on the right.
CAUTION!
Do not apply excessive force as this may damage the screw holes.
INSTALLATION
screwdriver to affix the stand to the
5

Wall-Mounting Instructions
Please ensure the TV is not plugged into the wall socket and furthermore we recommend
to get another person to assist in the following task.
• We recommend you use a professional installer as we assume no liability for any eventual
damage to the product or injury to yourself if you mount the TV on your own.
NOTE: If you are wall-mounting the TV, this should be done b\DTXDOL¿HGLQstaller.
INSTALLATION
BACK OF TV
VESA PATTERN: 600 x 400mm
6

7
CONTROLS AND CONNECTIONS
Channel Up
Channel Down
Volume Down
Power
OK/Select
Volume Up
Input Menu

CONTROLS AND CONNECTIONS
OPTICAL USB2
HDMI1
ARC
HDMI2
USB1
Camcorder
PC (HDMI-output)
Blu-ray disc player
DVD player
8

SPECIFICATIONS
Operating System
Model
webOS
KUD75WT808AN
Resolution 3840 x 2160
Contrast ratio: 1200 : 1
Luminance 300 cd/m2
Colours 1.07 G
Aspect Ratio 16 : 9
Multimedia Playback
Format under
USB Mode
Music: MP3, M4A,WMA
Movie: AVI,MP4,MPG,MKV,MOV,DAT, VOB
Photo: JPG, BMP, PNG
Power Source 110-240V~ 50/60Hz
Power Consumption 290W
9
Controller Power
Work Temperature
DC 3V (Two AA size batteries)
° °

REMOTE CONTROL
Using the Remote Control Button
10
: Launch Live Playback.
: go to Netflix.
: go to prime video.
: Corresponds to various colour functions in the menu or teletext.
The marks and positions of the remote control buttons may vary depending on the model.
Wheel (UP)
Wheel (OK)
Wheel (DOWN)
TV POWER ON/OFF
STB POWER ON/OFF
Number Key
Number Key
Number Key
Number Key
Number Key
Number Key
Number Key
Number Key
Number Key
Input/Channel List
Brief : Number Key / Hold : Quick Access
Brief : Screen remote Call / Hold : Audio Description
Mute
Volume UP
Volume Down
Channel UP
Channel Down
Voice recognition Call (Voice recognition activation roll)
Home Menu Call
Quick Settings Call
Page Scroll Up / Go to upper channel level
Confirm
Page Scroll Down / Go to lower channel level
Focus Move Up
Focus Move Left
Focus Move Right
Focus Move Down
Historical Back
EPG Call
NETFLIX APP Execution
Input Picker Call
AMAZON APP Execution
Color Key
Color Key
Color Key
Color Key
MOVIES Call
Play
Pause

You can open the Home screen by pressing the button on your remote control.
You can combine frequently used apps on a single screen and use whichever you want
at any time.
1.Launch Search.
To see the details, click the Enjoying Content Store Content Search in User Guide.
2.Move to the Home Dashboard.
You can select or control a device (mobile, external device, Home IoT Devices, etc.)
connected to the TV.
For more information, see Connecting External Devices Using Home Dashboard in
User Guide.
3.Move to the TV input you used recently.
4.Move to the recently used app.
Long-press the button on the remote control or focus on the Recents.
You can run or close a recently used app in the list provided in the Preview area at the top.
5.You can run, move, and delete the apps installed on your TV.
Focus on each App area. It provides the Preview at the top.
You can check or run useful features of each app and recommended content on the
Preview without entering into the app.
Some apps may not provide the Preview.
The home screen will be displayed automatically when the TV is turned on. If you don’t
ZDQWWKHKRPHVFUHHQWREHGLVSOD\HGVHW+RPH$XWR/DXQFKRIĺĺ*HQHUDOĺ
Home Settings as Off.
The availability of and access to Contents and Services in device are subject to change
at any time without prior notice.
Getting Started with webOS TV
Home Tutorial
Using the Home Feature of the webOS TV

You can view a list of all apps installed on your TV, change their positions, or delete them.
1.Select the app you want to edit, and press and hold the Wheel (OK) button on the remote
control.
This will activate the app edit mode.
Or you can select the Edit mode button at the right corner of the Home list to enter the
App Edit mode.
2.To move the app to your desired position, go to the position and press the Wheel (OK)
button.
To delete an app, select the App Delete icon above the app.
You can move and delete as many apps as you wish before exiting the edit mode.
You can also move apps with the / buttons on your remote control.
3.After the editing is done, press the Close at the top right to exit the App Edit mode.
The default TV app cannot be edited.
1.You can automatically arrange the app list in the order of most frequently used based
on your accumulated app usage pattern.
2.You can add your favourite video service programme to the list.
This feature is available only when the network is connected.
Some models may not be supported.
1.Connect the broadcast antenna to the TV.
You can also connect a piece of equipment that can receive broadcasting such as a
set-top box instead of the antenna.
/DXQFKĺ&RQQHFWLRQĺ'HYLFH&RQQHFWLRQ6HWWLQJV8QLYHUVDO
Control Settings
6WDUWWKHĺĺ3URJUDPPHV3URJUDPPH7XQLQJ3URJUDPPH
Tuning & Settings) Auto Tuning.
Finds and adds only programmes being broadcast.
To solve a problem related to this function, refer to the Troubleshooting section of
User Guide.
Manage webOS TV Home
Live TV Preparation
Getting Started with webOS TV
Manage Home

Connecting to the Network
Setting a Wired Network
If you configure settings for the network, you can use various services such as online
contents and applications.
1.Turn on the power of the router connected to the Internet.
2.Press the Settings button on the remote control.
3.Select All Settings icon Connection Network Connection Settings Wi-Fi Connection.
4.When the network search is complete, the list of networks available for connection
is shown.
5.Select a network to connect.
If your wireless LAN router is password protected, enter the password configured for the
router.
To see the details, click the Settings Connection Network Connection Settings in
User Guide.
Getting Started with webOS TV
Connecting to the Network
1.Connect the LAN port of the TV and the router using a LAN cable.
The router should be connected to the Internet beforehand.
If the router supports DHCP, the TV is automatically connected to the network when
you connect the TV to the network with a LAN cable.
If the Network Is Not Automatically Connected
2.Press the button on the remote control.
6HOHFWĺ&RQQHFWLRQĺ1HWZRUN&RQQHFWLRQ6HWWLQJV
Wired Connection (Ethernet).
To see the details, click the Settings Connection Network Connection Settings in
User Guide
Setting a Wireless Network
13

1.Use standard LAN cable (connect to Cat7 or higher with RJ45 connector, 10 Base-T,
or 100 Base TX LAN port).
2.Resetting the modem may fix some network connection problems. Turn the power OFF,
disconnect and reconnect it, and then turn the power on to solve the problem.
3.The manufacturer is not responsible for any network connection problems or any faults,
malfunctions, or errors caused by network connection.
4.The network connection may not work properly because of network settings or the
Internet service provider.
5.DSL service must use a DSL modem; and cable service must use a cable modem. Since
only a limited number of network connections may be available, TV network setting may
not be used depending on the contract with Internet service provider. (If the contract does
not allow more than one device per line, only the already-connected PC may be used.)
6.A wireless network can experience interference from other devices that use the 2.4 GHz
frequency (wireless phone, Bluetooth device, or microwave oven). Although interference
can also happen when using the 5 GHz frequency, it is less likely to occur.
7.The wireless environment can make wireless network service run slowly.
Failure to turn off all local home networks may cause excessive traffic on some devices.
The access point device must support wireless connections and wireless connection
feature must be enabled on the device to have AP (access point) connection. Contact the
service provider for availability of wireless connections on the access point.
8.Check SSID and security settings of the AP. Refer to the appropriate documentation for
SSID and security settings of the AP.
9.Invalid settings of network devices (wired/wireless line sharer, hub) can cause the TV to
operate slowly or not operate properly. Install the devices correctly according to the
appropriate manual and network.
10.The connection method may differ depending on the AP manufacturer.
11.To solve a problem related to this function, refer to the Troubleshooting section of
User Guide
Network Setting Warnings
Getting Started with webOS TV
Connecting to the Network

Using SIMPLINK
Connecting to SIMPLINK (HDMI-CEC)
With a single remote control, you can easily manage various devices such as a soundbar or
set-top box connected to a TV with HDMI.
Up to three devices can be connected and used simultaneously.
1.Connect the SIMPLINK HDMI Output port to the TV HDMI IN port with an HDMI cable.
2.Press the button on the remote control.
6HOHFWĺ&RQQHFWLRQĺ'HYLFH&RQQHFWLRQ6HWWLQJV
4.Set SIMPLINK (HDMI-CEC) to On.
5.Configure the Auto Power Sync settings to On or Off. (If Auto Power Sync is set to On,
turning on a SIMPLINK-linked device will turn the TV on. When you turn off the TV, the device
will also be turned off.)
6.Turn on the connected device. When the TV automatically connects to the device, the input
will change.
If the device is not automatically connected to the TV, click the Input button.
This feature works only with devices with the SIMPLINK logo logo. Check for the SIMPLINK
logo on the external device.
How to Operate TV
Use of any product other than those specified may cause problems during operation.
To use Simplink, you need to use a high-speed HDMI cable with CEC (Consumer Electronics
Control) function. The High-Speed HDMI cable has the pin 13 for enabling information
exchange between devices.
If you want to output sound to the external audio equipment connected through the
HDMI cable, set SIMPLINK (HDMI-CEC) to On

Supported SIMPLINK Functions
How to Operate TV
Instant Play
When you start a multimedia device, you can immediately watch content from the device
on the TV without having to control anything.
Controlling devices with the TV remote control
Enables the user to control multimedia devices with the TV remote control to watch content.
The pointer function of the Magic remote can be limited.
Shortcuts to Accessibility
Main Power Off
If Auto Power Sync is set to On in the Device Connection Settings and turn off your TV,
the devices connected to your TV via SIMPLINK will also be turned off.
This feature is only available in certain devices.
Main Power On
If Auto Power Sync is set to On in the Device Connection Settings, turning on a SIMPLINK-
linked device will turn the TV on.
If SIMPLINK (HDMI-CEC) is set to Off, Auto Power Sync can not set to On.
Some models may not be supported.
Shortcuts to Accessibility
You may go directly to Accessibility without entering the Advanced Settings menu.
Press and hold the MUTE button on your remote control.
You can set High Contrast, Grayscale, Invert Colours, etc.

Making the Most of Live Menu
Enjoy Live TV
Using Live Menu
You can use the relevant features with ease when watching TV broadcasts.
Press the LIST button on the remote control.
Or press the Wheel (OK) button on the remote control and select Programmes.
1.Programmes : View a list of broadcast content that is currently being broadcast.
2.Guide : You can view programmes and the schedule of each programmes.
To see the details, click the Enjoy Live TV Viewing Guide in User Guide.
3.TV Scheduler : You can enter the time and date of a programme to schedule watching or
recording it at the set time.
To see the details, click the Enjoy Live TV Using TV Scheduler in User Guide.
4.Recordings : You can check the recordings stored in the storage device and play the
recordings.
To see the details, click the Enjoy Live TV Playing Recorded TV Programs in User Guide.
The menu appears only if an external storage device is connected and the recorded video
can be viewed.
The programmes displayed in Programme List are a configuration of programmes provided
by the broadcast service provider. Therefore, if the broadcast service provider has changed
its programme configuration without notice, the programmes displayed in Programme List
may differ from the actual TV programmes.
Because programme information displayed in programme List includes information
provided by external Electronic Programme Guide (EPG) providers, it may differ from the
actual TV programmes.
You must complete the settings of the network, region, and auto-programme to receive
normal live broadcast service.
The configurable items differ depending on model

Viewing Guide
Enjoy Live TV
Viewing TV Guide
You can view programmes and the schedule of each programmes.
Press the remote control's LIST button, and select the Guide tab on the left side of the screen.
1.Click on each area, and you can move to the app.
2.You can view information on the programme and broadcaster.
3.You can view information about the programme you are currently watching as well as the
focused programme information.
4.Select the See Details button or the title of the desired programme. You can view more
information on the programme and perform Watch/Record (only available on certain models)
or Reminder/Scheduled Recording (only available on certain models), etc.
5.You will be taken to the programme list for the current date and time.
6.Launch Programme Manager.
7.You can change the size of the programme list to adjust the number of programmes
displayed on the screen.
8.Sets the filter.
9.You can turn on/off Mini TV.
Programme information is not displayed for programmes with no provided broadcast
information.
Some models may not be supported.
The configurable items differ depending on model.

Checking Programme Info
Live Playback
Enjoy Live TV
Viewing Programme Information
During watch the Live broadcast, press the Wheel (OK) button. The Programme Banner
appears.
Move to the Programmes.
To see the details, click the Enjoy Live TV Making the Most of Live Menu in User Guide.
It displays the information about the programme you are watching. Select a programme
banner to enter the detailed information pop-up to see the detailed programme information
or run additional features related to the banner.
You can view broadcast information about other programmes using the Up/Down buttons.
You can view broadcast information about the programme you are currently watching using
the Left/Right buttons.
Press the Blue button on the remote control to move the banner’s position.
The features can be controlled only within the detailed information pop-up.
It displays content related to Recording/Live Playback.
To see the details, click the Enjoy Live TV Live Playback in User Guide.
If the programme you are watching includes information such as Subtitle or Audio Language,
you can set these features.
Subtitle : You can set Subtitle.
Audio language : You can set Audio Language.
Only available with digital broadcasts.
Multi Audio icon : You can set Multi Audio.
Only available with analogue broadcasts.
Available features may vary depending on the broadcast signal
Using Live Playback (Real-time Playback)
It is a function you can use to temporarily save the programme you are currently watching
to a USB HDD, so you can play back any scenes you might miss while watching TV.
This function allows you to continue watching from where you were previously if you go
out for a while.
1.Input the USB HDD in the USB port.
2.Press the Wheel (OK) button on your remote control.
3.Press the Start Live Playback button at the bottom of the screen.
Table of contents
Other Teac LED TV manuals

Teac
Teac LE40A4E1FHD User manual

Teac
Teac LE65A4E3UHD User manual

Teac
Teac A5 Series User manual

Teac
Teac LEV40A317FHD User manual

Teac
Teac LET3996FHD User manual

Teac
Teac LE32E120 User manual

Teac
Teac LEV40A119 User manual

Teac
Teac A1 Series User manual

Teac
Teac LE65A521 User manual

Teac
Teac LEDV29G72HD User manual

Teac
Teac LEV19A119 User manual

Teac
Teac LE58A521 User manual

Teac
Teac E Series User manual

Teac
Teac LEDV19U83HD User manual

Teac
Teac DLE5089FHD User manual

Teac
Teac LEV3992FHD User manual

Teac
Teac DLE3289HD User manual

Teac
Teac LE43A718UHD User manual

Teac
Teac LE50A521 User manual

Teac
Teac LE32G6FHD User manual