Teac MC-DX10 User manual

Z
MC-DX10
9A09899100
ITALIANO ENGLISH
MICRO Hi-Fi SYSTEM
OWNER’S MANUAL
MANUALE D’ISTRUZIONI

MOUNTING THE SYSTEM ON THE WALL
The supplied paper pattern helps you to align the main with
the speakers properly.
1. Mark where to fasten the screws on the wall using the
paper pattern.
*Wall mounting screws are not sup-
plied with this system. Use screws suit-
able for the wall material. Also, select
the screws of appropriate size for the holes size as illustrated below.
2. Drive the screws into the wall.
3. Hang the main unit/ speaker using the holes on the back on the protruding screws.
Make sure that the screws securely connect with the narrow parts of the holes.
IMPORTANT
The wall on which the unit and speakers are to be attached should be capable of supporting 15 kg (33 lb.) per screw.
When in doubt, consult qualified service personnel.
Confirm that all screws are fastened tightly and the wall mounting screws are properly fitted into the holes of the bracket
and the speakers.
Mounting Speaker on the wall
Mounting the unit on the wall
2

3
ENGLISH
CLEANING AND MAINTENANCE
CD LENS
When the lens gets dirty, malfunctions may occur. The lens should be cleaned using a commercially available camera lens
cleaner.
MAIN UNIT
Clean with a soft, dry cloth. If the unit is heavily stained and soiled, wipe with a moistened cloth.
Donít use benzine or thinner.
PLUG
Wipe the headphone plug with a soft cloth to keep it clean. A dirty plug may cause interference or malfunction.
CAUTION
Don’t put anything except a compact disc into the compartment. Other objects can damage the mechanism.
Don’t force compartment open.
Keep compartment closed when not in use to prevent dirt and dust from settling inside.
Never place multiple discs into compartment at same time.
USING THE REMOTE CONTROL
To use the remote, point it at the REMOTE SENSOR window on unit to control stereo from your listening
position.
NOTE: Even if remote control is within effective range, operation may be compromised by obstacles between remote and unit.
If remote is operated near other appliances which generate infrared rays, or if other remote control devices using infrared rays
are used near the unit, it may operate incorrectly. Conversely, this remote might make other appliances operate incorrectly.

MAIN UNIT DESCRIPTION
1. CD Compartment - Holds CD disc.
2. Display - Displays information regarding the status of the disc.
3. Remote Sensor -Receives the signals from the remote control. Aim the remote control at the sensor to perform
functions.
4. PRESET (1-20) button - Program 20 favorite AM and
FM radio stations in Radio mode.
5. PGM/SET button - From OFF state, into clock mode.
On CD mode Stop state, into CD Program mode. On
Tuner mode, into tuner preset mode. On playing disc,
show the clock time.
6. FM/AM button - Switches to RADIO AM/FM mode.
7. CD button - Switches to CD mode.
8. TUNING SCAN buttons - Skip/search
backward or forward in CD mode, turn down or up for
a certain radio station in Tuner mode; set time for
clock in Clock mode.
9. PLAY/PAUSE button - Plays and pauses playing a
disc in the CD mode.
10. STOP button - Stops disc play or clears program
setting the total number of tracks and the total playing
time will appear on the display panel to indicate that
the player in Stop mode.
11. OPEN button - Opens or closes CD compartment.
12. POWER button - Switches the power ON/OFF.
13. TONE + (+/-) buttons - Selects the Bass, Treble,
Volume mode.
14. +/- buttons - Adjusts the volume level.
15. Audio Output - Connects to AUDIO INPUT jack of the Subwoofer.
16. FM Antenna - Extends the wire antenna and position it for the best sound.
17. DC In - Connects to DC OUT jack of the Subwoofer.
18. Aux In - Connects to Audio Output of the other audio source (Portable CD Player or PC computer). DO NOT connect
it to the amplifier’s PHONO jacks.
4

5
ENGLISH
REMOTE CONTROL DESCRIPTION
1. POWER button - Switches the power ON/OFF.
2. CD button - Switches to CD mode.
3. OPEN button - Opens or closes CD compartment.
4. PLAY/PAUSE button - Plays and pauses playing a disc in the CD mode.
5. SKIP/SEARCH BACKWARD or FORWARD buttons - Skip/search
backward or forward in CD mode; turn down or up for a certain
radio station in Tuner mode; set time for clock in Clock mode.
6. INTRO button - Press it to scan 10 seconds of each track and
then automatically move to the next track.
7. DISP button - Switches time display to either remaining playing
time of current track, total remaining play time, or elapsed time of
playing track.
8. FM/AM button - Selects FM/AM mode.
9. AUX button - Selects AUX input.
10. RPT/PRESET + button - Act as a repeat button in CD mode.
Tunes up the preset station in RADIO mode.
11. RDM/PRESET - button - Playing the entire disc in random order
in CD mode.
Tunes down the preset station in RADIO mode.
12. TREBLE +/- buttons - To adjust the high frequencies.
13. BASS +/- buttons - To adjust the low frequencies.
14. VOLUME +/- buttons - To adjust the sound level.
15. MUTE button - To silence audio output.
16. EQ button - Selects equalizer mode (Classic, Pop, Flat, Rock).
17. SET/PGM button - From OFF state, into Clock mode. On CD mode stop state, into CD Program mode. On Tuner
mode, into Tuner Preset mode. On playing disc, show the clock time.
18. STOP button - Stops disc play or clears program setting the total number of tracks and the total playing time will
appear on the display panel to indicate that the player in Stop mode.

INSTALLATION/CONNECTION
6

7
ENGLISH
INSTALLING AND REPLACING REMOTE BATTERIES
1. Slide open battery compartment cover back of Remote.
2. Insert the supplied CR2032 button cell. Make sure batteries are inserted with their positive and negative poles posi-
tioned correctly.
3. Close cover until it clicks.
Remarks: (i) When remote is not going to be used for more than 30 days, remove batteries to prevent them from leaking.
If they leak, wipe away the liquid inside battery compartment and replace with new batteries.
(ii) Donít heat or disassemble batteries, and never dispose of old batteries by throwing them into a fire.
CLOCK SETTING
1. From off mode, LCD will be displayed the clock time. Press SET/PGM button and the hour digits will flash on the
display.
2. Press the or buttons to set the hour and then press SET/PGM button to confirm and hours stop flashing.
3. Minute digits begin to flash. Press or buttons to set the minute and then press SET/PGM to confrim.
4. The time stops flashing and your clock is set.
Remarks : The unit can be displayed 12 hour mode clock.
The clock can be set only in the POWER OFF mode.
POWER ON
When you press the POWER button, main unit will turn on at the last selected play mode.
* If it’s in Tuner mode when you turn it on, the radio will play. Display will show the radio band and frequency.
* If it’s in CD mode when you turn it on, display will show the total number of tracks and total play time of the disc.
Note: System will start in Tuner mode when system is reset.

CD OPERATION
LOADING CD
1. Press CD button “NO DISC“ will appear on display if no CD is inside.
2. Press OPEN button on the main unit or remote unit to open compartment door. Display will shown “OPEN” on the
LCD display.
3. Place CD into tray with label face upward.
4. Press OPEN button on the main unit or remote unit to close compartment door. Door will show “CLOSE” on the LCD
display.
Note :Once CD door is opened and then closed, the pick-up head will automatically search for a CD. Once a disc is found,
the display will show its total number of tracks and total play time. However, if no CD can be found, the pick-up
head will stop and display will shown “NO DISC”.
BASIC OPERATION
1. After CDs are loaded, press PLAY/PAUSE button to play CD. Display will show track number and playing time.
2. Press and release or button to skip backward or forward to a desired track.
3. Press and hold or button to search to any desired point within a track.
4. To temporarily stop CD playing, press PLAY/PAUSE button. The “ “ indicator will appear on the display. Press the
button again to resume play.
5. Play stops automatically after all tracks on all loaded CDs have been played. Display will show the CDís total number of
tracks and total play time.
6. To stop CD play at anytime, press STOP button.
Note : When playing the disc, press PGM/SET button to show the clock time on the LCD display around 8 sec and turn back to
the normal playing time.
PLAYING TRACKS IN RANDOM ORDER
1. Press RDM button on the remote unit. The CD player will now play the entire disc in random order.
2. Press RDM again to exit this function. Disc will continue playing to the end in the correct order.
REPEAT PLAY
REPEAT ONE TRACK
1. Press or button to select a desired track.
2. Press RPT (on Remote) button repeatedly until “REPEAT 1” indicator appears on display. The selected track will play
repeatedly.
REPEAT DISC
Press RPT (on Remote) button repeatedly until “REPEAT ALL” indicator appears on display.
INTRO PLAY
This feature will play only 10 seconds from each track and then automatically move to the next track.
1. Press INTRO button on the remote unit to activate INTRO PLAY. INTRO icon will appear on the display.
2. Press INTRO button again to cancel.
8

9
ENGLISH
PROGRAMMING DISC PLAY
This feature programs the order in which tracks on a disc play.
1. Load your desired disc and press STOP button.
2. Press SET/PGM button, then “MEMORY” will be flashed and “00 P-01” will be indicated on the display.
3. Use the or buttons to enter the desired track number.
4. Press SET/PGM button to store, then “00 P-02” will be indicated on the display.
5. Repeat steps 3 & 4 to program other tracks for the rest of the sequence.
6. Up to 20 tracks can be stored for programmed play.
7. Press PLAY to start your programmed sequence.
8. To cancel PROGRAMMED PLAY, press STOP button twice or open the CD door.
TIME DISPLAY
When a disc is played, the display will show the running time of the track in play.
1. Press DISP button (on remote), the remaining time of the track is shown and “REMAIN” will be indicated on display.
2. Press DISP button again to show the disc total remaining time and “TOTAL REMAIN” will be indicated on the display.
3. Press DISP button again to show the discís running time. “TOTAL” will be indicated on the display.
4. Press DISP button again to show normal track running time.
ADJUSTING TONE
These are two group Tone button (Bass and Treble) can be used to obtain a “flat” frequency response or a tone which suits your
individual listening preference.
1. Press TONE button (on Main Unit) to select Bass or Treble; and then press +/- to adjust;
2. or press BASS +/- buttons (on Remote) to adjust low frequencies from -6 to +6 level or press TREBLE +/- buttons (on
Remote) to adjust high frequencies from -6 to +6 level.
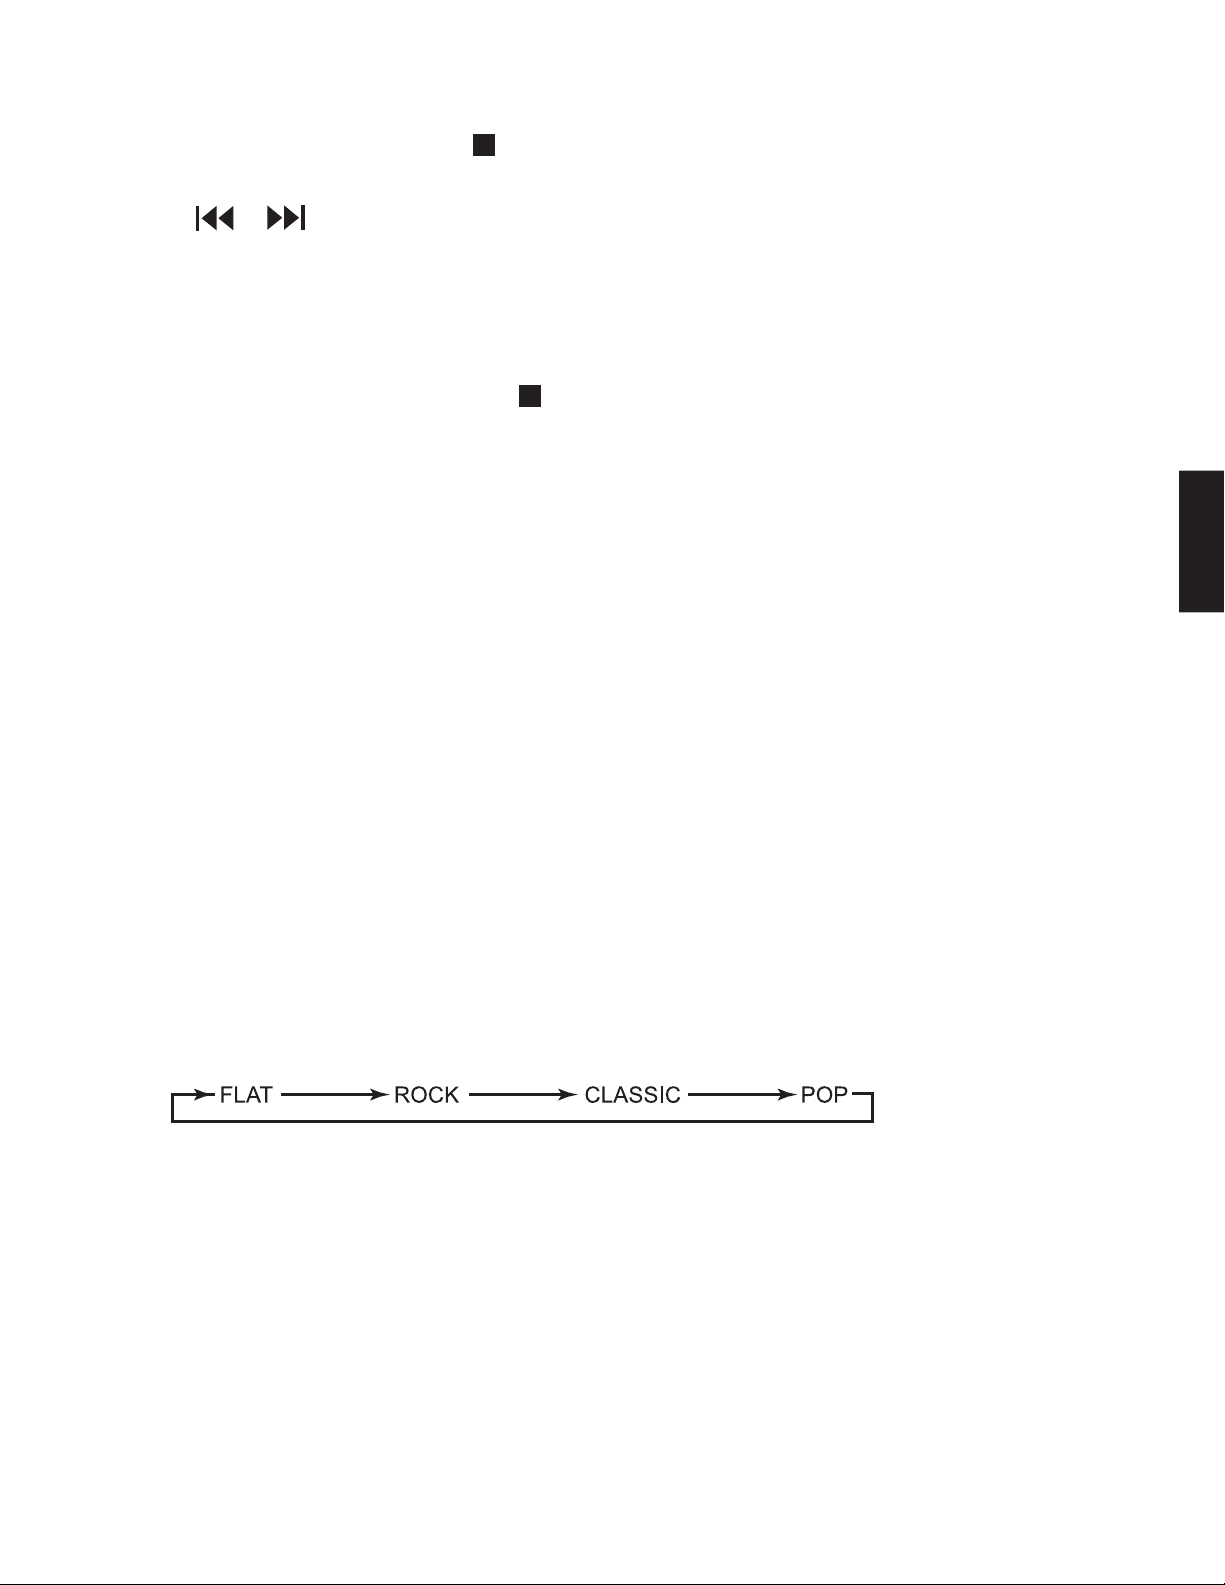
CHANGING SOUND QUALITY EQ
During play, press EQ button repeatedly to select the preferred equalizer mode.
When you press the button repeatedly, the corresponding EQ indicator will appear on the display
MUTE
Press MUTE button on remote unit to silence audio output. “MUTE” will appear on the display. Press MUTE again to cancel.
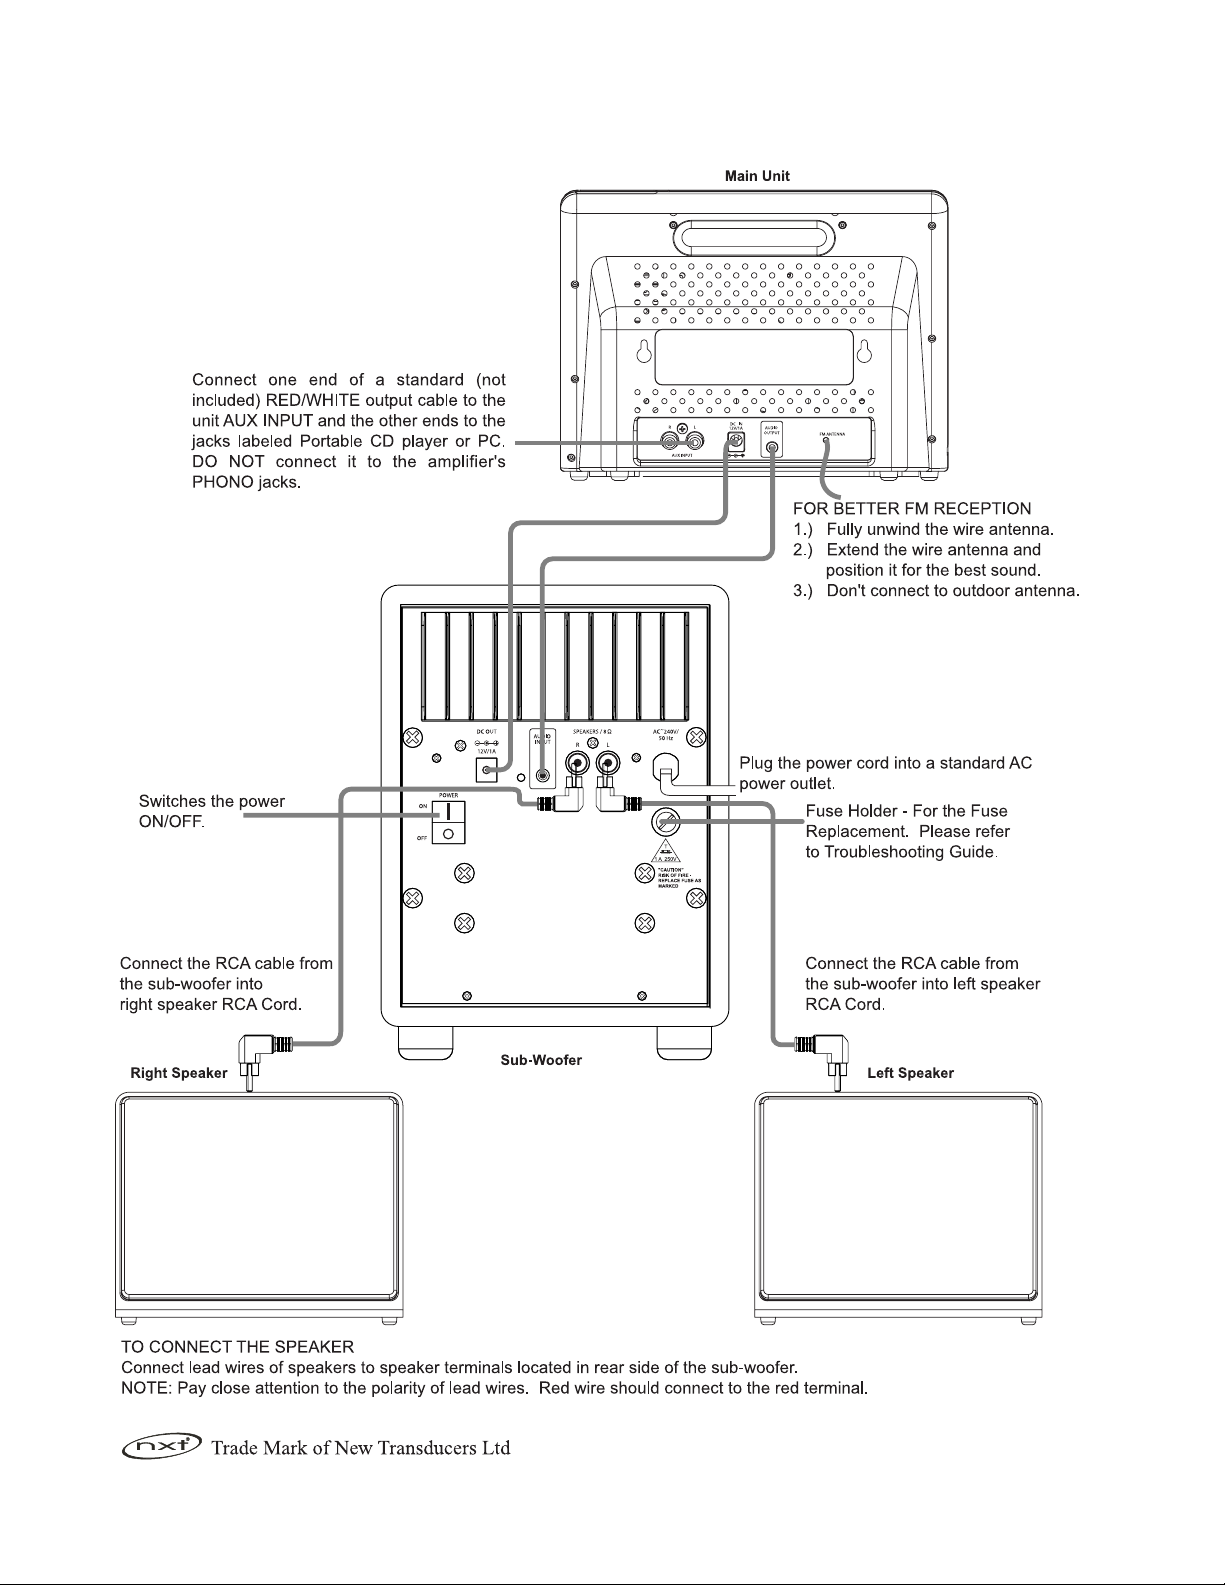
AUXILIARY AUDIO INPUT JACKS
The red and white terminals located on the side of the stereo are auxiliary audio input jacks. Use these jacks to provide a
sound output to other audio source (Portable CD Player or PC computer).

RADIO OPERATION
BASIC OPERATION
1. Press FM/AM button to select FM or AM mode.
2. Press or buttons to select a radio station.
* If you press for less than 0.5 seconds each time, the receiving frequency will step up or down.
* If you press and hold for more than 0.5 seconds, the frequency will keep on increasing automatically unit a radio
station received.
3. Adjust to the desired sound and volume.
RADIO STATION MEMORY
You can store up to 20 FM stations and 20 AM stations in channel memory.
SETTING STATION
1. Press FM/AM button to select FM or AM mode.
2. For Auto Tuning, use or buttons to select the desired station.
3. Press SET/PGM button. “MEMORY” and “00” indicators will appeared on display. Use Preset +/- buttons (on Remote
Control) or use Preset (1-20) (On Main Unit) to select 1-20 memory location you want to store the selected station at.
4. Press SET/PGM button again to save into memory. The former station at the memory location is replaced.
5. Repeat step 3-5 to store additional station.
PLAYING PRESET STATIONS
1. Press FM/AM button to select FM or AM mode.
2. Press PRESET (1-20) button (on Main Unit) to select a preset channel directly. Or press +/- button (on Remote) to select
the desired preset channel.
LAST MEMORY AND MEMORY BACKUP
The last tuner station will be retained and recalled when you turn the system on. The tuned station will be stored in memory
backup even if AC power is disconnected or cut due to temporary power failure.
FOR BETTER AM RECEPTION
DO NOT CONNECT TO AN OUTSIDE ANTENNA. Reposition the unit to get better AM reception.
TURNING OFF YOUR STEREO
To shutdown your system after listening, press POWER button once.
10

11
ENGLISH
TROUBLESHOOTING GUIDE
*If the fault remains, try to clear it by switching your player off and on again. If this also fails to help, consult your dealer.
Note: Under no circumstances should you repair the player yourself as this will invalidate the guarantee!

12
SPECIFICATIONS
Amplifier
Output Power 5 watts per channel (RMS, 8 ohms)
Output to Subwoofer 15 watts per channel (RMS, 8 ohms)
Frequency Responce 50 Hz to 20 kHz
Tuner
FM 87.5 MHz to 108.0 MHz
AM (MW) 522 kHz to 1620 kHz
CD Player
Frequency Responce 50 Hz to 20 kHz
Signa-to-Noise Ratio Better than 80 dB
General
Power Requirements 230 V AC, 50 Hz
Power Consumption 60 W
Dimensions (W x H x D) Main Unit 216 x 165 x 78 mm
Speaker 193 x 156 x 65 mm
Subwoofer 161 x 218 x 355 mm
Weight (net) Main Unit 1.1 kg
Speaker 0.65 kg
Subwoofer 4.8 kg
Standard Accessorires:
Remote Control Unit (with battery) x 1
Subwoofer Power Cable x 1
Subwoofer Audio Cable x 1
Set of Speaker Cables x 1
Owner's Manual x 1
Warranty x 1

MONTAGGIO A PARETE
La dima di carta allegata permette di allineare in modo corretto
apparecchio e diffusori.
1. Servendosi della dima, segnare sulla parete il punto dove
fissare le viti.
*Le viti per il montaggio a parete non
sono comprese nella fornitura.
Scegliere viti adatte al tipo di muro e con testa adeguata alla
dimensione dei fori, come si vede nell’illustrazione.
2. Fissare le viti nella parete.
3. Appendere apparecchio e diffusori inserendo la parte sporgente delle viti nei fori praticati sul retro.
Accertarsi che le viti siano saldamente inserite nella parte più stretta dei fori.
IMPORTANTE
La parete scelta per il montaggio deve essere in grado di sostenere 15 kg. per ogni vite. In caso di dubbio, chiedere la
consulenza di un tecnico qualificato.
Verificare che tutte le viti siano ben salde nella parete e che la loro testa entri correttamente nei fori praticati nella staffa
di montaggio e nei diffusori.
Montaggio dei diffusori alla parete
Montaggio dell’apparecchio
alla parete
13
ITALIANO

PULIZIA E MANUTENZIONE
LENTE DEL LASER
Quando la lente diventa sporca, il lettore di CD non è più in grado di funzionare correttamente. Bisogna allora pulire la
lente, usando uno degli appositi prodotti disponibili in commercio.
APPARECCHIO
Pulire il mobile con un panno morbido, asciutto. Solo se fosse molto sporco e macchiato, inumidire il panno in una
blanda soluzione detergente. Non usare mai alcool, solventi o benzina.
SPINA
Per mantenere sempre pulita la spina della cuffia, strofinarla con un panno morbido. Una spina sporca potrebbe causare
interferenze o cattivo funzionamento dell’apparecchio.
ATTENZIONE
Nel vano dischi vanno inseriti esclusivamente CD: qualsiasi altro oggetto potrebbe danneggiare la parte meccanica
dell’apparecchio.
Non forzare l’apertura del vano dischi.
Quando l’apparecchio non è in funzione, verificare che il vano dischi sia chiuso per evitare che possano penetrarvi
polvere e sporcizia.
Non inserire mai più di un CD alla volta.
USO DEL TELECOMANDO
Per azionare l’apparecchio direttamente dalla posizione d’ascolto, puntare il telecomando verso il sensore
REMOTE.
NOTA: Anche quando si utilizza il telecomando entro il suo raggio d’azione, il controllo a distanza risulta impossibile se
qualche ostacolo impedisce il percorso del segnale diretto all’apparecchio.
Il telecomando potrebbe non funzionare correttamente se viene utilizzato in prossimità di altri apparecchi che generano
raggi infrarossi oppure se, nelle vicinanze, sono in funzione altri dispositivi di comando a distanza. Analogamente,
anche gli altri eventuali apparecchi potrebbero non funzionare in modo corretto.
14

POSIZIONE E FUNZIONE DEI COMANDI
1. Vano CD - Inserire qui il Compact Disc.
2.. Display - In questa finestra vengono visualizzate le informazioni sullo stato operativo dell’apparecchio.
3. Sensore REMOTE - Riceve i segnali inviati dal telecomando. Per poter funzionare, il telecomando deve essere puntato
verso questo sensore.
4. Tasto PRESET (1-20) - Nel modo Tuner, questo tasto
permette di selezionare e memorizzare le 20 emittenti
AM e FM preferite.
5. Tasto PGM/SET - La pressione di questo tasto produce
effetti diversi. Partendo dalla condizione OFF, imposta il
modo Clock (regolazione dell’orologio). Nel modo CD,
partendo da Stop avvia la riproduzione programmata.
Nel modo Tuner, avvia la ricerca Preset (emittenti
preselezionate). Mentre si ascolta un disco, visualizza
l’ora.
6. Tasto FM / AM - Permette di commutare fra le gamme
di frequenza AM e FM.
7. Tasto CD - Imposta il modo CD.
8. Tasti TUNING SCAN : - Nel modo CD,
permettono di saltare fra i vari brani in entrambe le
direzioni, per effettuare la ricerca diretta. Nel modo
Tuner, analizzano le frequenze verso il basso o verso
l’alto per sintonizzare una determinata emittente. Nel
modo Clock, permettono di regolare l’orologio.
9. Tasto PLAY / PAUSE - Nel modo CD, avvia la
riproduzione del disco o la interrompe
momentaneamente.
10. Tasto STOP - Ferma la riproduzione del disco, o
cancella la sequenza programmata; il display mostra
allora il numero totale dei brani ed il tempo di
riproduzione totale, per segnalare che l’apparecchio si
trova in Stop.
11. Tasto OPEN - Apre o chiude il vano CD.
12. Tasto POWER - Attiva e disattiva l’alimentazione dell’apparecchio.
13. Tasto TONE - Seleziona la funzione dei tasti (+/-) : regolazione del volume dei toni bassi (Bass) oppure dei toni acuti
(Treble).
14. Tasti (+/-) - Aumentano o diminuiscono il livello del volume.
15. Audio Output - Collegare qui il cavo proveniente da AUDIO INPUT del Subwoofer.
16. Antenna FM - Inserire qui il filo dell’antenna FM, esteso e posizionato per la ricezione ottimale.
17. DC IN - Collegare qui il cavo proveniente da DC OUT del Subwoofer.
18. Aux In - Collegare qui il cavo di una sorgente audio esterna (lettore di CD portatile o computer).
NON collegare questo cavo alle prese PHONO dell’amplificatore.
15
ITALIANO

CONTROLLI SUL TELECOMANDO
1. Tasto POWER - Attiva e disattiva l’alimentazione dell’apparecchio.
2. Tasto CD - Imposta il modo CD.
3. Tasto OPEN - Apre e chiude lo sportello del vano CD.
4. Tasto PLAY / PAUSE - Nel modo CD, avvia la riproduzione del disco o la interrompe momentaneamente.
5. Tasti SKIP / SEARCH o - Nel modo CD, permettono di saltare fra i vari brani in entrambe le direzioni,
per effettuare la ricerca diretta. Nel modo Tuner, analizzano le
frequenze verso il basso o verso l’alto per sintonizzare una
determinata emittente. Nel modo Clock, regolano l’indicazione
dell’ora.
6. Tasto INTRO - Permette di ascoltare, in sequenza automatica, i 10
secondi iniziali dei brani del CD.
7. Tasto DISP - Commuta tra la visualizzazione dei vari modi
temporali: tempo restante del brano in corso, tempo di
riproduzione totale, tempo trascorso del brano in ascolto.
8. Tasto FM/AM - Commuta fra le gamme di frequenza AM e FM.
9. Tasto AUX - Seleziona l’ingresso di una sorgente esterna.
10. Tasto RPT / PRESET ( + ) - Nel modo CD, avvia la funzione
Repeat (ascolto ripetitivo del brani). Nel modo Tuner, sintonizza le
emittenti preselezionate secondo valori crescenti di frequenza.
11. Tasto RDM / PRESET ( – ) - Nel modo CD, avvia la funzione
Random (lettura di tutti i brani in ordine casuale). Nel modo Tuner,
sintonizza le emittenti preselezionate secondo valori decrescenti
di frequenza.
12. Tasti TREBLE ( +/– ) - Regolano i suoni con frequenze alte.
13. Tasti BASS ( +/– ) - Regolano i suoni con frequenze basse.
14. Tasti VOLUME ( +/– ) - Regolano il livello del volume audio.
15. Tasto MUTE - Esclude temporaneamente l’uscita audio.
16. Tasto EQ - Ogni volta che si preme questo tasto, commutano in sequenza le curve presettate dell’equalizzatore
(Classic, Pop, Flat, Rock).
17. Tasto SET/PGM - La pressione di questo tasto produce effetti diversi. Partendo dalla condizione OFF, imposta il
modo Clock (regolazione dell’orologio). Nel modo CD, partendo da Stop avvia la riproduzione Programmata.
Nel modo Tuner, avvia la ricerca Preset (emittenti preselezionate). Mentre si ascolta un disco, visualizza l’ora.
18. Tasto STOP - Ferma la riproduzione del disco, o cancella la sequenza programmata; il display mostra allora il
numero totale dei brani ed il tempo di riproduzione totale, per segnalare che l’apparecchio si trova in Stop.
16

INSTALLAZIONE / COLLEGAMENTI
17
ITALIANO

INSERIMENTO E SOSTITUZIONE DELLE PILE NEL
TELECOMANDO
1. Togliere il coperchio del vano batteria, sul retro del telecomando.
2. Inserire la batteria a bottone CR2032, compresa nella fornitura, accertandosi che i poli “+” e “-“ corrispondano agli
analoghi contrassegni nel vano batteria.
3. Chiudere il coperchio fino a sentire uno scatto.
Osservazioni: (i) Quando si prevede di non utilizzare il telecomando per più di un mese, ricordarsi di togliere la batteria per
evitare che possa trasudare, corrodendo i componenti interni. Se dovesse comunque manifestarsi qualche
perdita, eliminare ogni residuo di materiale e inserire una batteria nuova.
(ii) Non riscaldare la batteria, non cercare di aprirla e non gettarla nel fuoco: quando è scarica depositarla
negli appositi contenitori.
REGOLAZIONE DELL’OROLOGIO
1. Nel modo Off, sul display si vede l’indicazione dell’ora. Premendo il tasto SET/PGM le cifre delle ore cominciano a
lampeggiare.
2. Premere i tasti o per regolare l’indicazione dell’ora, premere poi SET/PGM per confermare: le cifre delle ore
smettono di lampeggiare.
3. Cominciano a lampeggiate le cifre relative ai minuti. Premere i tasti o per regolare l’indicazione dei minuti,
premere poi SET/PGM per confermare.
4. L’orologio è così regolato, e le cifre smettono di lampeggiare.
Osservazioni : L’orologio è previsto per l’indicazione a 12 ore.
Si può regolare l’orologio solo quando POWER è in posizione OFF.
ACCENSIONE DELL’APPARECCHIO
Quando si preme POWER, viene impostato il modo attivo nel momento in cui l’apparecchio era stato spento l’ultima volta.
*Se l’accensione imposta il modo Tuner, si sentirà subito la radio e verranno visualizzate la gamma e la frequenza
dell’emittente in ascolto.
* Se l’accensione imposta il modo CD, verranno visualizzati il numero totale dei brani e la durata totale del disco.
Nota: Dopo ogni reset del sistema, la successiva accensione imposta il modo Tuner.
18

ASCOLTO DEI CD
INSERIMENTO DEL COMPACT DISC
1. Premere il tasto CD: in mancanza di un disco inserito apparirà la scritta “NO DISC”.
2. Premere il tasto OPEN (sull’apparecchio o sul telecomando) per aprire il coperchio del vano disco.
Sul display apparirà la scritta “OPEN”.
3. Inserire un disco nel cassetto, con l’etichetta rivolta verso l’alto.
4. Premere il tasto OPEN (sull’apparecchio o sul telecomando) per chiudere il coperchio del vano disco. Sul display
apparirà la scritta “CLOSE”.
Nota :Quando il vano disco viene aperto e poi richiuso, la testina del pickup inizia automaticamente la ricerca di un CD. Se
lo trova, sul display diventano visibili il numero complessivo dei brani contenuti nel disco e la durata totale della
riproduzione. Se invece un CD non viene localizzato, la testina si ferma e compare la scritta “NO DISC”.
OPERAZIONI FONDAMENTALI
1. Dopo aver inserito un CD, premere il tasto PLAY / PAUSE per iniziare la riproduzione. Il display mostra il numero del
brano e la durata della sua riproduzione.
2. Premere e rilasciare il tasto o per saltare direttamente su un brano desiderato, in entrambe le direzioni.
3. Premere e tenere abbassato il tasto o per trovare un punto qualsiasi all’interno di un brano.
4. Per interrompere momentaneamente la riproduzione del CD, premere il tasto PLAY / PAUSE . Sul display apparirà
l’indicatore “ ”. Premere di nuovo questo tasto quando si desidera riprendere la riproduzione.
5. Quando tutti i brani del disco inserito sono stati riprodotti, l’operazione si ferma automaticamente. Il display mostra di
nuovo i numero complessivo dei brani ed il tempo totale di riproduzione.
6. Per fermare la riproduzione del CD in qualsiasi momento, premere il tasto STOP .
Nota : Per vedere l’indicazione dell’ora mentre si ascolta il disco, premere il tasto PGM/SET. Dopo circa 8 secondi, sul display
torna la normale indicazione del tempo di riproduzione.
RIPRODUZIONE DI BRANI IN ORDINE CASUALE (RANDOM)
1. Premere Il tasto RDM sul telecomando. Tutti i brani del disco inserito verranno ora letti in ordine casuale.
2. Per uscire da questa funzione premere ancora il tasto RDM. La riproduzione continuerà fino al termine del disco, leggendo
i brani nell’ordine normale.
RIPRODUZIONE RIPETUTA (REPEAT)
RIPETIZIONE DI UN SOLO BRANO
1. Premere il tasto o per selezionare il brano desiderato.
2. Premere ripetutamente il tasto RPT (sul telecomando) finché compare l’indicatore “REPEAT 1”. Il brano scelto verrà ora
riprodotto in continuità.
RIPETIZIONE DEL DISCO
Premere ripetutamente il tasto RPT sul telecomando finché compare l’indicatore “REPEAT ALL”. L’intero disco verrà ora
riprodotto in continuità.
RIPRODUZIONE INTRO
Questa funzione riproduce solo i 10 secondi iniziali di ogni brano, passando automaticamente da uno all'altro.
1. Per attivare questo modo di riproduzione, premere il tasto INTRO sul telecomando. Sul display apparirà l’icona “INTRO”.
2. Per annullare la funzione, premere di nuovo il tasto INTRO.
19
ITALIANO

20
RIPRODUZIONE PROGRAMMATA
Questa funzione permette di programmare l’ordine nel quale verranno riprodotti i brani del disco.
1. Inserire il disco desiderato e premere il tasto STOP .
2. Premere il tasto SET/PGM: sul display lampeggerà l’indicatore “MEMORY” e comparirà “00 P-01”.
3. Con i tasti o impostare il numero del brano desiderato.
4. Premere il tasto SET/PGM per memorizzare il numero: sul display comparirà la scritta “00 P-02”.
5. Ripetere i passi 3 e 4 per impostare e memorizzare altri brani della sequenza.
6. La sequenza programmata può contenere un massimo di 20 brani.
7. Premere PLAY per iniziare l’ascolto dei brani nella sequenza programmata.
8. Per annullare questa funzione, premete due volte il tasto STOP , oppure aprire il vano disco.
VISUALIZZAZIONE DEL TEMPO
Durante la riproduzione di un disco, il display indica il tempo attuale del brano in ascolto.
1. Premendo il tasto DISP (sul telecomando) viene visualizzato il tempo restante del brano in ascolto: compare l’indicatore
“REMAIN”.
2. Premere di nuovo DISP per visualizzare il tempo totale restante del disco: compare l’indicatore “TOTAL REMAIN”.
3. Premere di nuovo DISP per visualizzare il tempo attuale di riproduzione del disco: compare l’indicatore “TOTAL”.
4. Premendo ancora una volta DISP, torna l’indicazione del tempo attuale del brano in ascolto.
REGOLAZIONE DEL TONO
I due tasti TONE (Bass e Treble) permettono di ottenere una risposta in frequenza piatta (flat) oppure una tonalità adatta alle
personali preferenze d’ascolto.
1. Premere il tasto TONE (sull’apparecchio) per selezionare Bass o Treble; effettuare poi la regolazione con i tasti +/–.
2. In alternativa, premere i tasti BASS +/– (sul telecomando) per regolare il livello delle basse frequenze da –6 a +6, oppure
i tasti TREBLE +/– (sul telecomando) per regolare il livello delle alte frequenze da –6 a +6.
COMMUTAZIONE FRA LE CURVE EQ
Nel corso della riproduzione, premere ripetutamente il tasto EQ per selezionare la curva desiderata dell’equalizzatore.
Continuando a premere il tasto, vengono visualizzate le corrispondenti curve EQ presettate, in questa sequenza:
SILENZIAMENTO
Per escludere momentaneamente l’uscita audio, premere il tasto MUTE sul telecomando. Sul display compare l’indicatore
“MUTE”. Una seconda pressione del tasto annulla la funzione e ripristina le normali condizioni d’ascolto.
PRESE PER INGRESSO AUDIO AUSILIARIO
I terminali laterali rosso e bianco servono per l’ingresso audio di una sorgente esterna (lettore CD portatile o Personal Com-
puter).
Other manuals for MC-DX10
2
Table of contents
Languages:
Other Teac Stereo System manuals